
Entire Self-Driving Car Software Stack Tested on Real Vehicle
Self-Driving Car using ROS
Udacity Self-Driving Car Engineer Nanodegree --- Capstone Project
Team 4Tzones

| Team Member | Email | LinkedIn | GitHub | | :---: | :---: | :---: | :---: | | Mohamed Elgeweily | mohamed.elgeweily@gmail.com | mohamed-elgeweily-05372377 | Elgeweily | | Jerry Tan Si Kai | jerrytansk@gmail.com | thejerrytan | thejerrytan | | Karthikeya Subbarao | karthikeya108@gmail.com | karthikeyasubbarao | Karthikeya108 | | Pradeep Korivi | pradeepkorivi@gmail.com | pradeepkorivi | pkorivi | | Sergey Morozov | sergey@morozov.ch | ser94mor | ser94mor |
All team members contributed equally to the project.
4Tzones means "Four Time Zones" indicating that team members were located in 4 different time zones while working on this project. The time zones range from UTC+1 to UTC+8.
Software Architecture
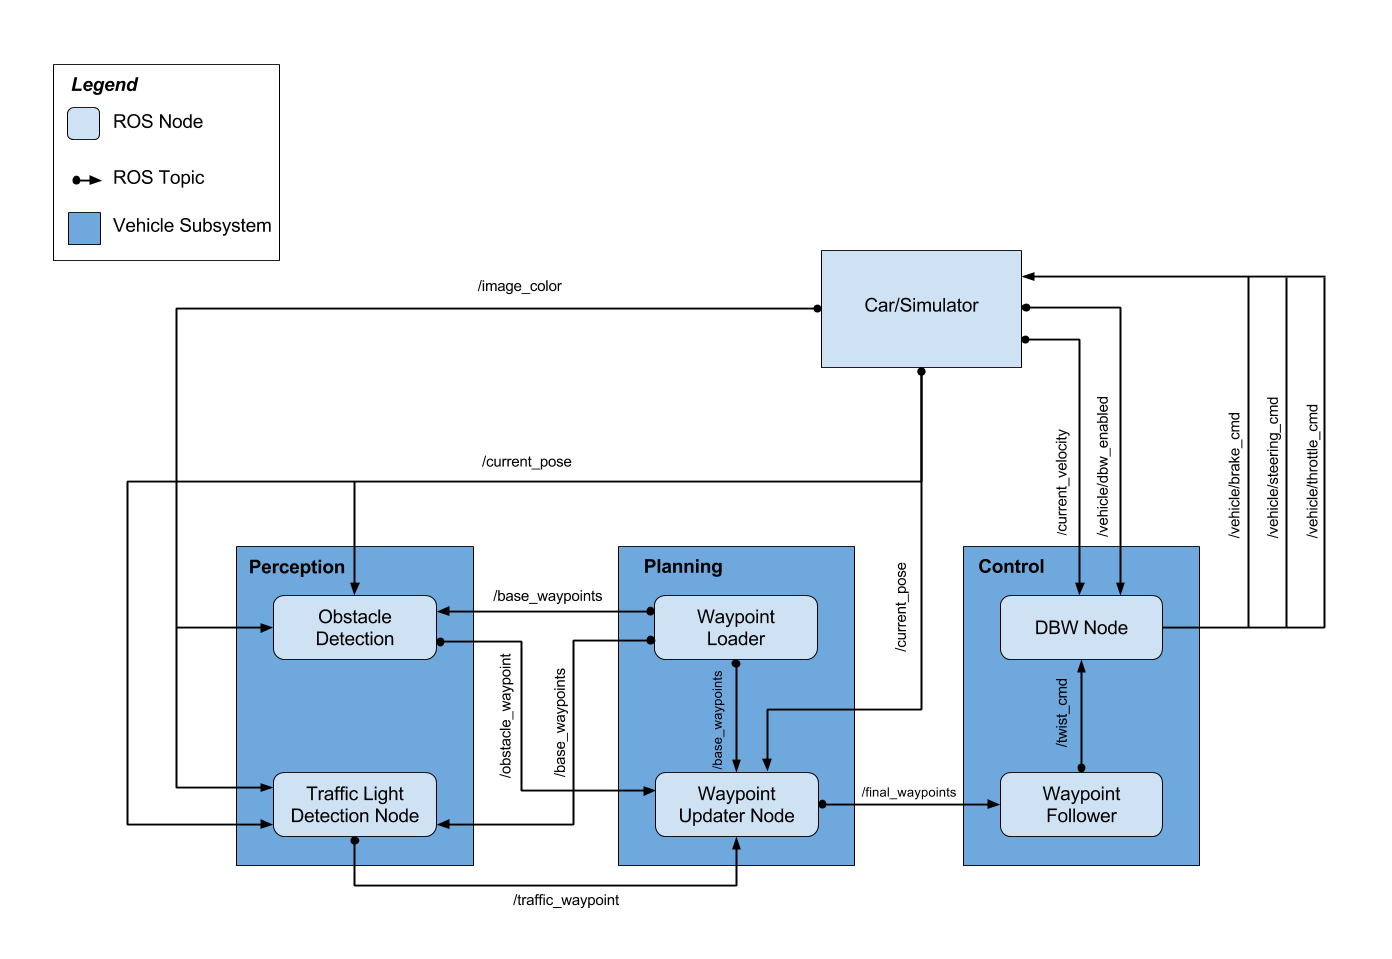
Note that obstacle detection is not implemented for this project.
Traffic Light Detection Node
A large part of the project is to implement a traffic light detector/classifier that recognizes the color of nearest upcoming traffic light and publishes it to /waypoint_updater node so it can prepare the car to speed up or slow down accordingly. Because the real world images differ substantially from simulator images, we tried out different approaches for both. The approaches which worked best are described below.
OpenCV Approach
Simulator (Highway)
In this approach we used the basic features of OpenCV to solve the problem, the steps are described below.- Image is transformed to HSV colorspace, as the color feature can be extracted easily in this colorspace.
- Mask is applied to isolate red pixels in the image.
- Contour detection is performed on the masked image.
- For each contour, area is checked, and, if it falls under the approximate area of traffic light,
- If all the above conditions satisfy there is a red sign in the image.
Pros
- This approach is very fast.
- Uses minimum resources.
Cons
- This is not robust enough, the thresholds need to be adjusted always.
- Doesnt work properly on real world data as there is lot of noise.
SSD Approach (Single Shot Detection)
We need to solve both object detection - where in the image is the object, and object classification --- given detections on an image, classify traffic lights. While there are teams who approached it as 2 separate problems to be solved, recent advancements in Deep Learning has developed models that attempt to solve both at once. For example, SSD (Single Shot Multibox Detection) and YOLO (You Only Look Once).Simulator (Highway)
Here we experimented with Tensorflow Object Detection API, using pretrained models on COCO dataset, such as: "ssdinceptionv2coco" and "ssdmobilenetv2coco":- Testing the coco pretrained models without retraining on simulator images didn't lead to any success,
- So we decided to utilize transfer learning, and retrain the models on images extracted from the simulator,
- We choose the "ssdinceptionv2_coco model", since it proved to be a good compromise between speed and accuracy,
Sample dataset for simulator images 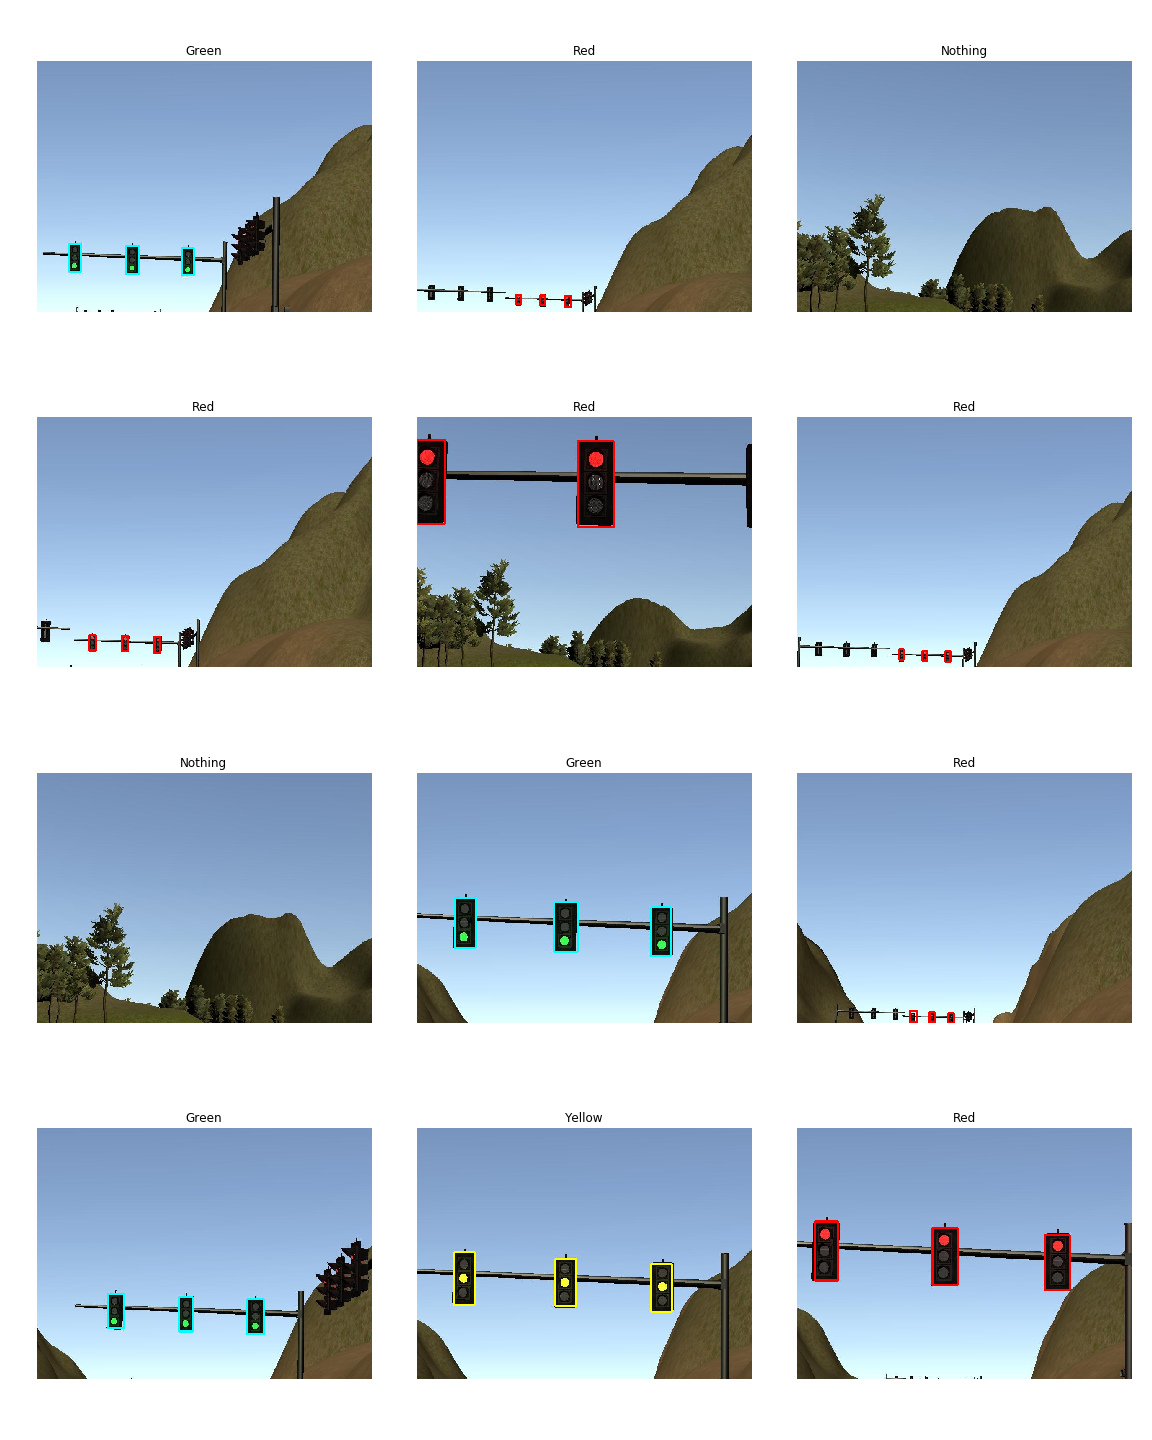
- The configuration parameters for retraining was:
- The training took around 3.5 hours on an NVIDIA GTX 1070 (tensorflow-gpu == 1.4.0),
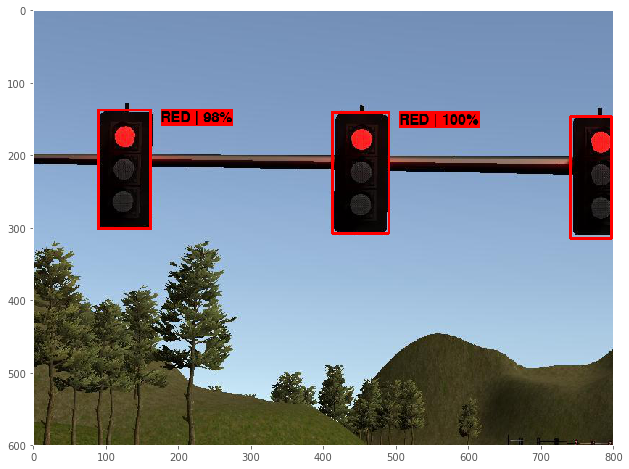
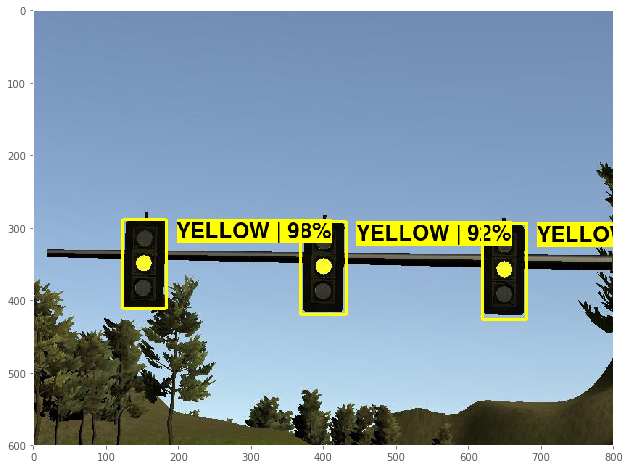
- The retraining of the model lead to very good results; confidence levels reaching up to 0.999
Here are the results of our trained model.
Pros
- This approach is very accurate.
- It can detect all 3 colors; Red, Yellow & Green, with great confidence.
- It can pinpoint the exact position and size of the lights, which can be further utilized
Cons
- It's slower than OpenCV method.
Real World (Test Lot)
- We tested the pretrained models without retraining, on real world images from the ROS bags
- Similarly we opted for retraining the "ssdinceptionv2_coco" model, but this time we compiled
Here is a sample of the dataset. 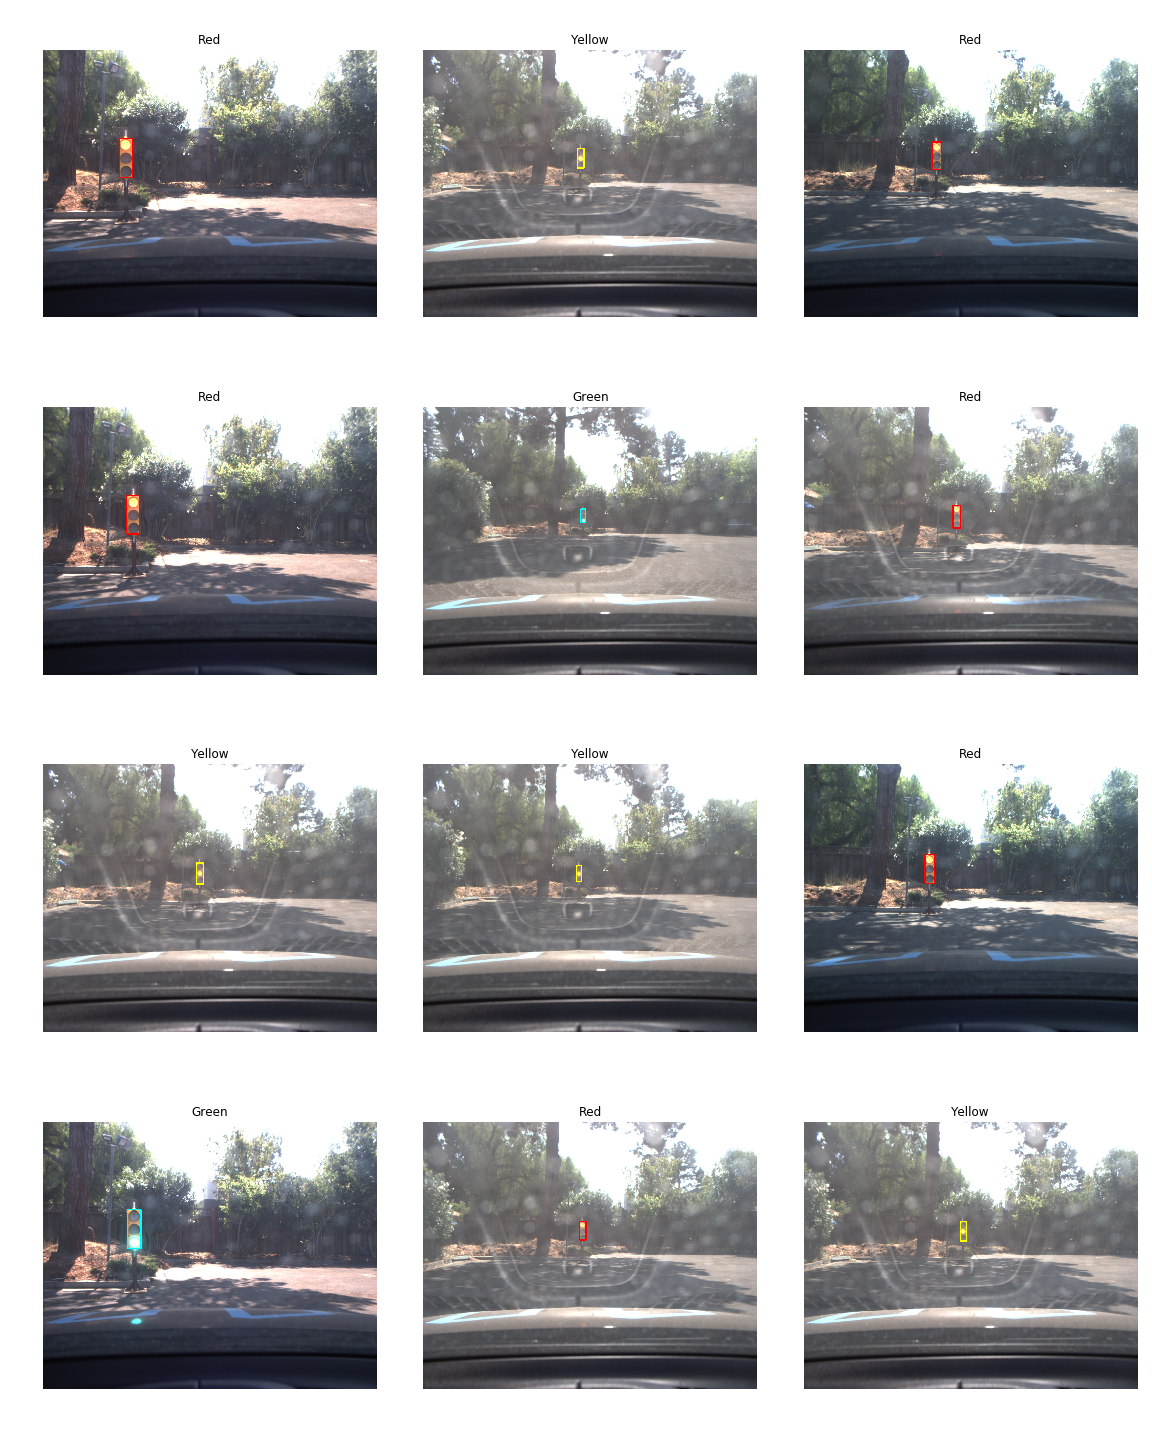
- The configuration parameters for retraining was:
- The training took around 18 hours on an NVIDIA GTX 1070 (tensorflow-gpu == 1.4.0),
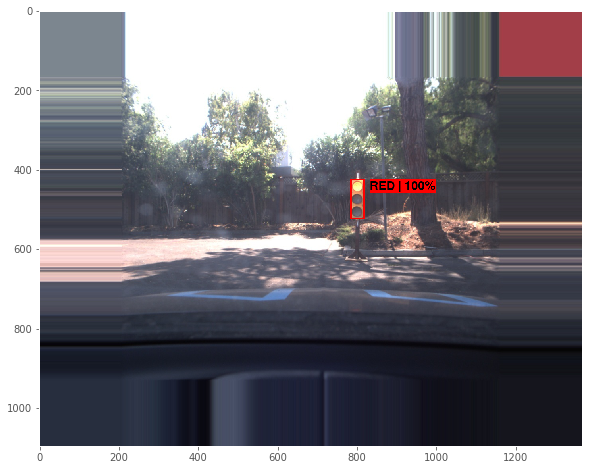
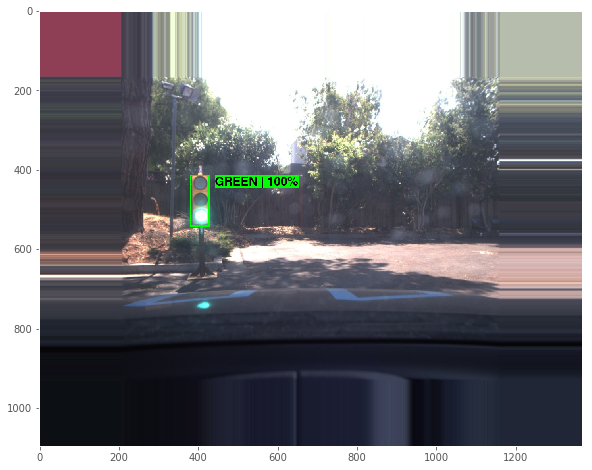
- The results were good reaching to a confidence of 1.0 most of the time, but in some instances
Here are the results of our trained model.
Pros
- This approach is accurate in most cases.
- It can detect all 3 colors; Red, Yellow & Green, with great confidence.
- It can pinpoint the exact position and size of the lights, which can be further utilized
Cons
- It's not very fast, the FPS when running the ROS bag was averaging 15 FPS.
- It requires a very large dataset including images of different lighting conditions,
YOLOv3-tiny (You Only Look Once)
Real World (Test Lot)
We used this approach for real world. TODO:write about itDataset
Image Collection
We used images from 3 ROS bags provided by Udacity:Image Extraction
As described in How to export image and video data from a bag file, we:<!--Replace <path-to-your-ros-bag> with the actual path to your ROS bag from which you want to extract images.-->
<!--Replace <topic> with the actual topic that contains images of your interest.-->
<launch>
<node pkg="rosbag" type="play" name="rosbag" required="true" args="<path-to-your-ros-bag>"/>
<node name="extract" pkg="imageview" type="extractimages" respawn="false" required="true" output="screen" cwd="ROS_HOME">
<remap from="image" to="<topic>"/>
</node>
</launch>- Prepared the environment by executing:
roscd imageview && rosmake imageview --rosdep-install. - Created an
extract-images-from-ros-bag.launchfile (above).
/image_color topic.
- For justtrafficlight.bag and
loopwithtraffic_light.bag
we used /image_raw topic.
- Ran:
roslaunch extract-images-from-ros-bag.launch. - Created a folder to keep extracted images in:
mkdir <folder>. - Moved extracted images to the newly created folder:
mv ~/.ros/frame*.jpg <folder>
Video Creation
We extracted images from the ROS bags in the Image Extraction step and converted them to videos following the instructions from How to export image and video data from a bag file. We:- Prepared the environment by executing:
sudo apt install mjpegtools. - Ran:
ffmpeg -framerate 25 -i <folder>/frame%04d.jpg -c:v libx264 -profile:v high -crf 20 -pix_fmt yuv420p <output>,
where <folder> is a directory with files extracted from a particular ROS bag and <output-name> is a desired name
for your MP4 videos file (the file should have the .mp4 extension).
Below is a video archive containing 3 videos, each corresponding to one of the ROS bags mentioned in the Image Collection section. The archive is called "4Tzones Traffic Lights Videos" and is licensed under the Creative Commons Attribution-ShareAlike 4.0 International (CC BY-SA 4.0) license.
| | 4Tzones Traffic Lights Videos | |------------------------| :------------------------: | | Link | https://yadi.sk/d/DhyGqahR-NWtEA | | License | CC BY-SA 4.0 | | trafficlights.bag | trafficlights.mp4 | | justtrafficlight.bag | justtrafficlight.mp4 | | loopwithtrafficlight.bag | loopwithtrafficlight.mp4 |
Image Annotation
We used a Yolo_mark tool to label the extracted images. The annotated dataset which is called "4Tzones Traffic Lights Dataset" is available under the Creative Commons Attribution-ShareAlike 4.0 International (CC BY-SA 4.0) license.| \ & \\ & \\\ | 4Tzones Traffic Lights Dataset | |------------------------| :------------------------: | | Link | https://yadi.sk/d/a1Kr8Wmg0zfa0A | | License | CC BY-SA 4.0 | | Total TL # of Samples | 2795 | | Red TL # of Samples | 682 | | Yellow TL # of Samples | 267 | | Green TL # of Samples | 783 | | No TL # of Samples | 1063 |
\* TL stands for "Traffic Lights" and # stands for "Number."
\\ Notice that the total number of images contained in the ROS bags mentioned above is a little bigger. We removed all images that are ambiguous, e.g., two traffic light bulbs are simultaneously ON, or the image border partially cuts a traffic light.
\\\* It takes about 3 hours of continuous work for one person to label images from all three ROS bags using Yolo_mark given that he has a decent monitor and mouse.
Image Augmentation
We tried different neural networks for traffic lights detection and classification. We first used the data obtained during the Image Annotation step. Models trained on these data did not perform well enough on similar but previously unseen images. The 4Tzones Traffic Lights Dataset is just not good enough to enable the neural network to generalize. The dataset is unbalanced in different aspects. That is, the number of samples per class is not equal to each other; the majority of red traffic light images are captured from far distances; in all the traffic light images containing a close view of the traffic light, the traffic light position is biased to the left, and in other aspects. After several trial and error attempts, it was obvious that we need to augment the dataset. Moreover, for different models we used different training code, that is, for YOLO-tiny model we used code from the keras-yolo3 repository with minor modifications and for SSD models we used the TensorFlow Object Detection API repository. Both training scripts accept different labels format, and we needed to convert Yolo_mark annotations to those other formats. To accomplish these image augmentation and label conversion tasks we have created adata_preparer.py.
With this script, we easily augmented the 4Tzones Traffic Lights Dataset,
which dramatically increased the models' ability to generalize.
More about the data_preparer.py script is in
the Data Preparer Script section. The resulting annotated augmented dataset,
which is called "4Tzones Traffic Lights Augmented Dataset" can be downloaded using the link below and
is licensed under the
Creative Commons Attribution-ShareAlike 4.0 International (CC BY-SA 4.0)
license.
| \ & \\* | 4Tzones Traffic Lights Augmented Dataset | |------------------------| :------------------------: | | Link | https://yadi.sk/d/q2Yyy9PO2SrMKQ | | License | CC BY-SA 4.0 | | Total TL # of Samples | 11988 | | Red TL # of Samples | 1998 | | Yellow TL # of Samples | 1998 | | Green TL # of Samples | 1998 | | No TL # of Samples | 5994 |
\* Notice that the number of samples of red, yellow, and green traffic lights is equal to each other and the number of samples of images without traffic lights is triple that. Such a balancing of the dataset is suggested in the How to improve object detection section of README file from https://github.com/AlexeyAB/darknet repository by AlexeyAB.
\** Notice that you cannot obtain the same level of "balancing" by only using the data_preparer.py script on the 4Tzones Traffic Lights Dataset. The process of creating the 4Tzones Traffic Lights Augmented Dataset involved several manual steps, that can be described as follows. Initially, we had stored labeled images from different ROS bags in different folders. On each dataset, we performed flipping, scaling, and balancing. For balancing, the number of samples per class was set to about 2000 (the data_preparer.py script has a --balance N option which commands the script to create N sample images per class through augmentation and 3*N samples for images without traffic lights). It was needed to balance the number of samples among the datasets. That is, suppose that we have N1 red traffic light samples from the first ROS bag, N2, and N3 from the second and third ROS bags. If we combine these three datasets and then balance the combined dataset with samples per class parameter set to 1998 (i.e. --balance 1998), we would get 1998 red traffic light images with a proportion of images from different datasets equal to N1:N2:N3. To avoid such an uneven proportion, we would need to generate a sufficient amount of red traffic light images for each dataset (2000 samples, for example) and then pick 666 images from these 2000 generated samples in accordance with the uniform distribution. Then, combining 666 images from each of the three datasets, we would get 1998 samples of red traffic light images in the final dataset with a proportion of the presence of images from each of the three initial datasets equal to 666:666:666. For images without traffic lights, this proportion would be equal to 1998:1998:1998. So, we performed such a "fair" balancing among the three datasets for red, yellow, green, and images without traffic lights and then combined them into one dataset called the 4Tzones Traffic Lights Augmented Dataset.
Data Preparer Script
For data augmentation and conversion of labels to different formats we have created adata_preparer.py script. It is a quite sophisticated script that is capable of
performing horizontal image flipping, image scaling, adjustment of brightness and contrast,
image resizing, dataset balancing, that is, making number of samples of red, yellow, and green lights equal to
a specified value while creating triple that for samples without traffic lights, random picking of the specified
number of samples, and conversion of image annotations (bounding boxes) to several different label formats, such as
a format used in the Bosh Small Traffic Lights Dataset,
a format produced by Yolo_mark tool,
a format required by keras-yolo3,
a format used in the
Vatsal Srivastava's Traffic Lights Dataset.
The data_preparer.py --help command produces a help-message that
presents comprehensive instructions on how to use
the script. We strongly recommend reading it before feeding your data to the script.
usage: data_preparer.py [-h] --dataset
                        {boschsmalltrafficlights,vatsalsrivastavatrafficlights,yolo_mark}
                        [--fliplr] [--scale] [--balance [B]] [--pick N]
                        [--resize H W] --input-dir DIR --output-dir DIR
                        [--continue-output-dir] [--draw-bounding-boxes]
This script is capable of working with several datasets from the list below.  It applies the requested image augmentation to the images from the provided dataset and converts labels to several formats specified below. It also balances dataset to the following form: red == yellow == green == nolight/3.
Datasets:     - Bosh Small Traffic Lights Dataset: https://hci.iwr.uni-heidelberg.de/node/6132     - Vatsal Srivastava's Traffic Lights Dataset (Simulator & Test Lot):             https://drive.google.com/file/d/0B-Eiyn-CUQtxdUZWMkFfQzdObUE/view?usp=sharing     - Any Traffic Lights Dataset Labeled with Yolomark: https://github.com/AlexeyAB/Yolomark.       4Tzones Traffic Lights Dataset (Yolo_mark compatible): https://yadi.sk/d/a1Kr8Wmg0zfa0A.
Label formats:     - One row for one image (singular and ternary);        Useful for https://github.com/qqwweee/keras-yolo3;       Row format: imagefilepath box1 box2 ... boxN;        Box format: xmin,ymin,xmax,ymax,class_id (no space).     - Vatsal Srivastava's yaml format (only ternary). Example:       - annotations:         - {class: Green, xwidth: 17, xmin: 298, yheight: 49, ymin: 153}         class: image         filename: ./images/a0a05c4e-b2be-4a85-aebd-93f0e78ff3b7.jpg       - annotations:         - {class: Yellow, xwidth: 15, xmin: 364, yheight: 43, ymin: 156}         - {class: Yellow, xwidth: 15, xmin: 151, yheight: 52, ymin: 100}         class: image         filename: ./images/ccbd292c-89cb-4e8b-a671-47b57ebb672b.jpg     - Bosh Small Traffic Lights yaml format (only ternary). Example:       - boxes:         - {label: Red, occluded: false, xmax: 640, xmin: 633, ymax: 355, ymin: 344}         - {label: Yellow, occluded: false, xmax: 659, xmin: 651, ymax: 366, ymin: 353}         path: ./images/ccbd292c-89cb-4e8b-a671-47b57ebb672b.png     - Yolomark format. One file per image. Example: imagename.jpg -> image_name.txt. Content:       <object-class> <xcenter> <ycenter> <width> <height>       <object-class> <xcenter> <ycenter> <width> <height>       ...
optional arguments:   -h, --help            show this help message and exit   --dataset {boschsmalltrafficlights,vatsalsrivastavatrafficlights,yolo_mark}                         dataset name   --fliplr              apply imgaug.Fliplr function (flip horizontally) to all images; dataset size will x2 in size   --scale               apply imgaug.Affine(scale=0.7) function (scale image, keeping original image shape);                          dataset size will x2 in size   --balance [B]         balance dataset, so that there is an equal number of representatives of each class;                          when no argument is provided, the number of elements per RED, YELLOW, GREEN classes                          are made equal to the maximum number of elements per class after the first processing stage,                          i.e., before balancing; if B argument is provided, the number of samples per                          RED, YELLOW, and GREEN classes are made equal to B; number of instances for NO_LIGHT class                          is made equal to 3*B   --pick N              picks N images from the original dataset in accordance with uniform distribution                          and ignores other images   --resize H W          resize all images to the specified height and width; aspect ratio is not preserved   --input-dir DIR       dataset's root directory   --output-dir DIR      directory to store prepared images and labels   --continue-output-dir                         expand existing output directory with new image-label entries   --draw-bounding-boxes                         draw bounding boxes on the output images; do not use it while preparing data for training
Other approaches for traffic light detection
We experimented with few other (unsuccessful) approaches to detect traffic lights.
Idea
The idea is to use the entire image with a given traffic light color as an individual class. This means we will have 4 classes
1. Entire image showing yellow traffic sign 2. Entire image showing green traffic sign 3. Entire image showing red traffic sign 4. Entire image showing no traffic sign
Models
We trained couple of models:
- A simple CNN with two convolutional layers, a fully connected layer and an output layer. The initial results looked promising with
training accuracy > 97%andtest accuracy > 90%. However when we deployed and tested the model, the results were not consistent. The car did not always stop at red lights and sometimes it did not move even when the lights were green. Efforts to achieve higher accuracies were in vain.
- Used transfer learning for multi-class classification approach using
VGG19andInceptionV3models, usingimagenetweights. The network did not learn anything after1-2epochs and hence the training accuracy never exceeded65%.
Learning Points
Future Work
Acknowledgements
- We would like to thank Udacity for providing the instructional videos and learning resources.
- We would like to thank Alex Lechner for his wonderful tutorial on how to do transfer learning on TensorFlow Object Detection API research models and get it to run on older tensorflow versions, as well as providing datasets. You can view his readme here: https://github.com/alex-lechner/Traffic-Light-Classification/blob/master/README.md#1-the-lazy-approach


