
[ECCV 2024] DoubleTake: Geometry Guided Depth Estimation
DoubleTake: Geometry Guided Depth Estimation
This is the reference PyTorch implementation for training and testing MVS depth estimation models using the method described in
DoubleTake: Geometry Guided Depth Estimation>
Mohamed Sayed, Filippo Aleotti, Jamie Watson, Zawar Qureshi, [Guillermo Garcia-Hernando](), Gabriel Brostow, Sara Vicente and Michael Firman.>
Paper, ECCV 2024 (arXiv pdf), Supplemental Material, Project Page, Video

https://github.com/user-attachments/assets/aa2052df-79f4-43a8-ab24-d704660f228a
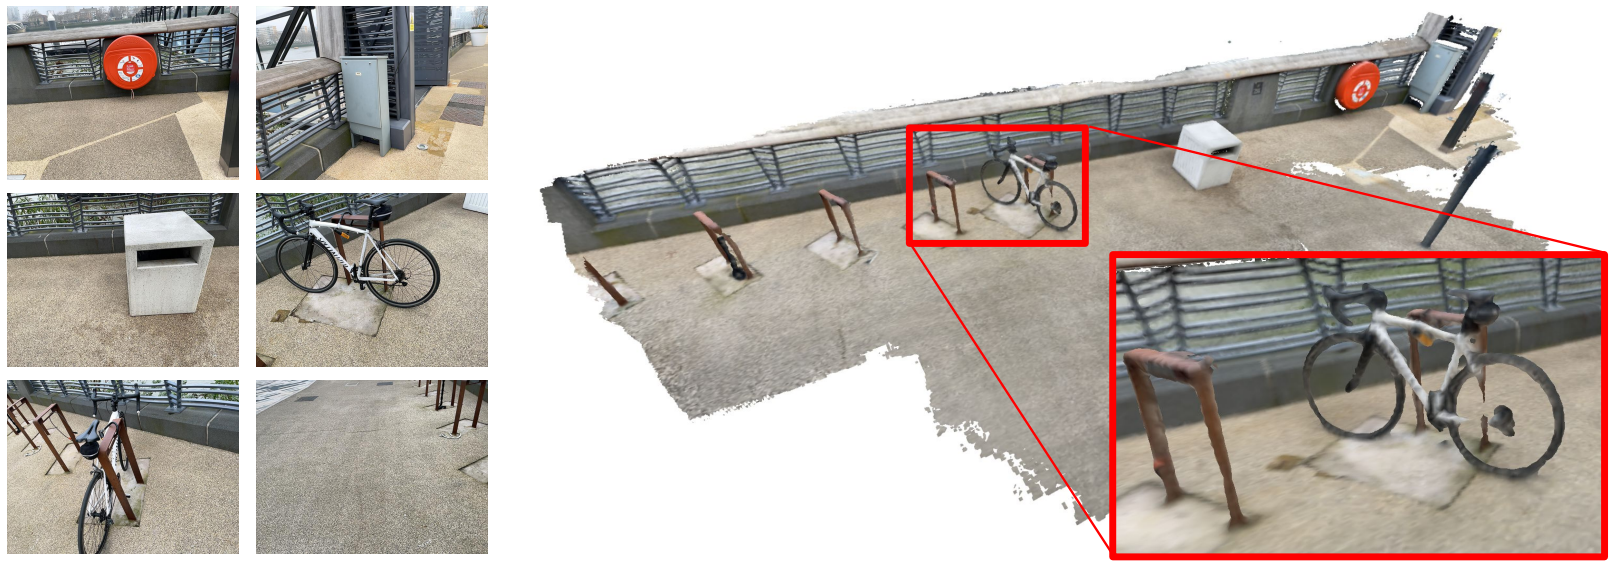
Please, refer to the the license file for terms of usage. If you use this codebase in your research, please consider citing our paper using the BibTex below and linking this repo. Thanks!
Table of Contents
* 🗺️ Overview * ⚙️ Setup * 📦 Trained Models and Precomputed Meshes/Scores * 🚀 Speed * 🏃 Running out of the box! * 💾 ScanNetv2 Dataset * 💾 SimpleRecon ScanNet Training Depth Renders * 💾 3RScan Dataset * 📊 Testing and Evaluation * 📊 Mesh Metrics * 📝🧮👩💻 Notation for Transformation Matrices * 🗺️ World Coordinate System * 🔨💾 Training Data Preperation * 🙏 Acknowledgements * 📜 BibTeX * 👩⚖️ License
🗺️ Overview
DoubleTake takes as input posed RGB images, and outputs a depth map for a target image. Under the hood, it uses a mesh it itself builds either online (incrementally) or offline (mesh built on one pass and used for better depth on the second pass) to improve its own depth estimates.
https://github.com/user-attachments/assets/269c658a-7325-4b52-98ab-bd3505f045db
⚙️ Setup
We are going to create a new Mamba environment called doubletake. If you don't have Mamba, you can install it with:
make install-mambaThen setup the environment with:
make create-mamba-env mamba activate doubletakeIn the code directory, install the repo as a pip package:
pip install -e .Some C++ code will compile JIT using ninja the first time you use any of the fusers. Should be quick.
In case you don't have this in your ~/.bashrc already, you should run:
export LDLIBRARYPATH=$LDLIBRARYPATH:$CONDA_PREFIX/lib/GLIBCXX_3.4.29 not found error it's very likely this.
📦 Trained Models and Precomputed Meshes/Scores
We provide three models. The standard DoubleTake model used for incremental, offline, and revisit evaluation on all datasets and figures in the paper, a slimmed down faster version of DoubleTake, and the vanilla SimpleRecon model we used for SimpleRecon scores. Use the links in the table to access the weights for each. The scores here are very slightly different (better) than those in the paper due to a slight bug fix in training data renders.Download a pretrained model into the weights/ folder.
Scores on ScanNet: | Model | Config | Weights | Notes | |---------------|---------------------------------------|-----------------------------------------------------------------------|---------------| | SimpleRecon | configs/models/simplereconmodel.yaml | Link | | | DoubleTake Small | configs/models/doubletakesmallmodel.yaml | Link | | | DoubleTake | configs/models/doubletakemodel.yaml | Link | ours in the paper |
| Offline/Two Pass using testofflinetwo_pass | Abs Diff↓ | Sq Rel↓ | delta < 1.05↑ | Chamfer↓ | F-Score↑ | Meshes and Full Scores | |-------------------------------------------------|-----------|---------|---------------|----------|----------|-------------------------| | SimpleRecon (Offline Tuples w/ testnohint ) | .0873 | .0128 | 74.12 | 5.29 | .668 | Link | | DoubleTake Small | .0631 | .0097 | 86.36 | 4.64 | .723 | Link | | DoubleTake | .0624 | .0092 | 86.64 | 4.42 | .742 | Link |
| Incremental using test_incremental | Abs Diff↓ | Sq Rel↓ | delta < 1.05↑ | Chamfer↓ | F-Score↑ | Meshes and Full Scores | |----------------------------------------|-----------|---------|---------------|----------|----------|-------------------------| | DoubleTake Small | .0825 | .0124 | 76.75 | 5.53 | .649 |Link | | DoubleTake | .0754 | .0109 | 80.29 | 5.03 | .689 |Link |
| No hint and online using testnohint | Abs Diff↓ | Sq Rel↓ | delta < 1.05↑ | Chamfer↓ | F-Score↑ | Meshes and Full Scores | |----------------------------------------|-----------|---------|---------------|----------|----------|-------------------------| | SimpleRecon (Online Tuples) | .0873 | .0128 | 74.12 | 5.29 | .668 | Link | | DoubleTake Small | .0938 | .0148 | 72.02 | 5.50 | .650 | Link | | DoubleTake | .0863 | .0127 | 74.64 | 5.22 | .672 | Link |
🚀 Speed
Please see the paper and supplemental material for details on runtime. We do not include the first-pass feature caching step in this code release.🏃 Running out of the box!
We've included two scans for people to try out immediately with the code. You can download these scans from here.
Steps:
- Download weights for the
hero_modelinto the weights directory. - Download the scans and unzip them into
datasets/ - If you've unzipped into a different folder, modify the value for the option
datasetpathinconfigs/data/vdr/vdrdefault_offline.yamlto the base path of the unzipped vdr folder. - You should be able to run it! Something like this will work:
CUDAVISIBLEDEVICES=0 python -m doubletake.testofflinetwopass --name doubletakeoffline \ --outputbasepath $OUTPUT_PATH \ --configfile configs/models/doubletakemodel.yaml \ --loadweightsfromcheckpoint weights/doubletakemodel.ckpt \ --dataconfig configs/data/vdr/vdrdefault_offline.yaml \ --num_workers 8 \ --batch_size 2 \ --fastcostvolume \ --run_fusion \ --depthfuser customopen3d \ --fuse_color \ --fusionmaxdepth 3.5 \ --fusion_resolution 0.02 \ --trimtsdfusing_confience \ --extendednegtruncation \ --dumpdepthvisualization;This will output meshes, quick depth viz, and scores when benchmarked against LiDAR depth under OUTPUT_PATH.
This command uses vdrdefaultoffline.yaml which will generate a depth map for every keyframe and fuse them into a mesh. You can also use denseoffline tuples by instead using vdrdense_offline.yaml for a depth map for every frame.
See the section below on testing and evaluation. Make sure to use the correct config flags for datasets.
💾 ScanNetv2 Dataset
We've written a quick tutorial and included modified scripts to help you with downloading and extracting ScanNetv2. You can find them at datascripts/scannetwrangling_scripts/You should change the dataset_path config argument for ScanNetv2 data configs at configs/data/ to match where your dataset is.
The codebase expects ScanNetv2 to be in the following format:
dataset_path scans_test (test scans) scene0707 scene070700vhclean2.ply (gt mesh) sensor_data frame-000261.pose.txt frame-000261.color.jpg frame-000261.color.512.png (optional, image at 512x384) frame-000261.color.640.png (optional, image at 640x480) frame-000261.depth.png (full res depth, stored scale *1000) frame-000261.depth.256.png (optional, depth at 256x192 also scaled) scene0707.txt (scan metadata and image sizes) intrinsic intrinsic_depth.txt intrinsic_color.txt ... scans (val and train scans) scene0000_00 (see above) scene0000_01 ....
In this example scene0707.txt should contain the scan's metadata:
colorHeight = 968 colorToDepthExtrinsics = 0.999263 -0.010031 0.037048 ........ colorWidth = 1296 depthHeight = 480 depthWidth = 640 fx_color = 1170.187988 fx_depth = 570.924255 fy_color = 1170.187988 fy_depth = 570.924316 mx_color = 647.750000 mx_depth = 319.500000 my_color = 483.750000 my_depth = 239.500000 numColorFrames = 784 numDepthFrames = 784 numIMUmeasurements = 1632
frame-000261.pose.txt should contain pose in the form:
-0.384739 0.271466 -0.882203 4.98152 0.921157 0.0521417 -0.385682 1.46821 -0.0587002 -0.961035 -0.270124 1.51837
frame-000261.color.512.png and frame-000261.color.640.png are precached resized versions of the original image to save load and compute time during training and testing. frame-000261.depth.256.png is also a precached resized version of the depth map.
All resized precached versions of depth and images are nice to have but not required. If they don't exist, the full resolution versions will be loaded, and downsampled on the fly.
💾 SimpleRecon ScanNet Training Depth Renders
DoubleTake is trained using depth and confidence renders of partial and full meshes of the train and validation ScanNet splits. We've provided these here if you'd like to train a DoubleTake model.💾 3RScan Dataset
This section explains how to prepare 3RScan for testing:
Please download and extract the dataset by following the instructions here.
The dataset should be formatted like so:
<dataset_path>
  <scanId>
  |-- mesh.refined.v2.obj
      Reconstructed mesh
  |-- mesh.refined.mtl
      Corresponding material file
  |-- mesh.refined_0.png
      Corresponding mesh texture
  |-- sequence.zip
      Calibrated RGB-D sensor stream with color and depth frames, camera poses
  |-- labels.instances.annotated.v2.ply
      Visualization of semantic segmentation
  |-- mesh.refined.0.010000.segs.v2.json
      Over-segmentation of annotation mesh
  |-- semseg.v2.json
            Instance segmentation of the mesh (contains the labels)
Please make sure to extract each sequence.zip inside every scanId folder.
We provide the frame tuple files for this dataset (see for eg. datasplits/3rscan/testeightviewdeepvmvs.txt) but if you need recreate them, you can do so by following the instructions here.
NOTE: we only use 3RScan dataset for testing and the data split used (datasplits/3rscan/3rscantest.txt) corresponds to the validation split in the original dataset repo (splits/val.txt). We use the val split as the transformations that align the reference scan to the rescans are readily available for the train and val splits.
🖼️🖼️🖼️ Frame Tuples
By default, we estimate a depth map for each keyframe in a scan. We use DeepVideoMVS's heuristic for keyframe separation and construct tuples to match. We use the depth maps at these keyframes for depth fusion. For each keyframe, we associate a list of source frames that will be used to build the cost volume. We also use dense tuples, where we predict a depth map for each frame in the data, and not just at specific keyframes; these are mostly used for visualization.
We generate and export a list of tuples across all scans that act as the dataset's elements. We've precomputed these lists and they are available at datasplits under each dataset's split. For ScanNet's test scans they are at datasplits/ScanNetv2/standardsplit. Our core depth numbers are computed using datasplits/ScanNetv2/standardsplit/testeightviewdeepvmvs.txt.
Here's a quick taxonamy of the type of tuples for test:
default: a tuple for every keyframe following DeepVideoMVS where all source frames are in the past. Used for all depth and mesh evaluation unless stated otherwise. For ScanNet usedatasplits/ScanNetv2/standardsplit/testeightview_deepvmvs.txt.offline: a tuple for every frame in the scan where source frames can be both in the past and future relative to the current frame. These are useful when a scene is captured offline, and you want the best accuracy possible. With online tuples, the cost volume will contain empty regions as the camera moves away and all source frames lag behind; however with offline tuples, the cost volume is full on both ends, leading to a better scale (and metric) estimate.dense: an online tuple (like default) for every frame in the scan where all source frames are in the past. For ScanNet this would bedatasplits/ScanNetv2/standardsplit/testeightviewdeepvmvsdense.txt.dense_offline: an offline tuple for every frame in the scan.
If you'd like to generate these tuples yourself, you can use the scripts at datascripts/generatetraintuples.py for train tuples and datascripts/generatetesttuples.py for test tuples. These follow the same config format as test.py and will use whatever dataset class you build to read pose informaiton.
Example for test:
# default tuples
python ./scripts/datascripts/generatetest_tuples.py
    --dataconfig configs/data/scannet/scannetdefault_test.yaml
    --num_workers 16
dense tuples
python ./scripts/datascripts/generatetest_tuples.py
    --dataconfig configs/data/scannet/scannetdense_test.yaml
    --num_workers 16
Examples for train:
# train
python ./scripts/datascripts/generatetrain_tuples.py
    --dataconfig configs/data/scannet/scannetdefault_train.yaml
    --num_workers 16
val
python ./scripts/datascripts/generateval_tuples.py
    --dataconfig configs/data/scannet/scannetdefault_val.yaml
    --num_workers 16
These scripts will first check each frame in the dataset to make sure it has an existing RGB frame, an existing depth frame (if appropriate for the dataset), and also an existing and valid pose file. It will save these validframes in a text file in each scan's folder, but if the directory is read only, it will ignore saving a validframes file and generate tuples anyway.
📊 Testing and Evaluation
Depth Evaluation
You can evaluate our model on the depth benchmark of ScanNetv2 using the following commands:
For online incremental depth estimation, use this command.
CUDAVISIBLEDEVICES=0 python -m doubletake.test_incremental \ --name doubletake_incremental \ --configfile configs/models/doubletakemodel.yaml \ --loadweightsfromcheckpoint weights/doubletakemodel.ckpt \ --dataconfig configs/data/scannet/scannetdefault_test.yaml \ --num_workers 12 \ --batch_size 1 \ --fastcostvolume \ --outputbasepath $OUTPUT_DIR \ --loademptyhint \ --fusion_resolution 0.02 \ --extendednegtruncation \ --fusionmaxdepth 3.5 \ --depth_fuser ours;For offline depth estimation, use this command. Note this will generate meshes. Remove --run_fusion if you don't want to generate meshes for the second pass.
CUDAVISIBLEDEVICES=0 python -m doubletake.testofflinetwo_pass \ --name doubletake_offline \ --configfile configs/models/doubletakemodel.yaml \ --loadweightsfromcheckpoint weights/doubletakemodel.ckpt \ --dataconfig configs/data/scannet/scannetoffline_test.yaml \ --num_workers 12 \ --batch_size 4 \ --fastcostvolume \ --outputbasepath $OUTPUT_DIR \ --loademptyhint \ --fusion_resolution 0.02 \ --extendednegtruncation \ --fusionmaxdepth 3.5 \ --depth_fuser ours;If you want to see the performance of a DoubleTake model without hints (no depth hint and online), use:
CUDAVISIBLEDEVICES=0 python -m doubletake.testnohint \ --name doubletakenohint \ --configfile configs/models/doubletakemodel.yaml \ --loadweightsfromcheckpoint weights/doubletakemodel.ckpt \ --dataconfig configs/data/scannet/scannetdefault_test.yaml \ --num_workers 12 \ --batch_size 4 \ --fastcostvolume \ --outputbasepath $OUTPUT_DIR \ --loademptyhint \ --fusion_resolution 0.02 \ --extendednegtruncation \ --fusionmaxdepth 3.5 \ --depth_fuser ours;testnohint for the provided SimpleRecon model as well.
TSDF Fusion TL;DR: use ours for ScanNet, 7Scenes, and 3RScan. Anything to do with scores. Use custom_open3d for anything else.
ours and custom_open3d give almost identical scores on ScanNet given the same fusion flags.
To run TSDF fusion provide the --run_fusion flag. This is mandatory for incremental running. You have three choices for fusers: 1) --depth_fuser ours (default) will use our fuser, whose meshes are used in most visualizations and for scores. This fuser does not support color. We've provided a custom branch of scikit-image with our custom implementation of measure.matching_cubes that allows single walled. We use single walled meshes for evaluation. If this is isn't important to you, you can set the exportsinglemesh to False for call to export_mesh in test.py. This fuser's TSDF volume is not sparse, and ScanNet/7Scenes/3RScan meshes will fit in memory on an A100 given we have known mesh bounds. 3) --depthfuser customopen3d will use a custom version of the open3d fuser that supports our confidence mapping and confidence sampling. There is currently a memory leak in open3d core. We will post an updated version of the fuser if resolved. This fuser supports a sparse volume and our free space cleanup. This fuser supports color via the --fuse_color flag. 3) --depth_fuser open3d will use the default open3d depth fuser. This fuser supports color and you can enable this by using the --fuse_color flag. This fuser does not support confidences. This fuser cannot be used as a hint fuser.
For ours and customopen3d you can pass --extendedneg_truncation for more complete meshes. Scores in the paper are computed with this.
For customopen3d you can pass --trimtsdfusingconfience to remove potential floaters, especially in outdoor scenes.
By default, depth maps will be clipped to 3.5m for fusion and a tsdf resolution of 0.02m3 will be used, but you can change that by changing both --maxfusiondepth and --fusion_resolution.
Hint fusers are locked to 3.0m and 0.04m resolution.
Meshes will be stored under resultspath/meshes/{scan name}{mesh params}.
Cache depths
You can optionally store depths by providing the --cache_depths flag. They will be stored at results_path/depths.
Example command to compute scores and cache depths
CUDAVISIBLEDEVICES=0 python -m doubletake.testofflinetwo_pass \
    --name doubletake_offline \
    --configfile configs/models/doubletakemodel.yaml \
    --loadweightsfromcheckpoint weights/doubletakemodel.ckpt \
    --dataconfig  configs/data/scannet/scannetoffline_test.yaml \
    --num_workers 12 \
    --batch_size 4 \
    --fastcostvolume \
    --outputbasepath $OUTPUT_DIR \
    --loademptyhint \
    --cache_depths;
Quick viz
There are other scripts for deeper visualizations of output depths and fusion, but for quick export of depth map visualization you can use --dumpdepthvisualization. Visualizations will be stored at resultspath/viz/quickviz/.
# Example command to output quick depth visualizations
CUDAVISIBLEDEVICES=0 python -m doubletake.testofflinetwo_pass \
    --name doubletake_offline \
    --configfile configs/models/doubletakemodel.yaml \
    --loadweightsfromcheckpoint weights/doubletakemodel.ckpt \
    --dataconfig  configs/data/scannet/scannetoffline_test.yaml \
    --num_workers 12 \
    --batch_size 4 \
    --fastcostvolume \
    --outputbasepath $OUTPUT_DIR \
    --loademptyhint \
    --dumpdepthvisualization;
Revisit Evaluation
You can evaluate our model in the revist scenario (i.e using the geometry from a previous visit as ‘hints’ for our current depth estimates) on the 3RScan dataset by running the following command:
CUDAVISIBLEDEVICES=0 python -m doubletake.test_revisit \
            --configfile configs/models/doubletakemodel.yaml \
            --loadweightsfromcheckpoint ./models/doubletakemodel.ckpt \
            --dataconfig configs/data/3rscan/3rscantest.yaml \
            --datasetpath PATH/TO/3RScandataset \
            --num_workers 12 \
            --batch_size 6 \
            --outputbasepath ./outputs/ \
            --depthhintaug 0.0 \
            --loademptyhint \
            --name finalmodel3rscan_revisit \
            --run_fusion \
            --rotate_images;
📊 Mesh Metrics
We use a mesh evaluation protocol similar to TransformerFusion's, but use occlusion masks that better fit available geometry in the ground truth. The masks can be found here.
CUDAVISIBLEDEVICES=0 python scripts/evals/mesh_eval.py \
    --groundtruthdir SCANNETTESTFOLDERPATH  \
    --predictiondir ROOTPREDDIRECTORY/SCANNAME.ply \
    --visibilityvolumepath UNTAREDVISIBILITYMASK_PATH \
    --waitforscan;
Use --waitforscan if the prediction is still being generated and you want the script to wait until a scan's mesh is available before proceeding.
📝🧮👩💻 Notation for Transformation Matrices
TL;DR: worldTcam == worldfromcam This repo uses the notation "camTworld" to denote a transformation from world to camera points (extrinsics). The intention is to make it so that the coordinate frame names would match on either side of the variable when used in multiplication from right to left:
campoints = camTworld @ worldpoints
worldTcam denotes camera pose (from cam to world coords). refTsrc denotes a transformation from a source to a reference view. Finally this notation allows for representing both rotations and translations such as: worldRcam and worldtcam
🗺️ World Coordinate System
This repo is geared towards ScanNet, so while its functionality should allow for any coordinate system (signaled via input flags), the model weights we provide assume a ScanNet coordinate system. This is important since we include ray information as part of metadata. Other datasets used with these weights should be transformed to the ScanNet system. The dataset classes we include will perform the appropriate transforms.
🔨💾 Training Data Preperation
To train a DoubleTake model you'll need the ScanNetv2 dataset and renders of a mesh from an SR model. We provide these renders.To generate mesh renders, you'll first need to run a SimpleRecon model and cache those depths to disk. You should use scannetdefaulttraininferencestyle.yaml and scannetdefaultvalinferencestyle.yaml for this. These configs run the model on test-style keyframes on both train and val splits. Something like this:
CUDAVISIBLEDEVICES=0 python -m doubletake.testnohint
    --configfile configs/models/simplereconmodel.yaml
    --loadweightsfromcheckpoint simplereconmodel_weights.ckpt
    --dataconfig configs/data/scannet/scannetdefaulttraininference_style.yaml
    --num_workers 8
    --batch_size 8
    --cache_depths
    --run_fusion
    --outputbasepath YOUROUTPUTDIR
--datasetpath SCANNETDIR;CUDAVISIBLEDEVICES=0 python -m doubletake.testnohint
--configfile configs/models/simplereconmodel.yaml
--loadweightsfromcheckpoint simplereconmodel_weights.ckpt
--dataconfig configs/data/scannet/scannetdefaultvalinference_style.yaml
--num_workers 8
--batch_size 8
--cache_depths
--run_fusion
--outputbasepath YOUROUTPUTDIR
--datasetpath SCANNETDIR;With these cached depths, you can generate mesh renders for training:
CUDAVISIBLEDEVICES=0 python ./scripts/renderscripts/rendermeshes.py \
    --dataconfig configs/data/scannet/scannetdefault_train.yaml \
    --cacheddepthpath YOUROUTPUTDIR/simplerecon_model/scannet/default/depths \
    --outputroot renders/partialrenders \
    --datasetpath SCANNETDIR \
    --batch_size 4 \
    --datatorender both \
    --partial 1;
CUDAVISIBLEDEVICES=0 python ./scripts/renderscripts/rendermeshes.py \     --dataconfig configs/data/scannet/scannetdefault_train.yaml \     --cacheddepthpath YOUROUTPUTDIR/simplerecon_model/scannet/default/depths \     --output_root renders/renders \     --dataset_path /mnt/scannet/ \     --batch_size 4 \     --datatorender both \     --partial 0;
CUDAVISIBLEDEVICES=0 python ./scripts/renderscripts/rendermeshes.py \     --dataconfig configs/data/scannet/scannetdefault_val.yaml \     --cacheddepthpath YOUROUTPUTDIR/simplerecon_model/scannet/default/depths \     --outputroot renders/partialrenders \     --datasetpath SCANNETDIR \     --batch_size 4 \     --datatorender both \     --partial 1;
CUDAVISIBLEDEVICES=0 python ./scripts/renderscripts/rendermeshes.py \     --dataconfig configs/data/scannet/scannetdefault_val.yaml \     --cacheddepthpath YOUROUTPUTDIR/simplerecon_model/scannet/default/depths \     --output_root renders/renders \     --dataset_path /mnt/scannet/ \     --batch_size 4 \     --datatorender both \     --partial 0;
🙏 Acknowledgements
The tuple generation scripts make heavy use of a modified version of DeepVideoMVS's Keyframe buffer (thanks Arda and co!).
We'd like to thank the Niantic Raptor R\&D infrastructure team - Saki Shinoda, Jakub Powierza, and Stanimir Vichev - for their valuable infrastructure support.
📜 BibTeX
If you find our work useful in your research please consider citing our paper:
@inproceedings{sayed2022simplerecon,
  title={DoubleTake: Geometry Guided Depth Estimation},
  author={Sayed, Mohamed and Aleotti, Filippo and Watson, Jamie and Qureshi, Zawar and Garcia-Hernando, Guillermo and Brostow, Gabriel and Vicente, Sara and Firman, Michael},
  booktitle={Proceedings of the European Conference on Computer Vision (ECCV)},
  year={2024},
}👩⚖️ License
Copyright © Niantic, Inc. 2024. Patent Pending. All rights reserved. Please see the license file for terms.


