
Make your own running home page
Note
- clone or Fork before vercel 404 need to pull the latest code
- python in README means python3 python
- use v2.0 need change vercel setting from gatsby to vite
- 2023.09.26 garmin need secret_string(and in Actions) get
python runpage/getgarmin_secret.py ${email} ${password}
     # if cn
python runpage/getgarmin_secret.py ${email} ${password} --is-cn- 2024.09.29: Added
Elevation Gainfield, If you forked the project before this update, please run the following command:
sqlalchemy.exc.OperationalError: (sqlite3.OperationalError) no such column: activities.elevation_gain
- If you don't have a local environment, set RUNTYPE to dbupdater in the .github/workflows/rundatasync.yml file once then change back.
python runpage/dbupdater.py- For old data: To include Elevation Gain for past activities, perform a full reimport. - To show the 'Elevation Gain' column, modify SHOWELEVATIONGAIN in src/utils/const.ts - note: Elevation Gain may be inaccurate. You can use Strava's "Correct Elevation" or Garmin's "Elev Corrections" feature for more precise data.
- This project now uses MapCN (free) by default. If you choose to use Mapbox, please get your own token. Do not use the project maintainer's token - check this issue and issue #1055

Create a personal running home page


Runner's Page Show
Running page runners
| Runner | page | App | | ---------------------------------------------------- | ---------------------------------------------- | ----------- | | zhubao315 |
How it works
Features
- GitHub Actions automatically synchronizes running data and generates page displays
- Support for Vercel (recommended) and GitHub Pages automated deployment
- React Hooks
- Mapbox for map display
- Supports most sports apps such as nike strava...
- Support for metric and imperial units
- Terminal UI (TUI) for browsing activities locally
automatically backup gpx data for easy backup and uploading to other software.>
Note: If you don't want to make the data public, you can choose strava's fuzzy processing, or private repositories.
Support
- Garmin
- Garmin-CN
- New Way To Sync Nike Run Club
- Nike Run Club
- Strava
- GPX
- TCX
- FIT
- Garmin-CNtoGarmin(Sync Garmin-CN activities to Garmin Global)
- NiketoStrava(Using NRC Run, Strava backup data)
- TcxtoStrava(upload all tcx data to strava)
- TcxtoGarmin(upload all tcx data to Garmin)
- GpxtoStrava(upload all gpx data to strava)
- GarmintoStrava(Using Garmin Run, Strava backup data)
- StravatoGarmin(Using Strava Run, Garmin backup data)
- COROS
- iGPSPORT
- Joyrun
- Komoot
- Onelap
- Intervals.icu
Download
Clone or fork the repo.
git clone https://github.com/yihong0618/running_page.git --depth=1Installation and testing (node >= 20 python >= 3.11)
pip3 install -r requirements.txt
npm install -g corepack && corepack enable && pnpm install
pnpm develop
Open your browser and visit
TUI (Terminal UI)
You can browse your activities in the terminal using the built-in Textual TUI.
# Using make
make tui
Or run directly with uv
uv run run_page
Or specify a custom activities.json path
uv run run_page /path/to/your/activities.json
Keyboard shortcuts inside TUI:
1/2– Switch between List and Stats views←/→– Change year filter↑/↓– Navigate activitiesy– Cycle through yearst– Cycle through activity typesq– Quit
Docker
# NRC
docker build -t runningpage:latest . --build-arg app=NRC --build-arg nikerefresh_token=""
Garmin
docker build -t runningpage:latest . --build-arg app=Garmin --build-arg secretstring=""
Garmin-CN
docker build -t runningpage:latest . --build-arg app=Garmin-CN --build-arg secretstring=""
Strava
docker build -t runningpage:latest . --build-arg app=Strava --build-arg clientid=""  --build-arg clientsecret=""  --build-arg refreshtoken=""
NiketoStrava
docker build -t runningpage:latest . --build-arg app=NiketoStrava  --build-arg nikerefreshtoken="" --build-arg clientid=""  --build-arg clientsecret=""  --build-arg refreshtoken=""
Keep
docker build -t runningpage:latest . --build-arg app=Keep --build-arg keepph --build-arg keep_password=""
run
docker run -itd -p 80:80   running_page:latest
visit
Open your browser and visit localhost:80
Imperial Units
- add
--build-arg VITEUSEIMPERIAL=truetodocker build ... - add
--units imperialflag to eachpython3 runpage/gensvg.py ...command in the Dockerfile
Local sync data
Modifying Mapbox token
If you use English please changeIS_CHINESE = falseinsrc/utils/const.ts
Suggested changes to your own Mapbox token
const MAPBOX_TOKEN =
  'pk.eyJ1IjoieWlob25nMDYxOCIsImEiOiJja2J3M28xbG4wYzl0MzJxZm0ya2Fua2p2In0.PNKfkeQwYuyGOTT_x9BJ4Q';
Change Default Map Tile Style
In addition to using the default map tile style, you can customize the map display by modifying the following configurations in src/utils/const.ts:
const MAPTILEVENDOR = 'mapcn'; // Default (free!)
const MAPTILESTYLE = 'osm-bright';
const MAPTILEACCESS_TOKEN = ''; // Not needed for MapCN
Currently supported MAPTILEVENDOR options include:
- "mapcn" - MapCN map services (FREE, no token required) ⭐ DEFAULT & RECOMMENDED
- "mapbox" - Mapbox map services (requires token, has costs)
- "maptiler" - MapTiler map services (free tier available)
- "stadiamaps" - Stadia Maps services (free tier available)
Available MapCN styles:
- osm-bright - Light OpenStreetMap style (default)
- osm-liberty - Alternative light style
- dark-matter - Dark theme style
Attribution
When using MapCN (Carto Basemaps), please ensure you comply with their attribution requirements:
- Map tiles: © CARTO
- Map data: © OpenStreetMap contributors
Using Other Providers
If you prefer Mapbox, MapTiler, or Stadia Maps, you can change the vendor:const MAPTILEVENDOR = 'mapbox'; // or 'maptiler' or 'stadiamaps'
const MAPTILESTYLE = 'dark-v10'; // style for chosen vendor
const MAPTILEACCESSTOKEN = 'youraccesstokenhere';Each MAPTILEVENDOR provides multiple MAPTILESTYLE options. Ensure the style matches your selected vendor. For available MAPTILESTYLE names, refer to the definitions in src/utils/const.ts.
When using "mapbox", "maptiler" or "stadiamaps", you must configure an ACCESS_TOKEN. The default token may cause quota limit issues if not replaced.
- Mapbox: Register at https://www.mapbox.com/ (Has usage costs)
- MapTiler: Register at https://cloud.maptiler.com/auth/widget (Free tier available)
- Stadia Maps: Sign up at https://client.stadiamaps.com/signup/ (Free tier available)
Custom your page
- Find
src/static/site-metadata.tsin the repository directory, find the following content, and change it to what you want.
siteMetadata: {
  siteTitle: 'Running Page', #website title
  siteUrl: 'https://yihong.run', #website url
  logo: 'https://encrypted-tbn0.gstatic.com/images?q=tbn:ANd9GcQTtc69JxHNcmN1ETpMUX4dozAgAN6iPjWalQ&usqp=CAU', #logo img
  description: 'Personal site and blog',
  navLinks: [
    {
      name: 'Blog', #navigation name
      url: 'https://yihong.run/running', #navigation url
    },
    {
      name: 'About',
      url: 'https://github.com/yihong0618/running_page/blob/master/README-CN.md',
    },
  ],
},- Modifying styling in
src/utils/const.ts
// styling: set to false if you want to disable dash-line route
const USEDASHLINE = true;
// styling: route line opacity: [0, 1]
const LINE_OPACITY = 0.4;
// styling: set to true if you want to display only the routes without showing the map
// Note: This config only affects the page display; please refer to "privacy protection" below for data protection
// update for now 2024/11/17 the privacy mode is true
const PRIVACY_MODE = true;
// update for now 2024/11/17 the lights on default is false
// styling: set to false if you want to make light off as default, only effect when PRIVACY_MODE = false
const LIGHTS_ON = false;
// set to true if you want to show the 'Elevation Gain' column
const SHOWELEVATIONGAIN = true;- To use Google Analytics, you need to modify the configuration in the
src/utils/analytics.tsfile.
const USEGOOGLEANALYTICS = false;
const GOOGLEANALYTICSTRACKING_ID = '';
privacy protection,setting flowing env:
# ignore distance for each polyline start and end.
IGNORESTARTEND_RANGE = 200
ignore meters for each point in below polyline.
IGNORE_RANGE = 200
a polyline include point you want to ignore.
IGNORE_POLYLINE = ktjrFoemeU~IorGq}DeB
Do filter before saving to database, you will lose some data, but you can protect your privacy, when you using public repo. enable for set 1, disable via unset.
IGNOREBEFORESAVING =
You can using Google map Interactive Polyline Encoder Utility, to making your IGNOREPOLYLINE.
Download your running data
Download your running data and do not forget to generate svg in total page
GPX
Make your
GPX data
Copy all your gpx files to GPX_OUT or new gpx files
python runpage/gpxsync.pyTCX
Make your
TCX data
Copy all your tcx files to TCX_OUT or new tcx files
python runpage/tcxsync.pyFIT
Make your
FIT data
Copy all your tcx files to FIT_OUT or new fit files
python runpage/fitsync.pyGarmin
Get your
Garmin data
- If you only want to sync
type runningadd args --only-run - If you only want
tcxfiles add args --tcx - If you only want
fitfiles add args --fit - If you are using Garmin as a data source, it is recommended that you pull the code to your local environment to run and obtain the Garmin secret.
Get Garmin Secret
Enter the following command in the terminal
# to get secret_string
python runpage/getgarmin_secret.py ${your email} ${your password}
Execute Garmin Sync Script
Copy the Secret output in the terminal,If you are using GitHub, please configure GARMINSECRETSTRING in GitHub Action.
# use this secret_string
python runpage/garminsync.py ${secret_string}
example:
python runpage/getgarmin_secret.py xxxxxxxxxxxonly-run:
python runpage/garminsync.py xxxxxxxxxxxxxx(secret_string) --only-runGarmin-CN(China)
Get your
Garmin-CN data
- If you only want to sync
type runningadd args --only-run - If you only want
tcxfiles add args --tcx - If you only want
fitfiles add args --fit - If you are using Garmin as a data source, it is recommended that you pull the code to your local environment to run and obtain the Garmin secret.
Get Garmin CN Secret
Enter the following command in the terminal
# to get secret_string
python runpage/getgarmin_secret.py ${your email} ${your password} --is-cn
Execute Garmin CN Sync Script
Copy the Secret output in the terminal,If you are using GitHub, please configure GARMINSECRETSTRING_CN in GitHub Action. 
example:
python runpage/garminsync.py xxxxxxxxx(secret_string) --is-cnonly-run:
python runpage/garminsync.py xxxxxxxxxxxxxx(secret_string) --is-cn --only-runGarmin-CN to Garmin
Sync your
Garmin-CN data to Garmin
- If you only want to sync
type runningadd args --only-run
Get Garmin CN Secret
Enter the following command in the terminal
# to get secret_string
python runpage/getgarmin_secret.py ${your email} ${your password} --is-cn
Get Garmin Secret
Enter the following command in the terminal
# to get secret_string
python runpage/getgarmin_secret.py ${your email} ${your password}
Sync Garmin CN to Garmin
Enter the following command in the terminal
# to sync garmin-cn to garmin-global
python runpage/garminsynccnglobal.py ${garmincnsecretstring} ${garminsecret_string}
Nike Run Club New
Get your
Nike Run Club data
Please note:Due to the discontinuation of Nike Run Club in mainland China, you can only log in through a VPN. Before starting, please ensure that you are using a global non-mainland China proxy, allowing you to accessnike.cominstead ofnike.com.cn, as shown in the following image.
- Sign in/Sign up NikeRunClub account
- after successful login,openF12->Application->localstorage-> copy the content of "access_token" from the value of key
https://www.nike.com. - Execute in the root directory , you should be able to see the image below, and then you can log into your account on the mobile as usual:
python runpage/nikesync.py ${access_token}if you want to automate the submission of NRC data, you can refer to issue692.
If you've previously synced activities and want to continue syncing new ones, with --continue-sync args
python runpage/nikesync.py ${access_token} --continue-syncNike Run Club
Get your
Nike Run Club data
Please note: When you choose to deploy running_page on your own server, due to Nike has blocked some IDC's IP band, maybe your server cannot sync Nike Run Club's data correctly and display 403 error, then you have to change another way to host it.
Get Nike's refresh_token
ALL need to do outside GFW.

- Login from this website, open F12 -> XHR -> get the
refreshtokenfrom login api.
- copy this
refresh_tokenand use it in GitHub Secrets or in command line
- Execute in the root directory:
python runpage/nikesync.py ${nike refresh_token}example:
python runpage/nikesync.py eyJhbGciThiMTItNGIw
Strava
Get your
Strava data
[!NOTE]
Strava updated its Developer Program in June 2026. If you use Strava as the data source, or upload activities to Strava before syncing, check your app tier in the Strava API settings dashboard. Standard Tier developers need a Strava subscription to access the API; existing Standard Tier developers are affected from June 30, 2026. See Strava's announcement for details.
- Sign in/Sign up Strava account
- Open after successful Signin Strava Developers -> Create & Manage Your App
- Create
My API Application: Enter the following information

Created successfully:

- Use the link below to request all permissions: Replace
${your_id}in the link withMy API ApplicationClient ID
https://www.strava.com/oauth/authorize?clientid=${yourid}&responsetype=code&redirecturi=http://localhost/exchangetoken&approvalprompt=force&scope=readall,profile:readall,activity:read_all,profile:write,activity:writeExample:
https://www.strava.com/oauth/authorize?clientid=115321&responsetype=code&redirecturi=http://localhost/exchangetoken&approvalprompt=force&scope=readall,profile:readall,activity:readall,profile:write,activity:write
- Get the
codevalue in the link
example:
http://localhost/exchangetoken?state=&code=1dab37edd9970971fb502c9efdd087f4f3471e6e&scope=read,activity:write,activity:readall,profile:write,profile:readall,readallcode value:
1dab37edd9970971fb502c9efdd087f4f3471e6
- Use
Clientid、Clientsecret、Codegetrefresh_token: Execute inTerminal/iTerm
curl -X POST https://www.strava.com/oauth/token \
   -F client_id=${Your Client ID} \
   -F client_secret=${Your Client Secret} \
   -F code=${Your Code} \
   -F granttype=authorizationcode
example:
curl -X POST https://www.strava.com/oauth/token \
   -F client_id=12345 \
   -F client_secret=b21d0bfb377998ed1ac3b0 \
   -F code=d09b58abface48003 \
   -F granttype=authorizationcode
- Sync
Stravadata
type running add args --only-run
python runpage/stravasync.py ${clientid} ${clientsecret} ${refresh_token}References: -
TCXtoStrava
upload all tcx files to strava
- follow the strava steps
- copy all your tcx files to TCX_OUT
- Execute in the root directory:
python runpage/tcxtostravasync.py ${clientid} ${clientsecret} ${stravarefreshtoken}example:
python runpage/tcxtostravasync.py xxx xxx xxx
   or
python runpage/tcxtostravasync.py xxx xxx xxx --all- if you want to all files add args
--all
TCXtoGarmin
upload all tcx files to garmin
- follow the garmin steps
- copy all your tcx files to TCX_OUT
- Execute in the root directory:
python3 runpage/tcxtogarminsync.py ${{ secrets.GARMINSECRETSTRING_CN }} --is-cnexample:
python runpage/tcxtogarminsync.py xxx --is-cn
   or Garmin Global
python runpage/tcxtogarminsync.py xxx- if you want to all files add args
--all
GPXtoStrava
upload all gpx files to strava
- follow the strava steps
- copy all your gpx files to GPX_OUT
- Execute in the root directory:
python runpage/gpxtostravasync.py ${clientid} ${clientsecret} ${stravarefreshtoken}example:
python runpage/gpxtostravasync.py xxx xxx xxx
   or
python runpage/tcxtostravasync.py xxx xxx xxx --all- if you want to all files add args
--all
NiketoStrava
Get your
Nike Run Club data and upload to strava
- follow the nike and strava steps
- Execute in the root directory:
python runpage/niketostravasync.py ${nikerefreshtoken} ${clientid} ${clientsecret} ${stravarefreshtoken}example:
python runpage/niketostravasync.py eyJhbGciThiMTItNGIw xxx xxx xxxGarmintoStrava
Get your
Garmin data and upload to strava
- finish garmin and strava setup
- Execute in the root directory:
python runpage/garmintostravasync.py ${clientid} ${clientsecret} ${stravarefreshtoken} ${garminsecretstring} --is-cne.g.
python runpage/garmintostravasync.py xxx xxx xxx xxStravatoGarmin
Get your
Strava data and upload to Garmin
- finish garmin and strava setup, at the same time, you need to add additional strava config in GitHub Actions secret:
secrets.STRAVAEMAIL,secrets.STRAVAPASSWORD,secrets.STRAVAJWT, Note:STRAVAJWTis superior toSTRAVAEMAILandSTRAVAPASSWORD,STRAVAJWTis thestravaremember_tokenfield of the Strava web login Cookie. - Execute in the root directory:
python runpage/stravatogarminsync.py ${{ secrets.STRAVACLIENTID }} ${{ secrets.STRAVACLIENTSECRET }} ${{ secrets.STRAVACLIENTREFRESHTOKEN }} ${{ secrets.GARMINSECRETSTRING }} ${{ secrets.STRAVAEMAIL }} ${{ secrets.STRAVA_PASSWORD }}if your garmin account region is China, you need to execute the command:
python runpage/stravatogarminsync.py ${{ secrets.STRAVACLIENTID }} ${{ secrets.STRAVACLIENTSECRET }} ${{ secrets.STRAVACLIENTREFRESHTOKEN }} ${{ secrets.GARMINSECRETSTRINGCN }} ${{ secrets.STRAVAEMAIL }} ${{ secrets.STRAVAPASSWORD }} ${{ secrets.STRAVA_JWT }} --is-cnIf you want to add Garmin Device during sync, you should add --usefakegarmindevice argument, this will add a Garmin Device (Garmin Forerunner 245 by default, and you can change device in garmindevice_adaptor.py) in synced Garmin workout record, this is essential when you want to sync the workout record to other APP like Keep, JoyRun etc.
the final command will be:
python runpage/stravatogarminsync.py ${{ secrets.STRAVACLIENTID }} ${{ secrets.STRAVACLIENTSECRET }} ${{ secrets.STRAVACLIENTREFRESHTOKEN }} ${{ secrets.GARMINSECRETSTRINGCN }} ${{ secrets.STRAVAEMAIL }} ${{ secrets.STRAVAPASSWORD }} ${{ secrets.STRAVAJWT }}--usefakegarmindeviceps: when initializing for the first time, if you have a large amount of strava data, some data may fail to upload, just retry several times.
COROS
Get your COROS data
- If you only want to sync
type runningadd args --only-run
Enter the following command in the terminal
python runpage/corossync.py 'your coros account' 'your coros password'Modify rundatasync.yml env.RUN_TYPE: coros
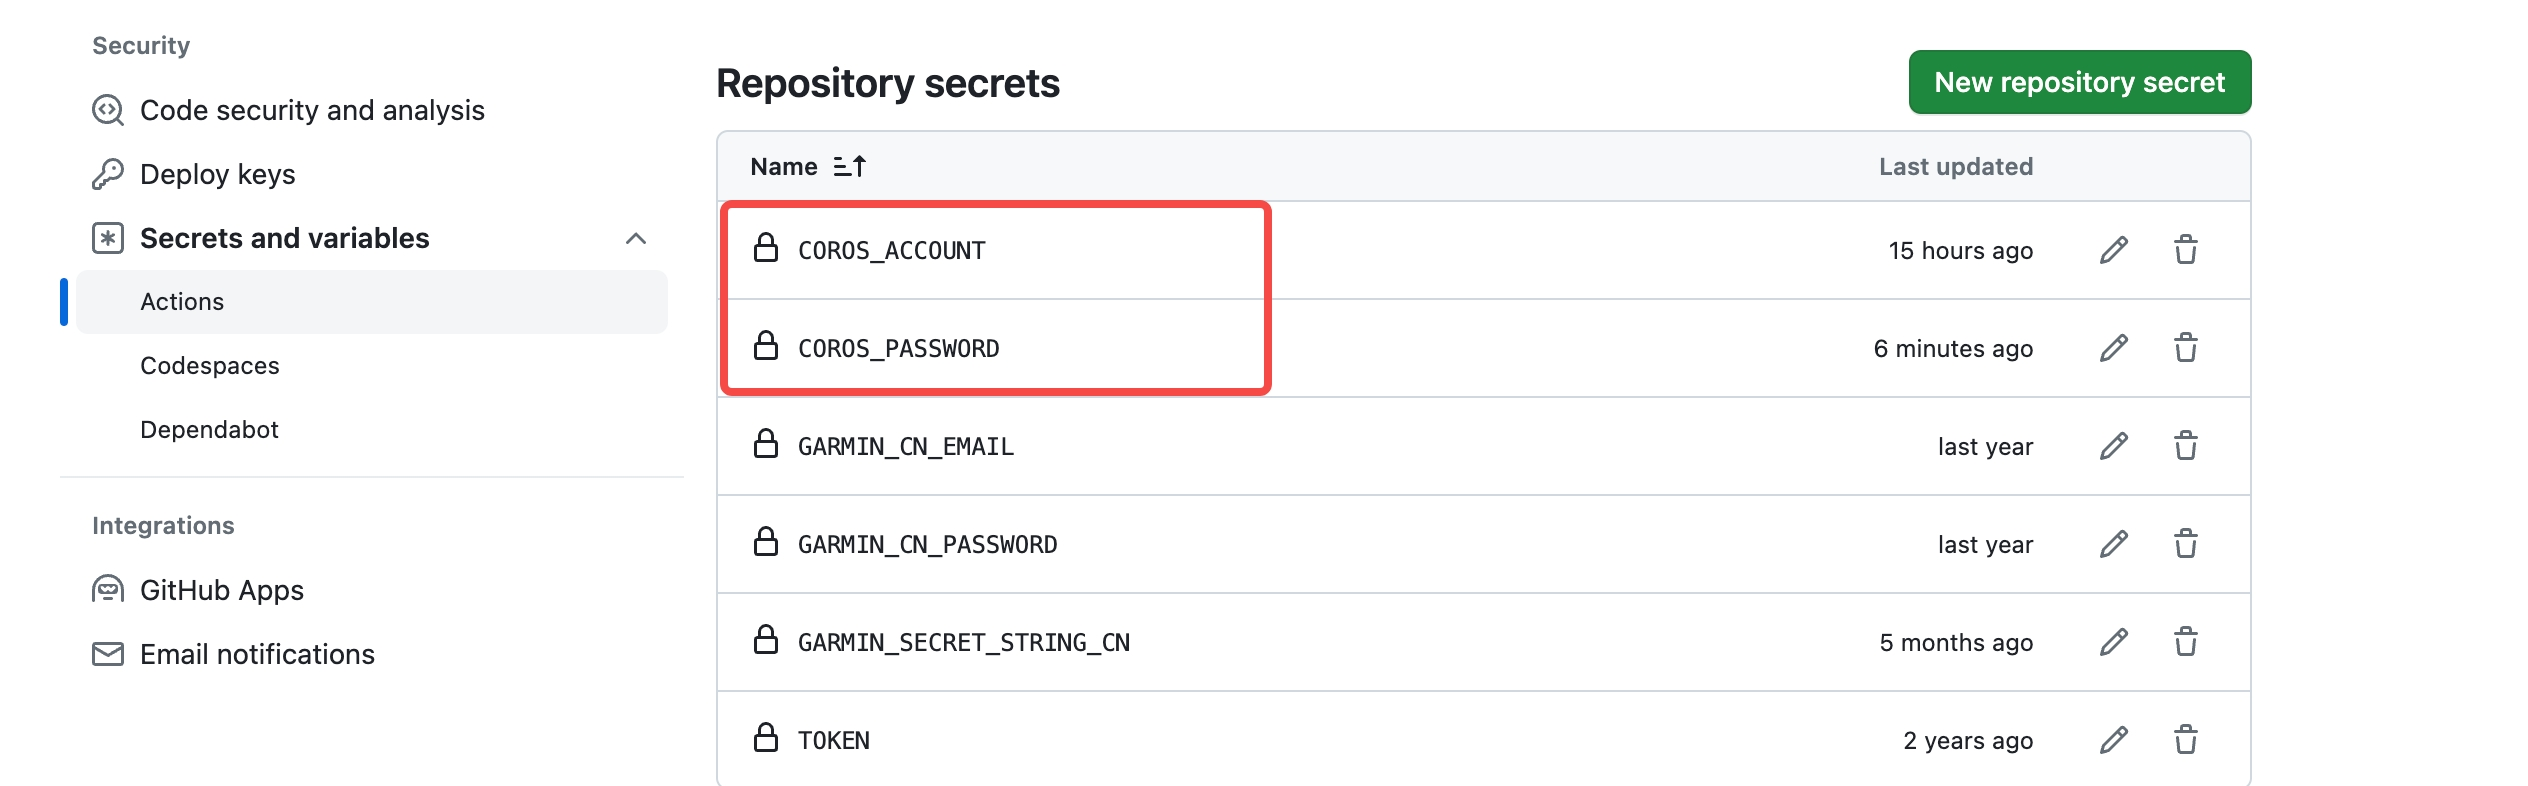
Set the Coros account information in github action
- configure the
COROSACCOUNT,COROSPASSWORD
iGPSPORT
Get your iGPSPORT data
Enter the following command in the terminal
python3 runpage/igpsportsync.py 'your igpsport phone' 'password' --with-gpxYou can replace with-gpx with with-fit to acquire data in fit format.
Joyrun
Get your Joyrun data
Enter the following command in the terminal
python3 runpage/joyrunsync.py 'your joyrun phone' 'verication code' --with-gpxYou can replace with-gpx with with-tcx to acquire data in tcx format.
Komoot
Get your Komoot data
Enter the following command in the terminal
python3 runpage/komootsync.py 'your komoot email' 'password' --with-gpx| Parameter | Description | | --- | --- | | mail | Login using specified email address | | password | Use provided password and skip interactive prompt | | -n, --anonymous | Skip authentication, no interactive prompt (valid only with -d) | | --with-gpx | Download all tours as GPX | | -r, --remove-deleted | Remove GPX files (from --output dir) without corresponding tour in Komoot (deleted and previous versions) | | --start-date=YYYY-MM-DD | Filter tours on or after specified date | | --end-date=YYYY-MM-DD | Filter tours on or before specified date | | -e, --no-poi | Do not include highlights as POIs |
Onelap
Get your Onelap data
Enter the following command in the terminal
python3 runpage/onelapsync.py 'your onelap phone' 'password' --with-fitIntervals.icu
Get your
Intervals.icu data
Sync running activities from Intervals.icu. Downloads original FIT/GPX files.
- Log in to Intervals.icu, go to Settings → Developer Settings to find your Athlete ID and create an API Key.
- Execute in the root directory:
python runpage/intervalsicusync.py ${athleteid} ${api_key}If you want to sync all historical data (default is last 6 months):
python runpage/intervalsicusync.py ${athleteid} ${api_key} --allTo specify a custom start date:
python runpage/intervalsicusync.py ${athleteid} ${api_key} --start-date 2024-01-01If your data comes from a Huawei/China device using the GCJ-02 coordinate system, add --gcj02 to fix the coordinate offset (converts GCJ-02 to WGS-84 in downloaded FIT/GPX/TCX files):
python runpage/intervalsicusync.py ${athleteid} ${api_key} --gcj02GitHub Actions
- Change
RUNTYPEtointervalsicuin therundatasync.ymlfile - Add
INTERVALSICUATHLETEIDandINTERVALSICUAPIKEYto your GitHub repository secrets
Total Data Analysis
Running data display
- Generate SVG data display
- Display of results:Click to view、Click to view
python runpage/gensvg.py -h
usage: gen_svg.py [-h] [--gpx-dir DIR] [--output FILE] [--language LANGUAGE] [--year YEAR] [--title TITLE] [--athlete NAME] [--special FILE] [--type TYPE]                   [--background-color COLOR] [--track-color COLOR] [--track-color2 COLOR] [--text-color COLOR] [--special-color COLOR] [--special-color2 COLOR] [--units UNITS]                   [--verbose] [--logfile FILE] [--special-distance DISTANCE] [--special-distance2 DISTANCE] [--min-distance DISTANCE] [--use-localtime] [--from-db]                   [--github-style GITHUB_STYLE] [--circular-rings] [--circular-ring-color COLOR] [--empty-data-color COLOR] [--birth YYYY-MM]
options:   -h, --help            show this help message and exit   --gpx-dir DIR         Directory containing GPX files (default: current directory).   --output FILE         Name of generated SVG image file (default: "poster.svg").   --language LANGUAGE   Language (default: english).   --year YEAR           Filter tracks by year; "NUM", "NUM-NUM", "all" (default: all years)   --title TITLE         Title to display.   --athlete NAME        Athlete name to display (default: "John Doe").   --special FILE        Mark track file from the GPX directory as special; use multiple times to mark multiple tracks.   --type TYPE           Type of poster to create (default: "grid", available: "grid", "circular", "github", "monthoflife").   --background-color COLOR                         Background color of poster (default: "#222222").   --track-color COLOR   Color of tracks (default: "#4DD2FF").   --track-color2 COLOR  Secondary color of tracks (default: none).   --text-color COLOR    Color of text (default: "#FFFFFF").   --special-color COLOR                         Special track color (default: "#FFFF00").   --special-color2 COLOR                         Secondary color of special tracks (default: none).   --units UNITS         Distance units; "metric", "imperial" (default: "metric").   --verbose             Verbose logging.   --logfile FILE   --special-distance DISTANCE                         Special Distance1 by km and color with the special_color   --special-distance2 DISTANCE                         Special Distance2 by km and corlor with the special_color2   --min-distance DISTANCE                         min distance by km for track filter   --use-localtime       Use utc time or local time   --from-db             activities db file   --github-style GITHUB_STYLE                         github svg style; "align-firstday", "align-monday" (default: "align-firstday").   --birth YYYY-MM       Birth date in format YYYY-MM
Circular Type Options:   --circular-rings      Draw distance rings.   --circular-ring-color COLOR                         Color of distance rings.
Github Type Options:   --empty-data-color COLOR                         Color for empty dates in github style poster (default: #444444)
Generate github style svg show
python runpage/gensvg.py --from-db --title "${{ env.TITLE }}" --type github --athlete "${{ env.ATHLETE }}" --special-distance 10 --special-distance2 20 --special-color yellow --special-color2 red --output assets/github.svg --use-localtime --min-distance 0.5If you want to change the display color of empty data(only github style), please use --empty-data-color:
python runpage/gensvg.py --from-db --title "${{ env.TITLE }}" --type github --athlete "${{ env.ATHLETE }}" --special-distance 10 --special-distance2 20 --special-color yellow --special-color2 red --output assets/github.svg --use-localtime --min-distance 0.5 ----empty-data-color greyGenerate grid style svg show
python runpage/gensvg.py --from-db --title "${{ env.TITLE_GRID }}" --type grid --athlete "${{ env.ATHLETE }}" --output assets/grid.svg --min-distance 10.0 --special-color yellow --special-color2 red --special-distance 20 --special-distance2 40 --use-localtimepython runpage/gensvg.py --from-db --type circular --use-localtimeGenerate a "Runner Month of Life" visualization as if your entire life consisted of only 1000 months.
python3 runpage/gensvg.py --from-db --type monthoflife --birth 1989-03 --special-distance 10 --special-distance2 20 --special-color '#f9d367' --special-color2 '#f0a1a8' --output assets/mol.svg --use-localtime --athlete yihong0618 --title 'Runner Month of Life'Generate your share png using GPT gpt-image-1(last one)
python runpage/autosharesync.py --apikey xxxxxxxxx --base_url xxxxxxxxIf you want to generate a share png for a date
python runpage/autosharesync.py --apikey xxxxxxxxx --base_url xxxxxxxx --date 2023-11-11If you want to auto gen in ci you can refer this link
For more display effects, see:
server(recommendation vercel)
Use
Vercel to deploy
- vercel connects to your GitHub repo.
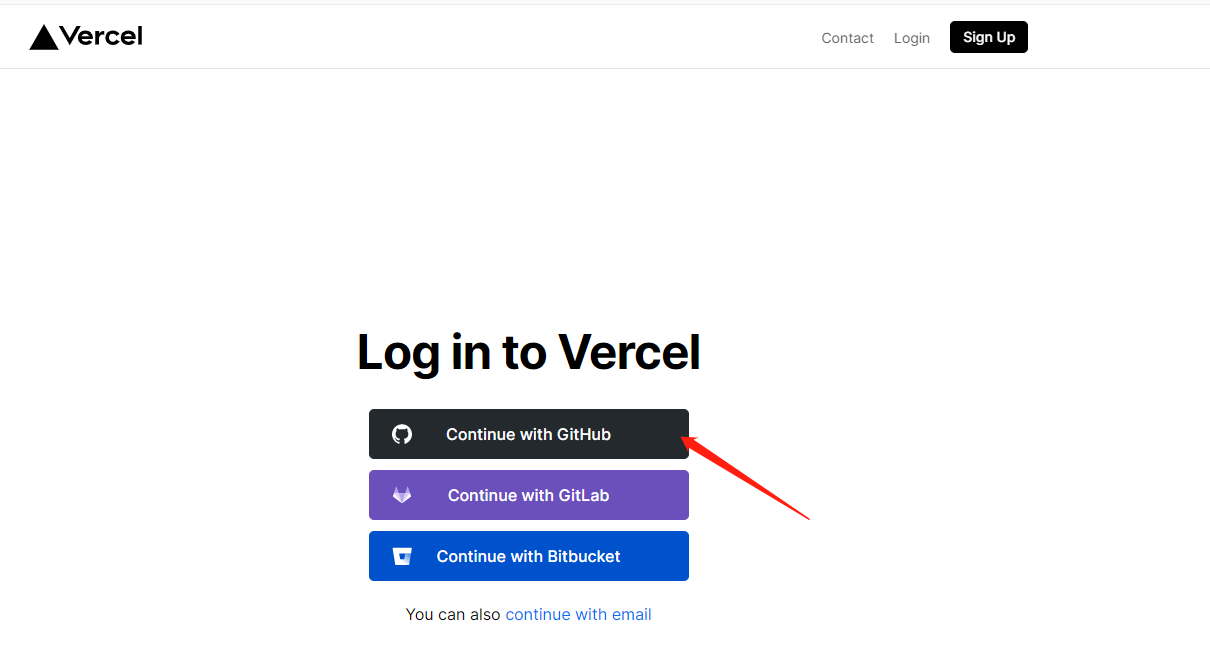
- import repo

- Awaiting completion of deployment
- Visits
Use
Cloudflare to deploy
- Login to Cloudflare dashboard.
- Click
Workers & Pageson the left side.
- Click
Create applicationand selectPagestab, connect your GitHub account and selectrunning_pageRepo, then clickBegin setup.
- Scroll down to
Build settings, chooseCreate React AppfromFramework preset, and setBuild output directorytodist.
- Scroll down, click
Environment variables (advanced), then add a variable like the below:
PYTHON_VERSION, Value = 3.11
- Click
Save and Deploy
Deploy to GitHub Pages
- Go to repository's
Settings -> GitHub Pages -> Source, chooseGitHub Actions
- Go to the repository's
Actions -> Workflows -> All Workflows, chooseRun Data Syncfrom the left panel, and clickRun workflow.
Run Data Sync will update data and then trigger the Publish GitHub Pages workflow
- Make sure the workflow runs without errors.
- Open your website to check on the results
F5.
- Some browsers (e.g. Chrome) won't refresh if there is a cache, you then need to use Ctrl+F5 (Windows) or Shift+Cmd+r (Mac) to force clearing the cache and reload the page.
- make sure you have write permissions in Workflow permissions settings.
- If you want to deploy your runningpage to xxx.github.io instead of xxx.github.io/runningpage or redirect your GitHub Pages to a custom domain, you need to do three things:
xxx.github.io, where xxx is your GitHub username
- Modify the Build module in gh-pages.yml, remove ${{ github.event.repository.name }} and change to run: PATH_PREFIX=/ pnpm build
- In src/static/site-metadata.ts, set siteUrl: '' or your custom domain URL
GitHub Actions
Modifying information in
GitHub Actions
Actions source code The following steps need to be taken
- change to your app type and info

- Add your secret in repo Settings > Secrets (add only the ones you need).

- My secret is as follows
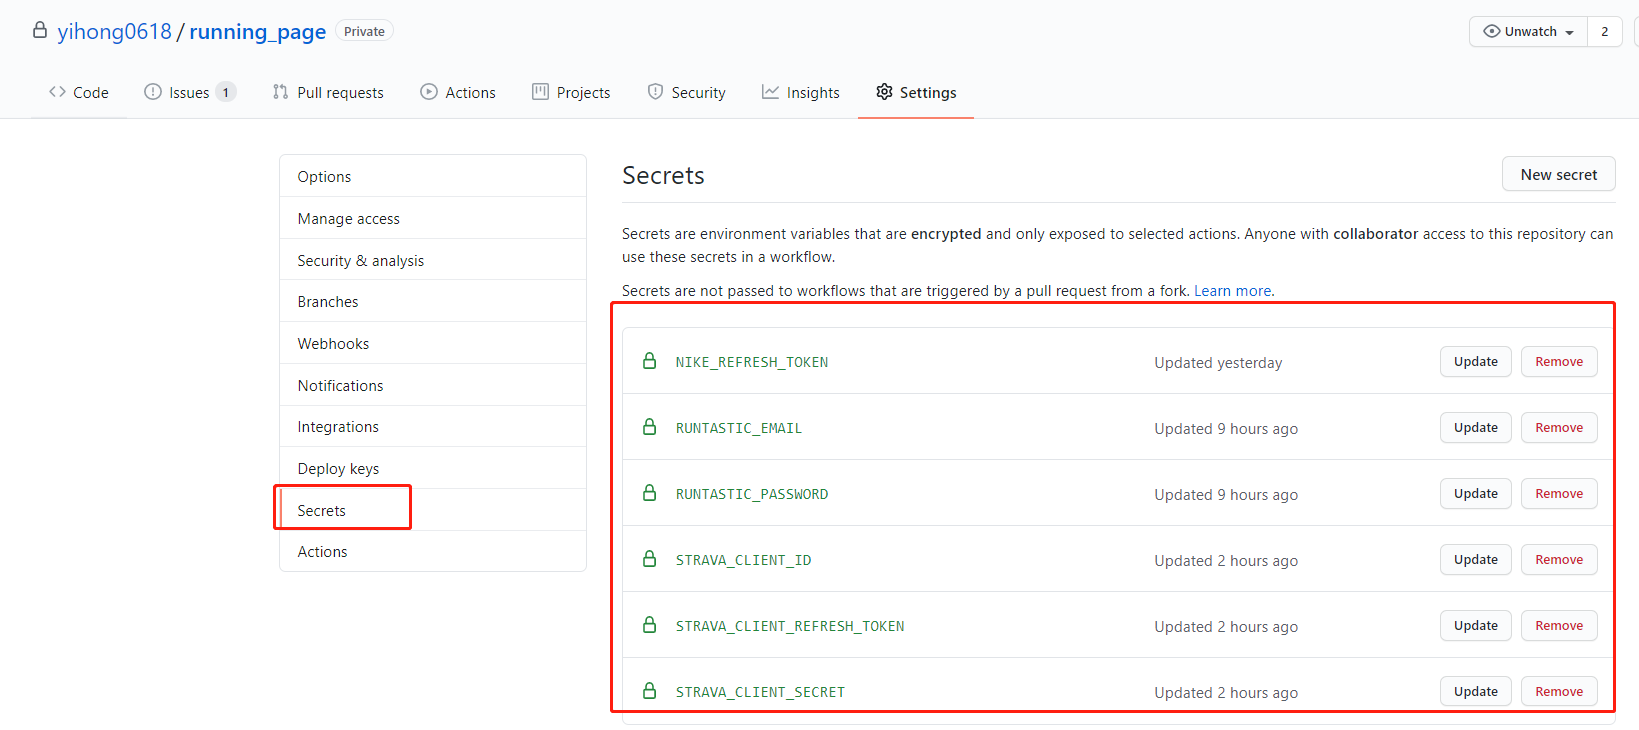
- Go to repository's
Settings -> Code and automation -> Actions ->General, Scroll to the bottom, findWorkflow permissions, choose the first optionRead and write permissions, clickSave.
Shortcuts
iOS Shortcuts
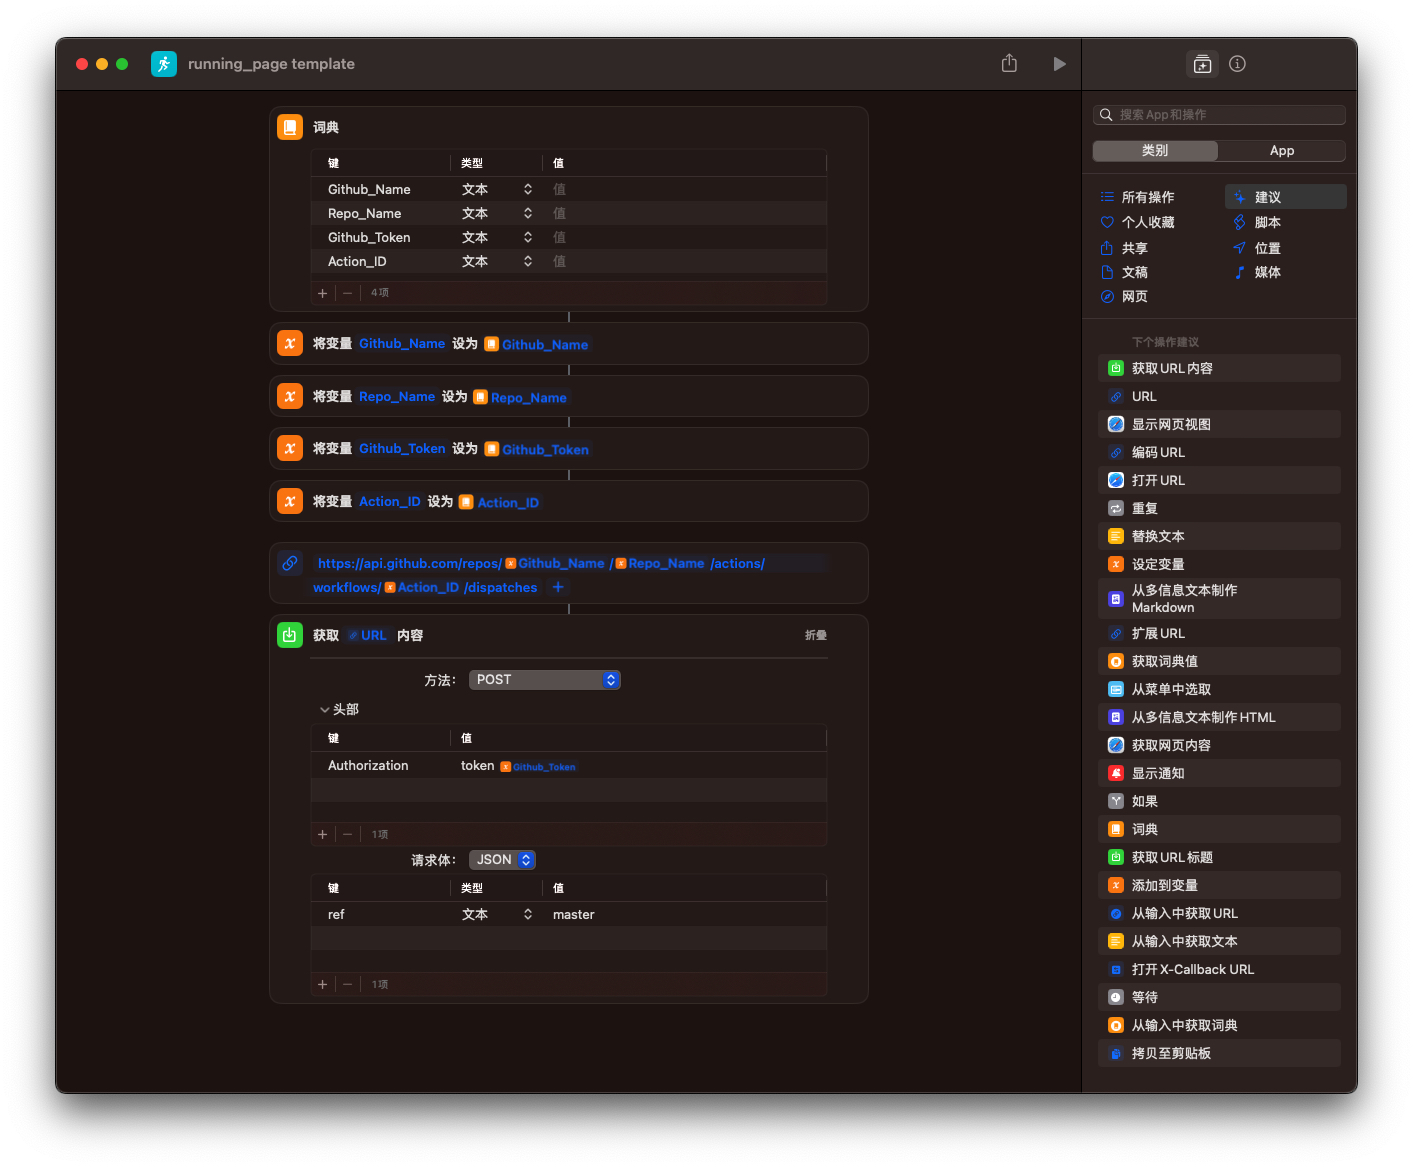
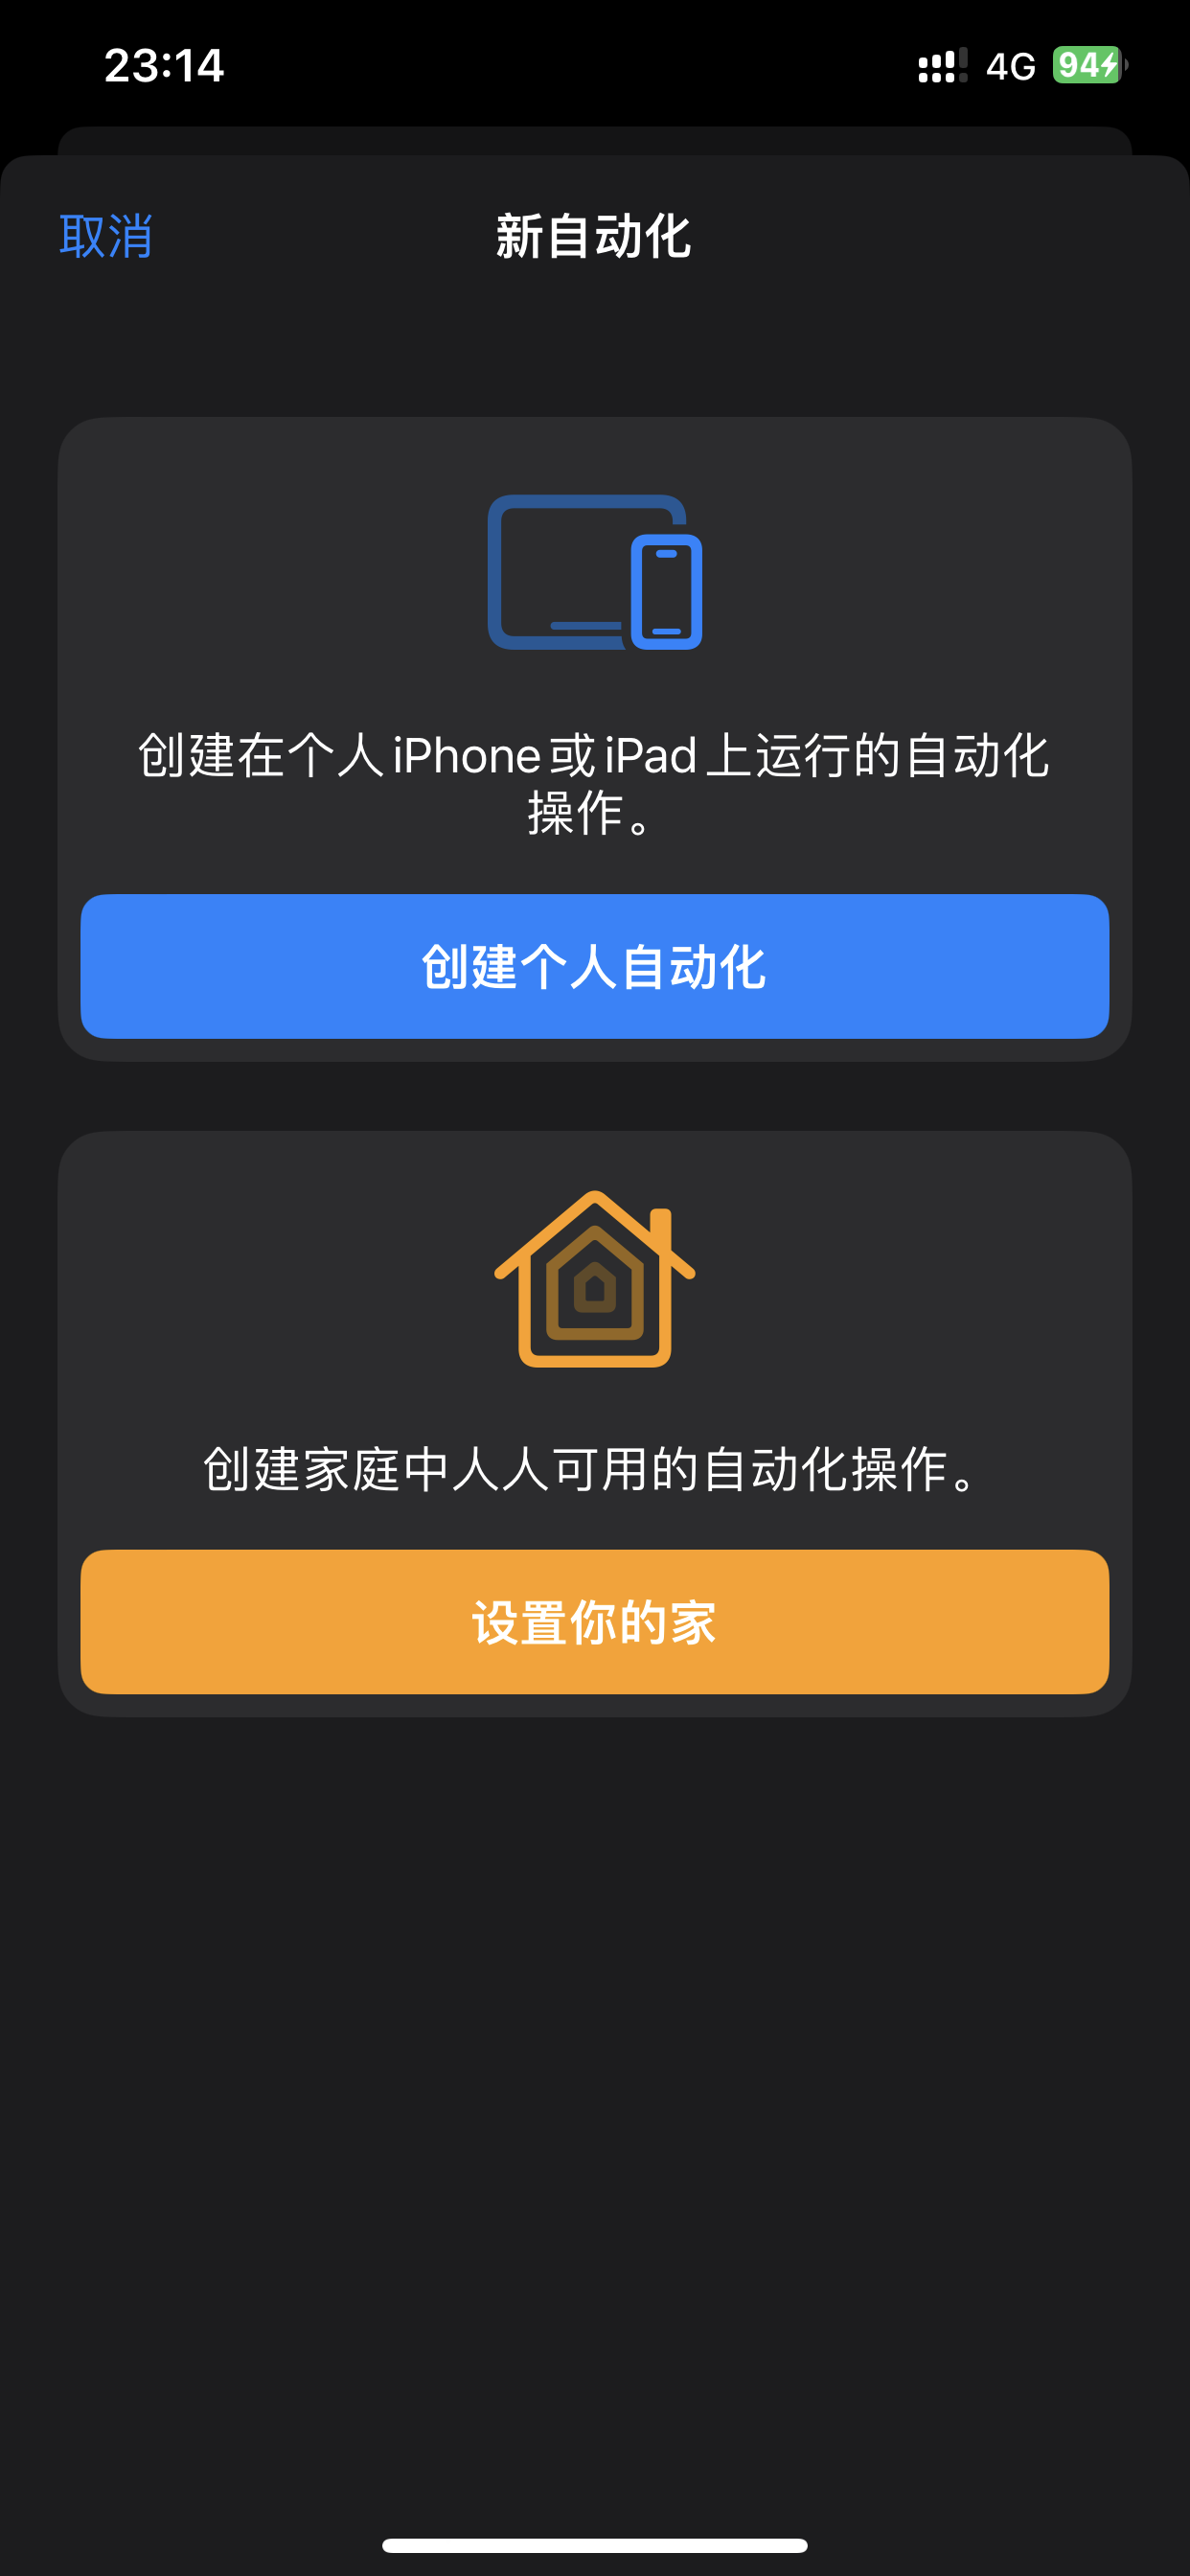
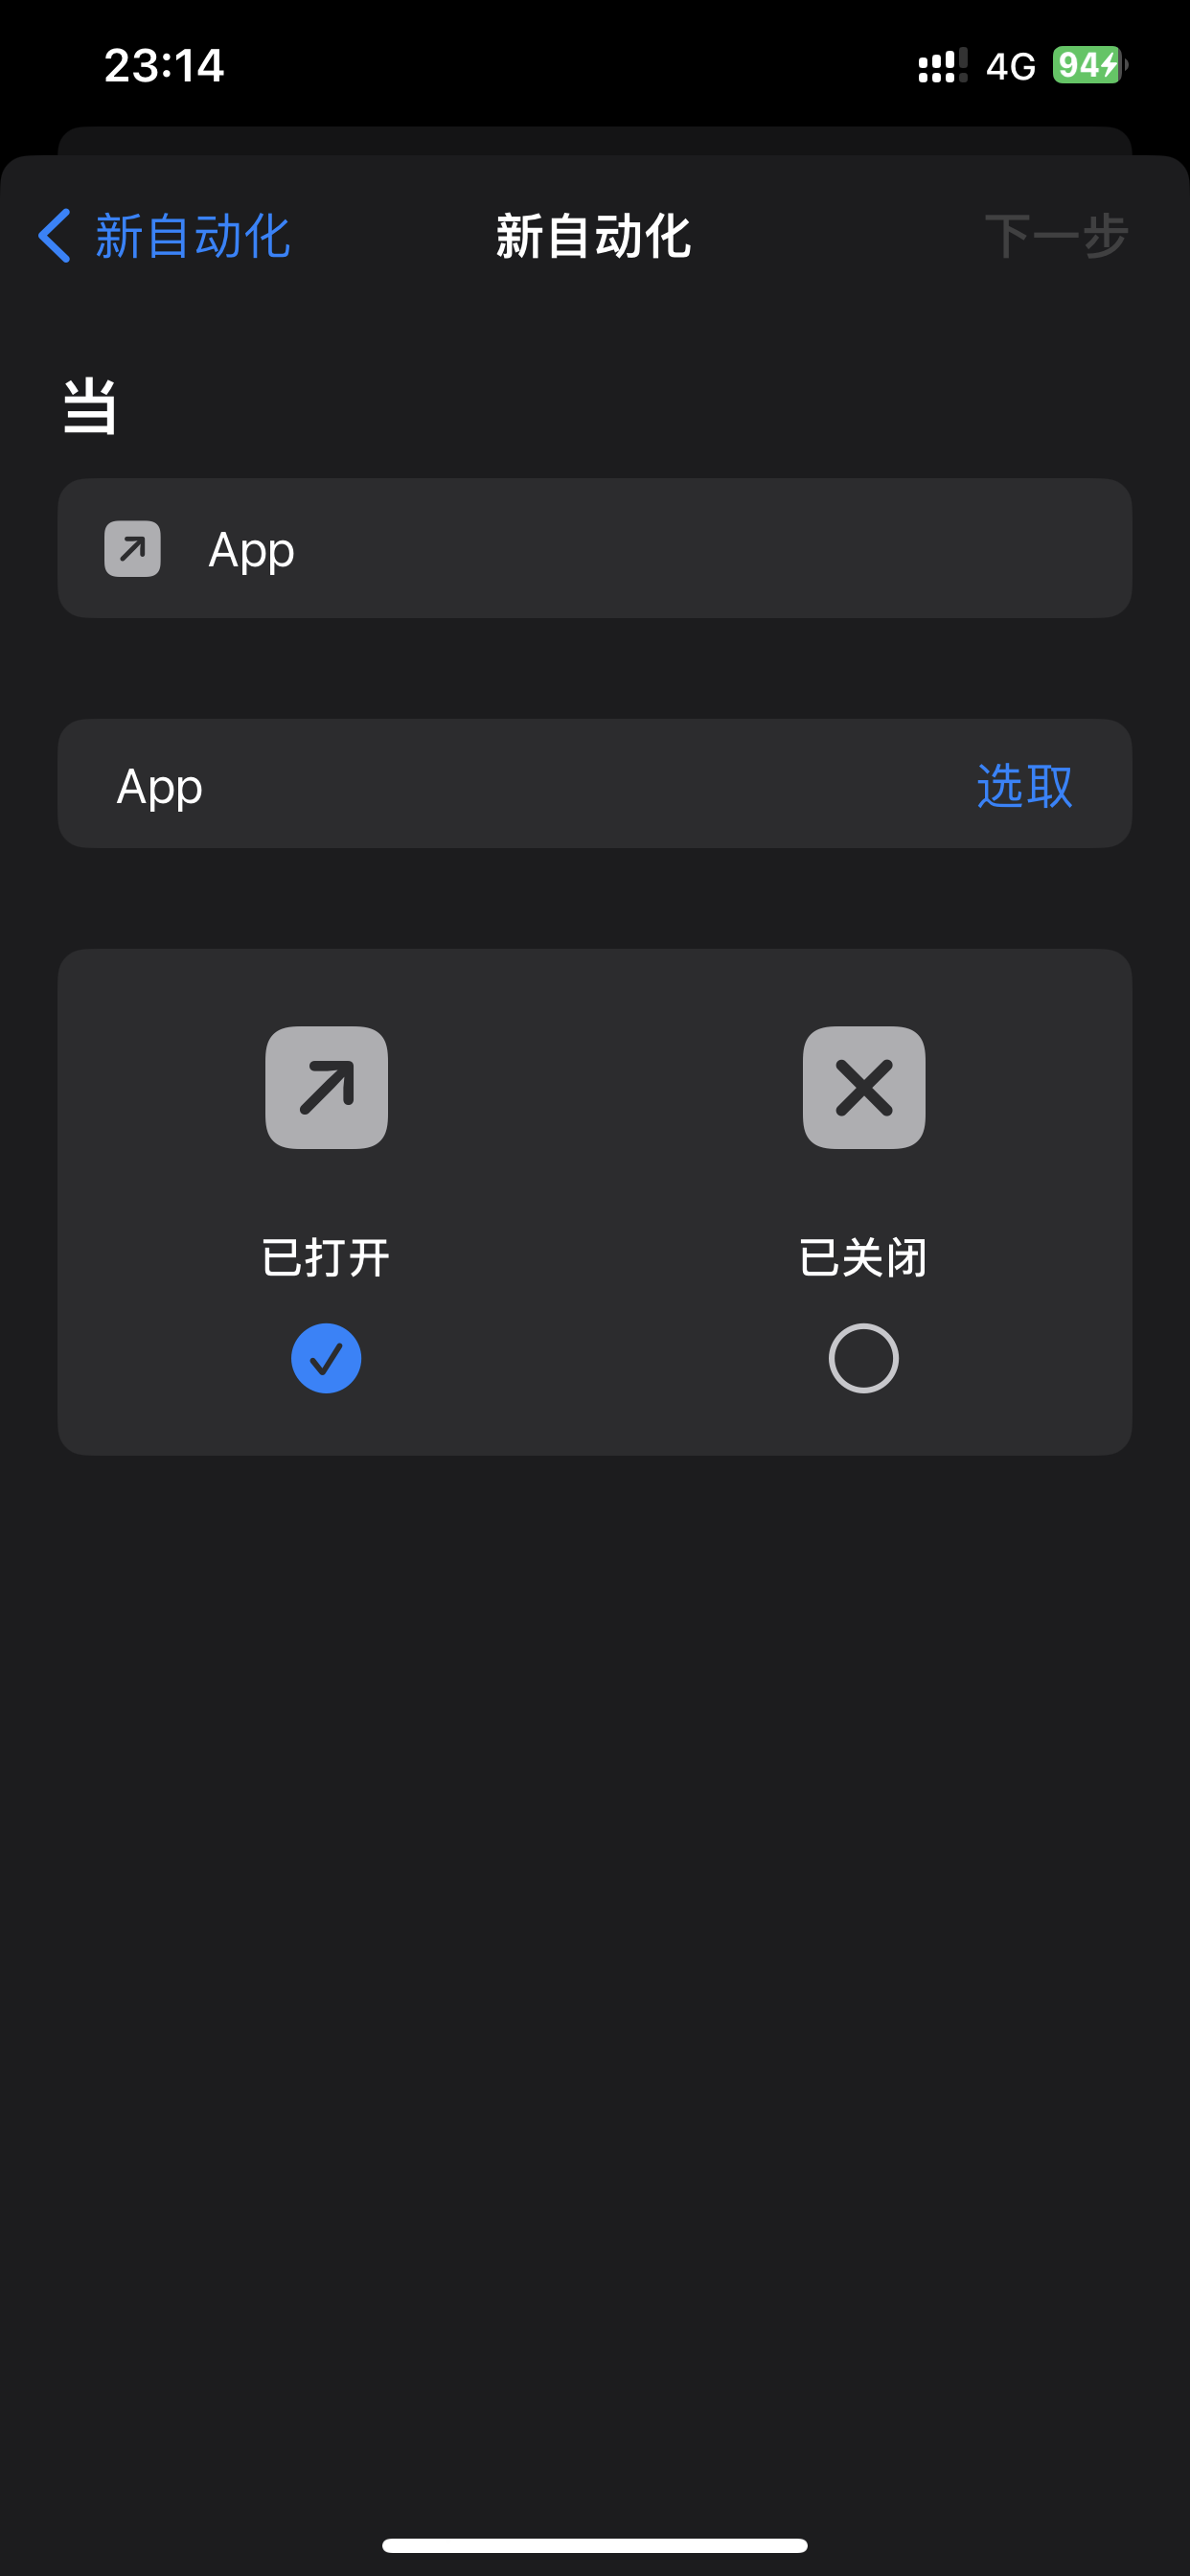
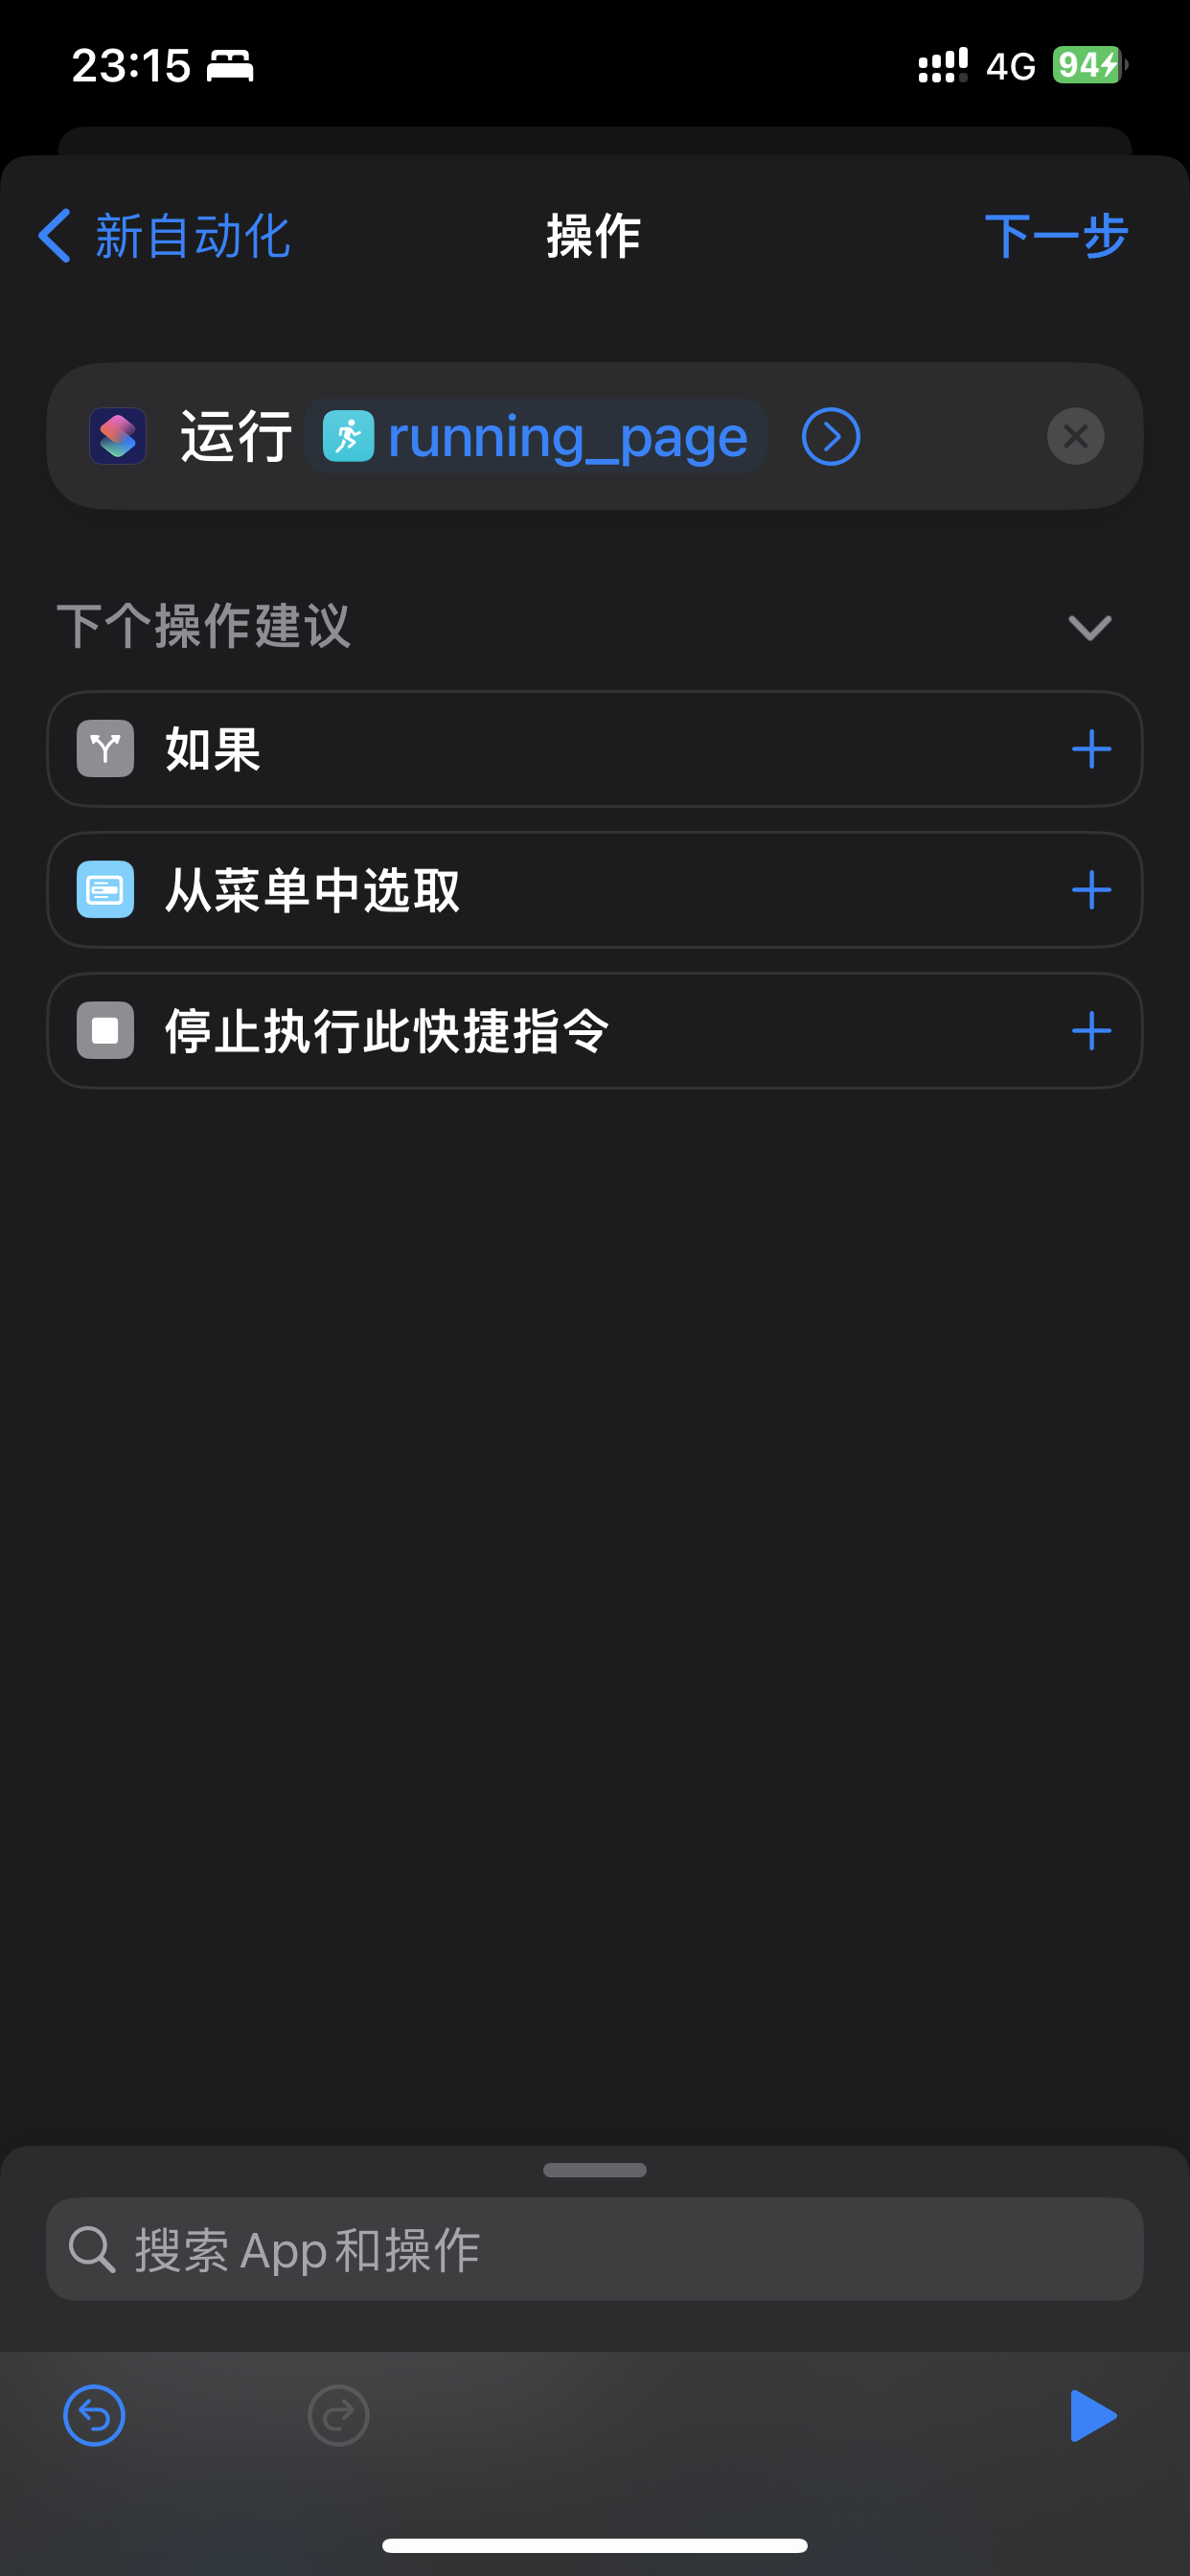
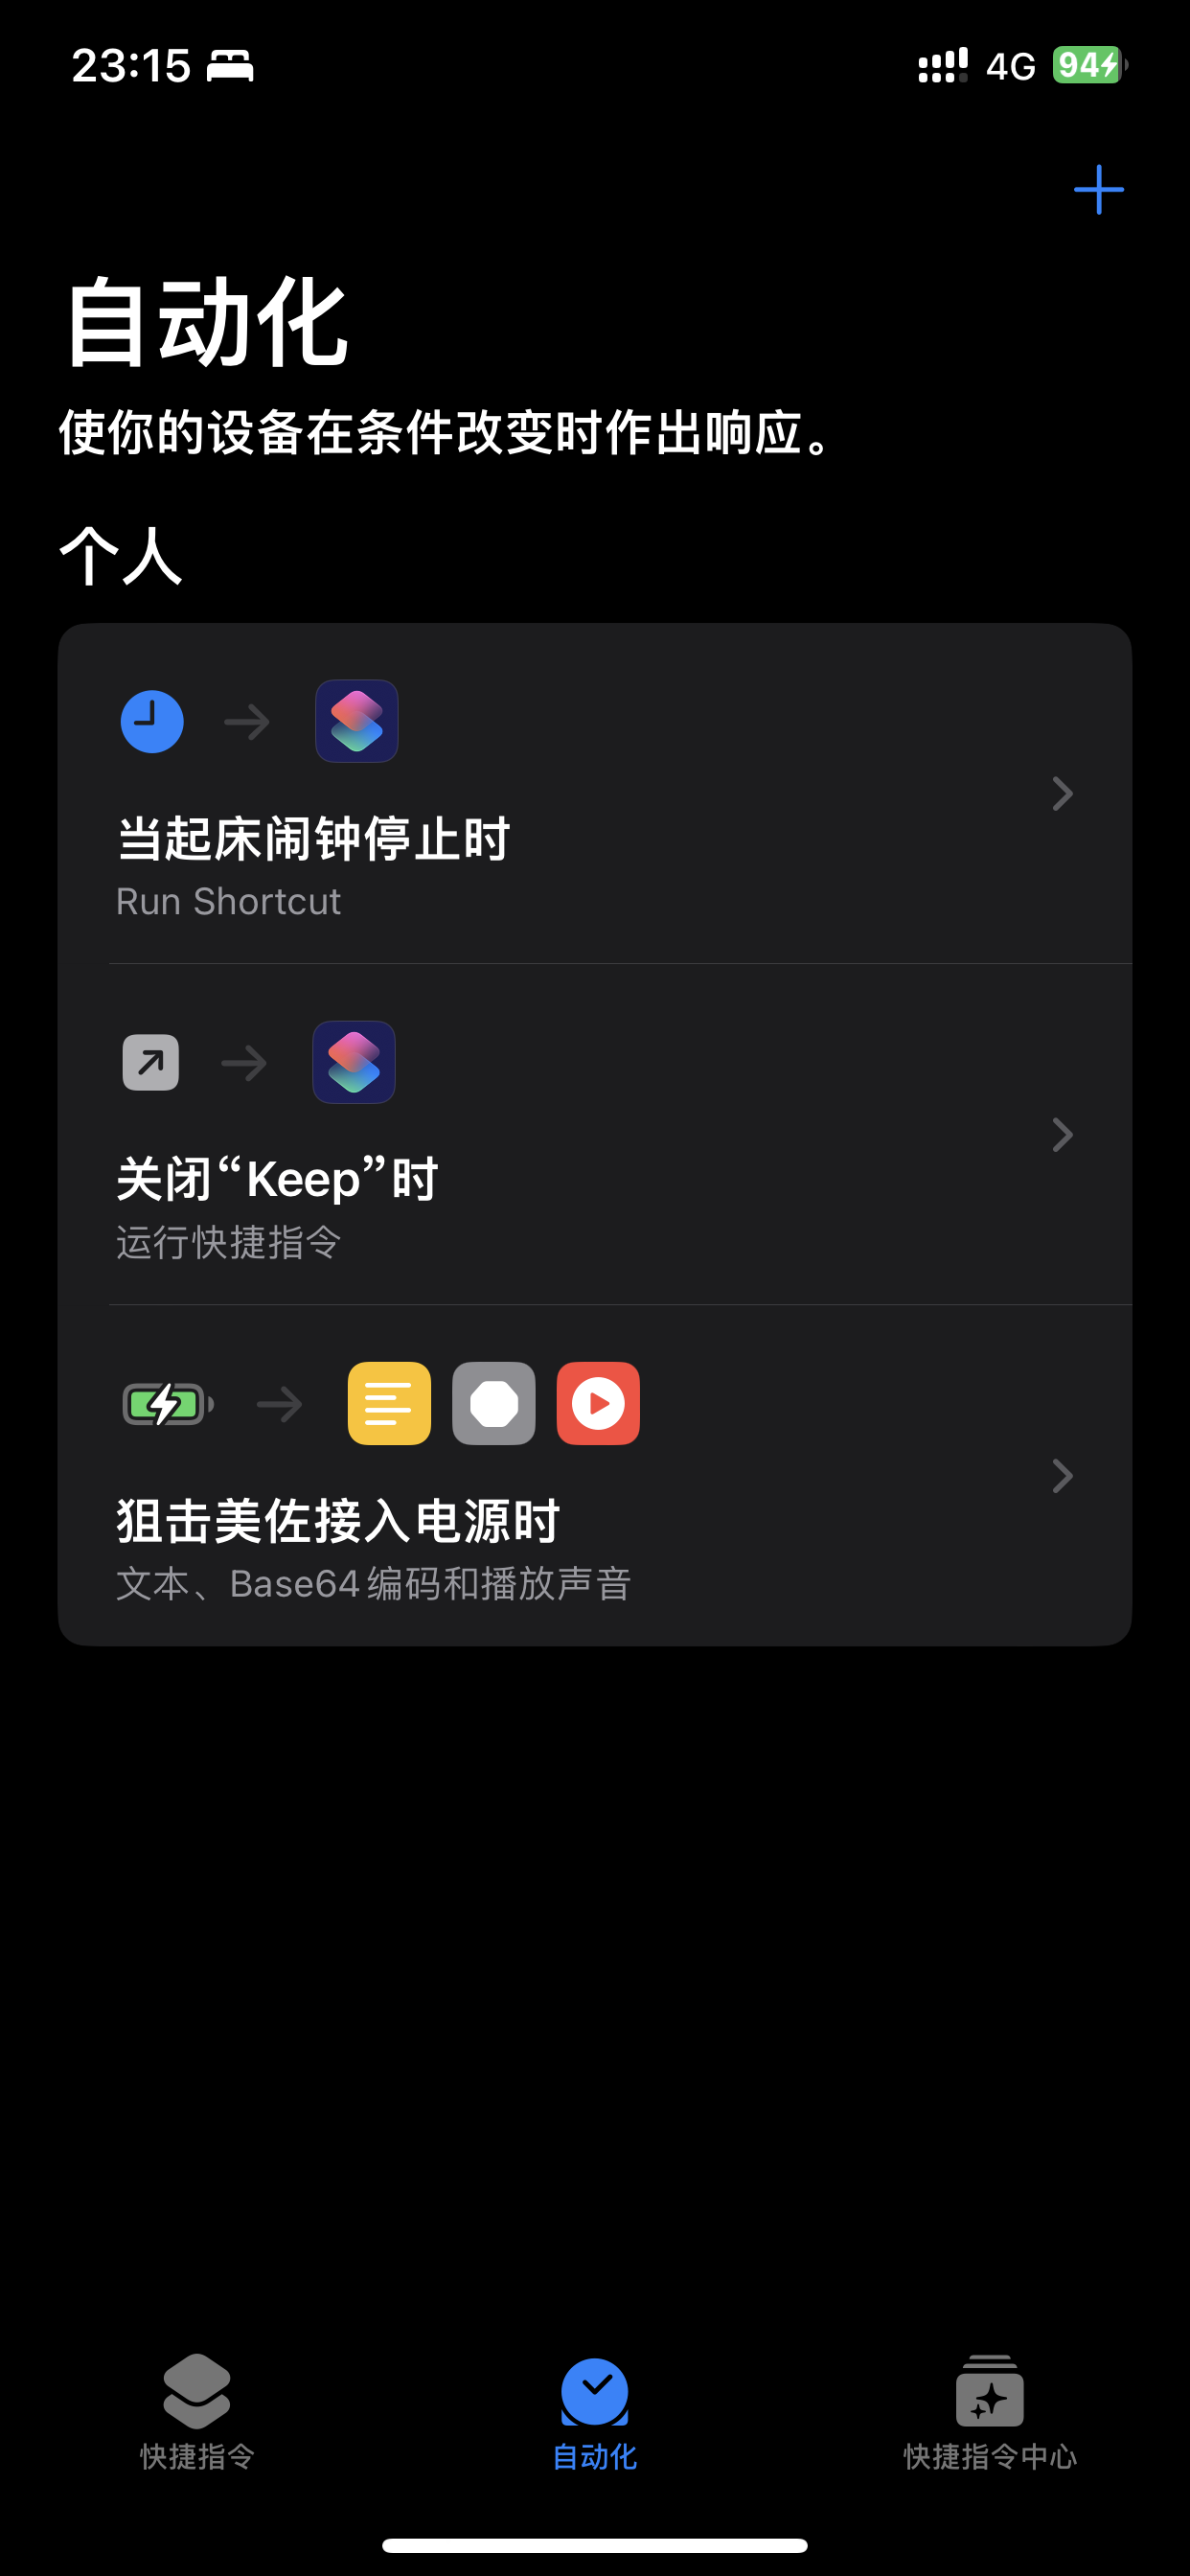
Take the keep app as an example. Close the app after running, and then automatically trigger Actions to update the data.
- Get actions id (need to apply token)
curl https://api.github.com/repos/yihong0618/running_page/actions/workflows -H "Authorization: token d8xxxxxxxxxx" # change to your config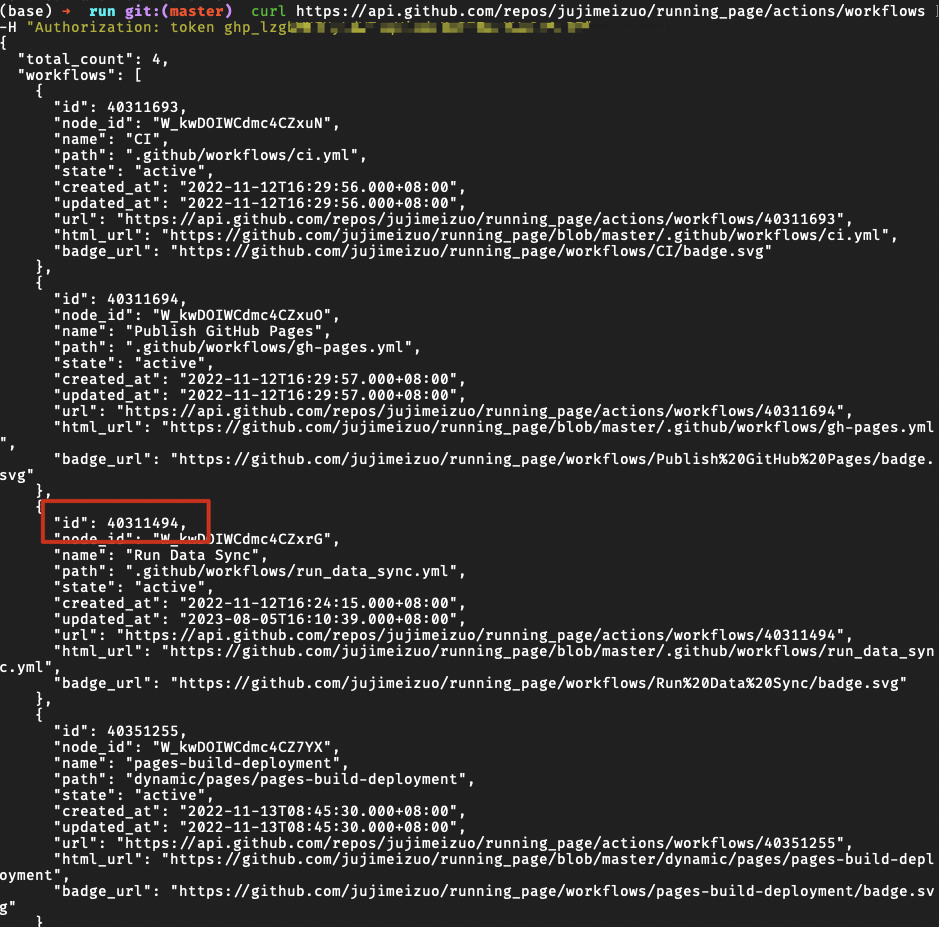
- Binding shortcut instruction
2. Modify the dictionary parameters in the following figure
- Automation
Storing Data Files in GitHub Cache
Storing Data Files in GitHub Cache
When SAVEDATAINGITHUBCACHE is set to true in the rundatasync.yml file, the script can store fetched and intermediate data files in the GitHub Action Cache. This helps keep your GitHub commit history and directory clean.
If you are deploying using GitHub Pages, it is recommended to set this value to true, and set BUILDGHPAGES to true.
Fit file
supported manufacturer:
- [x] Garmin
- [x] magene
TODO
- [x] Complete this document.
- [x] Support Garmin, Garmin China
- [x] support for nike+strava
- [x] Support English
- [x] Refine the code
- [x] add new features
- [ ] tests
- [ ] support the world map
- [ ] support multiple types, like hiking, biking~
- [ ] support for Zeep life
Contribution
- Any Issues welcome.
- PR need to disscuss first(For LLM year 2026)
- You can PR share your Running page in README I will merge it.
- Format Python code with
black(black .)
Special thanks
- @flopp great repo GpxTrackPoster
- @danpalmer UI design
- @shaonianche icon design and doc
- @geekplux Friendly help and encouragement, refactored the whole front-end code, learned a lot
- @MFYDev Wiki
Recommended Forks
- @gongzili456 for motorcycle version
- @ben-29 for different types support
- @geekplux for different types support
Support
Just enjoy it~
Raycast Extension

FAQ
- Strava API limit
Strava API Rate Limit Exceeded. Retry after 100 seconds
Strava API Rate Limit Timeout. Retry in 799.491622 seconds- vercel git ignore gh-pages:
if [ "$VERCELGITCOMMIT_REF" != "gh-pages" ]; then exit 1; else exit 0;


