
Flowrunner is a lightweight package to organize and represent Data Engineering/Science workflows
flowrunner: A lightweight Data Engineering/Science Flow package




What is it?
flowrunner is a lightweight package to organize and represent Data Engineering/Science workflows. Its designed to be integrated with any pre-existing framework like pandas or PySparkMain Features
- Lazy evaluation of DAG: flowrunner does not force you to execute/run your dag until you want to, only run it when its explicitly mentioned as
run - Easy syntax to build new Flows
- Easy data sharing between methods in a
Flowusing attributes - Data store to store output of a function(incase it has
return) for later - Param store to easily pass reusable parameters to
Flow - Visualizing your flow as a DAG
Installing flowrunner
To install flowrunner, following commands will workSource code is hosted at https://github.com/prithvijitguha/flowRunner
pip install flowrunnerOr install from source
pip install git+https://github.com/prithvijitguha/flowrunner@mainUsage
Here is a quick example to run as is
# example.py
from flowrunner import BaseFlow, step, start, end
class ExampleFlow(BaseFlow):     @start     @step(next=['method2', 'method3'])     def method1(self):         self.a = 1
@step(next=['method4'])     def method2(self):         self.a += 1
@step(next=['method4'])     def method3(self):         self.a += 2
@end     @step     def method4(self):         self.a += 3         print("output of flow is:", self.a)
You can run the flow with the following command
$ python -m flowrunner run example.py output of flow is: 7Or in a notebook/script like this:
ExampleFlow.run()Visualize Flow as DAG(Directed Acyclical Graph)
ExampleFlow().display()Your output will look like this.
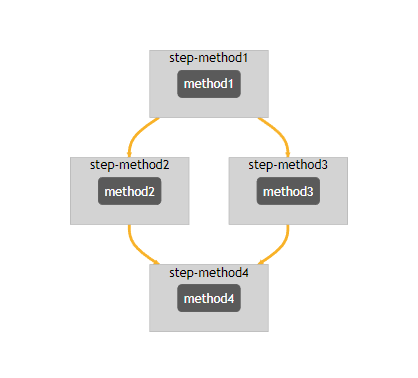
Or can be run in cli like this:
python -m flowrunner display example.pyFor CLI usage we create a file called exampleflow.html in the current directory with the same output
Show your Flow
ExampleFlow().show()2023-03-08 22:35:24 LAPTOP flowrunner.system.logger[12692] INFO Found flow ExampleFlow
2023-03-08 22:35:24 LAPTOP flowrunner.system.logger[12692] DEBUG Validating flow for ExampleFlow
✅ Validated number of start nodes
✅ Validated start nodes 'next' values
✅ Validate number of middle_nodes
✅ Validated middle_nodes 'next' values
✅ Validated end nodes
✅ Validated start nodes 'next' values
2023-03-08 22:35:24 LAPTOP flowrunner.system.logger[12692] DEBUG Show flow for ExampleFlow
method1
? Next=method2, method3
method2
? Next=method4
method3
? Next=method4
Or through CLI like below
python -m flowrunner show example.pyPandas Example
# -- coding: utf-8 --
import pandas as pd
from flowrunner import BaseFlow, end, start, step
class ExamplePandas(BaseFlow):     @start     @step(next=["transformationfunction1", "transformationfunction2"])     def create_data(self):         """         This method we create the dataset we are going use. In real use cases,         you'll have to read from a source (csv, parquet, etc)
For this example we create two dataframes for students ranked by marked scored         for when they attempted the example on 1st January 2023 and 12th March 2023
After creating the dataset we pass it to the next methods
- transformationfunction1         - transformationfunction2         """         data1 = {"Name": ["Hermione", "Harry", "Ron"], "marks": [100, 85, 75]}
data2 = {"Name": ["Hermione", "Ron", "Harry"], "marks": [100, 90, 80]}
df1 = pd.DataFrame(data1, index=["rank1", "rank2", "rank3"])
df2 = pd.DataFrame(data2, index=["rank1", "rank2", "rank3"])
self.inputdata1 = df1         self.inputdata2 = df2
@step(next=["append_data"])     def transformationfunction1(self):         """         Here we add a snapshot_date to the input dataframe of 2023-03-12         """         transformeddf = self.inputdata_1         transformeddf.insert(1, "snapshotdate", "2023-03-12")         self.transformeddf1 = transformed_df
@step(next=["append_data"])     def transformationfunction2(self):         """         Here we add a snapshot_date to the input dataframe of 2023-01-01         """         transformeddf = self.inputdata_2         transformeddf.insert(1, "snapshotdate", "2023-01-01")         self.transformeddf2 = transformed_df
@step(next=["show_data"])     def append_data(self):         """         Here we append the two dataframe together         """         self.finaldf = pd.concat([self.transformeddf1, self.transformeddf_2])
@end     @step     def show_data(self):         """         Here we show the new final dataframe of aggregated data. However in real use cases. It would         be more likely to write the data to some final layer/format         """         print(self.final_df)         return self.final_df
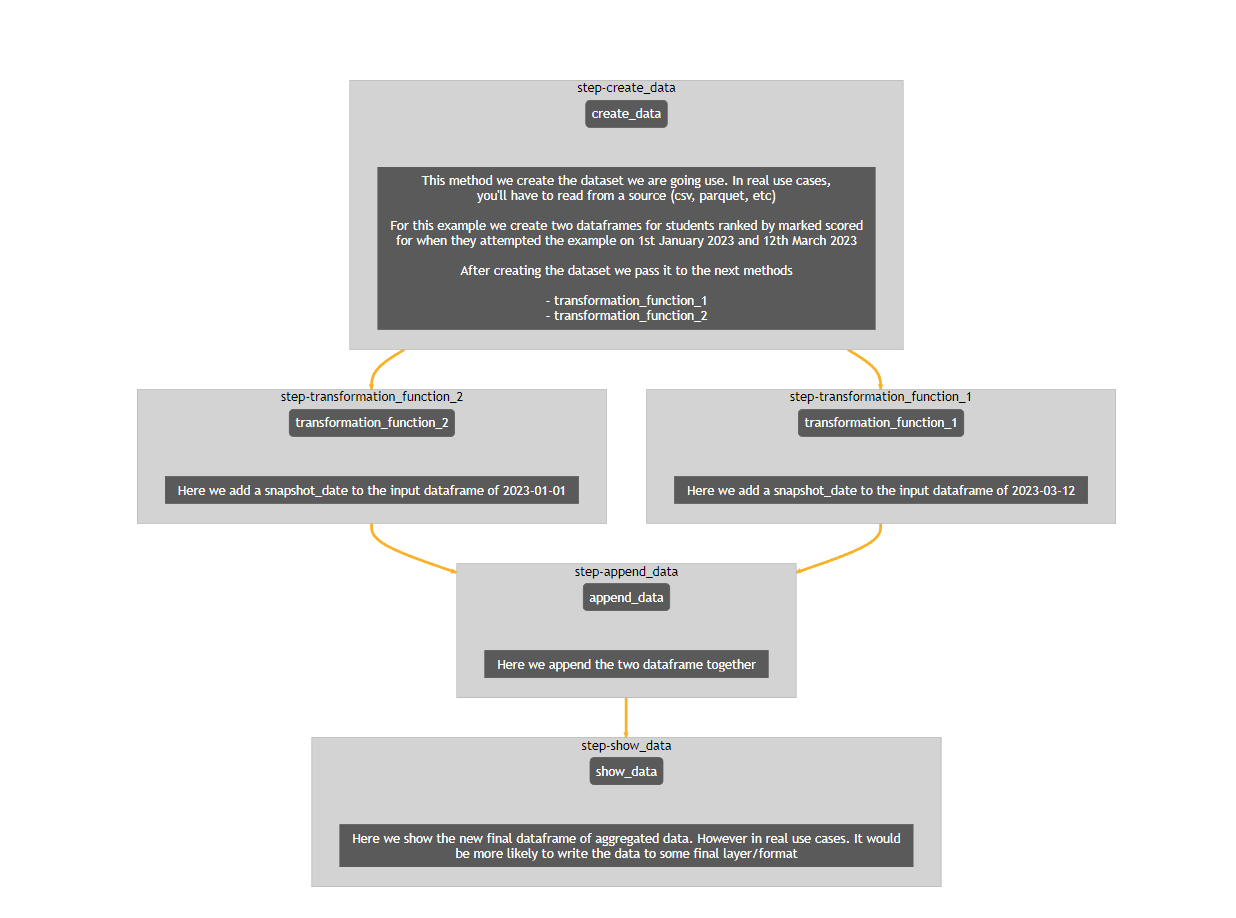
Now when you run ExamplePandas().display() you get the following output
PySpark Example
# -- coding: utf-8 --
from pyspark.sql import SparkSession
from pyspark.sql.functions import lit
from flowrunner import BaseFlow, end, start, step
spark = SparkSession.builder.getOrCreate()
class ExamplePySpark(BaseFlow):     @start     @step(next=["transformationfunction1", "transformationfunction2"])     def create_data(self):         """         This is an example where we use the Spark engine instead of Pandas
This method we create the dataset we are going use. In real use cases,         you'll have to read from a source (csv, parquet, etc)
For this example we create two dataframes for students ranked by marked scored         for when they attempted the example on 1st January 2023 and 12th March 2023
After creating the dataset we pass it to the next methods
- transformationfunction1         - transformationfunction2         """
data1 = [             ("Hermione",100),             ("Harry", 85),             ("Ron", 75),         ]
data2 =  [             ("Hermione",100),             ("Harry", 90),             ("Ron", 80),         ]
columns = ["Name", "marks"]
rdd1 = spark.sparkContext.parallelize(data1)         rdd2 = spark.sparkContext.parallelize(data2)         self.df1 = spark.createDataFrame(rdd1).toDF(*columns)         self.df2 = spark.createDataFrame(rdd2).toDF(*columns)
@step(next=["append_data"])     def transformationfunction1(self):         """         Here we add a snapshot_date to the input dataframe of 2023-03-12         """
self.transformeddf1 = self.df1.withColumn("snapshot_date", lit("2023-03-12"))
@step(next=["append_data"])     def transformationfunction2(self):         """         Here we add a snapshot_date to the input dataframe of 2023-01-01         """         self.transformeddf2 = self.df2.withColumn("snapshot_date", lit("2023-01-01"))
@step(next=["show_data"])     def append_data(self):         """         Here we append the two dataframe together         """         self.finaldf = self.transformeddf1.union(self.transformeddf_2)
@end     @step     def show_data(self):         """         Here we show the new final dataframe of aggregated data. However in real use cases. It would         be more likely to write the data to some final layer/format         """         self.final_df.show()         return self.final_df
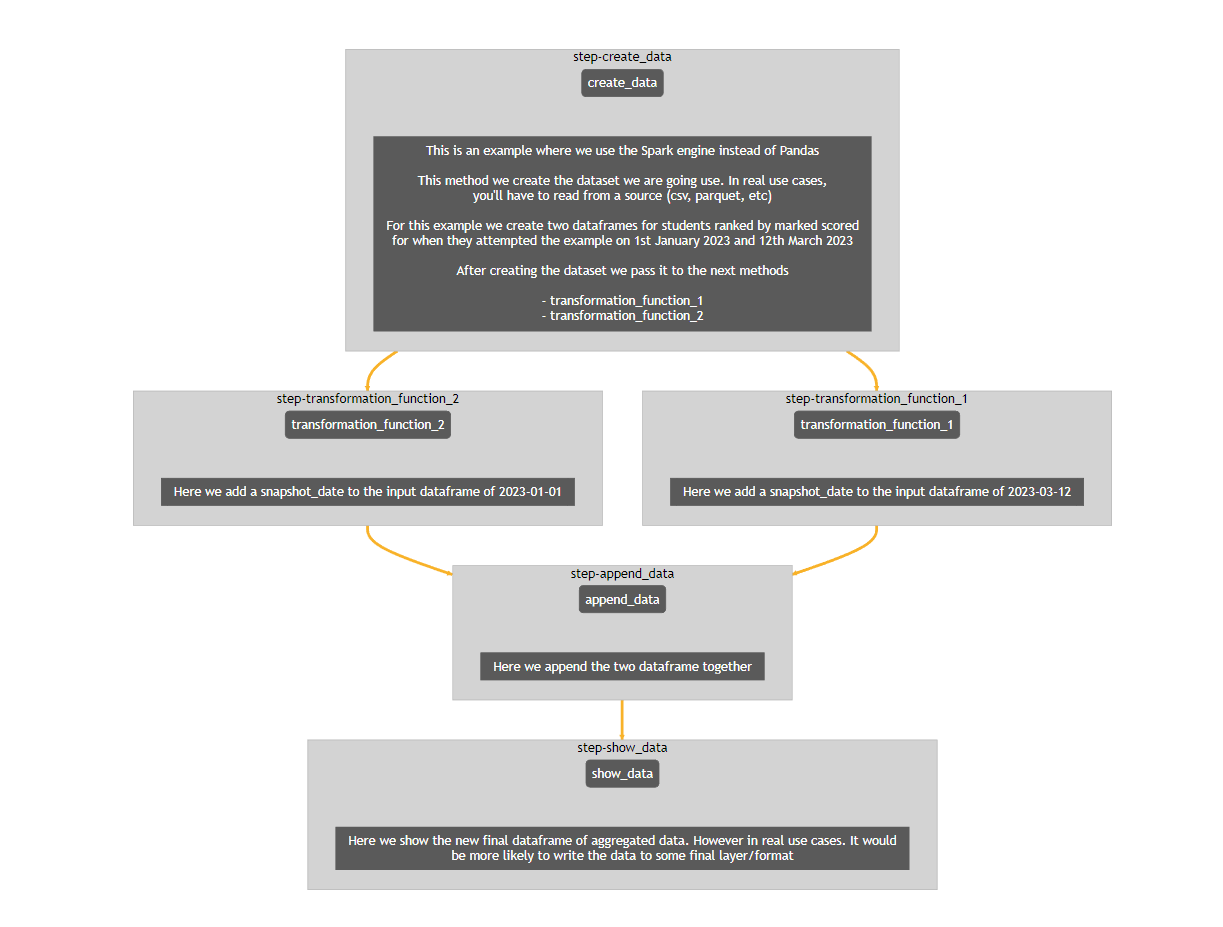
Now when you run ExamplePySpark().display() you get the following output
Documentation
Check out the latest documentation here: FlowRunner documentationContributing
All contributions are welcome :smiley:If you are interested in contributing, please check out this page: FlowRunner Contribution Page


