
Fast Swift Views layouting without auto layout. No magic, pure code, full control and blazing fast. Concise syntax, intuitive, readable & chainable. [iOS/macOS/tvOS/CALayer]







Extremely Fast views layouting without auto layout. No magic, pure code, full control and blazing fast. Concise syntax, intuitive, readable & chainable. PinLayout can layouts UIView, NSView and CALayer.
"No Auto layout constraints attached"
Requirements
- iOS 9.0+ / tvOS 9.0+ / macOS 10.9+
- Swift 5.x / 4 / 3 / Objective-C
- Xcode 13 / 12 / 11 / 10
Recent changes/features
- :star: Add
pin.keyboardAreaproperty [iOS 15+] - :star: New chainable Objective-C syntax. See PinLayout using Objective-C
- :star: Automatic Sizing, use PinLayout to compute view size. See Automatic sizing
- :star: Add methods to position a view between two other views. See Layout between other views.
- :star: Add
pin.readableMarginsandpin.layoutMarginsproperties. - :star: Add
sizeToFit()method. See Adjusting size. - :star: PinLayout can now layout CALayer. See CALayer Support for more information.
- :star: PinLayout is #8 in the list of Swift Layout frameworks on Awesome Swift
- See Changelog for all changes.
Content
* Right to left languages (RTL) support * Edges layout * Relative Edges layout * Relative Edges layout with alignment * Layout between other views * Layout between other views with alignment * Edges * Anchors * Width, height and size * Adjusting size * minWidth, maxWidth, minHeight, maxHeight * Margins * Aspect Ratio * safeArea, readable and layout margins * WrapContent * justify, align * Automatic sizing * UIView's transforms * Warnings * Animations using PinLayout * More examples- Examples App
- macOS Support
- CALayer Support
- PinLayout in Xcode Playgrounds
- PinLayout using Objective-C
- Installation
- FAQ
- Comments, ideas, suggestions, issues, ...
:pushpin: PinLayout is actively updated. So please come often to see latest changes. You can also Star it to be able to retrieve it easily later.
PinLayout and layoutBox

PinLayout is part of the layoutBox organization containing few Open Source projects related to layout using Swift. See layoutBox.
PinLayout + Autolayout
You don't need to choose, you can layout some views using PinLayout and some other with autolayout. Your views just to need to implement the autolayoutintrinsicContentSize properties.
Introduction examples
Example 1:
This example layout an image, a UISegmentedControl, a label and a line separator. This example adjusts its content to match the device's size and orientation changes.- UIImageView's size is 100x100 and layouted below the UINavigationBar with a margin of 10 pixels all around.
- UISegmentedControl is at the right of the logo image, use the remaining horizontal space with a left and right margin of 20 pixels.
- UILabel is below the UISegmentedControl with a top margin of 10 pixels. Its width matched the UISegmentedControl's width. The label is multiline, so its height must be adjusted to fit its width.
- Separator is below the UIImageView and the UILabel, i.e. below the tallest one. The separator has a top margin of 10 pixels, left-aligned to the UIImageView and right-aligned to the UISegmentedControl.

override func layoutSubviews() {
   super.layoutSubviews()
   let padding: CGFloat = 10

   logo.pin.top(pin.safeArea).left(pin.safeArea).width(100).aspectRatio().margin(padding)
   segmented.pin.after(of: logo, aligned: .top).right(pin.safeArea).marginHorizontal(padding)
   textLabel.pin.below(of: segmented, aligned: .left).width(of: segmented).pinEdges().marginTop(10).sizeToFit(.width)
   separatorView.pin.below(of: [logo, textLabel], aligned: .left).right(to: segmented.edge.right).marginTop(10)
}- 4 views, 4 lines
- PinLayout expose the
safeAreaInsetsthroughUIView.pin.safeArea, this property support not only iOS 11, but is also backward compatible for earlier iOS releases (7/8/9/10). See safeAreaInsets support for more information. - PinLayout doesn't use auto layout constraints, it is a framework that manually layout views. For that reason you need to update the layout inside either
UIView.layoutSubviews()orUIViewController.viewDidLayoutSubviews()to handle container size's changes, including device rotation. You'll also need to handle UITraitCollection changes for app's that support multitasking. In the example above PinLayout's commands are inside UIView'slayoutSubviews()method. - This example is available in the Examples App. See example complete source code
Example 2:
This example shows how easily PinLayout can adjust its layout based on the view's container size.- If the container's width is smaller than 500 pixels, the label takes the full width and the UISegmentedControl is placed below it.
- If the container's width is greater or equal to 500 pixels, the UISegmentedControl is at the top-right corner and the label takes the remaining horizontal space.

let margin: CGFloat = 12

  if frame.width < 500 {
      textLabel.pin.top().horizontally().margin(margin).sizeToFit(.width)
      segmentedControl.pin.below(of: textLabel).right().margin(margin)
  } else {
      segmentedControl.pin.top().right().margin(margin)
      textLabel.pin.top().left().before(of: segmentedControl).margin(margin).sizeToFit(.width)
  }
:pushpin: This example is available in the Examples App. See example complete source code
PinLayout principles and philosophy
- Manual layouting (doesn't rely on auto layout).
- PinLayout exist to be simple and fast as possible! In fact, it is fast as manual layouting. See performance results below.
- Full control: You're in the middle of the layout process, no magic black box.
- Layout one view at a time. Make it simple to code and debug.
- Concise syntax. Layout most views using a single line.
- See the complete list here....
PinLayout's Performance
PinLayout's performance has been measured using the Layout Framework Benchmark.
As you can see in the following chart, PinLayout are faster or equal to manual layouting, and between 8x and 12x faster than auto layout, and this for all types of iPhone (5S/6/6S/7/8/X)
See here for more details, results and explanation of the benchmark.

Documentation
UIKit safeAreaInsets support
PinLayout can easily handle iOS 11UIView.safeAreaInsets, but it goes even further by supporting safeAreaInsets for previous iOS releases (including iOS 7/8/9/10) by adding a property UIView.pin.safeArea. See here for more details
macOS support
PinLayout support macOS 10.9+.:pushpin: In this documentation, any methods with parameters of type UIView or UIEdgeInsets are also supported on macOS, using NSView and NSEdgeInsets. See macOS Support for more information.
Right to left languages (RTL) support
PinLayout supports left-to-right (LTR) and right-to-left (RTL) languages.See here for more details.
Edges layout
PinLayout can position a view’s edge relative to its superview edges.
Example:
This example layout the view A to fit its superview frame with a margin of 10 pixels. It pins the top, left, bottom and right edges.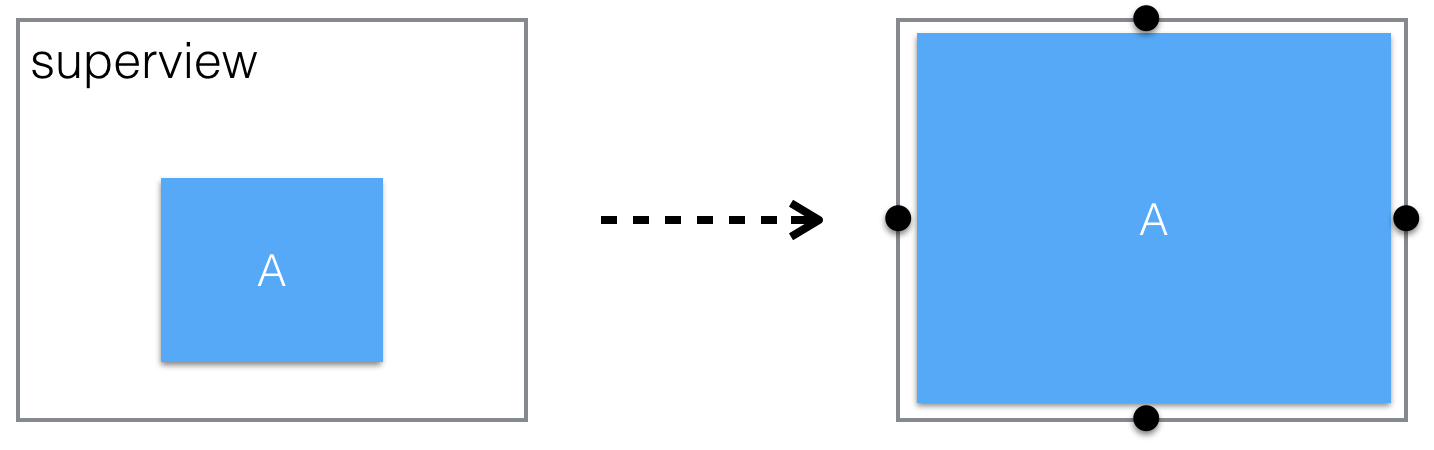
viewA.pin.top(10).bottom(10).left(10).right(10)Another shorter possible solution using all():
view.pin.all(10)Methods:
The following methods are used to position a view’s edge relative to its superview edges.
:pushpin: The offset/margin parameter in the following methods can be either positive and negative. In general cases positive values are used.
top( offset: CGFloat)/top( offset: Percent)/top()/top(_ margin: UIEdgeInsets)
top() is similar to calling top(0), it position the view top edge directly on its superview top edge. top(:UIEdgeInsets) use the UIEdgeInsets.top property, is particularly useful with safeArea, readable and layout margins.
bottom( offset: CGFloat)/bottom( offset: Percent)/bottom()/bottom(_ margin: UIEdgeInsets)
bottom() is similar to calling bottom(0), it position the view bottom edge directly on its superview top edge. bottom(:UIEdgeInsets) use the UIEdgeInsets.bottom property, it is is particularly useful with safeArea, readable and layout margins.
left( offset: CGFloat)/left( offset: Percent)/left()/left(_ margin: UIEdgeInsets)
left() is similar to calling left(0), it position the view left edge directly on its superview left edge. left(:UIEdgeInsets) use the UIEdgeInsets.left property, it is particularly useful with safeArea, readable and layout margins.
right( offset: CGFloat)/right( offset: Percent)/right()/right(_ margin: UIEdgeInsets)
right() is similar to calling right(0), it position the view right edge directly on its superview right edge. right(:UIEdgeInsets) use the UIEdgeInsets. right property, it is particularly useful with safeArea, readable and layout margins.
vCenter( offset: CGFloat)/vCenter( offset: Percent)/vCenter()
vCenter() is similar to calling vCenter(0), it position vertically the view's center directly on its superview vertical center.
hCenter( offset: CGFloat)/hCenter( offset: Percent)/hCenter()
hCenter() is similar to calling hCenter(0), it position horizontally the view's center directly on its superview horizontal center.
Methods supporting LTR (left-to-right) and RTL (right-to-left) languages.
start( offset: CGFloat)/start( offset: Percent)/start()/start( margin: UIEdgeInsets):leftright_arrow:
start() is similar to calling start(0). start(:UIEdgeInsets) use the UIEdgeInsets.left property in LTR direction and UIEdgeInsets.right in RTL direction.
end( offset: CGFloat)/end( offset: Percent)/end()/end( margin: UIEdgeInsets):leftright_arrow:
end() is similar to calling end(0). end(:UIEdgeInsets) use the UIEdgeInsets.right property in LTR direction and UIEdgeInsets.left in RTL direction.
Methods pinning multiple edges:
all( margin: CGFloat)/all()/all( margin: UIEdgeInsets)
view.top(value).bottom(value).left(value).right(value).
all() is similar to calling all(0).
all(:UIEdgeInsets) is particularly useful with safeArea, readable and layout margins.
horizontally( margin: CGFloat)/horizontally( margin: Percent)/horizontally()/horizontally(_ margin: UIEdgeInsets)
horizontally() is similar to calling horizontally(0).
horizontally(:UIEdgeInsets) use the UIEdgeInsets's left and right value to pin left and right edges.
vertically( margin: CGFloat)/vertically( margin: Percent)/vertically()/vertically(_ margin: UIEdgeInsets)
vertically() is similar to calling vertically(0).
vertically(:UIEdgeInsets) use the UIEdgeInsets's top and bottom value to pin top and bottom edges.
Usage Examples:
view.pin.top(20).bottom(20)   // The view has a top margin and a bottom margin of 20 pixels
   view.pin.top().left()         // The view is pinned directly on its parent top and left edge
   view.pin.all()                // The view fill completely its parent (horizontally and vertically)
   view.pin.all(pin.safeArea)    // The view fill completely its parent safeArea
   view.pin.top(25%).hCenter()   // The view is centered horizontally with a top margin of 25%
   view.pin.left(12).vCenter()   // The view is centered vertically
   view.pin.start(20).end(20)    // Support right-to-left languages.
   view.pin.horizontally(20)     // The view is filling its parent width with a left and right margin.
   view.pin.top().horizontally() // The view is pinned at the top edge of its parent and fill it horizontally.
Layout multiple edges relative to superview
This section describe methods that are similar to methods describe in the previous section Edges layout, except that they position 2 edges simultaneously. They can be used as shortcuts to set 2 consecutive edges.
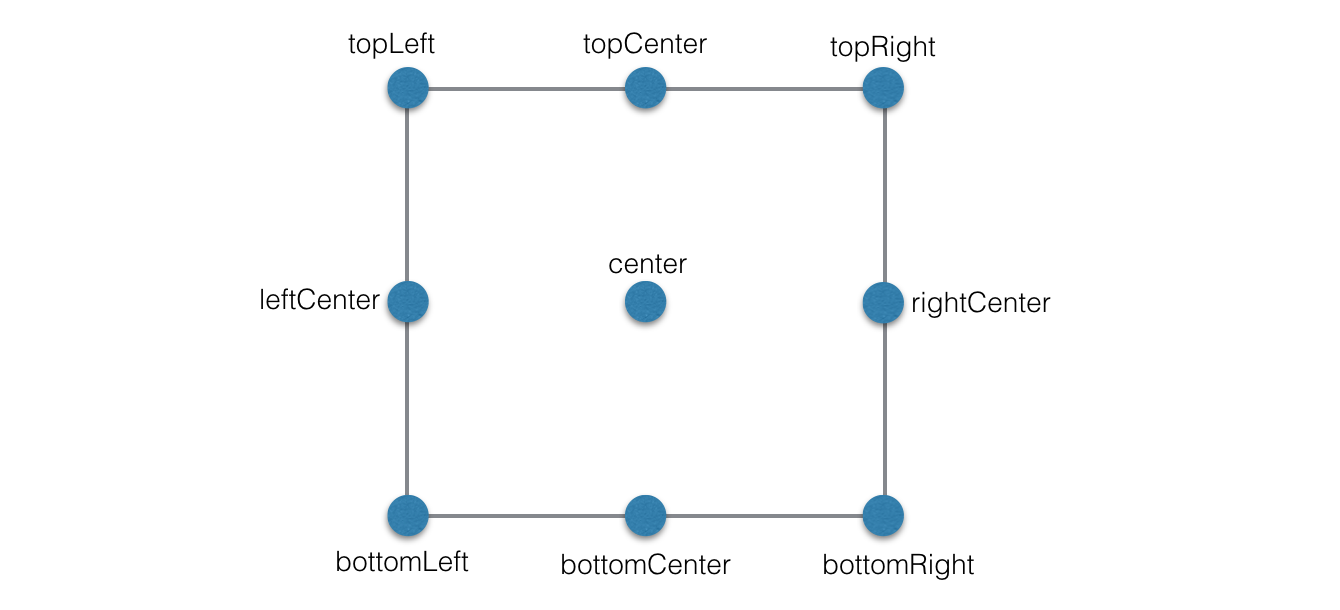
Example:
This example position the view’s on the top-right corner of its superview’s topRight and set its size to 100 pixels.
viewA.pin.topRight().size(100)This is equivalent to:
viewA.pin.top().right().size(100):pushpin: The offset parameter in the following methods can be either positive and negative. In general cases positive values are used.
topLeft(_ offset: CGFloat)/topLeft()
topLeft() is similar to calling topLeft(0).
topCenter(_ topOffset: CGFloat)/topCenter()
topCenter() is similar to calling topCenter(0).
topRight(_ offset: CGFloat)/topRight()
topRight() is similar to calling topRight(0).
centerLeft(_ leftOffset: CGFloat)/centerLeft()
centerLeft() is similar to calling centerLeft(0).
center(_ offset: CGFloat)/center()
center() is similar to calling center(0).
centerRight(_ rightOffset: CGFloat)/centerRight()
centerRight() is similar to calling centerRight(0).
bottomLeft(_ offset: CGFloat)/bottomLeft()
bottomLeft() is similar to calling bottomLeft(0).
bottomCenter(_ bottomOffset: CGFloat)/bottomCenter()
bottomCenter() is similar to calling bottomCenter(0).
bottomRight(_ offset: CGFloat)/bottomRight()
bottomRight() is similar to calling bottomRight(0).
Methods supporting LTR (left-to-right) and RTL (right-to-left) languages.
topStart( offset: CGFloat)/topStart():leftright_arrow:
topEnd( offset: CGFloat)/topEnd():leftright_arrow:
bottomStart( offset: CGFloat)/bottomStart():leftright_arrow:
bottomEnd( offset: CGFloat)/bottomEnd():leftright_arrow:
centerStart( offset: CGFloat)/centerStart():leftright_arrow:
centerEnd( offset: CGFloat)/centerEnd():leftright_arrow:
Usage Examples:
// Position a view at the top left corner with a top and left margin of 10 pixels
   view.pin.topLeft(10)
// Position the 4 edges with a margin of 10 pixels.    view.pin.topLeft(10).bottomRight(10)
Relative Edges layout
Layout using relative positioning
PinLayout has methods to position relative to other views. The view can be layouted relative to one or many relative views. The following methods layout one view's edge (top, bottom, left or right).
Methods:
above(of: UIView)/above(of: [UIView])
below(of: UIView)/below(of: [UIView])
before(of: UIView)/before(of: [UIView]):leftrightarrow:
after(of: UIView)/after(of: [UIView]):leftrightarrow:
left(of: UIView)/left(of: [UIView])
before(of:). One or many relative views can be specified. This method position the view’s right edge.
right(of: UIView)/right(of: [UIView])
after(of:). One or many relative views can be specified. This method position the view’s left edge.
:pushpin: Multiple relative views: If for example a call to below(of: [...]) specify multiple relative views, the view will be layouted below ALL these views.
:pushpin: These methods can pin a view’s relative to any views, even if they don't have the same direct superview! It works with any views that have a shared ancestor.
Usage examples:
<pre><code class="lang-swift">view.pin.after(of: view4).before(of: view1).below(of: view3) view.pin.after(of: view2) view.pin.below(of: [view2, view3, view4])</code></pre>Example:
The following example will position the view C between the view A and B with margins of 10px using relative positioning methods.<img src="docs/pinlayout-relative.png" width="600"/>
<pre><code class="lang-swift">viewC.pin.top().after(of: viewA).before(of: viewB).margin(10)</code></pre> This is an equivalent solution using edges:
<pre><code class="lang-swift">viewC.pin.top().left(to: viewA.edge.right).right(to: viewB.edge.left). margin(10)</code></pre>
This is also an equivalent solution using horizontallyBetween(). See section Layout between other views:
<pre><code class="lang-swift">viewC.pin.horizontallyBetween(viewA, and: viewB, aligned: .top).marginHorizontal(10)</code></pre>
<br/>
<a name="relativeedgeslayoutwalignment"></a>
Layout using Relative Edges and alignment
PinLayout also has methods to position relative to other views but with also the ability to specify an alignment. The view can be layouted relative to one or many relative views.
This is really similar to Relative Edges layout except that here two edges are being layouted.
Methods:
- above(of: UIView, aligned: HorizontalAlignment)
- below(of: UIView, aligned: HorizontalAlignment)
- before(of: UIView, aligned: VerticalAlignment)
:leftrightarrow:
- after(of: UIView, aligned: VerticalAlignment)
:leftrightarrow:
- left(of: UIView, aligned: VerticalAlignment)
. One or many relative views can be specified.
right(of: UIView, aligned: VerticalAlignment)
right(of: [UIView], aligned: VerticalAlignment)
Position the view right of the specified view(s) and aligned it using the specified VerticalAlignment. Similar to after(of:). One or many relative views can be specified.
HorizontalAlignment values:
.left: The view's left edge will be left-aligned with the relative view (or the left most view if a list of relative views is specified).
.center: The view's will be horizontally centered with the relative view (or the average hCenter if a list of relative views is used).
.right: The view's right edge will be right-aligned with the relative view (or the right most view if a list of relative views is specified).
.start:leftrightarrow::
In LTR direction, similar to using .left.
In RTL direction, similar to using .right.
.end:leftrightarrow::
In LTR direction, similar to using .right.
In RTL direction, similar to using .left.
VerticalAlignment values:
-
.top: The view's top edge will be top-aligned with the relative view (or the top most view if a list of relative views is specified).
.center: The view's will be vertically centered with the relative view (or the average vCenter if a list of relative views is used).
.bottom: The view's bottom edge will be bottom-aligned with the relative view (or the bottom most view if a list of relative views is specified).
:pushpin: Multiple relative views: If for example a call to below(of: [...], aligned:) specify multiple relative views, the view will be layouted below ALL these views. The alignment will be applied using all relative views.
:pushpin: These methods can layout a view’s relative to any views, even if they don't have the same direct superview/parent! It works with any views that have a shared ancestor.
Usage examples:
view.pin.above(of: view2, aligned: .left)
	view.pin.below(of: [view2, view3, view4], aligned: .left)
	view.pin.after(of: view2, aligned: .top).before(of: view3, aligned: .bottom)
Example:
The following example layout the view B below the view A aligned on its center.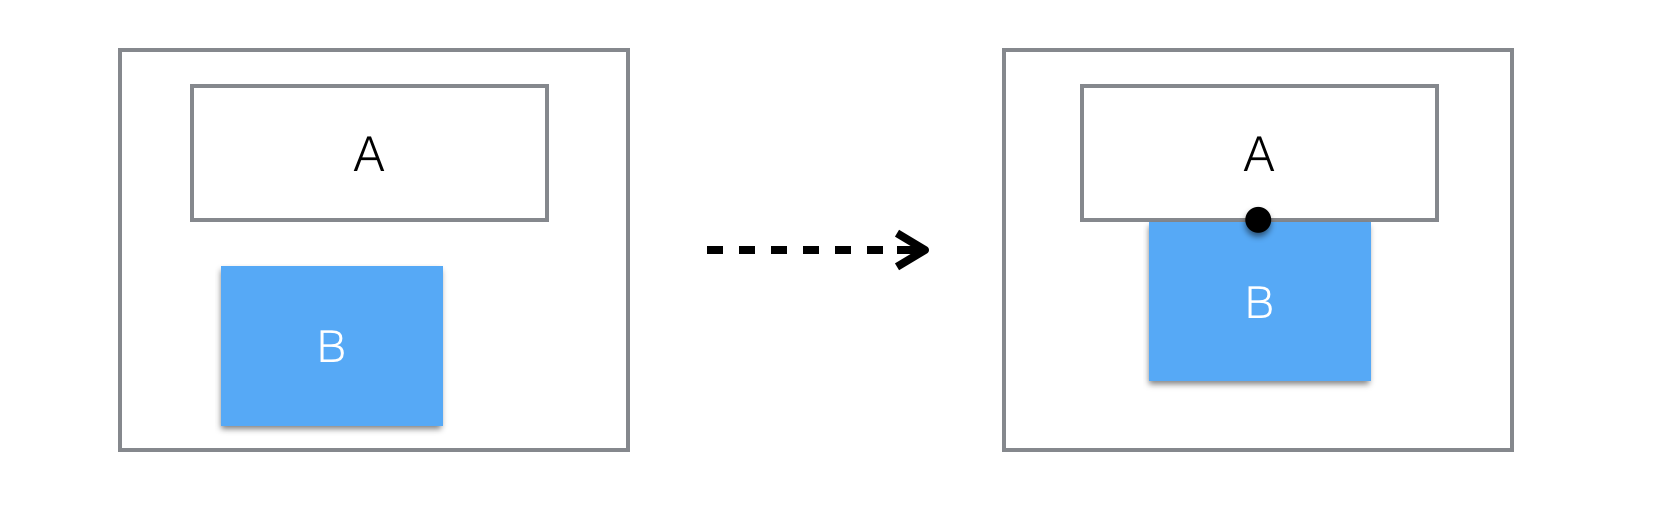
viewB.pin.below(of: viewA, aligned: .center)viewB.pin.topCenter(to: viewA.anchor.bottomCenter)Example:
The following example layout the view A below the UIImageView and the UILabel. View A should be left aligned to the UIImageView and right aligned to the UILabel, with a top margin of 10 pixels.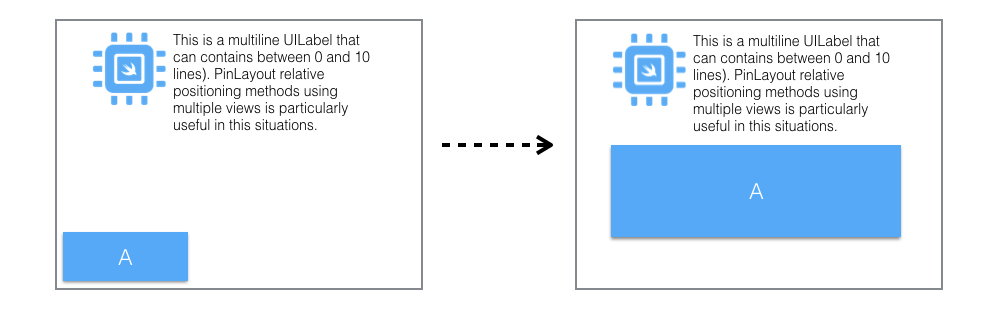
a.pin.below(of: [imageView, label], aligned: .left).right(to: label.edge.right).marginTop(10)let maxY = max(imageView.frame.maxY, label.frame.maxY) // Not so nice
a.pin.top(maxY).left(to: imageView.edge.left).right(to: label.edge.right).marginTop(10)Positioning using only visible relative Views
All PinLayout's relative methods can accept an array of Views (ex: below(of: [UIView])). Using these methods its possible to filter the list of relative Views before the list is used by PinLayout.
You can define your own filter methods, but PinLayout has a filter method called visible that can be used to layout a view related to only visible views. This can be really useful when some views may be visible or hidden depending on the situation.
view.pin.below(of: visible([ageSwitch, ageField])).horizontally().Note that the Form example use this filter method, see Examples App.
Layout between other views
PinLayout has methods to position a view between two other views, either horizontally or vertically. These methods layout 2 edges simultaneously.
Methods:
horizontallyBetween(:UIView, and: UIView)
verticallyBetween(:UIView, and: UIView)
Usage examples:
view.pin.horizontallyBetween(viewA, and: viewB)
	view.pin.verticallyBetween(viewC, and: viewD)
Example:
This example position a view between two other views horizontally with a left and right margins of 5 pixels, and set its top edge at 10 pixels.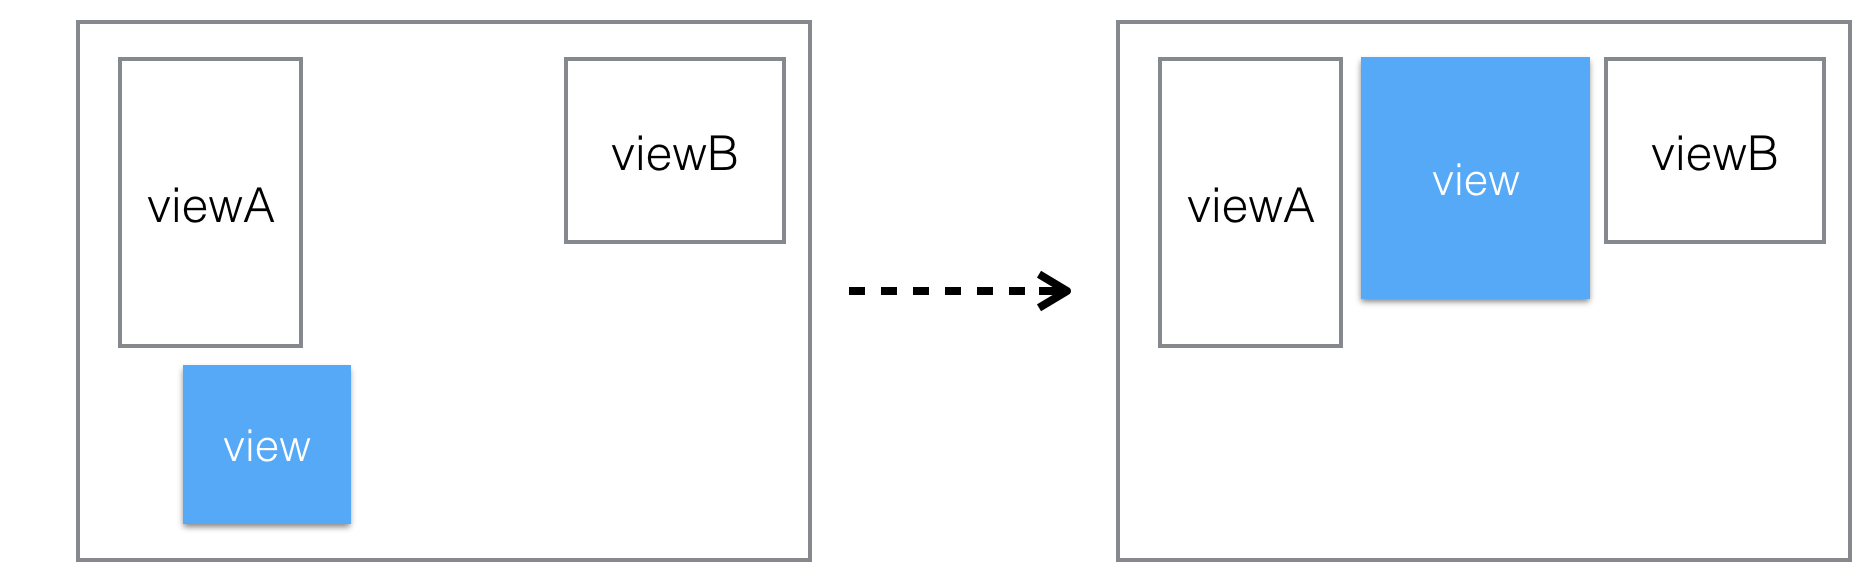
view.pin.horizontallyBetween(viewA, and: viewB).top(10).marginHorizontal(5)Note that the same result can also be achieved using an alignment parameter, describe in the next section:
view.pin.horizontallyBetween(viewA, and: viewB, aligned: .top).marginHorizontal(5)Or using Relative Edges layout:
view.pin.after(of: viewA).before(of: viewB).top(10).marginHorizontal(5)Layout between other views with alignment
PinLayout has also methods to position a view between two other views, either horizontally or vertically, but with also the ability to specify an alignment.
This is really similar to the previous section methods except that here an alignment is specified and three edges are being layouted simultaneously.
Methods:
horizontallyBetween(:UIView, and: UIView, aligned: VerticalAlign)
verticallyBetween(:UIView, and: UIView, aligned: HorizontalAlign)
:pushpin: These methods will apply the alignment related to the first specified reference view. If you want to align it using the second reference view, simply swap views parameters. :pushpin: These methods can use references to any views, even if they don't have the same direct superview/parent! It works with any views that have a shared ancestor.
HorizontalAlignment values:
.left: The view's left edge will be left-aligned with the first view..center: The view's will be horizontally centered with the first view.-
.right: The view's right edge will be right-aligned with the first view. .start:leftrightarrow::
.left.
In RTL direction, similar to using .right.
.end:leftrightarrow::
.right.
In RTL direction, similar to using .left.
VerticalAlignment values:
-
.top: The view's top edge will be top-aligned with the first view. -
.center: The view's will be vertically centered with the first view. -
.bottom: The view's bottom edge will be bottom-aligned with the first view.
Usage examples:
view.pin.horizontallyBetween(viewA, and: viewB, aligned: .top)
	view.pin.verticallyBetween(viewC, and: viewD, aligned: .center)
Example:
This example position a view between two other views vertically, and center it relative to the first view with an top and bottom margin of 10 pixels.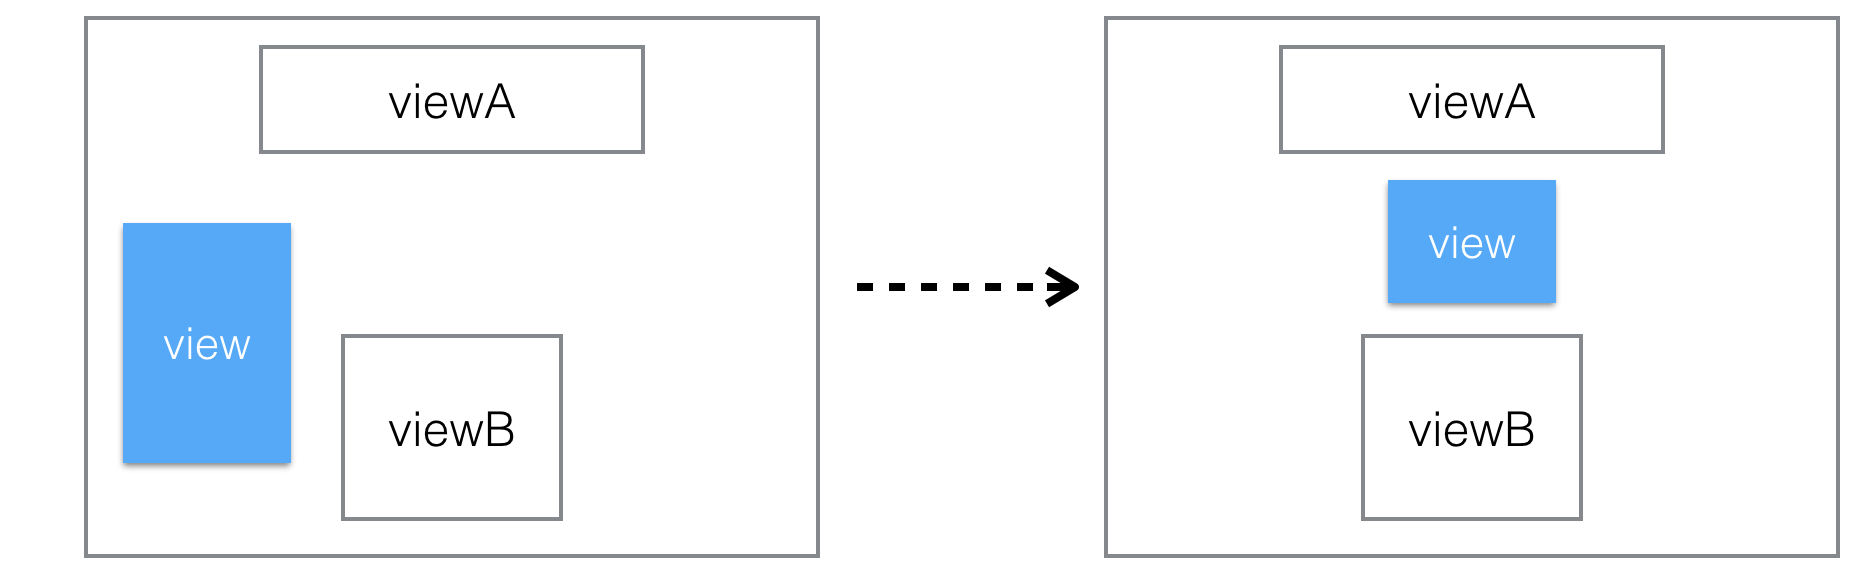
view.pin.verticallyBetween(viewA, and: viewB, aligned: .center).marginVertical(10)Edges
PinLayout UIView’s edges
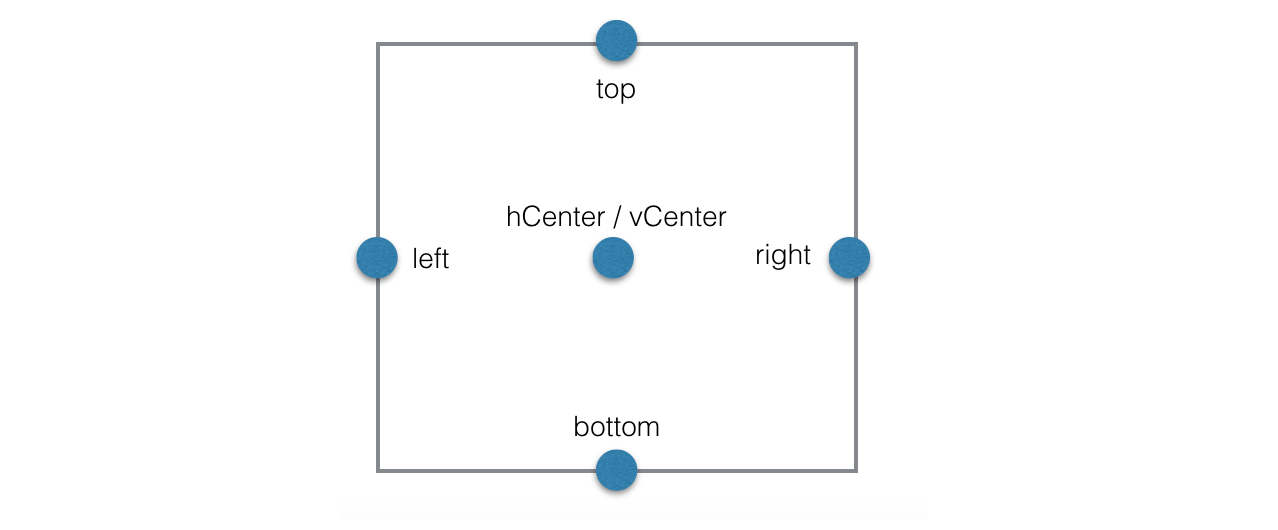
PinLayout adds edges properties to UIView/NSView. These properties are used to reference other view’s edges.
PinLayout View’s edges:
UIView.edge.topUIView.edge.vCenterUIView.edge.bottomUIView.edge.leftUIView.edge.hCenterUIView.edge.rightUIView.edge.start:leftrightarrow:UIView.edge.end:leftrightarrow:
Layout using edges
PinLayout has methods to attach a View's edge (top, left, bottom, right, start or end edge) to another view’s edge.
Methods:
top(to edge: ViewEdge):
vCenter(to edge: ViewEdge):
bottom(to edge: ViewEdge):
left(to: edge: ViewEdge):
hCenter(to: edge: ViewEdge):
right(to: edge: ViewEdge):
start(to: edge: ViewEdge):leftrightarrow:
end(to: edge: ViewEdge):leftrightarrow:
:pushpin: These methods can pin a view’s edge to any other view's edge, even if they don't have the same direct superview! It works with any views that have a shared ancestor.
Usage examples:
view.pin.left(to: view1.edge.right)
	view.pin.left(to: view1.edge.right).top(to: view2.edge.right)
Example 1:
This example layout the view B left edge on the view A right edge. It only changes the view B left coordinate.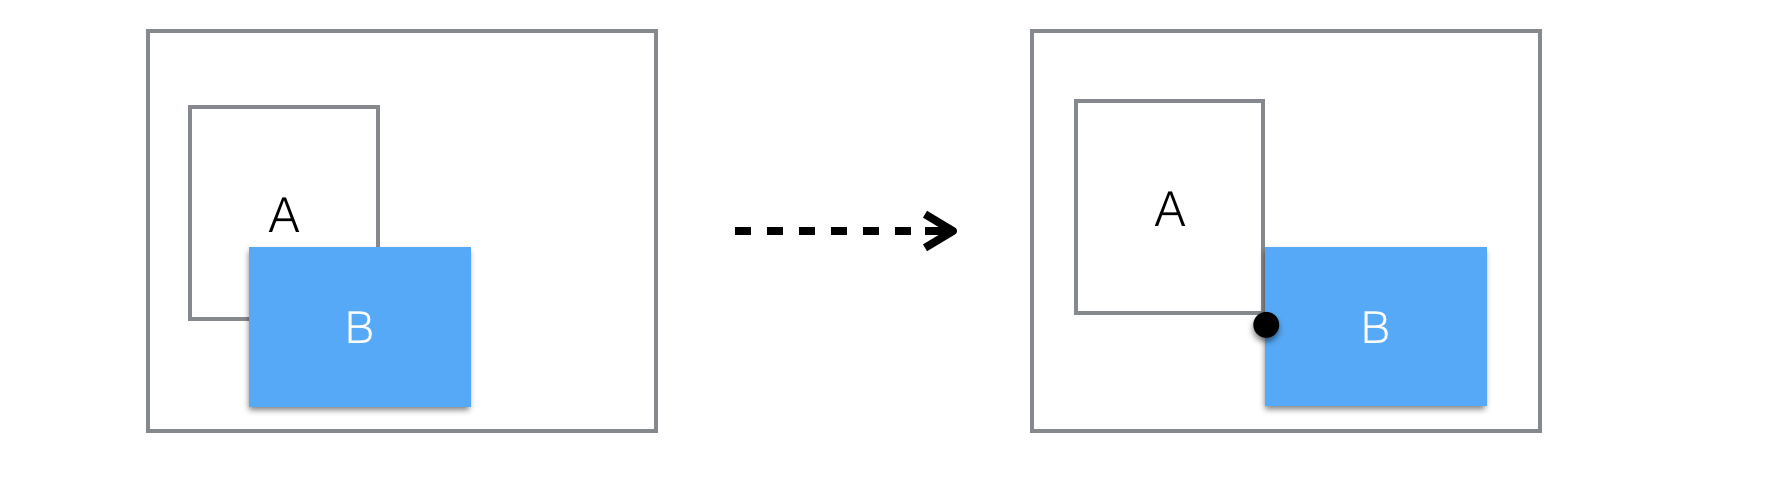
viewB.pin.left(to: viewA.edge.right)Example 2:
This example center horizontally the view B inside the view A with a top margin of 10 from the same view.
aView.pin.top(to: bView.edge.top).hCenter(to: bView.edge.hCenter).marginTop(10)Anchors
PinLayout View’s anchors
PinLayout adds anchors properties to UIView/NSView. These properties are used to reference other view’s anchors.
PinLayout View’s anchors:
UIView.anchor.topLeft/UIView.anchor.topCenter/UIView.anchor.topRightUIView.anchor.topStart/UIView.anchor.topEnd:leftrightarrow:UIView.anchor.centerLeft/UIView.anchor.centers/UIView.anchor.centerRightUIView.anchor.centerStart/UIView.anchor.centerEnd:leftrightarrow:UIView.anchor.bottomLeft/UIView.anchor.bottomCenter/UIView.anchor.bottomRightUIView.anchor.bottomStart/UIView.anchor.bottomEnd:leftrightarrow:
Layout using anchors
PinLayout can use anchors to position view’s related to other views.
Following methods position the corresponding view anchor on another view’s anchor.
Methods:
topLeft(to anchor: Anchor)topCenter(to anchor: Anchor)topRight(to anchor: Anchor)topStart(to anchor: Anchor):leftrightarrow:topEnd(to anchor: Anchor):leftrightarrow:centerLeft(to anchor: Anchor)center(to anchor: Anchor)centerRight(to anchor: Anchor)centerStart(to anchor: Anchor):leftrightarrow:centerEnd(to anchor: Anchor):leftrightarrow:bottomLeft(to anchor: Anchor)bottomCenter(to anchor: Anchor)bottomRight(to anchor: Anchor)bottomStart(to anchor: Anchor):leftrightarrow:bottomEnd(to anchor: Anchor):leftrightarrow:
Usage examples:
view.pin.topCenter(to: view1.anchor.bottomCenter)
    view.pin.topLeft(to: view1.anchor.topLeft).bottomRight(to: view1.anchor.center)
Example 1:
Layout using an anchor. This example pins the view B topLeft anchor on the view A topRight anchor.
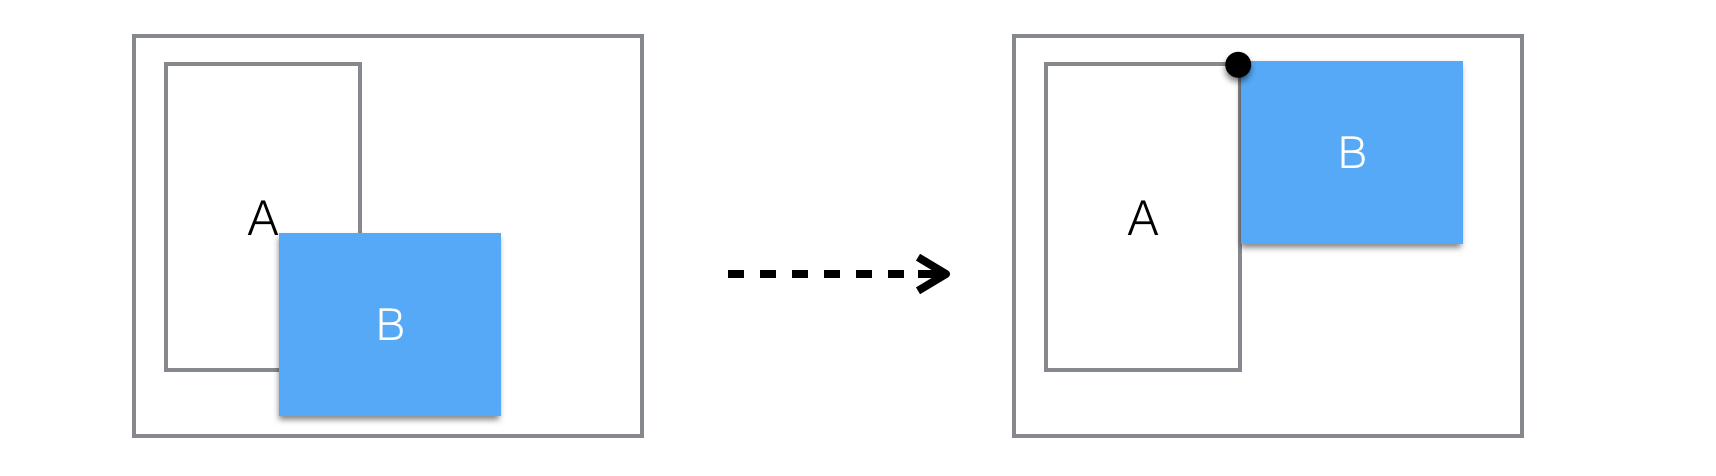
viewB.pin.topLeft(to: viewA.anchor.topRight)Example 2:
This example center the view B on the view A's top-right anchor.

viewB.pin.center(to: viewA.anchor.topRight)Example 3:
Layout using multiple anchors. It is also possible to combine two anchors to pin the position and the size of a view. The following example will position the view C between the view A and B with horizontal margins of 10px.
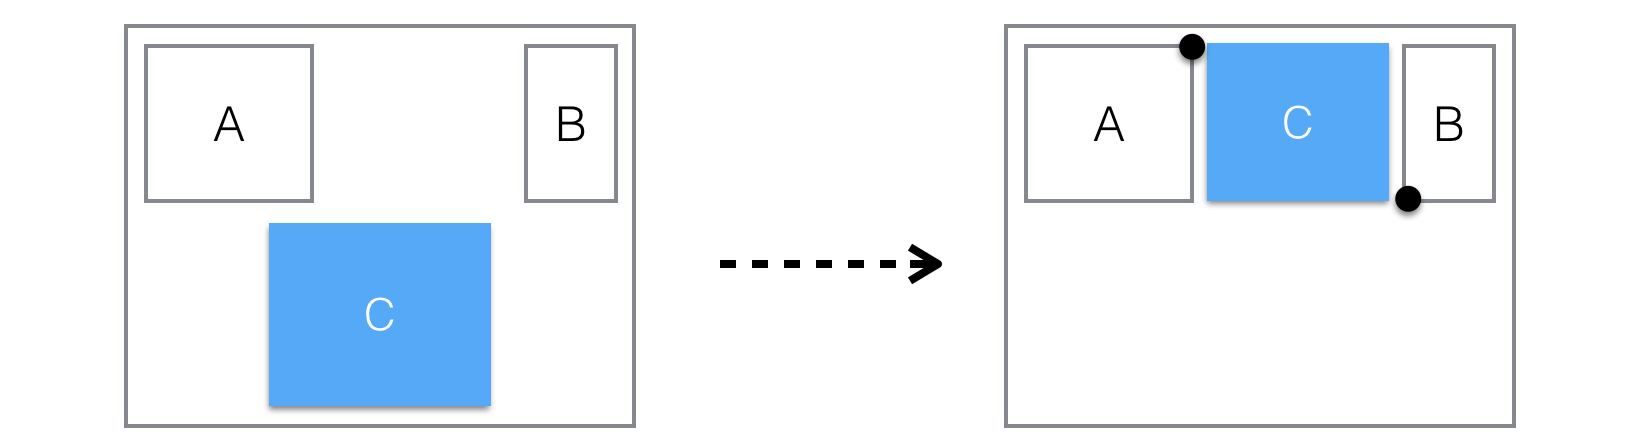
viewC.pin.topLeft(to: viewA.anchor.topRight)
	         .bottomRight(to: viewB.anchor.bottomLeft).marginHorizontal(10)
This is an another possible solution using horizontallyBetween():
viewC.pin.horizontallyBetween(viewA, and: viewB, aligned: .top).height(of: viewA).marginHorizontal(10)Width, height and size
Adjust view width, height and size
PinLayout has methods to set the view’s height and width.Methods:
width(:CGFloat)/width(:Percent)
width(of: UIView)
height(:CGFloat)/height(:Percent)
height(of: UIView)
size(:CGSize)/size(:Percent)
size(_ sideLength: CGFloat)
size(of: UIView)
:pushpin: width/height/size have a higher priority than edges and anchors positioning.
Usage examples:
view.pin.width(100)
	view.pin.width(50%)
	view.pin.width(of: view1)

	view.pin.height(200)
	view.pin.height(100%).maxHeight(240)

	view.pin.size(of: view1)
	view.pin.size(50%)
	view.pin.size(250)
Adjusting size
PinLayout has methods to adjust the view’s size based on their content.
The resulting size will always respect minWidth/maxWidth/minHeight/maxHeight values.
Methods:
sizeToFit()
sizeToFit(: FitType)
sizeThatFits(:CGSize).
PinLayout will adjust either the view's width or height based on the fitType parameter value.
If margins are specified, they will be applied before calling the view's sizeThatFits(:CGSize) method.
Parameter fitType: Identify the reference dimension (width / height) that will be used to adjust the view's size.
* .width: The method adjust the view's size based on the reference width. * If properties related to the width have been pinned (e.g: width, left & right, margins, ...), the reference width will be determined by these properties, if not the current view's width will be used. * The resulting width will always match the reference width. * .height: The method adjust the view's size based on the reference height. * If properties related to the height have been pinned (e.g: height, top & bottom, margins, ...), the reference height will be determined by these properties, if not the current view's height will be used. * The resulting height will always match the reference height. * .widthFlexible: Similar to .width, except that PinLayout won't constrain the resulting width to match the reference width. The resulting width may be smaller of bigger depending on the view's sizeThatFits(..) method result. For example a single line UILabel may returns a smaller width if it's string is smaller than the reference width. * .heightFlexible: Similar to .height, except that PinLayout won't constrain the resulting height to match the reference height. The resulting height may be smaller of bigger depending on the view's sizeThatFits(..) method result.
Usage examples:
// Adjust the view's size based on the result of UIView.sizeToFit() and center it.
     view.pin.center().sizeToFit()
// Adjust the view's size based on a width of 100 pixels.      // The resulting width will always match the pinned property width(100).      view.pin.width(100).sizeToFit(.width)        // Adjust the view's size based on view's current width.      // The resulting width will always match the view's original width.      // The resulting height will never be bigger than the specified maxHeight.      view.pin.sizeToFit(.width).maxHeight(100)        // Adjust the view's size based on 100% of the superview's height.      // The resulting height will always match the pinned property height(100%).      view.pin.height(100%).sizeToFit(.height)       // Adjust the view's size based on view's current height.     // The resulting width will always match the view's original height.     view.pin.sizeToFit(.height)
// Since .widthFlexible has been specified, its possible that the resulting     // width will be smaller or bigger than 100 pixels, based of the label's sizeThatFits()     // method result.     label.pin.width(100).sizeToFit(.widthFlexible)
Example:
The following example layout the UILabel on the right side of the UIImageView with a margin of 10px all around and also adjust the UILabel’t height to fit the text size. Note that the UILabel’s height has changed to fit its content.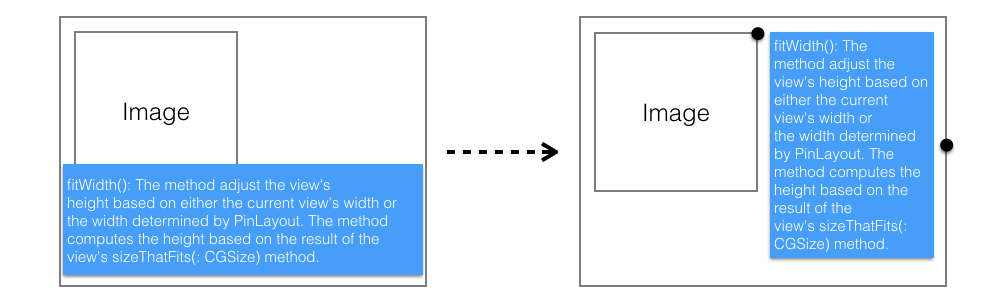
label.pin.after(of: image, aligned: .top).right().marginHorizontal(10).sizeToFit(.width)minWidth, maxWidth, minHeight, maxHeight
PinLayout has methods to set the view’s minimum and maximum width, and minimum and maximum height.
:pushpin: minWidth/maxWidth & minHeight/maxHeight have the highest priority. Higher than sizes (width/height/size, sizeToFit, aspectRatio) and edges positioning (top/left/bottom/right). Their values are always fulfilled.
Methods:
minWidth(:CGFloat)
minWidth(:Percent)
The value specifies the view's minimum width of the view in pixels (or in percentage of its superview). The value must be non-negative.
maxWidth(:CGFloat)
maxWidth(:Percent)
The value specifies the view's maximum width of the view in pixels (or in percentage of its superview). The value must be non-negative.
minHeight(:CGFloat)
minHeight(:Percent)
The value specifies the view's minimum height of the view in pixels (or in percentage of its superview). The value must be non-negative.
maxHeight(:CGFloat)
maxHeight(:Percent)
The value specifies the view's maximum height of the view in pixels (or in percentage of its superview). The value must be non-negative.
Usage examples:
view.pin.left(10).right(10).maxWidth(200)
	view.pin.width(100%).maxWidth(250)

	view.pin.top().bottom().maxHeight(100)
	view.pin.top().height(50%).maxHeight(200)
Example:
This example layout a view 20 pixels from the top, and horizontally from left to right with a maximum width of 200 pixels. If the superview is smaller than 200 pixels, the view will take the full horizontal space, but for a larger superview, the view will be centered.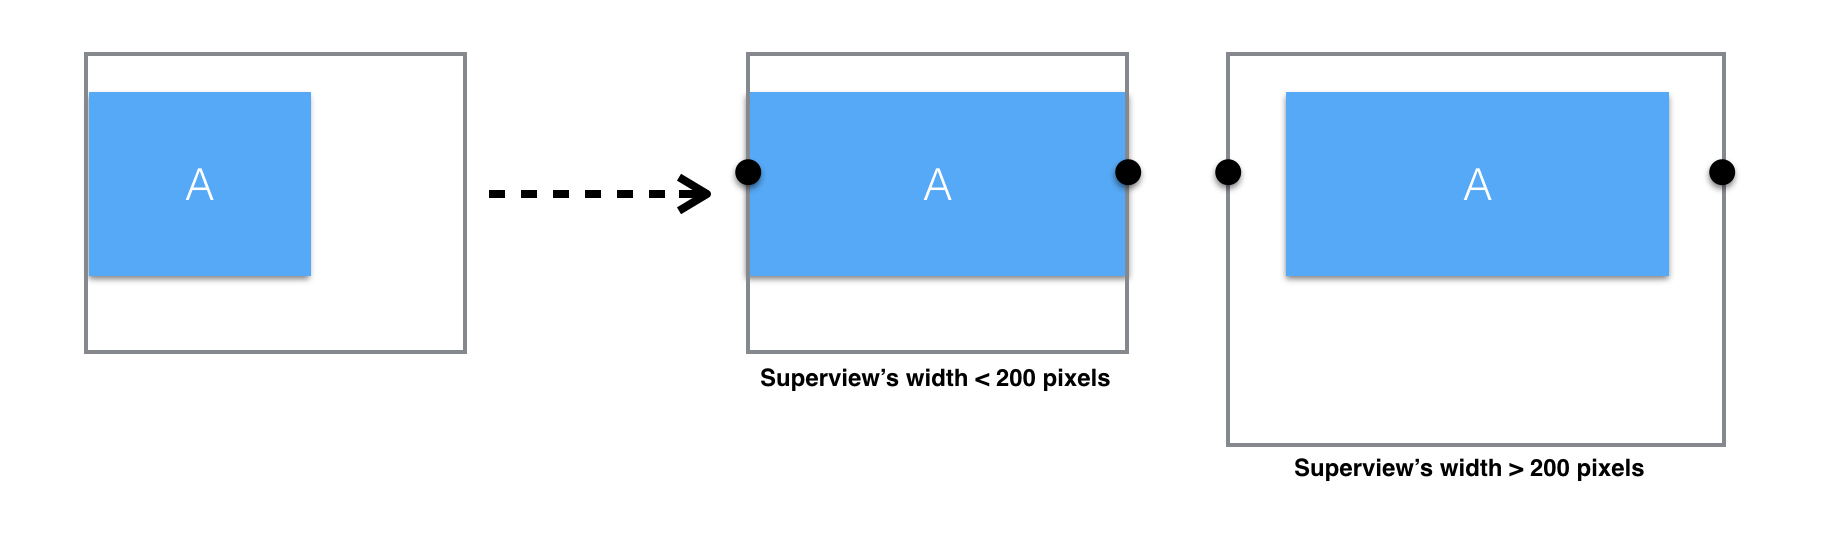
viewA.pin.top(20).hCenter().width(100%).maxWidth(200)This is an equivalent solutions using the justify() method. This method is explained in the next section:
viewA.pin.top(20).horizontally().maxWidth(200).justify(.center)Margins
PinLayout has methods to apply margins. PinLayout applies margins similar to CSS.
Methods:
marginTop(:CGFloat)/marginTop(: Percent)
marginLeft(:CGFloat)/marginLeft(: Percent)
marginBottom(:CGFloat)/marginBottom(: Percent)
marginRight(:CGFloat)/marginRight(: Percent)
marginStart(:CGFloat)/marginStart(: Percent):leftrightarrow:
Pin.layoutDirection(...). In LTR direction, start margin specify the left margin. In RTL direction, start margin specify the right margin.
marginEnd(:CGFloat)/marginEnd(: Percent):leftrightarrow:
Pin.layoutDirection(...). In LTR direction, end margin specify the right margin. In RTL direction, end margin specify the left margin.
marginHorizontal(:CGFloat)/marginHorizontal(: Percent)
marginVertical(:CGFloat)/marginVertical(: Percent)
margin(:CGFloat)/margin(: Percent)
margin(:UIEdgeInsets)
margin(_ insets: NSDirectionalEdgeInsets)
UIView. directionalLayoutMargins when layouting a view supporting RTL/LTR languages.
margin( vertical: CGFloat, horizontal: CGFloat)
margin( vertical: Percent, horizontal: Percent)
Set the individually vertical margins (top, bottom) and horizontal margins (left, right, start, end)
margin( top: CGFloat, horizontal: CGFloat, _ bottom: CGFloat)
margin( top: Percent, horizontal: Percent, _ bottom: Percent)
Set individually top, horizontal margins and bottom margin
margin( top: CGFloat, left: CGFloat, bottom: CGFloat, right: CGFloat)
margin( top: Percent, left: Percent, bottom: Percent, right: Percent)
Usage examples:
view.pin.top().left().margin(20)
	view.pin.bottom().marginBottom(20)
	view.pin.horizontally().marginHorizontal(20)
	view.pin.all().margin(10, 12, 0, 12)
PinLayout margin rules
The following section explains how CSS/PinLayout margin rules are applied.When and how horizontal margins are applied in PinLayout?
This table explains how and when left and right margins are applied depending on which view’s attribute has been pinned.
| View’s pinned attributes | Left Margin | Right Margin | |--------------------------|:-------------------------------------:|:----------------------------------------------:| | Left | Move view right | - | | Left and Width | Move view right | - | | Right | - | Move view left | | Right and Width | - | Move view left | | Left and Right | Reduce the width to apply the left margin | Reduce the width to apply the right margin | | hCenter | Move view right | Movie view left |
NOTE: - indicates that the margin is not applied.
When and how does vertical margins are applied in PinLayout?
This table explains how and when top and bottom margins are applied depending on which view’s attribute has been pinned.
| View’s pinned attributes | Top Margin | Bottom Margin | |--------------------------|:----------------------------------------:|:-------------------------------------------:| | Top | Move view down | - | | Top and Height | Move view down | - | | Bottom | - | Move view up | | Bottom and Height | - | Move view up | | Top and Bottom | Reduce the height to apply the top margin | Reduce the height to apply the bottom margin | | vCenter | Move view down | Movie view up |
Margin examples
Example 1:
In this example, only the left margin is applied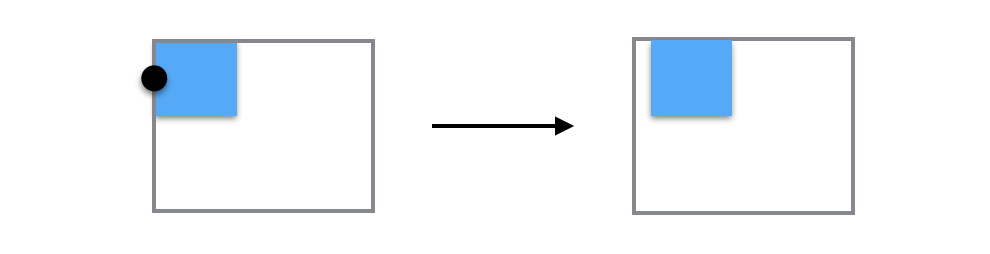
view.pin.left().margin(10)Example 2:
In this example, only the right margin is applied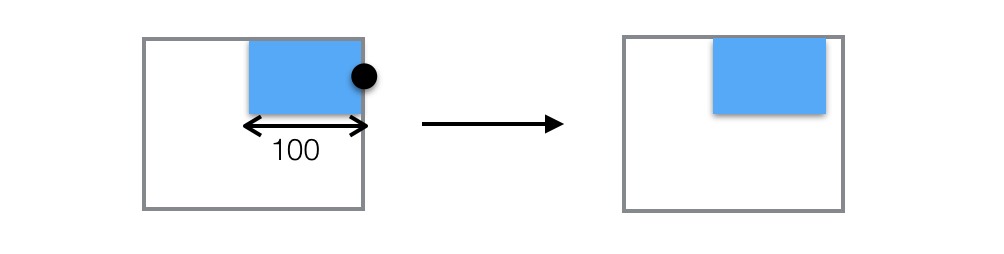
view.pin.right().width(100).marginHorizontal(10)Example 3:
In this example, the left and right margins are applied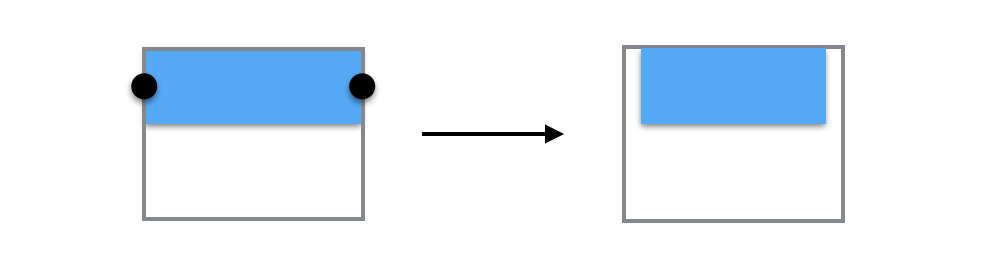
view.pin.left().right().margin(10)Example 4:
In this example, left, right and top margins are applied. Note that the view’s width has been reduced to apply left and right margins.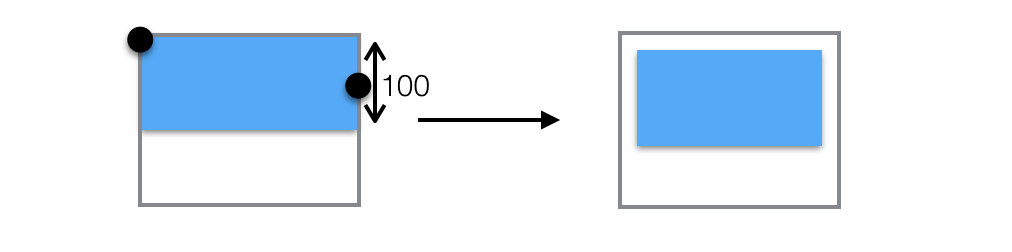
view.pin.top().left().right().height(100).margin(10)Example 5:
In this example, left, right, top and bottom margins are applied.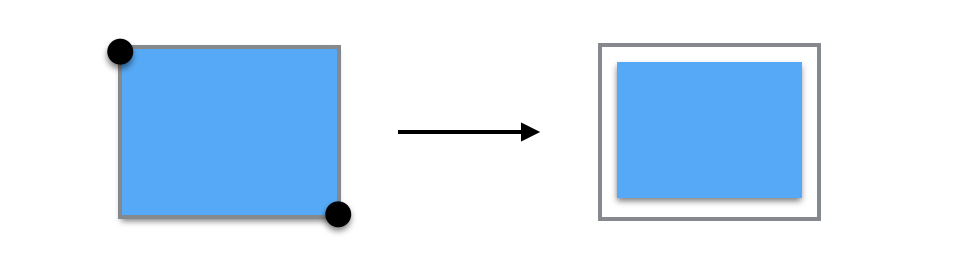
view.pin.top().bottom().left().right().margin(10)pinEdges() and margins
ThepinEdges() method pins the four edges (top, left, bottom and right edges) before applying margins.
This method is useful in situations where the width and/or the height attributes have been pinned. This method is an add-on, there is no equivalent in CSS.
Example without pinEdges
Without pinEdges() margins rules would be applied and the view would be moved to the left.
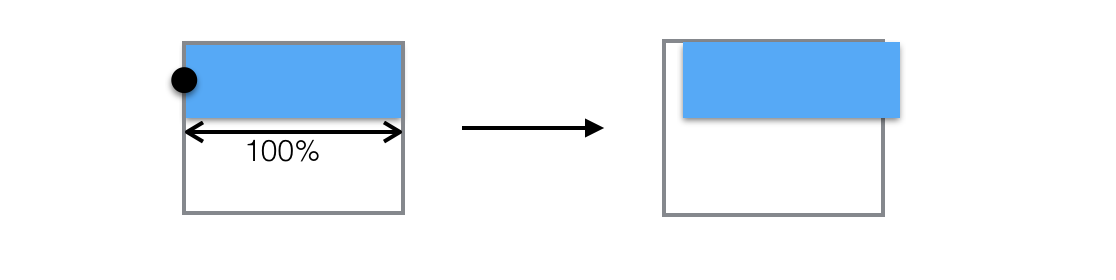
view.pin.left().width(100%).marginHorizontal(20)Example with pinEdges
With pinEdges() the left and right margins are applied even if only the left and width has been set. The reason is the call to pinEdges() has pinned the two horizontal edges at their position before applying margins.
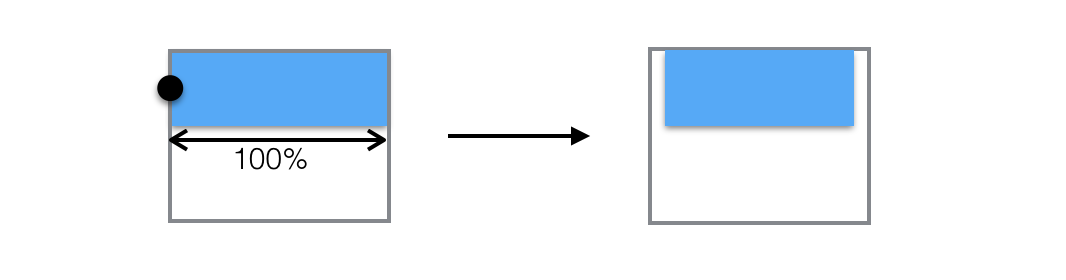
view.pin.left().width(100%).pinEdges().marginHorizontal(20)NOTE: In that in that particular situation, the same results could have been achieved differently too:
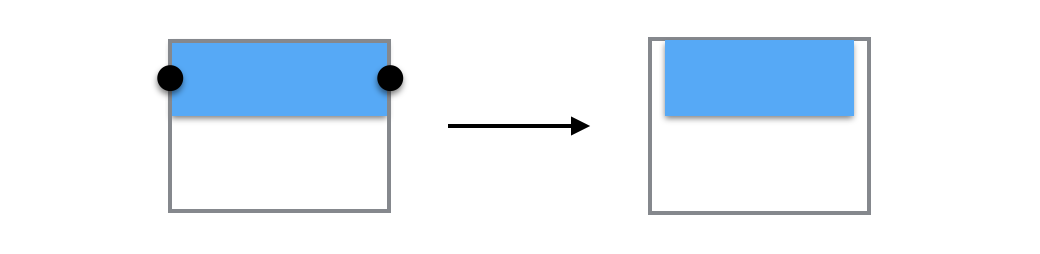
view.pin.left().right().marginHorizontal(20)Aspect Ratio
Set the view aspect ratio. AspectRatio solves the problem of knowing one dimension of an element and an aspect ratio, this is particularly useful for images. AspectRatio is applied only if a single dimension (either width or height) can be determined, in that case the aspect ratio will be used to compute the other dimension.- AspectRatio is defined as the ratio between the width and the height (width / height).
- An aspect ratio of 2 means the width is twice the size of the height.
- AspectRatio respects the min (minWidth/minHeight) and the max (maxWidth/maxHeight)
aspectRatio(_ ratio: CGFloat):
aspectRatio(of view: UIView):
aspectRatio():
Usage examples:
aView.pin.left().width(100%).aspectRatio(2)
	imageView.pin.left().width(200).aspectRatio()
Example:
This example layout an UIImageView at the top and center it horizontally, it also adjust its width to 50%. The view’s height will be adjusted automatically using the image aspect ratio.
imageView.pin.top().hCenter().width(50%).aspectRatio()safeArea, readable, layout and keyboard margins
UIKit expose 4 kind of areas/guides that can be used to layout views. PinLayout expose them using these properties:
UIView.pin.safeArea: Expose UIKitUIView.safeAreaInsets/UIView.safeAreaLayoutGuide.UIView.pin.readableMargins: Expose UIKitUIView.readableContentGuide.UIView.pin.layoutMargins: Expose UIKitUIView.layoutMargins/UIView.layoutMarginsGuide.UIView.pin.keyboardArea: Expose UIKitUIView.keyboardLayoutGuide. [iOS 15+]

See the SafeArea & readableMargins example in the Examples App.
1. pin.safeArea
PinLayout can handle easily iOS 11 UIView.safeAreaInsets, but it goes further by supporting safeAreaInsets for previous iOS releases (including iOS 7/8/9/10) by adding a property `UIV
README truncated. View on GitHub


