
A SwiftUI package to beautifully display and handle permissions.
PermissionsSwiftUI: A SwiftUI package to handle permissions





PermissionsSwiftUI displays and handles permissions in SwiftUI. It is largely inspired by SPPermissions. The UI is highly customizable and resembles an Apple style. If you like the project, please star ★.
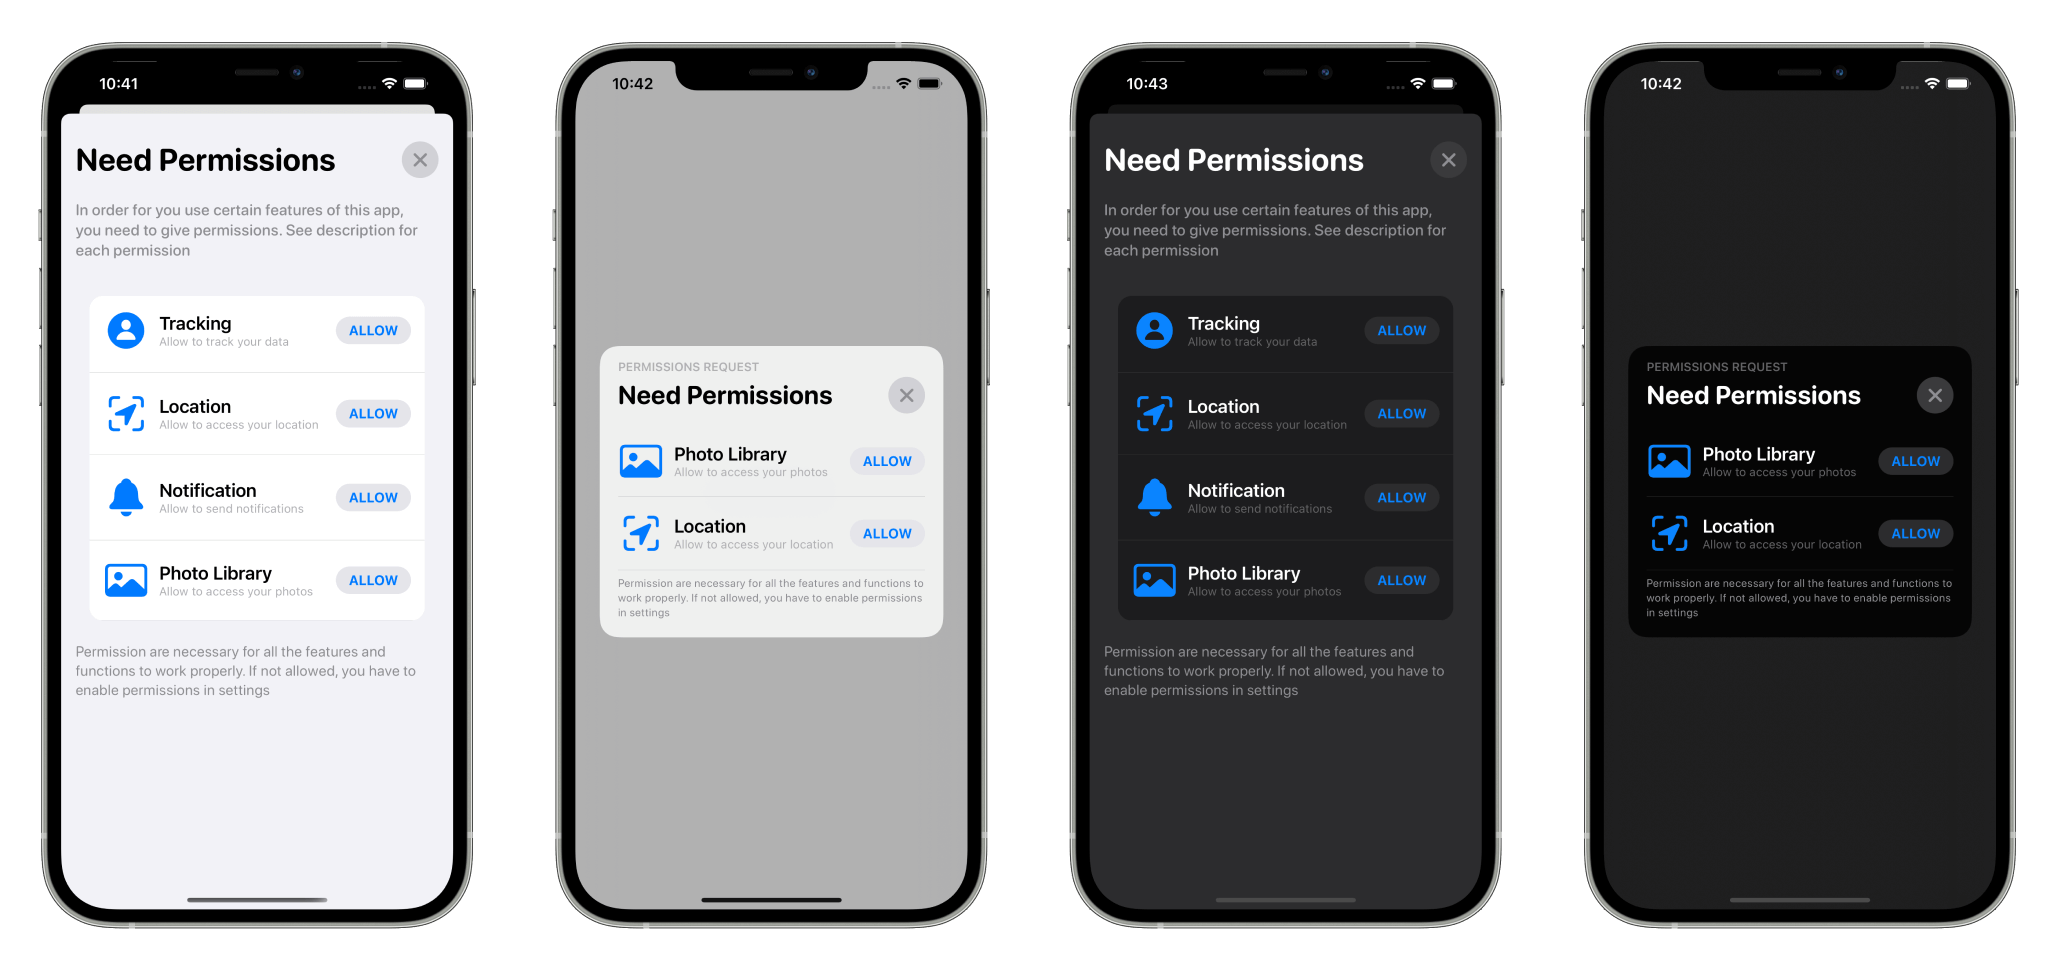
PermissionsSwiftUI looks equally gorgeous on both ☀️light and 🌑 dark mode.
🧭 Navigation
Usage
- Customize Permission Texts - Customize header texts -onAppear and onDisappear Override
- Auto Check Authorization
- Auto Dismiss
- Customize Colors
- Restrict Dismissal
- Configuring Health Permissions
🖥️ Installation
Requirements
- iOS 11 (SwiftUI require iOS 13.0) or iPadOS 13
- Xcode 12 and Swift 5.3
- tvOS support coming soon
- No MacOS, and WatchOS support for now
Install
Swift Package Manager (Recommended)
You can install PermissionsSwiftUI into your Xcode project via SPM. To learn more about SPM, click here- In Xcode 12, open your project and navigate to File → Swift Packages → Add Package Dependency...
- Paste the repository URL (
https://github.com/jevonmao/PermissionsSwiftUI) and click Next. - For Version, verify it's Up to next major.
- Click Next and ONLY SELECT PERMISSIONS NEEDED else Apple will reject your app

- Click Finish
- You are all set, thank you for using PermissionsSwiftUI!
Cocoapods (Deprecated)
You can also install PermissionsSwiftUI with Cocoapods. Addpod 'PermissionsSwiftUI' in your podfile:
platform :ios, '14.0'
target 'test abstract' do   use_frameworks!   pod 'PermissionsSwiftUI'
end
🚀 Quickstart
Before you start, please star ★ this repository. Your star is my biggest motivation to pull all-nighters and maintain this open-source project.
⚠️ v1.4.0 Migration Guide
v1.4 is here! If you encounter any issues, please check out the migration guide designed to help developers resolve any deprecations and API updates.
Modal Style
To use PermissionsSwiftUI, simply add theJMModal modifier to any view:
.JMModal(showModal: $showModal, for: [.locationAlways, .photo, .microphone])</code></pre>
Pass in a Binding to show the modal view, and add whatever permissions you want to show. For example:
<pre><code class="lang-Swift">struct ContentView: View {
@State var showModal = false
var body: some View {
Button(action: {
showModal=true
}, label: {
Text("Ask user for permissions")
})
.JMModal(showModal: $showModal, for: [.locationAlways, .photo, .microphone])
}
}</code></pre>
Alert Style
<img src="https://github.com/jevonmao/PermissionsSwiftUI/blob/main/Resources/alertviewscreenshot.png?raw=true" height="300" align="left" />
The alert style is equally gorgeous, and allows for more versatile use. It is recommended when you have less than 3 permissions. <br />
To show a permission pop up alert, use:
<pre><code class="lang-Swift">.JMAlert(showModal: $showModal, for: [.locationAlways, .photo])</code></pre> Similar to the previous
JMPermissions, you need to pass in a Binding to show the view, and add whatever permissions you want to show. To quickly glance at all of PermissionsSwiftUI's customization and configurations, check out the cheatsheet! <br /> <br /> <br /> <br /> <br /> <br />
🛠️ Usage
Customize Permission Texts
To customize permission texts, use the modifier
setPermissionComponent() For example, you can change title, description, and image icon: <pre><code class="lang-Swift">.setPermissionComponent(for: .camera, image: AnyView(Image(systemName: "camera.fill")), title: "Camcorder", description: "App needs to record videos")</code></pre> and the result: <div style="text-align:center"> <img src="https://github.com/jevonmao/PermissionsSwiftUI/blob/main/Resources/Screenshot-camera.png" height="70"> </div> <br /> Or only change 1 of title and description:
<pre><code class="lang-Swift">setPermissionComponent(for: .tracking, title: "Trackers")</code></pre> <pre><code class="lang-Swift">setPermissionComponent(for: .tracking, description: "Tracking description")</code></pre>
Note:
- The parameters you don't provide will show the default text
- Add the
setPermissionComponent modifier on your root level view, after JMPermissions modifier The image parameter accepts AnyView, so feel free to use SF Symbols or your custom asset: <pre><code class="lang-Swift">.setPermissionComponent(for: .camera, image: AnyView(Image("Your-cool-image"))</code></pre> Even full SwiftUI views will work😱: <pre><code class="lang-Swift">.setPermissionComponent(for: .camera, image: AnyView(YourCoolView())</code></pre> You can use custom text and icons for all the supported permissions, with a single line of code. Customize Header Texts
To customize the header title, use the modifier changeHeaderTo: <img align="right" src="https://github.com/jevonmao/PermissionsSwiftUI/blob/main/Resources/Header%20annotation.png?raw=true" alt="Annotated for headers screen" height="400" /> <pre><code class="lang-Swift">.JMPermissions(showModal: $showModal, for: [.camera, .location, .calendar]) .changeHeaderTo("App Permissions")</code></pre> To customize the header description, use the modifier changeHeaderDescriptionTo: <pre><code class="lang-Swift">.JMPermissions(showModal: $showModal, for: [.camera, .location, .photo]) .changeHeaderDescriptionTo("Instagram need certain permissions in order for all the features to work.")</code></pre> To customize the bottom description, use the modifier changeBottomDescriptionTo: <pre><code class="lang-Swift">.JMPermissions(showModal: $showModal, for: [.camera, .location, .photo]) .changeBottomDescriptionTo("If not allowed, you have to enable permissions in settings")</code></pre> onAppear and onDisappear Override You might find it incredibly useful to execute your code, or perform some update action when a PermissionsSwiftUI view appears and disappears. <br /> You can perform some action when PermissionsSwiftUI view appears or disappears by: <pre><code class="lang-Swift">.JMPermissions(showModal: $showModal, for: [.locationAlways, .photo, .microphone], onAppear: {}, onDisappear: {})</code></pre> The onAppear and onDisappear closure parameters will be executed everytime PermissionsSwiftUI view appears and disappears. <br /> The same view modifier closure for state changes are available for the JMAlert modifier: <pre><code class="lang-Swift">.JMAlert(showModal: $showModal, for: [.locationAlways, .photo], onAppear: {print("Appeared")}, onDisappear: {print("Disappeared")})</code></pre> Auto Check Authorization
PermissionsSwiftUI by default will automatically check for authorization status. It will only show permissions that are currently notDetermined status. (the iOS system prevents developers from asking for denied permissions. Allowed permissions will also be ignored by PermissionsSwiftUI). If all permissions are allowed or denied, PermissionsSwiftUI will not show the modal or alert at all. To set auto check authorization, use the autoCheckAuthorization parameter: <pre><code class="lang-Swift">.JMModal(showModal: $showModal, for: [.camera], autoCheckAuthorization: false)</code></pre> same applies for JMAlert <pre><code class="lang-Swift">.JMAlert(showModal: $showModal, for: [.camera], autoCheckAuthorization: false)</code></pre> Auto Dismiss
PermissionsSwiftUI by default will not have any auto dismiss behavior. You can override this behavior to make it automatically dismiss the modal or alert after the user allows the last permission item. (All permissions must be ALLOWED, if any is DENIED, it will not auto dismiss). <pre><code class="lang-Swift">.JMModal(... autoDismiss: Bool) -> some View</code></pre> Pass in true or false to select whether to automatically dismiss the view.
Customize Colors
Using PermissionSwiftUI's capabilities, developers and designers can customize all the UI colors with incredible flexibility. You can fully configure all color at all states with your custom colors. <br />
To easily change the accent color:
<pre><code class="lang-Swift">.setAccentColor(to: Color(.sRGB, red: 56/255, green: 173/255,
blue: 169/255, opacity: 1))</code></pre>
To change the primary (default Apple blue) and tertiary (default Apple red) colors:
<pre><code class="lang-Swift">.setAccentColor(toPrimary: Color(.sRGB, red: 56/255, green: 173/255,
blue: 169/255, opacity: 1),
toTertiary: Color(.systemPink))</code></pre>
<p align="center">
<img src="https://github.com/jevonmao/PermissionsSwiftUI/blob/main/Resources/Color-custom-screenshot.png?raw=true" height="250" style="display: block; margin: auto;"/>
</p>
> ⚠️
.setAccentColor() and .setAllowButtonColor() should never be used at the same time.
To unleash the full customization of all button colors under all states, you need to pass in the
AllButtonColors struct: <pre><code class="lang-Swift">.setAllowButtonColor(to: .init(buttonIdle: ButtonColor(foregroundColor: Color, backgroundColor: Color), buttonAllowed: ButtonColor(foregroundColor: Color, backgroundColor: Color), buttonDenied: ButtonColor(foregroundColor: Color, backgroundColor: Color)))</code></pre> For more information regarding the above method, reference the official documentation.
Restrict Dismissal
PermissionsSwiftUI will by default, prevent the user from dismissing the modal and alert before all permissions have been interacted with. This means if the user has not explicitly denied or allowed EVERY permission shown, they will not be able to dismiss the PermissionsSwiftUI view. This restricts dismissal behavior can be overridden by the var restrictModalDismissal: Bool or var restrictAlertDismissal: Bool properties.
To disable the default restrict dismiss behavior:
<pre><code class="lang-Swift">.JMModal(showModal: $show, for permissions: [.camera], restrictDismissal: false)</code></pre>
You can also configure with the model:
<pre><code class="lang-Swift">let model: PermissionStore = {
var model = PermissionStore()
model.permissions = [.camera]
model.restrictModalDismissal = false
model.restrictAlertDismissal = false
return model
}
......
.JMModal(showModal: $showModal, forModel: model)</code></pre>
Configuring Health Permissions
Unlike all the other permissions, the configuration for health permission is a little different. Because Apple requires developers to explicitly set read and write types, PermissionsSwiftUI greatly simplifies the process. HKAccess The structure HKAccess is required when initializing health permission’s enum associated values. It encapsulates the read and write type permissions for the health permission.
To set read and write health types (
activeEnergyBurned is used as example here): <pre><code class="lang-Swift">let healthTypes = Set([HKSampleType.quantityType(forIdentifier: .activeEnergyBurned)!]) .JMModal(showModal: $show, for: [.health(categories: .init(readAndWrite: healthTypes))])
//Same exact syntax for JMAlert styles .JMAlert(showModal: $show, for: [.health(categories: .init(readAndWrite: healthTypes))])</code></pre> To set read or write individually: <pre><code class="lang-Swift">let readTypes = Set([HKSampleType.quantityType(forIdentifier: .activeEnergyBurned)!]) let writeTypes = Set([HKSampleType.quantityType(forIdentifier: .appleStandTime)!]) .JMModal(showModal: $showModal, for: [.health(categories: .init(read: readTypes, write: writeTypes))])</code></pre> You may also set only read or write type: <pre><code class="lang-Swift">let readTypes = Set([HKSampleType.quantityType(forIdentifier: .activeEnergyBurned)!]) .JMModal(showModal: $showModal, for: [.health(categories: .init(read: readTypes))])</code></pre>
📖 Cheatsheet
Modifiers
Customize overall accent color:
<pre><code class="lang-Swift">setAccentColor(to:)
setAccentColor(toPrimary:toTertiary:)</code></pre>
Customize title:
<pre><code class="lang-Swift">changeHeaderTo(_:)</code></pre>
Customize top description:
<pre><code class="lang-Swift">changeHeaderDescriptionTo(_:)</code></pre>
Customize bottom description:
<pre><code class="lang-Swift">changeBottomDescriptionTo(_:)</code></pre>
Customize each permission's displayed text & image:
<pre><code class="lang-Swift">setPermissionComponent(for:image:title:description:)
setPermissionComponent(for:title:)
setPermissionComponent(for:description:)</code></pre> Customize
allow button's colors: <pre><code class="lang-Swift">setAllowButtonColor(to:)</code></pre> Automatically dismiss after last <pre><code class="lang-Swift">autoDismiss: Bool</code></pre> Parameters of
JMModal and JMAlert Check authorization before showing modal or alert <pre><code class="lang-Swift">autoCheckAuthorization: Bool</code></pre> Prevent dismissing before all permissions interacted <pre><code class="lang-Swift">restrictDismissal: Bool</code></pre> Do something right before view appear <pre><code class="lang-Swift">onAppear: () -> Void</code></pre> Do something right before view disappear <pre><code class="lang-Swift">onDisappear: (() -> Void</code></pre> 🧰 Supported Permissions
Here is a list of all the permissions PermissionsSwiftUI supports. Yup, even the newest tracking permission for iOS 14 so you can stay on top of your game. All permissions in PermissionsSwiftUI come with a default name, description, and a stunning Apple native SF Symbols icon.
Support for FaceID permission is work in progress and coming soon! If you don't find a permission you need, open an issue. Even better, build it yourself and open a pull request, you can follow this step-by-step guide on adding new permissions. <br /> <br /> <br /> <img align="center" src="https://github.com/jevonmao/PermissionsSwiftUI/blob/main/Resources/All-permissions-card-new.png" alt="A card of all the permissions" width="100%">
💪 Contribute
Contributions are welcome here for coders and non-coders alike. No matter what your skill level is, you can for certain contribute to PermissionSwiftUI's open source community. Please read contributing.md before starting, and if you are looking to contributing a new type of iOS permission, be sure to read this step-by-step guide.
If you encounter ANY issue, have ANY concerns, or ANY comments, please do NOT hesitate to let me know. Open a discussion, issue, or email me. As a developer, I feel you when you don't understand something in the codebase. I try to comment and document as best as I can, but if you happen to encounter any issues, I will be happy to assist in any way I can.
Additional Information
Acknowledgement
SPPermissions is in large a SwiftUI remake of the famous Swift library SPPermissions by @verabeis. SPPermissions was initially created in 2017, and today on GitHub has over 4000 stars. PermissionsSwiftUI aims to deliver a just as beautiful and powerful library in SwiftUI. If you star ★` my project PermissionsSwiftUI, be sure to check out the original project SPPermissions where I borrowed the UI Design, some parts of README.md page, and important source code references along the way.
License
PermissionsSwiftUI is created by Jingwen (Jevon) Mao and licensed under the MIT License


