
Android Automation Framework for Python on emulators (BlissOs, BlueStacks, LDPlayer, Memu, Mumu, Android Studio ...) and rooted devices WITHOUT ADB!
📱 CyAndroEmu: Advanced Android Automation Library

Python / Cython Automation for Android Emulators
Android automations without ADB - directly on emulators
About The Project
CyAndroEmu is a powerful Python library designed for advanced Android automation. For performance reasons, it’s primarily written in C++ and Cython (Line count - C++: 20229 lines / Python: 2960 lines / Cython: 9397 lines), providing multiple backends for interacting with UI elements, handling input events, and efficiently extracting screen data.
Unlike any other Android automation library, CyAndroEmu is designed to run directly and independently on the emulator or rooted device without relying on ADB. This architecture offers significant performance and reliability advantages.
🚀 Why Choose CyAndroEmu?
✅ Key Advantages:
- No Broken Connections:
- Blazing Fast Automation:
- Unlimited Device Scalability:
- Natural Mouse Movements:
- Fingerprint Avoidance:
- Direct Botting Mode with Magisk/KernelSU:
- Easy Device-Wide Proxying:
⚡ Additional Highlights:
- Low-Level Performance:
- Multi-Backend Support:
- Seamless Emulator Integration:
- Root-Friendly:
- Magisk / KernelSU Plugins:
Getting Started
Installation
1. Download and install your favorite Android emulator, and ensure it has root access. CyAndroEmu should also work on any rooted smartphone (not tested yet). A non-root version is available here. CyAndroEmu has been tested with the following: * BlueStacks 5 * BlissOs 14, 15, 16 Go (on ProxMox, Virtual Box - Windows and VMWare - Windows) * LDPlayer * MeMuPlay * MuMuPlayer * GenyMotion * Nox Player * Android Studio - Magisk Patched PlayStore API 30 - Android 11
Although neither Magisk nor KernelSU is required, using them can significantly simplify tasks such as running Python scripts at Android startup and automatically adding the Termux folder to the PATH when accessing the ADB shell . They also assist in hiding root access and automating actions - writing your own Plugins is really simple. Here are some of my tutorials in Portuguese/English that teach you how to install them:
| How to install Python on an emulator | | |-----------|-----------| |  |
|  | |
| |  |
|  | |
| |  |
|  | |
| |  |
|  | |
| |  |
|  |
|
2. Install Termux and TermuxBoot - optional
3. Use the following command to install the required packages (Python, Pandas, NumPy and some other stuff): * Open a ADB shell, and Termux on your emulator and copy and paste this command to the ADB shell to save some typing: * necessary packages:
input text 'yes | pkg up;pkg install -y openssh;pkg install -y git;pkg install -y openssl;pkg install -y python;pkg install -y python-numpy;pkg install -y python-pip;pkg install -y clang;pkg install -y cmake;pkg install -y coreutils;pkg install -y termux-tools;pkg install -y root-repo;pkg install -y cpulimit;pkg install -y tur-repo;pkg install -y python-pandas;pkg install -y tesseract;pkg install -y imagemagick; pkg install -y imagemagick-static;yes | python -m pip install ptpython;yes | python -m pip install cyandroemu;yes | python -m pip install regex;yes | python -m pip install ptpython;yes | python -m pip install setuptools;yes | python -m pip install Cython;yes | python -m pip install requests';input keyevent KEYCODEENTER;input keyevent KEYCODEENTER* recommended packages:
input text 'yes | pkg up;yes | pkg install -y openssh;yes | pkg install -y ripgrep;yes | pkg rei libexpat;pkg install -y git;pkg install -y openssl;pkg install -y python;pkg install -y cloneit;pkg install -y python-lxml;pkg install -y python-numpy;pkg install -y python-pillow;pkg install -y python-pip;pkg install -y python-scipy;pkg install -y vim-python;pkg install -y clang;pkg install -y cmake;pkg install -y coreutils;pkg install -y termux-exec;pkg install -y termux-tools;pkg install -y root-repo;pkg install -y matplotlib;pkg install -y cpulimit;pkg install -y tur-repo;pkg install -y python-pandas;pkg install -y tmux;pkg install -y opencv-python;pkg install -y boost;pkg install -y boost-headers;pkg install -y boost-static;pkg install -y tesseract; pkg install -y tor; pkg install -y torsocks; pkg install -y fzf; pkg install -y imagemagick; pkg install -y imagemagick-static;pkg install -y python-scikit-image; pkg install -y python-polars; pkg install -y nodejs-20; pkg install -y gcc-14; pkg install -y ffmpeg7;yes | python -m pip install ptpython;yes | python -m pip install cyandroemu;yes | python -m pip install regex;yes | python -m pip install ptpython;yes | python -m pip install setuptools;yes | python -m pip install Cython;yes | python -m pip install requests';input keyevent KEYCODEENTER;input keyevent KEYCODEENTER4. Accessing Python from the ADB shell. Choose one of the 3 solutions: 1. Recommended: Install the Magisk/KernelSU plugin to automatically add the Termux bin folder to the PATH 2. Add export PATH="$PATH:/data/data/com.termux/files/usr/bin" to /system/etc/mkshrc (don't forget to set the correct owner/group ... afterwards)
3. Manually type export PATH="$PATH:/data/data/com.termux/files/usr/bin" each time you enter the ADB su shell.
Writing Python scripts
Cyandroemu will be compiled the first time you import it! Since this process is very CPU- and memory-intensive, I recommend setting the memory to 8 GB of RAM. Later on, you can reduce it. The SO files can be copied to other instances of your chosen emulator, but be careful: the CPU must be the same, as the C++ files are compiled with the flags -march=native and -mtune=native to ensure the highest possible performance."
Cyandroemu is primarily written in C++ (6 out of 7 parsers, modified sendevent, etc.) and Cython (1 parser and the Python interface), but all automation is handled using the Python class TermuxAutomation.
The Constructor
May Look Intimidating, but It’s Easy to Understand
TermuxAutomation:
    parsers: dict,
    parser_timeout: int = 30,
    addinputtap: bool = True,
    addsendeventmouse_click: bool = True,
    addsendeventtap: bool = True,
    addmouseaction: bool = True,
    mouse_device: str = "/dev/input/event4",
    touch_device: str = "/dev/input/event5",
    keyboard_device: str = "/dev/input/event1",
    touchdevicemax: int = 32767,
    mousedevicemax: int = 65535,
    inputcmdtap: str = "/system/bin/input tap",
    inputcmdtext: str = "/system/bin/input text",
    sendevent_path: str = "/system/bin/sendevent",
    screen_height: int = 768,
    screen_width: int = 1024,
    sh_exe: str = "/bin/sh",
    su_exe: str = "su",
    uiautomatordumppath: str = "/sdcard/window_dump.xml",
    uiautomatorcpulimit: int = 5,
    systembinpath: str = "/system/bin/",
    path_screencap: str = "screencap",
    pathexetesseract: str = "/data/data/com.termux/files/usr/bin/tesseract",
    pathexeimagemagick: str = "/data/data/com.termux/files/usr/bin/magick",
    tesseract_args: str = '"-l por+eng --oem 3"',
    imagemagick_args: object = None,
    tesseractpathoutpic: str = "/sdcard/screenshot.ppm",
    uiautomator2downloadlink1: str = "https://github.com/hansalemaos/uiautomator2tocsv/raw/refs/heads/main/app-uiautomator-test.apk",
    uiautomator2downloadlink2: str = "https://github.com/hansalemaos/uiautomator2tocsv/raw/refs/heads/main/app-uiautomator.apk",
    uiautomator2savepath1: str = "/sdcard/app-uiautomator-test.apk",
    uiautomator2savepath2: str = "/sdcard/app-uiautomator.apk",
    lcpdequesize: int = 40960,
    lcpprintstdout: bool = False,
    lcpprintstderr: bool = False,
    kwargs: object = None,
    adbkeyboardlink="https://github.com/hansalemaos/ADBKeyBoard/raw/refs/heads/master/ADBKeyboard.apk",
    adbkeyboardsave_path="/sdcard/ADBKeyboard.apk",
    validadbkeyboards=(
        "com.android.adbkeyboard/.AdbIME",
        "com.github.uiautomator/.AdbKeyboard",
    ),
Each constructor argument explained
parsers: dict
The heart of the library, containing all the C++ applications required to run the automation. To obtain the dictionary, use the following command. The first time you run it, it will take about 5 minutes as the C++ files will be downloaded and compiled using GCC.
parsers = TermuxAutomation.loadparsersordownloadand_compile("g++")parser_timeout: int = 30
The timeout (in seconds) for subprocess.run.
addinputtap: bool = True
Wether to add the option to input tap any elment.
addsendeventmouse_click: bool = True
Whether to add the option to perform mouse clicks on any element using sendevent.
addsendeventtap: bool = True
Whether to add the option to tap any element using sendevent.
addmouseaction: bool = True
Whether to add the option to perform mouse actions on elements (e.g., move to, right-click, left-click, middle-click, etc.) using a modified version of sendevent.
mouse_device: str = "/dev/input/event4"
touch_device: str = "/dev/input/event5"
keyboard_device: str = "/dev/input/event1"
touchdevicemax: int = 32767
mousedevicemax: int = 65535
The mouse/keyboard/touch devices and their corresponding device max can be identified using
getevent -lpfindsuitabledevicesforinput_events:
dfdevices = TermuxAutomation.findsuitabledevicesforinputevents() # returns a pandas DataFrameinputcmdtap: str = "/system/bin/input tap"
inputcmdtext: str = "/system/bin/input text"
sendevent_path: str = "/system/bin/sendevent"
These are the standard input commands. In most cases, there’s no need to modify them.
screen_height: int = 768
screen_width: int = 1024
Screen height and screen width, can be identified using
wm sizeor by using the static method getresolutionof_screen
screenwidth, screenheight = TermuxAutomation.getresolutionof_screen()[!CAUTION]
**MAKE SURE TO PROVIDE THE CORRECT VALUES HERE AND DO NOT ROTATE THE SCREEN DURING AUTOMATION!
Many parsers rely on this information to function correctly.**
sh_exe: str = "/bin/sh"
The path to the shell executable, in most cases, there’s no need to modify it.
su_exe: str = "su"
The command used to enter su (superuser) mode. In most cases, there’s no need to modify it.
uiautomatordumppath: str = "/sdcard/window_dump.xml"
Dump path for uiautomator. In most cases, there’s no need to modify it.
uiautomatorcpulimit: int = 5
The CPU usage limit for the UIAutomator + cpulimit backend.
systembinpath: str = "/system/bin/"
The path where system executables are stored. In most cases, there’s no need to modify it.
path_screencap: str = "screencap"
The command used for taking screenshots. In most cases, there’s no need to modify it.
pathexetesseract: str = "/data/data/com.termux/files/usr/bin/tesseract"
The path to the Tesseract executable. In most cases, there’s no need to modify it.
pathexeimagemagick: str = "/data/data/com.termux/files/usr/bin/magick"
The path to the ImageMagick executable. Used for tesseract preprocessing. In most cases, there’s no need to modify it.
tesseract_args: str = '"-l por+eng --oem 3"'
Default Tesseract arguments. The default languages are Portuguese (por) and English (eng), with fully automatic page segmentation but no OSD (default). Use tesseract --help-extra to view all available options. Words are grouped using pandas
**Note: Be aware that changing the output format may cause the parser to crash, as it requires the output to be in hOCR format.**
imagemagick_args: object = None
Pass None if you don’t want to preprocess the screenshot before passing it to Tesseract. If you choose to preprocess, you can provide ImageMagick command-line arguments to adjust the image (e.g., converting to grayscale, increasing contrast) to improve OCR accuracy.
tesseractpathoutpic: str = "/sdcard/screenshot.ppm"
The C++ Tesseract parser captures a screenshot using screencap, converts the image to a PPM format, and saves the converted output to disk before invoking Tesseract. In most cases, there’s no need to modify this path.
uiautomator2downloadlink1: str = "https://github.com/hansalemaos/uiautomator2tocsv/raw/refs/heads/main/app-uiautomator-test.apk"
uiautomator2downloadlink2: str = "https://github.com/hansalemaos/uiautomator2tocsv/raw/refs/heads/main/app-uiautomator.apk"
Backups APKs from the Uiautomator2 project.
You can also use my modified version which shows all hidden elements (good for web scraping)
https://github.com/hansalemaos/uiautomator2tocsv/raw/refs/heads/main/app-uiautomator-testwithhidden_elements.apk
https://github.com/hansalemaos/uiautomator2tocsv/raw/refs/heads/main/app-uiautomatorwithhidden_elements.apk
uiautomator2savepath1: str = "/sdcard/app-uiautomator-test.apk"
uiautomator2savepath2: str = "/sdcard/app-uiautomator.apk"
Download path for the APKs from the Uiautomator2 project. In most cases, there’s no need to modify them.
lcpdequesize: int = 40960
The ring buffer size of the C++ vector used by the Logcat Parser backend. In most cases, there’s no need to modify it.
lcpprintstdout: bool = False
lcpprintstderr: bool = False
Debug print options for the Logcat Parser backend. These should only be enabled if you encounter issues with the Logcat Parser backend.
kwargs: object = None
kwargs for subprocess.run In most cases, there’s no need to modify it.
adbkeyboardlink: str = "https://github.com/hansalemaos/ADBKeyBoard/raw/refs/heads/master/ADBKeyboard.apk"
Backup APK from the ADBKeyboard project. It allows sending Unicode characters but may not work on all devices. In most cases, there’s no need to modify it.
adbkeyboardsave_path: str = "/sdcard/ADBKeyboard.apk"
The download path for the APK from the ADBKeyboard project project. In most cases, there’s no need to modify it.
validadbkeyboards: tuple = ("com.android.adbkeyboard/.AdbIME", "com.github.uiautomator/.AdbKeyboard",)
Possible package names for ADBKeyboard.
- The first name is the original from the ADBKeyboard project project.
- The second name is from the Uiautomator2 project project.
Creating an instance
from cyandroemu import TermuxAutomation, clean_zombies
import pandas as pd from time import sleep as timesleep import atexit
Ensure background parsers and shells are terminated on exit
atexit.register(clean_zombies)
Load parsers (first time may take ~5 mins due to download and compilation)
parsers = TermuxAutomation.loadparsersordownloadand_compile("g++")
Detect input devices dynamically (returns a pandas DataFrame)
dfdevices = TermuxAutomation.findsuitabledevicesforinputevents()
print(df_devices)
screenwidth, screenheight = TermuxAutomation.getresolutionof_screen()
On VMware and BlissOS, device order may change after a reboot, so hardcoding is avoided.
If device order doesn't change on your emulator, you can hardcode the path, e.g.:
mouse_device = "/dev/input/event4"
te = TermuxAutomation(     parsers=parsers,     mousedevice=dfdevices.loc[         (dfdevices["max"].str.len() == 2) & (dfdevices["type"] == "mouse")     ]["path"].iloc[0],     keyboarddevice=dfdevices.loc[         (dfdevices["keysfound"]) & (df_devices["type"] == "keyboard")     ]["path"].iloc[0],     mousedevicemax=df_devices.loc[         (dfdevices["max"].str.len() == 2) & (dfdevices["type"] == "mouse")     ]["max"].iloc[0][0],     screenheight=screenheight,     screenwidth=screenwidth, ) Clean up any leftover background processes (e.g., uiautomator2 server) from earlier automations. atexit should handle this, but "Doppelt genaeht haelt besser :)" (German proverb - double-stitched holds better).
te.kill_zombies()
Automation - it's all about pandas DataFrames
Most automation tools implement their own logic for finding elements, which often looks like this:
self.find(text="Some text").children[0].click()
That looks beautiful and very Pythonic, but most of the time, it’s just unreliable — mainly when the attributes and positions of objects vary, or when the objects aren’t loaded on the screen yet.
Instead of bothering you with my own "great" ideas, I decided to rely on battle-tested solutions: pandas DataFrames.
With DataFrames, you can leverage powerful features like:
- Fast sorting algorithms
- All kinds of comparisons
- Regular expressions (regex)
- Custom filter functions
Pretty Print
The default repr and str functions in pandas are not ideal for displaying DataFrames, which is why they’ve been monkey-patched to ensure the entire DataFrame is pretty-printed.
df = te.getdfuiautomator2(with_screenshot=True)
print(df)
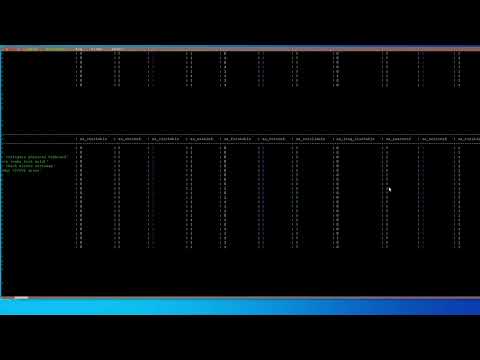
Now, when you print the DataFrame, you’ll see the complete content neatly formatted, making it easier to analyze UI elements. For a line-break-free experience, I recommend using the VTM terminal
Example of a pandas DataFrame in the VTM terminal
Getting screenshots of each element
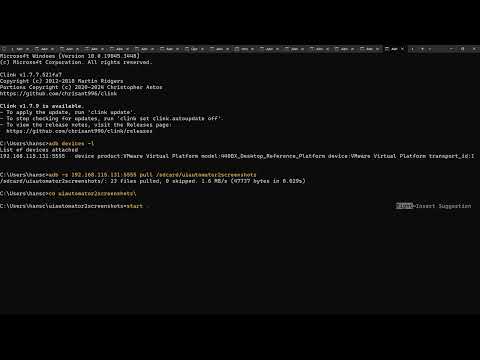
In the example above, the elements are very easy to locate. However, this is not always the case. You might want to see a screenshot of each element to write your script faster. In this case, you can use the following command on the device:
df.bbsavescreenshotsaspng("/sdcard/uiautomator2screenshots")Then, pull the screenshots using ADB to review them on your computer:
adb -s 192.168.115.131:5555 pull /sdcard/uiautomator2screenshotsThe screenshot filenames correspond to the location of the elements in the DataFrame. For example, if you want to locate the third element (index 2), simply run:
df.iloc[2]Example of element screenshots
The Backends
Uiautomator2 Backend
| Advantages ✅ | Disadvantages ❌ | |------------------------------------------------|----------------------------------------------------------| | Very fast parsing | Blocks other parsers like the Logcat parser and traditional UIAutomator | | Never fails due to excessive screen movement (unlike UIAutomator) | Requires APKs to be installed | | Includes both element text and description | The server needs to run in the background | | Great for web scraping and interacting with web elements | Automation might be detected when used with installed apps | | Runs on any emulator | Useless with specific engines like the Unreal Engine |
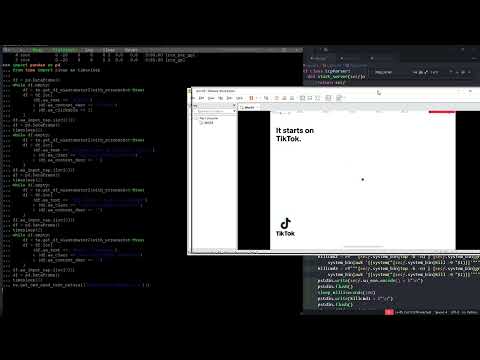
Video - in action
Python Code
from cyandroemu import TermuxAutomation, clean_zombies
import pandas as pd
from time import sleep as timesleep
import atexit
Ensure all background processes are terminated on exit
atexit.register(clean_zombies)
Load parsers (first time may take ~5 mins due to download/compilation)
parsers = TermuxAutomation.loadparsersordownloadand_compile("g++")
Detect input devices dynamically (Necessary on BlissOS 16 Go with VMWare)
dfdevices = TermuxAutomation.findsuitabledevicesforinputevents()
screenwidth, screenheight = TermuxAutomation.getresolutionof_screen()

Initialize TermuxAutomation with dynamic device paths
te = TermuxAutomation(
    parsers=parsers,
    mousedevice=dfdevices.loc[
        (dfdevices["max"].str.len() == 2) & (dfdevices["type"] == "mouse")
    ]["path"].iloc[0],
    keyboarddevice=dfdevices.loc[
        (dfdevices["keysfound"]) & (df_devices["type"] == "keyboard")
    ]["path"].iloc[0],
    mousedevicemax=df_devices.loc[
        (dfdevices["max"].str.len() == 2) & (dfdevices["type"] == "mouse")
    ]["max"].iloc[0][0],
    screenheight=screenheight,
    screenwidth=screenwidth,
)
Kill any leftover background processes
te.kill_zombies()
You can install the APK using:
te.downloadandinstalluiautomator2apks()
Ensure elements are loaded on the screen instead of relying solely on sleep
df = pd.DataFrame()
while df.empty:
    # First DataFrame load may take ~5 seconds (UIAutomator2 server startup)
    # For production scripts, set with_screenshot=False for better performance
    # You can also pass these kwargs to temporarily change the default paramenters passed to the class constructor (valid for all backends, but not recommended)
        # If you pass anything else than None, it will override the default parameters once.
        # addinputtap=None,
        # addsendeventmouse_click=None,
        # addsendeventtap=None,
        # addmouseaction=None,
        # x_column=None,
        # y_column=None,
        # mouse_device=None,
        # touch_device=None,
        # touchdevicemax=None,
        # mousedevicemax=None,
        # input_cmd=None,
        # sendevent_path=None,
        # screen_height=None,
        # screen_width=None,
        # mouseactionexe=None,
        # sh_exe=None,
        # su_exe=None,
        # kwargs=None,
        # timeout=None,
    df = te.getdfuiautomator2(with_screenshot=True)
    # Filter elements to target the TikTok app
    df = df.loc[
        (df.aa_text == "TikTok")
        & (df.aacontentdesc == "TikTok")
        & (df.aa_clickable == 1)
    ]
Click the first matching element using input tap
Optional: Add offset like df.aainputtap.iloc0
df.aainputtap.iloc[0]()
Clear DataFrame for the next loop
df = pd.DataFrame()
optional sleep
timesleep(2)
Repeating the same process for other UI elements
while df.empty:
    df = te.getdfuiautomator2(with_screenshot=True)
    df = df.loc[
        (df.aa_text == "Already have an account? Log in")
        & (df.aa_clazz == "android.widget.Button")
        & (df.aacontentdesc == "")
    ]
df.aainputtap.iloc[0]()
df = pd.DataFrame()
timesleep(2)
while df.empty:
    df = te.getdfuiautomator2(with_screenshot=True)
    df = df.loc[
        (df.aa_text == "Use phone / email / username")
        & (df.aa_clazz == "android.widget.TextView")
        & (df.aacontentdesc == "")
    ]
df.aainputtap.iloc[0]()
df = pd.DataFrame()
timesleep(2)
while df.empty:
    df = te.getdfuiautomator2(with_screenshot=True)
    df = df.loc[
        (df.aa_text == "Email / Username")
        & (df.aa_clazz == "android.widget.TextView")
        & (df.aacontentdesc == "")
    ]
df.aainputtap.iloc[0]()
df = pd.DataFrame()
timesleep(2)
Send text input naturally using a lightweight Cython class
In this example, call is used directly to enter the email once
te.getcmdsendtextnatural("myemailtest@gmail.com")()
Example of a Pandas DataFrame (column width cropped to 30 chars)
|index |aaindex |aaindent |aatext |aaresourceid |aaclazz |aapackage |aacontentdesc |aacheckable |aachecked |aaclickable |aaenabled |aafocusable |aafocused |aascrollable |aalongclickable |aapassword |aaselected |aavisibletouser |aabounds |aadrawingorder |aahint |aadisplayid |aalineindex |aachildren |aaparents |aastartx |aastarty |aaendx |aaendy |aacenterx |aacentery |aawidth |aaheight |aaarea |aawhrelation |aainputtap |aasendeventmouseclick |aasendeventtap |aamouseaction |aa_screenshot | |------------------------------|------------------------------|------------------------------|------------------------------|------------------------------|------------------------------|------------------------------|------------------------------|------------------------------|------------------------------|------------------------------|------------------------------|------------------------------|------------------------------|------------------------------|------------------------------|------------------------------|------------------------------|------------------------------|------------------------------|------------------------------|------------------------------|------------------------------|------------------------------|------------------------------|------------------------------|------------------------------|------------------------------|------------------------------|------------------------------|------------------------------|------------------------------|------------------------------|------------------------------|------------------------------|------------------------------|------------------------------|------------------------------|------------------------------|------------------------------|------------------------------| |0 |0 |4 | |com.android.systemui:id/status|android.widget.FrameLayout |com.android.systemui | |0 |0 |0 |1 |0 |0 |0 |0 |0 |0 |1 |[0,0][1024,24] |1 | |0 |1 |() |() |0 |0 |1024 |24 |512 |12 |1024 |24 |24576 |42.666668 |(offsetx=0, offsety=0) |(offsetx=0, offsety=0, durat|(offsetx=0, offsety=0, durat|(offsetx=0, offsety=0, actio|[[[255 255 255] [255 255 255| |1 |0 |6 |8:18 |com.android.systemui:id/clock |android.widget.TextView |com.android.systemui |8:18 PM |0 |0 |0 |1 |0 |0 |0 |0 |0 |0 |1 |[16,0][45,24] |2 | |0 |2 |() |() |16 |0 |45 |24 |30 |12 |29 |24 |696 |1.208333 |(offsetx=0, offsety=0) |(offsetx=0, offsety=0, durat|(offsetx=0, offsety=0, durat|(offsetx=0, offsety=0, actio|[[[255 255 255] [255 255 255| |2 |1 |6 | | |android.widget.ImageView |com.android.systemui |Termux notification: 1 session|0 |0 |0 |1 |0 |0 |0 |0 |0 |0 |1 |[45,0][69,24] |4 | |0 |3 |() |() |45 |0 |69 |24 |57 |12 |24 |24 |576 |1.0 |(offsetx=0, offsety=0) |(offsetx=0, offsety=0, durat|(offsetx=0, offsety=0, durat|(offsetx=0, offsety=0, actio|[[[255 255 255] [255 255 255| |3 |2 |6 | | |android.widget.ImageView |com.android.systemui |Settings notification: NECVMWa|0 |0 |0 |1 |0 |0 |0 |0 |0 |0 |1 |[69,0][93,24] |5 | |0 |4 |() |() |69 |0 |93 |24 |81 |12 |24 |24 |576 |1.0 |(offsetx=0, offsety=0) |(offsetx=0, offsety=0, durat|(offsetx=0, offsety=0, durat|(offsetx=0, offsety=0, actio|[[[255 255 255] [255 255 255| |4 |3 |6 | | |android.widget.ImageView |com.android.systemui |Ethernet. |0 |0 |0 |1 |0 |0 |0 |0 |0 |0 |1 |[959,1][978,23] |12 | |0 |5 |() |() |959 |1 |978 |23 |968 |12 |19 |22 |418 |0.863636 |(offsetx=0, offsety=0) |(offsetx=0, offsety=0, durat|(offsetx=0, offsety=0, durat|(offsetx=0, offsety=0, actio|[[[255 255 255] [255 255 255| |5 |4 |6 | |com.android.systemui:id/batter|android.widget.LinearLayout |com.android.systemui |Battery percentage unknown. |0 |0 |0 |1 |0 |0 |0 |0 |0 |0 |1 |[984,0][996,24] |16 | |0 |6 |() |() |984 |0 |996 |24 |990 |12 |12 |24 |288 |0.5 |(offsetx=0, offsety=0) |(offsetx=0, offsety=0, durat|(offsetx=0, offsety=0, durat|(offsetx=0, offsety=0, actio|[[[255 255 255] [255 255 255| |6 |0 |2 | | |android.widget.FrameLayout |com.zhiliaoapp.musically | |0 |0 |0 |1 |0 |0 |0 |0 |0 |0 |1 |[0,0][1024,768] |0 | |0 |7 |() |() |0 |0 |1024 |768 |512 |384 |1024 |768 |786432 |1.333333 |(offsetx=0, offsety=0) |(offsetx=0, offsety=0, durat|(offsetx=0, offsety=0, durat|(offsetx=0, offsety=0, actio|[[[255 255 255] [255 255 255| |7 |0 |4 | |com.zhiliaoapp.musically:id/d4|android.view.ViewGroup |com.zhiliaoapp.musically | |0 |0 |0 |1 |0 |0 |0 |0 |0 |0 |1 |[0,24][1024,736] |1 | |0 |8 |() |() |0 |24 |1024 |736 |512 |380 |1024 |712 |729088 |1.438202 |(offsetx=0, offsety=0) |(offsetx=0, offsety=0, durat|(offsetx=0, offsety=0, durat|(offsetx=0, offsety=0, actio|[[[255 255 255] [255 255 255| |8 |0 |6 | |com.zhiliaoapp.musically:id/r7|android.widget.ImageView |com.zhiliaoapp.musically |Report a problem |0 |0 |1 |1 |1 |0 |0 |0 |0 |0 |1 |[4,26][52,74] |3 | |0 |9 |() |() |4 |26 |52 |74 |28 |50 |48 |48 |2304 |1.0 |(offsetx=0, offsety=0) |(offsetx=0, offsety=0, durat|(offsetx=0, offsety=0, durat|(offsetx=0, offsety=0, actio|[[[255 255 255] [255 255 255| |9 |2 |6 |Skip |com.zhiliaoapp.musically:id/p6|android.widget.Button |com.zhiliaoapp.musically | |0 |0 |1 |1 |1 |0 |0 |0 |0 |0 |1 |[980,38][1008,56] |5 | |0 |10 |() |() |980 |38 |1008 |56 |994 |47 |28 |18 |504 |1.555556 |(offsetx=0, offsety=0) |(offsetx=0, offsety=0, durat|(offsetx=0, offsety=0, durat|(offsetx=0, offsety=0, actio|[[[255 255 255] [255 255 255| |10 |3 |6 | |com.zhiliaoapp.musically:id/tt|androidx.viewpager.widget.View|com.zhiliaoapp.musically | |0 |0 |0 |1 |1 |0 |1 |0 |0 |0 |1 |[0,77][1024,736] |2 | |0 |11 |() |() |0 |77 |1024 |736 |512 |406 |1024 |659 |674816 |1.553869 |(offsetx=0, offsety=0) |(offsetx=0, offsety=0, durat|(offsetx=0, offsety=0, durat|(offsetx=0, offsety=0, actio|[[[255 255 255] [255 255 255| |11 |0 |8 | |com.zhiliaoapp.musically:id/c7|androidx.recyclerview.widget.R|com.zhiliaoapp.musically | |0 |0 |0 |1 |1 |0 |0 |0 |0 |0 |1 |[267,77][758,396] |1 | |0 |12 |() |() |267 |77 |758 |396 |512 |236 |491 |319 |156629 |1.539185 |(offsetx=0, offsety=0) |(offsetx=0, offsety=0, durat|(offsetx=0, offsety=0, durat|(offsetx=0, offsety=0, actio|[[[255 255 255] [255 255 255| |12 |0 |10 | | |android.widget.LinearLayout |com.zhiliaoapp.musically | |0 |0 |0 |1 |0 |0 |0 |0 |0 |0 |1 |[267,82][758,228] |1 | |0 |13 |() |() |267 |82 |758 |228 |512 |155 |491 |146 |71686 |3.363014 |(offsetx=0, offsety=0) |(offsetx=0, offsety=0, durat|(offsetx=0, offsety=0, durat|(offsetx=0, offsety=0, actio|[[[255 255 255] [255 255 255| |13 |0 |12 |Sign up for TikTok |com.zhiliaoapp.musically:id/ti|android.widget.TextView |com.zhiliaoapp.musically | |0 |0 |0 |1 |0 |0 |0 |1 |0 |0 |1 |[267,122][758,150] |1 | |0 |14 |() |() |267 |122 |758 |150 |512 |136 |491 |28 |13748 |17.535715 |(offsetx=0, offsety=0) |(offsetx=0, offsety=0, durat|(offsetx=0, offsety=0, durat|(offsetx=0, offsety=0, actio|[[[255 255 255] [255 255 255| |14 |1 |12 |Create a profile, follow other|com.zhiliaoapp.musically:id/oe|android.widget.TextView |com.zhiliaoapp.musically | |0 |0 |0 |1 |0 |0 |0 |0 |0 |0 |1 |[267,162][758,200] |2 | |0 |15 |() |() |267 |162 |758 |200 |512 |181 |491 |38 |18658 |12.921053 |(offsetx=0, offsety=0) |(offsetx=0, offsety=0, durat|(offsetx=0, offsety=0, durat|(offsetx=0, offsety=0, actio|[[[255 255 255] [255 255 255| |15 |1 |10 | |com.zhiliaoapp.musically:id/cz|android.widget.Button |com.zhiliaoapp.musically |Use phone or email |0 |0 |1 |1 |1 |0 |0 |0 |0 |0 |1 |[267,228][758,272] |2 | |0 |16 |() |() |267 |228 |758 |272 |512 |250 |491 |44 |21604 |11.159091 |(offsetx=0, offsety=0) |(offsetx=0, offsety=0, durat|(offsetx=0, offsety=0, durat|(offsetx=0, offsety=0, actio|[[[255 255 255] [255 255 255| |16 |0 |12 |Use phone or email |com.zhiliaoapp.musically:id/c7|android.widget.TextView |com.zhiliaoapp.musically | |0 |0 |0 |1 |0 |0 |0 |0 |0 |0 |1 |[454,241][593,260] |1 | |0 |17 |() |() |454 |241 |593 |260 |523 |250 |139 |19 |2641 |7.31579 |(offsetx=0, offsety=0) |(offsetx=0, offsety=0, durat|(offsetx=0, offsety=0, durat|(offsetx=0, offsety=0, actio|[[[255 255 255] [255 255 255| |17 |2 |10 | |com.zhiliaoapp.musically:id/cz|android.widget.Button |com.zhiliaoapp.musically |Continue with Facebook |0 |0 |1 |1 |1 |0 |0 |0 |0 |0 |1 |[267,284][758,328] |3 | |0 |18 |() |() |267 |284 |758 |328 |512 |306 |491 |44 |21604 |11.159091 |(offsetx=0, offsety=0) |(offsetx=0, offsety=0, durat|(offsetx=0, offsety=0, durat|(offsetx=0, offsety=0, actio|[[[255 255 255] [255 255 255| |18 |0 |12 |Continue with Facebook |com.zhiliaoapp.musically:id/c7|android.widget.TextView |com.zhiliaoapp.musically | |0 |0 |0 |1 |0 |0 |0 |0 |0 |0 |1 |[437,297][611,316] |1 | |0 |19 |() |() |437 |297 |611 |316 |524 |306 |174 |19 |3306 |9.157895 |(offsetx=0, offsety=0) |(offsetx=0, offsety=0, durat|(offsetx=0, offsety=0, durat|(offsetx=0, offsety=0, actio|[[[255 255 255] [255 255 255| |19 |3 |10 | |com.zhiliaoapp.musically:id/cz|android.widget.Button |com.zhiliaoapp.musically |Continue with Google |0 |0 |1 |1 |1 |0 |0 |0 |0 |0 |1 |[267,340][758,384] |4 | |0 |20 |() |() |267 |340 |758 |384 |512 |362 |491 |44 |21604 |11.159091 |(offsetx=0, offsety=0) |(offsetx=0, offsety=0, durat|(offsetx=0, offsety=0, durat|(offsetx=0, offsety=0, actio|[[[255 255 255] [255 255 255| |20 |0 |12 |Continue with Google |com.zhiliaoapp.musically:id/c7|android.widget.TextView |com.zhiliaoapp.musically | |0 |0 |0 |1 |0 |0 |0 |0 |0 |0 |1 |[445,353][602,371] |1 | |0 |21 |() |() |445 |353 |602 |371 |523 |362 |157 |18 |2826 |8.722222 |(offsetx=0, offsety=0) |(offsetx=0, offsety=0, durat|(offsetx=0, offsety=0, durat|(offsetx=0, offsety=0, actio|[[[255 255 255] [255 255 255| |21 |1 |8 |By continuing with an account |com.zhiliaoapp.musically:id/rw|android.widget.TextView |com.zhiliaoapp.musically | |0 |0 |0 |1 |1 |0 |0 |0 |0 |0 |1 |[32,628][992,675] |3 | |0 |22 |() |() |32 |628 |992 |675 |512 |651 |960 |47 |45120 |20.425531 |(offsetx=0, offsety=0) |(offsetx=0, offsety=0, durat|(offsetx=0, offsety=0, durat|(offsetx=0, offsety=0, actio|[[[255 255 255] [255 255 255| |22 |2 |8 |Already have an account? Log i|com.zhiliaoapp.musically:id/s5|android.widget.Button |com.zhiliaoapp.musically | |0 |0 |1 |1 |1 |0 |0 |0 |0 |0 |1 |[0,676][1024,736] |7 | |0 |23 |() |() |0
README truncated. View on GitHub


