
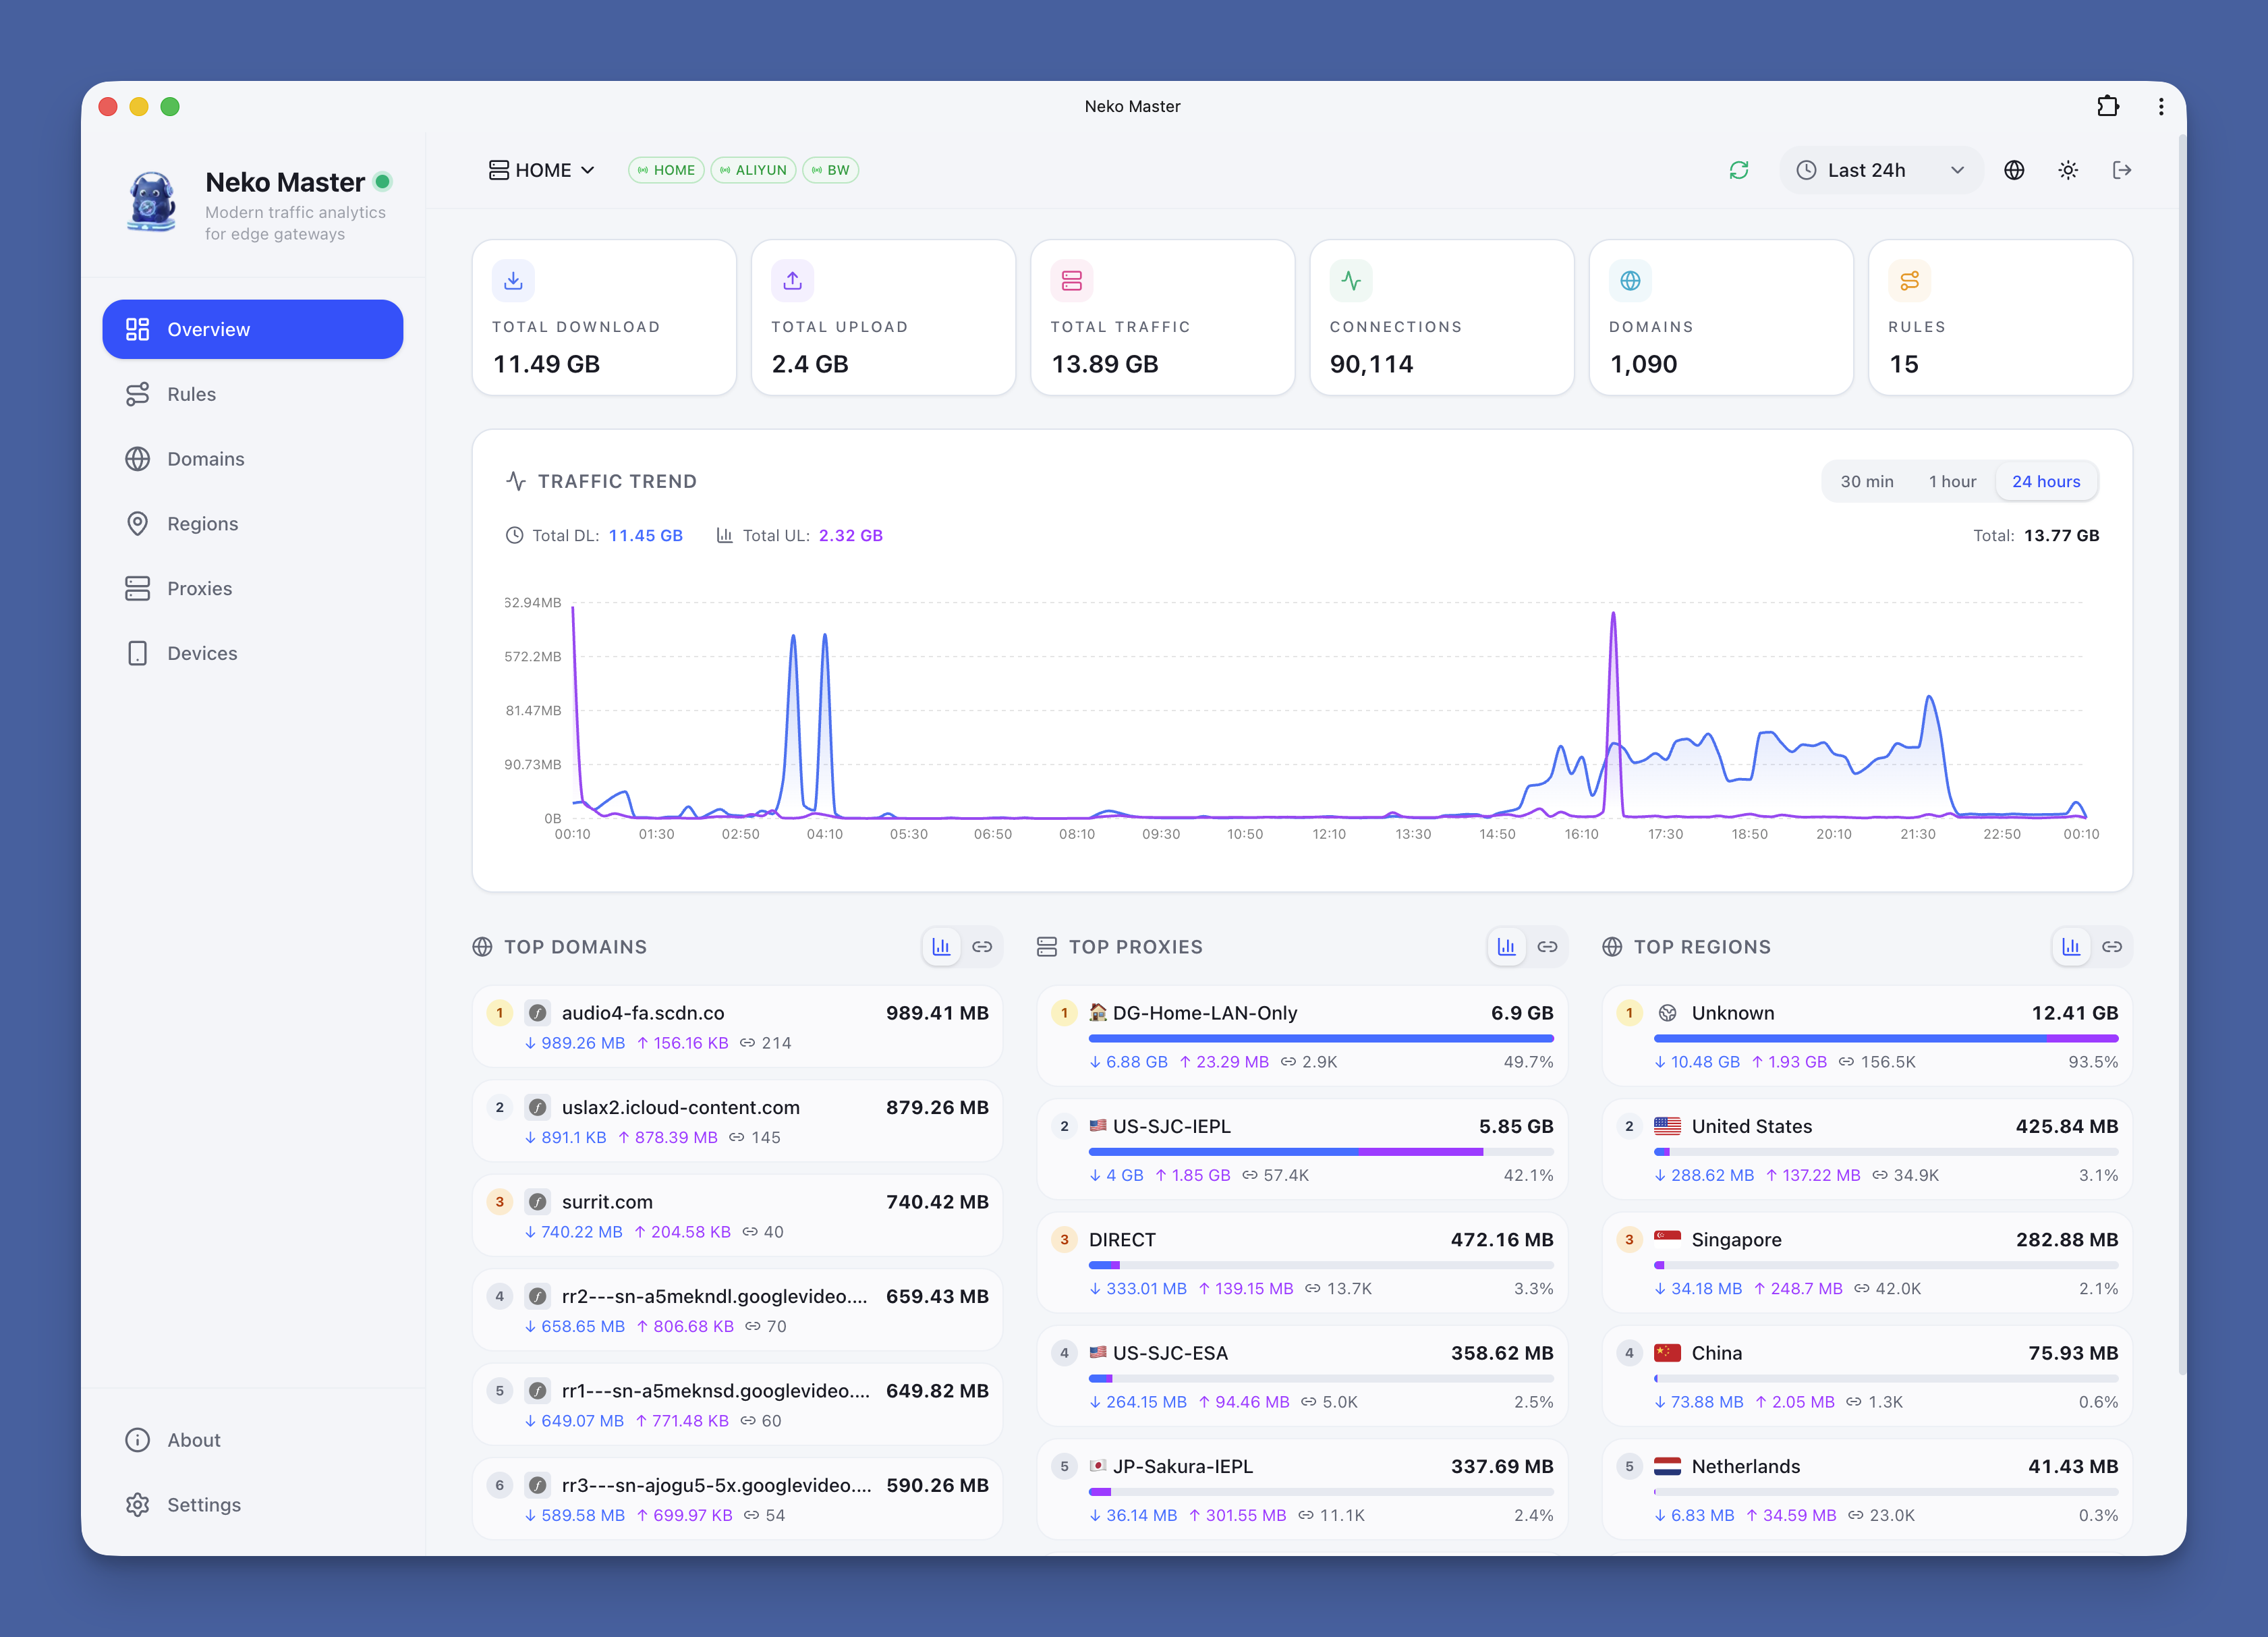
A modern and elegant dashboard for network traffic visualization and analysis.

Neko Master
See your network traffic clearly.
Real-time monitoring · Traffic auditing · Multi-gateway support
English | 中文







[!IMPORTANT]
Disclaimer>
This project is a traffic analysis and visualization tool
for local gateway environments.>
It does not provide any network access service,
proxy subscription, or cross-network connectivity.
All data is collected from the user's own network environment.>
This project is open-sourced under the MIT License. We assume no responsibility for any consequences resulting from the use of this software. Please use it in compliance with applicable laws and regulations.
|
|
|
|
About the Name
Neko (ねこ) means cat in Japanese. Pronounced /ˈneɪkoʊ/ (NEH-ko).
Like a cat, Neko Master observes network traffic quietly and precisely. It is a lightweight analytics dashboard designed for modern gateway environments.
📋 Table of Contents
- ✨ Features
- 🚀 Quick Start
- 🤖 Agent Deployment
- 📖 First Use
- 🔧 Port Conflict Resolution
- 🐳 Docker Configuration
- 🗄️ ClickHouse (Optional)
- 🌐 Reverse Proxy & Tunnel
- 🔐 Authentication & Security
- ❓ FAQ
- 🏗️ Architecture Guide
- 🤝 Feedback & Issues
- 📁 Project Structure
- 🛠️ Tech Stack
- 📄 License
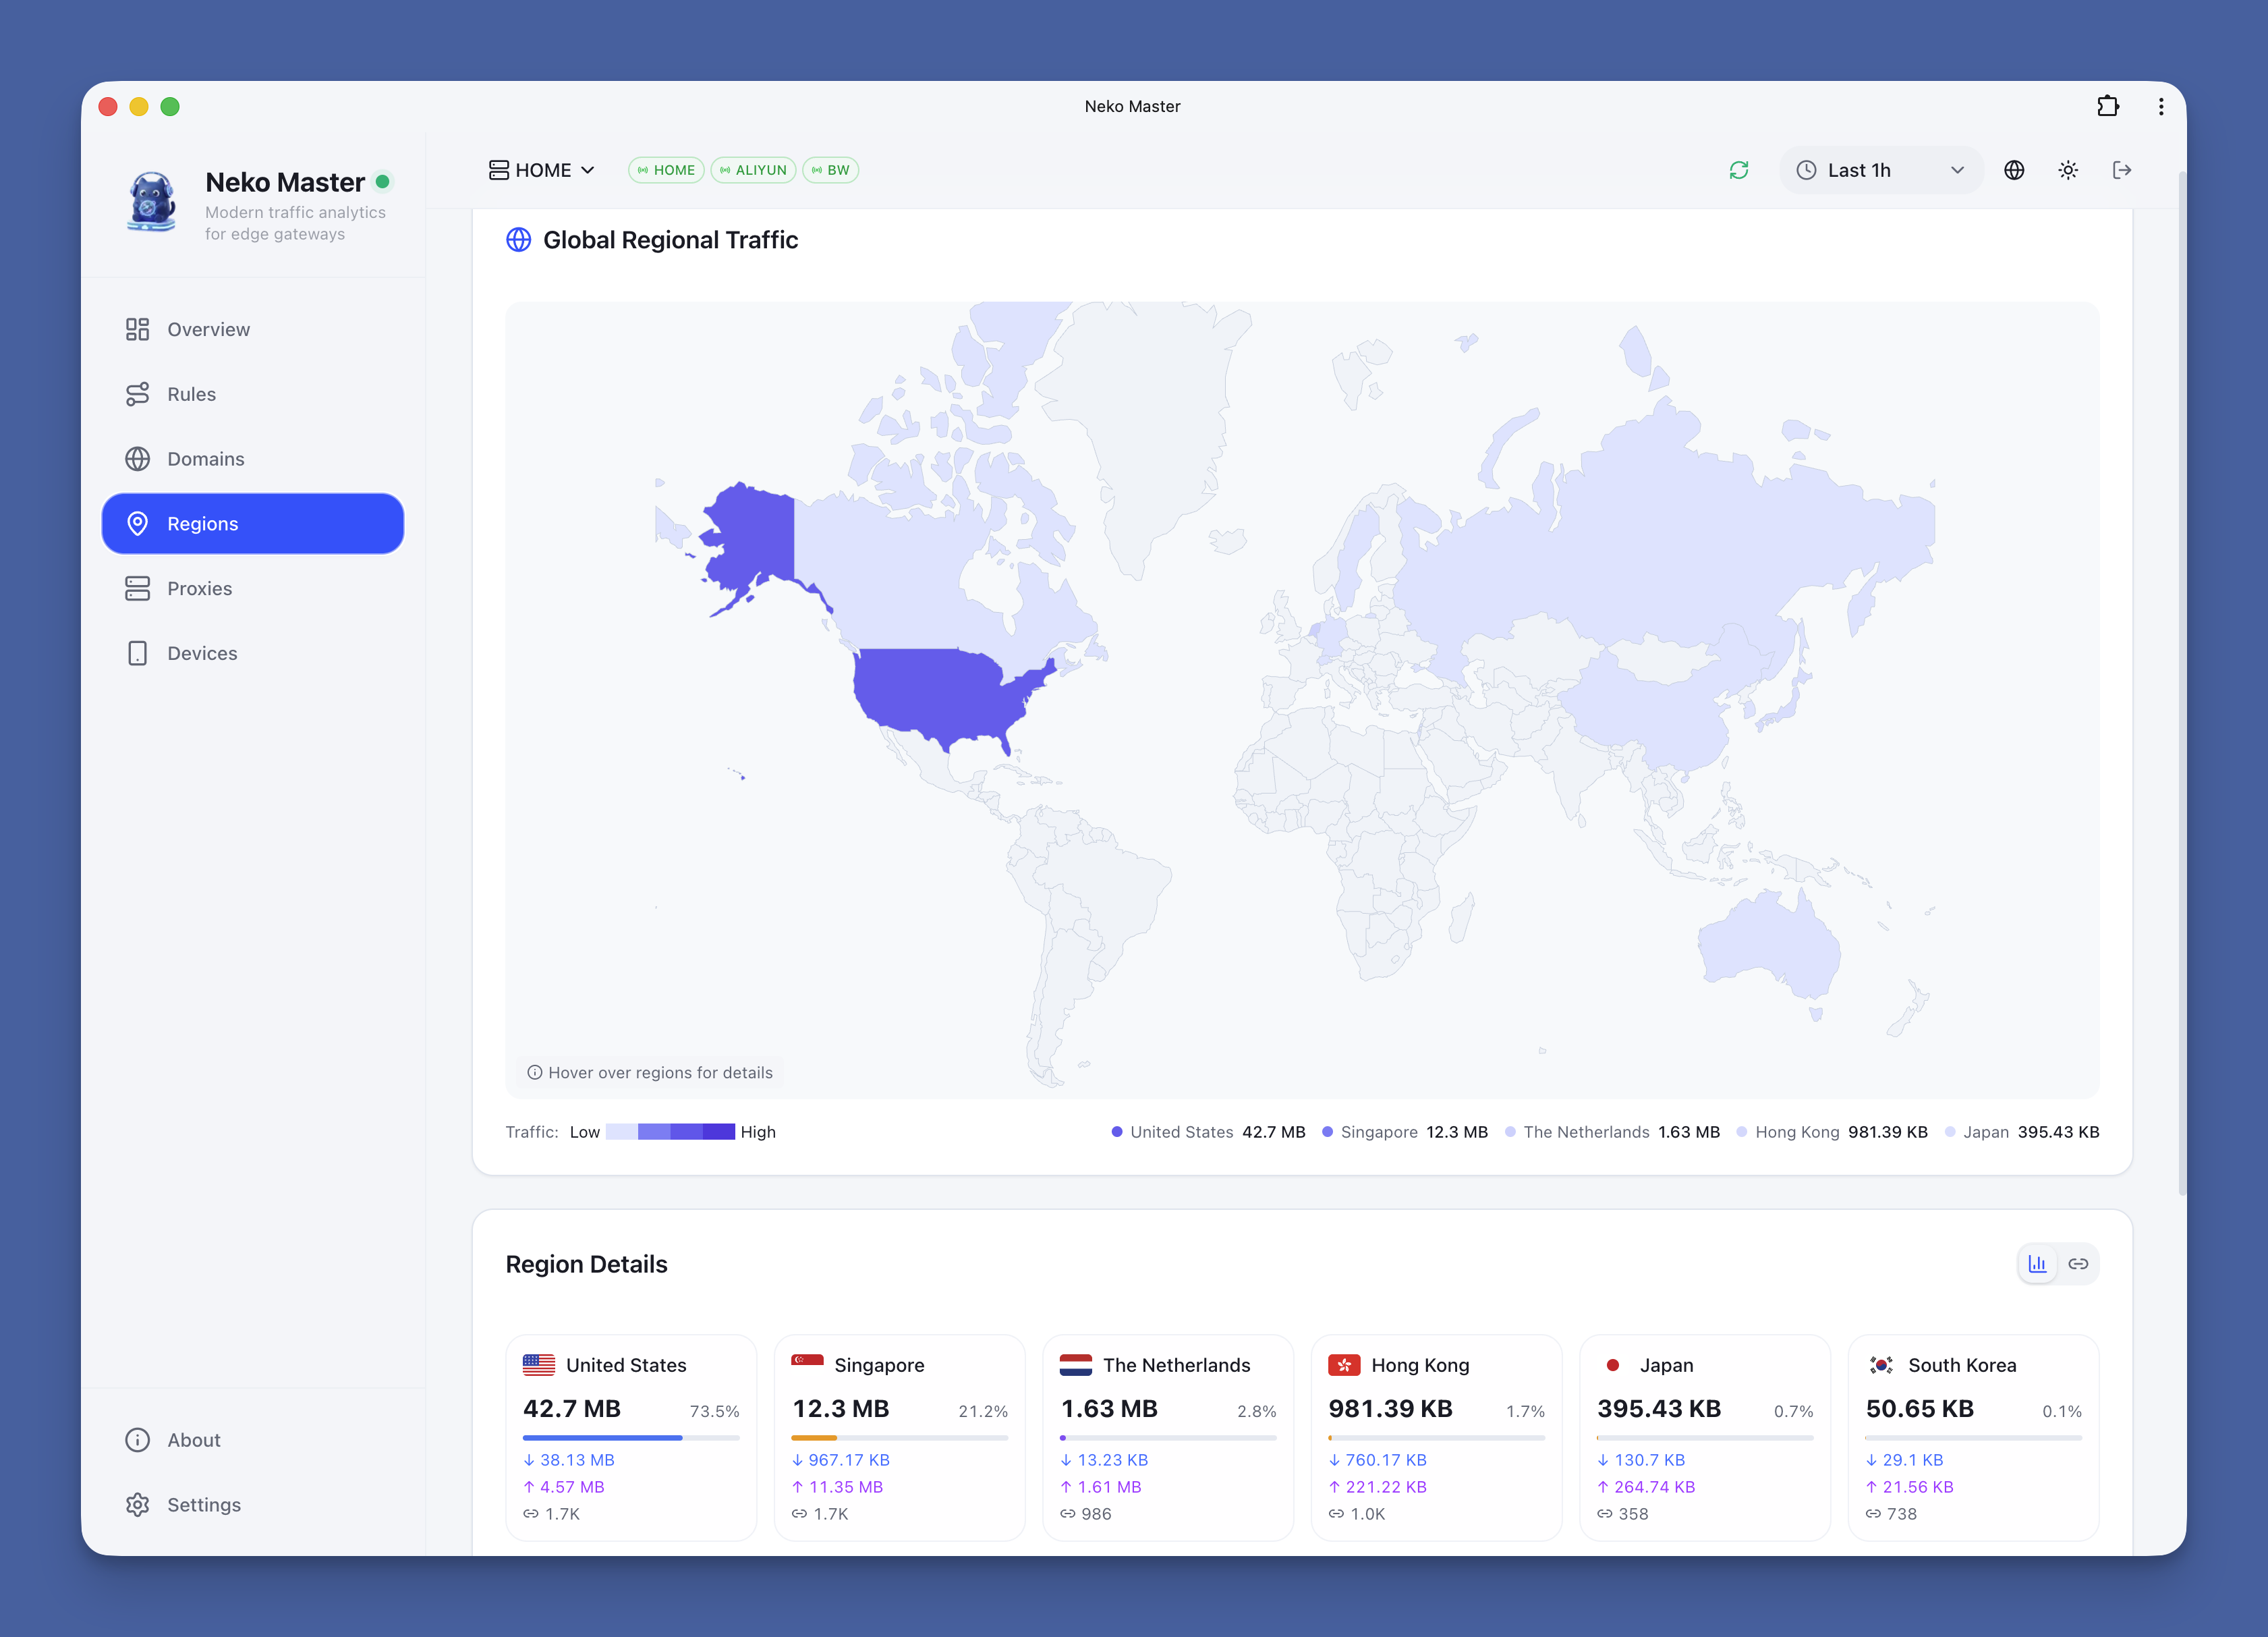
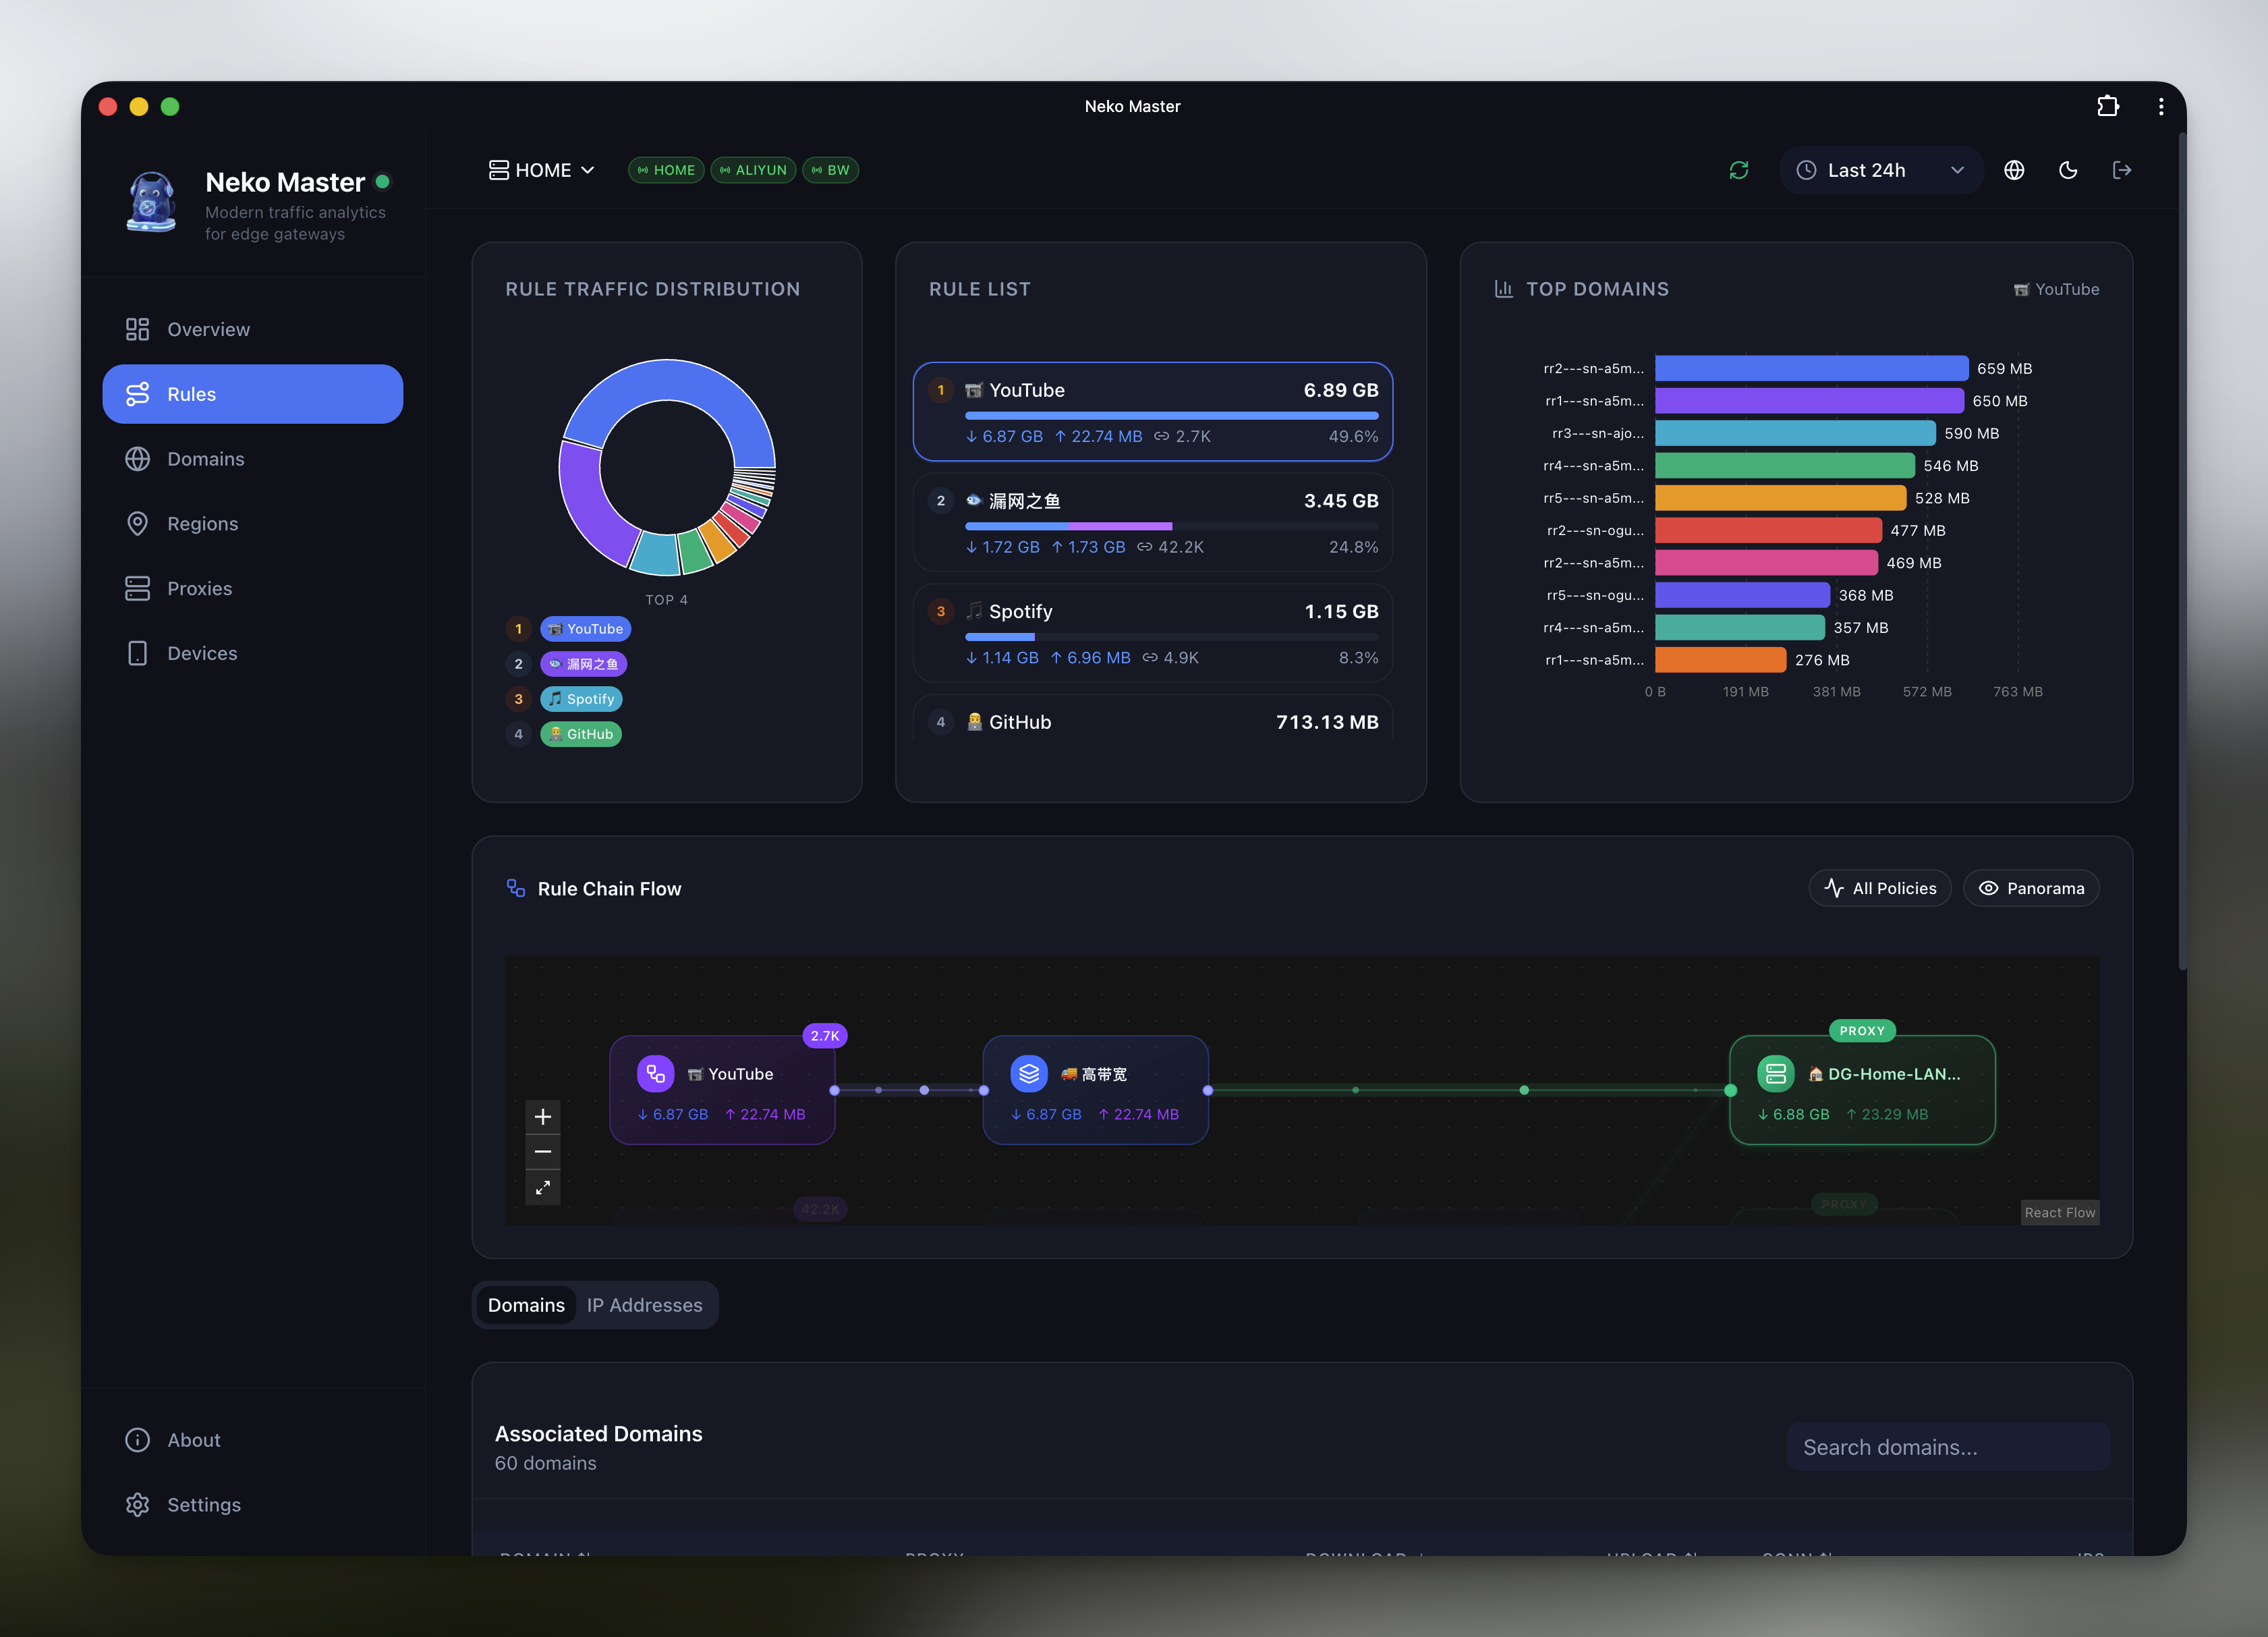
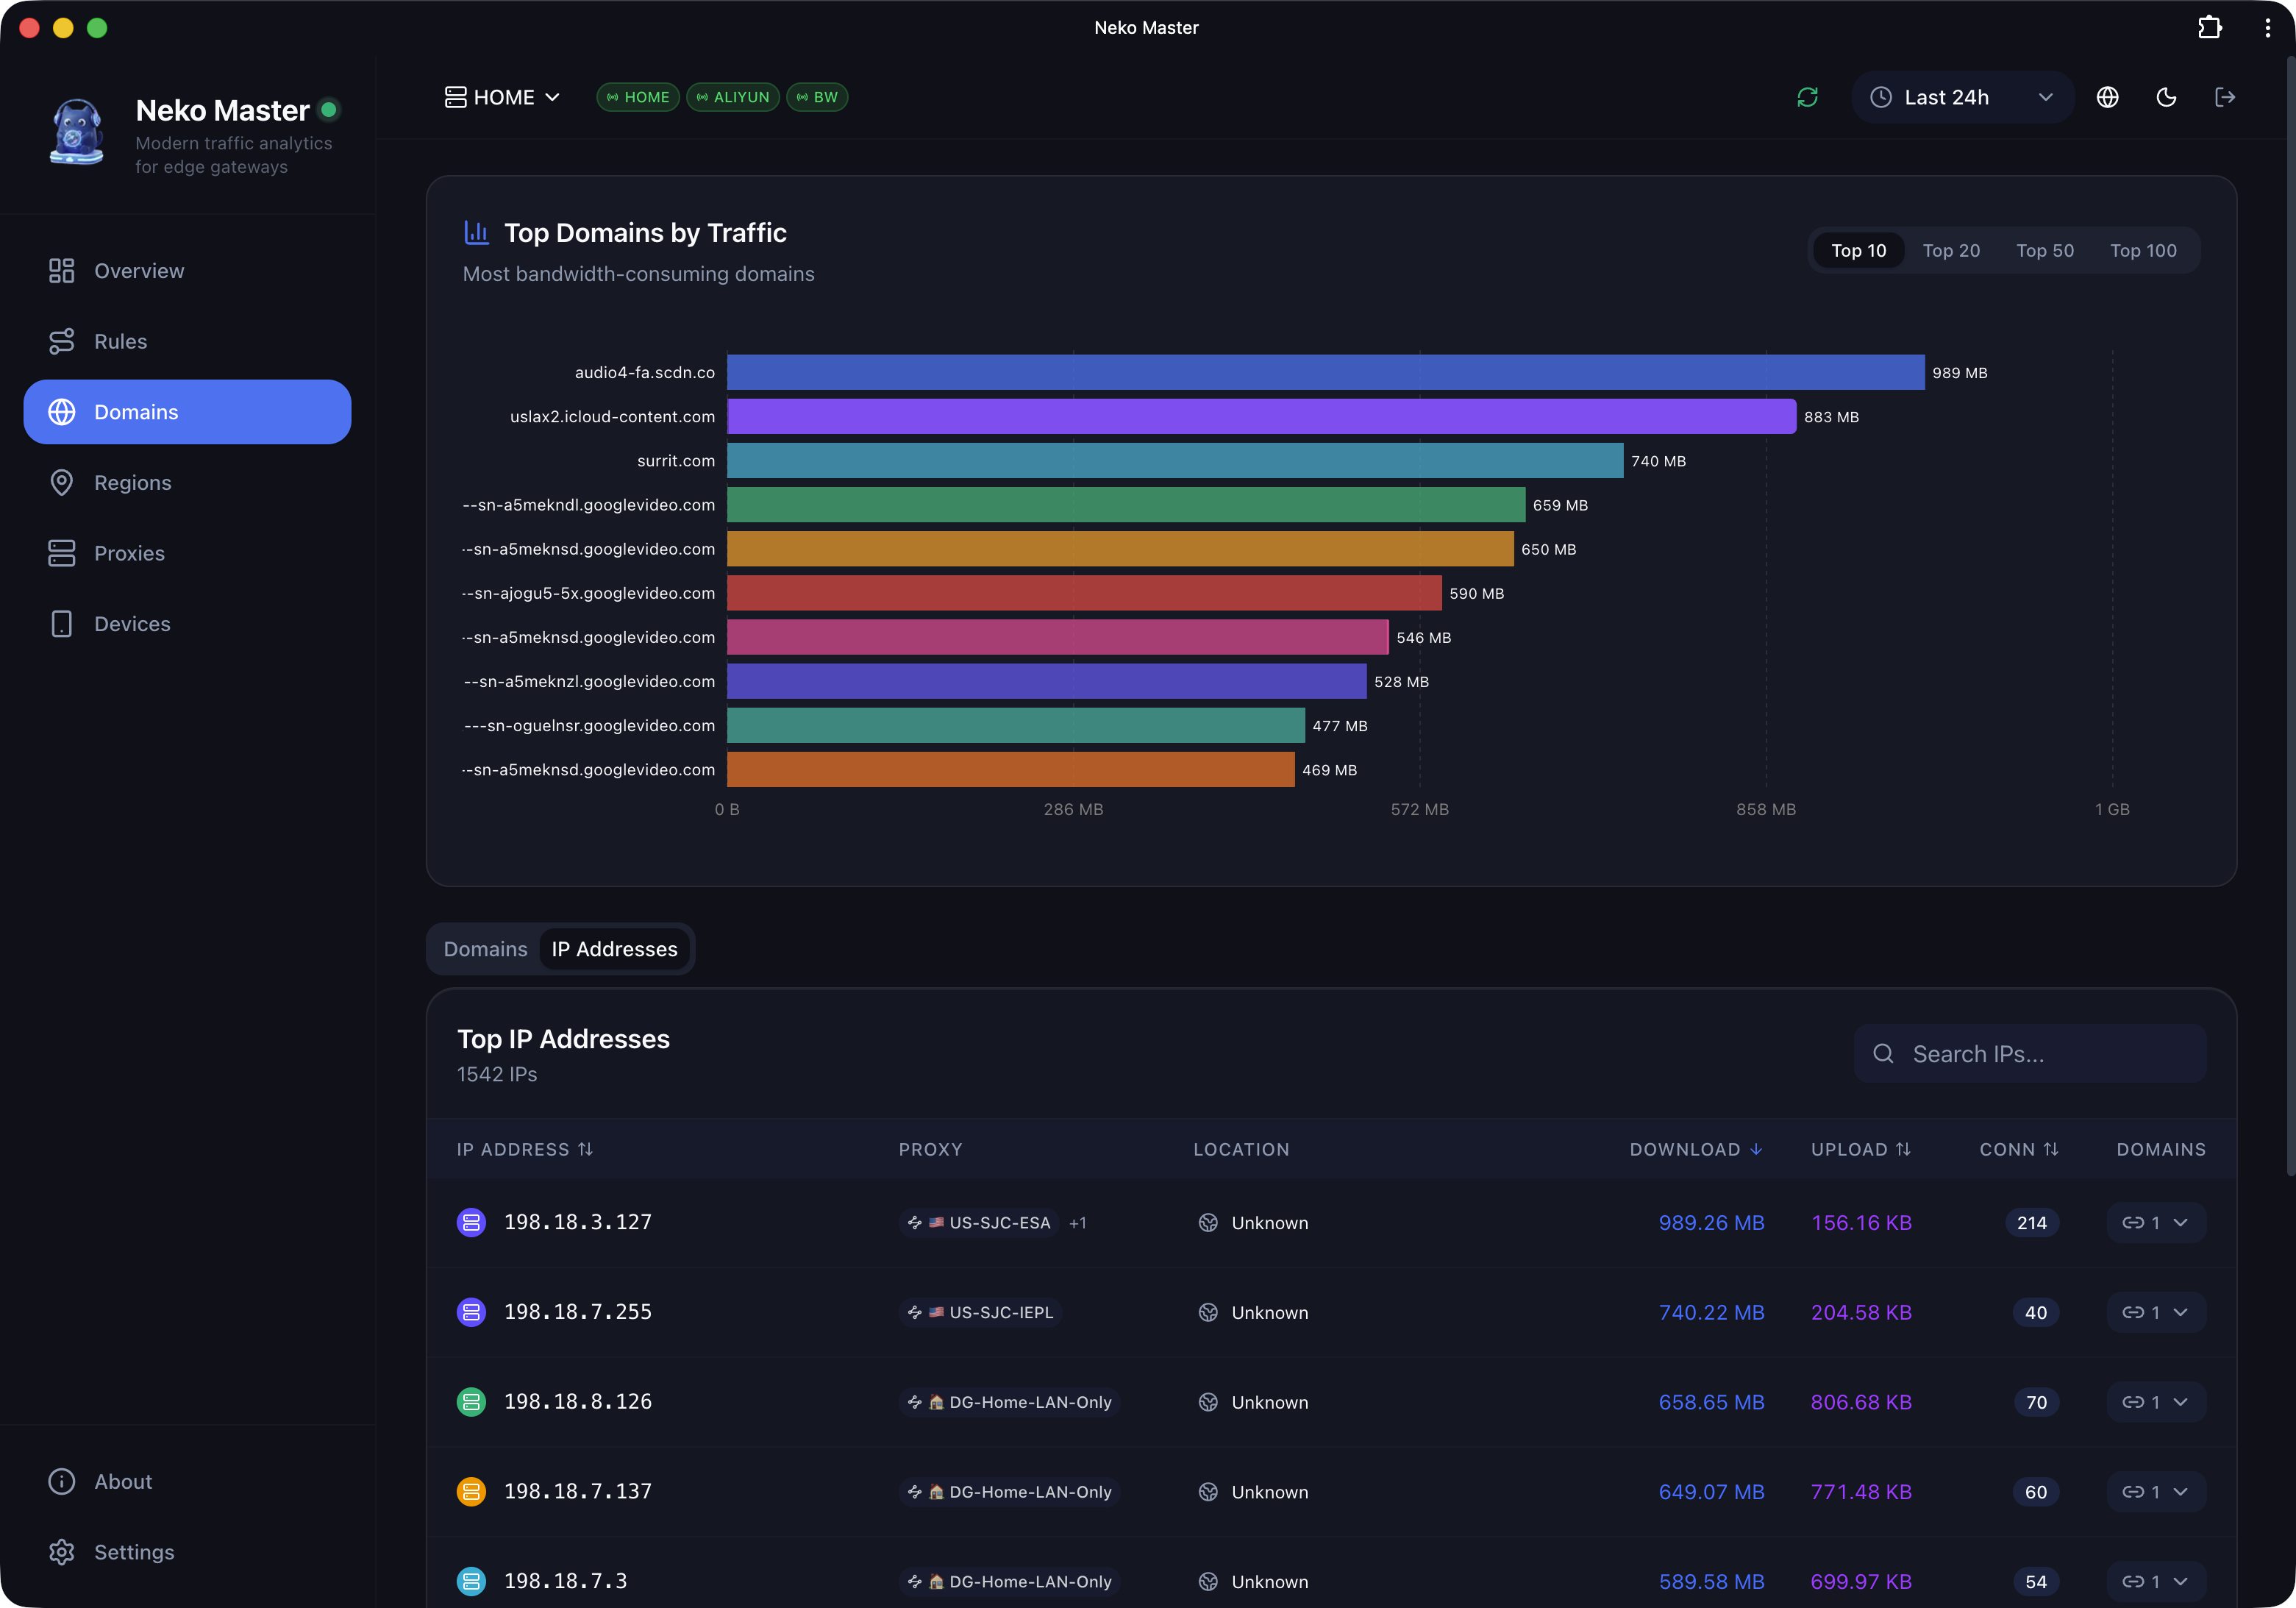
✨ Features
| Feature | Description | | --------------------------- | ------------------------------------------------------------- | | 📊 Real-time Monitoring | WebSocket real-time collection with millisecond latency | | 📈 Trend Analysis | Multi-dimensional traffic trends: 30min / 1h / 24h | | 🌐 Domain Analysis | View traffic, associated IPs, and connection count per domain | | 🗺️ IP Analysis | ASN, geo-location, and associated domain display | | 🚀 Proxy Statistics | Traffic distribution and connection count per proxy node | | 📱 PWA Support | Install as desktop app for native experience | | 🌙 Dark Mode | Light / Dark / System theme support | | 🌍 i18n Support | English / Chinese seamless switching | | 🔄 Multi-Backend | Monitor multiple OpenClash backend instances simultaneously |
🚀 Quick Start
Option 1: Docker Compose (Recommended)
The repository's built-indocker-compose.ymlmaps3000/3001/3002by default.
Scenarios A/B below are minimal templates for common deployments.
Scenario A: Minimal deployment (only expose 3000)
services:
  neko-master:
    image: foru17/neko-master:latest
    container_name: neko-master
    restart: unless-stopped
    ports:
      - "3000:3000" # Web UI
    volumes:
      - ./data:/app/data
      # Local MMDB (optional, files should be downloaded into ./geoip)
      - ./geoip:/app/data/geoip:ro
    environment:
      - NODE_ENV=production
      - DB_PATH=/app/data/stats.db
      - COOKIESECRET=${COOKIESECRET}
Recommended in.env(same directory asdocker-compose.yml):
COOKIE_SECRET=<at least 32-byte random string>(generate withopenssl rand -hex 32)
This mode is fully upgrade-compatible and works out of the box.
If WS is not routed, the app falls back to HTTP polling automatically.
Scenario B: Real-time WebSocket (recommended with reverse proxy)
services:
  neko-master:
    image: foru17/neko-master:latest
    container_name: neko-master
    restart: unless-stopped
    ports:
      - "3000:3000" # Web UI
      - "3002:3002" # WebSocket (for Nginx / Tunnel forwarding)
    volumes:
      - ./data:/app/data
      # Local MMDB (optional, files should be downloaded into ./geoip)
      - ./geoip:/app/data/geoip:ro
    environment:
      - NODE_ENV=production
      - DB_PATH=/app/data/stats.db
      - COOKIESECRET=${COOKIESECRET}
Then run:
docker compose up -dOpen
If you use the repository's built-in Compose file (default 3000/3001/3002), run the same command.
Option 2: Docker Run
# Generate a fixed cookie secret first (for session persistence)
export COOKIE_SECRET="$(openssl rand -hex 32)"
# Minimal (only 3000)
docker run -d \
--name neko-master \
-p 3000:3000 \
-v $(pwd)/data:/app/data \
-e COOKIESECRET="$COOKIESECRET" \
--restart unless-stopped \
foru17/neko-master:latest
Real-time WS (with reverse proxy)
docker run -d \
--name neko-master \
-p 3000:3000 \
-p 3002:3002 \
-v $(pwd)/data:/app/data \
-e COOKIESECRET="$COOKIESECRET" \
--restart unless-stopped \
foru17/neko-master:latestOpen
The frontend uses same-origin /api by default, so port 3001 is usually not required externally.
For real-time WS, your reverse proxy/tunnel must be able to reach port 3002. If not, the app falls back to ~5s HTTP polling.
Fordocker run, change external ports using-pmappings directly.
Only if you use direct WS access (no reverse proxy) and external WS port is not>3002, also pass-e WSEXTERNALPORT=<external-ws-port>.
Local MMDB lookup mode (optional): mount -v $(pwd)/geoip:/app/data/geoip:ro,
then switch source to Local in Settings -> Preferences -> IP Lookup Source.
Option 3: One-Click Script
Automatically detects port conflicts and configures everything:
# Using curl
curl -fsSL https://raw.githubusercontent.com/foru17/neko-master/main/setup.sh | bash
Or using wget
wget -qO- https://raw.githubusercontent.com/foru17/neko-master/main/setup.sh | bash
The script will automatically:
- ✅ Download
docker-compose.yml - ✅ Check if default ports (3000/3001/3002) are in use
- ✅ Suggest available alternative ports
- ✅ Create configuration file and start the service
Option 4: Source Code
# 1. Clone the repository
git clone https://github.com/foru17/neko-master.git
cd neko-master
2. Install dependencies
pnpm install
3. Prepare collector env (source mode reads apps/collector/.env)
cp apps/collector/.env.example apps/collector/.env
4. Start development services
pnpm dev
Open
In source mode: collector listens on3001/3002, web listens on3000by default.
If you changedAPIPORT(not 3001), setAPIURLaccordingly (for exampleAPI_URL=http://localhost:4001) so web/apirewrite targets the correct API.
apps/collector/.env.localtakes precedence overapps/collector/.env.
🤖 Agent Deployment
Use Agent mode when you want one centralized Neko Master service and multiple remote devices (OpenWrt, Linux, macOS) collecting local gateway data. The agent runs near the gateway, pulls data, and reports to the panel — the panel never connects to the gateway directly.
Supported gateway types: Clash / Mihomo (WebSocket real-time) and Surge v5+ (HTTP polling).
Quick Install (UI-generated command)
- In the dashboard, go to
Settings → Backends, add anAgentbackend, select gateway type - Click "View Agent Script" and copy the one-line install command, then run it on the target host:
# Clash / Mihomo gateway example
curl -fsSL https://raw.githubusercontent.com/foru17/neko-master/main/apps/agent/install.sh \
  | env NEKO_SERVER='http://your-panel:3000' \
        NEKOBACKENDID='1' \
        NEKOBACKENDTOKEN='ag_xxx' \
        NEKOGATEWAYTYPE='clash' \
        NEKOGATEWAYURL='http://127.0.0.1:9090' \
        sh
Surge gateway example
curl -fsSL https://raw.githubusercontent.com/foru17/neko-master/main/apps/agent/install.sh \
  | env NEKO_SERVER='http://your-panel:3000' \
        NEKOBACKENDID='2' \
        NEKOBACKENDTOKEN='ag_yyy' \
        NEKOGATEWAYTYPE='surge' \
        NEKOGATEWAYURL='http://127.0.0.1:9091' \
        sh
After install, manage instances with nekoagent:
nekoagent list               # list all instances
nekoagent status <instance>  # check running state
nekoagent logs <instance>    # tail live logs
nekoagent restart <instance> # restart
nekoagent upgrade            # global upgrade (CLI + binary)
The script auto-detects an existing installation — if neko-agent is already present, it only adds the new instance without re-downloading.
Multiple instances can run on the same host (different NEKOINSTANCENAME), each pointing to a different gateway.
Agent Documentation
- Overview: architecture, Direct vs Agent comparison, security model
- Quick Start: end-to-end setup from UI to running agent
- Install Guide: install methods, systemd / launchd autostart
- Configuration: full flag and env variable reference
- Release Flow: versioning and compatibility policy
- Troubleshooting: common errors and fixes
📖 First Use
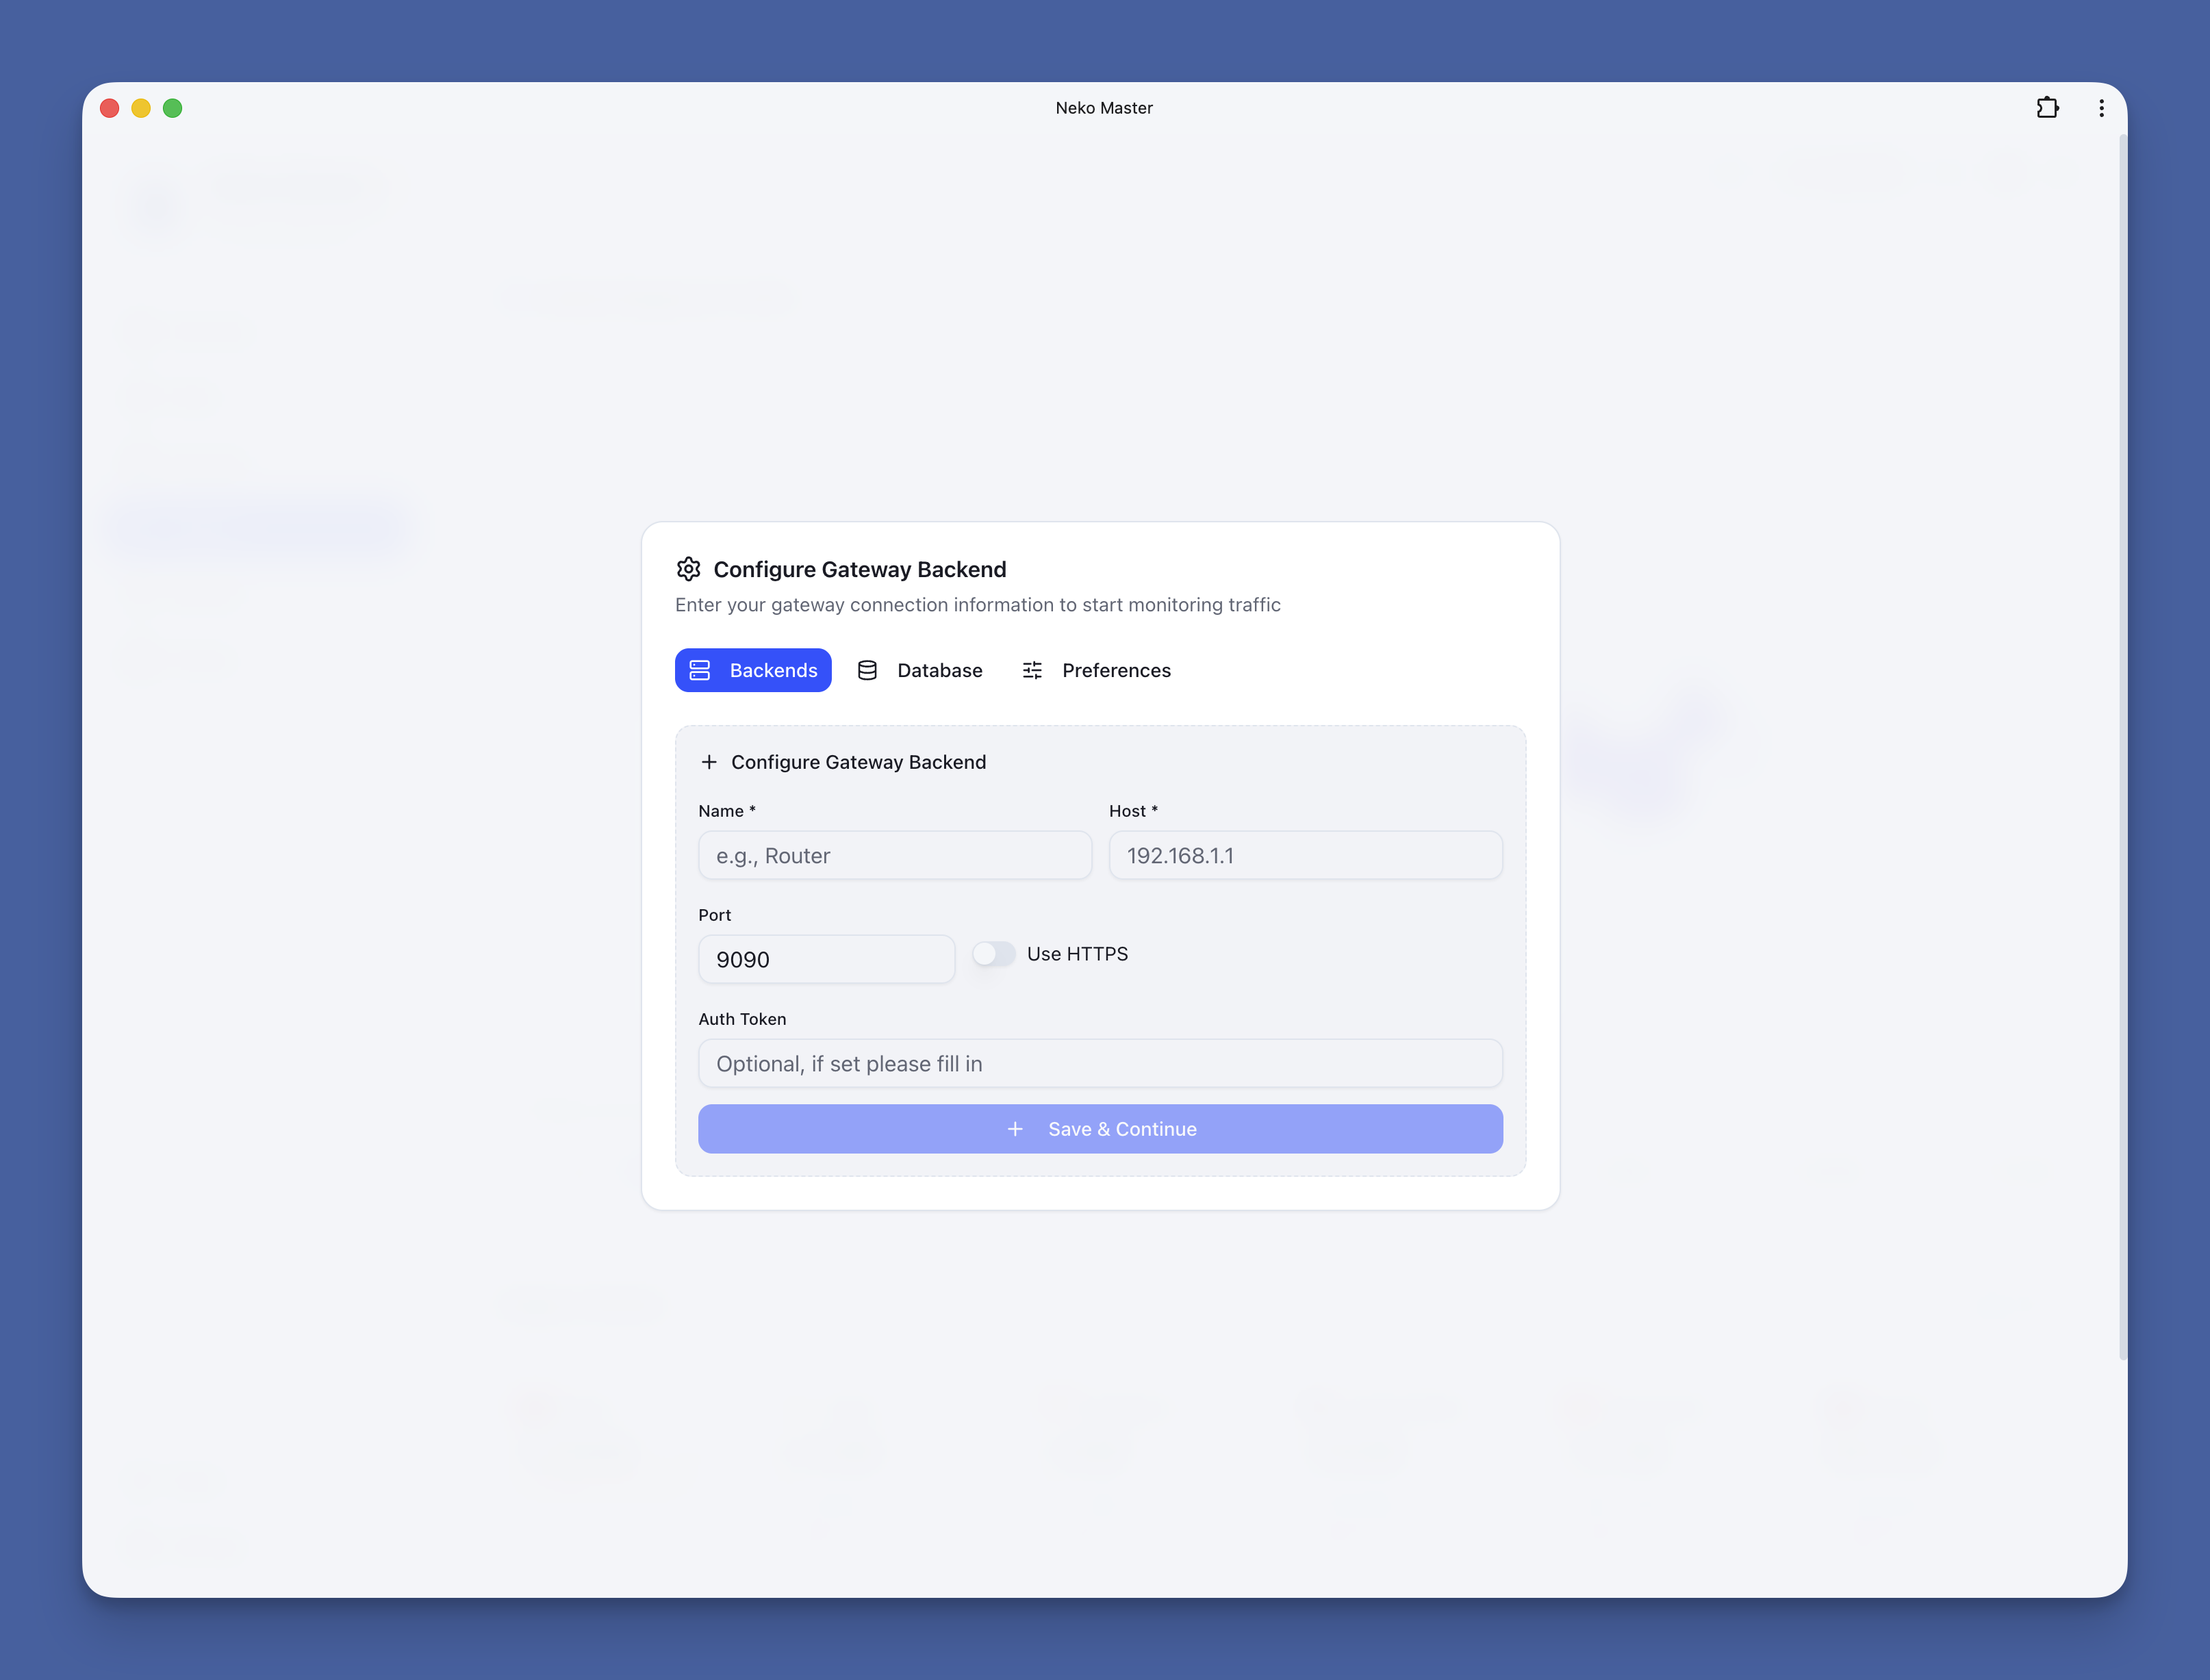
Connect Clash / Mihomo
- Open
- The Gateway Configuration dialog will appear on first visit
- Fill in your network gateway (e.g., OpenClash) connection info:
Clash / Mihomo
- Host: Gateway backend address (e.g., 192.168.101.1)
- Port: Gateway backend port (e.g., 9090)
- Token: Fill if Secret is configured, otherwise leave empty
- Click "Add Backend" to save
- The system will automatically start collecting and analyzing traffic data
💡 Get Gateway Address: Go to your gateway control panel (e.g., OpenClash) → Enable "External Control" → Copy API address
Connect Surge
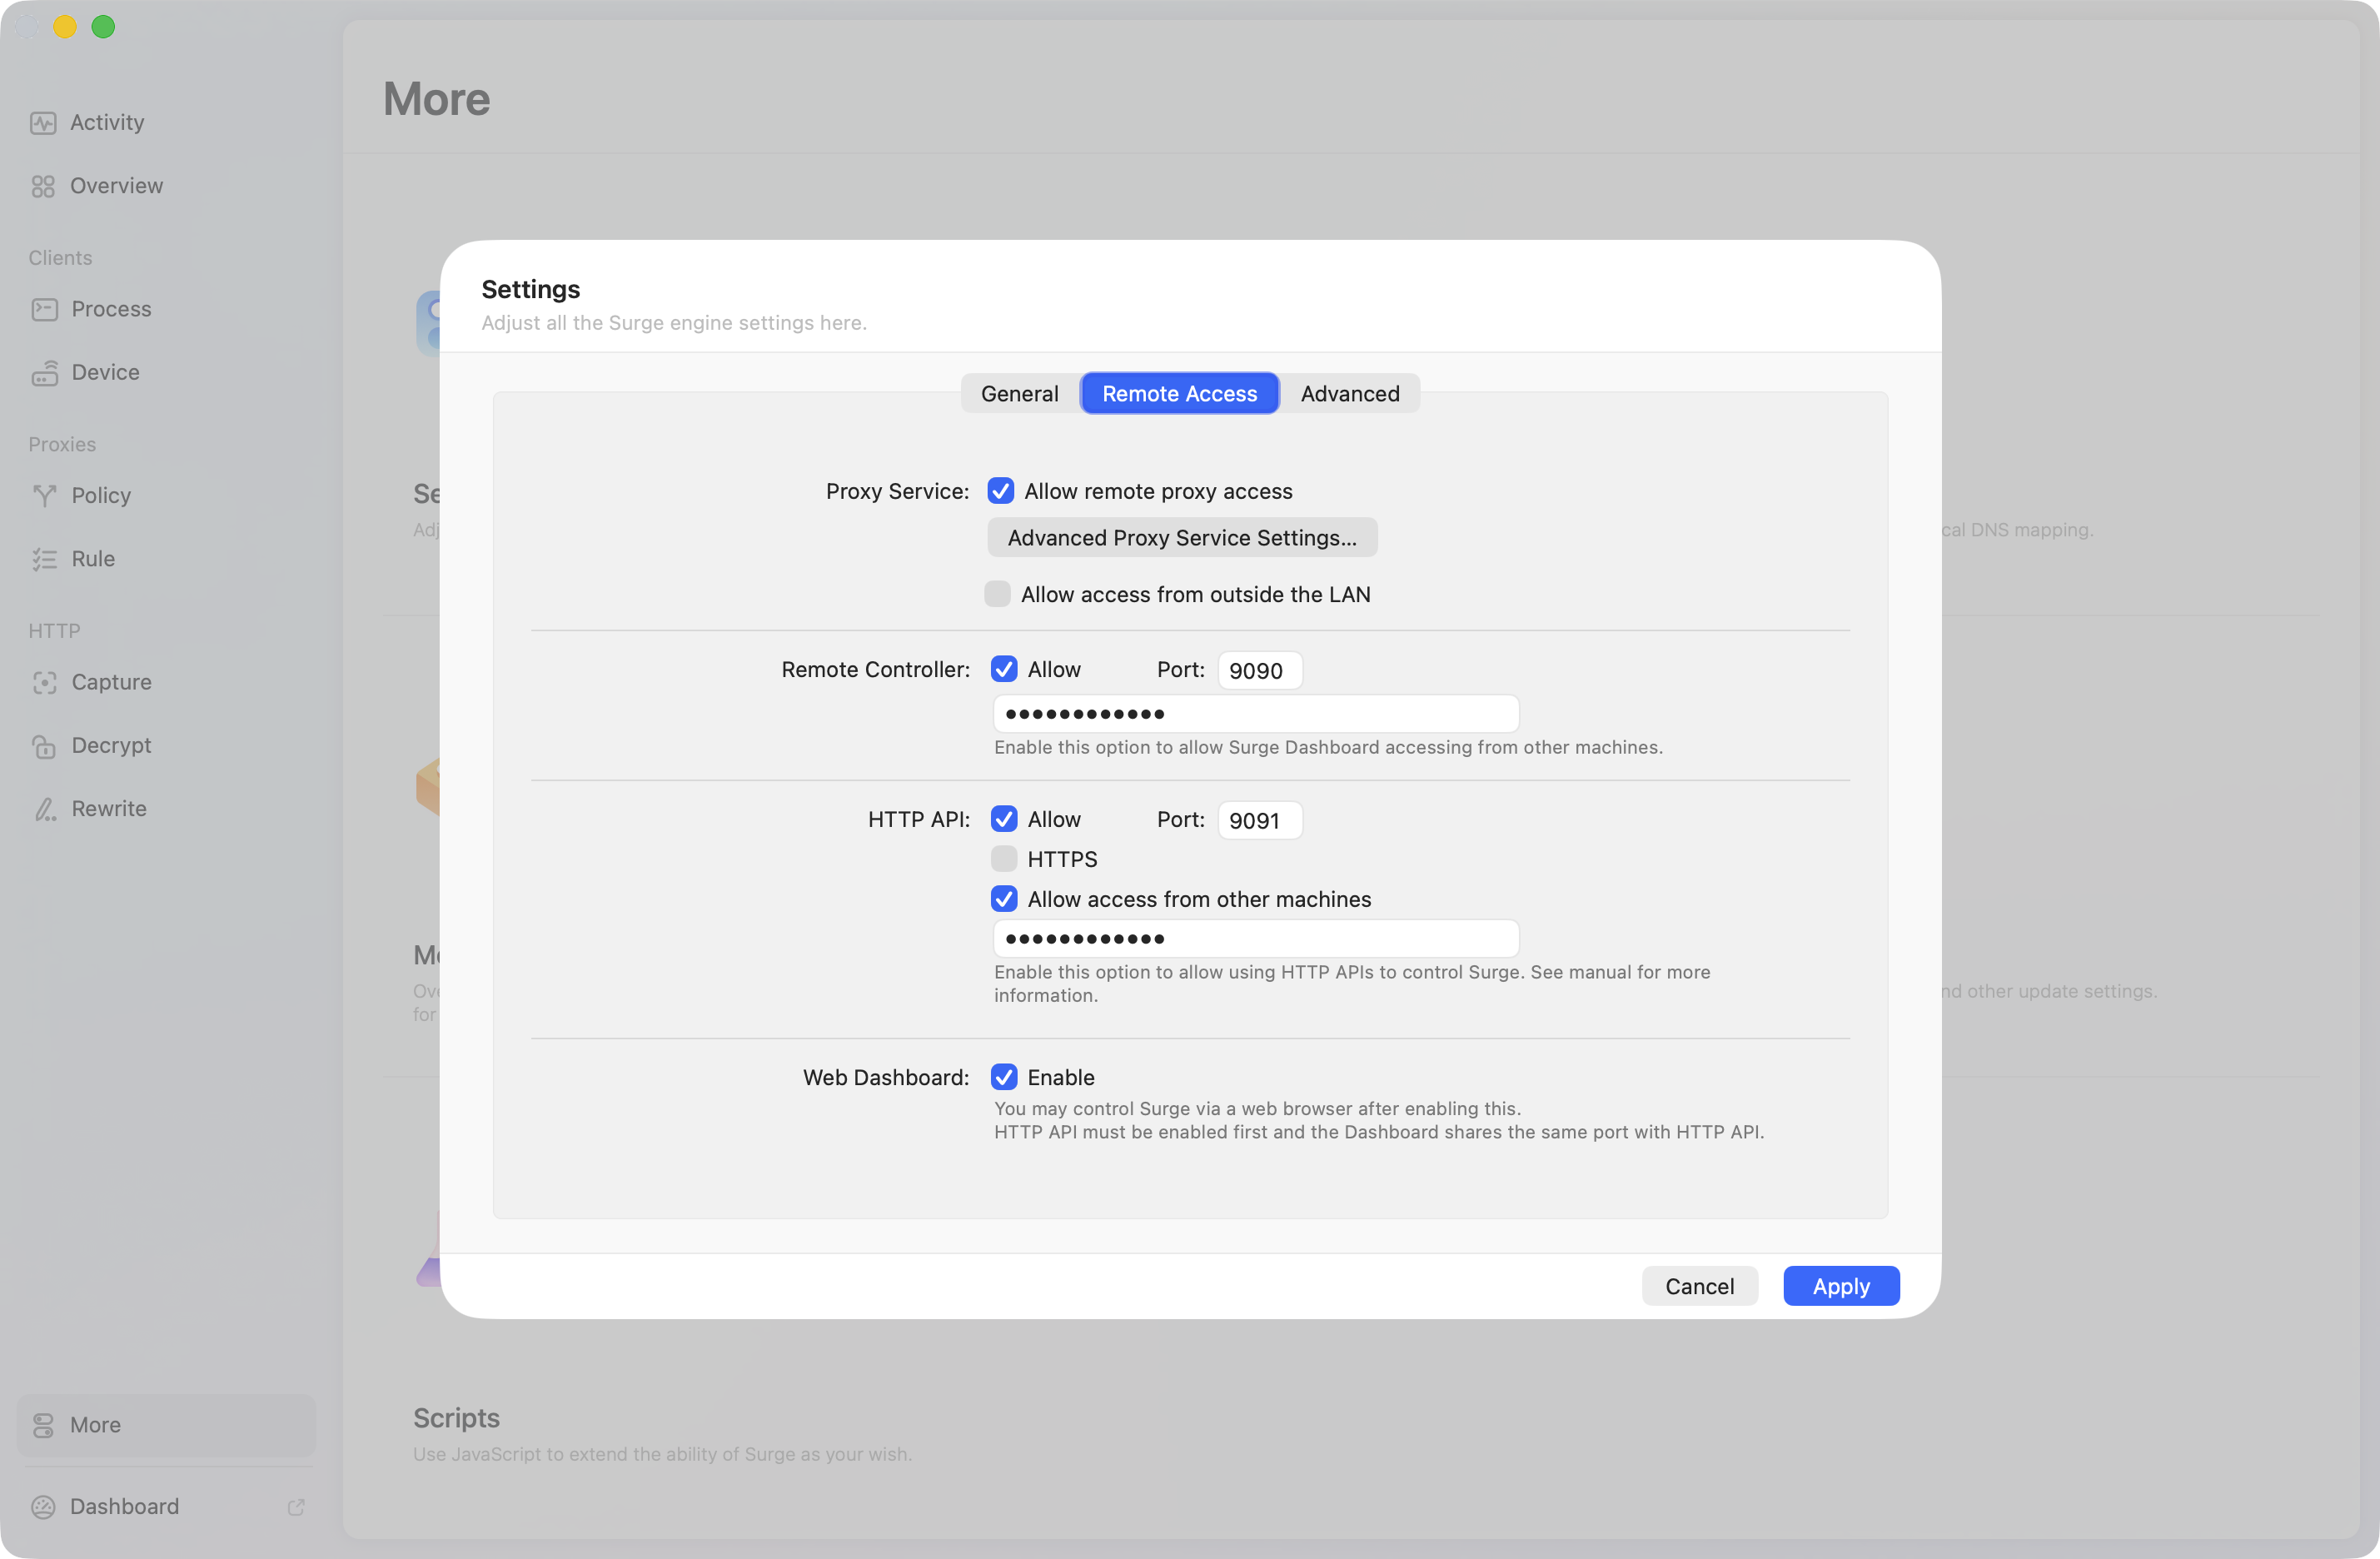
Neko Master supports connecting to Surge gateways for complete rule chain visualization and traffic analysis.
1. Enable Surge HTTP API
Enable HTTP remote API in your Surge configuration:
[General]
http-api = 127.0.0.1:9091
http-api-tls = false
http-api-web-dashboard = true
Or configure via Surge's graphical interface:
- HTTP Remote API:
Settings→General→HTTP Remote API - Port: Default
9091 - Authentication: Recommended to set a password for enhanced security
2. Add Surge Backend in Neko Master
- Open Neko Master settings dialog
- Click "Add Backend"
- Fill in the connection info:
Surge
- Host: IP address where Surge is running (e.g., 192.168.1.1 or 127.0.0.1)
- Port: HTTP API port (default 9091)
- Token: HTTP API password (if configured)
- Click "Test Connection" to verify the configuration
- Save the configuration
💡 Note: Surge uses HTTP polling to fetch data (compared to Clash's WebSocket real-time stream), with a data refresh delay of approximately 2 seconds.
🔧 Port Conflict Resolution
If you see "port already in use" error, here are the solutions:
Solution 1: Use .env File
Create a .env file in the same directory as docker-compose.yml:
WEBEXTERNALPORT=8080    # Change Web UI port
APIEXTERNALPORT=8081    # Change API port
WSEXTERNALPORT=8082     # Change WebSocket external port (only for direct access)
COOKIE_SECRET=your-long-random-secret   # Strongly recommended to keep fixed
Then restart:
docker compose down
docker compose up -d
Now access
Solution 2: Directly Modify docker-compose.yml
ports:
  - "8080:3000" # External 8080 → Internal 3000
  - "8082:3002" # External 8082 → Internal 3002 (for proxy/tunnel WS forwarding)
Note: if you use direct WS access (no reverse proxy) and external WS port is not3002, setWSEXTERNALPORT=<external-ws-port>.
Solution 3: Use One-Click Script
curl -fsSL https://raw.githubusercontent.com/foru17/neko-master/main/setup.sh | bashThe script will automatically detect and suggest available ports.
🐳 Docker Configuration
Ports
| Port | Purpose | External Required | Description | | :--: | :-------: | :---------------: | :---------------------------------------------------------------------------------------------------------- | | 3000 | Web UI | ✅ | Frontend entry point | | 3001 | API | Optional | Frontend uses same-origin /api by default; usually no public exposure needed (default Compose maps it) | | 3002 | WebSocket | Optional | Real-time push endpoint; recommended for reverse proxy/tunnel forwarding only (default Compose maps it) |
Environment Variables (Deployment)
| Variable | Default | Purpose | When to set | | :-- | :-- | :-- | :-- | | WEB_PORT | 3000 | Web listen port (inside container) | Usually unchanged | | API_PORT | 3001 | API listen port (inside container) | Usually unchanged | | COLLECTORWSPORT | 3002 | WS listen port (inside container) | Usually unchanged | | DB_PATH | /app/data/stats.db | SQLite data path | Custom data path | | WEBEXTERNALPORT | 3000 | External web port mapping in docker-compose.yml | External web port changed | | APIEXTERNALPORT | 3001 | External API port mapping in docker-compose.yml | Direct external API access needed | | WSEXTERNALPORT | 3002 | External WS port mapping in docker-compose.yml; also used for direct WS port inference | Direct WS access without proxy and external WS port changed | | NEXTPUBLICAPI_URL | empty | Override frontend API base URL (e.g. https://api.example.com) | API is not same-origin /api | | NEXTPUBLICWSURL | empty | Override frontend WS URL (absolute URL or /customws) | Custom WS path/domain | | NEXTPUBLICWSPORT | 3002 | WS direct-connection fallback port (build-time only — setting this at Docker runtime has no effect; use WSEXTERNAL_PORT instead) | Only for custom source builds | | API_URL | http://localhost:3001 | Next.js /api rewrite target (mainly source/custom builds) | API listen address changed | | COOKIE_SECRET | auto-generated | Cookie signing secret; if not fixed, sessions can be invalidated after restart when data dir is not persisted | Strongly recommended in production | | GEOIPLOOKUPPROVIDER | online | IP geolocation source (online / local) | Default to local MMDB lookup | | GEOIPONLINEAPI_URL | https://api.ipinfo.es/ipinfo | Online IP geolocation API endpoint (must be compatible with ipinfo.my response schema) | Set only when you deploy a compatible endpoint | | FORCEACCESSCONTROL_OFF | false | Force disable access control (emergency recovery) | Temporary use only when token is lost | | SHOWCASESITEMODE | false | Read-only showcase mode (blocks sensitive write operations) | Public demo sites only |
Advanced Tuning Variables (Optional)
| Variable | Default | Description | | :-- | :-- | :-- | | FLUSHINTERVALMS | 30000 | Buffer flush interval for collector writes | | FLUSHMAXBUFFER_SIZE | 5000 | Max buffer entries before early flush | | REALTIMEMAXMINUTES | 180 | Realtime in-memory window size (minutes) | | REALTIMERANGEENDTOLERANCEMS | 120000 | End-time tolerance for range queries | | SURGEPOLICYSYNCINTERVALMS | 600000 | Surge policy sync interval | | DBRANGEQUERYCACHETTL_MS | 8000 | Range-query cache TTL | | DBHISTORICALQUERYCACHETTL_MS | 300000 | Historical-query cache TTL | | DBRANGEQUERYCACHEMAX_ENTRIES | 1024 | Max range-query cache entries | | DBRANGEQUERYCACHEDISABLED | empty | Set 1 to disable range-query cache | | DEBUG_SURGE | false | Enable Surge collector debug logs (true) |
API / WS Resolution Priority
- API client base:
runtime-config.APIURL→NEXTPUBLICAPIURL→ same-origin/api /apiserver-side rewrite target:API_URL(defaulthttp://localhost:3001, applied in Next.js rewrites)- WS URL:
runtime-config.WSURL→NEXTPUBLICWSURL→ auto candidates (whenruntime-config.WSPORTis set, direct port is preferred; otherwise/cm_wsis tried first) - WS port:
runtime-config.WSPORT(fromWSEXTERNALPORT) →NEXTPUBLICWSPORT→3002 - In normal deployments,
NEXTPUBLICWS_URLis usually unnecessary unless you use a custom WS path/domain
Production Environment Baseline (Recommended)
NODE_ENV=production
DB_PATH=/app/data/stats.db
COOKIE_SECRET=<at least 32-byte random string>
Optional: default to local MMDB lookup
GEOIPLOOKUPPROVIDER=local
Keep false in normal operation
FORCEACCESSCONTROL_OFF=false
Use openssl rand -hex 32 to generate COOKIE_SECRET.
Additional recommendations:
- Mount persistent storage (for example
./data:/app/data) to avoid data and secret loss. - If using direct WS access and external WS port is not
3002, setWSEXTERNALPORTaccordingly. - If API port/address changes in source deployment, update
API_URLas well. - For local MMDB lookup, mount
./geoip:/app/data/geoip:roand switch source inSettings -> Preferences -> IP Lookup Source. - MMDB files are large and are not bundled in the image. Download and place them in
./geoipwith fixed names:
GeoLite2-City.mmdb, GeoLite2-ASN.mmdb (required), and GeoLite2-Country.mmdb (optional).
Recommended source: Advanced Agent details (install, config, release, compatibility) are maintained under docs/agent/*.
🗄️ ClickHouse (Optional)
SQLite is Neko Master's default storage engine and works well for most users. Consider enabling ClickHouse if you need:
- Very large datasets (hundreds of thousands of domain/IP entries)
- Fast aggregation queries over long time ranges (≥ 7 days)
- Separation of historical stats from configuration/metadata storage
ClickHouse is entirely optional. SQLite remains as the configuration and metadata store regardless of whether ClickHouse is enabled.
Architecture Overview
When ClickHouse is enabled, the system enters dual-write mode:
BatchBuffer.flush()
    │
    ├──→ SQLite (config / metadata, always written)
    └──→ ClickHouse (stats traffic data, dual-write)
           └── Buffer tables → SummingMergeTree async merge
Read source is controlled by STATSQUERYSOURCE (default: sqlite).
Enabling ClickHouse (Docker)
Step 1: Start the ClickHouse container
The repository's built-in docker-compose.yml already includes a ClickHouse service, gated by profiles: [clickhouse] so it does not start by default. From the repository root, run:
docker compose --profile clickhouse up -dClickHouse data is persisted to ./data/clickhouse, separate from the main app data directory.
If you use a custom docker-compose.yml (such as Scenario A/B above), add the ClickHouse service block manually:
services:
  neko-master:
    # ... your existing config ...
    environment:
      # append to existing environment section:
      - CHENABLED=${CHENABLED:-0}
      - CHHOST=${CHHOST:-clickhouse}
      - CHPORT=${CHPORT:-8123}
      - CHDATABASE=${CHDATABASE:-neko_master}
      - CHUSER=${CHUSER:-neko}
      - CHPASSWORD=${CHPASSWORD:-neko_master}
      - CHWRITEENABLED=${CHWRITEENABLED:-0}
      - STATSQUERYSOURCE=${STATSQUERYSOURCE:-sqlite}
    networks:
      - neko-master-network
clickhouse:     image: clickhouse/clickhouse-server:24.8     container_name: neko-master-clickhouse     restart: unless-stopped     profiles: ["clickhouse"]     ports:       - "${CHEXTERNALHTTP_PORT:-8123}:8123"       - "${CHEXTERNALNATIVE_PORT:-9000}:9000"     volumes:       - ./data/clickhouse:/var/lib/clickhouse     environment:       - CLICKHOUSEDB=${CHDATABASE:-neko_master}       - CLICKHOUSEUSER=${CHUSER:-neko}       - CLICKHOUSEPASSWORD=${CHPASSWORD:-neko_master}       - CLICKHOUSEDEFAULTACCESS_MANAGEMENT=1     networks:       - neko-master-network     healthcheck:       test: ["CMD-SHELL", "wget -q --spider http://127.0.0.1:8123/ping || exit 1"]       interval: 30s       timeout: 10s       retries: 3       start_period: 40s
networks:   neko-master-network:     driver: bridge
Step 2: Configure environment variables
Add to your .env (same directory as docker-compose.yml):
# Enable ClickHouse connection
CH_ENABLED=1
Enable dual-write
CHWRITEENABLED=1
Read source: sqlite (default) / auto (smart routing) / clickhouse (force)
STATSQUERYSOURCE=auto
ClickHouse connection (defaults match docker-compose.yml, no change needed)
CH_HOST=clickhouse
CH_PORT=8123
CHDATABASE=nekomaster
CH_USER=neko
CHPASSWORD=nekomaster
Restart:
docker compose --profile clickhouse up -dClickHouse Environment Variables
| Variable | Default | Description | | :-- | :-- | :-- | | CH_ENABLED | 0 | Enable ClickHouse connection (1 to enable) | | CHWRITEENABLED | 0 | Enable dual-write (requires CH_ENABLED=1) | | CHONLYMODE | 0 | When CH is healthy, skip SQLite stats writes (CH-only mode) | | CH_HOST | clickhouse | ClickHouse host address | | CH_PORT | 8123 | ClickHouse HTTP port | | CHDATABASE | nekomaster | Database name | | CH_USER | neko | Username | | CHPASSWORD | nekomaster | Password | | CH_SECURE | 0 | Use HTTPS connection | | CH_REQUIRED | 0 | Refuse to start if CH is unavailable | | CHAUTOCREATE_TABLES | 1 | Auto-create tables on first start | | CHWRITEMAXPENDINGBATCHES | 200 | Max pending write batches | | CHUNHEALTHYTHRESHOLD | 5 | Consecutive failures before marking unhealthy (auto-fallback to SQLite) | | STATSQUERYSOURCE | sqlite | Read source: sqlite / auto / clickhouse | | CHCOMPAREENABLED | 0 | Enable SQLite ↔ ClickHouse consistency check | | CHEXTERNALHTTP_PORT | 8123 | ClickHouse HTTP external port (Compose mapping) | | CHEXTERNALNATIVE_PORT | 9000 | ClickHouse Native external port (Compose mapping) |
Health & Fallback: AfterCHUNHEALTHYTHRESHOLDconsecutive write failures, the system automatically marks ClickHouse as unhealthy and resumes SQLite writes—even whenCHONLYMODE=1. Once ClickHouse recovers, it is re-marked healthy and logged.
Migration Guide for Existing Users
Upgrading from a SQLite-only version? Your data is safe.
The SQLite file (./data/stats.db) is fully preserved. Here is the recommended gradual migration path:
Phase 1: Dual-write (observation period, recommended starting point)
CH_ENABLED=1
CHWRITEENABLED=1
STATSQUERYSOURCE=sqlite   # Keep reading from SQLite while CH accumulates data
Start and watch [ClickHouse Writer] logs to confirm successful writes.
Phase 2: Switch read source
STATSQUERYSOURCE=auto        # Smart routing: recent data from CH, historical from SQLite
or
STATSQUERYSOURCE=clickhouse  # Force all reads to ClickHouse
Phase 3 (optional): Migrate historical data
To move historical SQLite stats into ClickHouse:
# Standard migration (truncate CH then re-import, with consistency check)
./scripts/ch-migrate-docker.sh
Append mode (keep existing CH data, incremental import)
./scripts/ch-migrate-docker.sh --append
Specific time window
./scripts/ch-migrate-docker.sh --from 2026-02-01T00:00:00Z --to 2026-02-20T00:00:00Z
Phase 4 (optional): CH-only mode
Once ClickHouse is running stably, stop SQLite stats writes:
CHONLYMODE=1Even with CHONLYMODE=1, if ClickHouse becomes unhealthy the system automatically falls back to SQLite writes—no data loss.
Reverting to SQLite-only
You can always roll back completely:
CH_ENABLED=0
CHWRITEENABLED=0
CHONLYMODE=0
STATSQUERYSOURCE=sqlite
Restart and everything returns to pure SQLite mode. Historical data remains intact.
🌐 Reverse Proxy & Tunnel
Recommended approach: keep Web and WS under the same domain, with path routing: / → 3000, /cmws → 3002.
Nginx Standard Example
server {
  listen 443 ssl http2;
  server_name neko.example.com;
location / {     proxy_pass http://<neko-master-host>:3000;     proxyhttpversion 1.1;     proxysetheader Host $host;     proxysetheader X-Real-IP $remote_addr;     proxysetheader X-Forwarded-For $proxyaddxforwardedfor;     proxysetheader X-Forwarded-Proto $scheme;   }
location ^~ /cmws {     proxy_pass http://<neko-master-host>:3002;     proxyhttpversion 1.1;     proxysetheader Upgrade $http_upgrade;     proxysetheader Connection "upgrade";     proxysetheader Host $host;     proxysetheader X-Forwarded-For $proxyaddxforwardedfor;     proxysetheader X-Forwarded-Proto $scheme;     proxyreadtimeout 86400;     proxysendtimeout 86400;     proxy_buffering off;   } }
Optional env override:
# Not required by default (already /cmws)
NEXTPUBLICWSURL=/customws
Cloudflare Tunnel Standard Example
~/.cloudflared/config.yml:
tunnel: <your-tunnel-name-or-id>
credentials-file: /path/to/<credentials>.json
ingress:   - hostname: neko.example.com     path: /cmws*     service: http://localhost:3002   - hostname: neko.example.com     path: /*     service: http://localhost:3000   - service: http_status:404
Run:
cloudflared tunnel --config ~/.cloudflared/config.yml run <your-tunnel-name-or-id>For Zero Trust dashboard-managed routes (token mode), configure the same two routes and keep /cmws above /.
Key Notes
- Do not use
ws(without leading slash) as WS path; it can overmatch and cause/_next/static/...→426 Upgrade Required - WS route must be above catch-all
/* NEXTPUBLICWS_URLis optional by default; if customized, restart frontend/container after changes- Mapping only
3000still works, but falls back to HTTP polling (~5s), with less real-time responsiveness beacon.min.jsfailures (Cloudflare analytics script) are typically unrelated to app API/WS data flow- No extra
/apireverse-proxy rule is required in most setups; frontend uses same-origin/apiand app handles internal forwarding to3001
Note: /_next/static/... 426 Upgrade Required is common in misconfigured reverse proxy / tunnel setups; it is uncommon in direct local access without a proxy.
Multi-Architecture Support
Docker images support both linux/amd64 and linux/arm64.
Data Persistence
Data is stored in /app/data inside the container. Mount it to host to prevent data loss:
volumes:
  - ./data:/app/data
Update to Latest
# Pull the latest image and restart
docker compose pull
docker compose up -d
🔐 Authentication & Security
Neko Master supports access authentication to protect dashboard data.
Production Security Baseline
- Set a fixed
COOKIE_SECRET(otherwise sessions may be invalidated after restart). - Do not keep
FORCEACCESSCONTROL_OFF=trueenabled in normal operation. - Use
SHOWCASESITEMODE=trueonly for public demo environments (write operations are restricted).
COOKIE_SECRET=<at least 32-byte random string>
FORCEACCESSCONTROL_OFF=false
SHOWCASESITEMODE=false
Enable / Disable Authentication
- Open dashboard and click "Settings" in the lower-left sidebar.
- Go to the "Security" tab.
- Enable/disable access control and set your token.
Forgot Token (Emergency Reset)
If you forgot the token, temporarily set FORCEACCESSCONTROL_OFF=true to enter emergency mode.
Docker Compose
- Add to
docker-compose.yml:
environment:
- FORCEACCESSCONTROL_OFF=true- Restart:
docker compose up -d- Open dashboard and reset token in "Settings -> Security".
- Remove this env var immediately after reset, then restart again.
Docker CLI
- Stop and remove container:
docker stop neko-master
docker rm neko-master- Re-run with emergency flag:
docker run -d \
     --name neko-master \
     -p 3000:3000 \
     -v $(pwd)/data:/app/data \
     -e FORCEACCESSCONTROL_OFF=true \
foru17/neko-master:latest- Reset token, then remove this flag and restart normally.
❓ FAQ
Q: Can I run normally with only 3000:3000 exposed?
A: Yes. Core features still work. If WS is not routed, the app automatically falls back to HTTP polling. For full realtime experience, route /cmws to 3002.
Q: Port conflict or inaccessible after port changes?
A: Create/update .env (same directory as docker-compose.yml):
WEBEXTERNALPORT=8080
APIEXTERNALPORT=8081
WSEXTERNALPORT=8082
Then restart:
docker compose down
docker compose up -d
Q: Why does login/session disappear after restart?
A: Usually because COOKIE_SECRET is not fixed or data directory is not persisted.
- Set a fixed
COOKIE_SECRET - Mount
./data:/app/data
Q: Which files are required for local MMDB lookup?
A: Create ./geoip in your project directory (same level as docker-compose.yml is recommended), then place:
GeoLite2-City.mmdb(required)GeoLite2-ASN.mmdb(required)GeoLite2-Country.mmdb(optional)
/app/data/geoip, so keep:
./geoip:/app/data/geoip:ro. To update later, just replace files in host ./geoip.
Q: Failed to connect OpenClash / gateway?
A: Check:
- External control is enabled on gateway side
- Host/port is correct
- Token/Secret is correct (if configured)
- Container network can reach gateway
Q: How to backup and restore data?
A: Backup first:
cp -r ./data ./data-backup-$(date +%Y%m%d)Restore:
docker compose down
cp -r ./data-backup-YYYYMMDD/. ./data/
docker compose up -d
🏗️ Architecture Guide
If you want to quickly understand the system design depth, read in this order:
- System Architecture Diagram: end-to-end layering and module responsibilities → docs/architecture.en.md
- Data Flow: Clash / Surge collection pipelines and aggregation
- Data Model & Storage: SQLite schema, ClickHouse Buffer tables, retention policy
- Realtime Channel Design:
RealtimeStoremerge strategy and WS push - ClickHouse Module: dual-write architecture, health fallback, read routing
This documentation covers the core design of collection, aggregation, caching, realtime push, and multi-backend management.
🤝 Feedback & Issues
This project uses GitHub Issue Templates (Bug / Feature / Support).
Please include at least:
- Deployment method (Compose / Docker Run / Source)
- Version info (image tag or commit)
- Key env vars (masked, e.g.
COOKIE_SECRET=*) - Reproduction steps and expected vs actual behavior
- Key logs (
docker logs, browser console, network errors)
📁 Project Structure
neko-master/
├── docker-compose.yml      # Docker Compose config
├── Dockerfile              # Docker image build
├── setup.sh                # One-click setup script
├── docker-start.sh         # Docker container startup script
├── start.sh                # Source code dev startup script
├── docs/                   # Documentation (see docs/README.md)
│   ├── README.md           # Documentation index (English default)
│   ├── README.zh.md        # Documentation index (Chinese)
│   ├── README.en.md        # Documentation index (English mirror)
│   ├── architecture.md     # System architecture (Chinese)
│   ├── architecture.en.md  # System architecture (English)
│   ├── release-checklist.md
│   ├── agent/              # Agent docs (bilingual)
│   │   ├── overview.md / overview.en.md
│   │   ├── quick-start.md / quick-start.en.md
│   │   ├── install.md / install.en.md
│   │   ├── config.md / config.en.md
│   │   ├── release.md / release.en.md
│   │   └── troubleshooting.md / troubleshooting.en.md
│   ├── research/           # Research reports
│   └── dev/                # Internal development docs
├── assets/                 # Screenshots and icons
├── apps/
│   ├── collector/          # Data collection service (Node.js + WebSocket)
│   ├── agent/              # Agent daemon (Go)
│   └── web/                # Next.js frontend app
└── packages/
    └── shared/             # Shared types and utilities
🛠️ Tech Stack
- Frontend: Next.js 16 + React 19 + TypeScript
- Styling: Tailwind CSS + shadcn/ui
- Charts: Recharts
- i18n: next-intl
- Backend: Node.js + Fastify + WebSocket
- Database: SQLite (better-sqlite3) + ClickHouse (optional)
- Build: pnpm + Turborepo
🤝 Contributing
Contributions are welcome!
Before opening a PR, read CONTRIBUTING.md (workflow, checks, i18n/dark-mode requirements).Developing with an AI coding tool? (Claude Code, Copilot, Cursor, Codex, ...) Point it at AGENTS.md — conventions, key contracts, and the project map — plus the task-specific workflow guides in .claude/skills/. Claude Code picks both up automatically.
📄 License
⭐ Star History
Made with ❤️ by @foru17
If this project helps you, please consider giving it a ⭐


