
Final Project of the MLOps Zoomcamp hosted by DataTalksClub.









Final Project
- Diagram - Reproducibility - If you only want to see the final apps - Create a conda enviroment for the project with python=3.9 - Active the enviroment - Install the dependencies - Dataset: IBM HR Analytics Employee Attrition \& Performance - Download dataset with the following command: - Working on model.ipynb - Install ipython kernel - Model Register - Install prefect - Authenticating with Prefect Cloud (Optional) - Start UI - Build the deployment - Apply the deployment - Work queues and agents - Create a Workflow in the UI - Start an agent - Schedule the deployment - Evidently - Install evidently - Dashboard for classification report - Results - Whylogs - Install whylogs - Get your API key - First approach: Connect dataset - Results - Classifier Report - Generate performance report - Results - Activate Presets - Configure Tests - Intall Pylint - Lint the code - Runs Results - View Results in Visual Studio Code - Add.pylintrc file
- Formatting with black and isort
- Add Black to pyproject.toml
- Apply Isort
- Add Isort to pyproject.toml
- Install pre-commit
- See pre-commit hooks examples in the root of the project (Optional)
- Create a sample config file with pre-commit
- Create a yaml file with pre-commit settings
- Add pre-commit to the .git folder
- For one of my commits, I've got the following result:
- You can see all the hooks that pre-commit can run at the following link:
- Isort pre-commit hook
- Black pre-commit hook
- Pylint pre-commit hook
- Pytest pre-commit hook
- Install make with the following command:
- Example:
- Run make with the following command:
- Install Flask
- Create a Flask app
- Install Streamlit
- Model that we'll use
- Load the model
- Run the app
- Github actions
- Testing workflow
- Continuous training workflow
Problem Explanation
Imagine that you're working on a company that want to predict if an employee is leaving or not the company based on several factors like age, salary, etc.The main focus of this project is to build a model to predict it, register it in a register service and deploy it.
Diagram
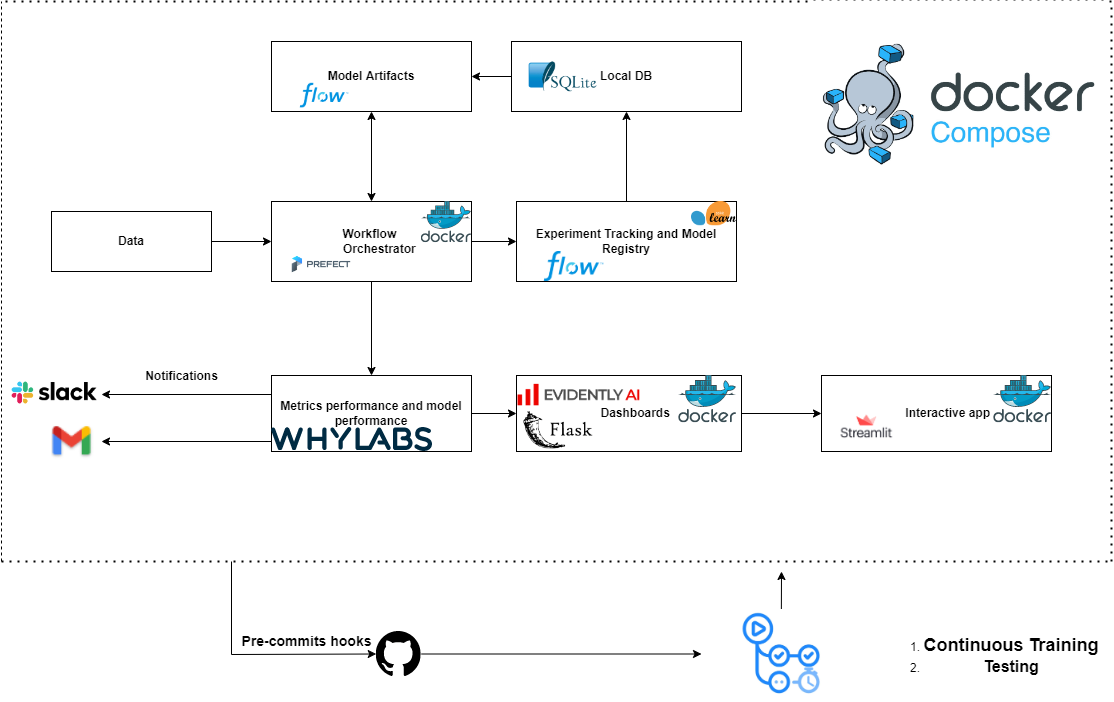
Reproducibility
If you want to reproduce the results of this project, run the following commands:Add a whylog_token.json to the root of the project with your token
pip install -r requirements.txt
python model.py
make build
make upIf you only want to see the final apps
make build
make upStep by Step
Follow the steps below to reproduce the problem and build the model.Enviroment
Create a conda enviroment for the project with python=3.9
conda create -n project_enviroment python=3.9Active the enviroment
conda activate project_enviromentInstall the dependencies
pip install -r requirements.txtModel: Classification model that predict if an employee is leaving the company.
Dataset: IBM HR Analytics Employee Attrition & Performance
Download dataset hereDownload dataset with the following command:
wget https://www.kaggle.com/datasets/pavansubhasht/ibm-hr-analytics-attrition-dataset?resource=downloadWorking on model.ipynb
Install ipython kernel
conda install -n project_enviroment ipykernel --update-deps --force-reinstallTracking Experiment with Mlflow
Run the following command in your terminal to track the experiment in your local machine:
mlflow ui --backend-store-uri sqlite:///mydb.sqliteAdd this code to your notebook to track the experiment in your local machine using a SQLite database:
import mlflow
mlflow.settrackinguri('sqlite:///mydb.sqlite')
And start a run with:
mlflow.start_run()Model Register
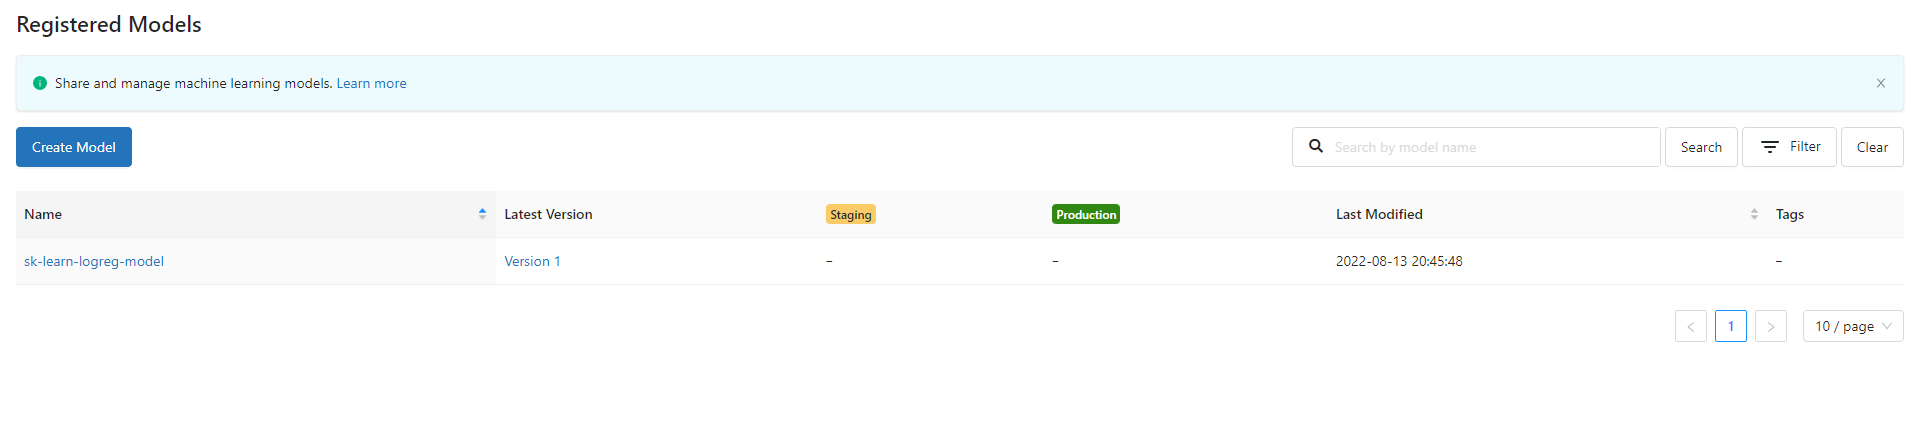
I'm using a sklearn library, mlflow provides a way to register the model with the following command:#Model Register
mlflow.sklearn.log_model(
sk_model = logreg,
artifact_path='models/logreg',
registeredmodelname='sk-learn-logreg-model'
)
Orchestration of the project
I'm going to use Prefect==2.7.3 to orchestrate the project.Install prefect
conda install prefect -c conda-forgeAuthenticating with Prefect Cloud (Optional)
prefect cloud login -k YOUR_KEYStart UI
>Go to prefect-cloud-webDeployment
See the options wit the following command:prefect deployment build --helpBuild the deployment
prefect deployment build .\model.py:applying_model --name Project-Deployment --tag MLOpsApply the deployment
prefect deployment apply applying_model-deployment.yamlWork queues and agents
We can't run the deployment from the UI yet. We nned a work queue and an agent to run the deployment.Work queues and agents are the mechanisms by which the Prefect API orchestrates deployment flow runs in remote execution environments.
Work queues let you organize flow runs into queues for execution. Agents pick up work from queues and execute the flows
Create a Workflow in the UI
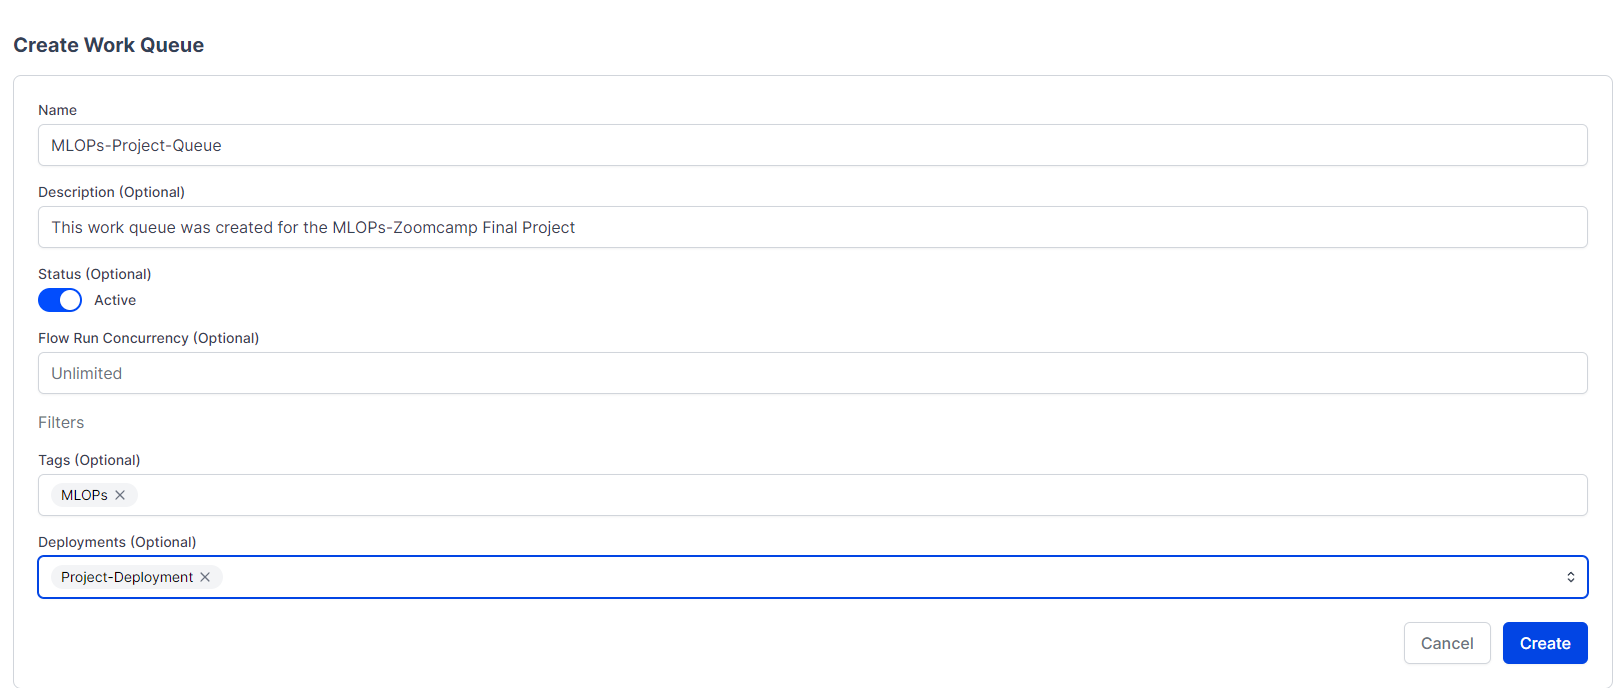
Start an agent
prefect agent start -t tag where tag is the tag you used to build the deployment.-t tag option, the agent will pick up the work from the queue and execute the flows. Schedule the deployment
- Go to the UI
- Select
Add Schedule
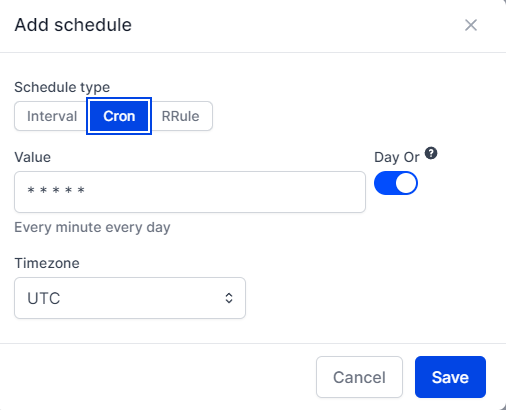
- I'm going to select
Cronwith a value of0 0 *that means every day at 12:00 AM. Timezoneis important, so, be sure to select the correct timezone.
Monitoring
I'm going to use Evidently and Whylogsto monitor the experiment.Evidently
Install evidently
You can install it with the following command:pip install evidentlyDashboard for classification report
Classification Performance report evaluates the quality of a classification model. It works both for binary and multi-class classification. If you have a probabilistic classification, refer to a separate report. This report can be generated for a single model, or as a comparison. You can contrast your current production model performance against the past or an alternative model.Results
Using train data and valid data to evaluate the model I've created the following dashboard: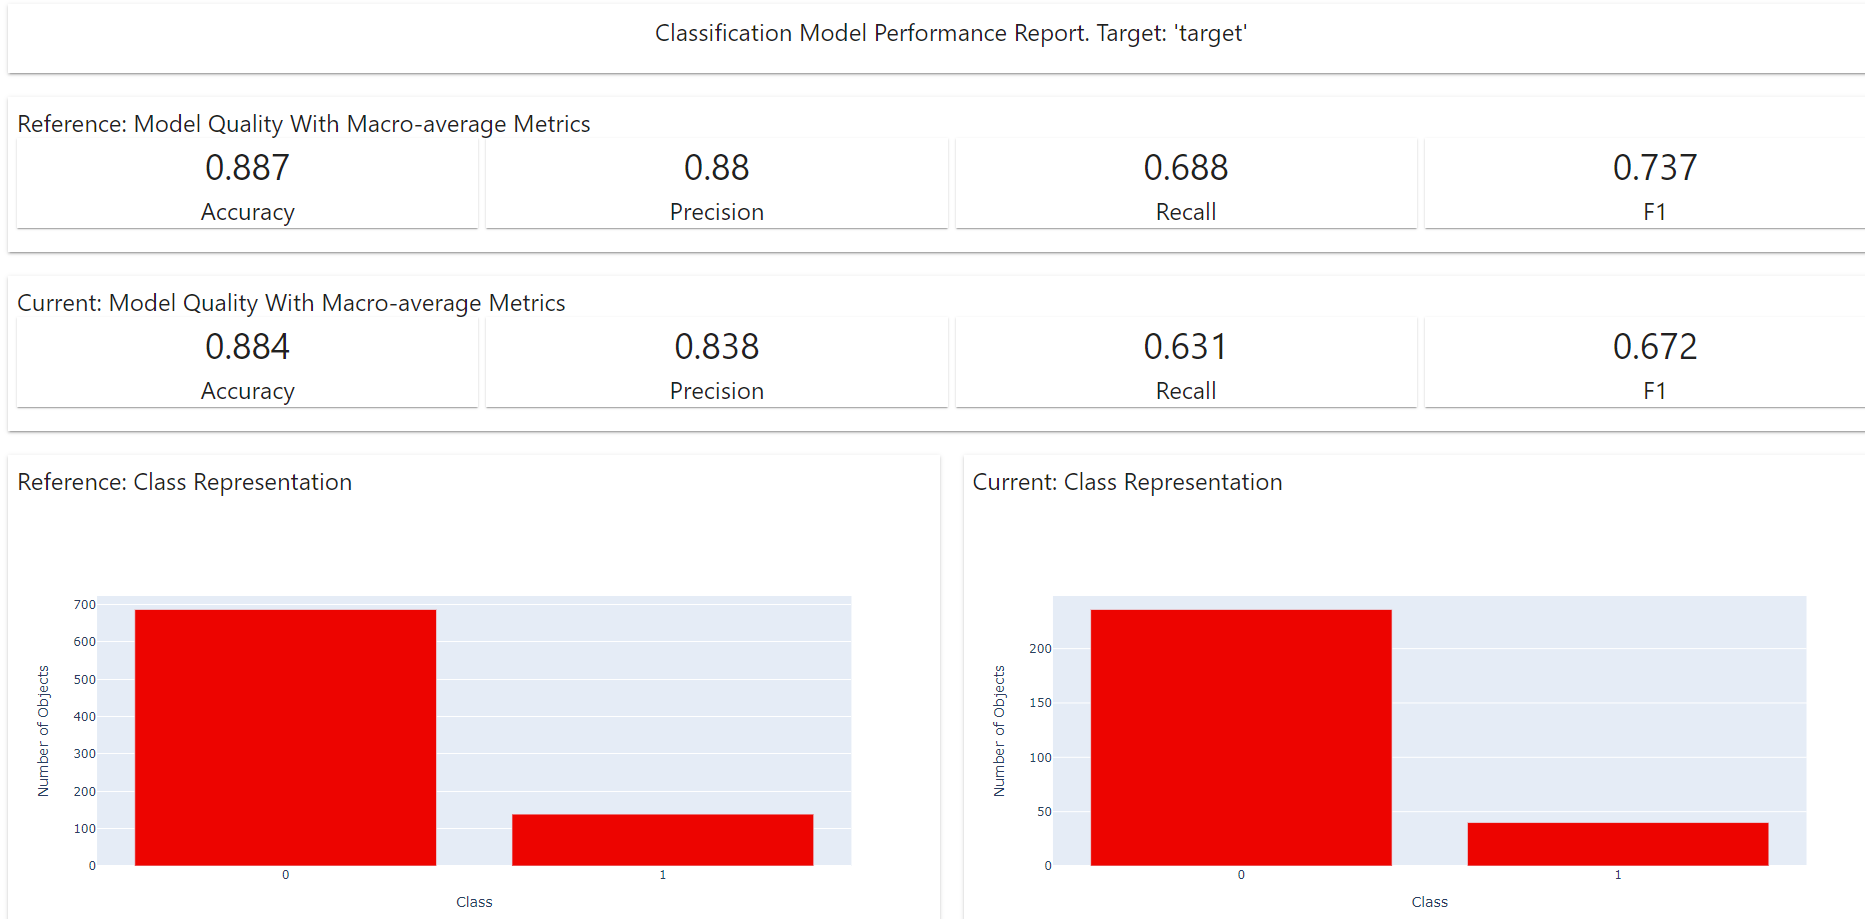 You can see the resuls in the
 dashboard folder.
Whylogs
Install whylogs
pip install "whylogs<1.0"Get your API key
Go to whylogs.com and create an account, then go to your profile and click on theAPI tab.
First approach: Connect dataset
As a first approach, we can connect the dataset to the experiment.I've used the following command to connect the dataset to the experiment:
import whylogs as why from whylogs.app import Session from whylogs.app.writers import WhyLabsWriter
writer = WhyLabsWriter("", formats=[])     session = Session(project="model-1", pipeline="mlops-project-pipeline", writers=[writer])
with session.logger(tags={"datasetId": "model-1"}) as ylog:         ylog.log_dataframe(df)
Results
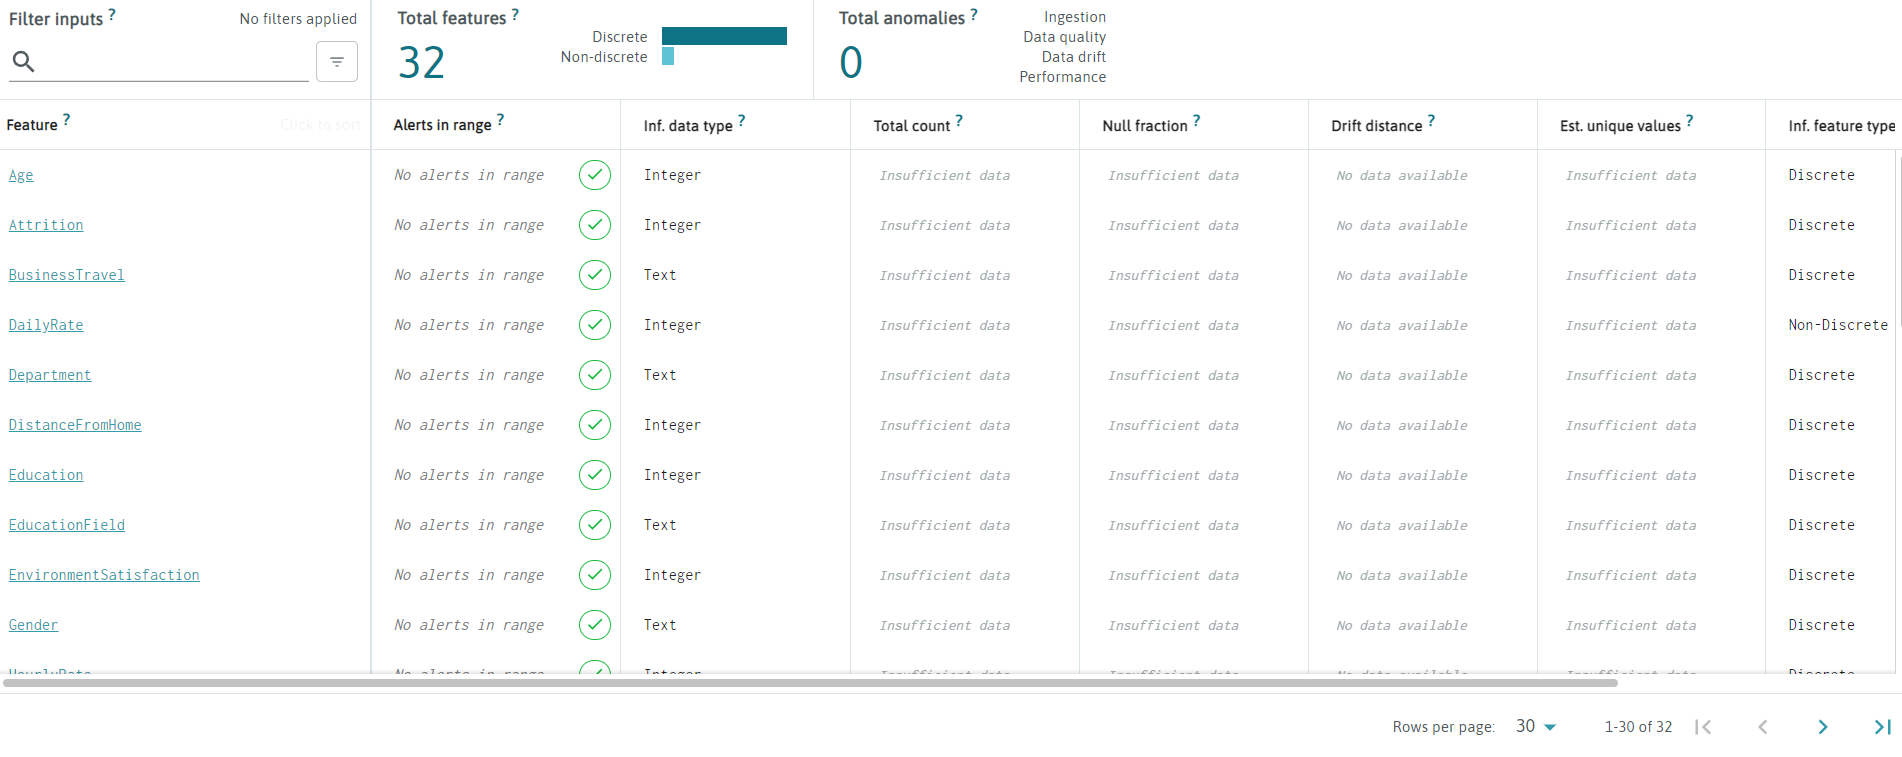
Classifier Report
First: Make sure that you have selectedClassification model in your Whylabs Project. 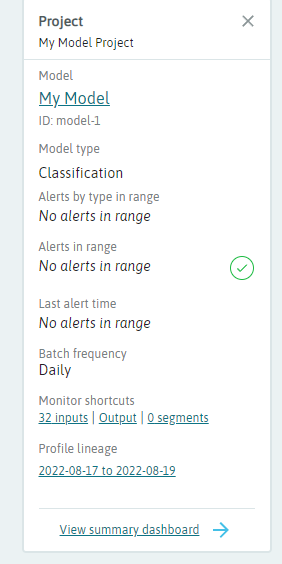
Generate performance report
scores = [max(p) for p in logreg.predictproba(Xval)] with session.logger(tags={"datasetId": "model-1"}, dataset_timestamp = datetime.now()) as ylog: ylog.log_metrics( targets = list(y_val), predictions = list(y_pred), scores = scores, model_type = ModelType.CLASSIFICATION, target_field="Attrition", predicti, score_field = "Normalized Prediction Probability", )Results
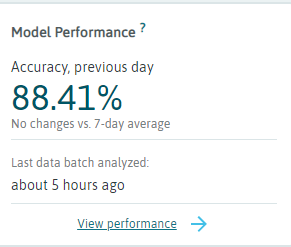
Activate Presets
We can activate somePreset monitors to monitor different part of the experiment.
You can receive alerts from these Preset monitors, in my case I've enabled: 
Tests
I'll use Pytest to test the model.Install pytest with the following command:
pip install pytestConfigure Tests
- Go to
testsextension in VS Code and select a folder that contains the tests, in this casetests/. - Select
Pytestas the test runner.
Linting and Formatting
I'm going to use Pylint to lint and format the code.Intall Pylint
Use this command to install pylint:pip install pylintLint the code
You can lint your python file as follows:pylint my_file.pypylint model.py.
Runs Results
- In the first time I'd obtained a score 5.23/10 (very bad).
- Score of 5.88/10 (still bad).
- Score of 6.47/10 (quite good).
- After creating pyproject.toml my score raises to 8.35/10 (very good).
- Now my score is 9.76/10 (excellent).
View Results in Visual Studio Code
- Press
Ctrl + Shift + Pand then typelintingand selectPylint. - Run linting with
Ctrl + Shift + PandRun linting.
Add .pylintrc file
You can add a .pylintrc file in the root of the project to configure pylint.
I'm going to use pyproject.toml instead.
Formatting with black and isort
Install black and isort with the following command:pip install black isortblack --diff my_file.pyblack my_file.pyAdd Black to pyproject.toml
You can add some configurations topyproject.toml, in my case: [tool.black] line-length = 120 target-version = ['py39'] skip-string-normalization = trueline-lengthis the maximum length of a line.target-versionis the version of python that you want to use.skip-string-normalizationis a boolean that indicates if you want to skip string normalization.
Apply Isort
You can apply isort with the following command:isort my_file.pyAdd Isort to pyproject.toml
Add the following configurations topyproject.toml: multilineoutput = 3 length_sort = true orderbytype = truemultilineoutputis the number of lines that will be used to output a multiline string.length_sortis a boolean that indicates if you want to sort by length.orderbytypeis a boolean that indicates if you want to order by type.
Git pre-commits hooks
 I'm going to install
 pre-commit library. More info here. Install pre-commit
pip install pre-commitSee pre-commit hooks examples in the root of the project (Optional)
- Go to
.git/hooksfolder and selectpre-commit. - Open
pre-commit.samplefile and see the examples. - Example content:
#!/bin/sh # An example hook script to verify what is about to be committed. Called by "git commit" with no arguments.  The hook should exit with non-zero status after issuing an appropriate message if it wants to stop the commit. # To enable this hook, rename this file to "pre-commit".
if git rev-parse --verify HEAD >/dev/null 2>&1 then 	against=HEAD else 	# Initial commit: diff against an empty tree object 	against=$(git hash-object -t tree /dev/null) fi
If you want to allow non-ASCII filenames set this variable to true.
allownonascii=$(git config --type=bool hooks.allownonascii)
Redirect output to stderr.
exec 1>&2
Cross platform projects tend to avoid non-ASCII filenames; prevent
them from being added to the repository. We exploit the fact that the
printable range starts at the space character and ends with tilde.
if [ "$allownonascii" != "true" ] &&
	# Note that the use of brackets around a tr range is ok here, (it's
	# even required, for portability to Solaris 10's /usr/bin/tr), since
	# the square bracket bytes happen to fall in the designated range.
	test $(git diff --cached --name-only --diff-filter=A -z $against |
	  LC_ALL=C tr -d '[ -~]\0' | wc -c) != 0
then
	cat <<\EOF
Error: Attempt to add a non-ASCII file name.
This can cause problems if you want to work with people on other platforms.
To be portable it is advisable to rename the file.
If you know what you are doing you can disable this check using:
git config hooks.allownonascii true EOF 	exit 1 fi
If there are whitespace errors, print the offending file names and fail.
exec git diff-index --check --cached $against --
Create a sample config file with pre-commit
Type the following command to create a sample config file:pre-commit sample-configCreate a yaml file with pre-commit settings
Type the following command to create a yaml file with pre-commit settings:pre-commit sample-config >.pre-commit-config.yamlAdd pre-commit to the .git folder
Type the following command to add pre-commit to the .git folder:pre-commit installFor one of my commits, I've got the following result:

You can see all the hooks that pre-commit can run at the following link:
https://pre-commit.com/hooks.htmlIsort pre-commit hook
Add the following configuration to.pre-commit-config.yaml:
- repo: https://github.com/pycqa/isort
    rev: 5.10.1
    hooks:
      - id: isort
        name: isort (python)
Black pre-commit hook
Add the following configuration to.pre-commit-config.yaml:
repos:
- repo: https://github.com/psf/black
rev: stable
hooks:
- id: black
language_version: python3.9Pylint pre-commit hook
Add the following configuration to.pre-commit-config.yaml:
- repo: local
  hooks:
    - id: pylint
      name: pylint
      entry: pylint
      language: system
      types: [python]
      args:
        [
          "-rn", # Only display messages
          "-sn", # Don't display the score
        ]
Pytest pre-commit hook
- repo: local
    hooks:
      - id: pytest-check
        name: pytest-check
        entry: pytest
        language: system
        pass_filenames: false
        always_run: true
Makefiles and Make
Make is a tool which controls the generation of executables and other non-source files of a program from the program's source files. Make gets its knowledge of how to build your program from a file called the makefile, which lists each of the non-source files and how to compute it from other files. When you write a program, you should write a makefile for it, so that it is possible to use Make to build and install the program.Install make with the following command:
sudo apt install makechoco install makechoco is the command to install chocolatey packages.
Example:
test:
	echo test
other_thing: 	echo other thing
run: test other_thing 	echo run
Run make with the following command:
make runFlask app: Evidently
I'm going to put the html generated by Evidently in a Flask app.Install Flask
Install Flask with the following command:pip install flaskCreate a Flask app
from flask import Flask, render_template
app = Flask (name, template_folder='dashboards')
@app.route('/') def evidently():     return rendertemplate('dfmodel_performance.html')
if name == 'main':     app.run(debug=True, host = '0.0.0.0', port = 9696)
dashboardsis the folder where the html files are located.- render_template is a function that takes the name of the html file and returns the html code.
- I've selected port = 9696.
Streamlit app
We can make a Streamlit app using our model.Install Streamlit
Install Streamlit with the following command:pip install streamlitModel that we'll use
We'll use the last model we trained. This model will be atmodels folder. Load the model
Load the model with the following command:def load_model(): model = 'models/pipeline.bin'
with open(model, 'rb') as f_in: pipeline = pickle.load(f_in)
return pipeline pipeline = load_model()
Run the app
Run the app with the following command:streamlit run streamlit/streamlit_app.pystreamlit_app.py is the name of the file.
CI/CD
Github actions
Github actions is a service that allows us to run our code in a virtual machine. We can use this service to run our code when we push our code to Github. We can also use this service to run our code when we create a pull request.Testing workflow
I've created a workflow to test the code. Basically, this workflow will run the following commands:- Install the requirements.
- Run the tests.
Continuous training workflow
This workflow will run the following commands:- Install the requirements.
- Run the model
- Push the new model to the repository.
- This workflow will run every day (6 hours after the last run).


