
CloverDX Docker container for CloverDX Server deployment including examples.
 You can find the repository for this Dockerfile at
 Overview
This Docker container provides an easy way to create a CloverDX Server instance. The container is tailored to spin-up a
standalone CloverDX Server with good defaults, in a recommended environment.
Quick start
git clone https://github.com/cloverdx/cloverdx-server-docker.git -b release-6-4. for Tomcat from <https://www.cloverdx.com> into cloverdx-server-docker directory (current working directory containing the Dockerfile). to download additional dependencies, e.g. JDBC drivers, BouncyCastle.
<pre><code class="lang-">$ docker build -t cloverdx-server:latest .</code></pre>
<pre><code class="lang-">$ docker run -d --name cloverdx --memory=3g -p 8080:8080 -e LOCALUSERID=id -u $USER --mount type=bind,source=/data/your-host-clover-home-dir,target=/var/clover cloverdx-server:latest</code></pre>
<pre><code class="lang-">docker run -d --name cloverdx --memory=3g -p 8080:8080 --mount type=bind,source=C:/your-host-clover-home-dir,target=/var/clover cloverdx-server:latest</code></pre>
Explanation:
- -d - detached mode, the container exits when Server exits
- --name - name to identify the running container
- --memory=3g - allow 3 GB of memory for the container, the container requires at least 2 GB of memory.
- -p 8080:8080 - publish exposed container port
- <pre><code class="lang-">-e LOCALUSERID=id -u $USER - set an environment variable, in this case user ID to be used for permissions (only on Linux)
- `--mount type=bind,source=/data/your-host-clover-home-dir,target=/var/clover - mount the /data/your-host-clover-home-dir directory from the host as a data volume into /var/clover path inside the container, this will contain the persistent data, configuration, etc.
- cloverdx-server:latest - name of the image to run as a container
Success. CloverDX Server is now available at <http://localhost:8080/clover>. The Server is running with default settings, and should be configured further to get it into production quality (i.e. it should use external database).
Architecture
This Docker container is designed to run a standalone CloverDX Server instance.
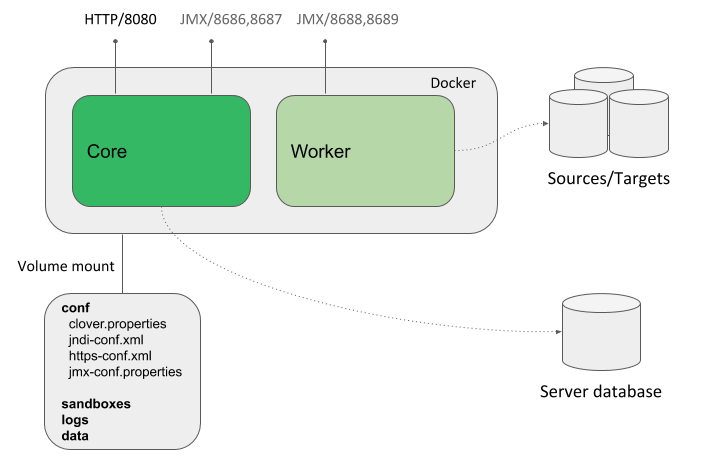 It has external dependencies:
The container expects a mounted volume that will contain its state and configuration. The volume should be mounted into the /var/clover directory. Contents of the volume:
conf/ - configuration of the server, e.g. connection to the system database
sandboxes/ - sandboxes with jobs, metadata, data, etc.
cloverlogs/ - server logs
tomcatlogs/ - Tomcat logs
clover-lib/ - libraries to add to Tomcat, Server Core classpath and Worker classpath
tomcat-lib/ - libraries to add to Tomcat and Server Core classpath
worker-lib/ - libraries to add to Worker classpath
Internal structure of the container:
/opt/tomcat/ - installation directory of Tomcat running the server
/var/clover/ - directory with persistent data, visible to users (config, jobs, logs, ...). It is expected that a volume is mounted into this directory from the host. See above for its structure
/var/cloverdata/ - directory with non-persistent data, not visible to users
/var/clover-lib/ - libraries to add to Tomcat, Server Core classpath and Worker classpath
/var/tomcat-lib/ - libraries to add to Tomcat and Server Core classpath
/var/worker-lib/ - libraries to add to Worker classpath
Environment:
Default exposed ports:
Used ports need to be published when running the container via the -p HOSTPORT:CONTAINERPORT (this maps the inside CONTAINERPORT to be visible from the outside as HOSTPORT). If you enable additional ports (e.g. 8443 for HTTPS), do not forget to publish them.
/var/clover/
Configuration
Data volume
CloverDX Server needs persistent storage for its data and configuration, so that the files are not lost when the container is restarted or updated to a newer version. You should bind a host directory to inside the container as a mounted volume:
<pre><code class="lang-bash"># bind host directory on Linux:
--mount type=bind,source=/data/your-host-clover-data-dir,target=/var/clover</code></pre>
<pre><code class="lang-bash"># bind host directory on Windows:
--mount type=bind,source=C:/your-host-clover-data-dir,target=/var/clover</code></pre>
On Linux, if you bind a directory from the host OS, the data files will be owned by the user with UID 1000. You should override this by setting LOCALUSERID environment variable:
<pre><code class="lang-bash">-e LOCALUSERID=id -u $USER</code></pre>
Server configuration
CloverDX Server is configured via configuration properties - e.g. connection information to the system database. See documentation for available configuration properties.
Configuration via clover.properties
The clover.properties file contains server configuration properties and their values. For example:
<pre><code class="lang-properties">jdbc.driverClassName=com.mysql.cj.jdbc.Driver
jdbc.url=jdbc:mysql://hostname:3306/clover?useUnicode=true&characterEncoding=utf8
jdbc.username=user
jdbc.password=pass
jdbc.dialect=org.hibernate.dialect.MySQLDialect</code></pre>
Put the clover.properties file in the conf directory of the data volume and it will be automatically recognized. If the file does not exist in the volume, the server will create an empty one and use the default settings. It is possible to modify the file via Setup page in Server Console.
Configuration via environment variables
Server's configuration properties can be set via environment variables in 2 ways:
clover. prefix. For example, the environment variable clover.sandboxes.home will override the configuration property sandboxes.home.
${env:ENVIRONMENTVARIABLE} syntax. For example, sandboxes.home=${env:SANDBOXESROOT}.
Environment variable values are set when running the container:
docker run -e "clover.sandboxes.home=/some/path" ...
var/dbdrivers/System database configuration
By default, CloverDX Server will use an embedded Derby database. In order to use an external database, the container needs a JDBC driver and a configuration file:
before building the image. The gradlew build script in this repository downloads default JDBC drivers.
clover.properties configuration file and place it into /data/your-host-clover-data-dir/conf/ directory in your host file system.
/data/your-host-clover-data-dir/ to /var/clover/ (see above) and start the container.
Libraries and classpath
Libraries are added to the classpath of Tomcat (i.e. Server Core) and Worker via the mounted volume. This action does not modify the build of the Docker image. Place the JARs to the following directories in the volume:
tomcat-lib/ - libraries to add to Tomcat and Server Core classpath (e.g. JDBC drivers)
worker-lib/ - libraries to add to Worker classpath (e.g. libraries used by jobs)
Sandboxes
The container automatically imports all directories from sandboxes/ directory in the mounted volume as sandboxes. This helps with initial set-up of the container, just place your sandboxes and their content into sandboxes/ in the volume and the container automatically imports them without additional configuration needed.
This feature is enabled by default in the container, not in vanilla CloverDX Server. It can be enabled/disabled via the sandboxes.autoimport configuration property (true/false). Sandboxes are imported from the sandboxes.home path, which is set to sandboxes/ in the mounted volume.
The container does not create default example sandboxes by default. To enable them, set the installer.BundledSandboxesInstaller.enabled configuration property to true.
Schedulers, listeners, Data Services
During the first startup, the container automatically imports configuration XML from ${CLOVERHOMEDIR}/conf/configurationimport.xml. This way you can set up schedulers, event listeners and data services, for example. The file can be obtained by exporting configuration from an existing Server instance. You can edit the exported file and replace hard-coded values with placeholders, e.g. ${env:VARIABLENAME} will be replaced with the value of VARIABLE_NAME environment variable during the import.
This feature is enabled by default in the container, not in vanilla CloverDX Server. It can be enabled/disabled via the configuration.autoimport.file configuration property.
Additionally, during the first startup the container also automatically imports configuration from each of the automatically created sandboxes (see section Sandboxes above). In each sandbox there can be a sandboxconfiguration.xml file that can contain sandbox-related configuration entities (schedules, event listeners, data services, job config properties). See documentation for more details. This simplifies deployment of sandbox content and related configuration.
License
To activate CloverDX Server, the container by default searches for a license file (text file containing the license key itself) in the conf/license.dat path in the mounted volume.
Alternative options:
license.file configuration property and set a different path to the license file, e.g. to a different volume.
Tomcat configuration
The mounted volume contains fragments of Tomcat configuration files that configure various aspects of Tomcat. If the files are not found during the start of the container, the container will create commented-out examples of them.
Configuration files:
conf/https-conf.xml - configuration of HTTPS connector of Tomcat, is referenced from server.xml when running the container. See Security / HTTPS section below.
conf/jmx-conf.properties - Java properties that can be updated to enable JMX monitoring over SSL. See Security / JMX over SSL section below.
conf/jndi-conf.xml - configuration of JNDI resources of Tomcat, is referenced from server.xml when running the container. See the commented <Resource> example on how to add a JNDI resource. We recommend to use JNDI to connect to server's system database.
Examples of these files are in this repo (see public/tomcat/defaults directory) - the examples can be used as a starting point for the configuration files before the first start of the container.
Java tuning
The container starts two Java processes - one for Tomcat running CloverDX Server Core and one for Worker running jobs. The container sets good default options for Java. For additional tuning of the command line options, use the following environment variables:
SERVERJAVAOPTS - additional Java command line options for Server Core and Tomcat
WORKERJAVAOPTS - additional Java command line options for Worker
The command line options in the above environment variables are added to the options that the container sets by default. It's mostly meant for customizing garbage collector, Java performance logging, etc. Do not use this to extend the classpath - see Libraries and Classpath section above for that.
Memory
Important memory settings inside the container are Java heap size for Server Core, Java heap size for Worker and sizes of additional Java memory spaces. The memory settings are automatically calculated based on the memory assigned to the container instance.
For example, if running the container with 4 GB of RAM:
docker run -d --name cloverdx --memory=4g ...
 Then Server Core will have 1 GB heap, Worker will have 2 GB heap, and the rest is left for additional Java memory spaces and the OS.

 The automatic memory settings can be overridden by setting BOTH environment properties:
CLOVERSERVERHEAP_SIZE - heap size of Server Core (in MB)
CLOVERWORKERHEAP_SIZE - heap size of Worker (in MB)
Note that if the memory for the container is not limited with the --memory option, the memory settings will be calculated as though only 2 GB of memory were available (Server Core will have 0.5 GB heap, Worker will have 1 GB heap).
CPU
The docker image follows CPU constraints assigned to it, e.g. it sees just a limited number of CPU cores and is assigned a portion of CPU cycles of the host machine.
Useful options of the docker run commands (see documentation):
--cpus=<value> - portion of host CPUs the container can use. For example, --cpus=1.5 allows at most one and a half CPU of all the host's CPUs. Available in Docker 1.13 and higher.
--cpu-shares=<value> - value is a weight of the container, and containers running on a host get their share of CPU cycles based on their weight. Default weight is 1024, which also translates into 1 CPU core from the point of view of Java. For example, setting this to 4096 will cause Java to see 4 CPU cores.
We recommend using multiple CPU cores for the docker image, e.g. --cpus=4.
Timezone
Default timezone of the container instance is UTC. The timezone is NOT inherited from the Docker host. To set a specific timezone, set the environment variable TZ when running the container:
docker run -e TZ=Europe/Amsterdam ...
HEALTHCHECKHealth monitoring (Health check)
The container reports its health via the Docker instruction.
The health check periodically calls http://localhost:8080/clover/accessibilityTest.jsp to check the health of CloverDX Server. By default, it is set-up to survive short restarts of the Worker.
Default setting in our container:
Custom entrypoint scripts
If you need to run some script before CloverDX Server starts, but after $CLOVERHOMEDIR directory is created, put your code into public/docker/hooks/init.sh file. Alternatively, you can also mount your own script as the init.sh file:
docker run -v /your/hook/script.sh:/opt/tomcat/hooks/init.sh
 Monitoring

 The docker container exposes ports by default for JMX monitoring via tools such as VisualVM. The JMX monitoring tools are useful to analyze threads, memory usage, classloaders, etc.

 Exposed JMX ports:
8686 - JMX monitoring of Server Core and Tomcat, use to monitor and analyze behavior of the core parts of server, i.e. scheduling, listeners, web UI, etc. Use this port when connecting a JMX client to Server Core.
8687 - RMI port for the above JMX monitoring of Server Core. This port is a utility port transparently used by JMX client.
8688 - JMX monitoring of Worker, use to monitor and analyze behavior of jobs, jobflows, etc. Use this port when connecting a JMX client to Worker.
8689 - RMI port for the above JMX monitoring of Worker. This port is a utility port transparently used by JMX client.
To enable JMX:
RMI_HOSTNAME environment variable to the hostname or IP address of the running container instance (i.e. the instance must know its external address).
See also JMX over SSL section below.
Security
This section describes security related aspects of the container. Parts of the security configuration cannot be enabled by default, because they require additional information from users (e.g. certificates for SSL) or 3rd party libraries that must be downloaded separately (e.g., Bouncy Castle for stronger cryptography).
By default, the ports exposed by the container do not use SSL. To secure them via SSL, additional configuration is needed - see subsection below.
HTTPS
To enable HTTPS:
conf/serverKS.jks file in the mounted volume.
conf/https-conf.xml in the mounted volume - uncomment the <Connector>... XML element and update the configuration as a standard Tomcat 10.1 HTTPS connector (see documentation).
docker run -p 8443:8443 ...).
JMX over SSL
JMX monitoring over SSL is supported by both Server Core and Worker. To enable it:
conf/serverKS.jks file in the mounted volume.
conf/jmx-conf.properties in the mounted volume.
docker run -p 8686:8686 -p 8687:8687 ...).
Stronger cryptography
Cryptography in CloverDX is used primarily for Secure Parameters and Secure Configuration Properties. It is possible to use stronger cryptographic algorithms than those available in the JVM, by installing a custom JCE provider. We recommend using Bouncy Castle. The steps below are a simplified version of our documentation, the only difference compared to non-Docker deployment is getting Bouncy Castle on classpath of the server.
Install Bouncy Castle
bcprov-jdk15on-1.70.jar from here).
var/bouncy-castle before building the image and then build the image. Optionally, the gradlew build script in this repository downloads it.
Secure configuration properties
Secure configuration properties are server's configuration properties that have encrypted values. They are used to encrypt sensitive values in the configuration file, e.g. credentials used to connect Server to the system database.
<pre><code class="lang-properties">...
security.config_properties.encryptor.providerClassName=org.bouncycastle.jce.provider.BouncyCastleProvider
security.config_properties.encryptor.algorithm=PBEWITHSHA256AND256BITAES-CBC-BC
...</code></pre>
encrypt.sh tool (from our secure-cfg-tool.zip package) to encrypt the configuration property values:
encrypt.sh -a PBEWITHMD5AND256BITAES-CBC-OPENSSL -c org.bouncycastle.jce.provider.BouncyCastleProvider -l bcprov-jdk15on-149.jar
${CLOVERHOMEDIR}/conf/master-password.txtSecure parameters
Secure parameters are graph parameters that have encrypted values. Typically they are used to store credentials used by jobs to connect to external systems and they prevent storage of the credentials in plain text.
<pre><code class="lang-properties">...
security.job_parameters.encryptor.providerClassName=org.bouncycastle.jce.provider.BouncyCastleProvider
security.job_parameters.encryptor.algorithm=PBEWITHSHA256AND256BITAES-CBC-BC
...</code></pre>
Master password autoimport
During the first startup, the container automatically imports master password from , if the file exists.
The file can be created manually. The whole file content is imported as the new password.
This feature is enabled by default in the container, not in vanilla CloverDX Server. It can be enabled/disabled via the masterpassword.autoimport.file configuration property.
After the server starts, you can check that the password is set in Configuration > Security page.
Stack deployment
You can deploy CloverDX Server and its system database together as a stack using Docker Compose or stack deploy in swarm mode. An example of the compose file is provided in examples/compose. This example deploys CloverDX Server built from Dockerfile and an instance of PostgreSQL database as its system database.
To build and run the stack in Docker Compose, use:
docker compose -f examples/compose/stack.yml up -d
or in a Docker swarm:
docker stack deploy -c examples/compose/stack.yml cloverdx
Kubernetes
You can deploy CloverDX Server to Kubernetes. You can find examples of deployment of a standalone CloverDX Server and a 3-node CloverDX Cluster in examples/kubernetes.
Building and running the AI-Enabled Docker image
Dockerfile.AI allows you to build an alternative Docker image that enables CloverDX Server to run AI components with GPU acceleration on systems with an NVIDIA GPU. This setup leverages an NVIDIA-provided base image that includes CUDA and related dependencies, allowing for seamless execution of GPU-accelerated tasks. Note that only Linux x8664 platform is currently supported.
Prerequisites
To run the AI-enabled container, your host machine must meet the following requirements:
You can test if your setup is working with the following command:
docker run --rm --gpus all nvidia/cuda:12.4.0-base-ubuntu22.04 nvidia-smi
You should see details about the NVIDIA GPU(s) if everything is configured correctly.
Building the AI-Enabled Docker image
From the root of the repository:
./gradlew to download additional dependencies, e.g. JDBC drivers, BouncyCastle, etc.
./gradlew copyDjlPytorchLib
Dockerfile.AI:
docker build -f Dockerfile.AI -t cloverdx-server-ai:latest .
Running the AI-Enabled container
Running the AI-enabled container is nearly identical to the standard CloverDX container, with one important addition:
--gpus all option to enable GPU access.
Example (on Linux):
<pre><code class="lang-">docker run -d --name cloverdx-ai --gpus all --memory=32g -p 8080:8080 -e LOCALUSERID=id -u $USER --mount type=bind,source=/data/your-host-clover-home-dir,target=/var/clover cloverdx-server-ai:latest</code></pre>
Note: The --gpus all parameter enables the container to access all available NVIDIA GPUs. Without this flag, GPU acceleration will not be available, and AI components may fail to start. Learn more in the Docker GPU runtime docs.
Verifying GPU access
Once the container is running, you can verify that the GPU is visible to the AI components from within the container. First, connect to the container:
<pre><code class="lang-">docker exec -it cloverdx-ai /bin/bash</code></pre>
Then, inside the container, run the following:
<pre><code class="lang-">nvidia-smi</code></pre>
You should see details about the NVIDIA GPU(s) if everything is configured correctly.
Memory configuration
AI workloads can be memory intensive. To avoid out-of-memory errors or performance issues, it's recommended to manually set the JVM maximum heap size for both the CloverDX Server Core and Worker processes - refer to the section about memory configuration.
Important:
CLOVERSERVERHEAPSIZE and CLOVERWORKERHEAPSIZE`, the container may run out of memory when loading your AI models.
The optimal values for these settings depend on your specific use case - including the complexity of executed jobs, data volume, and the AI models being used.
You may need to experiment and monitor memory usage to find the best configuration.
Also note that the memory reserved by the AI engine is not released when graphs using the AI components end. The memory is kept and reused the next time you run AI components in your graphs.


