
Pixel™ phone flashing GUI utility with features.

PixelFlasher


Table of contents
- Release Files - Supported platforms - Basic Mode - Expert Mode - Contributing Translations - Translation Limitations - Available languagesDescription / Features
As the name suggests this is an application to flash (update) Pixel™ phones (possibly all Google™ made phones/tablets, YMMV.) PixelFlasher at its core is a UI layer (with bells and whistles) on top of adb / fastboot commands, hence many of its features can be used on non Pixel devices as well. (YMMV). The executable which can be found in releases section is self contained single file and does not require Python™ to be installed on the system.
The application has two modes, normal mode (basic) and advanced mode (expert).
Basic mode: Should suit most users. Some of the features in basic mode are:
- Simple UI interface, click and go. No more command line, no more placing all files in one directory.
boot.img/initboot.imgmanagement UI, select the boot / initboot file to patch and click the patch button.
- Display details of
boot.img,initboot.img,vendorboot.img
- Choose to keep data or wipe data while flashing (Full OTA flashing always keeps data).
- Ability to flash even if multiple devices are connected to the computer.
- Option to flash to inactive slot (Full OTA always flashes to inactive slot).
- Display information about the phone.
- In app download of all Pixel phone / watch firmware images, full OTA images, beta images and canary images (past an present).
- Rooting Application installation UI, screenshot. Supported versions:
- Magisk Backup Manager, screenshot.
- Magisk settings management, screenshot:
- Display Android Platform Tools (SDK) version and warn / block if the version is old or has known issues.
- Install APK (an app) file from the computer onto the device with optional:
- Wireless Manager, to wirelessly connect to adb debug or adb wireless with pairing support.
- Advanced features are hidden to keep the interface simple and easy to follow.
- Easily open ADB shell to the device.
- Support for Genymotion Scrcpy to mirror Android devices (video and audio) via USB or over TCP/IP, and allows to control the device with the keyboard and the mouse of the computer.
- A lot of checks and validations for smooth operation with quite verbose console output to inform about every step of the operation.
- Automatic check for program and Magisk module updates.
- App Manager, screenshot:
- Configurable Toolbar
- Pif Manager (see a bit outdated but still valid UI Workflow)
- PI (Play Integrity) Analysis Report to troubleshoot PI related issues.
/data/adb/trickystore/spoofbuild_vars
- /data/adb/tricky_store/keybox.xml (Not the contents, just if the certificates are revoked or not)
- /data/adb/tricky_store/target.txt
- /data/adb/trickystore/securitypatch.txt
- /data/adb/trickystore/teestatus
- PlayIntegrity Fork (if available):
- /data/adb/modules/playintegrityfix/custom.pif.json
- /data/adb/modules/playintegrityfix/custom.pif.prop
- /data/adb/modules/playintegrityfix/custom.app_replace.list
- /data/adb/modules/playintegrityfix/scripts-only-mode
- TargetedFix (if available):
- /data/adb/modules/targetedfix/pif.json
- Contents of evert app json configuration referenced in target.txt
- PlayIntegrityFix (if available):
- /data/adb/modules/playintegrityfix/pif.json
- /data/adb/pif.json
- Whether a testkey ROM is used or not.
- logcat for PlayIntegrity and TrickyStore related logs.
- Playstore and GMS versions.
- Droidguard VM list.
- If any custom ROM injection apps are installed from:
- Xiaomi.eu
- EliteRoms
- helluvaOS
- hentaiOS
- Evolution X
- PixelOS
- Check overlays (if contents of /debug_ramdisk is visible without root)
- My Tools, add / remove and manage personal tools to be launched from within the app.
- Dev Tools
- Devices, to manage when multiple devices are connected to the PC
- The ability to flash custom ROM (with or without patching
boot/init_boot) - Option to flash to both slots.
- Option to flash to inactive slot.
- Options to disable verity and or verification.
- Ability to change the active slot.
- Ability to live boot to custom
boot(temporary stock or root). - Ability to boot to recovery, fastbootd, safe mode, download mode and sideload.
- Ability to flash custom image: boot, recovery, radio, kernel, ...
- Ability to sideload an image.
- Lock / Unlock bootloader.
- Option to gain temporary root (good for testing or checking things out).
- SOS Disable Magisk modules to get out of bootloop.
- Force option when flashing.
- Option to skip rebooting.
- Option to wipe.
- Partition Manager:
Prerequisites
- Android SDK Platform-Tools.
- USB Debug turned on in Developer Options and authorized for your computer. (see excellent guide links in credits section below).
- Android Pixel phone factory image or Android Pixel phone full OTA image (recommended).
- Bootloader unlocked phone if you want to root or flash Factory image (see excellent guide links in credits section below).
- On Windows: The latest Google USB drivers installed in adb and fastboot modes.
- On MacOS: Allow USB Accessory to connect (very important!).
- On Linux: User needs to be added to
plugdevgroup.
Installation
PixelFlasher doesn't have to be installed, just double-click it and it'll start. Check the releases section for downloads.
Release Files




File|Description :---|:--- PixelFlasher.exe|Windows standalone x64 binary (recommended for Windows) PixelFlasher-arm64.exe|Windows standalone arm64 binary (recommended for Windows arm64) PixelFlasherwin_2019.exe|Built with Windows 2019, to be used on older Windows) PixelFlasher_MacOS.dmg|Universal MacOS (11+) standalone executable (recommended for MacOS) PixelFlasherMacOSlegacy.dmg|x8664 MacOS standalone executable (to be used on older MacOS devices) PixelFlasherUbuntu24_04|Built on Ubuntu 24.04 Linux standalone x64 binary (recommended for Linux) PixelFlasherUbuntu22_04|Built on Ubuntu 22.04 Linux standalone x64 binary
Supported platforms
- Windows
- macOS. Download the DMG or Install via Homebrew by a single command:
brew install badabing2005/pixelflasher/pixelflasher- Linux (See this if you're having issues with a Linux build.)
Status
Scan the list of open issues for bugs and pending features.
Note This is my first wxPython based project. I got ideas and inspiration from nodemcu-pyflasher. If you have constructive feedback as for how to improve the code please do reach out to me.
Build it yourself
If you want to build this application yourself you need to: Setup
- Download or clone the repository.
- Install Python 3.x and Pip (it comes with Python™ if installed from
python.org)
- Install virtualenv
pip3 install virtualenv - Create a virtual environment with:
virtualenv --python <PATHTOPYTHON_EXE> venv
- On Linux / MacOS: python3 -m venv venv
- Activate the virtual environment with:
.\venv\Scripts\activate
- On Linux / MacOS: . venv/bin/activate
- Run
pip3 install -r requirements.txt
wxPython, wheels for Linux are complicated and may require you to run something like this to install wxPython correctly:
# Assuming you are running it on Ubuntu 20.04 LTS with GTK3
pip install -U \
    -f https://extras.wxpython.org/wxPython4/extras/linux/gtk3/ubuntu-20.04 \
    wxPython
If you're building on Fedora, take a look at this (Credit to @xChAmeLIoNz).
A note on Windows If you run into troubles installing wxPython on Windows, you can download wxPython wheel file matching your version of Python™ from wxpython snapshot-builds Look for cp310 if your python™ version is 3.10 You install it with pip, for example this would be the command to install 3.10 version.
pip install wxPython-4.1.2a1.dev5308+2258f215-cp310-cp310-win_amd64.whlA Note on MacOS Don't install Python™ on MacOS, instead brew install wxpython, this will install Python™ 3.9.12, the installed wxPython will only work with this version of Python. If python 3.9.12 is not in the system path, you can find it here: /usr/local/Cellar/python@3.9/3.9.12/Frameworks/Python.framework/Versions/3.9/bin It is advised that you add this to your system PATH On MacOS, you should also install create-dmg
brew install node graphicsmagick imagemagick
npm install --global create-dmg
Build Run build.bat on Windows or build.sh on Linux / MacOS.
Usage
Basic Mode
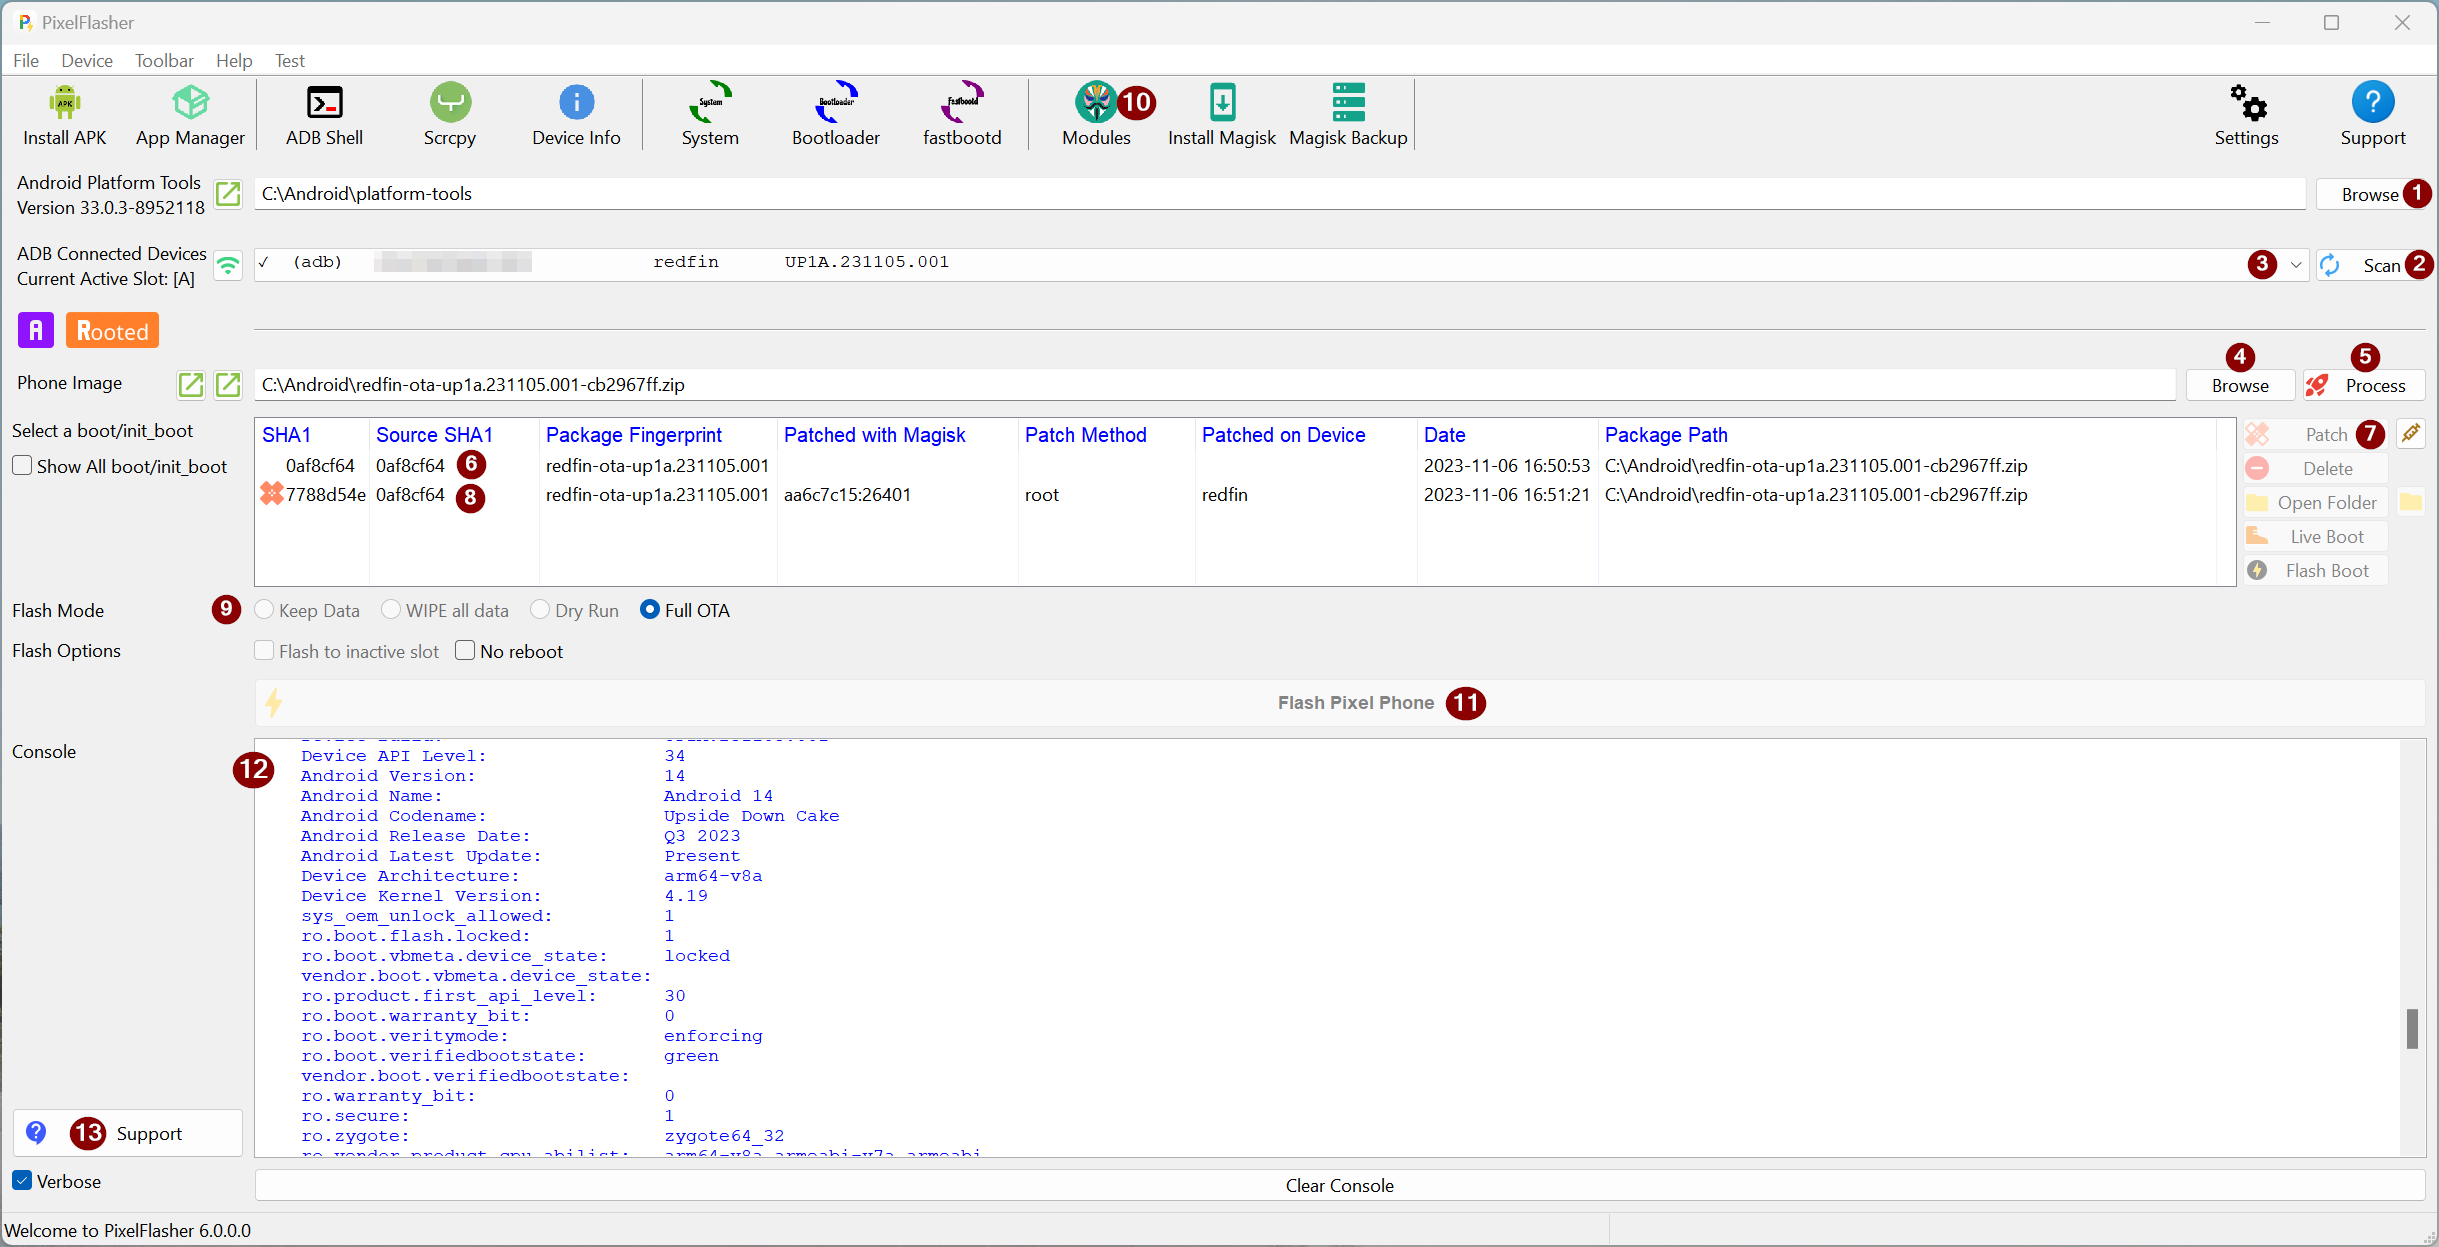
- First thing to do is select Android™ Platform Tools, you'd have to select where it is installed (unpacked).
 next to it.
If you have multiple versions, you can select another version, although it is best to always use the most recent version (The selected version will be identified and displayed.)
next to it.
If you have multiple versions, you can select another version, although it is best to always use the most recent version (The selected version will be identified and displayed.)
- Hit the
Scanbutton to detect connected devices, the application will detect all connected devices
- Select your device from the list in the combo box.
shell in Magisk.
 - (1st field) Non-Rooted devices will be identified with a ✗.
- (1st field) Devices in fastboot mode will be identified with a ? (in fastboot mode, root status cannot be determined).
- (2nd field) (adb), (f.b), (sid) or (rec) to indicate connection mode adb / fastboot / sideload / recovery.
- (3rd field) Device ID.
- (4th field) Device hardware.
- (5th field) Current running firmware (in fastboot mode current firmware cannot be determined).
- (1st field) Non-Rooted devices will be identified with a ✗.
- (1st field) Devices in fastboot mode will be identified with a ? (in fastboot mode, root status cannot be determined).
- (2nd field) (adb), (f.b), (sid) or (rec) to indicate connection mode adb / fastboot / sideload / recovery.
- (3rd field) Device ID.
- (4th field) Device hardware.
- (5th field) Current running firmware (in fastboot mode current firmware cannot be determined).
- Next select the full OTA (recommended) or factory zip file (don't unzip), the application will recognize the phone model from the image name and validate the SHA-256 checksum.
next to it.
Note: Because both firmware package and full OTA are complete images, you can upgrade to any newer version without worrying about jumping versions (downgrades with factory image are possible only with wipe data).
⚠️ Do not rename the downloaded file or extract parts of it, just point to the downloaded zip. PixelFlasher does validations to ensure you don't accidentally flash the wrong image to your device.
- Process the full OTA or factory image.
boot.img, initboot.img vendorboot.img, vbmeta.img from the image (if present in the image) and populate the boot list with an entry (5). This entry represent the stock boot / initboot / vendorboot.
- Select the stock entry from step 5 in the boot list, the selected file can be patched (6), or flashed (10).
- Optional: Select this option if you want to patch the with Magisk, Apatch, KernelSU, KernelSU-Next, SukiSU or WildKSU. If rooting application is not already installed on your phone, PixelFlasher will install it for you and will automatically select the right image to patch (
boot.img,initboot.img,vendorboot.img)
shell.
Whether the phone is rooted or not, the whole process is without any manual step.
- If you want to flash (10) a patched file select the newly added entry.
 Indicates that the selection is patched.
- SHA1 is (shortened for display only) is sha1 of the selected item.
- Source SHA1 (shortened for display only) SHA1 of source (stock image) used to create a patch.
- Package Fingerprint is just the filename portion of the image (without the extension).
- Patched with Version indicates the version of patching app used to patch the image (if applicable).
- Patched Method indicates what method PixelFlasher used to create a patch (possible options:
Indicates that the selection is patched.
- SHA1 is (shortened for display only) is sha1 of the selected item.
- Source SHA1 (shortened for display only) SHA1 of source (stock image) used to create a patch.
- Package Fingerprint is just the filename portion of the image (without the extension).
- Patched with Version indicates the version of patching app used to patch the image (if applicable).
- Patched Method indicates what method PixelFlasher used to create a patch (possible options: root, app, uiautomator, manual)
- Patched on Device indicates the device model that performed the patching. You should always use patched images that match the model of the device that it will be flashed on.
- Date is the item extraction or creation date.
- Package Path indicates the image file from which the stock image was extracted.
- Select the Flash Mode, PixelFlasher will automatically select applicable flash mode based on the selected image type.
-w flag is removed from the flash scripts so that data is not wiped. This is commonly known as dirty flashing.
- WIPE all data: As the text suggests, this will wipe your data, use it with caution!
If this mode is selected PixelFlasher will ask for confirmation during the flashing phase.
- Dry Run: In this mode, the phone will reboot to bootloader, and then mimic the flash actions (i.e. reboot into bootloader) without actually flashing anything (it prints to the console the steps it would have performed if dry run was not chosen).
This is handy for testing to check if the PixelFlasher properly is able to control fastboot commands.
- Optional: Open Magisk Modules Manager (works with most rooting apps that PixelFlasher supports) and disable (uncheck) modules known to cause issues during upgrades (highly recommended). (The list below has never caused issues for me, so I keep them enabled YMMV).
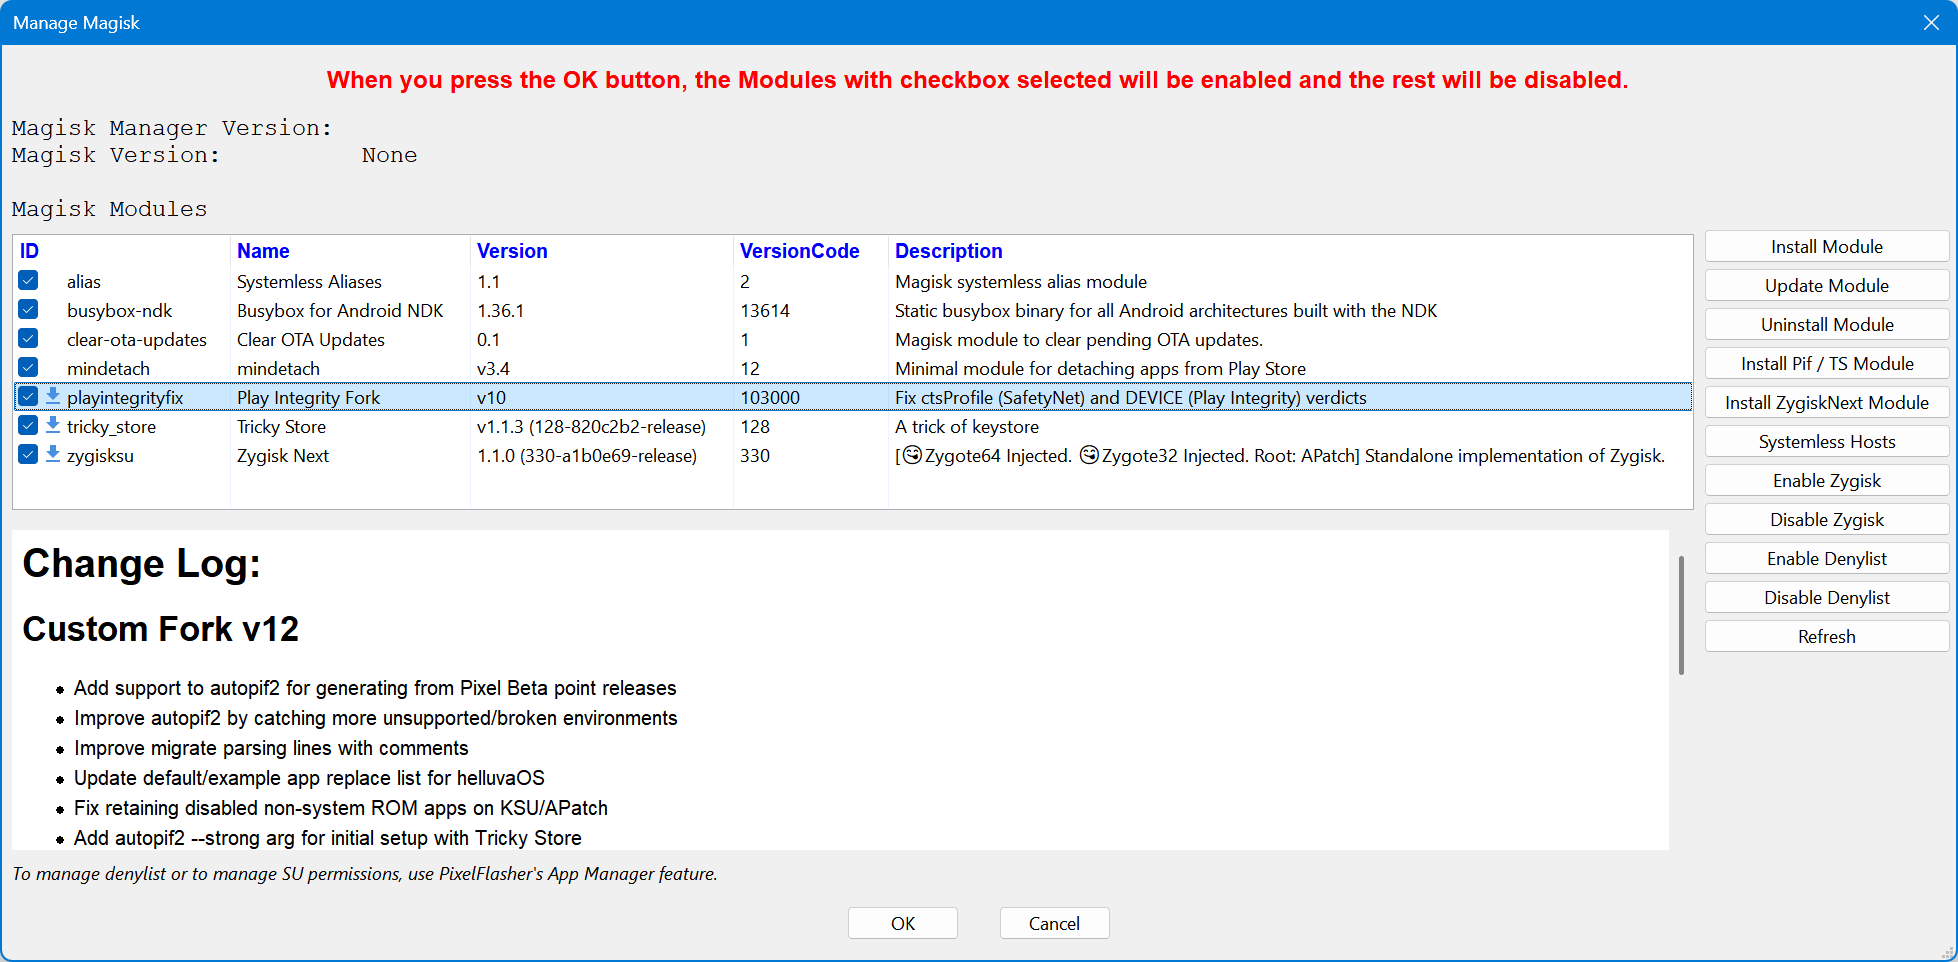
- Sideload OTA or Flash Device This is the final step, to actually flash the phone in the selected
Flash Mode.
- Monitor the console output and observe the performed actions and their outcomes.
- After successful flashing of OTA or factory image, it is recommended that you wait 10 minutes after the system loads to allow it to complete the merge.
- In case of trouble, click on Support button to generate encrypted and optionally sanitized (redacted) support logs archive.
Expert Mode
To enable the export mode use the File Menu | Advanced Configuration and select Enable Advanced Options 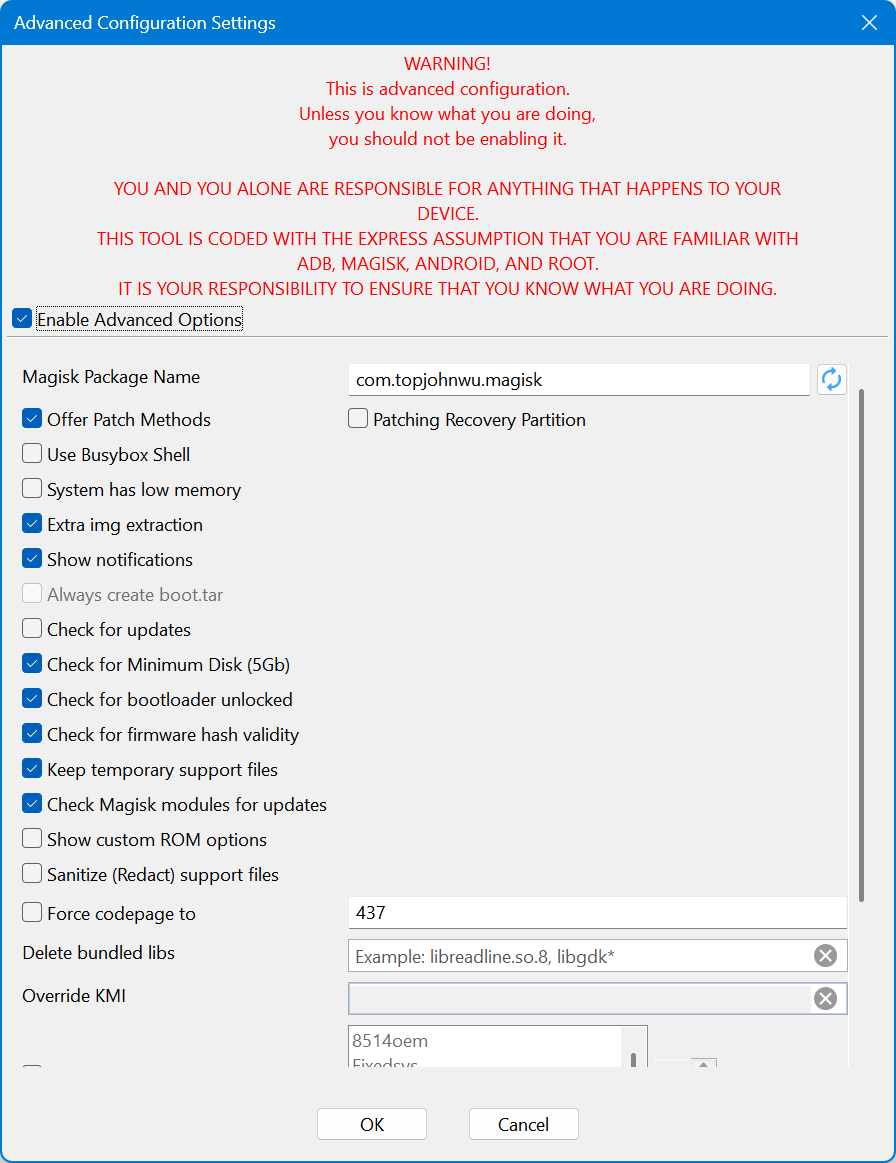
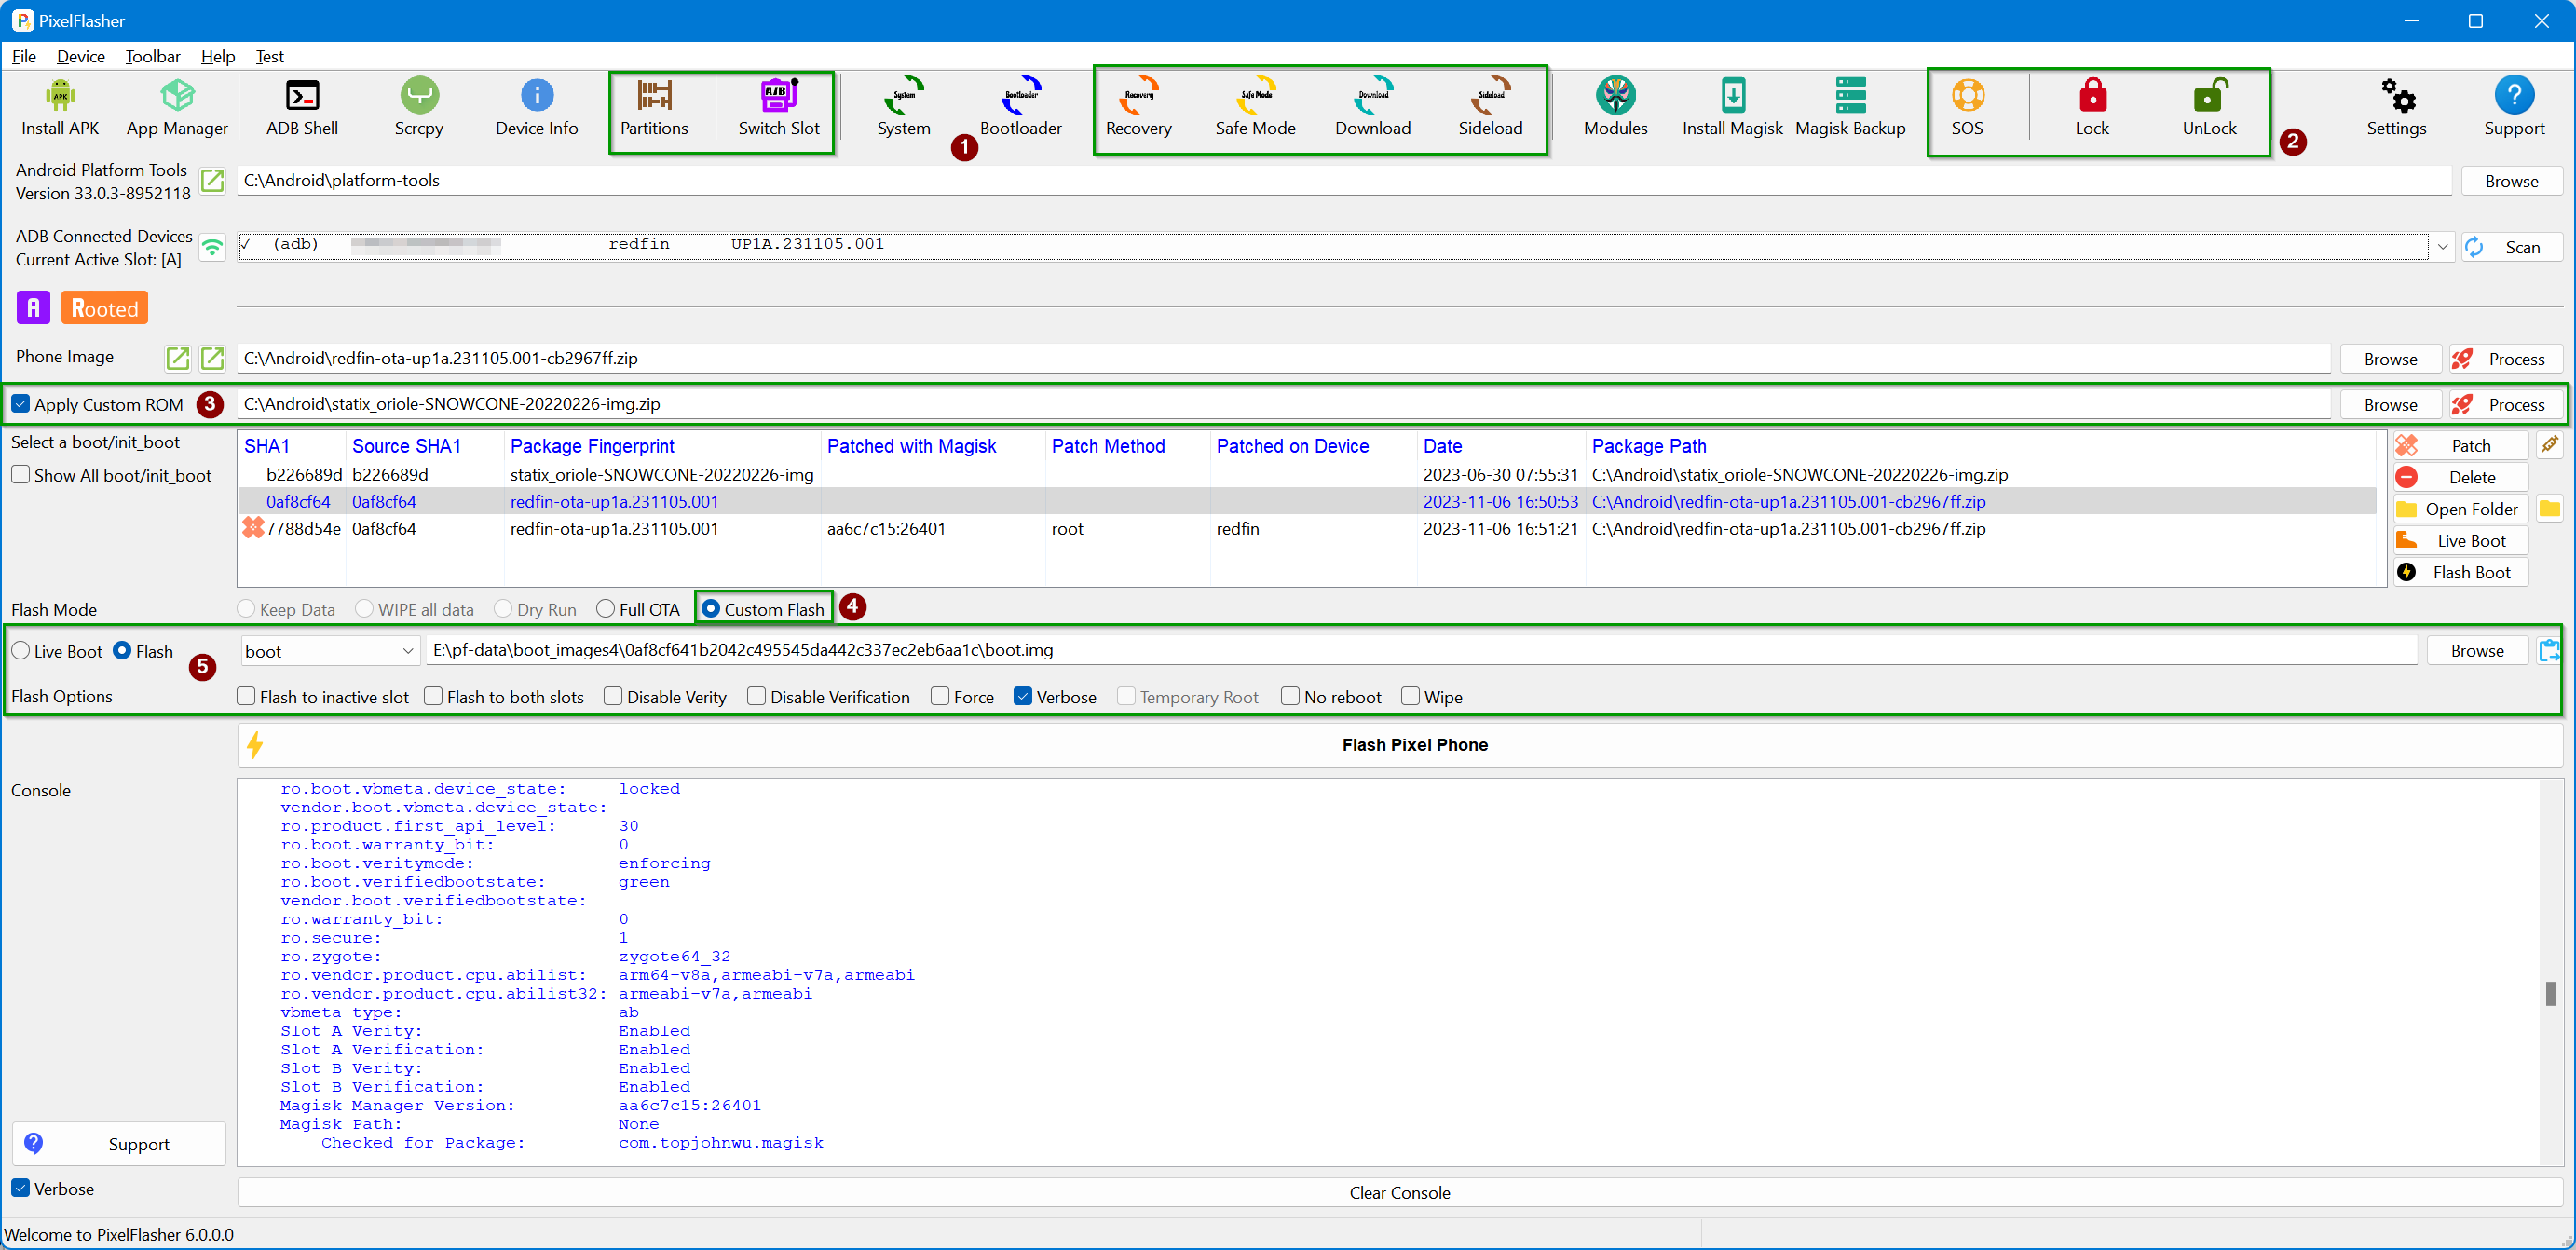
In this mode the following additional options are exposed (green bounding boxes), below notes are more for enumeration than a guide, as they should be trivial and obvious to an expert.
- Option to Change the Active Slot (the inactive slot is automatically selected).
- Options to Lock / Unlock bootloader, Option to disable Magisk modules when bootlooping, partitions manager.
- Apply Custom ROM. This replaces the factory ROM image with the selected file.
boot.img (or init_boot.img for Pixel 7 or newer devices) from the ROM image and displays below for selection or patching.
Please make sure to read the documentation of the chosen ROM, as each custom ROM instructions could be different.
To be clear, this is what PixelFlasher does internally when this mode is selected, please understand it, and don't use it if the selected ROM guide does not fit the bill.
You've been warned!
- Keeps stock bootloader and radio images.
- Replaces the stock ROM image with the selected custom ROM image.
- Flashes in the chosen Flash Mode just like a stock image, i.e. bootloader, custom ROM and radio images in the original order that they were in the stock firmware.
- Patching boot.img (or init_boot.img for Pixel 7 or newer devices) can be performed if the option is selected. You can select any of the listed files.
- Flash Mode is similar to basic flash mode described above in step 7.
- Custom Flash. select this to switch from flashing a Factory Image to flashing a single file.
- Browse to select a a valid image file (.img or .zip).
Flash to both slots option is selected, Pixelflasher flashes each slot individually to overcome a Google bug that fails with the option --slot=all
Translations
PixelFlasher currently includes French and Spanish translations, which were created using online translation tools. While these translations are functional, they may contain inaccuracies or awkward phrasing.
Contributing Translations
If you'd like to help improve existing translations or add support for a new language:
- Use
locale\en\LC_MESSAGES\pixelflasher.poas your template for translation. - Submit your corrections or new language translations as a pull request.
Translation Limitations
Please note the following about translations in PixelFlasher:
- Not all strings are translated; some will never be translated while others may be added in the future.
- Standard output (stdout) and console logs will never be translated.
- UI sizes and positions may be disrupted by languages that require more space (or much less space) for text elements - these UI adjustments won't be made to accommodate different languages.
Available languages
- French
fr, used online translation (it could be imperfect) - Spanish
es, used online translation (it could be imperfect) - Traditional Chinese
zh-rTW, thanks to EdwardWu - Simplified Chinese
zhCN, thanks to LittlenineEnnea - Italian
it, thanks to bandrea83
Credits
- First and foremost Magisk by John Wu which made rooting Pixel™ phones possible, without it none of this would have mattered.
- Big thanks to [[ryder203]](https://www.t-ryder.de/), [[t-ryder]](https://xdaforums.com/m/t-ryder.3705546/) for his valuable ideas, feedback and testing. Your contributions are very much appreciated.
- [[Homeboy76]](https://xdaforums.com/m/homeboy76.4810220/), [[v0latyle]](https://xdaforums.com/m/v0latyle.3690504/) and [[roirraW-edor-ehT]](https://xdaforums.com/m/roirraw-edor-eht.2560614/) at xda for their excellent guides [guide, guide and guide and many more] on Pixel™ series phones (The guide concepts are generic and can be applied to any Pixel devices).
- Marcel Stör's nodemcu-pyflasher source code which jump started my introduction to wxPython and eventually this program.
- wxPython Team for their cross-platform GUI toolkit for Python.
- JackMcKew for pyinstaller Github Actions.
- Endless counts of xda members and their posts that tirelessly answer questions and share tools. Too many to enumerate.
- Artwork / graphics / icons, designed and supplied by: [[ryder203]](https://www.t-ryder.de/), [[t-ryder]](https://xdaforums.com/m/t-ryder.3705546/) based on material-design-icons
- vm03's payload_dumper source code to extract images from payload.bin files.
- osm0sis for the creative and pioneer approach to beta pif print extraction, banned kernel list and endless other contributions that are too many to enumerate.
- capntrips for code / tools and mentoring provided to create features like
Downgrade PatchandCancel OTA Update. - Vagelis1608 for building canary / beta factory image catalog and graciously sharing.
Troubleshooting
If you need support or assistance, please first search Github issues and XDA Forums to see if it is already reported / resolved, if not, please generate and provide a support file from within PixelFlasher. You can hit that big Support button on the main screen, or select it from the Help menu. The generated support.zip file is encrypted and optionally sanitized (redacted) to keep your sensitive information (username device id ...) private.
- If your anti-virus program is telling you that PixelFlasher is a malware, or you are concerned in any way, please check this post about false positives.
Disclaimer
**
PLEASE DO YOUR PART AND READ / SEARCH / RESEARCH BEFORE USING THIS PROGRAM
AND/OR ATTEMPTING ANY MODIFICATIONS ON YOUR DEVICE.
THIS PROGRAM ASSUMES THAT YOU ALREADY KNOW HOW TO AND HAVE ALREADY UNLOCKED
YOUR BOOTLOADER, ALREADY ROOTED YOUR DEVICE, AND KNOW HOW TO USE ANDROID SDK
PLATFORM-TOOLS, ETC.
THIS TOOL IS SIMPLY MY QUICK WAY OF UPDATING THE FIRMWARE WHILE ROOTED WITH
MAGISK, WITHOUT LOSING DATA / REQUIRING A WIPE.
MODIFYING YOUR DEVICE COMES WITH INHERENT RISKS, AND IT'S NOT MY RESPONSIBILITY IF YOU LOSE YOUR DATA OR BRICK YOUR DEVICE. THE TOOL I SHARE HAVE WORKED FOR ME, BUT THAT DOESN'T MEAN THAT YOU MAY NOT RUN INTO PROBLEMS. BACKUP YOUR DATA. **


