
A Tutorial for Setting R Development Environment with VScode, Dev Containers, and Docker
Setting up an R Development Environment with VScode and Docker
This repo provides a step-by-step guide and a template for setting up an R development environment with VScode and Docker 🐳. Docker is an amazing tool, but it has some learning curve. This tutorial aims to reduce the entry barrier for learning tools such as Docker.
See also:
- Setting up a Python Development Environment with VScode and Docker
- Running Python/R with Docker vs. Virtual Environment
- Deploy Flexdashboard on Github Pages with Github Actions and Docker
- Docker for Data Scientists 🐳 (WIP)
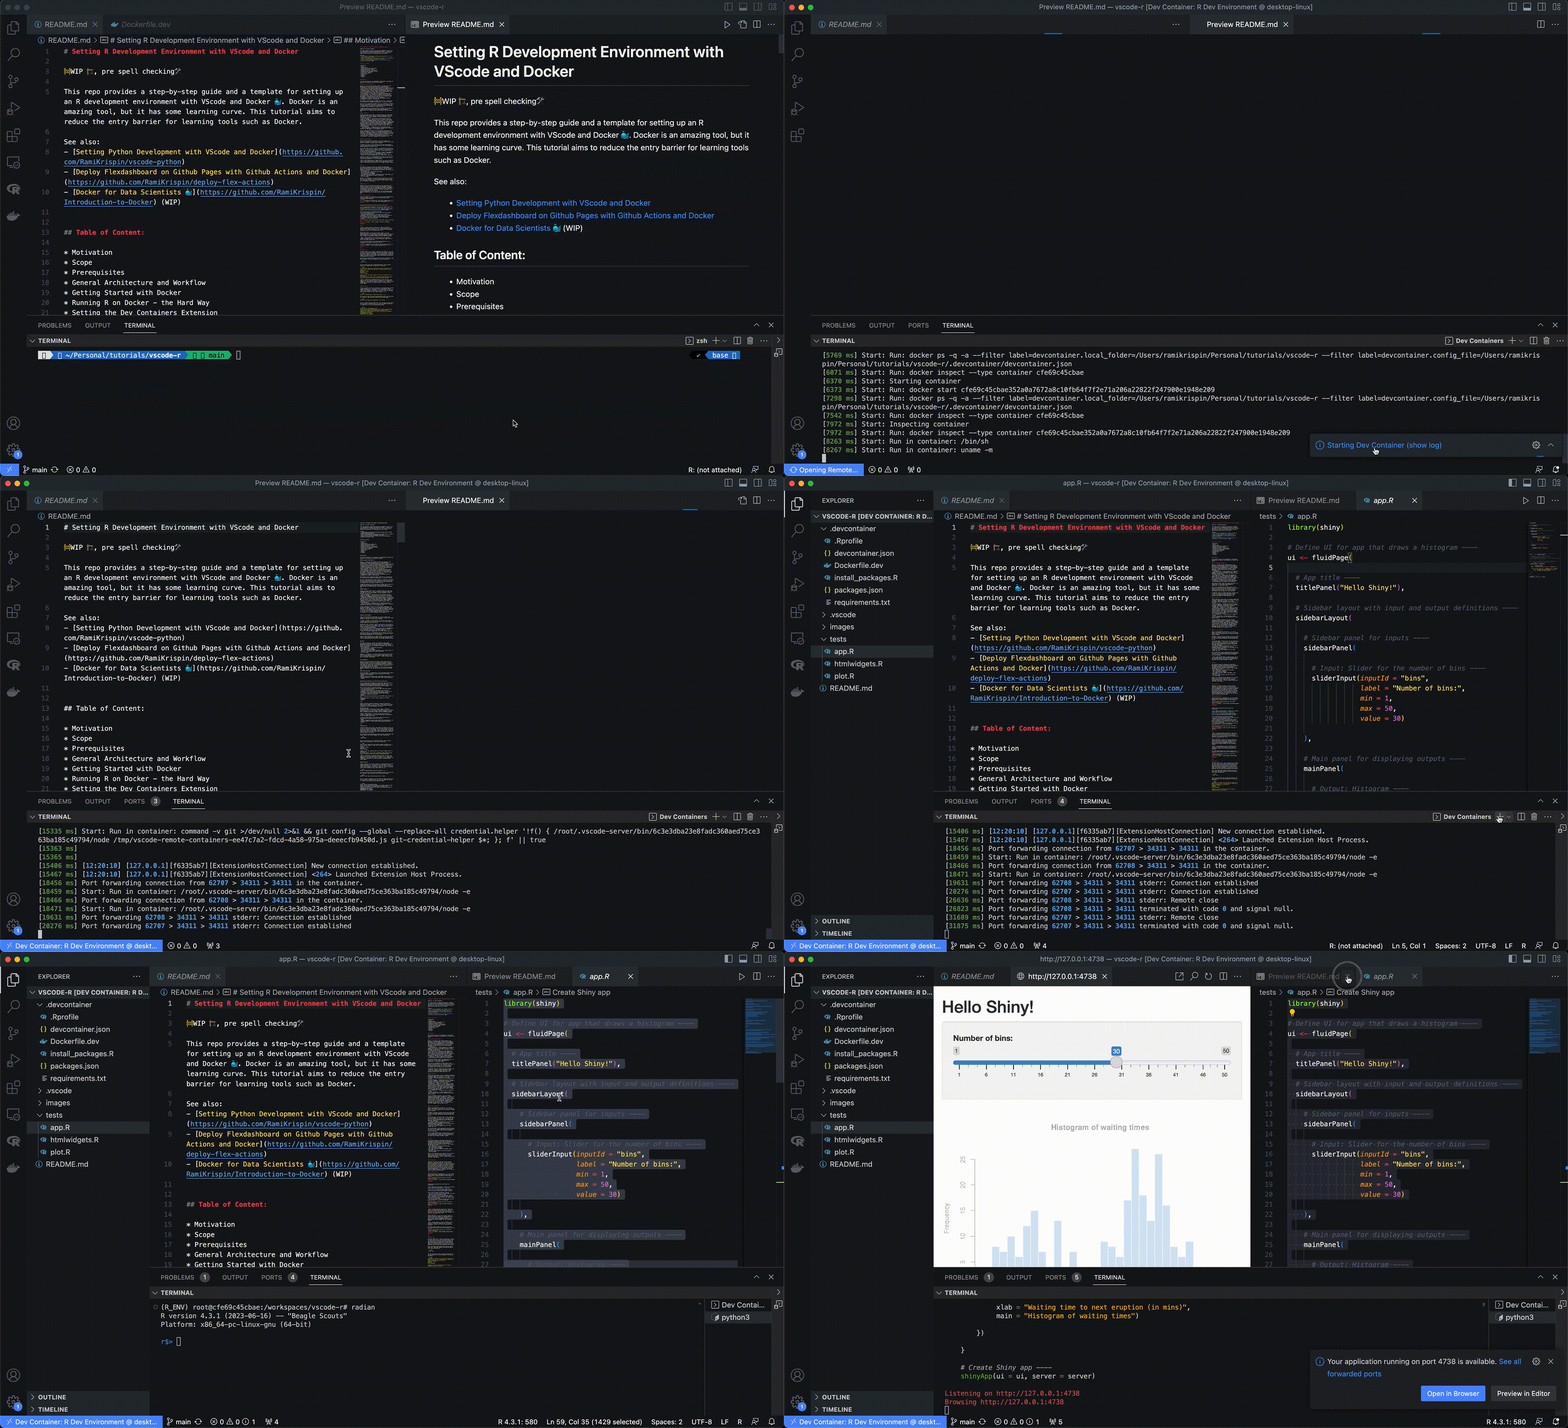
Open Issues
- CRAN mirror settings do not load from the
.Rprofile, see this open issue - Future enhancements are available here
Table of Contents:
- Motivation
- Scope
- Prerequisites
- General Architecture and Workflow
- The Rocker Project
- Getting Started with Docker
- Running R on Docker - the Hard Way
- Setting R Development Environment with VScode
- Setting the Dev Containers Extension
- Setting the R Environment
- Running R with VScode
- Summary
- Resources
- License
Motivation
This section focuses on the advantages of using Docker with VScode and explains the motivation for using R with VScode.
Why develop with Docker 🐳?
Docker is a CI/CD tool that enables seamless code deployment from development to production environments. By creating OS-level virtualization, it can package an application and its dependencies in a virtual container and ship it between different environments. The main advantages of using Docker within your development environment are:
- Reproducibility - Docker enables you to seamlessly package your code and its dependencies into a single container and execute, test, share, and deploy it with a high level of consistency
- Collaboration - Docker solves the dependencies madness when a team of developers works together on a specific project. Having a unified environment saves a ton of time during the development step. For example, if one developer gets some error, it is easy for other developers to reproduce the error and help debug it
- Deployment - Docker simplifies the code shipment from the development environment to the production
One of the core foundations of data science is the ability to reproduce your work, regardless of the user or machine the job is running. This is where Docker is shining by solving the lack of consistency between environments that cause many of us pain and grief.
In addition, Docker as a CI/CD tool plays a pivotal role in MLOps as it enables seamless deployment of data science and engineering applications such as data pipelines and automation, model deployment, etc.
Why VScode 💻?
VScode (aka Visual Studio Code) is a general-purpose free code editor developed by Microsoft. It can be run locally on Windows, macOS, and Linux OSs or on a cloud environment. The main advantages of using VScode as your IDE are:
- Multi-languages - VScode supports out-of-the-box JavaScript, TypeScript, and Node.js, and has a variety of extensions that enable running other programming languages such as Python, C++, C#, Go, etc.
- Extensions - VScode has a large community support that builds and maintains a variety of extensions that extend the editor's capabilities and functionality. That includes extensions that support programming languages (such as Python, R, and Julia), plugs-in that enables connection with external applications (Docker, Postgres, etc.), and other applications
- Git integration - VScode has built-in integration with Git
- Docker integration - VScode supports natively Docker integration, which we will dive deep into in the coming sections
Why R with VScode?!?
After we discussed Docker and VScode, it is time to address the elephant in the room - why use R with VScode when you have such a great IDE for R - RStudio? The short answer is Docker.
If Docker is not part of your workflow, you are more than welcome to continue reading this tutorial and learn how to run R with VScode, but RStudio would be the best IDE for you.
On the other hand, if Docker is part of your workflow (or you wish to adopt it), it is worth, in my opinion, the effort of customizing VScode to run R. Besides running your code inside a dockerized environment, VScode has additional advantages:
- A variety of extensions and add-ons, such as tools for documentation (Draw.io, Markdown, Quarto, etc.), databases (Postgres, Snowflake, etc.), and other utility tools (JSON, YAML viewers, etc.)
- Support for multiple languages such as JS, HTML, Python, Bash, etc.
Note: While RStudio does not support Docker, you can run an RStudio Server inside a dockerized environment. This approach required some level of customization, but the use of this is under the AGPL-3 license.
Scope
This tutorial focuses on setting up a dockerized R development environment with VScode. We will explore how to integrate VScode with Docker using Microsoft's Dev Container extensions and show various methods for configuring an R environment with Docker. That includes the following settings:
- Set a template for a dockerized R environment
- Define environment variables
- Set a code editor and debugger
- Set support for Shiny, Quarto, htmlwidgets, plots, table viewer, etc.
- Enable to launch multiple R sessions in parallel
- Set code snippet
Prerequisites
Generally, this tutorial does not require previous experience with Docker and VScode. In line with the tutorial scope above, the goal is to teach you how to set up an R development environment using Docker and VScode. That being said, as mentioned above, you will benefit more from and highly utilize this tutorial if you take some Docker intro courses before starting this tutorial. The main requirements for this tutorial are setting VScode and Docker Desktop. In addition, you will need to set up an account with Docker Hub.
Installing VScode
Installing VScode is straightforward - go to the VScode website https://code.visualstudio.com/ and click on the Download button (purple rectangle on the screenshot): 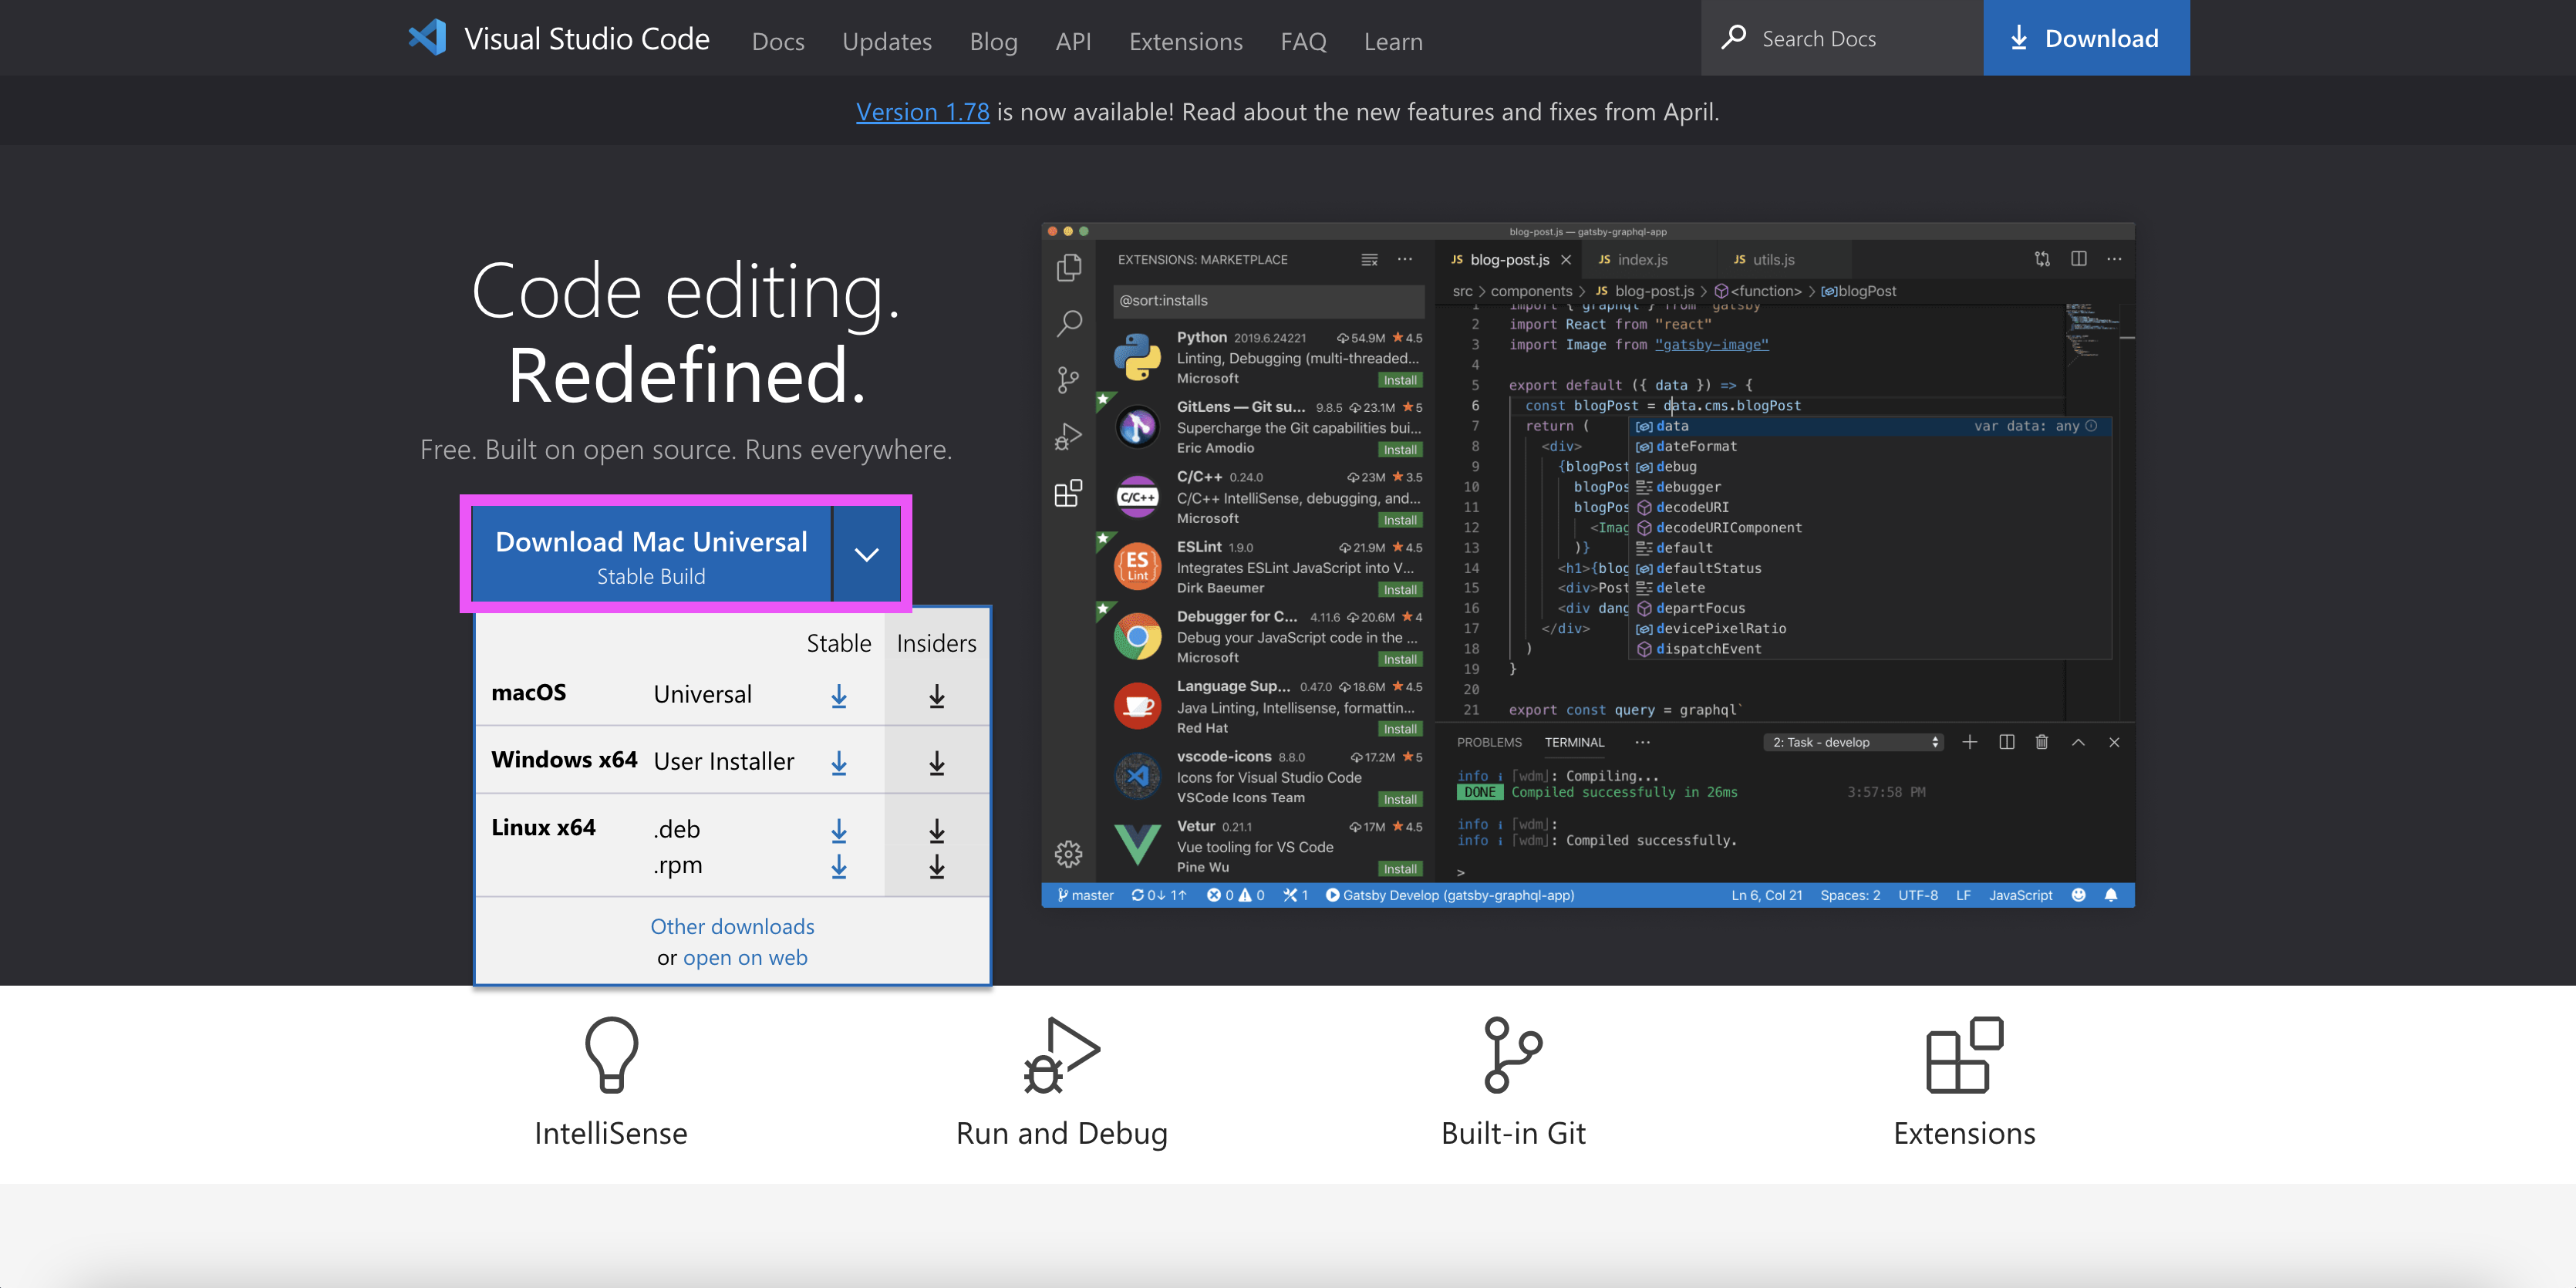
Download the installation file and follow the instructions.
To set a dockerized environment in VScode we will need to install the Dev Containers extension, which enables to open a folder and execute a code inside a Docker container.
Here is how to install an extension on VScode:
- Click the Extensions button on the left menu (mark with a purple arrow on the screenshot below)
- Type the extension name on the search menu (see the yellow rectangular). You can see the search results below, and clicking on each extension will open a window with the extension details.
- Last but not least, Click the install button (see the green rectangular) to install the extension
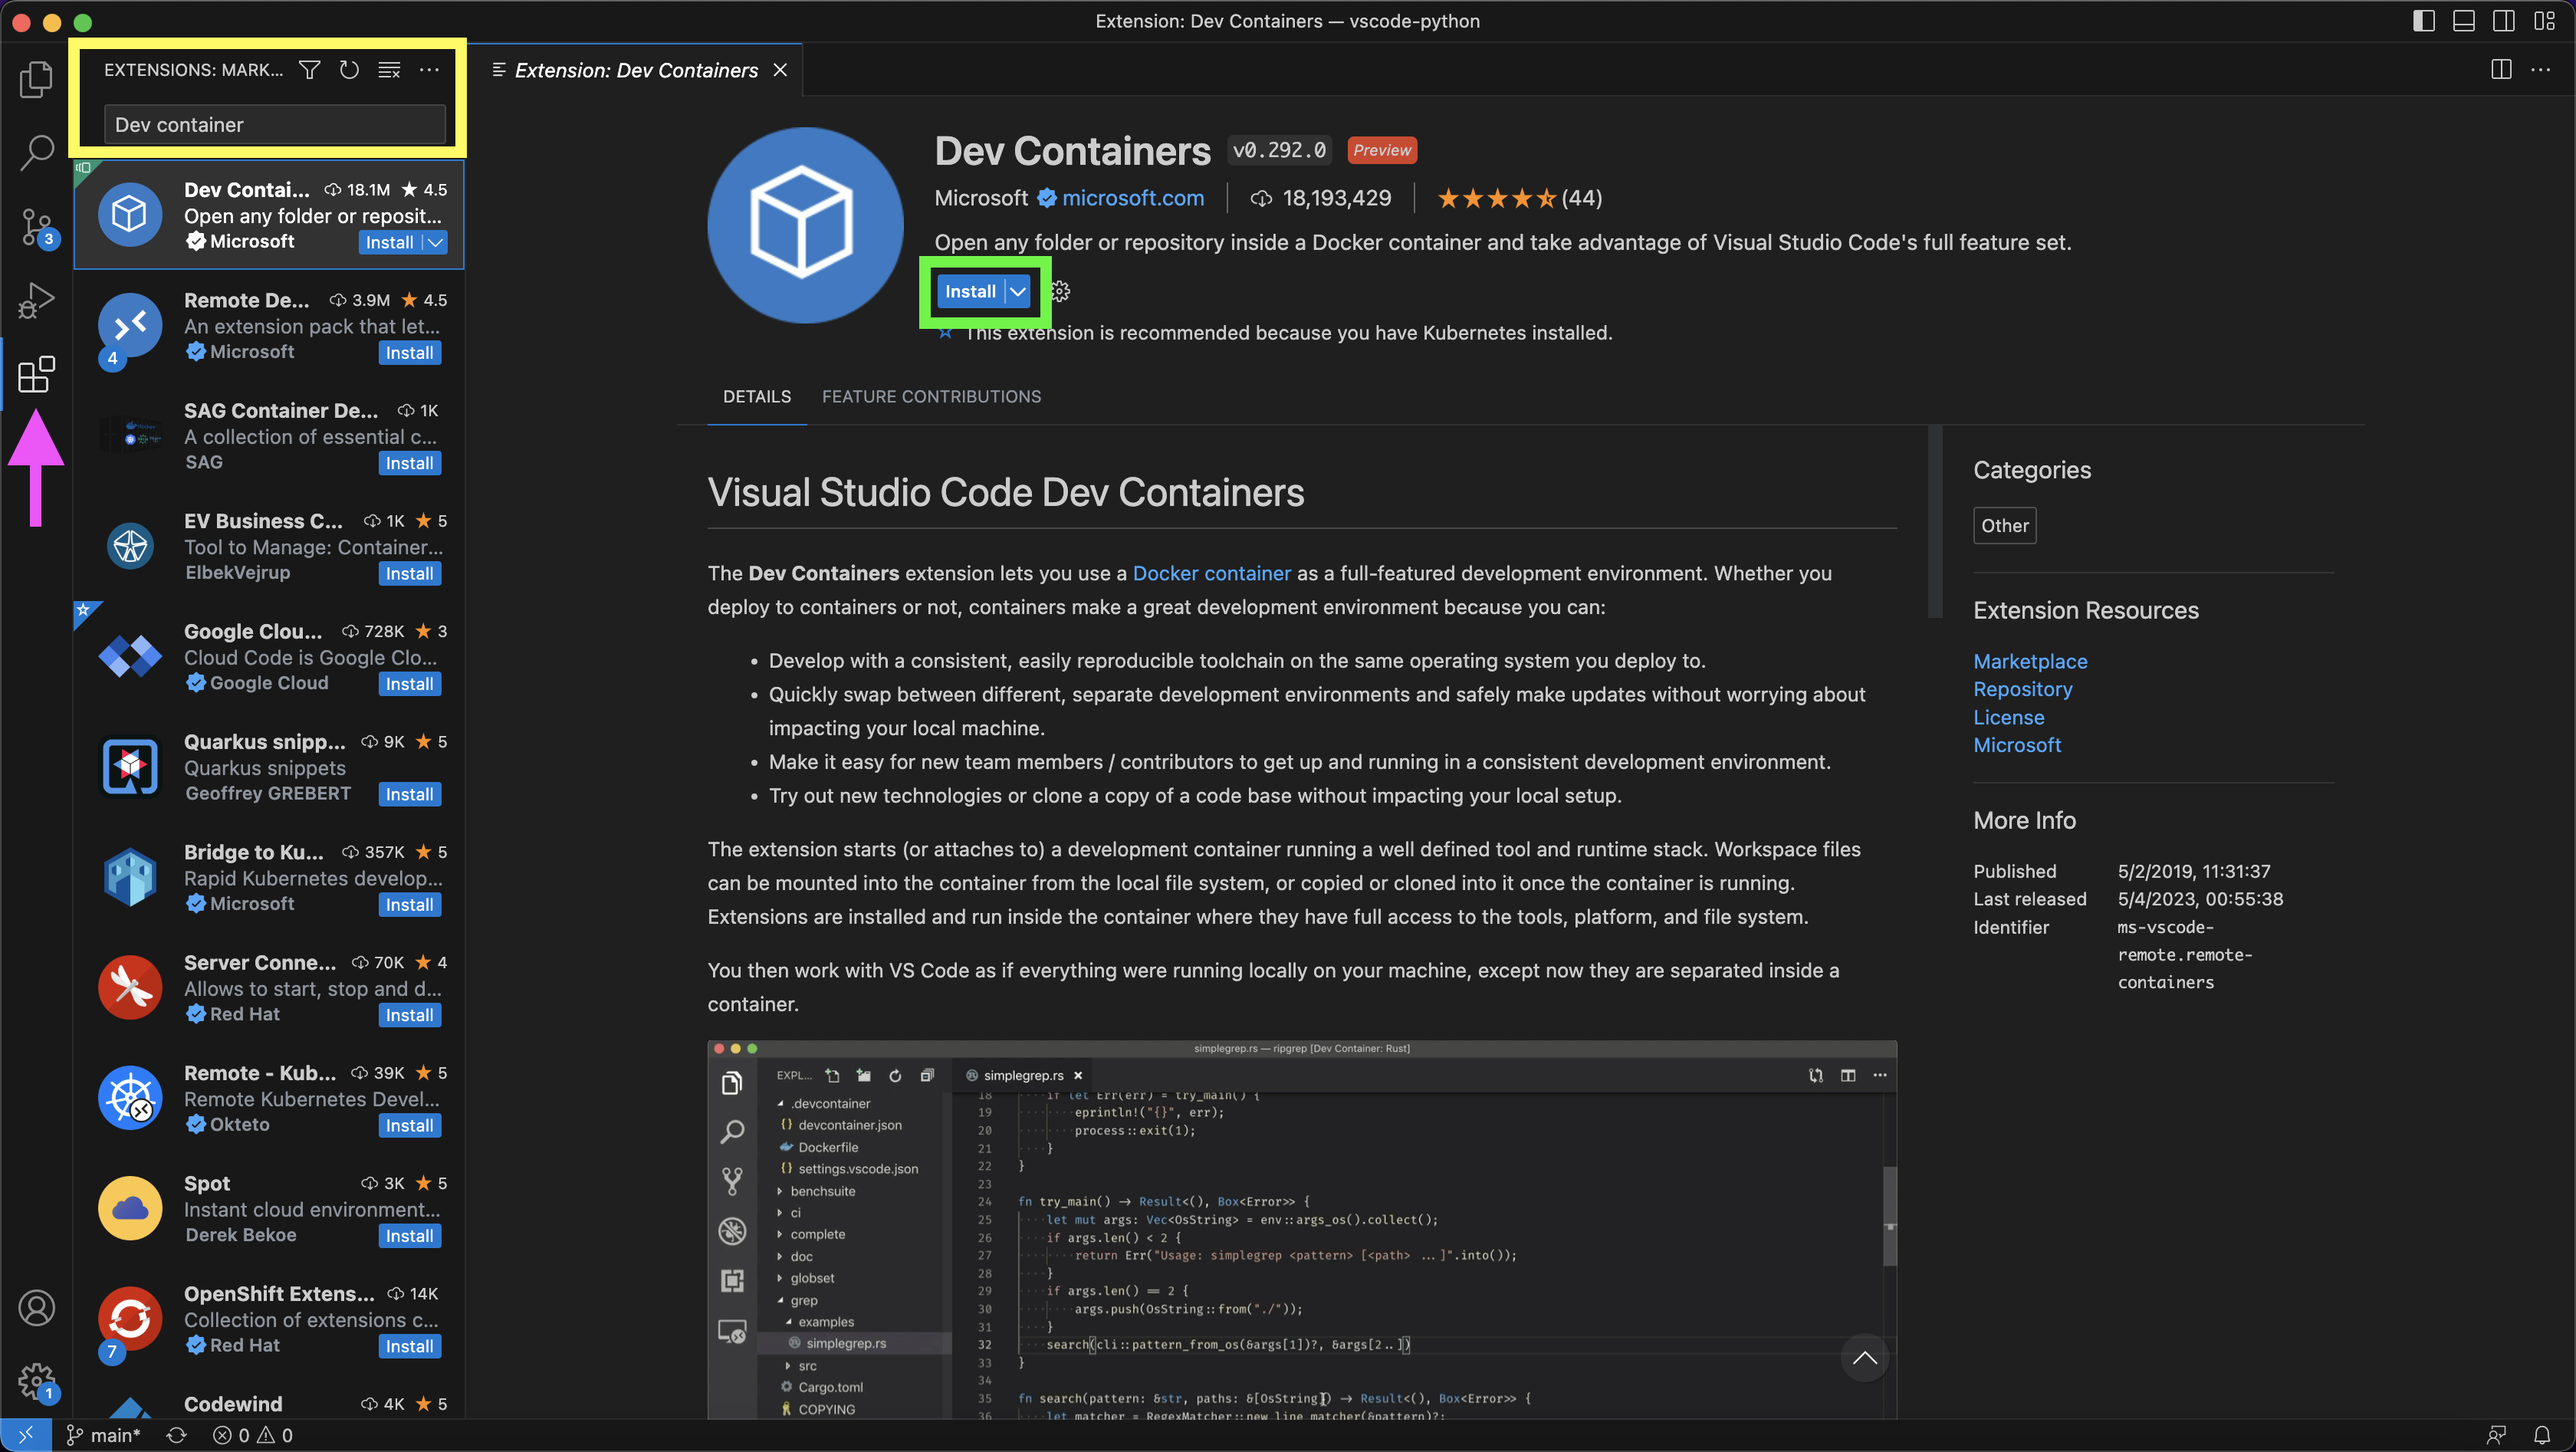
Note: The Dev Containers extension is required to launch the dockerized environment. We will see later in this tutorial how to set and install the necessary extensions for your dockerized environment automatically with the devcontainer.json file.
Setting Docker
Various ways exist to build and run Docker images on different operations systems. For the purpose of this guide, we will be utilizing Docker Desktop. It is a user-friendly container management interface that is compatible with MacOS, Windows, and Linux operating systems.Note: Docker Desktop is free for personal use but requires a license for commercial use. For further information, please refer to https://www.docker.com/pricing/.
To install Docker Desktop, go to Docker website and follow the installation instructions according to your OS: 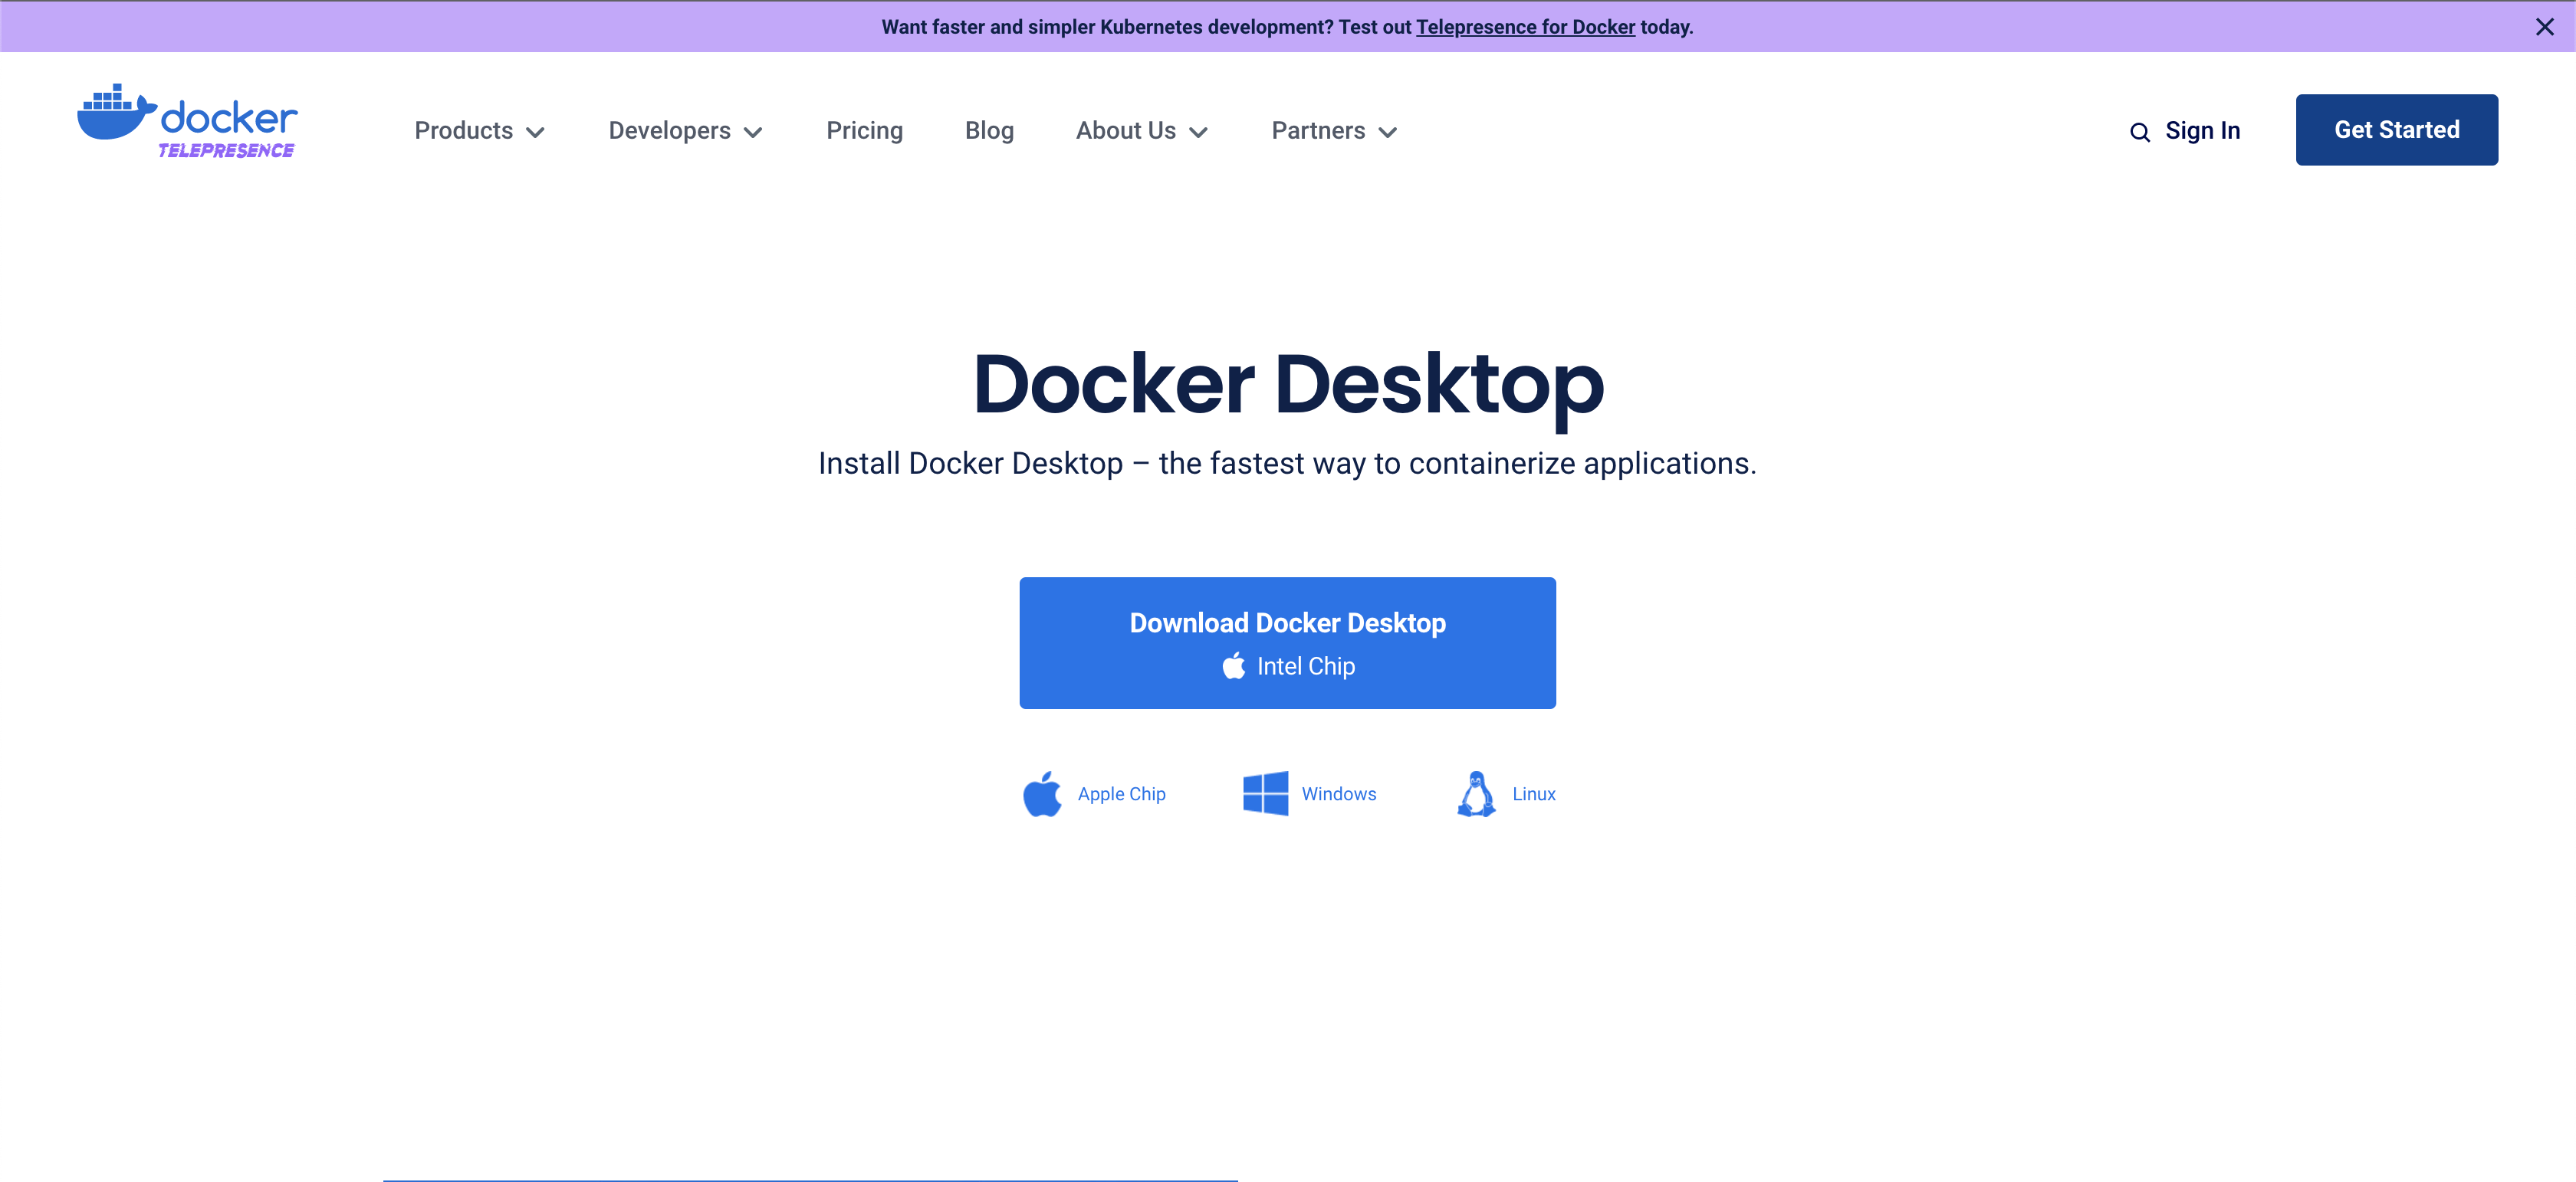
Docker Hub
Container Registry has a similar functionality as Github for code, and it uses to store and share images. There are many container registries, and the most common is Docker Hub. We will use throughout the tutorial Docker Hub to pull different images, such as R and Python images or OS base images such as Ubuntu. To register and create an account go to https://hub.docker.com and follow the registration instructions.
After installing Docker Desktop and setting account on Docker Hub, open Docker Desktop, and from the command line, login to Docker Hub:
shell
 docker login
You will have to enter your username and password, and you should expect the following output if the login is successful:
shell
Login with your Docker ID to push and pull images from Docker Hub. If you don't have a Docker ID, head over to https://hub.docker.com to create one.
Username: rkrispin
Password:
Login Succeeded
Logging in with your password grants your terminal complete access to your account. For better security, log in with a limited-privilege personal access token. Learn more at https://docs.docker.com/go/access-tokens/
Hello World!
There is no better way to test if Docker was installed properly than by running whalesay (or 🐳 say) Docker's most Hello World! common example. The whalesay is an adaption of the Linux cowsay (🐮 say) game using a whale instead of a cow to print some text. Let's run the below code from the terminal to print Hello R Users! 👋 😎:
shell
docker run docker/whalesay cowsay Hello R Users! 👋 😎whalesay image you should expect the following message:
shell
Unable to find image 'docker/whalesay:latest' locally
That is a generic message that notifies that the requested image cannot be found locally, and Docker will try to pull the image from the hub (if specified) and follow by downloading the image:
shell
latest: Pulling from docker/whalesay
Image docker.io/docker/whalesay:latest uses outdated schema1 manifest format. Please upgrade to a schema2 image for better future compatibility. More information at https://docs.docker.com/registry/spec/deprecated-schema-v1/
e190868d63f8: Pull complete
909cd34c6fd7: Pull complete
0b9bfabab7c1: Pull complete
a3ed95caeb02: Pull complete
00bf65475aba: Pull complete
c57b6bcc83e3: Pull complete
8978f6879e2f: Pull complete
8eed3712d2cf: Pull complete
Digest: sha256:178598e51a26abbc958b8a2e48825c90bc22e641de3d31e18aaf55f3258ba93b
Status: Downloaded newer image for docker/whalesay:latest
And this is the expected output:
shell

< Hello R Users! 👋 😎 >
 --------------------------
    \
     \
      \
                    ##        .
              ## ## ##       ==
           ## ## ## ##      ===
       /""""""""""""""""_/ ===
  ~ { ~~ ~ ~~  ~ /  ===- ~~~
       \ o          __/
        \    \        __/
          \_\_/
If you are able to run the whalesay app you are ready to get started with Docker.
General Architecture and Workflow
Before diving into the core functionality of Docker, let's review the generic development workflow architecture with Docker. Docker has similar functionality as Git and Github (or Gitlab, Bitbucket, etc.), enabling shifting your environment and settings (as opposed to code with Git) from one environment to another one (e.g., dev -> staging or dev -> prod) ensuring a high level of reproducibility. As a matter of fact those two (Docker and Git) go together side by side.
General architecture
The diagram below describes a high-level architecture of a Dockerized development environment with VScode. It might be overwhelming if you have never used Docker before, and it will make more sense (I hope) by the end of this section. 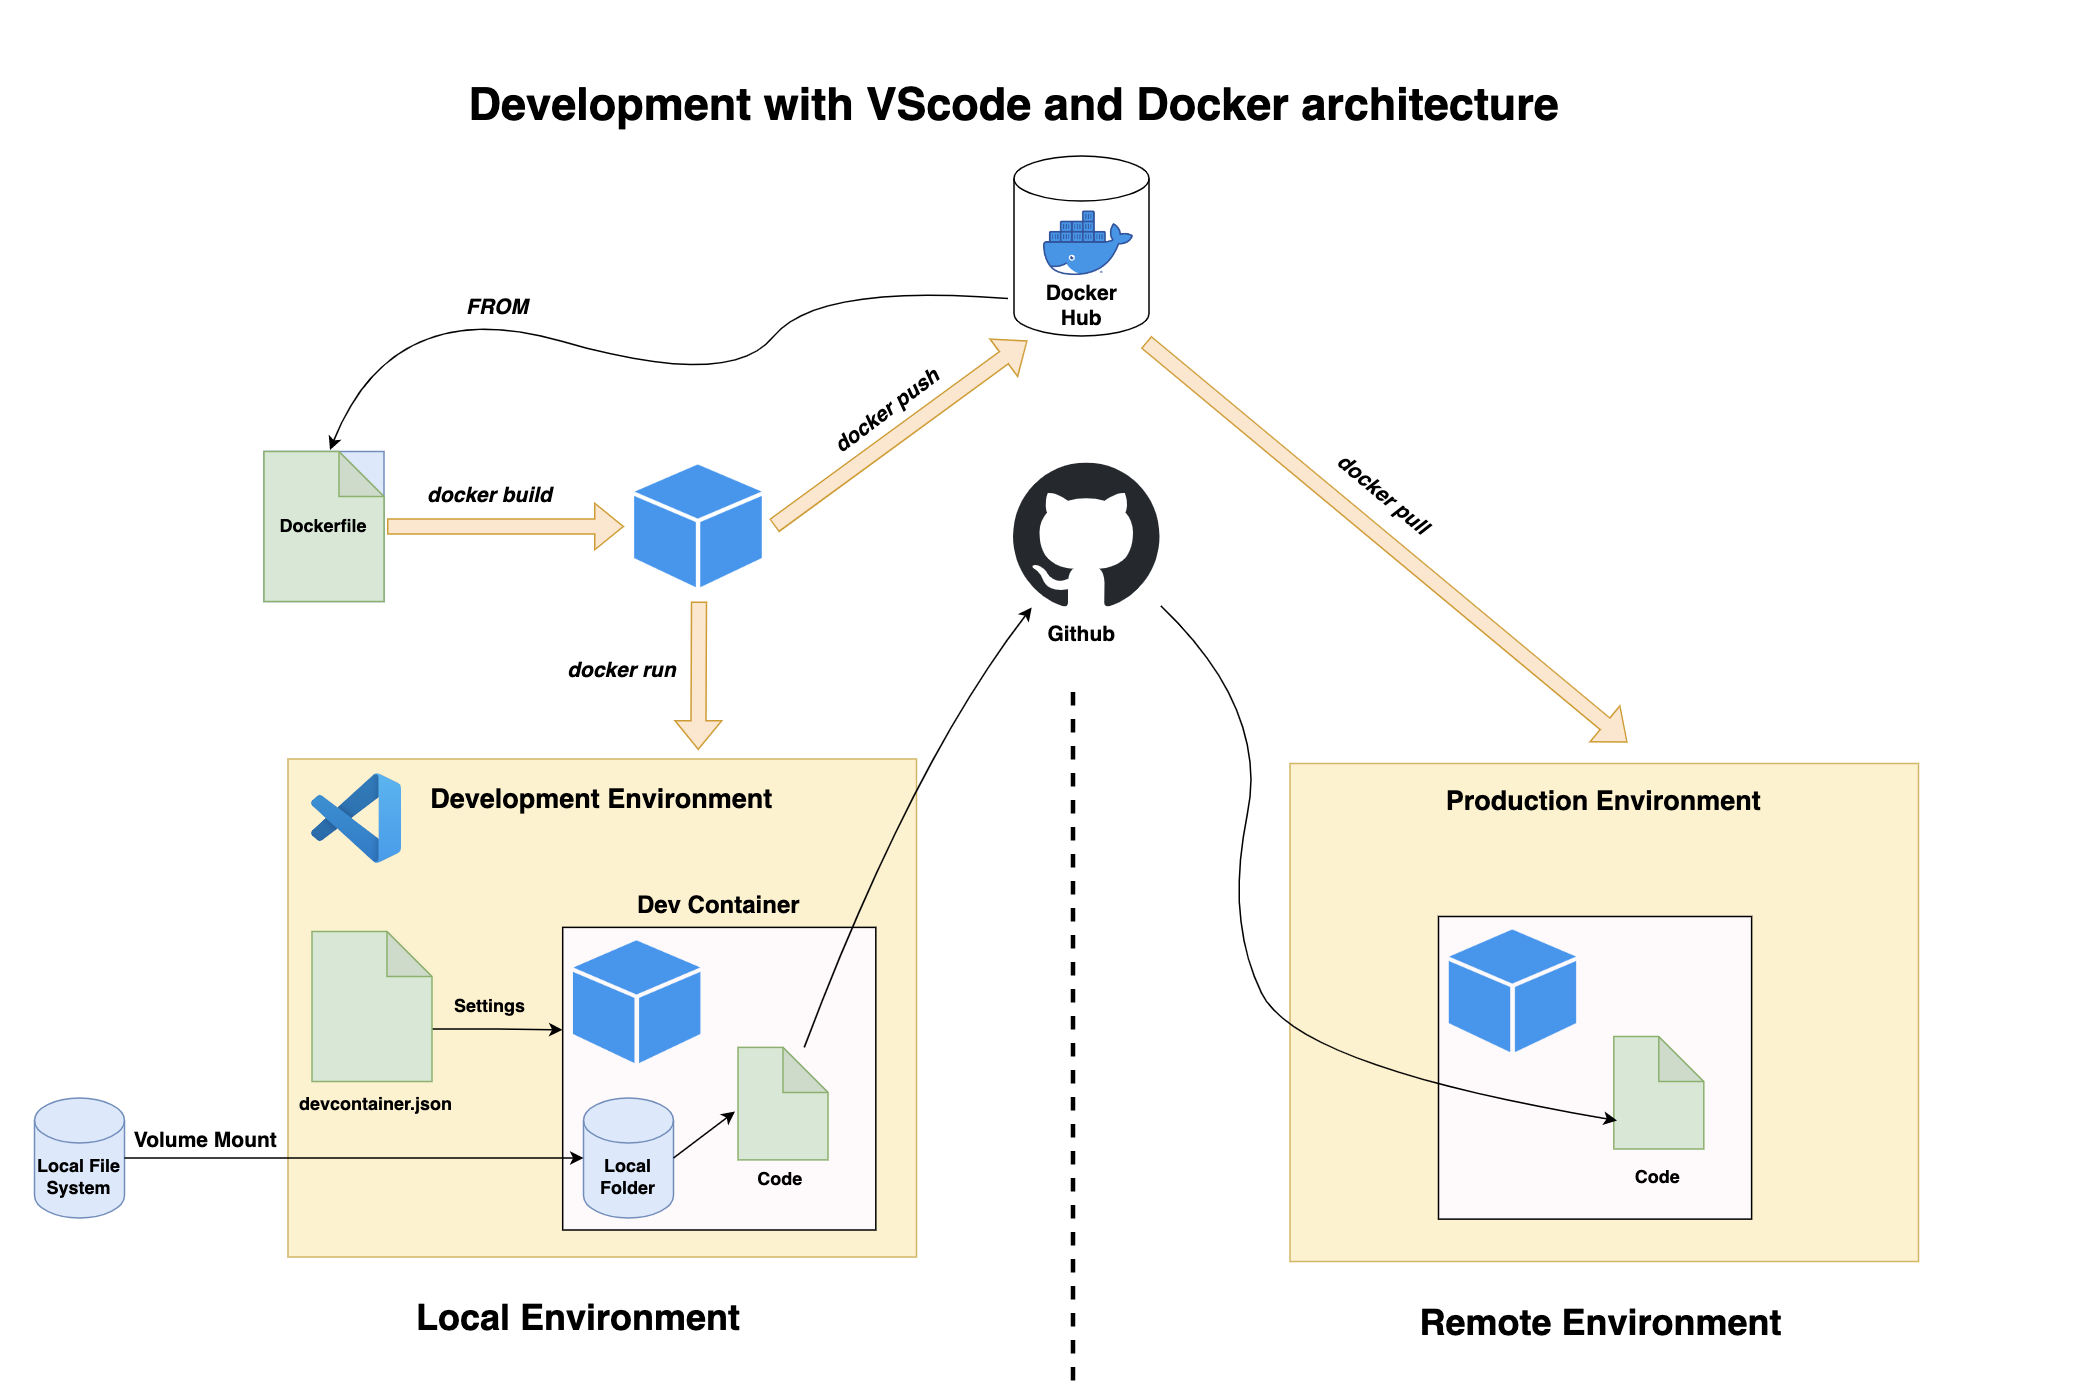
This process includes the following components:
- Dev Container - is the VScode extension that enables you to execute your local code inside a dockerized environment seamlessly. By default, it mounts your local folder to the docker environment ensuring your code runs inside the container and lives locally.
- devcontainer.json - is the Dev Container configuration file that enables you to highly customize your VScode development environment when using the Dev Container extension. From settings the VScode options (e.g., fonts, list of extensions to install, etc.) to the Docker settings (similar to the docker-compose.yml file functionality)
- Dockerfile - is the image manifest or recipe. It provides instructions for the docker engine about which base image to use and what components to install. Typically, you start the build process by importing some base image using the
FROMcommand, which we will explain later in this tutorial. The Dev Container extension enables you to build the image on the fly when launching the environment using the Dockerfile or import a built-in image from some image registry such as Docker Hub. - Image registry - has similar functionality as Github / Gitlab / Bitbucket, and it is used to store public images (or private on some enterprise versions). The image registry lets you shift and distribute your images from one environment to another. In this tutorial, we will use the main image registry - Docker Hub.
- Code registry - beyond version control, it enables you to shift your code from one environment to another. In this tutorial, we will use Github as our code registry.
Development workflow
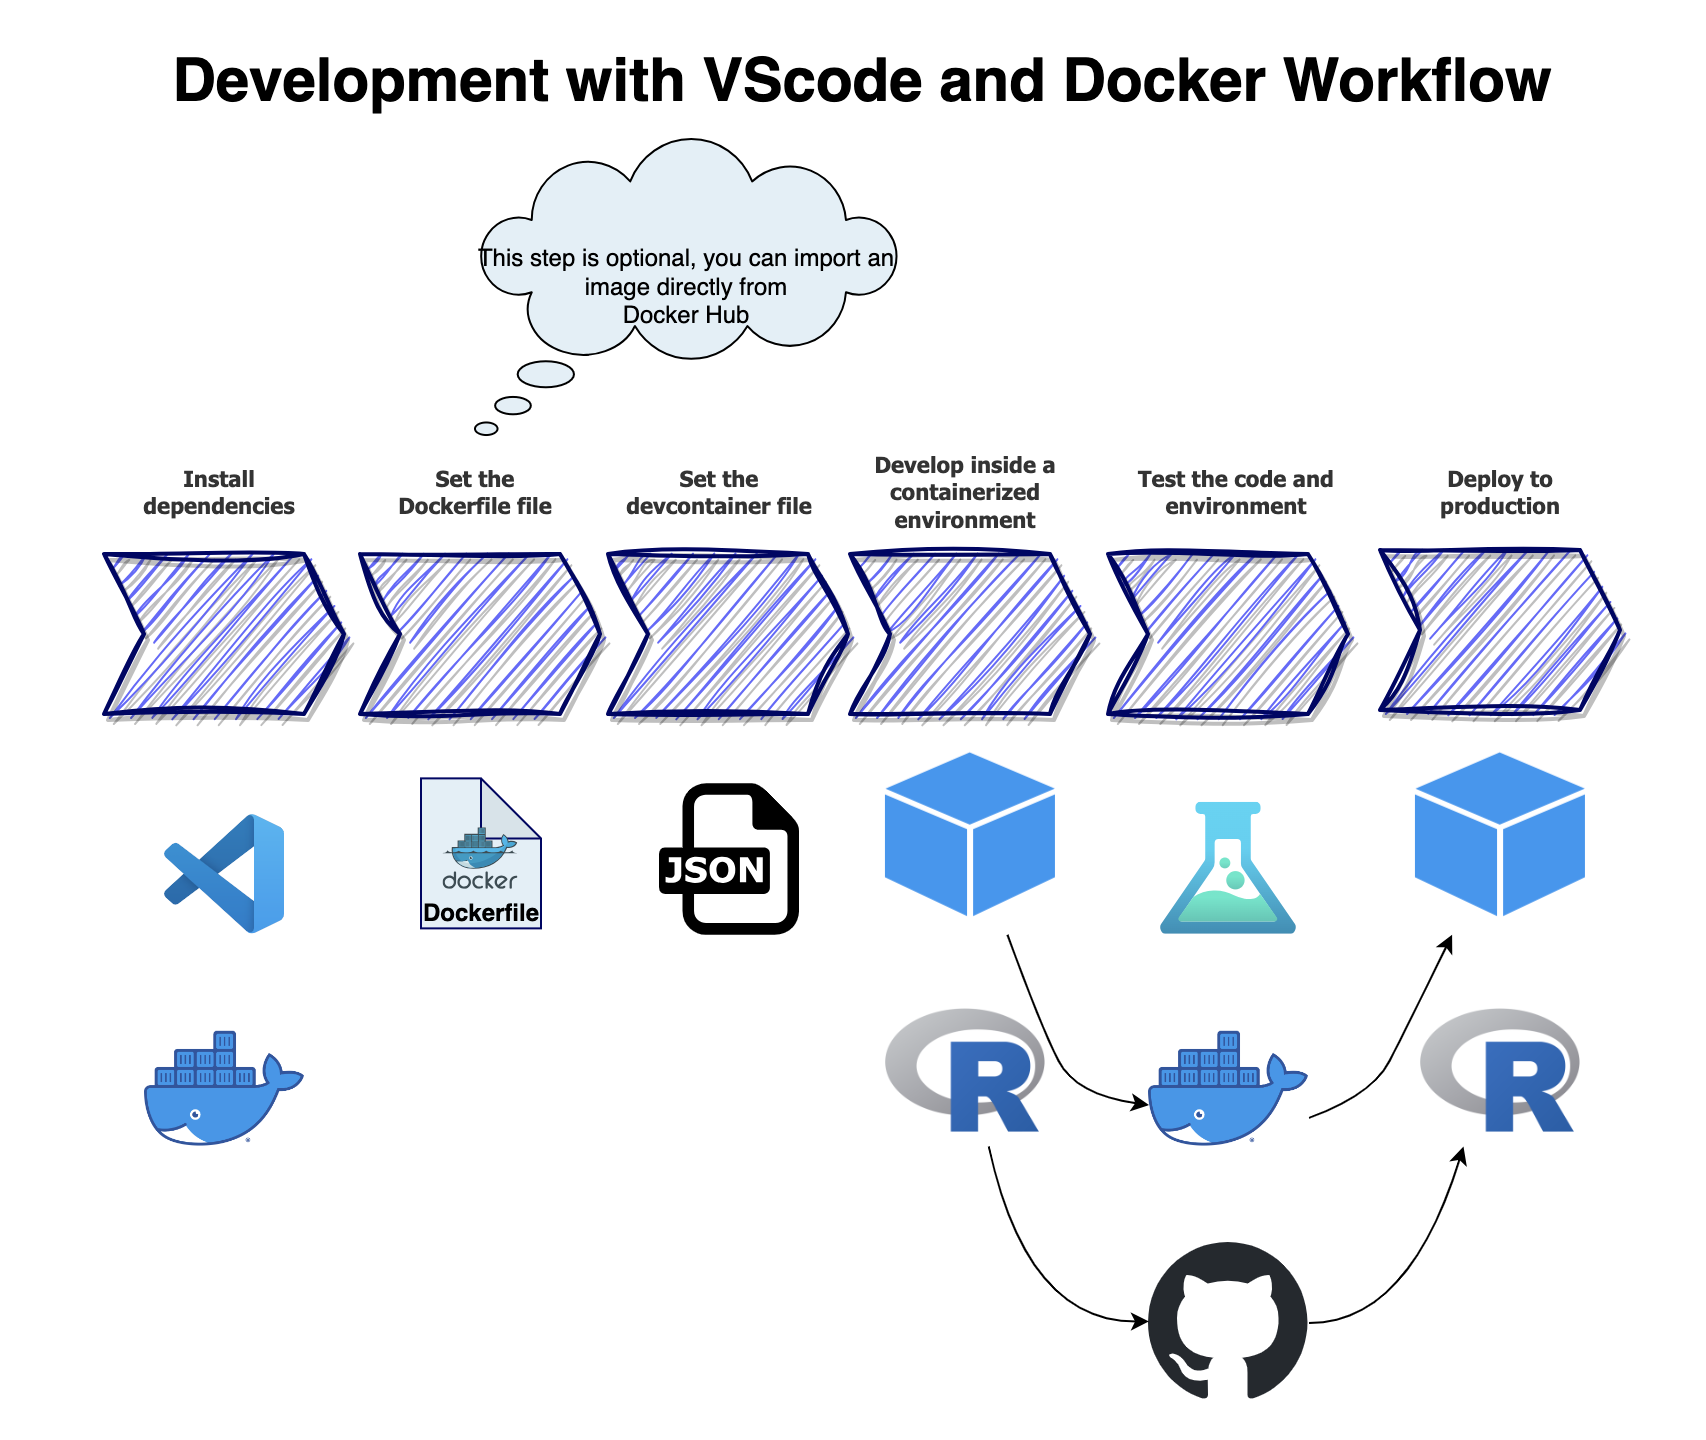
Let's now organize and order this process to a general workflow. The below diagram defines a general order of operation for the development process applying the following steps:- Install dependencies - setting the prerequisites, including installing VScode and the required extensions (e.g., Dev Container, etc.), installing Docker, and setting a Docker Hub account (or equivalent)
- Set the Dockerfile - this step is optional, if you wish to build your image on the fly. Alternatively, you can import a built-in image from an image registry and skip this step. In the next section, we will dive into more details about the core functionality of the Dockerfile and how to set it
- Set the devcontainer.json file - this file defines the environment and enables you to customize both the VScode functionality and VScode settings. Later in this tutorial, we will see how to set this file
- Development - once the
devcontainer.jsonfile is set, you can launch your dockerized development environment using the Dev Container extension on your local folder. - Testing - this is a recommended intermediate step before shipping your code and environment to deployment. There are multiple approaches to code and environment testing, and the main goal is to ensure that your code sync with the dockerized environment and identify potential problems before deploying it.
- Deployment - last but not least, using code and container registry (e.g., Github and Docker Hub), we can deploy our code using the same dockerized environment to some remote server (e.g., Github Actions, AWS, GCP, Azure, etc.) or have your peers run your code in their computer.
The Rocker Project
The Rocker project is the main hub for built-in R images. The project was created by Carl Boettiger and Dirk Eddelbuettel, and is now maintained by Carl, Dirk, Noam Ross, and SHIMA Tatsuya. The project provides a variety of R images, such as:
- Base R - a basic image with R installed. There is a corresponding image to most of the recent R versions
- RStudio Server - a built-in image with RStudio server installed
- Different R package settings - built-in images with different ecosystems installed, such as the tidyverse, verse, geospatial, Shiny, Shiny with tidyverse, etc.
The main advantages of using images from the Rocker project as base images are:
- Robust and tested
- Community support
- Comes with R's core dependencies (Debian packages, etc.)
As mentioned above, you can run RStudio inside a container using a containerized RStudio Server. The Rocker project provides a built-in and ready to use images with RStudio Server. While it is not in the scope of this tutorial, it is a good alternative for VScode with the following limitations:
- It is under an AGPL-3 license and therefore, cannot be used for enterprise
- Required some additional modifications and settings (e.g., mount local folders, git, etc.)
In the next section, we review Docker basic commands and learn how to set a Dockerfile.
Getting Started with Docker
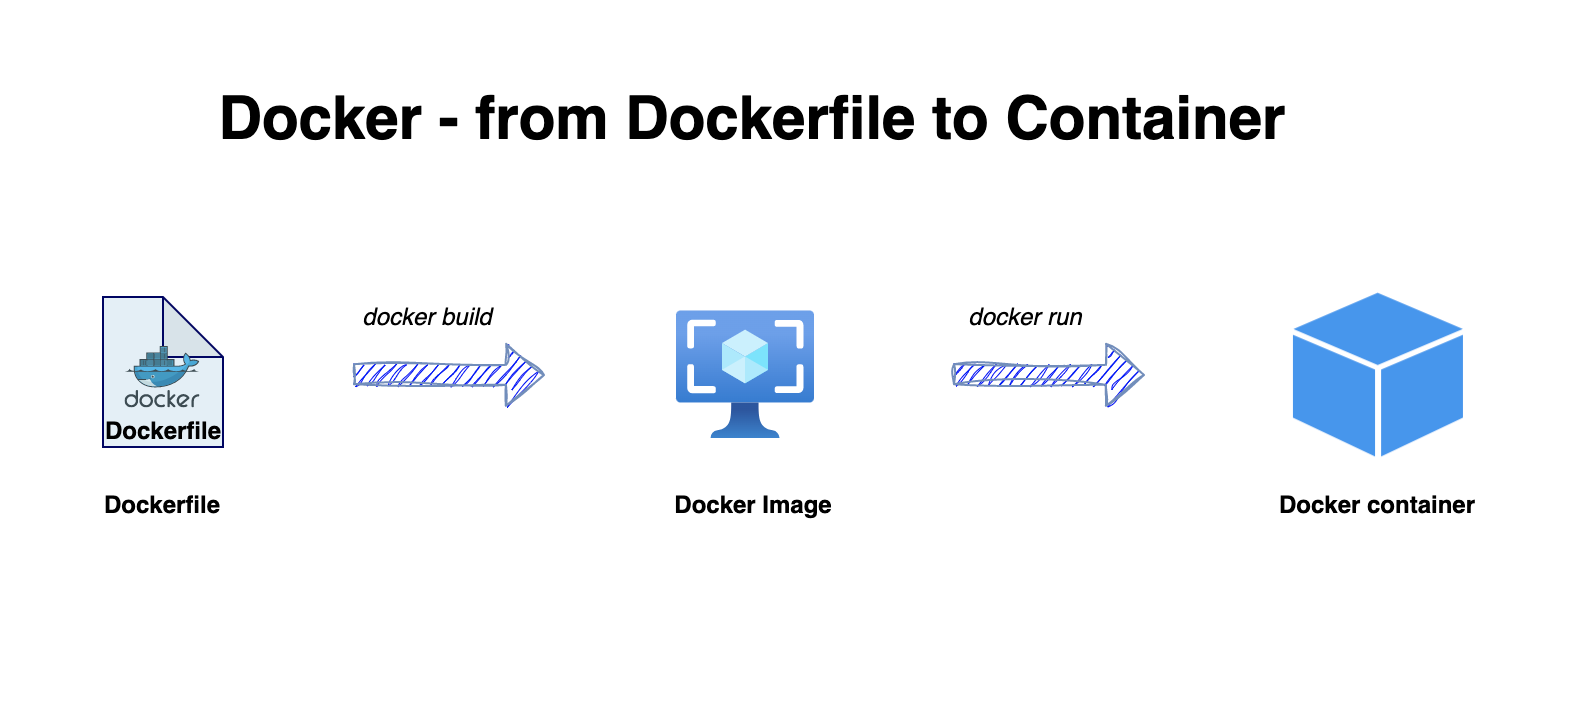
Generally, the VScode Dev Container extension lets you containerize your environment by importing a built-in image. However, often, you may want to add more layers (e.g., install additional dependencies) or build it yourself. This section focuses on the essential Docker requirements that will enable you to build your image and run it inside a container:- Dockerfile - the image recipe, allows you to add components and customize the dependencies according to the development environment requirements
- Docker CLI - core commands to build the image and run it as a containerized environment
Note: It is important to emphasize that this section covers the basic Docker requirements for this tutorial and is not an alternative to a full Docker tutorial or course.
The Dockerfile
TheDockerfile provides a set of instructions for the Docker engine about how to build the image. You can think about it as the image's recipe. It has its own unique and intuitive syntax using the following structure:
Dockerfile
COMMAND some instructions
For example, the following Dockerfile imports a built-in image with base R (version 4.3.1) from the Rocker project and then using the apt-get update and apt-get install to install the curl library :
./examples/ex-1/Dockerfile
Dockerfile FROM r-base:4.3.1
LABEL example=1
ENV R_VER=4.3.1
RUN apt-get update && apt-get install -y --no-install-recommends curl
In a nutshell, we used the FROM command to specify the image we want to import from the Docker registry (don't forget to login to the Docker registry service you are using before building the image!). The LABEL command is used to set labels or comments, and the ENV command is to set environment variables. Last but not least, the RUN command is used to run a command on the command line, in this case, to install the curl library.
Let's now review the Dockerfile core commands:
FROM- Defines the base image to use for the image's build. In most cases, unless you are building the image from scratch, you will use some base image with some pre-installed OS and some dependencies. For example, in this tutorial, we will import as our base image the official [Ubuntu image]()LABEL- Enables to add information about the image to the image's metadata, such as authors, maintainers, license, etc.ENV- Uses to set environment variablesARG- Enables to set parameters during the build timeRUN- Allows executing CLI commands (e.g.,pip install ...,apt-get ...,apt-install...,wget..., etc.) during the build time to add additional components to the base imageCOPY- Enables to copy objects (e.g., files and folders) from your local system to the imageWORKDIR- Sets the working directory inside the imageEXPOSE- Defines the port number to expose the image during the run timeCMD- Sets a default command to execute during the run time of the imageENDPOINT- Allows configuring a container that will run as an executable
Docker Build
Once the Dockerfile is ready, the next step is to build the image using the docker build command from the command line. For example, let's build the above Dockerfile using the build command from this repo root folder:
shell
docker build . -f ./examples/ex-1/Dockerfile -t rkrispin/vscode-r:ex1
Here are the arguments we used with the build command:
- The
-ftag defines theDockerfilepath. This argument is optional and should be used if you are calling thebuildfunction from a different folder than one of theDockerfile - The
.symbol defines the context folder of the files system as the one of theDockerfile. Although we did not use the file system in this case, this enables us in other cases to call and copy files from our local folder to the image during the build time - The
-tis used to set the image's name and tag (e.g., version). In this case, the image name isrkrispin/vscode-rand the tag isex1.
You should expect the following output:
shell
[+] Building 91.2s (6/6) FINISHED
 => [internal] load build definition from Dockerfile                                                                                                                                  0.1s
 => => transferring dockerfile: 197B                                                                                                                                                  0.0s
 => [internal] load .dockerignore                                                                                                                                                     0.2s
 => => transferring context: 2B                                                                                                                                                       0.0s
 => [internal] load metadata for docker.io/library/r-base:4.3.1                                                                                                                       1.5s
 => [1/2] FROM docker.io/library/r-base:4.3.1@sha256:fc60b05cb7cdd028290531cfedc86ca4abc2e6549c6b94a72ac375f0ed80f57d                                                                81.4s
 => => resolve docker.io/library/r-base:4.3.1@sha256:fc60b05cb7cdd028290531cfedc86ca4abc2e6549c6b94a72ac375f0ed80f57d                                                                 0.1s
 => => sha256:fc60b05cb7cdd028290531cfedc86ca4abc2e6549c6b94a72ac375f0ed80f57d 979B / 979B                                                                                            0.0s
 => => sha256:595a7cb5564e9f57ad854e5cf01226e09c5a24e9f6ba5161959c830a4890c5ad 1.58kB / 1.58kB                                                                                        0.0s
 => => sha256:ad8ea1d6d7b698747b90d75600aabd31d4c4a4738cfd5e5787ac6fa4823f1fd7 5.59kB / 5.59kB                                                                                        0.0s
 => => sha256:c80309e0a5bbe8e3c8000103b383c6a60c58a6a84681e6aa5963d565eebe59a6 49.40MB / 49.40MB                                                                                     18.2s
 => => sha256:e6cbeb6beab250969d7a012bc457340f9616f734a70d5b3528c9ea0836cff737 3.36kB / 3.36kB                                                                                        0.4s
 => => sha256:9f7d63b8619e463d865c0fe84818c1100294ce19cc17e3a9c6c1afc141a949ba 25.33MB / 25.33MB                                                                                     16.2s
 => => sha256:06d49c39ba288dc715fe7c732b83772de2a8362469d2de2984182ff219a2bbdd 866.32kB / 866.32kB                                                                                    2.3s
 => => sha256:7cba2360fd37c6a0a4e49af374129c5d2c04fa6dc57617dd4ff8d379a001e37d 348B / 348B                                                                                            2.6s
 => => sha256:5b9c9354c3386447ea1123b43a83ec67cfc7dde48b7ba1300f678a4172e800f2 249.74MB / 249.74MB                                                                                   78.1s
 => => extracting sha256:c80309e0a5bbe8e3c8000103b383c6a60c58a6a84681e6aa5963d565eebe59a6                                                                                             0.6s
 => => extracting sha256:e6cbeb6beab250969d7a012bc457340f9616f734a70d5b3528c9ea0836cff737                                                                                             0.0s
 => => extracting sha256:9f7d63b8619e463d865c0fe84818c1100294ce19cc17e3a9c6c1afc141a949ba                                                                                             0.2s
 => => extracting sha256:06d49c39ba288dc715fe7c732b83772de2a8362469d2de2984182ff219a2bbdd                                                                                             0.0s
 => => extracting sha256:7cba2360fd37c6a0a4e49af374129c5d2c04fa6dc57617dd4ff8d379a001e37d                                                                                             0.0s
 => => extracting sha256:5b9c9354c3386447ea1123b43a83ec67cfc7dde48b7ba1300f678a4172e800f2                                                                                             2.2s
 => [2/2] RUN apt-get update && apt-get install -y --no-install-recommends curl                                                                                                       7.7s
 => exporting to image                                                                                                                                                                0.2s
 => => exporting layers                                                                                                                                                               0.2s
 => => writing image sha256:76b24862f6caf9e0d6009b1abf7baa1485105637b01ed5e7de9c98766431ddc3                                                                                          0.0s
 => => naming to docker.io/rkrispin/vscode-r:ex1
Note: The above output of the build describes the different layers of the image. Don't worry if, at this point, it looks and sounds like gibberish. Reading this output type will be easier after reading the next section, which focuses on the image layers.
You can use the docker images command to validate that the image was created successfully:
shell
>docker images
REPOSITORY                                                                      TAG            IMAGE ID       CREATED              SIZE
rkrispin/vscode-r                                                               ex1            76b24862f6ca   About a minute ago   834MB
The next section will focus on the image layers and caching process.
The image layers
Docker builds images using a layers approach. Depending on the context, the docker engine takes each of the Dockerfile commands during the build time and translates it into layer or metadata. Dockerfile commands, such as FROM and RUN, create layers, and commands, such as LABEL, ARG, ENV, and CMD, create metadata. For example, we can observe in the output of the build of rkrispin/vscode-r:ex1 image above that there are two layers:
- The first layer started with
[1/2] FROM..., corresponding to theFROM r-base:4.3.1line on theDockerfile, which imports the base-R image from the Rocker project - The second layer started with [2/2] RUN apt-get...
, corresponding to theRUNcommand on theDockerfile
<figure> <img src="images/docker-layers.png" width="100%" align="center"/></a> <figcaption> Figure 8 - Example of a build output with respect to the Dockerfile</figcaption> </figure>
<br> <br />
The docker inspect command returns the image metadata details in a JSON format. That includes the environment variables, labels, layers and general metadata. In the following example, we will use jq to extract the layers information from the metadata JSON file:
<pre><code class="lang-">shell docker inspect rkrispin/vscode-r:ex1 | jq '.[] | .'</code></pre> Which will return the below JSON output: <pre><code class="lang-json">{ "Id": "sha256:76b24862f6caf9e0d6009b1abf7baa1485105637b01ed5e7de9c98766431ddc3", "RepoTags": [ "rkrispin/vscode-r:ex1" ], "RepoDigests": [], "Parent": "", "Comment": "buildkit.dockerfile.v0", "Created": "2023-09-30T05:21:38.987459558Z", "Container": "", "ContainerConfig": { "Hostname": "", "Domainname": "", "User": "", "AttachStdin": false, "AttachStdout": false, "AttachStderr": false, "Tty": false, "OpenStdin": false, "StdinOnce": false, "Env": null, "Cmd": null, "Image": "", "Volumes": null, "WorkingDir": "", "Entrypoint": null, "OnBuild": null, "Labels": null }, "DockerVersion": "", "Author": "", "Config": { "Hostname": "", "Domainname": "", "User": "", "AttachStdin": false, "AttachStdout": false, "AttachStderr": false, "Tty": false, "OpenStdin": false, "StdinOnce": false, "Env": [ "PATH=/usr/local/sbin:/usr/local/bin:/usr/sbin:/usr/bin:/sbin:/bin", "LCALL=enUS.UTF-8", "LANG=en_US.UTF-8", "RBASEVERSION=4.3.1", "R_VER=4.3.1" ], "Cmd": [ "R" ], "Image": "", "Volumes": null, "WorkingDir": "", "Entrypoint": null, "OnBuild": null, "Labels": { "example": "1", "org.opencontainers.image.authors": "Dirk Eddelbuettel <edd@debian.org>", "org.opencontainers.image.licenses": "GPL-2.0-or-later", "org.opencontainers.image.source": "https://github.com/rocker-org/rocker", "org.opencontainers.image.vendor": "Rocker Project" } }, "Architecture": "arm64", "Variant": "v8", "Os": "linux", "Size": 833810317, "VirtualSize": 833810317, "GraphDriver": { "Data": { "LowerDir": "/var/lib/docker/overlay2/98d0f9c020f2e472a5c77e7f9daeae68192e110647baa2a3b9fbd8fa66b163df/diff:/var/lib/docker/overlay2/109b7e7f1c7d1fa5d29c80823851e1c1cddcf53e5e837f346b17a7e20062eeac/diff:/var/lib/docker/overlay2/0756065361b7c670e0da7a50827e40c57b1eba208bd5f774a0379ee1a37f3656/diff:/var/lib/docker/overlay2/3b4c0139eae5c07dd126ec43d30d5d3a0d9dfe11861f7aa110d0cd7e1845a6cc/diff:/var/lib/docker/overlay2/af229f0c2d269960e7b8c0febc9c48cd467ef7107b2030103e81e17f9ab29192/diff:/var/lib/docker/overlay2/9e478497eba72b5835fb40c40aa51f70d11e955087f14d10b20ab8edd4646724/diff", "MergedDir": "/var/lib/docker/overlay2/hxvdo7qfj9alf4i9f0s8bbssk/merged", "UpperDir": "/var/lib/docker/overlay2/hxvdo7qfj9alf4i9f0s8bbssk/diff", "WorkDir": "/var/lib/docker/overlay2/hxvdo7qfj9alf4i9f0s8bbssk/work" }, "Name": "overlay2" }, "RootFS": { "Type": "layers", "Layers": [ "sha256:9f305994d6fe3db46de3369d20848de757d10d93e8cdd5b4fa6d0755535f8d1e", "sha256:f5fc7a4bd73d0f411e38d84e80728d8ef635bf3ee280740a2fce73b7b145e810", "sha256:22ffbf9407bad90dd11e8df42e062f174f176bede0100fadceaf983ecf6085d9", "sha256:5d461cbee76e31c6f9db3d3e56591b4a620a3e36b5ea3d5389808ce99b491b18", "sha256:500a8606fbf961ba3942c49bd7075fef4ae6e15831ddccf3272f02dc134b7d65", "sha256:360c54c41c8019ab1dbf51a4759f0b5ce65a8bfbc24daf180711ca2ef3219c35", "sha256:352b2e503f1d22ffa1c0e7885dec9d66cc21a7701fdbb95d2c6d9b3bdc411886" ] }, "Metadata": { "LastTagTime": "0001-01-01T00:00:00Z" } }</code></pre>
As you can see from the image's layers output above, the rkrispin/vscode-r:ex1 image has seven layers. Each layer is represented by its hash key (e.g., sha256:...), and it is cached on the backend. While we saw on the build output that the docker engine triggered two processes from the FROM and RUN commands, we ended up with nine layers. The main reason for that is related to the fact that when importing the baseline image, we inherited the imported image characteristics, including the layers. In this case, we used the FROM to import the official r-base image, which included six layers, and then added the 9th layer by executing the RUN commands. You can test it by pulling the baseline image and using the inspect command to review its layers:
<pre><code class="lang-">shell > docker pull r-base:4.3.1
> docker inspect r-base:4.3.1 | jq '.[] | .RootFS'</code></pre> Which will returns a JSON list with the base image layers:
<pre><code class="lang-json">{ "Type": "layers", "Layers": [ "sha256:9f305994d6fe3db46de3369d20848de757d10d93e8cdd5b4fa6d0755535f8d1e", "sha256:f5fc7a4bd73d0f411e38d84e80728d8ef635bf3ee280740a2fce73b7b145e810", "sha256:22ffbf9407bad90dd11e8df42e062f174f176bede0100fadceaf983ecf6085d9", "sha256:5d461cbee76e31c6f9db3d3e56591b4a620a3e36b5ea3d5389808ce99b491b18", "sha256:500a8606fbf961ba3942c49bd7075fef4ae6e15831ddccf3272f02dc134b7d65", "sha256:360c54c41c8019ab1dbf51a4759f0b5ce65a8bfbc24daf180711ca2ef3219c35" ] }</code></pre>
Layers caching
One of the disadvantages of Docker is the image build time. As the level of complexity of the Dockerfile is higher (e.g., a large number of dependencies), the longer the build time. Sometimes, your build fails or won't work as expected during the first run. Either some requirements are missing, or something breaks during the build time. This is where the use of caching helps in reducing the image rebuild time. Docker has smart mechanization that identifies if each layer should be built from scratch or can leverage a cached layer and save time. For example, let's add to the previous example another command to install the vim editor:
./examples/ex-2/Dockerfile <pre><code class="lang-">Dockerfile FROM r-base:4.3.1
LABEL example=1
ENV R_VER=4.3.1
RUN apt-get update && apt-get install -y --no-install-recommends curl
RUN apt-get update && apt-get install -y --no-install-recommends vim</code></pre>
We will use the below command to build this image and tag it as rkrispin/vscode-r:ex2:
<pre><code class="lang-">shell > docker build . -f ./examples/ex-2/Dockerfile -t rkrispin/vscode-r:ex2 [+] Building 7.6s (7/7) FINISHED => [internal] load build definition from Dockerfile 0.1s => => transferring dockerfile: 268B 0.0s => [internal] load .dockerignore 0.1s => => transferring context: 2B 0.0s => [internal] load metadata for docker.io/library/r-base:4.3.1 0.0s => [1/3] FROM docker.io/library/r-base:4.3.1 0.0s => CACHED [2/3] RUN apt-get update && apt-get install -y --no-install-recommends curl 0.0s => [3/3] RUN apt-get update && apt-get install -y --no-install-recommends vim 7.1s => exporting to image 0.3s => => exporting layers 0.2s => => writing image sha256:1a3de47798375e8ca177746d7689ac8516e62a0ffb8dd1dcd3ebe6e239c75e20 0.0s => => naming to docker.io/rkrispin/vscode-r:ex2</code></pre>
As can be noticed from the above build output, the first and second layers already exist from the previous build. Therefore, the docker engine adds their cached layers to the image (as opposed to building them from scratch), and just builds the 3rd layer and installs the vim editor.
Note: By default, the build output is concise and short. You can get more detailed output during the build time by adding the progress argument and setting it to plain:
<pre><code class="lang-">shell > docker build . -f ./examples/ex-2/Dockerfile -t rkrispin/vscode-r:ex2 --progress=plain #1 [internal] load build definition from Dockerfile #1 transferring dockerfile: 69B done #1 DONE 0.1s
#2 [internal] load .dockerignore #2 transferring context: 2B done #2 DONE 0.1s
#3 [internal] load metadata for docker.io/library/r-base:4.3.1 #3 DONE 0.0s
#4 [1/3] FROM docker.io/library/r-base:4.3.1 #4 DONE 0.0s
#5 [2/3] RUN apt-get update && apt-get install -y --no-install-recommends curl #5 CACHED
#6 [3/3] RUN apt-get update && apt-get install -y --no-install-recommends vim #6 CACHED
#7 exporting to image #7 exporting layers done #7 writing image sha256:1a3de47798375e8ca177746d7689ac8516e62a0ffb8dd1dcd3ebe6e239c75e20 #7 writing image sha256:1a3de47798375e8ca177746d7689ac8516e62a0ffb8dd1dcd3ebe6e239c75e20 0.0s done #7 naming to docker.io/rkrispin/vscode-r:ex2 done #7 DONE 0.1s</code></pre>
Since we already cached the 3rd layer on the previous build, all the layers in the above output are cached, and the run time is less than 1 second.
When setting your Dockerfile, you should be minded and strategic to the layers caching process. The order of the layers does matter! The following images demonstrate when the docker engine will use cached layers and when to rebuild them. The first image illustrates the initial build:
<figure> <img src="images/docker layers 1.png" width="100%" align="center"/></a> <figcaption> Figure 9 - Illustration of initial build of image. The left side represents the Dockerfile's commands and the right one the coorisponding layers</figcaption> </figure>
<br> <br />
In this case, we have a Dockerfile with four commands that are translated during the build time into four layers. What will happen if we add a fifth command and place it right after the third one? The docker engine will identify that the first and second commands in the Dockerfile did not change and, therefore, will use the corresponding cached layers (one and two), and rebuild the rest of the layers from scratch:
<figure> <img src="images/docker layers 2.png" width="100%" align="center"/></a> <figcaption> Figure 10 - Illustration of the caching process during the rebuild of an image</figcaption> </figure>
<br> <br />
When planning your Dockerfile, if applicable, a good practice is to place the commands that will most likely stay the same and keep new updates to the end of the file if possible.
That was just the tip of the iceberg, and there is much more to learn about Docker. The next section will explore different methods to run R inside a container.
Running R on Docker - the hard way
In the previous sections, we saw how to define the image requirements with the Dockerfile and build it with the build command. This section focuses on running Python inside a container using the docker run command.
Docker run
The docker run or run command enables us to create and run a new container from an image. Typically, the run command is used to launch a dockerized application or server or to execute a code following the below syntax:
<pre><code class="lang-">shell docker run [OPTIONS] IMAGE [COMMAND] [ARG...]</code></pre>
For example, we can use the run command with the base R image:
<pre><code class="lang-">shell >docker run r-base:4.3.1</code></pre>
This will return the following error message:
<pre><code class="lang-shell">Fatal error: you must specify '--save', '--no-save' or '--vanilla'</code></pre>
What just happened over here? To understand better, we should go back to the image metadata and review the CMD command of the image. As you remember, the CMD command sets a default command to execute during the run time of the image. We will run the inspect command again and use jq to extract the CMD settings:
<pre><code class="lang-shell">> docker inspect r-base:4.3.1 | jq '.[] | .Config.Cmd' [ "R" ]</code></pre>
This means that during runtime, the R command is executed on the command line, launching R. However, the session will exit unless exposed in a server and the port is opened. If you are familiar with R, when quitting a session, it popups the following questions regarding the session:
<pre><code class="lang-R">> q() Save workspace image? [y/n/c]:</code></pre>
Since the image CMD argument does not define how to handle the end of the session (e.g., R --vanilla), docker run when exiting the session triggers the above error.
Alternatively, we can use the interactive and tty arguments to keep the session persist during the run time. Let's now add the --interactive and --tty options to run the container in an interactive mode:
<pre><code class="lang-shell">docker run --interactive --tty r-base:4.3.1</code></pre> This launches R on the image. We can then test it by using the print command to print Hello World!:
<pre><code class="lang-R">R version 4.3.1 (2023-06-16) -- "Beagle Scouts" Copyright (C) 2023 The R Foundation for Statistical Computing Platform: aarch64-unknown-linux-gnu (64-bit)
R is free software and comes with ABSOLUTELY NO WARRANTY. You are welcome to redistribute it under certain conditions. Type 'license()' or 'licence()' for distribution details.
Natural language support but running in an English locale
R is a collaborative project with many contributors. Type 'contributors()' for more information and 'citation()' on how to cite R or R packages in publications.
Type 'demo()' for some demos, 'help()' for on-line help, or 'help.start()' for an HTML browser interface to help. Type 'q()' to quit R.
> print("Hello World") [1] "Hello World" ></code></pre>
In summary, the docker run command creates and runs a new container from an image. It enables running code and applications or launching a server inside a container. The output is dependent on the Dockerfile settings. As we saw in the above example, you open and run R inside a containerized environment using an interactive mode.
OK, we have R running inside a dockerized environment, so why should we not use it? Mainly due to the following reasons:
- This is not a development environment, and it is harder (in my mind) to maintain and develop code from the terminal with respect to R IDEs such as RStudio or VScode.
- By default, the docker run
is an ephemeral process, and therefore, your code is lost when you shut down the container.
While there are ways to overcome the above issues, it is still convoluted and not as efficient as using VScode. In the next section, we will see how to set and run R code with VScode and the Dev Containers extension.
Setting R Development Environment with VScode
So far, we reviewed the foundation of Docker. We saw how to set and build an image with the Dockerfile and the build command, respectively, and then run it in a container with the run command. This section will focus on setting up an R development environment with VScode. This includes the following steps: Dockerfile with the R environment settings General Requirements
Before we start setting up our R development environment, let's define the scope:
- R version 4.3.1
- R core packages (e.g., dplyr
,ggplot2,plotly,shiny) - Quarto version 1.3.450
- Support interactive R applications such as Shiny app, htmlwidget, etc.
- Plot viewers
- Tables viewer
- Help viewer
Last but not least, we will build the image to enable us to update, modify, and add new components seamlessly.
Image Build Approach
One of the main components of a dockerized environment is the image. Here are the main options for setting image with R environment from simple to complex:
- Pull a built-in and ready-to-use image from an external source such as the ones available on the Rocker project.
- Pull a built-in image but add additional layers (e.g., required packages, etc.)
- Build the image (almost) from scratch
What does it mean to build an image from scratch? it means that the starting point would be a clean and minimal Ubuntu image, which comes without the core R dependencies such C, C++, and Fortran compilers. In addition, we will have to set and define R's core configuration options, which, by default, in a regular OS such as Windows or macOS, you won't have to set or define.
To make this process seamless and easy to update and modify if needed, we will use:
- Environment variables to define the core properties of the R environment, such as R and Quarto version, default CRAN mirror, etc.
- A JSON file with a list of required packages and their versions
The Dockerfile
Below is the Dockerfile we will use to set the R environment:
./.devcontainer/Dockerfile <pre><code class="lang-Dockerfile"># Setting an R environment from scratch Step 1 - Import base image
FROM ubuntu:22.04
Step 2 - Set arguments and environment variables
Define arguments
ARG VENVNAME=VENVNAME ARG RVERSIONMAJOR=4 ARG RVERSIONMINOR=3 ARG RVERSIONPATCH=1 ARG DEBIAN_FRONTEND=noninteractive ARG CRAN_MIRROR=https://cran.rstudio.com/ ARG QUARTO_VER="1.3.450"Define environment variables
ENV VENVNAME=$VENVNAME ENV RVERSIONMAJOR=$RVERSIONMAJOR ENV RVERSIONMINOR=$RVERSIONMINOR ENV RVERSIONPATCH=$RVERSIONPATCH ENV QUARTOVER=$QUARTOVER ENV C ENV TZ=UTC ENV CRANMIRROR=$CRANMIRRORStep 3 - Install R dependencies
RUN apt-get update && apt-get install -y --no-install-recommends \ apt-utils\ gfortran \ git \ g++ \ libreadline-dev \ libx11-dev \ libxt-dev \ libpng-dev \ libjpeg-dev \ libcairo2-dev \ libcurl4-openssl-dev \ libssl-dev \ libxml2-dev \ libudunits2-dev \ libgdal-dev \ libbz2-dev \ libzstd-dev \ liblzma-dev \ libpcre2-dev \ locales \ openjdk-8-jdk \ screen \ texinfo \ texlive \ texlive-fonts-extra \ vim \ wget \ xvfb \ tzdata \ sudo\ jq\ curl\ libgit2-dev \ libmagick++-dev \ make \ tmux \ python3-launchpadlib \ python3.10-dev \ python3.10-venv \ python3-pip \ lsof \ && rm -rf /var/lib/apt/lists/*Step 4 - Install R
RUN wget https://cran.rstudio.com/src/base/R-${RVERSIONMAJOR}/R-${RVERSIONMAJOR}.${RVERSIONMINOR}.${RVERSIONPATCH}.tar.gz && \ tar zxvf R-${RVERSIONMAJOR}.${RVERSIONMINOR}.${RVERSIONPATCH}.tar.gz && \ rm R-${RVERSIONMAJOR}.${RVERSIONMINOR}.${RVERSIONPATCH}.tar.gzWORKDIR /R-${RVERSIONMAJOR}.${RVERSIONMINOR}.${RVERSIONPATCH}
RUN ./configure ${CONFIGURE_OPTIONS} && \ make && \ make install
RUN locale-gen en_US.UTF-8
WORKDIR /root
RUN mkdir settings
COPY packages.json installpackages.R requirements.txt installquarto.sh ./settings/ RUN Rscript ./settings/install_packages.R
Installing Quarto
RUN bash ./settings/installquarto.sh $QUARTOVER COPY .Rprofile /root/Step 5 - Set Python Environment and install radian
RUN python3 -m venv /opt/$VENV_NAME \ && export PATH=/opt/$VENV_NAME/bin:$PATH \ && echo "source /opt/$VENV_NAME/bin/activate" >> ~/.bashrcRUN pip3 install -r ./settings/requirements.txt</code></pre>
This Dockerfile includes the following five steps:
- Import Ubuntu version 22.04 image as the baseline image
- Set arguments and environment variables. That includes the R version settings, the CRAN mirror, etc.
- Install R dependencies and command lines tools- Debian libraries (git, C and Fortran compilers, vim, curl, etc.)
- Install R and set it, and Quarto
- Set Python virtual environment and install radian
Let's now break down and explain those steps in further detail.
Baseline Image
Our first step is to import a baseline image. We will use the FROM command to import the official Ubuntu version 22.04 image as our baseline image for this build:
<pre><code class="lang-Dockerfile"># Step 1 - Import base image FROM ubuntu:22.04</code></pre>
More details on this image can be found on Docker Hub. In the following steps, we will install R and its dependecies on top of this base image.
Argument vs. Environment variables
Next, we will define the build arguments and set environment variables:
<pre><code class="lang-Dockerfile"># Step 2 - Set arguments and environment variables
Define arguments
ARG VENVNAME=VENVNAME ARG RVERSIONMAJOR=4 ARG RVERSIONMINOR=3 ARG RVERSIONPATCH=1 ARG DEBIAN_FRONTEND=noninteractive ARG CRAN_MIRROR=https://cran.rstudio.com/ ARG QUARTO_VER="1.3.450"Define environment variables
ENV VENVNAME=$VENVNAME ENV RVERSIONMAJOR=$RVERSIONMAJOR ENV RVERSIONMINOR=$RVERSIONMINOR ENV RVERSIONPATCH=$RVERSIONPATCH ENV QUARTOVER=$QUARTOVER ENV C ENV TZ=UTC ENV CRANMIRROR=$CRANMIRROR</code></pre>This includes setting variables to define the R and Quarto versions, the R configurations, etc. The use of arguments during the build time allows us to modify and update the image settings as necessary. For instance, in the above Dockerfile, we used three arguments to indicate the major, minor, and path values of the R version. We set the default version as 4.3.1. If required, we can modify the R version by assigning values to the image arguments using the --build-arg argument. For example, the below build command will create an image with R version 4.1.0 and set the image name as rkrispin/vscode-r and tag it as rv4.1.0:
<pre><code class="lang-">shell docker build . -f ./.devcontainer/Dockerfile \ --build-arg RVERSIONMAJOR=4 \ --build-arg RVERSIONMINOR=1 \ --build-arg RVERSIONPATCH=0 \ -t rkrispin/vscode-r:rv4.1.0</code></pre>
Environment variables can be set on the Dockerfile using the ENV command or can pass directly to the container during the run time. Typically, we set environment variables for fixed values with the Dockerfile. For example, we set the time zone as UTC using the TZ variable.
Note: It is crucial to NEVER (but never!) store any sensitive information, like passwords, credentials, API keys, or other confidential data, in the Dockerfile itself. Instead, it is recommended to pass these variables during runtime. In this tutorial, we will explore various methods for setting environment variables during runtime using the Dev Containers extension.
While both arguments and environment variables are types of variables, the main difference between the two is that the first is used only during the build time, and the last is also available during the run time of the container.
Installing Required Dependencies
Since we are using a minimalist image as our baseline image, Ubuntu version 22.04 and some baseline tools. Since we are using this image, we must first install the Debian dependencies that R requires before we can install it. We will use the apt-get command to install those dependencies and some command-line tools:
<pre><code class="lang-Dockerfile"># Step 3 - Install R dependencies RUN apt-get update && apt-get install -y --no-install-recommends \ apt-utils\ gfortran \ git \ g++ \ libreadline-dev \ libx11-dev \ libxt-dev \ libpng-dev \ libjpeg-dev \ libcairo2-dev \ libcurl4-openssl-dev \ libssl-dev \ libxml2-dev \ libudunits2-dev \ libgdal-dev \ libbz2-dev \ libzstd-dev \ liblzma-dev \ libpcre2-dev \ locales \ openjdk-8-jdk \ screen \ texinfo \ texlive \ texlive-fonts-extra \ vim \ wget \ xvfb \ tzdata \ sudo\ jq\ curl\ libgit2-dev \ libmagick++-dev \ make \ tmux \ python3-launchpadlib \ python3.10-dev \ python3.10-venv \ python3-pip \ && rm -rf /var/lib/apt/lists/*</code></pre>
As we are setting the R environment almost from scratch, there is a long list of dependencies. This includes some Debian dependencies that are required to install R and some of the packages and command line tools. We use the RUN command to execute apt-get command to install those dependencies. One of the main challenges in this type of build is to identify what dependencies required them in the first place. While it is not in the scope of this tutorial, here are some tips:
- Build log - when the build fails, the build log provides information about the error type or failure reason. By default, the docker build
returns a concise output, which may not contain the error information. To get the full build log output, set the progress argument as plain (--progress=plain) - System requirements - when adding a new R package, check the package description to see if the SystemRequirements
section is available. For example, one of the R environment requirements is the httpgd package that enables running interactive R applications in VScode, such as Shiny applications, or HTML widgets, such as Plotly. The package description provides the package system requirements (as can be seen in Figure 11 below) - C++17, libpng, cairo, freetype2, fontconfig, which must be installed before installing this package
<figure> <img src="images/httpgd-sys-req.png" width="100%" align="center"/></a> <figcaption> Figure 11 - The httpgd package system requirements on the package description</figcaption> </figure>
<br> <br />
Installing R
This section focuses on the 4th step - installing R and setting it. This includes the following sub-steps:
- Install R from CRAN
- Config and set R
- Install packages
- Install Quarto
- Set the R profile
file, extract it, and install it. Note that we use the arguments we set in step 2 to define the R version (default is 4.3.1):
`` Dockerfile Step 4 - Install R
RUN wget https://cran.rstudio.com/src/base/R-${RVERSIONMAJOR}/R-${RVERSIONMAJOR}.${RVERSIONMINOR}.${RVERSIONPATCH}.tar.gz && \ tar zxvf R-${RVERSIONMAJOR}.${RVERSIONREADME truncated. View on GitHub


