
A Windows virtual display driver to add multiple virtual monitors to your PC! For Win10+. Works with VR, obs, streaming software, etc
Virtual Display Driver


This is a Windows driver made in Rust which creates a virtual desktop.
It has many uses, such as:
- A private virtual desktop for VR use
- For remote desktops
- For screenshare presentations, to give you more workspace with a second monitor
- Getting a higher resolution (or higher refresh rate) display when you don't have a physical one on-hand (though note you can only use it in software/VR)
- Other uses? Let me know!
For any bug reports, please see the debugging or reporting crashes section to get the panic message for the bug report
Features
- Multiple monitors (up to 10)
- Multiple resolutions per monitor
- Multiple refresh rates per resolution
- App to configure them all, disable all/individual monitors
How to install
- Go to the releases section for the latest driver.
- Download (you may receive a warning, just press accept)
- Install certificate
- Run the msi installer
- The driver will be installed, started, and you can find a shortcut to the control app in the start menu, named "Virtual Display Driver Control"
How to install portable version
- Go to the releases section for the latest driver.
- Download (you may receive a warning, just press accept)
- Install certificate
- Install
install.reg - Open device manager
Actions -> Add legacy hardware
* next on Install hardware that I manually select from a list
* next on Show all devices
* click on Have Disk... and select the folder with the driver files in it
* finish the setup
- The driver will be installed and started. The control panel exe you see in the folder will work from anywhere you put it.
Optional: Installing the driver with
nefcon CLI
- You might need to install the driver certificate and/or
install.reg
Get nefconc CLI
- Download the official latest release
- Or from our repo: installer/nefconc.exe
- Put
nefconc.exe in the extracted portable folder
Open console on this folder and run:
<pre><code class="lang-">.\nefconc.exe --remove-device-node --hardware-id Root\VirtualDisplayDriver --class-guid "4D36E968-E325-11CE-BFC1-08002BE10318"
.\nefconc.exe --create-device-node --class-name Display --class-guid "4D36E968-E325-11CE-BFC1-08002BE10318" --hardware-id Root\VirtualDisplayDriver
.\nefconc.exe --install-driver --inf-path ".\VirtualDisplayDriver.inf"</code></pre>
You can also completely uninstall the driver only by executing the first command:
<pre><code class="lang-">.\nefconc.exe --remove-device-node --hardware-id Root\VirtualDisplayDriver --class-guid "4D36E968-E325-11CE-BFC1-08002BE10318"</code></pre>
Installing the certificate
The certificate needs installation for Windows to accept the driver
- In your downloaded zip, there is a file
DriverCertificate.cer and install-cert.bat
Open a cmd prompt as admin and run install-cert.bat
Verify the certificate installed properly. *

\* If the certificate didn't install properly, then the driver won't install. If driver installation fails, this is most likely the reason why; and you should check that the certificate is actually installed. Try manually running the commands in the
install-cert.bat file (below) in an admin cmd prompt to make sure the certificate is installed correctly (for both root and TrustedPublisher stores). The commands will tell you if they successfully added it or not.
<pre><code class="lang-">certutil -addstore -f root "DriverCertificate.cer"
certutil -addstore -f TrustedPublisher "DriverCertificate.cer"</code></pre>
You can also search for Manage Computer Certificates, look in Trusted Publishers and Trusted Root Certification, you will see the certificate named DriverCertficate.
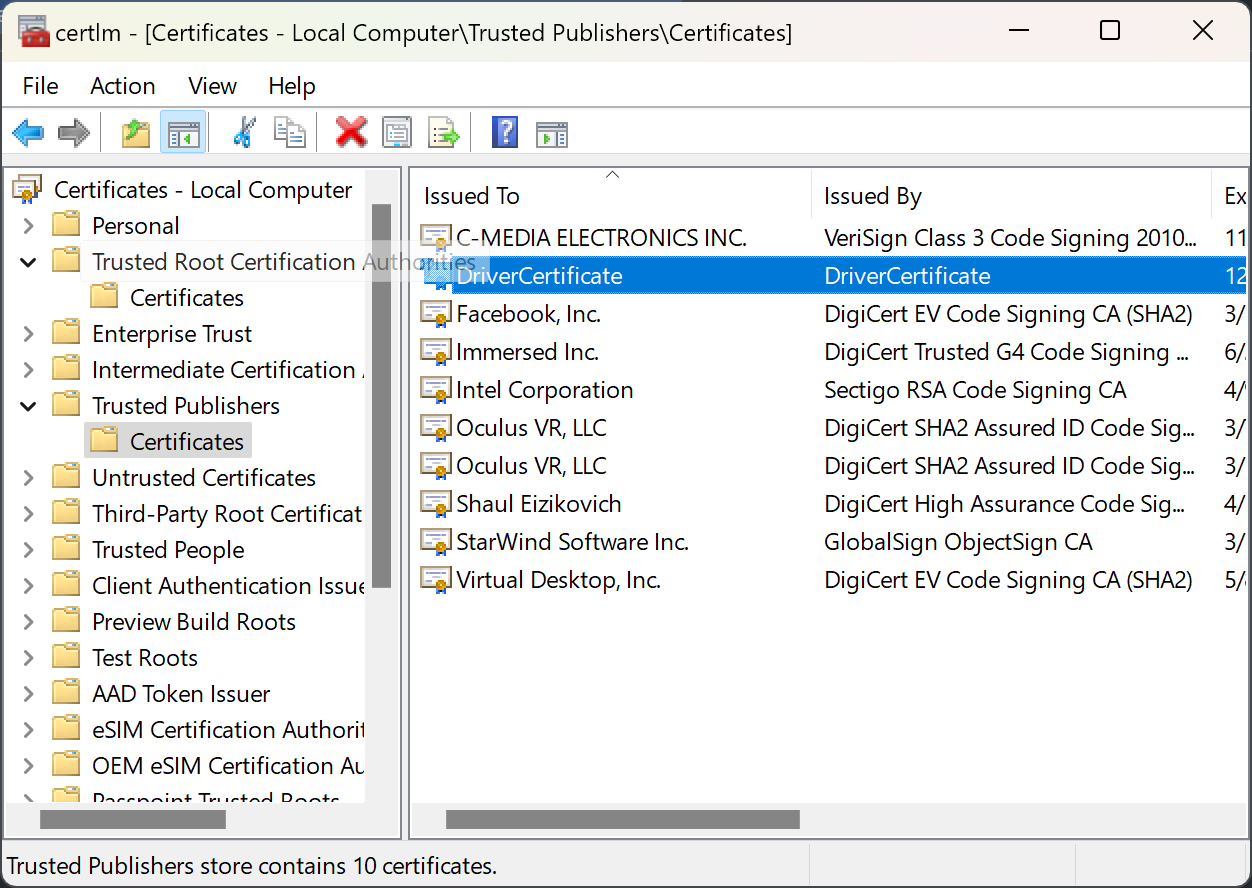
You can manually import it by right clicking on the menu entry ->
All Tasks -> Import, and following the instructions in the import wizard
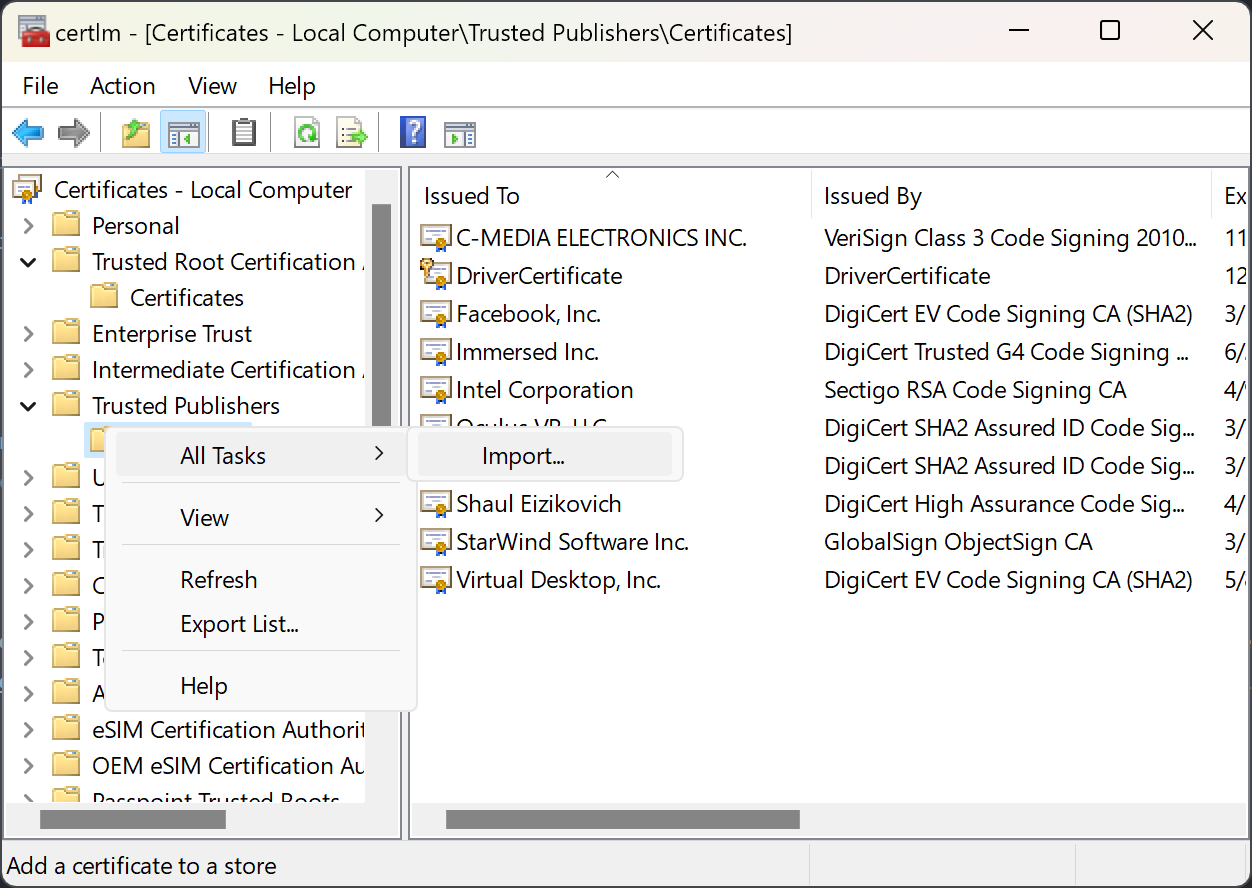
Why is it so difficult? The reason I didn't add auto certificate installation is because I believe certificates are a personal thing, and should not be added automatically without the users knowledge.
Updating
- Download the new release
- Install the msi package
Using the app
Please see the wiki for instructions on using the app.
How to build
- Download and install Visual Studio (use the 2022 edition)
- Select and install the Desktop development with C++ workload as well as Windows SDK
- Install the WDK
- Install
cargo-make if you don't have it
Install cargo-target-dir
Make sure you generate your own windows code signing cert and install it according to "Installing the certificate" section.
You can build it with
cargo make build (debug) or cargo make -p prod build (release), and check the target/output directory for all the files
To build the installer, do a
cargo make build-installer (dev) or cargo make -p prod build-installer (release). In order to build the installer, you need wix toolset installed and on Path
... Or, fork my project and build it with github actions. You will require 2 repository secrets:
PRIVATE_KEY - a windows code signing pfx certificate encoded in base64 (use certutil -encode) PRIVATEKEYPASSWORD - self explanatory Debugging or Reporting Crashes
If you want to debug a problem or need to report a crash, follow the below instructions:
All messages from the driver are logged in the Windows Event Viewer.
- Open the Event Viewer
- Go to
Windows Logs -> Application You will see logs for the driver under the source name VirtualDisplayDriver If you want to make them easier to see - right click on
Custom Views - click Create Custom View... - select By source - find and select VirtualDisplayDriver in the list, then press Ok - type in VirtualDisplayDriver for the name, and press Ok - You should now see any log messages under the
Custom Views section for VirtualDisplayDriver If you're using a driver compiled in debug mode, you can see panic messages and other information in a live logger: download DebugViewPP, run it, click on Log->Capture Global Win32 (note, this requires DebugViewPP be run with admin permissions). As long as the program is open and capturing, the messages will appear live as they are logged. This is a bit easier to use than the event log when you are trying to debug something.
Contributions
All contributions are welcome!
For first time contributors, please read our contributing guide.
Forking or using in other projects
You are welcome to use this project in your own projects.
If you do so, please contribute back to the main project with your code changes, and even by sponsoring. Every little bit helps us make an even better project. We appreciate it, thank you!
Where to talk or get help
If you have any questions, need support, need to collaborate on development, or any other use-case, you may join our discord server (see related #virtual-display-driver` channels). This is the quickest and easiest way to communicate.
You may also post in the project discussion section. Though note that using the discord channel will get your messages seen and responded to quicker.


