
🌳 WALD Stack Demo 🏎️

WALD: The Modern & Sustainable Analytics Stack
The name WALD-stack stems from the four technologies it is composed of, i.e. a cloud-computing Warehouse like [Snowflake] or [Google BigQuery], the open-source data integration engine [Airbyte], the open-source full-stack BI platform [Lightdash], and the open-source data transformation tool [DBT].
This demonstration projects showcases the WALD-stack in a minimal example. It makes use of the [Kaggle Formula 1 World Championship dataset] and the data warehouse [Snowflake]. To allow the definition of [Python]-based models within [dbt Core] also Snowflake's [Snowpark]-feature is enabled. For analytics and BI we use the graphical BI-tool [Lightdash], which is a suitable addition from the dbt-ecosystem.
The WALD-stack is sustainable since it consists mainly of open-source technologies, however all technologies are also offered as managed cloud services. The data warehouse itself, i.e. [Snowflake] or [Google BigQuery], is the only non-open-source technology in the WALD-stack. In case of Snowflake, only the clients, eg. [snowflake-connector-python] and [snowflake-snowpark-python], are available as open-source software.
To manage the Python environment and dependencies in this demonstration, we make use of [Mambaforge], which is a faster and open-source alternative to [Anaconda].
🎬 Check out the [slides] of the [PyConDE / PyData talk about the WALD Stack].
Getting started
- Setting up the data Warehouse [Snowflake], i.e.:
https://<account_identifier>.snowflakecomputing.com,
3. [log into Snowflake's Snowsight UI] using your account-identifier,
4. check if [Snowflake's TPC-H sample database] SNOWFLAKESAMPLEDATA is available under Data » Databases
or create it under Data » Private Sharing » SAMPLEDATA and name it SNOWFLAKESAMPLE_DATA.5. create a new database named
MY_DB with owner ACCOUNTADMIN by clicking Data » Databases » + Database (upper right corner)
and entering MY_DB in the emerging New Database form,
6. [activate Snowpark and third-party packages] by clicking on your login name followed by Switch Role » ORGADMIN.
Only if ORGADMIN doesn't show in the drop-down menu, go to Worksheets » + Worksheet and execute:
use role accountadmin;
grant role orgadmin to user YOUR_USERNAME;
ORGADMIN to the list. Now click Admin » Billing » Terms & Billing, and click Enable next to Anaconda Python packages. The Anaconda Packages (Preview Feature) dialog opens, and you need to agree to the terms by clicking Acknowledge & Continue. 7. choose a warehouse (which is a compute-cluster in Snowflake-speak) by clicking on Worksheets and selecting Tutorial 1: Sample queries on TPC-H data. Now click on the role button showing ACCOUNTADMIN · No Warehouse on the upper right and select the warehouse COMPUTE_WH or create a new one. Note the name of the warehouse for the dbt setup later, 8. execute all statements from the tutorial worksheet to see if everything was set up correctly.
- Setting up [DBT] and [Snowpark] locally, i.e.:
git clone https://github.com/FlorianWilhelm/wald-stack-demo.git,
2. change into the repository with cd wald-stack-demo,
3. make sure you have [Mambaforge] installed,
4. set up the mamba/conda environment wald-stack with:
mamba env create -f environment.ymlmamba activate wald-stack,
6. create a directory ~/.dbt/ and a file profiles.yml in it, with content:
default:
        outputs:
          dev:
            account: your_account-identifier
            database: MY_DB
            password: your_password
            role: accountadmin
            schema: WALDSTACKDEMO
            threads: 1
            type: snowflake
            user: your_username
            warehouse: COMPUTE_WH
target: devaccount, password as well as user accordingly. Note that account is the Snowflake Account identifier,
e.g. DWABNEV.LRB61572, but the . replaced by -, e.g. DWABNEV-LRB61572.
Also check that the value of warehouse corresponds to the one you have in Snowflake,
7. test that your connection works by running dbt debug in the directory of this repo. You should see "All checks passed!"-message.
- Setting up [Airbyte] locally, i.e.:
git clone https://github.com/airbytehq/airbyte.git
      cd airbyte
docker compose upairbyte and password password,
4. enter some e-mail address and click continue. The main dashboard should show up.
- Set up [Lightdash] locally, i.e.:
cd .. # to leave "wald-stack-demo" if necessary
      git clone https://github.com/lightdash/lightdash
      cd lightdash
./scripts/install.sh # and choose "Custom install", enter the path to your dbt project from abovelightdash CLI command following the [how-to-install-the-lightdash-cli] docs.
5. authenticate the CLI and connect the wald_stack dbt project by running lightdash login http://localhost:8080.
Note
If you use [Colima] as a Docker alternative, the installation script will fail, caused by the function supposed to start Docker Desktop. A simple fix is to comment out the line calling the start_docker function (line 417). Be sure that your Docker daemon is already running.
Additionally IPv6 is not properly implemented, which results in not being able to authenticate lightdash CLI usinglocalhostas host. Uselightdash login http://127.0.0.1:8080instead to force IPv4.
Note
If you have improvements for this example, please consider contributing back by creating a pull request. To have it
all nice and tidy, please make sure to install & setup [pre-commit], i.e.pip install pre-commitandpre-commit install,
so that all your commits conform automatically to the style guides used in this project.
Demonstration of the WALD-stack
To demonstrate the power of the WALD stack we will:
- ingest a Formula 1 dataset into [Snowflake] using Snowflake's internal capabilities,
- use [Airbyte] to exemplify how external data sources, in our case a csv file with weather information, can be ingested into Snowflake,
- use [dbt] to transform the raw data using SQL and Python leveraging [Snowpark] for data analysis as well as train & predict the position in a race using some simple [Scikit-Learn] model,
- use [Lightdash] to visualise the results and demonstrate its ad-hoc analysis capabilities.
Ingesting the Formula 1 Dataset
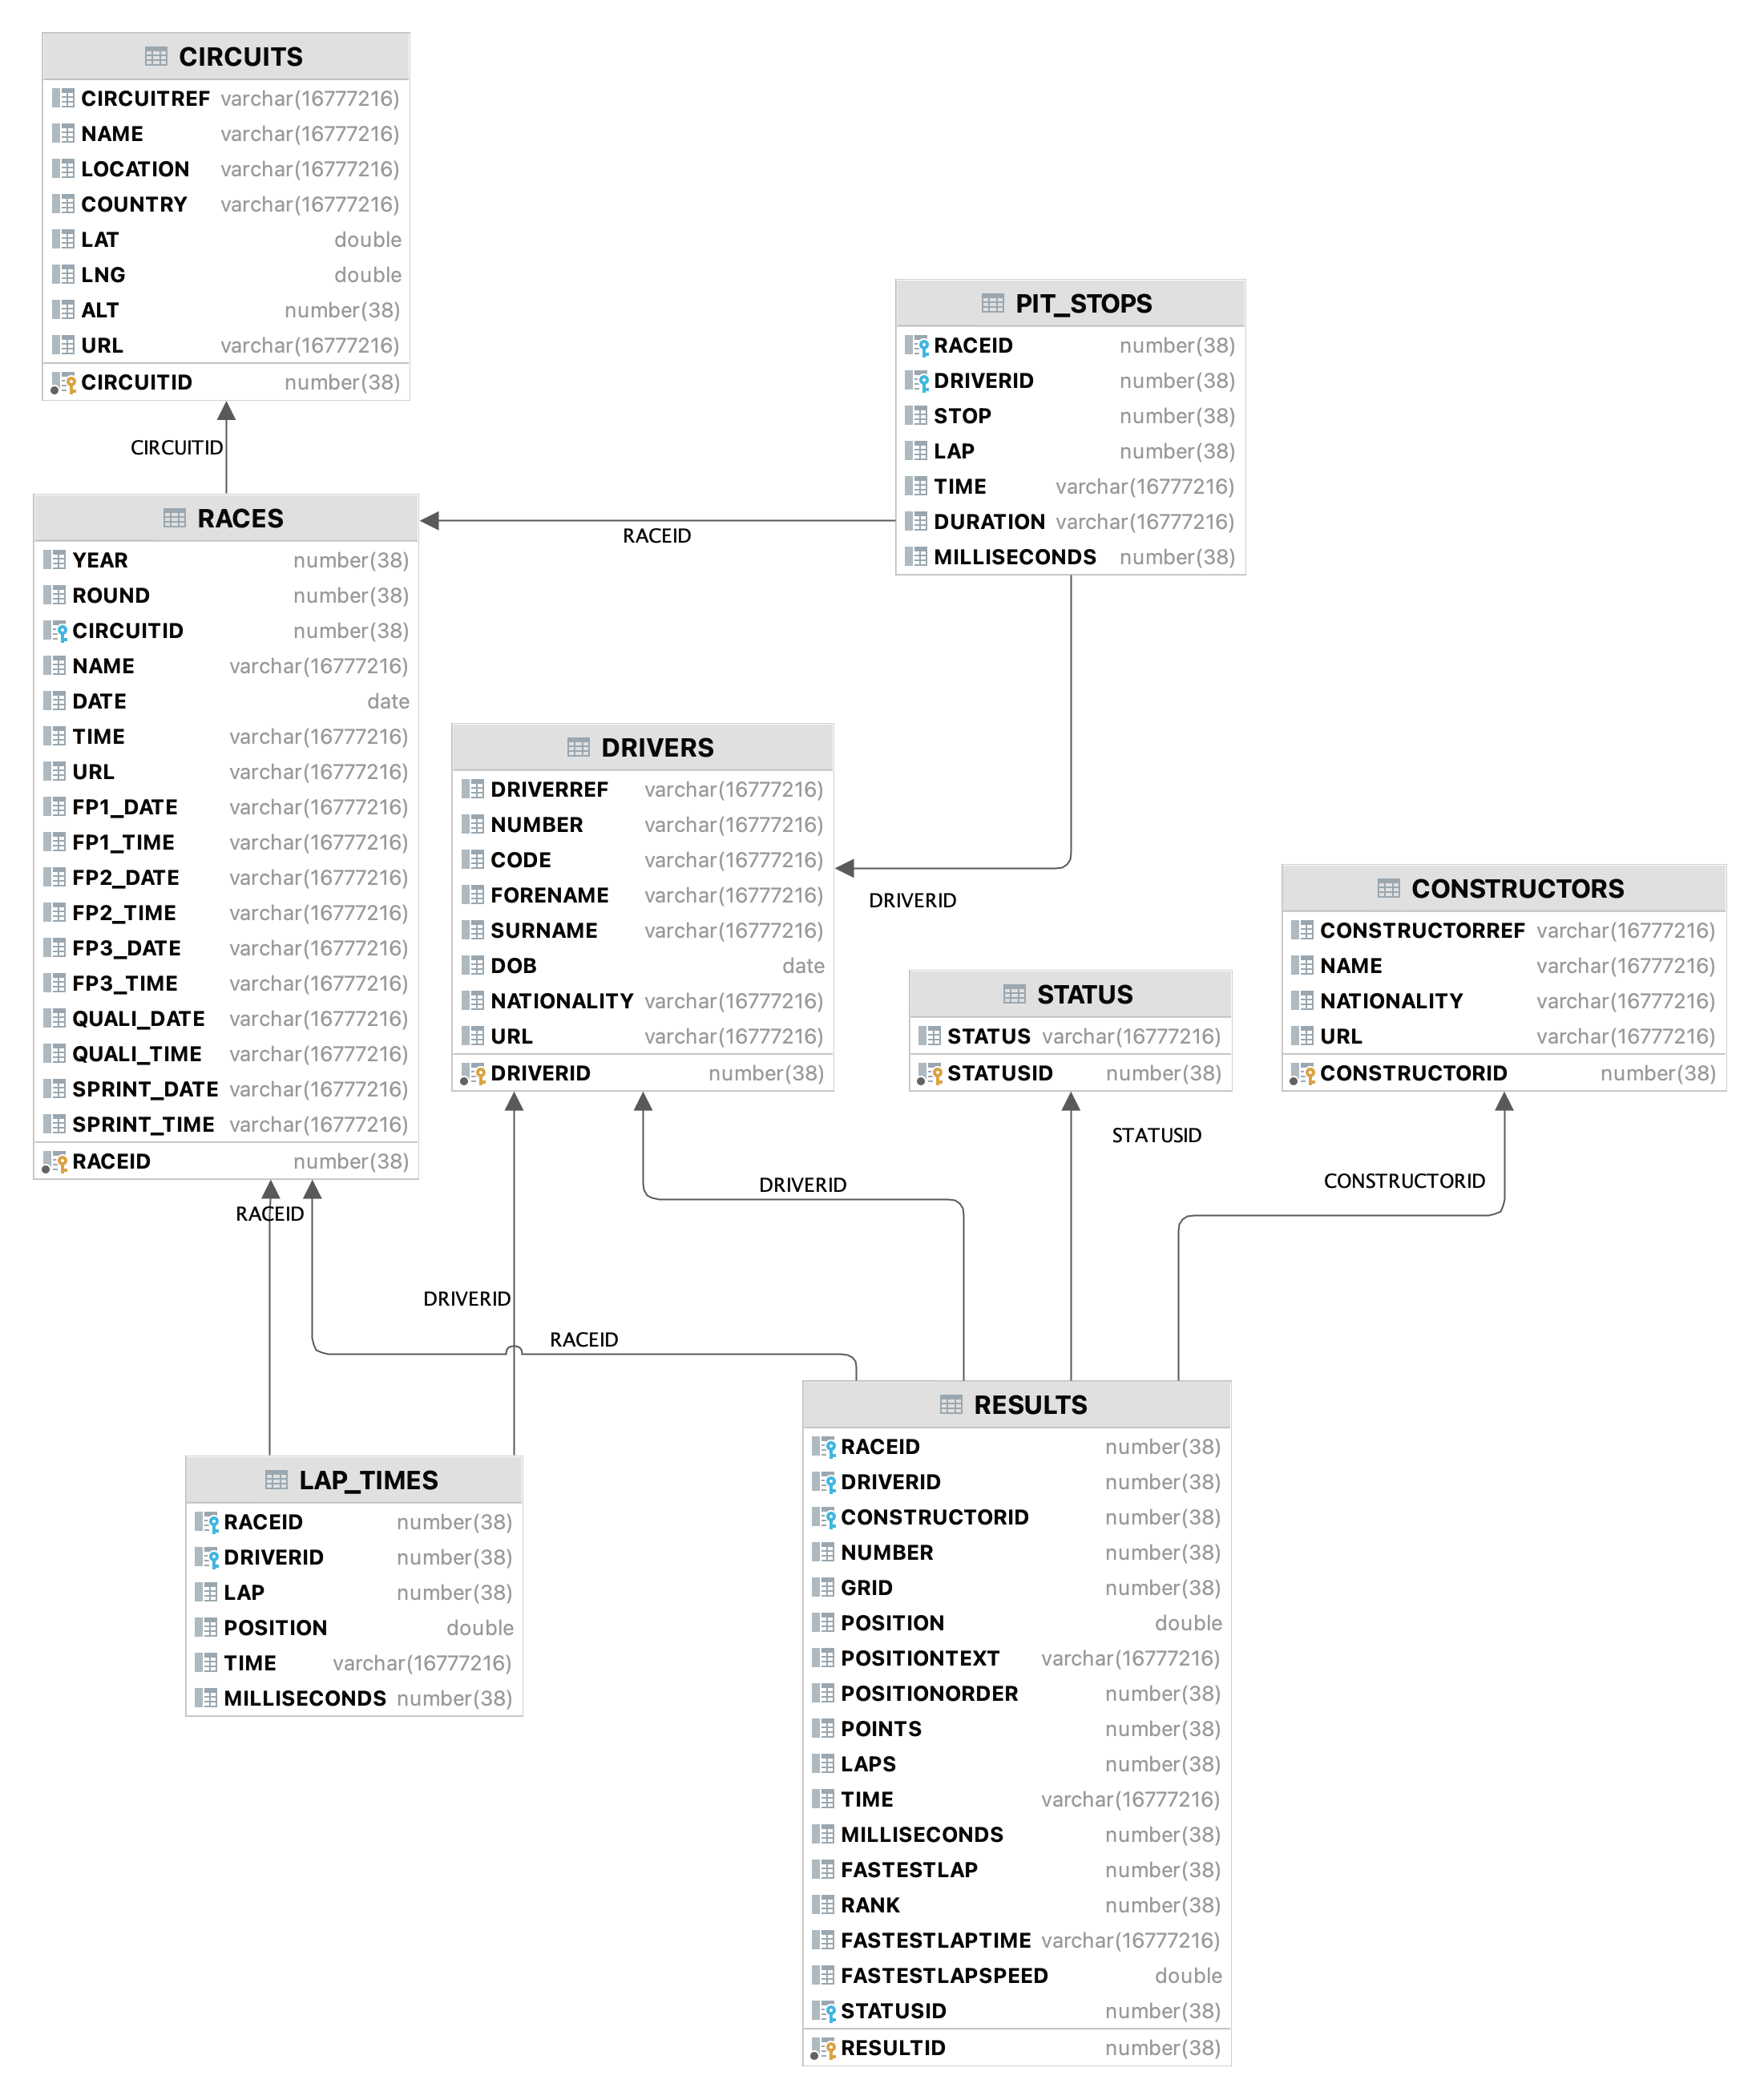
To have same data to play around we are going to use the [Kaggle Formula 1 World Championship dataset], which is luckily available on some S3 bucket. To ingest the data into Snowflake, just execute the script [ingestformula1froms3to_snowflake.sql] within a notebook of the Snowsight UI. Just select all rows and hit the run button.
The following figure shows database entities, relationships, and characteristics of the data:
Ingesting the weather data with Airbyte
To get our hands on some data we can ingest into our warehouse, let's take some [weather data from opendatasoft], which is located in the seeds folder. For Airbyte to find it, we need to copy it into the running Airbyte [docker] container with:
docker cp seeds/cameriweather.csv airbyte-server:/tmp/workspace/cameriweather.csvBefore we start using Airbyte, let's first set up a new database and schema for the data we are about to ingest. Open a notebook in Snowsight and execute:
CREATE DATABASE WEATHER; USE DATABASE WEATHER; CREATE SCHEMA RAW;Let's fire up the Airbyte web UI under http://localhost:8000 where you should see this after having logged in:
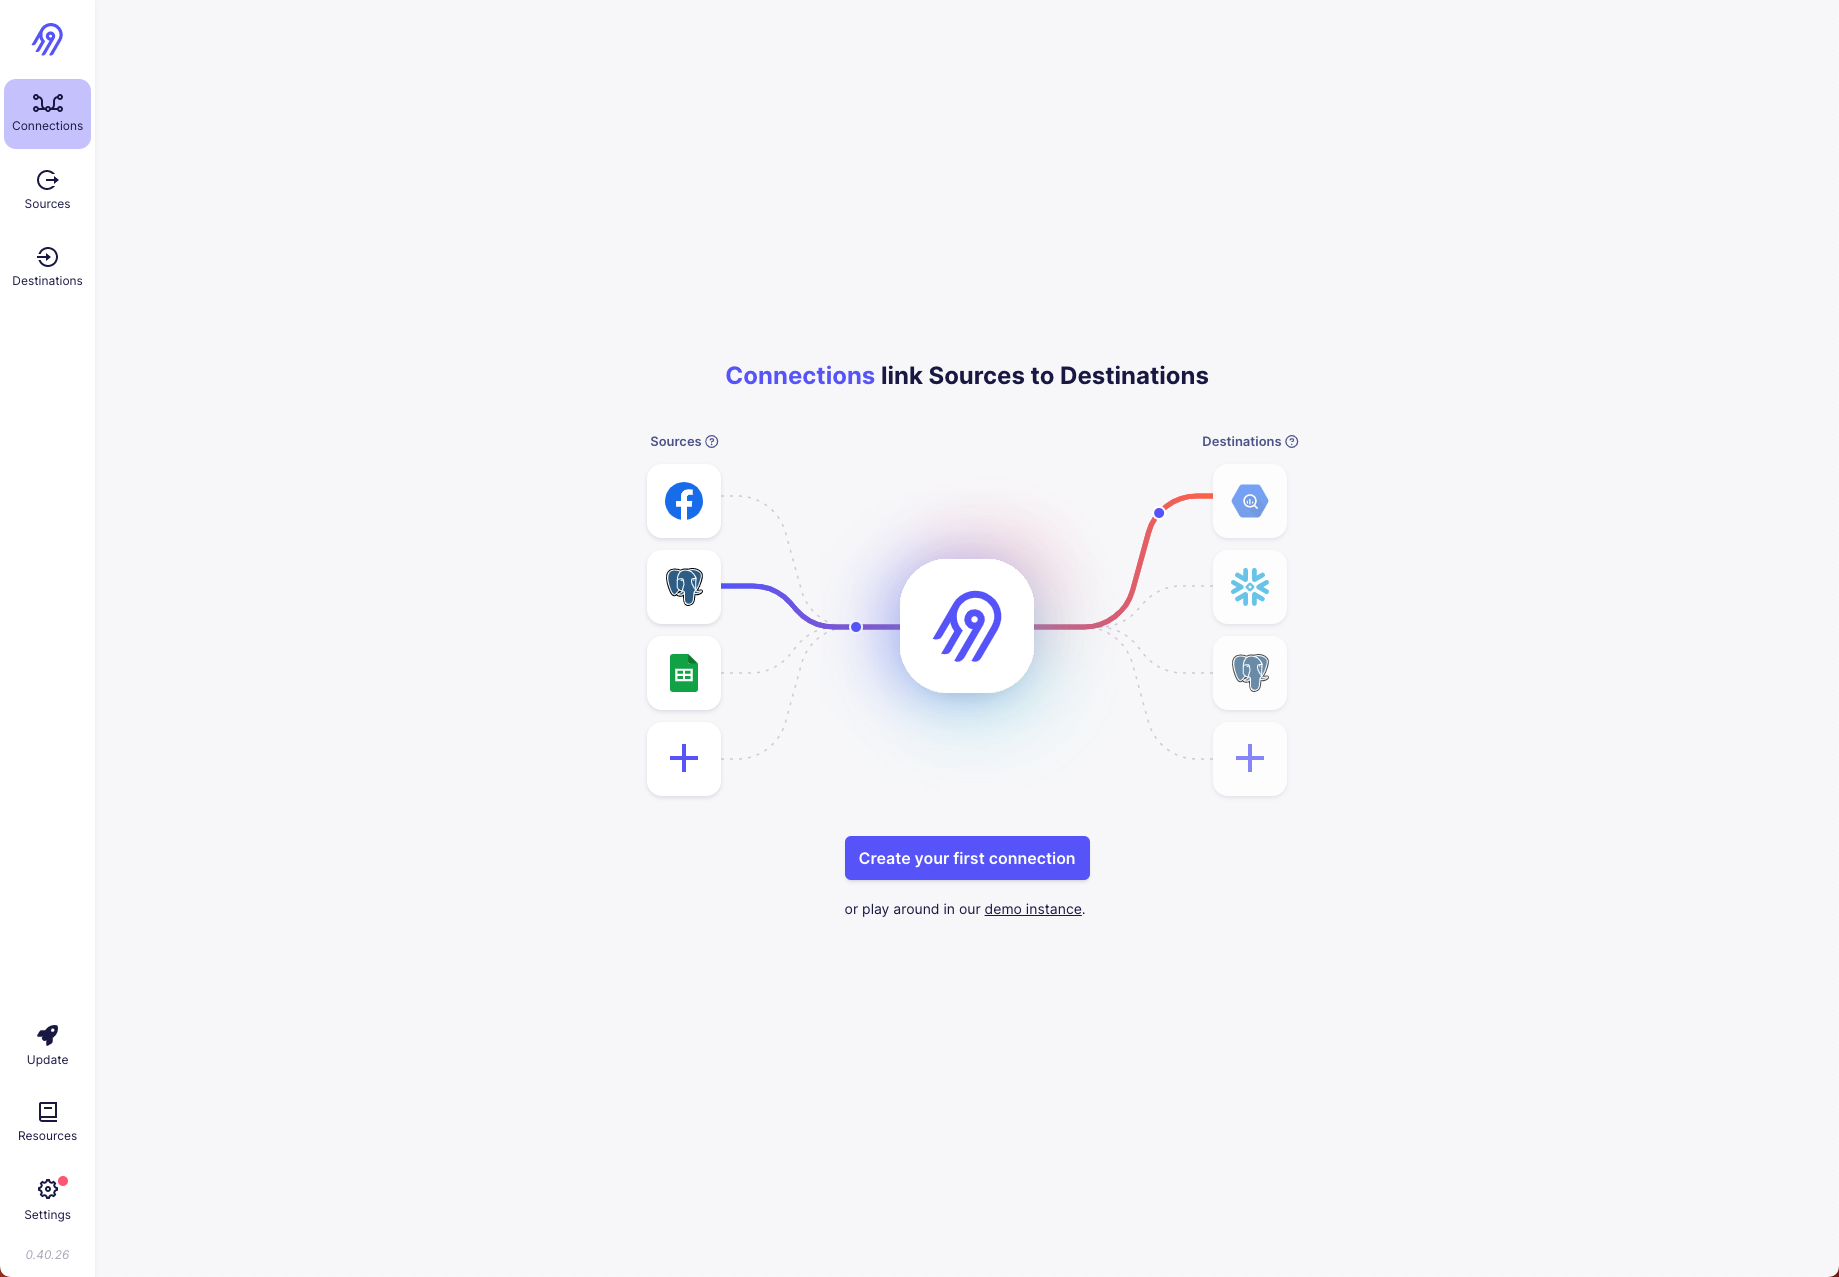
Now click on Create your first connection and select File as source type and fill out the form like this:
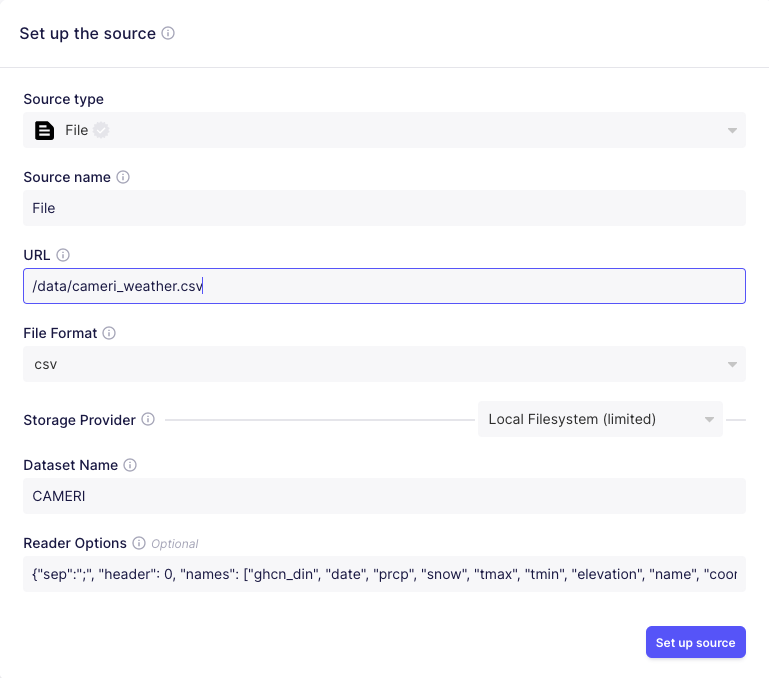
For the Reader Options, just copy & paste the following string:
{"sep":";", "header": 0, "names": ["ghcndin", "date", "prcp", "snow", "tmax", "tmin", "elevation", "name", "coord", "countrycode"]}Hit Set up Source and select Snowflake in the next form as destination type. No you should see a detailed form to set up the Snowflake destination. Enter the values like this with the corresponding settings from the Snowflake setup from above. Remember that the host url follows the schema <account_identifier>.snowflakecomputing.com.
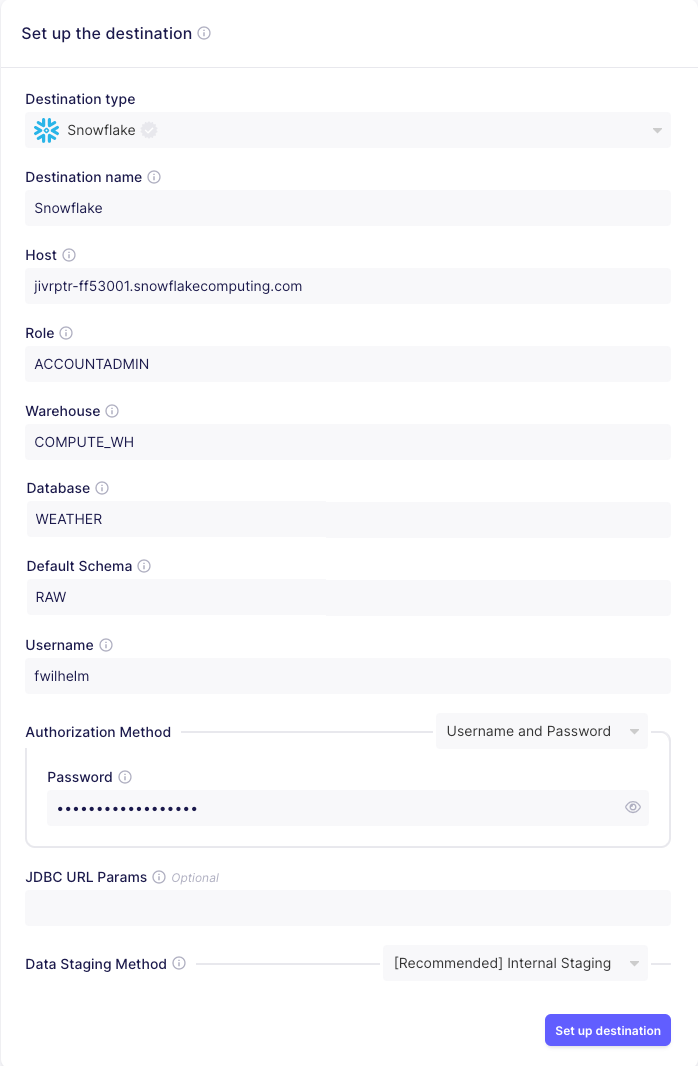
Then hit Set up destination and see a new form popping up. We just stick with the sane defaults provided to us.
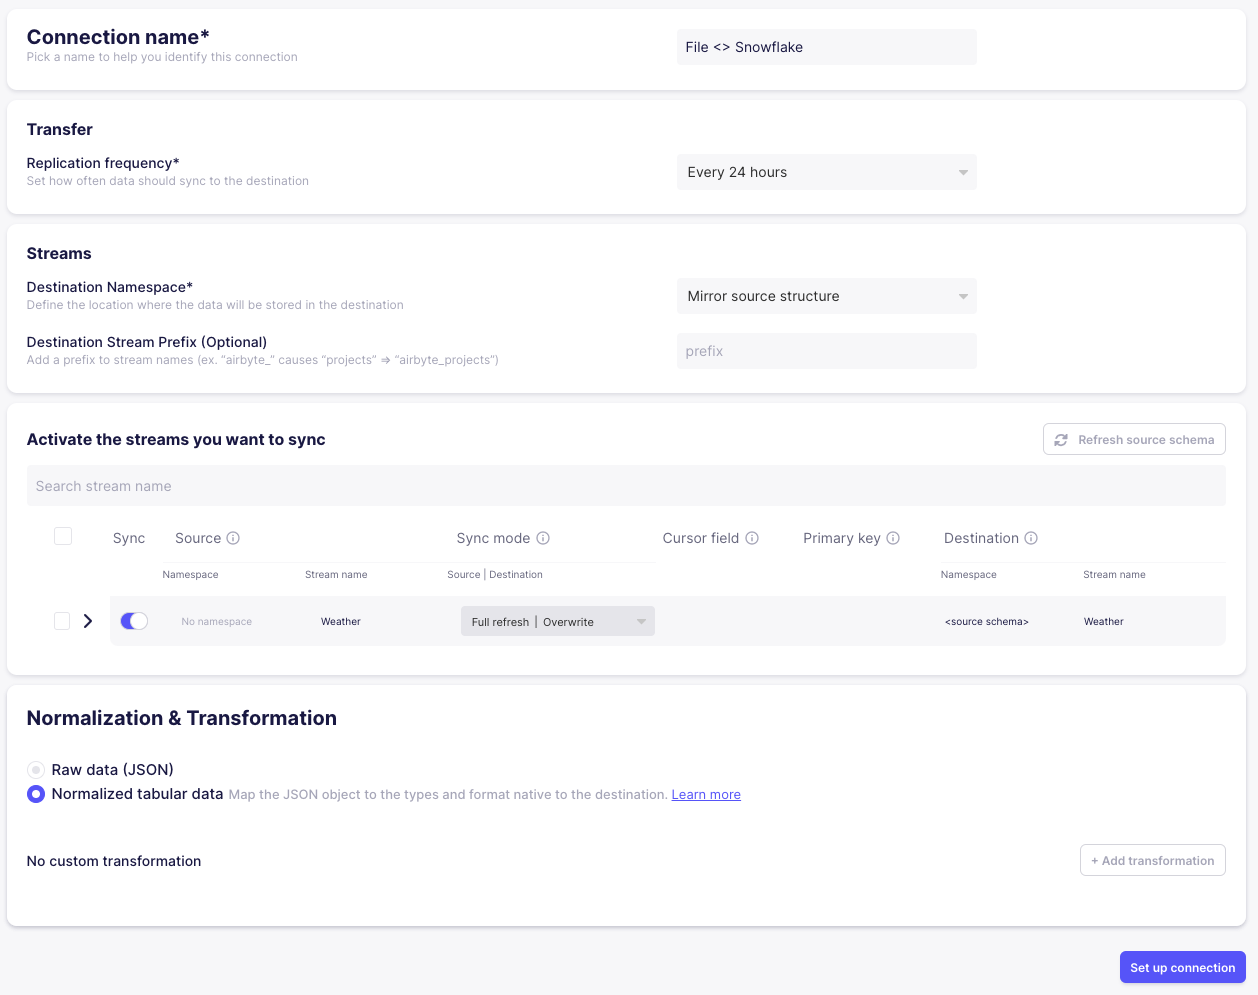
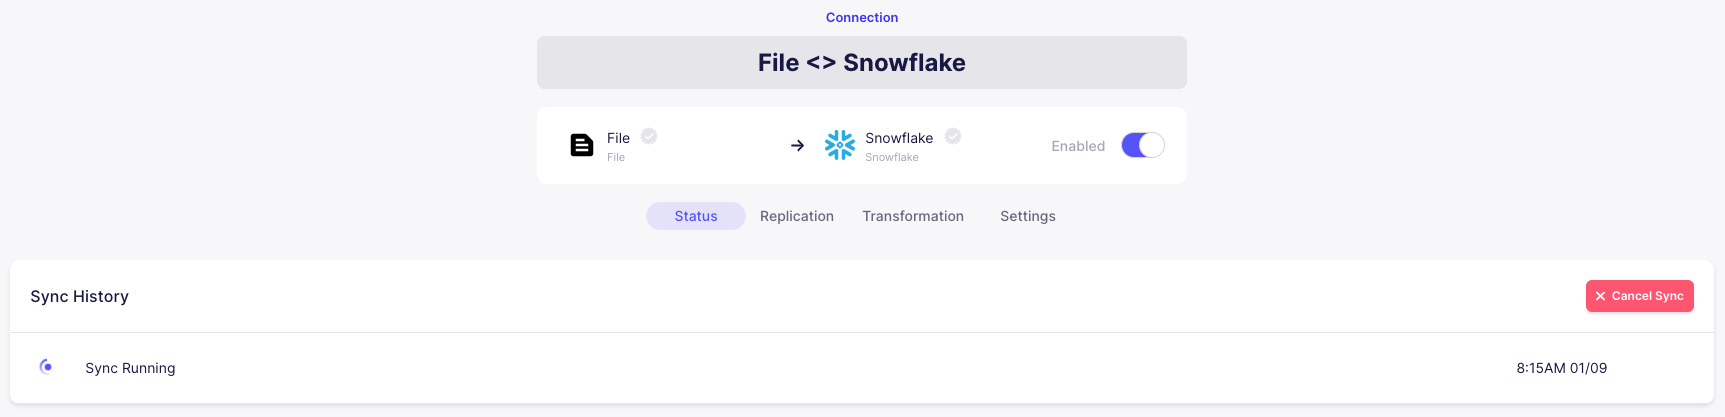
After hitting Set up connection, you should see that Airbyte starts syncing our weather data to Snowflake.
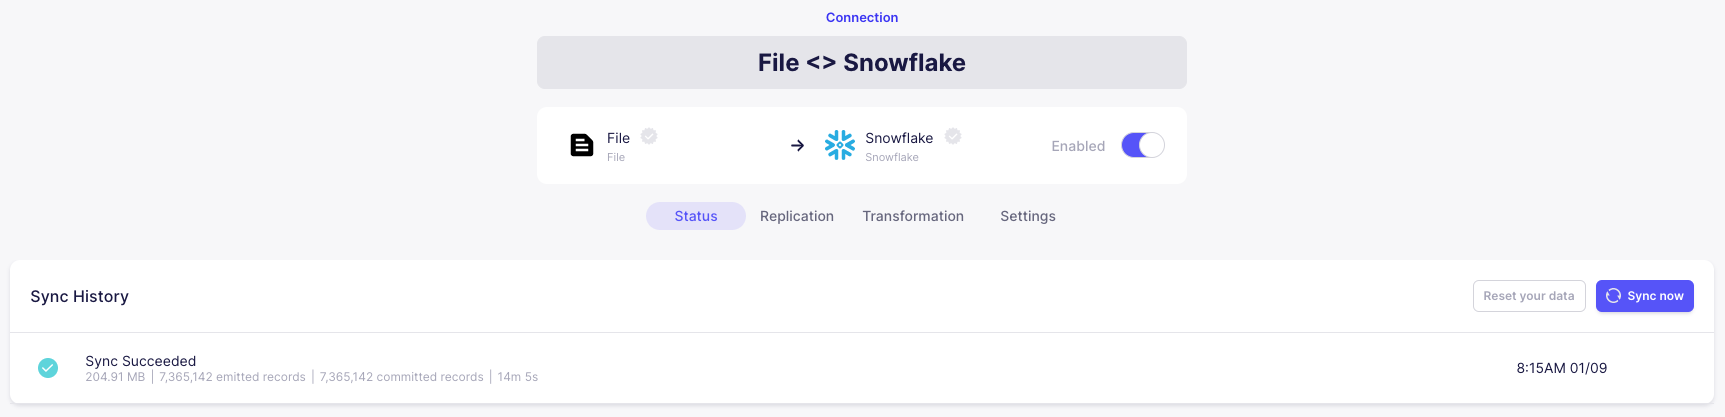
After roughly a minute, the sync should be successfully completed.
Airbyte has a lot more to offer since it has hundreds of sources and destinations for syncing. For our demonstration, however, that is all we need. Note that Airbyte integrates nicely with [dbt] and you can even specify your dbt transformations in Airbyte directly. There is much more to discover here :-) It should also be noted that uploading a simple csv file into Snowflake could also have been done using [dbt's seed] command.
DBT
Since everything is already set up for you in this repository, just don't forget to activate the mamba environment with mamba activate wald-stack before you run dbt with dbt run in the directory of this repo. You should see an output like this:
16:30:55 Running with dbt=1.3.1 16:30:55 Found 22 models, 17 tests, 0 snapshots, 0 analyses, 501 macros, 0 operations, 3 seed files, 9 sources, 0 exposures, 0 metrics 16:30:55 16:30:57 Concurrency: 1 threads (target='dev') 16:30:57 16:30:57 1 of 22 START sql view model WALDSTACKDEMO.stgf1circuits ................... [RUN] 16:30:58 1 of 22 OK created sql view model WALDSTACKDEMO.stgf1circuits .............. [SUCCESS 1 in 0.75s] 16:30:58 2 of 22 START sql view model WALDSTACKDEMO.stgf1constructors ............... [RUN] 16:30:59 2 of 22 OK created sql view model WALDSTACKDEMO.stgf1constructors .......... [SUCCESS 1 in 1.06s] 16:30:59 3 of 22 START sql view model WALDSTACKDEMO.stgf1drivers .................... [RUN] 16:31:00 3 of 22 OK created sql view model WALDSTACKDEMO.stgf1drivers ............... [SUCCESS 1 in 0.75s] 16:31:00 4 of 22 START sql view model WALDSTACKDEMO.stgf1lap_times .................. [RUN] 16:31:00 4 of 22 OK created sql view model WALDSTACKDEMO.stgf1lap_times ............. [SUCCESS 1 in 0.73s] 16:31:00 5 of 22 START sql view model WALDSTACKDEMO.stgf1pit_stops .................. [RUN] 16:31:01 5 of 22 OK created sql view model WALDSTACKDEMO.stgf1pit_stops ............. [SUCCESS 1 in 0.72s] 16:31:01 6 of 22 START sql view model WALDSTACKDEMO.stgf1races ...................... [RUN] 16:31:02 6 of 22 OK created sql view model WALDSTACKDEMO.stgf1races ................. [SUCCESS 1 in 0.77s] 16:31:02 7 of 22 START sql view model WALDSTACKDEMO.stgf1results .................... [RUN] 16:31:03 7 of 22 OK created sql view model WALDSTACKDEMO.stgf1results ............... [SUCCESS 1 in 0.70s] 16:31:03 8 of 22 START sql view model WALDSTACKDEMO.stgf1status ..................... [RUN] 16:31:03 8 of 22 OK created sql view model WALDSTACKDEMO.stgf1status ................ [SUCCESS 1 in 0.67s] ...MY_DB. From an analyst's perspective, the tables created from [models/marts/aggregates] are interesting as here Python is used to retrieve summary statistics about pit stops by constructor in table FASTESTPITSTOPSBYCONSTRUCTOR and the 5-year rolling average of pit stop times alongside the average for each year is shown in table LAPTIMESMOVING_AVG.
From a data scientist's perspective, it's really nice to see how easy it is to use [Scikit-Learn] to train an ML-model, store it away using a Snowflake stage and loading it again for prediction. Check out the files under [models/marts/ml] to see how easy that is with [Snowpark] and also take a look at the resulting tables TRAINTESTPOSITION and PREDICT_POSITION.
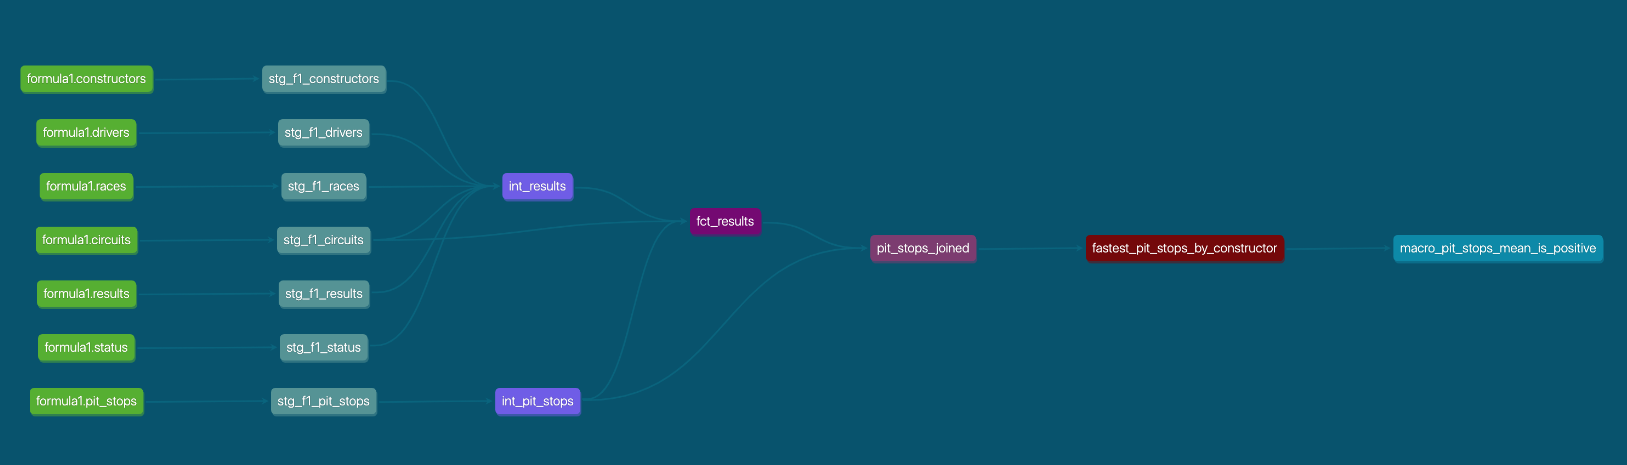
Besides transformations, [dbt] has much more to offer like unit tests. Run some predefined unit test examples with dbt test. Another outstanding feature of dbt is how easy it is to create useful documentation for your users and yourself. To test it just run dbt docs generate followed by dbt docs serve --port 8081 (on the default port 8080 Lightdash is running) and open http://localhost:8081. In this web UI you can explore your tables, columns, metrics, etc. and even get a useful lineage graph of your data:
Finally, don't forget to check out the References & Resources for more information on learning dbt.
Lightdash
The Lightdash Web UI let's you do two basic things, i.e. running ad-hoc queries or construct queries with the intent to save their results as charts. Different charts can then be placed within dashboards. Charts and dashboards can be organized within spaces. Here is a basic view of Lightdash:
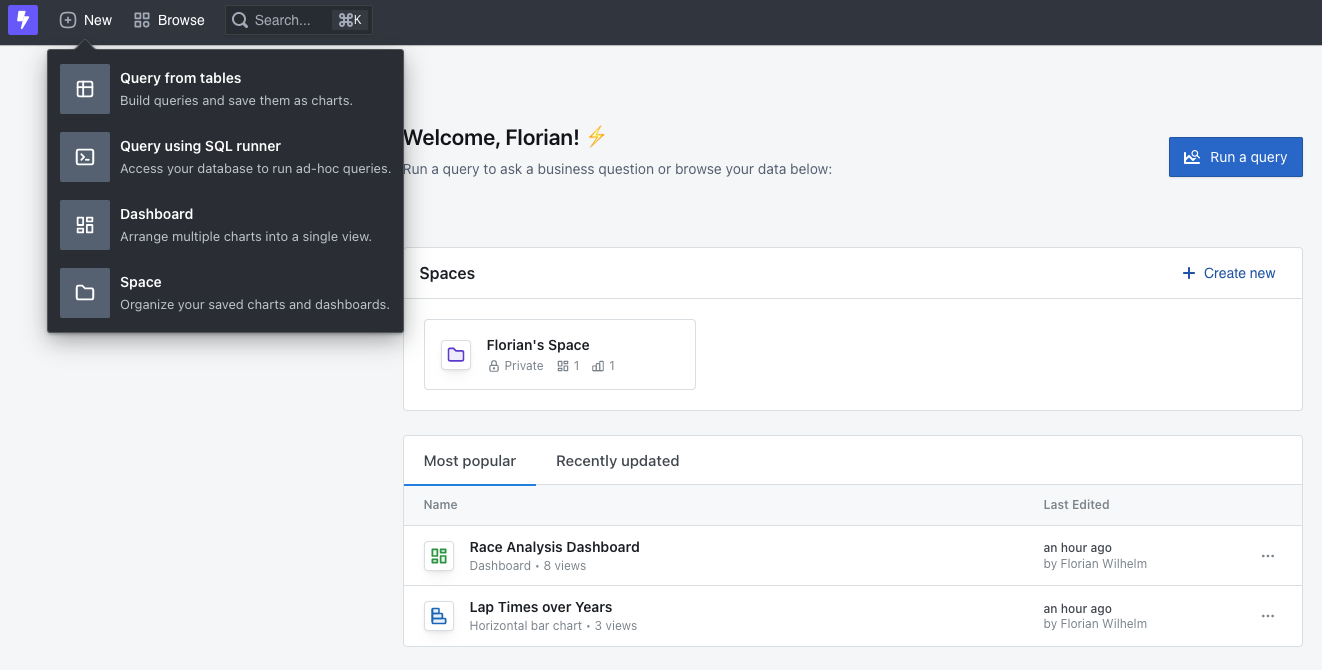
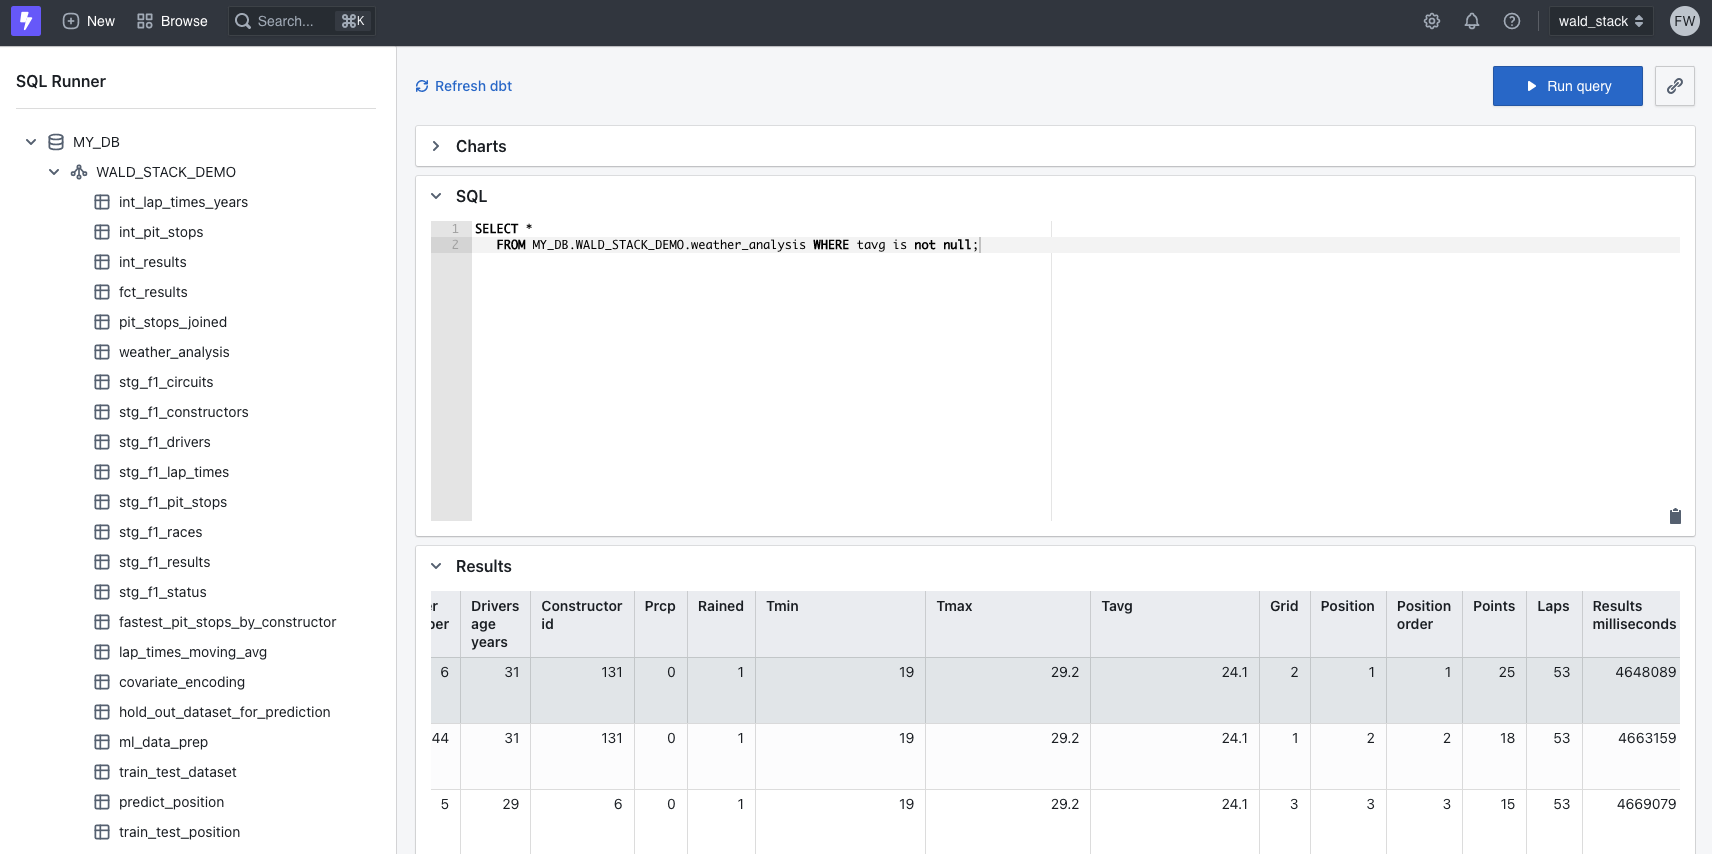
For demonstration purposes, let's run an ad-hoc query to take a look at the [weather-analsysis] table. For that, just hit + New and select Query using SQL runner. All we need to do is to select the table weather_analsysis from the left menu, adjust the query and hit the ▶ Run query button. That should look like this:
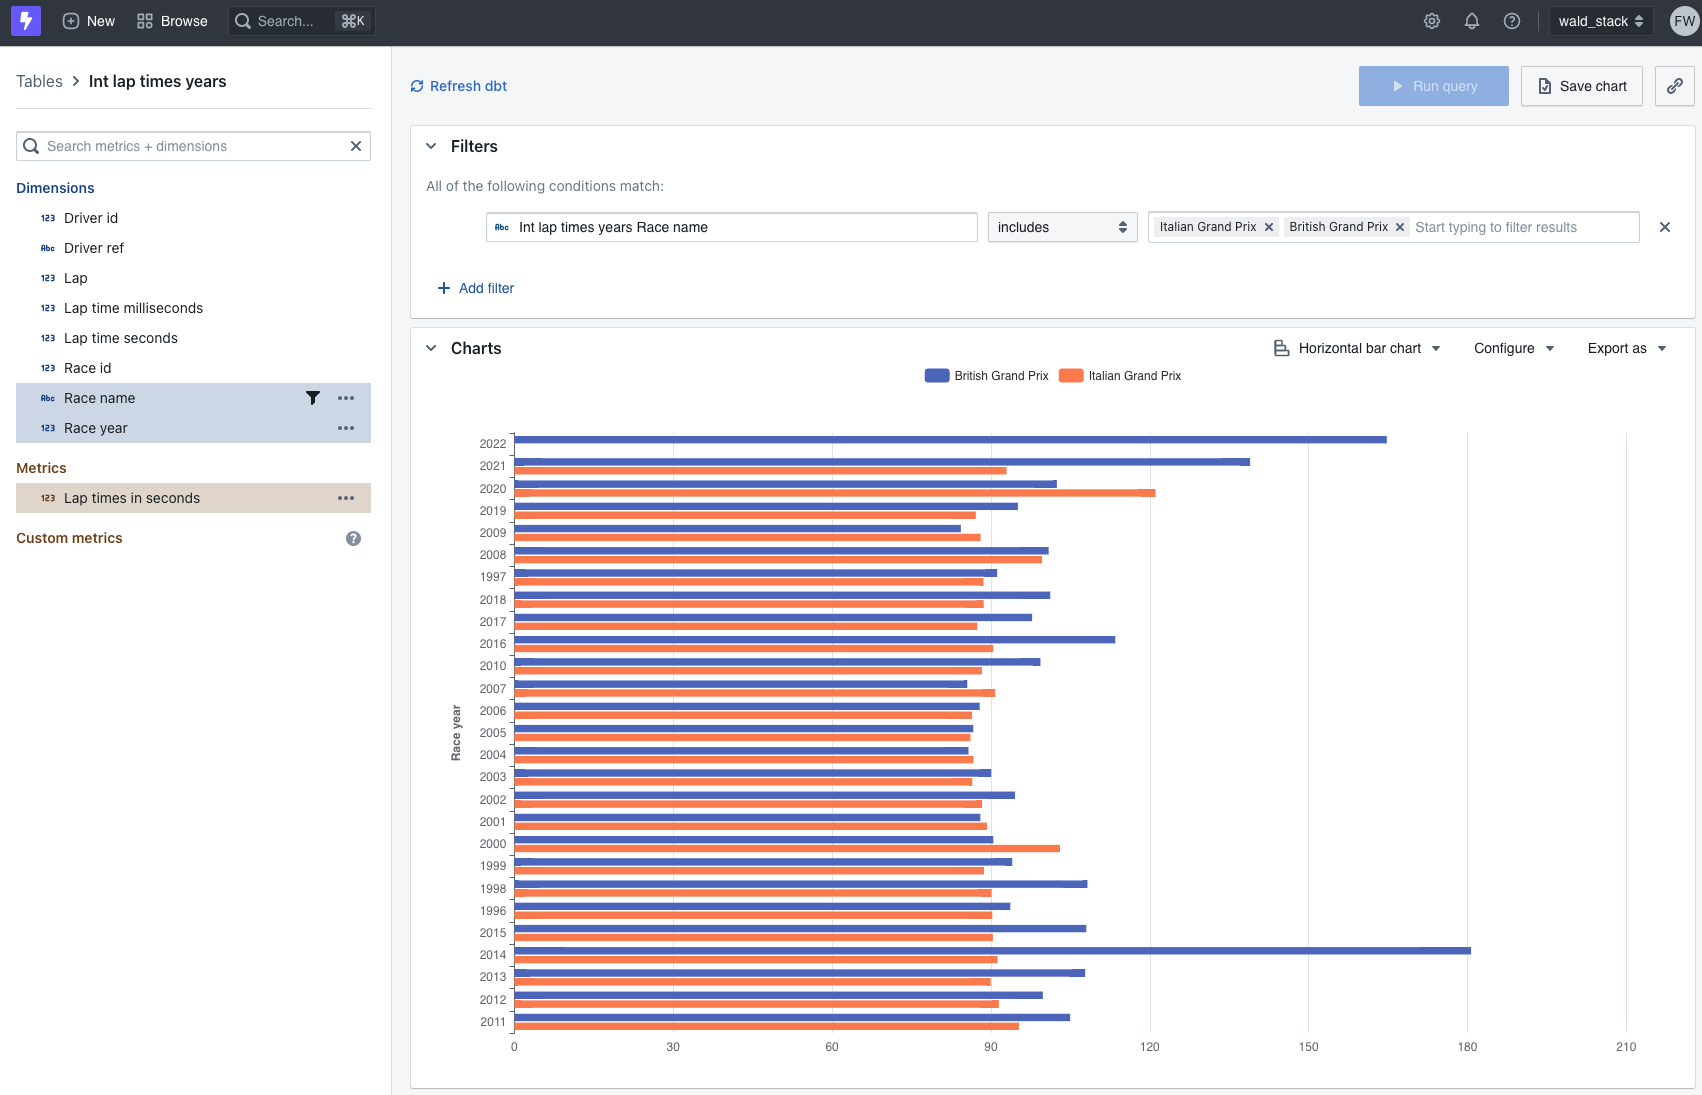
Now let's try to construct a chart by clicking on + New and select Query from tables. We select from the left menu the table Int lap times years and choose the metric Lap times in seconds followed by the dimensions Race name and Driver year and filter for the race names italian and british grand prix. We then hit Configure and group by Race name and also set a horizontal bar char. The result looks like this:
If you wonder about the concept of metrics and dimensions that dbt and lightdash are using you can find a good introduction here.
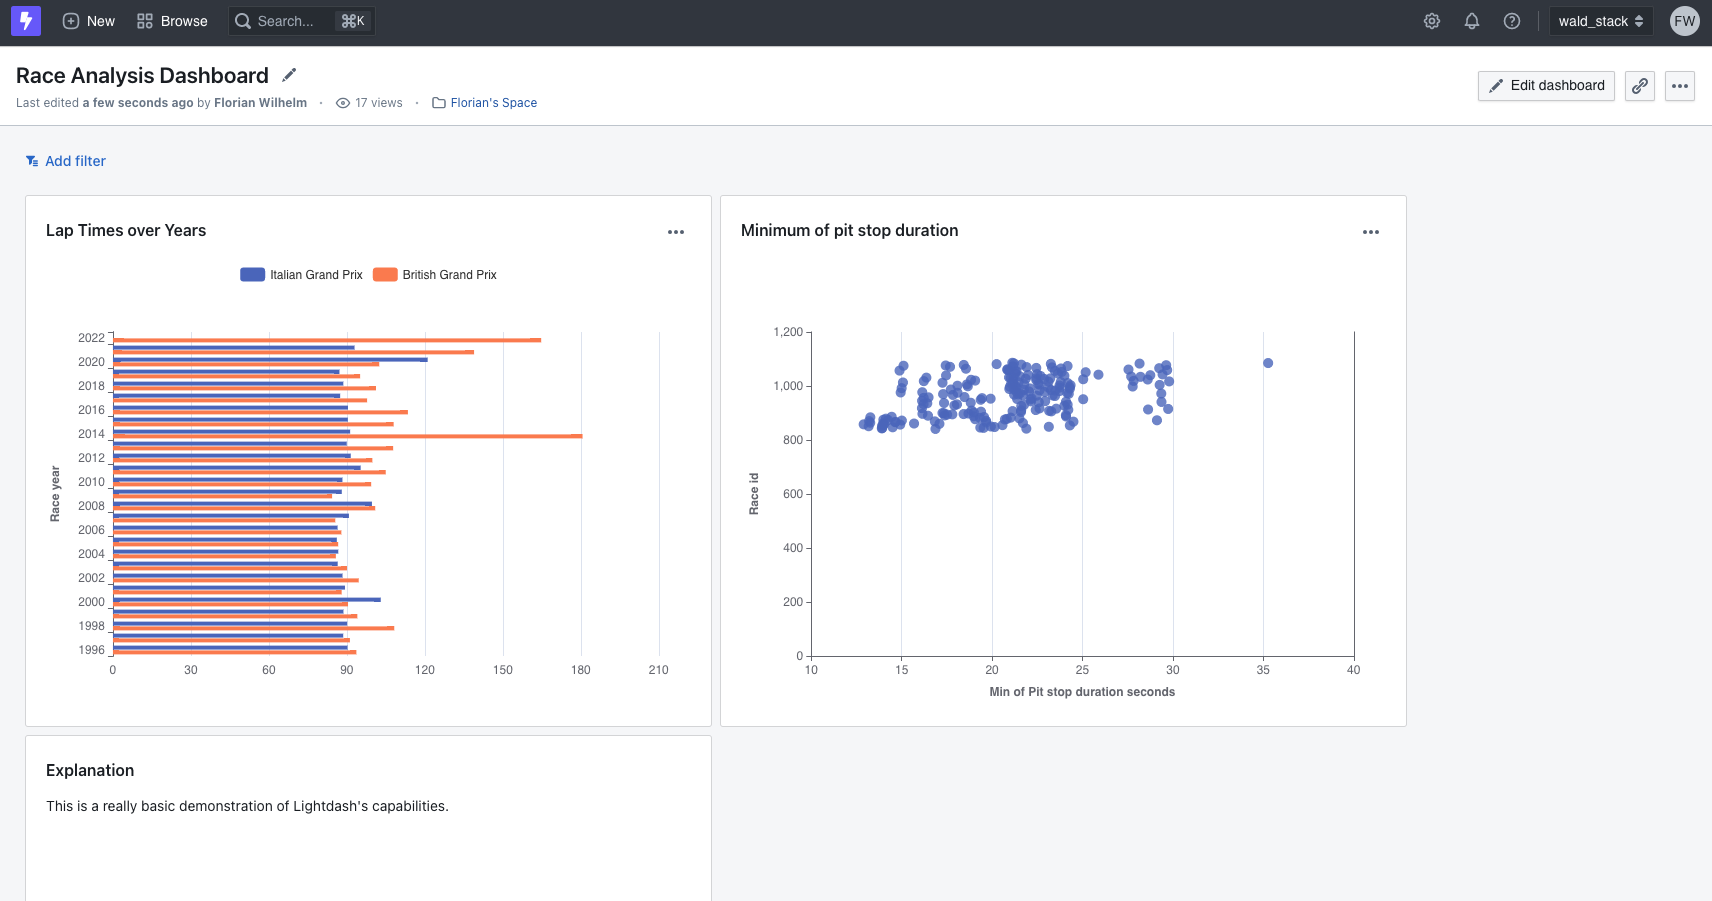
We can now hit the Save chart-button and save it into one of our spaces. If you haven't yet one, you can create one at that point. In appearing chart, view click on ... and select Add chart to dashboard. Select a dashboard or create a new one. Now use Browse » All dashboards to find your newly created dashboard. This shows a similar dashboard with two charts and a small explanation box.
The workflow with Lightdash is that you mostly work with whatever IDE you like to create tables, metrics, dimensions within your dbt project. After you are happy with your changes just prepend lightdash before your dbt commands like run, build, compile. For instance, if you altered the table [intlabtimesyears.sql], just run lightdash dbt run -s intlaptimesyears to update everything. In Lightdash you then hit ↻ Refresh dbt to load the changes.
Conclusion
We have seen the only surface of what's possible with the WALD stack using a simple example, but we did it end to end. There is much more to discover and the dbt ecosystem is growing constantly. Many established tools also start to integrate with it. For instance the data pipeline integration tool [dagster] also plays nicely with dbt as shown in the [dagster dbt integration] docs. If you need with help with your WALD-stack or have general questions don't hesitate to consult us at [inovex].
What else is to see here?
In the notebooks directory, you'll find two notebooks that demonstrate how [dbt] as well as the [snowflake-connector-python] can also be directly used to execute queries for instance for debugging. In both cases the subsystems of [dbt], and thus also the retrieval of the credentials, are used so that no credentials need to be passed.
Typical commands
dbt
- run all models:
dbt run - run all tests:
dbt test - executes snapshots:
dbt snapshot - load seed csv-files:
dbt seed - run + test + snapshot + seed in DAG order:
dbt build - download dependencies:
dbt dep - generate docs and lineage:
dbt docs
Lightdash
- restart:
docker compose -f docker-compose.yml start - stop:
docker compose -f docker-compose.yml stop -v - bring down and clean volumes:
docker compose -f docker-compose.yml down -v - lightdash CLI:
lightdash
References & Resources
Following resources were used for this demonstration project besides the ones already mentioned:
- [A Beginner’s Guide to DBT (data build tool)] by Jessica Le
- [Snowpark for Python Blog Post] by Caleb Baechtold
- [Overview Quickstart ML with Snowpark for Python] by Snowflake
- [Advanced Quickstart ML with Snowpark for Python] by Snowflake
- [Quickstart Data Engineering with Snowpark for Python and dbt] by Snowflake
- [Upgrade to the Modern Analytics Stack: Doing More with Snowpark, dbt, and Python] by Ripu Jain and Anders Swanson
- [dbt cheetsheet] by Bruno S. de Lima
Credits
The dbt, Snowpark part of this demonstration is heavily based on the [python-snowpark-formula1 repository] as well as the awesome "Advanced Analytics" online workshop by [Hope Watson] from [dbt labs] held on January 25th, 2023. Check out the similar tutorial [Generating ML-Ready Pipelines with dbt and Snowpark] by her.
ToDos
- [ ] Clean up the Python code especially in the ml part.


