
🔖 lightweight, efficient Tags input component in Vanilla JS / React / Angular / Vue

Tagify - tags input component
Transforms an input field or a textarea into a Tags component, in an easy, customizable way, with great performance and small code footprint, exploded with features.
Vanilla ⚡ React ⚡ Vue ⚡ Angular
👉 See Many Examples 👈




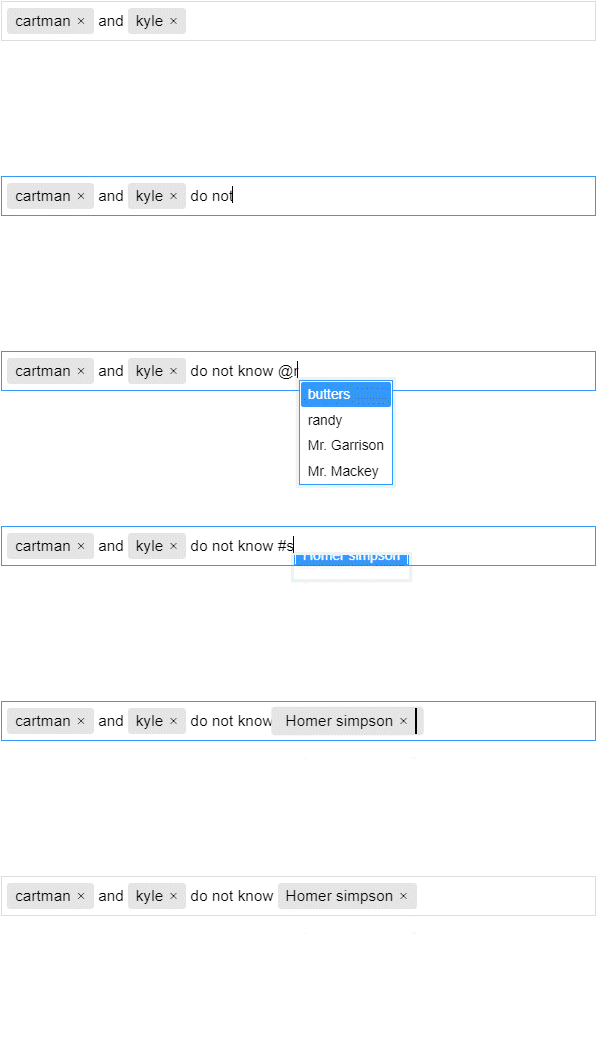
Table of Contents
- Option 1 - import from CDN: - Option 2 - import as a Node module: - Debugging - Output files: - Modify original input value format - Integration example: - Example of overriding the
tag template: - Example for a suggestion item alias - Example whitelist: - Update regarding onChange prop: - Updating the component's state - jQuery.tagify.js - Suggestions Dropdown CSS variables - Full list of Tagify's SCSS variables
Installation
Option 1 - import from CDN:
Place these lines before any other code which is (or will be) using Tagify (Example here)
<link href="https://cdn.jsdelivr.net/npm/@yaireo/tagify/dist/tagify.css" rel="stylesheet" type="text/css" />Tagify will then be available globally. To load specific version use @ - for example: unpkg.com/@yaireo/tagify@3.1.0
Option 2 - import as a Node module:
npm i @yaireo/tagify --saveBasic Usage Examples
- Many demos with code examples can be seen here
- CodeSandbox live demo
import Tagify from '@yaireo/tagify'
var inputElem = document.querySelector('input') // the 'input' element which will be transformed into a Tagify component var tagify = new Tagify(inputElem, {   // A list of possible tags. This setting is optional if you want to allow   // any possible tag to be added without suggesting any to the user.   whitelist: ['foo', 'bar', 'and baz', 0, 1, 2] })
The above example shows the most basic whitelist array setting possible, with a mix of Strings and Numbers but the array also support Objects which has a must-have property of value:
whitelist: [{value: 'foo', id: '123', email: 'foo@whatever.com'}, ...]The value property is what will be used when actually defining the value property of the original input element (inputElem in the example above) which was transformed into a Tagify component, and so when the form data is sent to the server, it will contain all the values (which are the selected tags in the component).
For selected tags to show a different text than what is defined in value for a whitelist item, see the tagTextProp setting
⚠️ Important: Don't forget to include tagify.css file in your project. CSS location: @yaireo/tagify/dist/tagify.css SCSS location: @yaireo/tagify/src/tagify.scss See SCSS usecase & example
Debugging
There are several places in the source code which emitsconsole.warn logs to help identify issues.
Tagify.logger.enabled flag is set to truewindow.TAGIFY_DEBUG = false
var tagify = new Tagify(...)
Features
- Can be applied to input & textarea elements
- Supports mix content (text and tags together)
- Supports single-value mode (like
<select>) - Supports whitelist/blacklist
- Customizable HTML templates for the different areas of the component (wrapper, tags, dropdown, dropdown item, dropdown header, dropdown footer)
- Allows setting suggestions' aliases for easier fuzzy-searching
- Auto-suggest input as-you-type with the ability to auto-complete
- Can paste in multiple values:
tag 1, tag 2, tag 3or even newline-separated tags - Tags can be created by Regex delimiter or by pressing the "Enter" key / focusing of the input
- Tags may be editable (double-click)
ARIA accessibility support(Component too generic for any meaningful ARIA)- Supports read-only mode to the whole component or per-tag
- Each tag can have any properties desired (class, data-whatever, readonly...)
- Automatically disallow duplicate tags (via "settings" object)
- Has built-in CSS loader, if needed (Ex. AJAX whitelist pulling)
- Tags can be trimmed via
hellipby givingmax-widthto thetagelement in yourCSS - RTL alignment (See demo)
- Modern evergreen browsers only — see
browserslistinpackage.json(Internet Explorer is not supported) - Many useful custom events
- Original input/textarea element values kept in sync with Tagify
Building the project
Building this repository requires Node.js 22+ and pnpm 10+ (seepackage.json engines). From the project root, install dependencies and run the build:
pnpm install
pnpm run build
For local development with watch mode, use pnpm start (runs Gulp with --dev). Gulp is used under the hood; you do not need a global Gulp install if you use the pnpm scripts above.
(Installing the published package in your app — e.g. npm i @yaireo/tagify — is unchanged; the Node/pnpm requirements apply to contributors building Tagify from source.)
Source files are this path: /src/
Output files, which are automatically generated using Gulp, are in: /dist/
Output files:
Filename | Info ------------------------------------ | ----------------------------------------------------------- tagify.esm.js | ESM version. see jsbin demo tagify.js | minified UMD version, including its sourcemaps. This is the main file the package exports. react.tagify.js | Wrapper-only for React. Read more jQuery.tagify.min.jstagify.js. Might be removed in the future. (Deprecated as of APR 24') tagify.css |
Adding tags dynamically
var tagify = new Tagify(...);
tagify.addTags(["banana", "orange", "apple"])
// or add tags with pre-defined properties
tagify.addTags([{value:"banana", color:"yellow"}, {value:"apple", color:"red"}, {value:"watermelon", color:"green"}])
Output value
There are two possible ways to get the value of the tags:- Access the tagify's instance's
valueprop:tagify.value(Array of tags) - Access the original input's value:
inputElm.value(Stringified Array of tags)
change event on the original input
var inputElm = document.querySelector('input'),
    tagify = new Tagify (inputElm);
inputElm.addEventListener('change', onChange)
function onChange(e){   // outputs a String   console.log(e.target.value) }
Modify original input value format
Default format is a JSON string:
'[{"value":"cat"}, {"value":"dog"}]'
I recommend keeping this because some situations might have values such as addresses (tags contain commas):
'[{"value":"Apt. 2A, Jacksonville, FL 39404"}, {"value":"Forrest Ray, 191-103 Integer Rd., Corona New Mexico"}]'
Another example for complex tags state might be disabled tags, or ones with custom identifier class:
(tags can be clicked, so developers can choose to use this to disable/enable tags)
'[{"value":"cat", "disabled":true}, {"value":"dog"}, {"value":"bird", "class":"color-green"}]'
To change the format, assuming your tags have no commas and are fairly simple:
var tagify = new Tagify(inputElm, {
  originalInputValueFormat: valuesArr => valuesArr.map(item => item.value).join(',')
})
Output:
"cat,dog"
Ajax whitelist
Dynamically-loaded suggestions list (whitelist) from the server (as the user types) is a frequent need to many.Tagify comes with its own loading animation, which is a very lightweight CSS-only code, and the loading state is controlled by the method tagify.loading which accepts true or false as arguments.
Below is a basic example using the fetch API. I advise aborting the last request on any input before starting a new request.
Example:
var input = document.querySelector('input'),
    tagify = new Tagify(input, {whitelist:[]}),
    controller; // for aborting the call
// listen to any keystrokes which modify tagify's input tagify.on('input', onInput)
function onInput( e ){   var value = e.detail.value   tagify.whitelist = null // reset the whitelist
// https://developer.mozilla.org/en-US/docs/Web/API/AbortController/abort   controller && controller.abort()   controller = new AbortController()
// show loading animation.   tagify.loading(true)
fetch('http://get_suggestions.com?value=' + value, {signal:controller.signal})     .then(RES => RES.json())     .then(function(newWhitelist){       tagify.whitelist = newWhitelist // update whitelist Array in-place       tagify.loading(false).dropdown.show(value) // render the suggestions dropdown     }) }
Persisted data
Sometimes the whitelist might be loaded asynchronously, and so any pre-filled value in the original input field will be removed if the enforceWhitelist is set to true.
Tagify can automatically restore the last used whitelist by setting a unique id to the Tagify instance, by using the localstorage to persist the whitelist & value data:
var input = document.querySelector('input'),
    tagify = new Tagify(input, {
      id: 'test1',  // must be unique (per-tagify instance)
      enforceWhitelist: true,
    }),
Edit tags
Tags that aren'tread-only can be edited by double-clicking them (by default)
or by changing the editTags setting to 1, making tags editable by single-clicking them.
The value is saved on blur or by pressing enter key. Pressing Escape will revert the change trigger blur. ctrlz will revert the change if an edited tag was marked as not valid (perhaps duplicate or blacklisted)
To prevent all tags from being allowed to be editable, set the editTags setting to false (or null).
To do the same but for specific tag(s), set those tags' data with editable property set to false:
<input value='[{"value":"foo", "editable":false}, {"value":"bar"}]'>Validations
For "regular" tags (not mix-mode or select-mode) the easiest way is to use thepattern setting and use a Regex, or
apply the pattern attribute directly on the input which will be "transformed" into a Tagify component (for vanilla code where the input tag is fully accessible to developers).
If the pattern setting does not meet your needs, use the validate setting, which receives a tag data object as an argument and should return true if validation is passing, or false/string of not. A string may be returned as the reason of the validation failure so it would be printed as the title attribute of the invalid tag.
Here's an example for async validation for an added tag. The idea is to listen to "add" event, and when it fires, first set the tag to "loading" state, run an async call, and then set the loading state (of the tag) back to false. If the custom async validation failed, call the replaceTag Tagify method and set the __isValid tag data property to the error string which will be shown when hovering the tag.
Note - there is a setting to keep invalid tags (keepInvalidTags) and if it's set to true, the user can see the reason for the invalidation by hovering the tag and see the browser's native tooltip via the title attribute:
{
  empty      : "empty",
  exceed     : "number of tags exceeded",
  pattern    : "pattern mismatch",
  duplicate  : "already exists",
  notAllowed : "not allowed"
}
The texts for those (invalid tags) titles can be customized from the settings:
new Tagify(inputElement, {
  texts: {
    duplicate: "Duplicates are not allowed"
  }
})
Or by directly manipulating the Tagify function prototype:
Tagify.prototype.TEXTS = {...Tagify.prototype.TEXTS, {duplicate: "Duplicates are not allowed"}}Drag & Sort
To be able to sort tags by dragging, a 3rd-party script is needed.
I have made a very simple drag & drop (~11kb unminified) script which uses HTML5 native API and it is available to download via NPM or Github but any other drag & drop script may work. I could not find on the whole internet a decent lightweight script.
Integration example:
var tagify = new Tagify(inputElement)
// bind "DragSort" to Tagify's main element and tell // it that all the items with the below "selector" are "draggable" var dragsort = new DragSort(tagify.DOM.scope, {     selector: '.'+tagify.settings.classNames.tag,     callbacks: {         dragEnd: onDragEnd     } })
// must update Tagify's value according to the re-ordered nodes in the DOM function onDragEnd(elm){     tagify.updateValueByDOMTags() }
DOM Templates
It's possible to control the templates for some of the HTML elements Tagify is using by modifying thesettings.templates Object with your own custom functions which must return an HTML string.
Available templates are: wrapper, input, tag, dropdown, dropdownItem, dropdownContent, dropdownHeader, dropdownFooter and the optional dropdownItemNoMatch which is a special template for rendering a suggestion item (in the dropdown list) only if there were no matches found for the typed input, for example:
// ...more tagify settings...
templates: {
  dropdownItemNoMatch: data =>
    <div class='${tagify.settings.classNames.dropdownItem}' value="noMatch" tabindex="0" role="option">
        No suggestion found for: <strong>${data.value}</strong>
    </div>
}Example of overriding the tag template:
Each template function is automatically bound with this pointing to the current Tagify instance. It is imperative to preserve the class names and also the this.getAttributes(tagData) for proper functionality.
new Tagify(inputElem, {
  templates: {
    tag(tagData, tagify){
      return <tag title="${(tagData.title || tagData.value)}"
              c
              spellcheck='false'
              tabIndex="${this.settings.a11y.focusableTags ? 0 : -1}"
              class="${this.settings.classNames.tag} ${tagData.class ? tagData.class : ""}"
              ${this.getAttributes(tagData)}>
      <x title='' class="${this.settings.classNames.tagX}" role='button' aria-label='remove tag'></x>
      <div>
          <span class="${this.settings.classNames.tagText}">${tagData[this.settings.tagTextProp] || tagData.value}</span>
      </div>
    </tag>,
dropdownFooter(suggestions){       var hasMore = suggestions.length - this.settings.dropdown.maxItems;
return hasMore > 0         ? <footer data-selector='tagify-suggestions-footer' class="${this.settings.classNames.dropdownFooter}">             ${hasMore} more items. Refine your search.           </footer>         : '';     }   } })
Suggestions list
The suggestions list is a whitelist Array of Strings or Objects which was set in the settings Object when the Tagify instance was created, and can be set later directly on the instance: tagifyInstance.whitelist = ["tag1", "tag2", ...].
The suggestions dropdown will be appended to the document's <body> element and will be rendered by default in a position below (bottom of) the Tagify element. Using the keyboard arrows up/down will highlight an option from the list, and hitting the Enter key to select.
It is possible to tweak the list dropdown via 2 settings:
- enabled - this is a numeral value that tells Tagify when to show the suggestions dropdown, when a minimum of N characters were typed. - maxItems - Limits the number of items the suggestions list will render
var input = document.querySelector('input'),
    tagify = new Tagify(input, {
        whitelist : ['aaa', 'aaab', 'aaabb', 'aaabc', 'aaabd', 'aaabe', 'aaac', 'aaacc'],
        dropdown : {
            classname     : "color-blue",
            enabled       : 0,              // show the dropdown immediately on focus
            maxItems      : 5,
            position      : "text",         // place the dropdown near the typed text
            closeOnSelect : false,          // keep the dropdown open after selecting a suggestion
            highlightFirst: true
        }
    });
Will render
<div class="tagifydropdown tagifydropdown--text" style="left:993.5px; top:106.375px; width:616px;">
    <div class="tagifydropdownwrapper">
      <div class="tagifydropdownitem tagifydropdownitem--active" value="aaab">aaab</div>
      <div class="tagifydropdownitem" value="aaabb">aaabb</div>
      <div class="tagifydropdownitem" value="aaabc">aaabc</div>
      <div class="tagifydropdownitem" value="aaabd">aaabd</div>
      <div class="tagifydropdownitem" value="aaabe">aaabe</div>
    </div>
</div>
By default searching the suggestions is using fuzzy-search (see settings).
If you wish to assign alias to items (in your suggestion list), add the searchBy property to whitelist items you wish to have an alias for.
In the below example, typing a part of a string which is included in the searchBy property, for example land midd" - the suggested item which matches the value "Israel" will be rendered in the suggestions (dropdown) list.
Example for a suggestion item alias
whitelist = [
    ...
    { value:'Israel', code:'IL', searchBy:'holy land, desert, middle east' },
    ...
]
Another handy setting is dropdown.searchKeys which, like the above dropdown.searchBy setting, allows expanding the search of any typed terms to more than the value property of the whitelist items (if items are a Collection).
Example whitelist:
[
  {
    value    : 123456,
    nickname : "foo",
    email    : "foo@mail.com"
  },
  {
    value    : 987654,
    nickname : "bar",
    email    : "bar@mail.com"
  },
  ...more..
]
Modified searchKeys setting to also search in other keys:
{ dropdown: { searchKeys: ["nickname", "email"] // fuzzy-search matching for those whitelist items' properties } }Mixed-Content
This feature must be toggled using these settings:
{
  //  mixTagsInterpolator: ["{{", "}}"],  // optional: interpolation before & after string
  mode: 'mix',    // <--  Enable mixed-content
  pattern: /@|#/  // <--  Text starting with @ or # (if single, String can be used here instead of Regex)
}
When mixing text with tags, the original textarea (or input) element will have a value as follows:
[[cartman]] and [[kyle]] do not know [[Homer simpson]]
If the initial value of the textarea or input is formatted as the above example, Tagify will try to automatically convert everything between [[ & ]] to a tag, if tag exists in the whitelist, so make sure when the Tagify instance is initialized, that it has tags with the correct value property that match the same values that appear between [[ & ]].
Applying the setting dropdown.position:"text" is encouraged for mixed-content tags, because the suggestions list looks weird when there is already a lot of content on multiple lines.
If a tag does not exist in the whitelist, it may be created by the user and all you should do is listen to the add event and update your local/remote state.
Single-Value
Similar to native <Select> element, but allows typing text as value.
React
See live demo for React integration examples. ⚠️ Tagify is not a controlled component.
A none-minified and raw source-code Tagify React component is exported from react.tagify.js and you can import it as seen in the below code example. The wrapper is shipped as dependency-light, JSX-free ES module source, so any bundler can consume it directly — no custom JSX/Babel loader or node_modules transpilation is required. Shipping raw source is also better for tree-shaking.
Update regarding onChange prop:
I have changed how the onChange works internally within the Wrapper of Tagify so as of March 30, 2021 the e argument will include a detail parameter with the value as string. There is no more e.target, and to access the original DOM input element, do this: e.detail.tagify.DOM.originalInput.
Note: You will need to import Tagify's CSS also, either by JavaScript or by SCSS @import (which is preferable)
Also note that you will need to use dart-sass and not node-sass in order to compile the file.
import { useCallback, useRef } from 'react'
import Tags from '@yaireo/tagify/react' // React-wrapper file
import '@yaireo/tagify/dist/tagify.css' // Tagify CSS
const App = () => {     // on tag add/edit/remove     const onChange = useCallback((e) => {         console.log("CHANGED:"             , e.detail.tagify.value // Array where each tag includes tagify's (needed) extra properties             , e.detail.tagify.getCleanValue() // Same as above, without the extra properties             , e.detail.value // a string representing the tags         )     }, [])
return (         <Tags             whitelist={['item 1', 'another item', 'item 3']}             placeholder='Add some tags'             settings={{                 blacklist: ["xxx"],                 maxTags: 4,                 dropdown: {                     enabled: 0 // always show suggestions dropdown                 }             }}             defaultValue="a,b,c" // initial value             onChange={onChange}         />     ) }
To gain full access to Tagify's (instance) inner methods, A custom ref can be used:
import Tags, {MixedTags} from "@yaireo/tagify/react";
... const tagifyRef = useRef() ... <Tags tagifyRef={tagifyRef} ... />
// or mix-mode <MixedTags settings={...} onChange={...} defaultValue={This is a textarea which mixes text with [[{"value":"tags"}]].} />
<MixedTags> component is a shorthand for <Tags InputMode="textarea">
Updating the component's state
The settings prop is only used once in the initialization process, please do not update it afterwards.
📖 List of (React) props for the <Tags/> component
Prop | Type | Updatable | Info ----------------------- | ------------------------- |:---------:| ----------------------------------------------------------- settings | Object | | See settings section name | String | ✔ | <input>'s element name attribute value | String/Array | ✔ | Initial value. defaultValue | String/Array | | Same as value prop placeholder | String | ✔ | placeholder text for the component readOnly | Boolean | ✔ | Toggles readonly state. With capital O. tagifyRef | Object | | useRef hook refference for the component inner instance of vanilla Tagify (for methods access) showDropdown | Boolean/String | ✔ | if true shows the suggestions dropdown. if assigned a String, show the dropdown pre-filtered. loading | Boolean | ✔ | Toggles loading state for the whole component whitelist | Array | ✔ | Sets the whitelist which is the basis for the suggestions dropdown & autocomplete className | String | | Component's optional class name to be added InputMode | String | | "textarea" will create a <textarea> (hidden) element instead of the default <input> and automatically make Tagify act as "mix mode" autoFocus | Boolean | | Should the component have focus on mount. Must be unique, per-page. children | String/Array | | value/defaultValue props are prefered onChange | Function | | See events section onInput | Function | | See events section onAdd | Function | | See events section onRemove | Function | | See events section onInvalid | Function | | See events section onClick | Function | | See events section onKeydown | Function | | See events section onFocus | Function | | See events section onBlur | Function | | See events section onEditInput | Function | | See events section onEditBeforeUpdate | Function | | See events section onEditUpdated | Function | | See events section onEditStart | Function | | See events section onEditKeydown | Function | | See events section onDropdownShow | Function | | See events section onDropdownHide | Function | | See events section onDropdownSelect | Function | | See events section onDropdownScroll | Function | | See events section onDropdownNoMatch | Function | | See events section onDropdownUpdated | Function | | See events section
Vue
I don't know Vue at all and this thin wrapper was built by a friend who knows. To import the wrapper file, use the import path @yaireo/tagify/vue
jQuery version
This variant of Tagify code has been deprecated because it doesn't really add much in terms of ease-of-use. I only made it so it would be possible to use jQuery selectors & chaining but the (jQuery) port really isn't needed when implementing Tagify within a jQuery code.
Below is the documentation for previous Tagify packages versions which included support:
jQuery.tagify.js
A jQuery wrapper version is also available, but I advise not using it because it's basically the exact same as the "normal" script (non-jqueryfied) and all the jQuery's wrapper does is allowing to chain the event listeners for ('add', 'remove', 'invalid')
$('[name=tags]')
    .tagify()
    .on('add', function(e, tagData){
        console.log('added', ...tagData)  // data, index, and DOM node
    });
Accessing methods can be done via the .data('tagify'):
$('[name=tags]').tagify();
// get tags from the server (ajax) and add them:
$('[name=tags]').data('tagify').addTags('aaa, bbb, ccc')
HTML input & textarea attributes
The below list of attributes affect Tagify.<br> These can also be set by Tagify settings Object manually, and not declaratively (via attributes).
Attribute         | Example                                               | Info ----------------- | ----------------------------------------------------- | -------------------- pattern | <pre lang=html>
</pre> | Tag Regex pattern which tag input is validated by. placeholder | <pre lang=html></pre> | This attribute's value will be used as a constant placeholder, which is visible unless something is being typed. readOnly | <pre lang=html></pre> | No user-interaction (add/remove/edit) allowed. autofocus | <pre lang=html></pre> | Automatically focus the Tagify component when the component is loaded required | <pre lang=html></pre> | Adds a required attribute to the Tagify wrapper element. Does nothing more.
Caveats
wrapped in a