
US Department of Transportation (USDOT) Intelligent Transportation Systems Operational Data Environment (ITS ODE). This is the main repository that integrates and coordinates ODE Submodules.




jpo-ode
US Department of Transportation (USDOT) Intelligent Transportation Systems (ITS) Joint Program Office (JPO) Operational Data Environment (ODE)
The ITS ODE is a real-time virtual data router that ingests and processes operational data from various connected devices - including vehicles, infrastructure, and traffic management centers - and distributes it to other devices and subscribing transportation management applications. Using the ITS ODE within intelligent transportation deployments increases data fluidity and interoperability while meeting operational needs and protecting user privacy. The software’s microservices architecture makes it easy to add new capabilities to meet local needs. Check the ITS factsheet for more information:
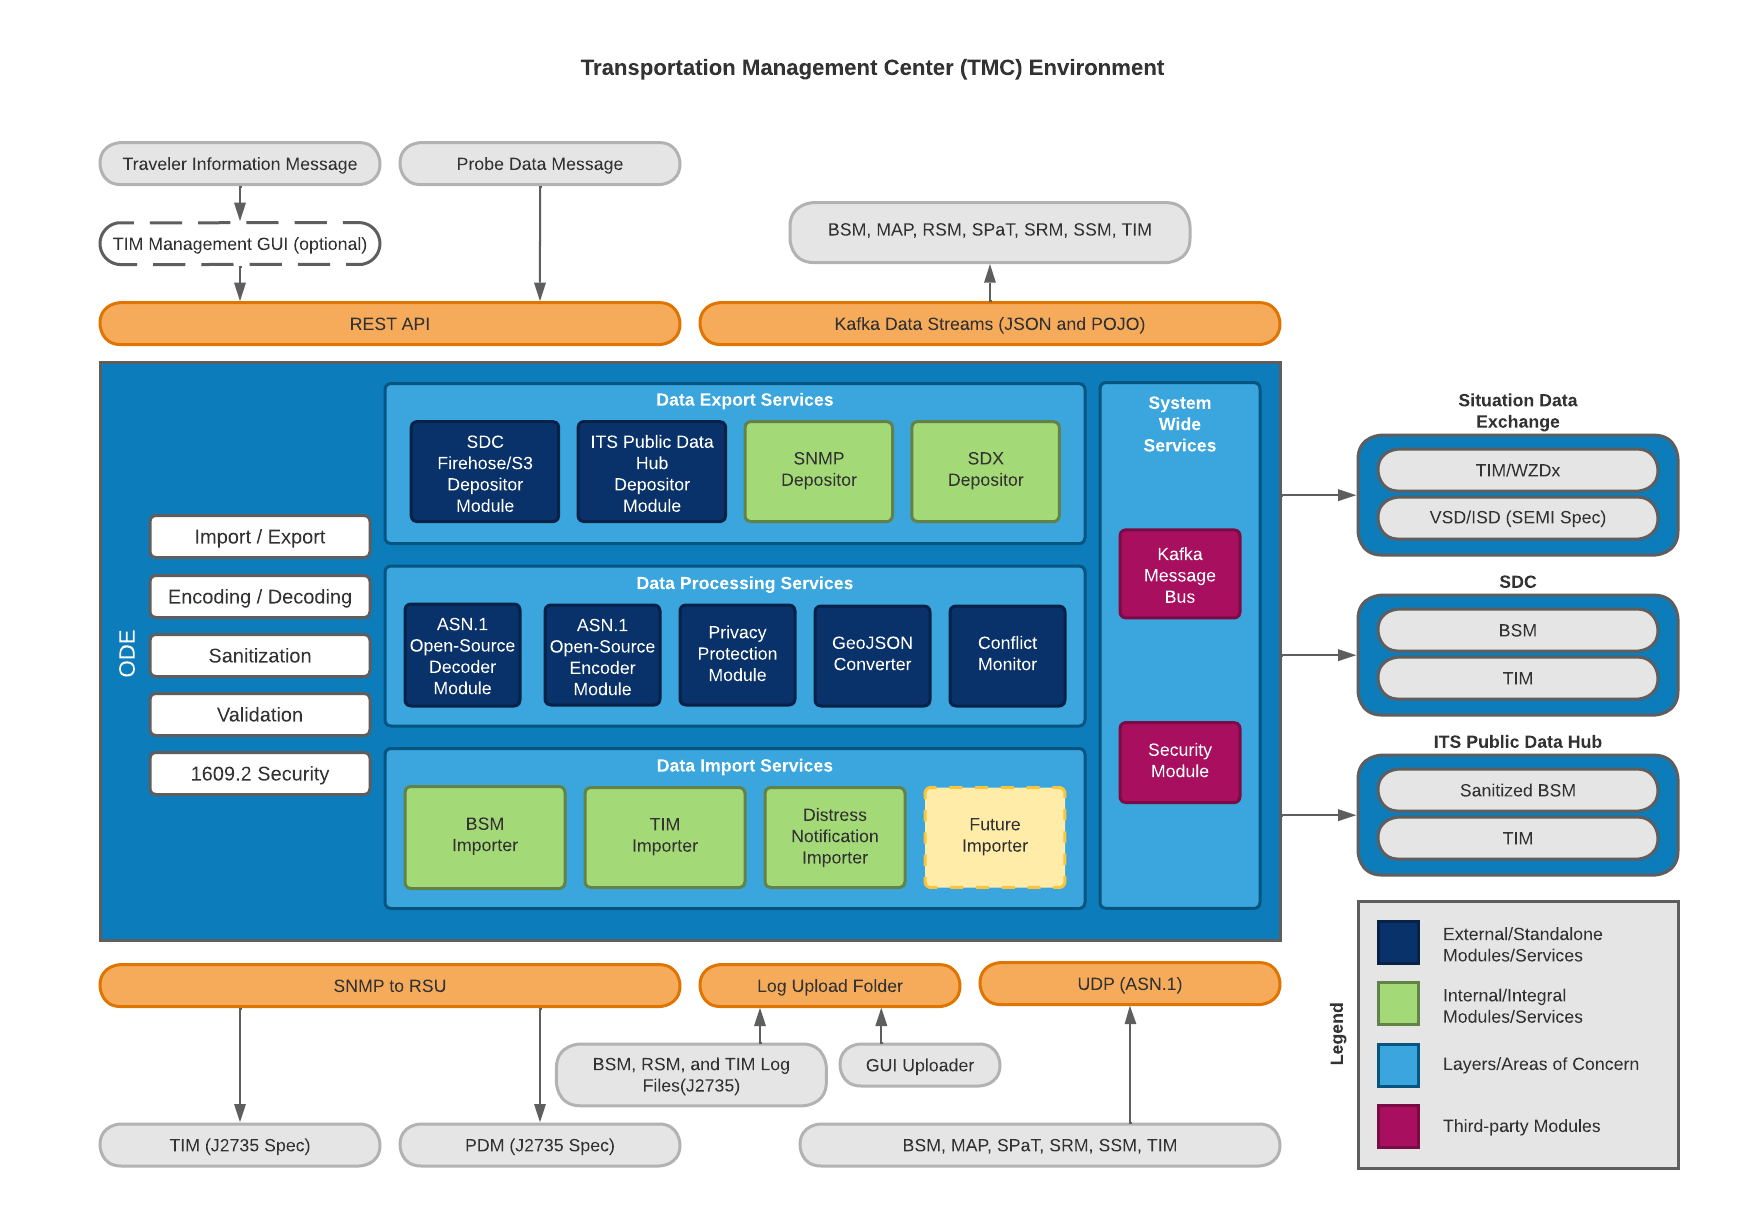
Figure 1: ODE Dataflows
For a module-by-module description of the components in this diagram, see Architecture Section 5.2 – Architecture Module Reference.
Documentation:
- ODE Architecture
- ODE User Guide
- ODE Output Schema Reference Guide
- ODE REST API Guide
- ODE Smoke Tests
Release Notes
The current version and release history of the JPO-ODE: ODE Release Notes
Table of Contents
- Usage Example
- Configuration
- Installation
- File Manifest
- Development Setup
- Release History
- Contact Information
- Contributing
- Credits and Acknowledgement
- Code.gov Registration Info
- Kubernetes
- Sonar Cloud (Documentation)
- SNMP
- GitHub Artifact Usage
1. Usage Example
Once the ODE is deployed and running locally, you may access the ODE's demonstration console by opening your browser and navigating to http://localhost:8080. This portal can only be used to decode a subset of the supported message types: BSM and TIM messages. To decode messages such as MAP, SPaT, SRM and SSM, the ODE UDP ports must be utilized. The following sections will describe how to utilize both methods.
For testing BSM and TIM decoding only:
- Press the
Connectbutton to connect to the ODE WebSocket service. - Press
Select Filebutton to select an OBU log file containing BSMs and/or TIM messages as specified by the WYDOT CV Pilot project. See below documents for details:
- Press
Uploadbutton to upload the file to ODE.
Another way data can be uploaded to the ODE is through copying the file to the location specified by the ode.uploadLocationRoot/ode.uploadLocationObuLogproperty. If not specified, Default locations would be uploads/bsmlogsub-directory off of the location where ODE is launched. In a standard Docker deployment, it is recommended to attach a storage directory from the machine that the ODE launched on as a volume. This way OBUs can log offload to a standard machine and the machine can handle the authorizedkeys for SSH connections. This is how this repository's docker-compose is setup with using the uploads directory as the mounted volume. In a Kubernetes deployment this is not possible, so the ODE has been equipped with an SSH server of its own that can be exposed through port 22. The authorizedkeys can be attached as a volume and it is recommended to attach some form of NFS persistent volume as a substitute for the pod's '/home/uploads/backup' directory. (See the Kubernetes documentation on an example on how to do this) However, it is not recommended to use this SSH server in a local Docker environment and thereby the port 22 will be disabled by default.
The result of uploading and decoding of messages will be displayed on the UI screen.
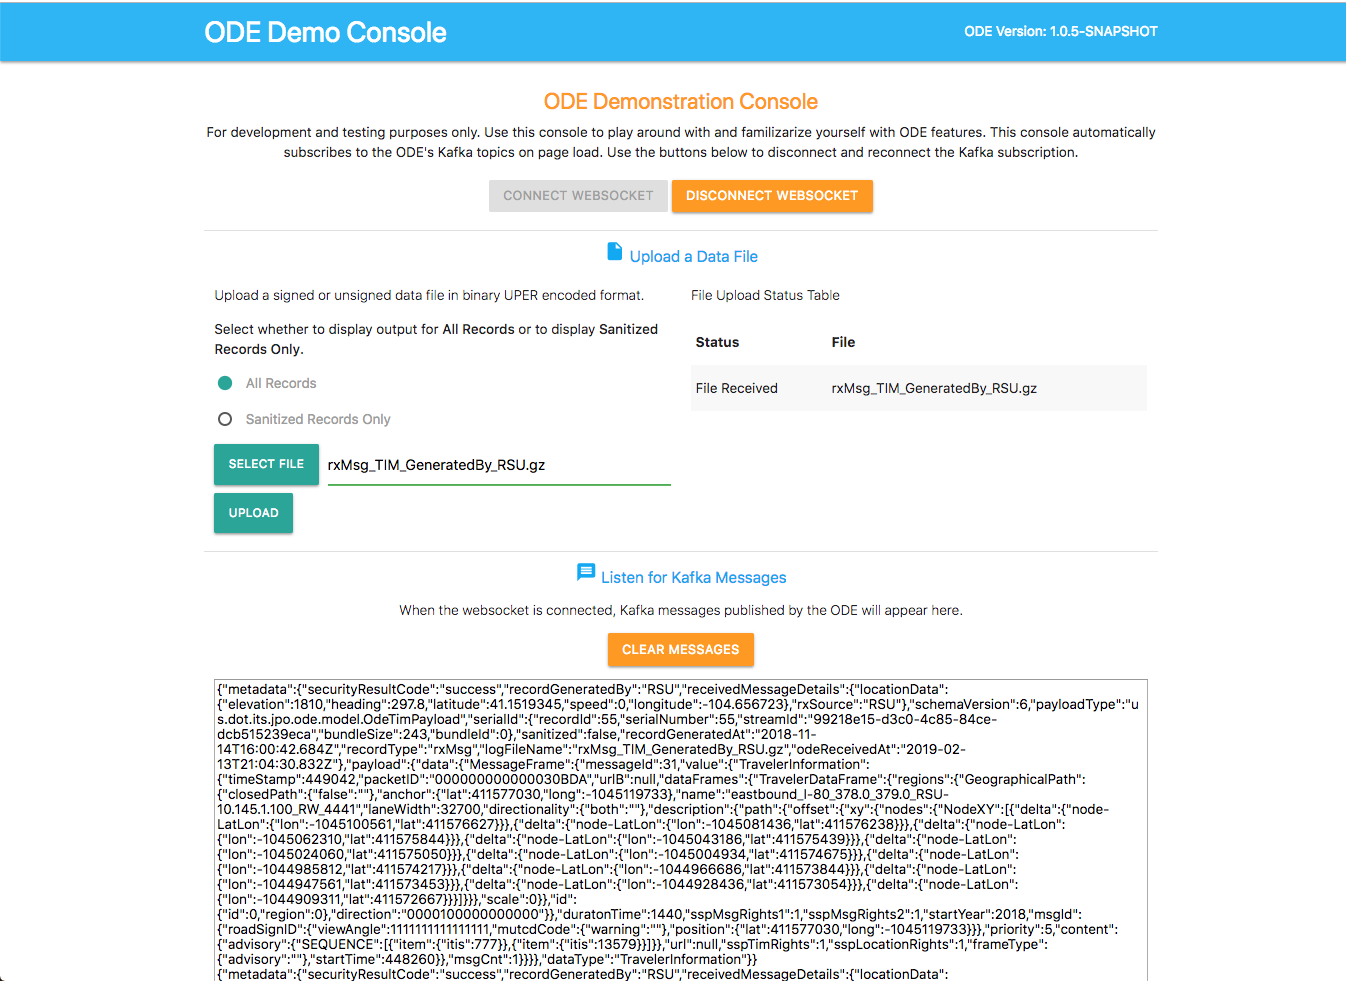
Figure 2: ODE UI demonstrating message subscription
Notice that the empty fields in the J2735 message are represented by a null value. Also note that ODE output strips the MessageFrame header and returns a pure BSM or TIM in the subscription topic.
With the PPM module running, all filtered BSMs that are uploaded through the web interface will be captured and processed. You will see an output of both submitted BSM and processed data unless the entire record was filtered out.
For testing decoding with all supported ODE message types:
To test decoding all supported ODE messages, the UDP endpoints must be utilized. These endpoints specifically take hex ASN.1 UPER encoded message data. These messages are allowed to have headers but do not need to. The headers are trimmed out currently once the UDP receiver receives the message so this data will not affect the output.
Supported message types:
- BSM
- TIM
- MAP
- SPaT
- SRM
- SSM
- PSM
- SDSM
- RTCM
- RSM
- Navigate to the UDP sender Python scripts in the project.
- Ensure the environment variable "DOCKERHOSTIP" has been set in the shell that will be running the script. This must be set to the same IP that the ODE deployments are using.
- Run the script of your choosing:
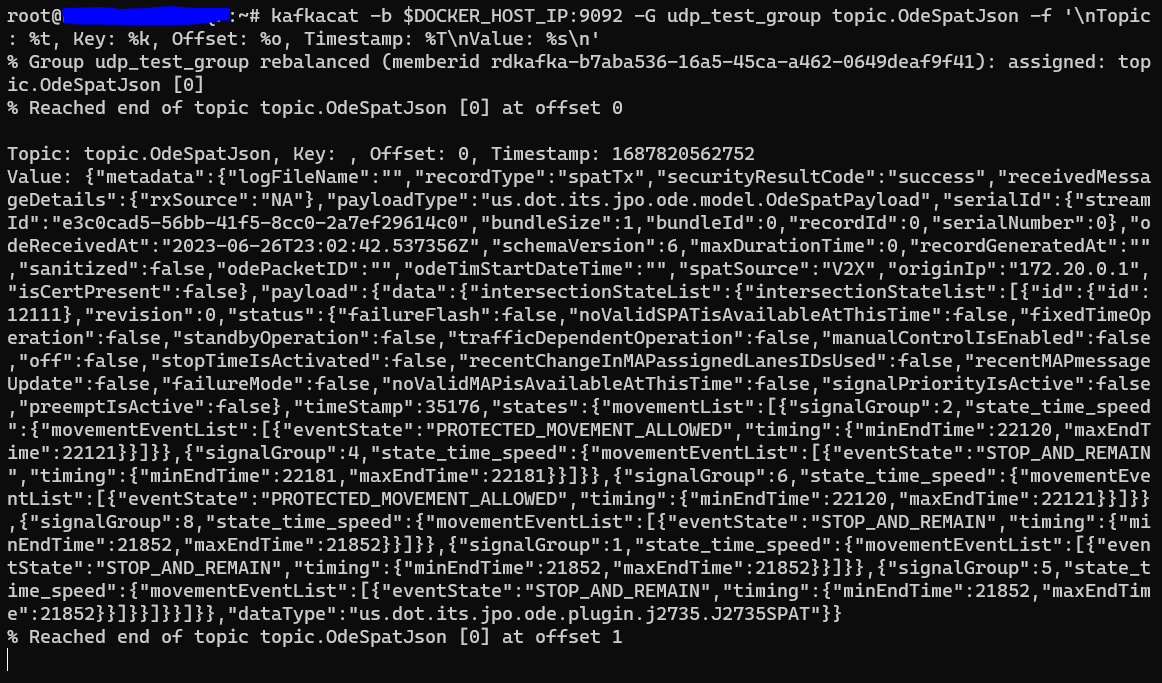
python3 ./scripts/tests/udpsender_spat.py - View the output Kafka messages from kafkacat:
kafkacat -b $DOCKERHOSTIP:9092 -G udptestgroup topic.OdeSpatJson -f '\nTopic: %t, Key: %k, Offset: %o, Timestamp: %T\nValue: %s\n' - The script should continue to send the same message every 5 seconds and kafkacat should continue to output the latest message.
- You may modify the content of the UDP sender scripts to test different payloads of your own.
2. Configuration
System Requirements
- Minimum RAM: 16 GB
- Minimum storage space: 100 GB
- Supported operating systems:
The ODE software can run on most standard Windows, Mac, or Linux based computers with Pentium core processors. Performance of the software will be based on the computing power and available RAM in the system. Larger data flows can require much larger space requirements depending on the amount of data being processed by the software. The ODE software application was developed using the open source programming language Java. If running the ODE outside of Docker, the application requires the Java 21 runtime environment.
Software Prerequisites
The ODE is bundled as a series of submodules running in Docker containers and managed by Docker-Compose. All other required dependencies will automatically be downloaded and installed as part of the Docker build process.
- Docker:
- Docker-Compose:
- Make:
choco install make
- Windows install Choco: sudo apt install make
Tips and Advice
Read the following guides to familiarize yourself with ODE's Docker and Kafka modules.
The following guide contains information about the data flow diagrams for the ODE. Installation and Deployment:- Docker builds may fail if you are on a corporate network due to DNS resolution errors.
- Additionally
gitcommands may fail for similar reasons, you can fix this by runningexport GITSSLNO_VERIFY=1. - Windows users may find more information on installing and using Docker here.
- A compatibility guide containing recommendations for suitable versions of submodules for each main module version can be found here.
If you wish to change the application properties, such as change the location of the upload service via ode.uploadLocation.* properties or set the ode.kafkaBrokers to something other than the $DOCKERHOSTIP:9092, or wish to change the log file upload folder, etc. instead of setting the environment variables, modify jpo-ode-svcs\src\main\resources\application.yaml file as desired. To adjust the settings in your unit/integration tests, modify the jpo-ode-svcs\src\test\resources\application.yaml file.
ODE configuration can be customized for every deployment environment using environment variables. These variables can either be set locally or using the sample.env file. Instructions for how to use this file can be found here.
Important!
You must rename sample.env to .env for Docker to automatically read the file. This file will contain AWS access keys and other private information. Do not push this file to source control.
3. Installation
The following instructions describe the minimal procedure to fetch, build, and run the main ODE application. If you want to use the privacy protection module and/or S3 depositors, see the User Guide for more detailed information. Additionally, different build processes are covered at the bottom of this section.
Step 0 - For Windows Users Only
If running on Windows, please make sure that your global git config is set up to not convert end-of-line characters during checkout.
Disable git core.autocrlf (One Time Only)
git config --global core.autocrlf falseStep 1 - Download the Source Code
The ODE software system consists of the following modules hosted in separate Github repositories:
| Name | Visibility | Description | |-------------------------------------------------------------------------|------------|--------------------------------------------------------------------------------------------------------| | jpo-ode | public | Contains the public components of the application code. | | jpo-cvdp | public | Privacy Protection Module | | asn1_codec | public | ASN.1 Encoder/Decoder module | | jpo-security-svcs | public | Provides cryptographic services. | | jpo-sdw-depositor | public | SDW depositor service. Optional, can be enabled by using the COMPOSEPROFILES environmental variable | | jpo-asn-pojos | public | ASN.1 POJOs for J2735 messages. |
You may download the stable, default branch for ALL of these dependencies by using the following recursive git clone command:
git clone --recurse-submodules https://github.com/usdot-jpo-ode/jpo-ode.gitIf you have already cloned the repository, you can use the following command to download the stable, default branch for all dependencies by using the following command:
git submodule update --init --recursiveOnce you have these repositories obtained, you are ready to build and deploy the application.
Downloading the source code from a non-default branch
The above steps to pull the code from GitHub repository pulls it from the default branch which is the stable branch. If you wish to pull the source code from a branch that is still under development or beta testing, you will need to specify the branch to pull from. The following commands aid you in that action. Note: These commands can also be performed using the provided script (Advanced) Downloading the source code from a non-default branch
update_branch.# Run the following commands to reset existing branch
git reset --hard
git submodule foreach --recursive git reset --hard
Pull from the non-default branch
git checkout <branch_name>
git pull origin <branch_name>
The next command wipes out all of the submodules and re-initializes them.
git submodule deinit -f . && git submodule update --recursive --init
The following commands help with removing an old submodule reference. The following refers to the removal of the jpo-s3-deposit submodule however the logic can be used for other Git submodules as well.(Advanced) Removing an old submodule reference
# Remove references to the git submodule
git submodule deinit -f jpo-s3-deposit
rm -rf .git/modules/jpo-s3-deposit
rm -rf jpo-s3-deposit
git rm --cached jpo-s3-deposit
Run the following commands to reset existing branch
git reset --hard
git submodule foreach --recursive git reset --hard
The next command wipes out all of the submodules and re-initializes them.
git submodule deinit -f . && git submodule update --recursive --init
Step 2 - Build and run the application
Notes:
- Docker builds may fail if you are on a corporate network due to DNS resolution errors.
- In order for Docker to automatically read the environment variable files, you must:
.env and_;
- Make a copy of jpo-utils/sample.env, rename it as .env (keep this one in the jpo-utils/ directory), and fill in the variables as described in the jpo-utils README
- The .env files will contain private keys, do not add them to version control.
- Log-based alerts are enabled by default in the sample.env. If you don't want log messages notifying you when no TIMs were ingested in a specific period of time,
you will want to update your .env file to set ODETIMINGESTMONITORINGENABLED=false. See TimIngestWatcher to see the log-based monitoring provided.
Make:
Navigate to the root directory of the jpo-ode project and run the following command:
# View available options:
$ make
Make target options:
make start to run the ODE
make build to build the ODE
make stop to stop the ODE
make delete to stop the ODE and remove the volumes
make restart to restart the ODE
make rebuild to stop, delete, and then rebuild the containers
make clean-build to rebuild the containers without using the cache
Possible error messages if .env files are not created:
# jpo-ode .env is missing
$ make start
Makefile:11: * "ERROR: jpo-ode Environment file .env not found in ".  Stop.
jpo-utils .env is missing
$ make start
Makefile:14: * "ERROR: jpo-utils Environment file .env not found in ".  Stop.
Docker Compose:
Navigate to the root directory of the jpo-ode project and run:
make startOR
docker compose up --build -d
docker compose ps
To bring down the services and remove the running containers run:
make stopOR
docker compose downFor a fresh restart, run:
make rebuildOR
docker compose down
docker compose up --build -d
docker compose ps
To completely rebuild from scratch, run:
make rebuildOR
docker compose down
docker compose rm -v
docker compose up --build -d
docker compose ps
Check the deployment by running docker compose ps. You can start and stop containers using docker compose start and docker compose stop commands. If using the multi-broker docker compose file, you can change the scaling by running docker compose scale <container>=n where container is the container you would like to scale and n is the number of instances. For example, docker compose scale kafka=3.
To configure what services are started, use the COMPOSEPROFILE environmental variable and set a comma separated string of profiles you want to start up. This project also supports all COMPOSEPROFILE values implemented in the jpo-utils docker-compose.yml. The following are the available profiles that the ODE is currently configured to use along with the services they will enable:
- Profile name:
ode_base
ode, adm, and aem
- Profile name:
ode_full
ode, adm, aem, ppmbsm, sdwdepositor, and sec
Profiles are also available for each service name to individually specify a service to enable.
asn1_codec Module (ASN.1 Encoder and Decoder)
ODE requires the deployment of asn1codec module. ODE's docker-compose.yml file is set up to build and deploy the module in a Docker container. If you wish to run asn1codec module outside Docker (i.e. directly on the host machine), please refer to the documentation of asn1_codec module.
The only requirement for deploying asn1codec module on Docker is the setup of two environment variables DOCKERHOSTIP and DOCKERSHARED_VOLUME.
PPM Module (Geofencing and Filtering)
To run the ODE with PPM module, you must install and start the PPM service. PPM service communicates with other services through Kafka Topics. PPM will read from the specified "Raw BSM" topic and publish the result to the specified "Filtered Bsm" topic. These topic names are specified by the following ODE and PPM properties:
- ODE properties for communications with PPM (set in application.yaml) - ode.kafka.topics.json.bsm (default = topic.OdeBsmJson) - ode.kafka.topics.json.bsm-filtered (default = topic.FilteredOdeBsmJson) - PPM properties for communications with ODE (set in yourconfig.properties) - privacy.topic.consumer (default = j2735BsmRawJson) - privacy.topic.producer (default = j2735BsmFilteredJson)
Follow the instructions here to install and build the PPM service.
After a successful build, use the following commands to configure and run the PPM
cd $BASEPPMDIR/jpo-cvdp/build
$ ./bsmjson_privacy -c ../config/ppm.properties
Confluent Cloud Integration
Rather than using a local kafka instance, the ODE can utilize an instance of kafka hosted by Confluent Cloud via SASL.
Environment variables
Purpose & Usage
- The DOCKERHOSTIP environment variable is used to communicate with the bootstrap server that the instance of Kafka is running on.
- The KAFKA_TYPE environment variable specifies what type of kafka connection will be attempted and is used to check if Confluent should be utilized. If this environment variable is not set, the ODE will default to normal behavior.
- The CONFLUENTKEY and CONFLUENTSECRET environment variables are used to authenticate with the bootstrap server. If the KAFKA_TYPE environment variable is not set, then these are not required.
Values
In order to utilize Confluent Cloud:
- DOCKERHOSTIP must be set to the bootstrap server address (excluding the port)
- KAFKA_TYPE must be set to "CONFLUENT"
- CONFLUENT_KEY must be set to the API key being utilized for CC
- CONFLUENT_SECRET must be set to the API secret being utilized for CC
Note
Port Mapped Receiver Configuration
Many production deployments may not send intersection data directly from an RSU unit. This often happens if another device is responsible for generating MAP / SPaT messages or if a proxy or load balancer is used between an RSU unit and the ODE. To handle these edge cases the ODE has a configurable port-mapped receiver which can be used for receiving data on a variety of ports. The intent of this feature is to allow the ODE to continue to identify different source RSU units based upon the port the data is forwarded on.To use port-mapped ingest, add an entry similar to the below to the application.yaml file. The entry below creates a BSM receiver which listens on port 1234. Any BSM data received on port 1234 will be marked as having been received from the IP 1.2.3.4.
port-mapped-ingest:
  sources:
    - intersectipon-name: "Name"
      intersection-id: 1234
      origin-ip: 1.2.3.4
      port: 1234
      type: BSM
Please note, ports added here are not automatically opened in the host docker container. Any port added here should separately be added to the running docker container.
This has only been tested with Confluent Cloud but technically all SASL authenticated Kafka brokers can be reached using this method.
MongoDB Integration
Description and Configuration
To sink streamed kafka topic data to a MongoDB database, a kafka connect and MongoDB instance can be deployed for the ODE. To deploy the kafka connect and MongoDB instance, add the following profiles to your COMPOSEPROFILES env variable: odebase,kafkaconnectstandalone,kafka_setup. This will result in the following topics being synced to MongoDB:
- OdeBsmJson
- OdeMapJson
- OdeSpatJson
- OdeTimJson
- OdePsmJson
connect container as a volume and if you would like to sink different topics then feel free to make a copy of the connectstart.sh script and attach it to the connect container to the following path: /scripts/connectstart.sh. The script can be overridden by setting the CONNECTSCRIPTRELATIVE_PATH to a location relative to the /jpo-utils repository.
For further documentation on configuring the MongoDB Kafka Connect image refer to this readme.
Note
Kafka connect is being used for MongoDB in this implementation but it can interact with many types of databases, here is further documentation for kafka connect
4. File Manifest
This section outlines the software technology stacks of the ODE.
Containerization and Management
Messaging
Code Quality
Continuous Integration
ODE Code
- Java 21
- Maven
- Spring Boot
- Logback
- SNMP4J
- JUnit
- JMockit - deprecated in favor of Mockito
- Mockito
- Stomp Websocket
Web UI
Back to top5. Development Setup
Integrated Development Environment (IDE)
Install the IDE of your choice:
- Eclipse: https://eclipse.org/
- STS: https://spring.io/tools/sts/all
- IntelliJ: https://www.jetbrains.com/idea/
- VSCode: https://code.visualstudio.com/
Dev Container Environment
The project can be reopened inside a dev container in VSCode. This environment should have all the necessary dependencies to debug the ODE and its submodules. When attempting to run scripts in this environment, it may be necessary to make them executable with "chmod +x" first.
Checkstyle configuration
This project uses Checkstyle with a modified version of Google's Java Style guide to weakly enforce style standards. To configure Checkstyle with your chosen IDE follow one of the following guides. This repo's checkstyle configuration file can be found here. For a quick guide to Checkstyle, check out this short article.
If you prefer the command line for your checkstyle output. You can runmvn checkstyle:check to
check the whole project. See Checkstyle's Github for more info.
6. Release History
7. Contact Information
Contact the developers of the ODE application by submitting a Github issue.
Contact the ODE management representative using the information in the Code.gov Registration Info section.
License information
Licensed under the Apache License, Version 2.0 (the "License"); you may not use this file except in compliance with the License. You may obtain a copy of the License at
8. Contributing
Please read our contributing guide to learn about our development process, how to propose pull requests and improvements, and how to build and test your changes to this project.
Source Repositories - GitHub
- Main repository on GitHub (public)
- Data Privacy Module on Github (public)
- Utils Module on Github (public)
- Security services repository on GitHub (public)
- SDW Depositor Module on GitHub (public)
- ASN.1 POJOs for J2735 messages (public)
- ODE Output Validatory Library (public)
Static Code Analysis
Quality Assurance
Code quality assurance is reported through the usdot-jpo-ode SonarCloud organization. Code quality reports are generated by the JaCoCo plugin for Maven during the ODE's webhook-triggered TravisCI build. After a successful build, the SonarQube scanner plugin for Maven creates and uploads a code quality report to SonarCloud.
For regression and user acceptance testing, ODE provides an automated test harness. The test harness is provided in the qa/test-harness directory under jpo-ode root folder. The test harness uses the ODE Validator Library repository as a submodule.
For more information, please see:
Troubleshooting
Please read our Wiki for more information, or check the User Guide.
Application Support for the ODE currently managed via GitHub's native issue tracker:
9. Credits and Acknowledgement
10. Code.gov Registration Info
Agency: DOT
Short Description: The ITS ODE is a real-time virtual data router that ingests and processes operational data from various connected devices – including vehicles, infrastructure, and traffic management centers – and distributes it to other devices and subscribing transportation management applications. Using the ITS ODE within intelligent transportation deployments increases data fluidity and interoperability while meeting operational needs and protecting user privacy. The software’s microservices architecture makes it easy to add new capabilities to meet local needs.
Status: Beta
Tags: transportation, connected vehicles, intelligent transportation systems, java
Labor hours: 200
Contact Name: James Lieu
Contact Phone: (202) 366-3000
11. Kubernetes
The ODE can be run in a Kubernetes (k8s) environment. See the Kubernetes document for more details about this.12. Sonar Token Configuration
Generating and Using Tokens Users can generate tokens that can be used to run analyses or invoke web services without access to the user's actual credentials.
USDOT-JPO-ODE SonarCloud Organization : https://sonarcloud.io/organizations/usdot-jpo-ode-1/
Generating a token
You can generate new tokens at User > My Account > Security. The form at the bottom of the page allows you to generate new tokens. Once you click the Generate button, you will see the token value. Copy it immediately; once you dismiss the notification you will not be able to retrieve it.
Using a token
SonarScanners running in GitHub Actions can automatically detect branches and pull requests being built so you don't need to specifically pass them as parameters to the scanner.
To analyze your projects with GitHub Actions, you need to:
Creating your GitHub secrets You can create repository secrets from your GitHub repository as below:
Sonar Token: Generate a SonarQube token and, in GitHub, create a new repository secret in GitHub with SONAR_TOKEN as the Name and the token you generated as the Value. Sonar Host URL: In GitHub, create a new repository secret with SONARHOSTURL as the Name and your SonarQube server URL as the Value.
Configure your workflow YAML file as below:
1. Add GitHub Secrets in ci.yml workflow as SONARTOKEN: ${ secrets.SONARTOKEN } 2. Update the sonar properties in Sonar scan step (- name: Run Sonar) with new sonar project properties. Commit and push your code to start the analysis.
Revoking a token
You can revoke an existing token at User > My Account > Security by clicking the Revoke button next to the token.
13. SNMP
The ODE is capable of communicating with RSUs to:- Query TIMs
- Deposit TIMs
- Delete TIMs
The following SNMP protocols are supported for communication with RSUs:
- DSRC 4.1 (defined in 'Dedicated Short-Range Communications Roadside Unit Specifications')
- NTCIP1218 (defined in 'National Transportation Communications for ITS Protocol')
Additionally, the ODE supports the execution of PDM operations on RSUs. PDM operations are not defined in NTCIP1218, but are defined DSRC 4.1.
14. GitHub Artifact Usage
To use this library in another application, add the GitHub package URLs to the repositories section in pom.xml of the consumer application or in your local ~/.m2/settings.xml file. Here is an example implementation of using the GitHub artifact in a consumer application:
<settings xmlns="http://maven.apache.org/SETTINGS/1.0.0"
  xmlns:xsi="http://www.w3.org/2001/XMLSchema-instance"
  xsi:schemaLocation="http://maven.apache.org/SETTINGS/1.0.0
                      http://maven.apache.org/xsd/settings-1.0.0.xsd">
<activeProfiles>     <activeProfile>github</activeProfile>   </activeProfiles>
<profiles>     <profile>       <id>github</id>       <repositories>         <repository>           <id>central</id>           <url>https://repo1.maven.org/maven2</url>         </repository>         <repository>           <id>github</id>           <url>https://maven.pkg.github.com/usdot-jpo-ode/jpo-ode</url>         </repository>       </repositories>     </profile>   </profiles>
<servers>     <server>       <id>github</id>       <username>${env.PACKAGEREADUSERNAME}</username>       <password>${env.PACKAGEREADTOKEN}</password>     </server>   </servers>
</settings>
And add the following line to the dependencies element in build.gradle
<dependencies>
  <dependency>
    <groupId>usdot.jpo.ode</groupId>
    <artifactId>jpo-ode-core</artifactId>
    <version>1.0.0</version>
  </dependency>
  <dependency>
    <groupId>usdot.jpo.ode</groupId>
    <artifactId>jpo-ode-plugins</artifactId>
    <version>1.0.0</version>
  </dependency>
  <dependency>
    <groupId>usdot.jpo.ode</groupId>
    <artifactId>jpo-ode-common</artifactId>
    <version>1.0.0</version>
  </dependency>
  <dependency>
    <groupId>usdot.jpo.ode</groupId>
    <artifactId>jpo-ode-svcs</artifactId>
    <version>1.0.0</version>
  </dependency>
</dependencies>
Finally, set the environment variables:
- PACKAGEREADUSERNAME - User name with read access to the repositories containing the packages.
- PACKAGEREADTOKEN - Personal access token with
read:packagesscope.


