
Docker image with Uvicorn managed by Gunicorn for high-performance FastAPI web applications in Python with performance auto-tuning.
DEPRECATED 🚨
This Docker image is now deprecated. There's no need to use it, you can just use Uvicorn with --workers. ✨
Read more about it below.


Supported tags and respective Dockerfile links
python3.11,latest(Dockerfile)_python3.10, (Dockerfile)_python3.11-slim(Dockerfile)_python3.10-slim(Dockerfile)_
Deprecated tags
🚨 These tags are no longer supported or maintained, they are removed from the GitHub repository, but the last versions pushed might still be available in Docker Hub if anyone has been pulling them:
python3.9python3.9-slimpython3.8python3.8-slimpython3.7python3.9-alpine3.14python3.8-alpine3.10python3.7-alpine3.8python3.6python3.6-alpine3.8
python3.9-2025-11-09python3.9-slim-2025-11-09python3.8-2024-11-02python3.8-slim-2024-11-02python3.7-2024-11-02python3.9-alpine3.14-2024-03-11python3.8-alpine3.10-2024-01-29python3.7-alpine3.8-2024-03-11python3.6-2022-11-25python3.6-alpine3.8-2022-11-25
Note: There are tags for each build date. If you need to "pin" the Docker image version you use, you can select one of those tags. E.g. tiangolo/uvicorn-gunicorn-fastapi:python3.11-2024-11-02.
uvicorn-gunicorn-fastapi
Docker image with Uvicorn managed by Gunicorn for high-performance FastAPI web applications in Python with performance auto-tuning.
GitHub repo: https://github.com/tiangolo/uvicorn-gunicorn-fastapi-docker
Docker Hub image: https://hub.docker.com/r/tiangolo/uvicorn-gunicorn-fastapi/
Description
FastAPI has shown to be a Python web framework with one of the best performances, as measured by third-party benchmarks, thanks to being based on and powered by Starlette.
The achievable performance is on par with (and in many cases superior to) Go and Node.js frameworks.
This image has an auto-tuning mechanism included to start a number of worker processes based on the available CPU cores. That way you can just add your code and get high performance automatically, which is useful in simple deployments.
🚨 WARNING: You Probably Don't Need this Docker Image
You are probably using Kubernetes or similar tools. In that case, you probably don't need this image (or any other similar base image). You are probably better off building a Docker image from scratch as explained in the docs for FastAPI in Containers - Docker: Build a Docker Image for FastAPI.
Cluster Replication
If you have a cluster of machines with Kubernetes, Docker Swarm Mode, Nomad, or other similar complex system to manage distributed containers on multiple machines, then you will probably want to handle replication at the cluster level instead of using a process manager (like Gunicorn with Uvicorn workers) in each container, which is what this Docker image does.
In those cases (e.g. using Kubernetes) you would probably want to build a Docker image from scratch, installing your dependencies, and running a single Uvicorn process instead of this image.
For example, your Dockerfile could look like:
FROM python:3.11
WORKDIR /code
COPY ./requirements.txt /code/requirements.txt
RUN pip install --no-cache-dir --upgrade -r /code/requirements.txt
COPY ./app /code/app
CMD ["uvicorn", "app.main:app", "--host", "0.0.0.0", "--port", "80"]
You can read more about this in the FastAPI documentation about: FastAPI in Containers - Docker.
Multiple Workers
If you definitely want to have multiple workers on a single container, Uvicorn now supports handling subprocesses, including restarting dead ones. So there's no need for Gunicorn to manage multiple workers in a single container.
You could modify the example Dockerfile from above, adding the --workers option to Uvicorn, like:
FROM python:3.11
WORKDIR /code
COPY ./requirements.txt /code/requirements.txt
RUN pip install --no-cache-dir --upgrade -r /code/requirements.txt
COPY ./app /code/app
CMD ["uvicorn", "app.main:app", "--host", "0.0.0.0", "--port", "80", "--workers", "4"]
That's all you need. You don't need this Docker image at all. 😅
You can read more about it in the FastAPI Docs about Deployment with Docker.
Technical Details
Uvicorn didn't have support for managing worker processing including restarting dead workers. But now it does.
Before that, Gunicorn could be used as a process manager, running Uvicorn workers. This added complexity that is no longer necessary.
Legacy Docs
The rest of this document is kept for historical reasons, but you probably don't need it. 😅
tiangolo/uvicorn-gunicorn-fastapi
This image will set a sensible configuration based on the server it is running on (the amount of CPU cores available) without making sacrifices.
It has sensible defaults, but you can configure it with environment variables or override the configuration files.
There are also slim versions. If you want one of those, use one of the tags from above.
tiangolo/uvicorn-gunicorn
This image (tiangolo/uvicorn-gunicorn-fastapi) is based on tiangolo/uvicorn-gunicorn.
That image is what actually does all the work.
This image just installs FastAPI and has the documentation specifically targeted at FastAPI.
If you feel confident about your knowledge of Uvicorn, Gunicorn and ASGI, you can use that image directly.
tiangolo/uvicorn-gunicorn-starlette
There is a sibling Docker image: tiangolo/uvicorn-gunicorn-starlette
If you are creating a new Starlette web application and you want to discard all the additional features from FastAPI you should use tiangolo/uvicorn-gunicorn-starlette instead.
Note: FastAPI is based on Starlette and adds several features on top of it. Useful for APIs and other cases: data validation, data conversion, documentation with OpenAPI, dependency injection, security/authentication and others.
How to use
You don't need to clone the GitHub repo.
You can use this image as a base image for other images.
Assuming you have a file requirements.txt, you could have a Dockerfile like this:
FROM tiangolo/uvicorn-gunicorn-fastapi:python3.11
COPY ./requirements.txt /app/requirements.txt
RUN pip install --no-cache-dir --upgrade -r /app/requirements.txt
COPY ./app /app
It will expect a file at /app/app/main.py.
Or otherwise a file at /app/main.py.
And will expect it to contain a variable app with your FastAPI application.
Then you can build your image from the directory that has your Dockerfile, e.g:
docker build -t myimage ./Quick Start
Build your Image
- Go to your project directory.
- Create a
Dockerfilewith:
FROM tiangolo/uvicorn-gunicorn-fastapi:python3.11
COPY ./requirements.txt /app/requirements.txt
RUN pip install --no-cache-dir --upgrade -r /app/requirements.txt
COPY ./app /app
- Create an
appdirectory and enter in it. - Create a
main.pyfile with:
from fastapi import FastAPI
app = FastAPI()
@app.get("/") def read_root():     return {"Hello": "World"}
@app.get("/items/{item_id}") def readitem(itemid: int, q: str = None):     return {"itemid": itemid, "q": q}
- You should now have a directory structure like:
.
├── app
│   └── main.py
└── Dockerfile- Go to the project directory (in where your
Dockerfileis, containing yourappdirectory). - Build your FastAPI image:
docker build -t myimage .- Run a container based on your image:
docker run -d --name mycontainer -p 80:80 myimageNow you have an optimized FastAPI server in a Docker container. Auto-tuned for your current server (and number of CPU cores).
Check it
You should be able to check it in your Docker container's URL, for example: http://192.168.99.100/items/5?q=somequery or http://127.0.0.1/items/5?q=somequery (or equivalent, using your Docker host).
You will see something like:
{"item_id": 5, "q": "somequery"}Interactive API docs
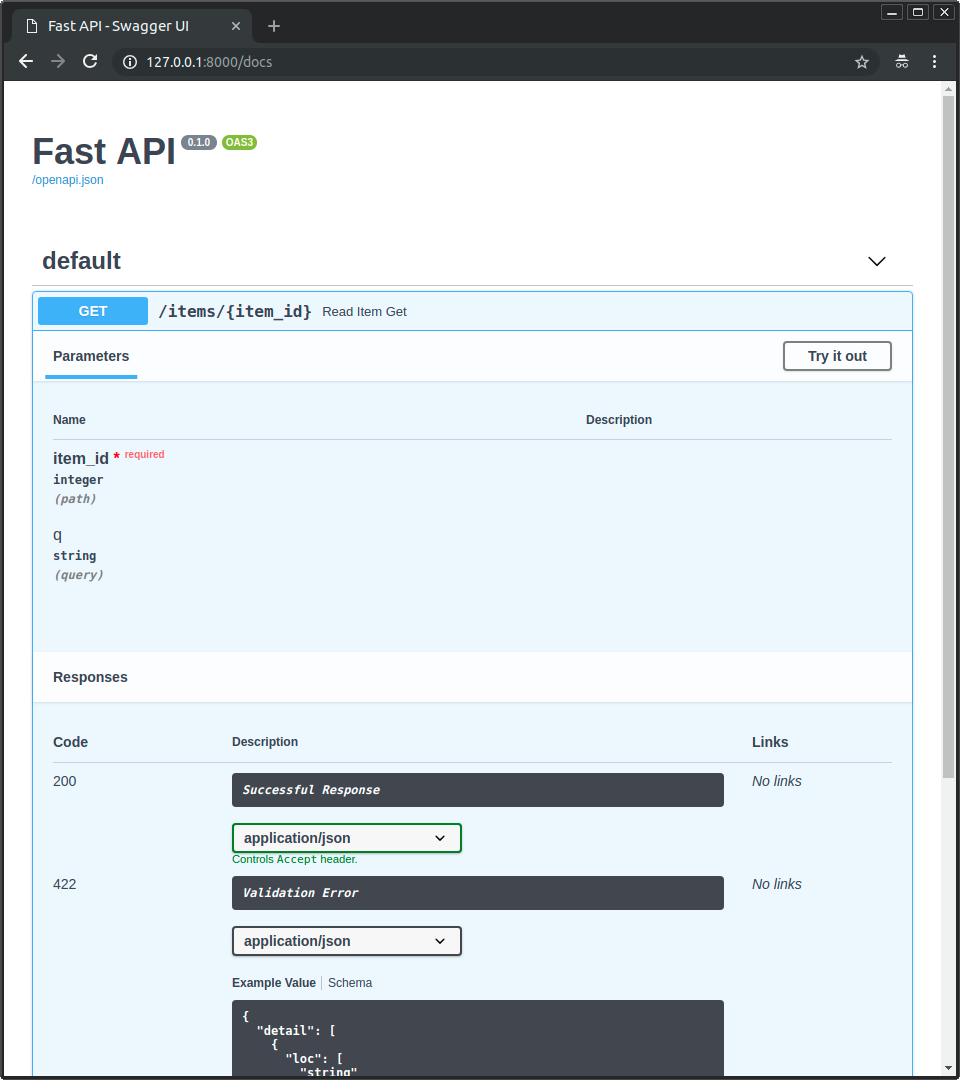
Now you can go to http://192.168.99.100/docs or http://127.0.0.1/docs (or equivalent, using your Docker host).
You will see the automatic interactive API documentation (provided by Swagger UI):
Alternative API docs
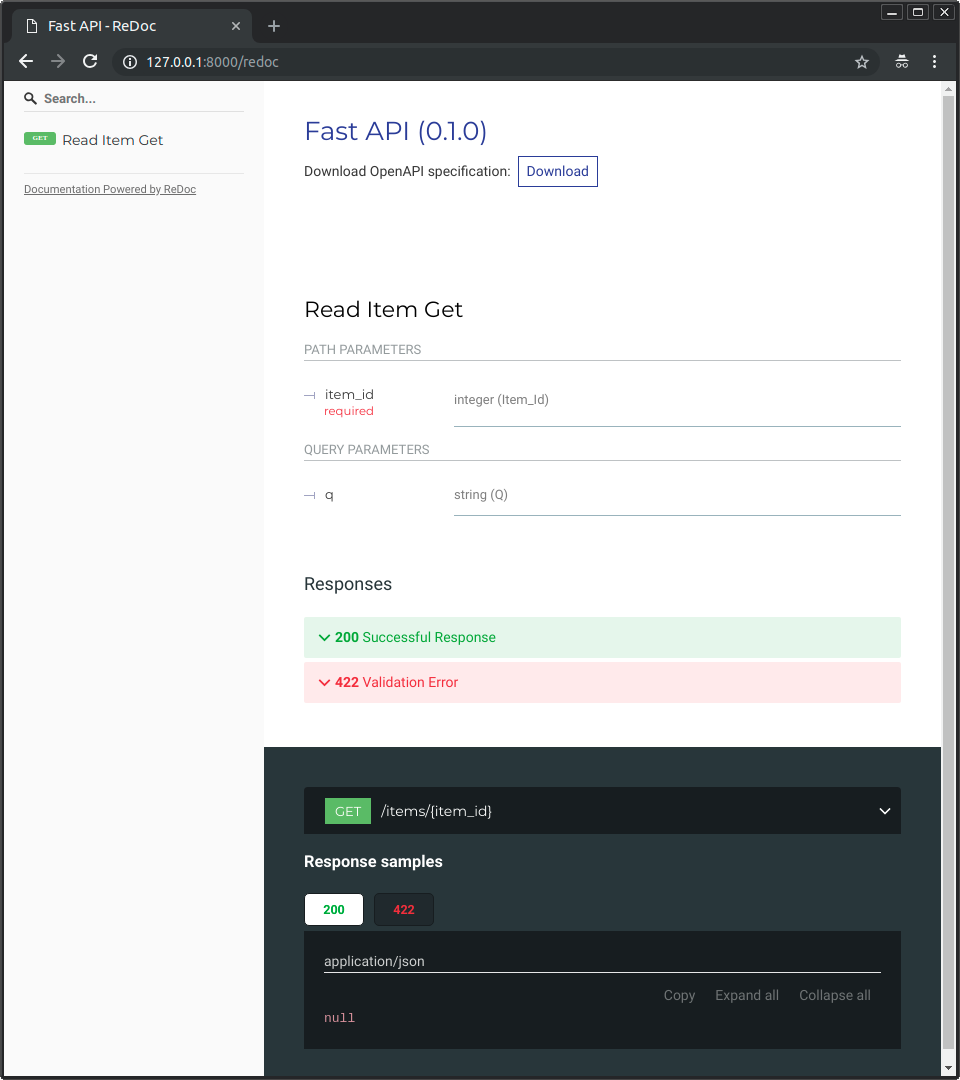
And you can also go to http://192.168.99.100/redoc or http://127.0.0.1/redoc(or equivalent, using your Docker host).
You will see the alternative automatic documentation (provided by ReDoc):
Dependencies and packages
You will probably also want to add any dependencies for your app and pin them to a specific version, probably including Uvicorn, Gunicorn, and FastAPI.
This way you can make sure your app always works as expected.
You could install packages with pip commands in your Dockerfile, using a requirements.txt, or even using Poetry.
And then you can upgrade those dependencies in a controlled way, running your tests, making sure that everything works, but without breaking your production application if some new version is not compatible.
Using Poetry
Here's a small example of one of the ways you could install your dependencies making sure you have a pinned version for each package.
Let's say you have a project managed with Poetry, so, you have your package dependencies in a file pyproject.toml. And possibly a file poetry.lock.
Then you could have a Dockerfile using Docker multi-stage building with:
FROM python:3.11 as requirements-stage
WORKDIR /tmp
RUN pip install poetry
COPY ./pyproject.toml ./poetry.lock* /tmp/
RUN poetry export -f requirements.txt --output requirements.txt --without-hashes
FROM tiangolo/uvicorn-gunicorn-fastapi:python3.11
COPY --from=requirements-stage /tmp/requirements.txt /app/requirements.txt
RUN pip install --no-cache-dir --upgrade -r /app/requirements.txt
COPY ./app /app
That will:
- Install poetry and configure it for running inside of the Docker container.
- Copy your application requirements.
./poetry.lock (ending with a *), it won't crash if that file is not available yet.
- Install the dependencies.
- Then copy your app code.
This also applies for any other way you use to install your dependencies. If you use a requirements.txt, copy it alone and install all the dependencies on the top of the Dockerfile, and add your app code after it.
Advanced usage
Environment variables
These are the environment variables that you can set in the container to configure it and their default values:
MODULE_NAME
The Python "module" (file) to be imported by Gunicorn, this module would contain the actual application in a variable.
By default:
app.mainif there's a file/app/app/main.pyormainif there's a file/app/main.py
/app/customapp/custommain.py, you could set it like:
docker run -d -p 80:80 -e MODULENAME="customapp.custom_main" myimageVARIABLE_NAME
The variable inside of the Python module that contains the FastAPI application.
By default:
app
from fastapi import FastAPI
api = FastAPI()
@api.get("/") def read_root():     return {"Hello": "World"}
In this case api would be the variable with the FastAPI application. You could set it like:
docker run -d -p 80:80 -e VARIABLE_NAME="api" myimageAPP_MODULE
The string with the Python module and the variable name passed to Gunicorn.
By default, set based on the variables MODULENAME and VARIABLENAME:
app.main:appormain:app
docker run -d -p 80:80 -e APPMODULE="customapp.custom_main:api" myimageGUNICORN_CONF
The path to a Gunicorn Python configuration file.
By default:
/app/gunicorn_conf.pyif it exists/app/app/gunicorn_conf.pyif it exists/gunicorn_conf.py(the included default)
docker run -d -p 80:80 -e GUNICORN_C myimageYou can use the config file from the base image as a starting point for yours.
WORKERSPERCORE
This image will check how many CPU cores are available in the current server running your container.
It will set the number of workers to the number of CPU cores multiplied by this value.
By default:
1
docker run -d -p 80:80 -e WORKERSPERCORE="3" myimageIf you used the value 3 in a server with 2 CPU cores, it would run 6 worker processes.
You can use floating point values too.
So, for example, if you have a big server (let's say, with 8 CPU cores) running several applications, and you have a FastAPI application that you know won't need high performance. And you don't want to waste server resources. You could make it use 0.5 workers per CPU core. For example:
docker run -d -p 80:80 -e WORKERSPERCORE="0.5" myimageIn a server with 8 CPU cores, this would make it start only 4 worker processes.
Note: By default, if WORKERSPERCORE is 1 and the server has only 1 CPU core, instead of starting 1 single worker, it will start 2. This is to avoid bad performance and blocking applications (server application) on small machines (server machine/cloud/etc). This can be overridden using WEB_CONCURRENCY.
MAX_WORKERS
Set the maximum number of workers to use.
You can use it to let the image compute the number of workers automatically but making sure it's limited to a maximum.
This can be useful, for example, if each worker uses a database connection and your database has a maximum limit of open connections.
By default it's not set, meaning that it's unlimited.
You can set it like:
docker run -d -p 80:80 -e MAX_WORKERS="24" myimageThis would make the image start at most 24 workers, independent of how many CPU cores are available in the server.
WEB_CONCURRENCY
Override the automatic definition of number of workers.
By default:
- Set to the number of CPU cores in the current server multiplied by the environment variable
WORKERSPERCORE. So, in a server with 2 cores, by default it will be set to2.
docker run -d -p 80:80 -e WEB_C myimageThis would make the image start 2 worker processes, independent of how many CPU cores are available in the server.
HOST
The "host" used by Gunicorn, the IP where Gunicorn will listen for requests.
It is the host inside of the container.
So, for example, if you set this variable to 127.0.0.1, it will only be available inside the container, not in the host running it.
It's is provided for completeness, but you probably shouldn't change it.
By default:
0.0.0.0
PORT
The port the container should listen on.
If you are running your container in a restrictive environment that forces you to use some specific port (like 8080) you can set it with this variable.
By default:
80
docker run -d -p 80:8080 -e PORT="8080" myimageBIND
The actual host and port passed to Gunicorn.
By default, set based on the variables HOST and PORT.
So, if you didn't change anything, it will be set by default to:
0.0.0.0:80
docker run -d -p 80:8080 -e BIND="0.0.0.0:8080" myimageLOG_LEVEL
The log level for Gunicorn.
One of:
debuginfowarningerrorcritical
info.
If you need to squeeze more performance sacrificing logging, set it to warning, for example:
You can set it like:
docker run -d -p 80:8080 -e LOG_LEVEL="warning" myimageWORKER_CLASS
The class to be used by Gunicorn for the workers.
By default, set to uvicorn.workers.UvicornWorker.
The fact that it uses Uvicorn is what allows using ASGI frameworks like FastAPI, and that is also what provides the maximum performance.
You probably shouldn't change it.
But if for some reason you need to use the alternative Uvicorn worker: uvicorn.workers.UvicornH11Worker you can set it with this environment variable.
You can set it like:
docker run -d -p 80:8080 -e WORKER_CLASS="uvicorn.workers.UvicornH11Worker" myimageTIMEOUT
Workers silent for more than this many seconds are killed and restarted.
Read more about it in the Gunicorn docs: timeout.
By default, set to 120.
Notice that Uvicorn and ASGI frameworks like FastAPI are async, not sync. So it's probably safe to have higher timeouts than for sync workers.
You can set it like:
docker run -d -p 80:8080 -e TIMEOUT="20" myimageKEEP_ALIVE
The number of seconds to wait for requests on a Keep-Alive connection.
Read more about it in the Gunicorn docs: keepalive.
By default, set to 2.
You can set it like:
docker run -d -p 80:8080 -e KEEP_ALIVE="20" myimageGRACEFUL_TIMEOUT
Timeout for graceful workers restart.
Read more about it in the Gunicorn docs: graceful-timeout.
By default, set to 120.
You can set it like:
docker run -d -p 80:8080 -e GRACEFUL_TIMEOUT="20" myimageACCESS_LOG
The access log file to write to.
By default "-", which means stdout (print in the Docker logs).
If you want to disable ACCESS_LOG, set it to an empty value.
For example, you could disable it with:
docker run -d -p 80:8080 -e ACCESS_LOG= myimageERROR_LOG
The error log file to write to.
By default "-", which means stderr (print in the Docker logs).
If you want to disable ERROR_LOG, set it to an empty value.
For example, you could disable it with:
docker run -d -p 80:8080 -e ERROR_LOG= myimageGUNICORNCMDARGS
Any additional command line settings for Gunicorn can be passed in the GUNICORNCMDARGS environment variable.
Read more about it in the Gunicorn docs: Settings.
These settings will have precedence over the other environment variables and any Gunicorn config file.
For example, if you have a custom TLS/SSL certificate that you want to use, you could copy them to the Docker image or mount them in the container, and set --keyfile and --certfile to the location of the files, for example:
docker run -d -p 80:8080 -e GUNICORNCMDARGS="--keyfile=/secrets/key.pem --certfile=/secrets/cert.pem" -e PORT=443 myimageNote: instead of handling TLS/SSL yourself and configuring it in the container, it's recommended to use a "TLS Termination Proxy" like Traefik. You can read more about it in the FastAPI documentation about HTTPS.
PRESTARTPATH
The path where to find the pre-start script.
By default, set to /app/prestart.sh.
You can set it like:
docker run -d -p 80:8080 -e PRESTARTPATH="/custom/script.sh" myimageCustom Gunicorn configuration file
The image includes a default Gunicorn Python config file at /gunicorn_conf.py.
It uses the environment variables declared above to set all the configurations.
You can override it by including a file in:
/app/gunicorn_conf.py/app/app/gunicorn_conf.py/gunicorn_conf.py
Custom /app/prestart.sh
If you need to run anything before starting the app, you can add a file prestart.sh to the directory /app. The image will automatically detect and run it before starting everything.
For example, if you want to add Alembic SQL migrations (with SQLALchemy), you could create a ./app/prestart.sh file in your code directory (that will be copied by your Dockerfile) with:
#! /usr/bin/env bash
Let the DB start
sleep 10;
Run migrations
alembic upgrade head
and it would wait 10 seconds to give the database some time to start and then run that alembic command.
If you need to run a Python script before starting the app, you could make the /app/prestart.sh file run your Python script, with something like:
#! /usr/bin/env bash
Run custom Python script before starting
python /app/mycustomprestart_script.py
You can customize the location of the prestart script with the environment variable PRESTARTPATH described above.
Development live reload
The default program that is run is at /start.sh. It does everything described above.
There's also a version for development with live auto-reload at:
/start-reload.shDetails
For development, it's useful to be able to mount the contents of the application code inside of the container as a Docker "host volume", to be able to change the code and test it live, without having to build the image every time.
In that case, it's also useful to run the server with live auto-reload, so that it re-starts automatically at every code change.
The additional script /start-reload.sh runs Uvicorn alone (without Gunicorn) and in a single process.
It is ideal for development.
Usage
For example, instead of running:
docker run -d -p 80:80 myimageYou could run:
docker run -d -p 80:80 -v $(pwd):/app myimage /start-reload.sh-v $(pwd):/app: means that the directory$(pwd)should be mounted as a volume inside of the container at/app.
$(pwd): runs pwd ("print working directory") and puts it as part of the string.
/start-reload.sh: adding something (like/start-reload.sh) at the end of the command, replaces the default "command" with this one. In this case, it replaces the default (/start.sh) with the development alternative/start-reload.sh.
Development live reload - Technical Details
As /start-reload.sh doesn't run with Gunicorn, any of the configurations you put in a gunicorn_conf.py file won't apply.
But these environment variables will work the same as described above:
MODULE_NAMEVARIABLE_NAMEAPP_MODULEHOSTPORTLOG_LEVEL
🚨 Alpine Python Warning
In short: You probably shouldn't use Alpine for Python projects, instead use the slim Docker image versions.
Do you want more details? Continue reading 👇
Alpine is more useful for other languages where you build a static binary in one Docker image stage (using multi-stage Docker building) and then copy it to a simple Alpine image, and then just execute that binary. For example, using Go.
But for Python, as Alpine doesn't use the standard tooling used for building Python extensions, when installing packages, in many cases Python (pip) won't find a precompiled installable package (a "wheel") for Alpine. And after debugging lots of strange errors you will realize that you have to install a lot of extra tooling and build a lot of dependencies just to use some of these common Python packages. 😩
This means that, although the original Alpine image might have been small, you end up with a an image with a size comparable to the size you would have gotten if you had just used a standard Python image (based on Debian), or in some cases even larger. 🤯
And in all those cases, it will take much longer to build, consuming much more resources, building dependencies for longer, and also increasing its carbon footprint, as you are using more CPU time and energy for each build. 🌳
If you want slim Python images, you should instead try and use the slim versions that are still based on Debian, but are smaller. 🤓
Tests
All the image tags, configurations, environment variables and application options are tested.
License
This project is licensed under the terms of the MIT license.


