
A Rust embedded-hal HAL impl for the STM32F1 family based on japarics stm32f103xx-hal
stm32f1xx-hal
[HAL] for the STM32F1 family of microcontrollers
[HAL]: https://crates.io/crates/embedded-hal





Quick start guide
Embedded Rust development requires a bit more setup than ordinary development. For this guide, we'll assume you're using a stm32 blue pill board (shown below), but if you have another f1 microcontroller, you should be able to adapt it.
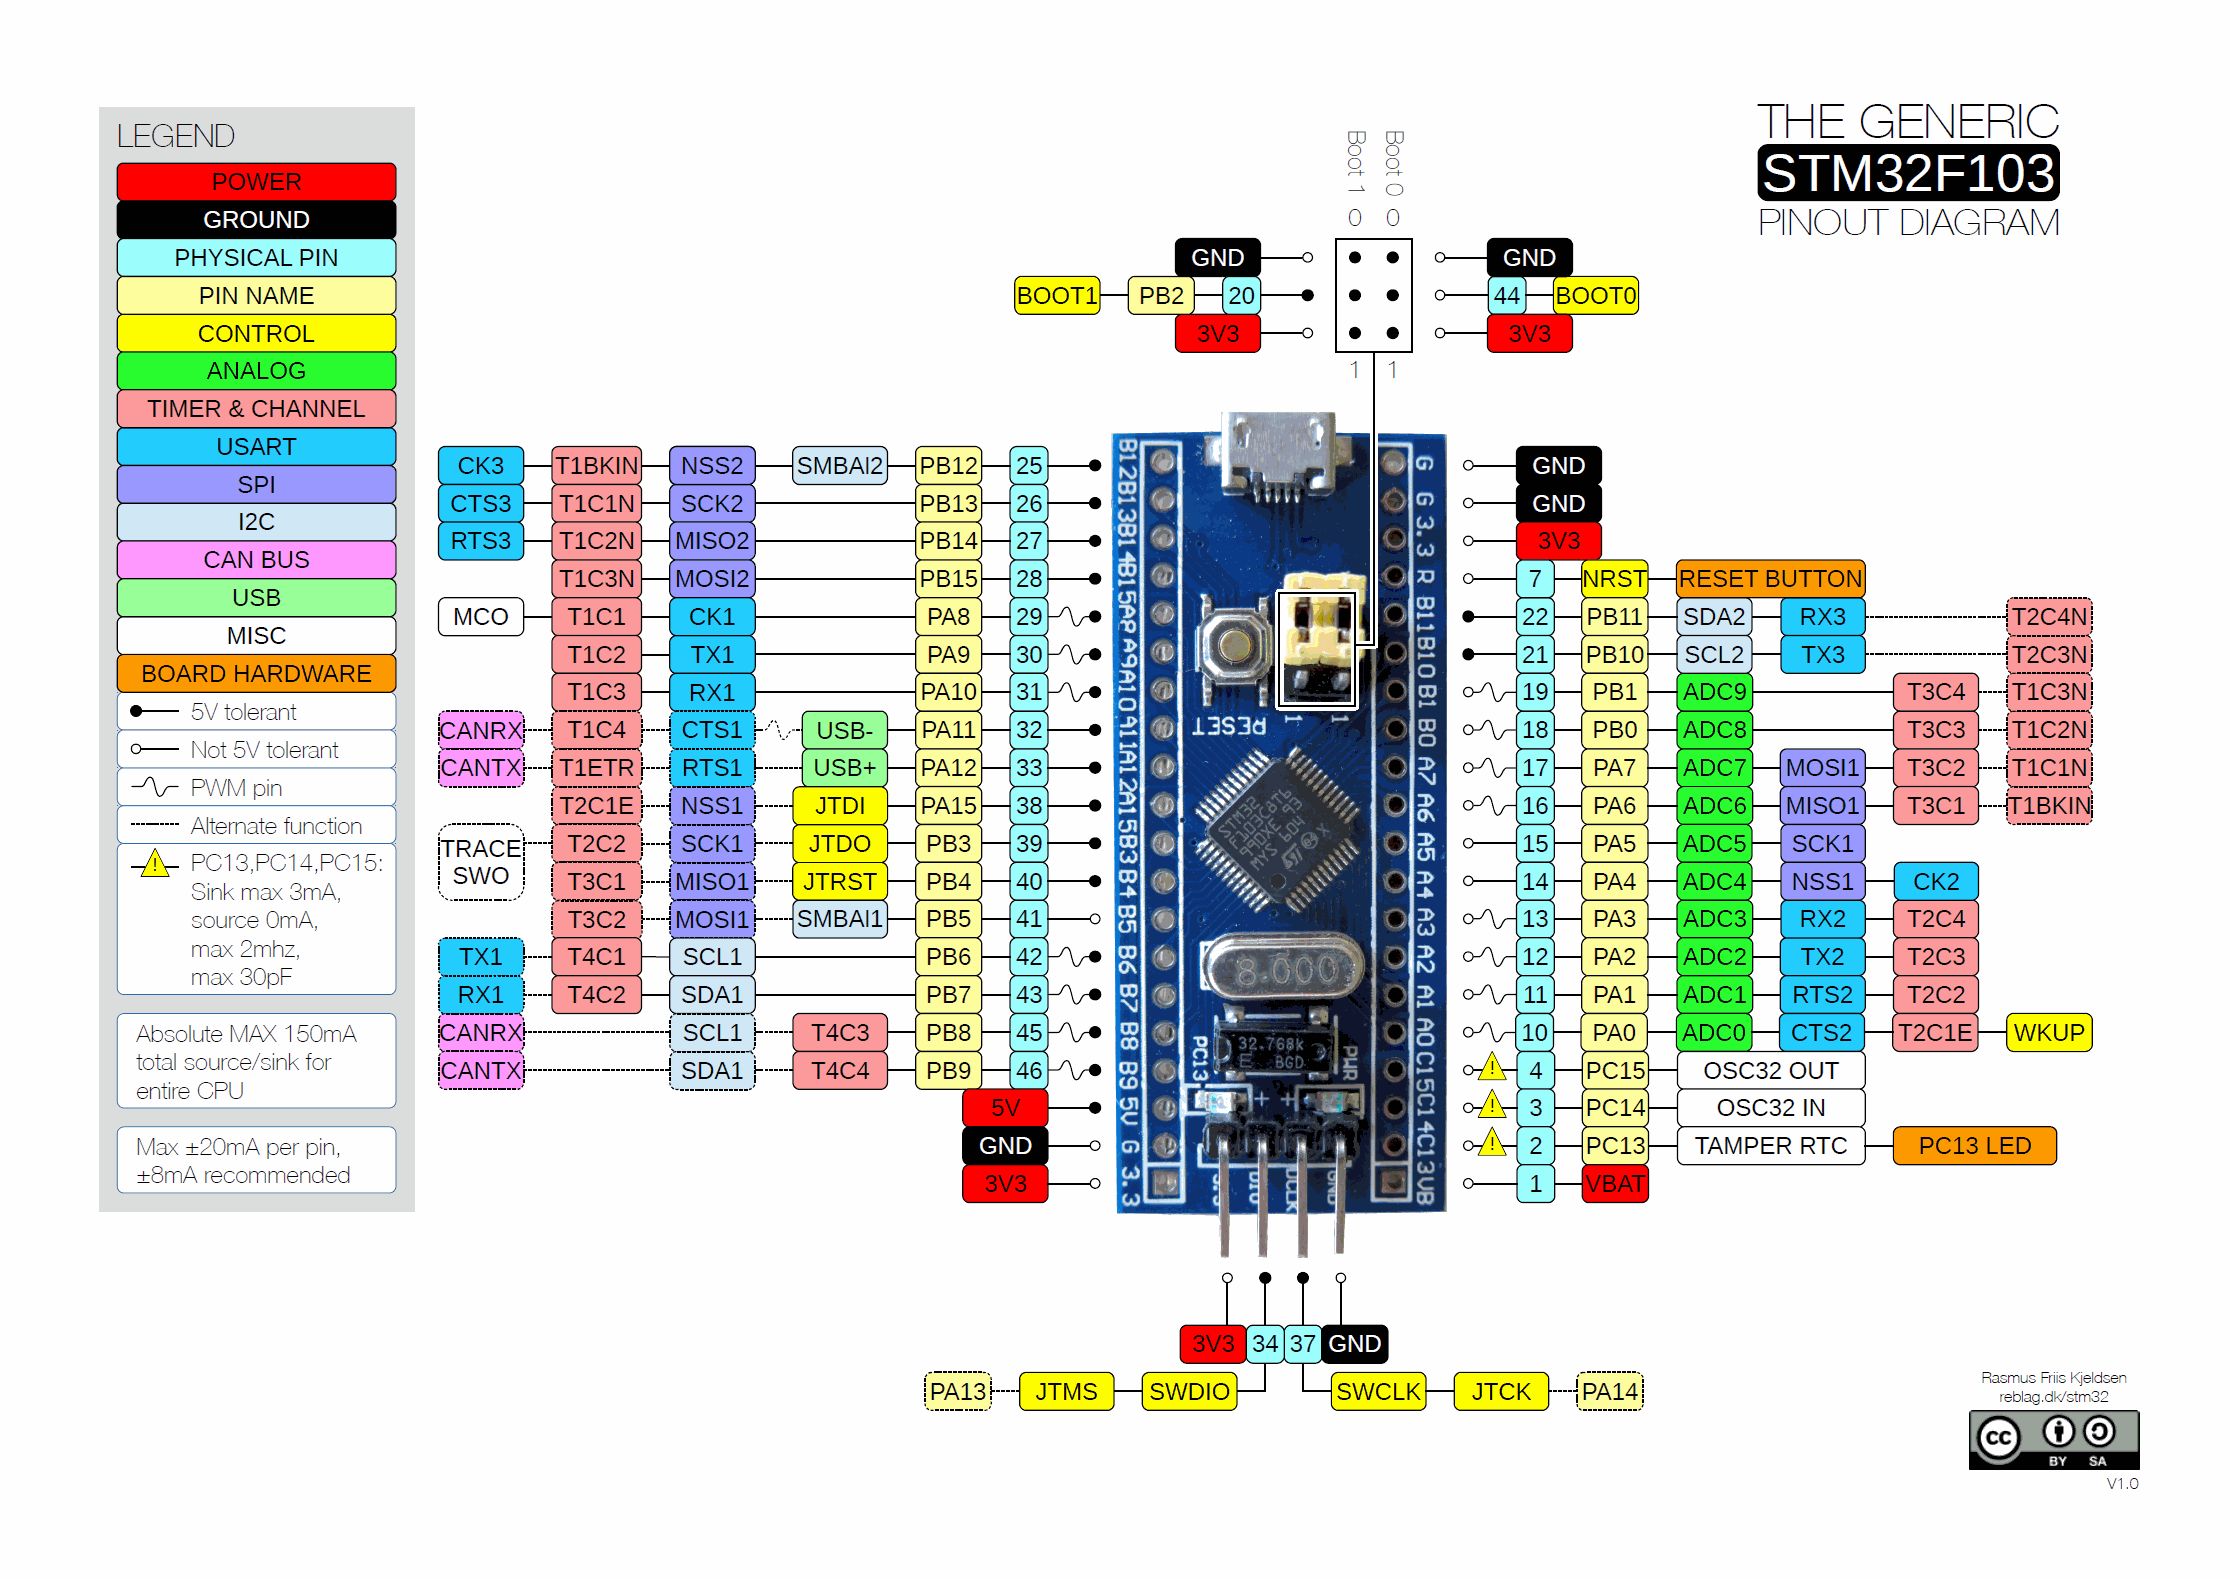
You will also need a debug probe, for example an stlink v3 mini for programming and debugging. (There are many different STLink probes out there, all of them should work fine with the instructions given here, other JTAG or SWD debug probes will work as well but will need different software or configuration).
Installing software
To program your microcontroller, you need to install:
- openocd
gdb-multiarch(on some platforms you may need to usegdb-arm-none-eabiinstead, make sure to update.cargo/configto reflect this change)
rustup target install thumbv7m-none-eabiSetting up your project
Create a new Rust project as you usually do with cargo init. The hello world of embedded development is usually to blink an LED and code to do so is available in examples/blinky.rs. Copy that file to the main.rs of your project.
You also need to add some dependencies to your Cargo.toml:
[dependencies]
embedded-hal = "1.0"
nb = "1"
cortex-m = "0.7.7"
cortex-m-rt = "0.7.5"
Panic behaviour, see https://crates.io/keywords/panic-impl for alternatives
panic-halt = "1.0.0"
[dependencies.stm32f1xx-hal] version = "0.11.0" features = ["stm32f103", "medium"]
If you build your project now, you should get a single error: error: language item required, but not found: eh_personality. This unhelpful error message is fixed by compiling for the right target.
We also need to tell Rust how to link our executable, and how to lay out the result in memory. To accomplish all this, copy .cargo/config.toml and memory.x from the stm32f1xx-hal repo to your project.
cargo buildIf everything went well, your project should have built without errors.
Programming the microcontroller
It is now time to actually run the code on the hardware. To do so plug your debug probe into the blue pill and start openocd using
openocd -f interface/stlink-v3.cfg -f target/stm32f1x.cfgIf all went well, it should detect your microcontroller and say Info : stm32f1x.cpu: hardware has 6 breakpoints, 4 watchpoints. Keep it running in the background.
We will use gdb for uploading the compiled binary to the microcontroller and for debugging. Cargo will automatically start gdb thanks to the .cargo/config you added earlier. gdb also needs to be told to connect to openocd which is done by copying .gdbinit to the root of your project.
You may also need to tell gdb that it is safe to load .gdbinit from the working directory.
- Linux
echo "set auto-load safe-path $(pwd)" >> ~/.gdbinit- Windows
echo set auto-load safe-path %CD% >> %USERPROFILE%\.gdbinitIf everything was successful, cargo should compile your project, start gdb, load your program and give you a prompt. If you type continue in the gdb prompt, your program should start and the green led on the blue pill should start blinking.
Going further
From here on, you can start adding more code to your project to make it do something more interesting. For crate documentation, see docs.rs/stm32f1xx-hal. There are also a lot more examples available. If something is unclear in the docs or examples, please, open an issue and we will try to improve it.
Selecting a microcontroller
This crate supports multiple microcontrollers in the stm32f1 family. Which specific microcontroller you want to build for has to be specified with a feature, for example stm32f103.
If no microcontroller is specified, the crate will not compile.
You may also need to specify the density of the device with medium, high or xl to enable certain peripherals. Generally the density can be determined by the 2nd character after the number in the device name (i.e. For STM32F103C6U, the 6 indicates a low-density device) but check the datasheet or CubeMX to be sure.
- 4, 6 => low density, no feature required
- 8, B =>
mediumfeature - C, D, E =>
highfeature - F, G =>
xlfeature
connectivity line (stm32f105 and stm32f107) no density feature must be specified.
Supported Microcontrollers
stm32f100stm32f101stm32f103stm32f105stm32f107
Trying out the examples
You may need to give cargo permission to call gdb from the working directory.
- Linux
echo "set auto-load safe-path $(pwd)" >> ~/.gdbinit- Windows
echo set auto-load safe-path %CD% >> %USERPROFILE%\.gdbinitCompile, load, and launch the hardware debugger.
$ rustup target add thumbv7m-none-eabi
on another terminal
$ openocd -f interface/$INTERFACE.cfg -f target/stm32f1x.cfg
flash and debug the "Hello, world" example. Change stm32f103 to match your hardware
$ cargo run --features stm32f103 --example hello
$INTERFACE should be set based on your debugging hardware. If you are using an stlink V2, use stlink-v2.cfg. For more information, see the [embeddonomicon].
[embeddonomicon]: https://rust-embedded.github.io/book/start/hardware.html
Using as a Dependency
When using this crate as a dependency in your project, the microcontroller can be specified as part of the Cargo.toml definition.
[dependencies.stm32f1xx-hal]
version = "0.11.0"
features = ["stm32f100"]
Documentation
The documentation can be found at docs.rs.
License
Licensed under either of
- Apache License, Version 2.0 (LICENSE-APACHE or
- MIT license (LICENSE-MIT or http://opensource.org/licenses/MIT)
Contribution
Unless you explicitly state otherwise, any contribution intentionally submitted for inclusion in the work by you, as defined in the Apache-2.0 license, shall be dual licensed as above, without any additional terms or conditions.


