
📊 APIs for web automation, testing, and bypassing bot-detection.

All-in-one Browser Automation Framework:
Web Crawling / Testing / Scraping / Stealth






🚀 Start | 🏰 Features | 🎛️ Options | 📚 Examples | 💻 Scripts | 🗾 Locale
📗 API | 📘 Stealth API | 🔠 DesignPatterns | 🔴 Recorder | 📊 Dashboard
🎖️ GUI | 📰 TestPage | 👤 UC Mode | 🐙 CDP Mode | 📶 Charts | 🖥️ Farm
👁️ How | 🚝 Migration | 🎭 Stealthy Playwright | 🛂 MasterQA | 🚎 Tours
🤖 CI/CD | 🟨 JSMgr | 🌏 Translator | 🎞️ Presenter | 🖼️ Visual | 🗂️ CPlans
- 🐙 CDP Mode bypasses bot-detection with Chromium-based browsers.
- 🎭 Stealthy Playwright Mode extends CDP Mode's stealth to Playwright.
pip install seleniumbasefor the main framework.pip install playwrightfor the Playwright integration.
📝 Here's a Python example that uses Pure CDP Mode (sb_cdp):
(It navigates to Browserscan where it bypasses bot-detection.)
from seleniumbase import sb_cdp
sb = sb_cdp.Chrome() sb.goto("https://browserscan.net/bot-detection") sb.sleep(3) sb.quit()
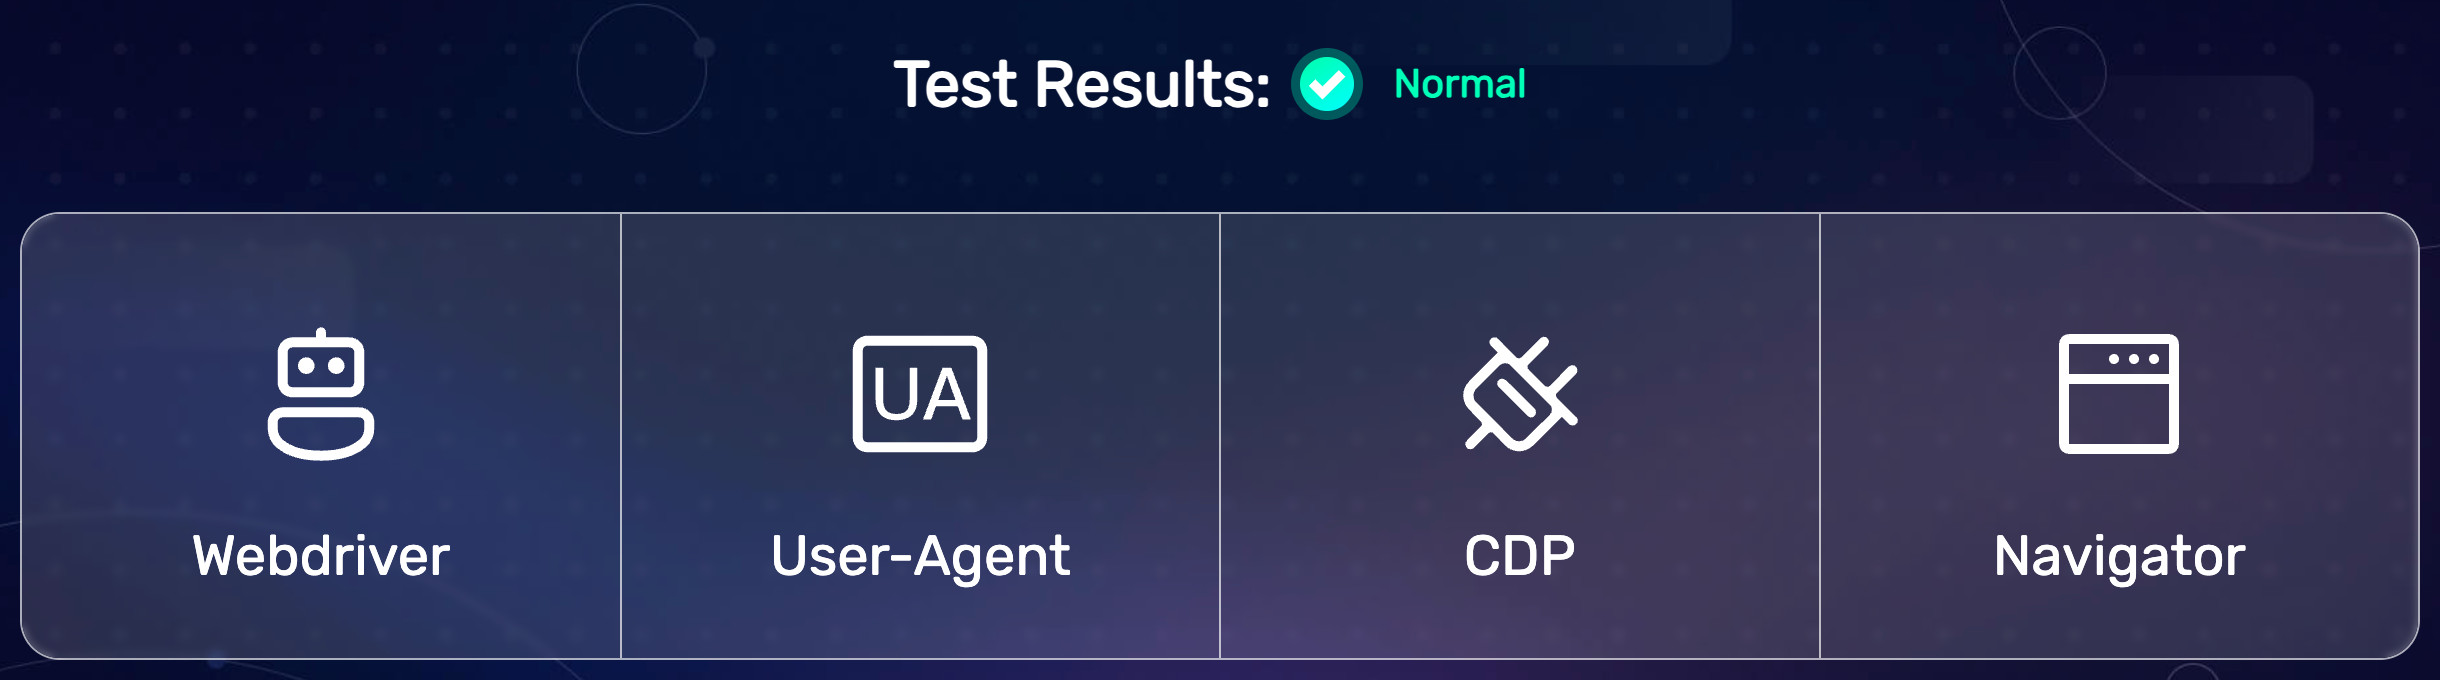
(All BrowserScan bot-detection tests passed successfully.)
🎭 Here's an example script that uses Stealthy Playwright Mode:
(Playwright connects to a stealthy SeleniumBase browser session.)
from playwright.syncapi import syncplaywright
from seleniumbase import sb_cdp
sb = sb_cdp.Chrome(guest=True) endpointurl = sb.getendpoint_url()
with sync_playwright() as p:     browser = p.chromium.connectovercdp(endpoint_url)     page = browser.contexts[0].pages[0]     page.goto("https://bot.sannysoft.com/")     page.waitfortimeout(500)
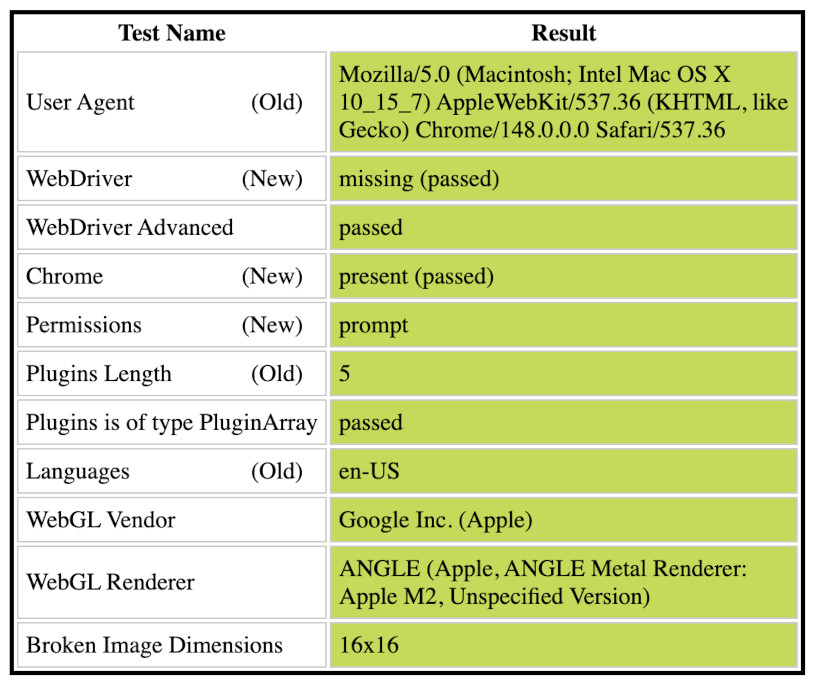
(All Sannysoft bot-detection tests passed successfully.)
📝 The Browserscan example can be expanded into a test demo:
(Assertions added and elements highlighted with JavaScript.)
from seleniumbase import sb_cdp
sb = sbcdp.Chrome(locale="en", adblock=True) sb.goto("https://browserscan.net/bot-detection") sb.flash("Test Results", duration=1.5, pause=0.5) sb.assert_element('strong:contains("Normal")') print("Bot Not Detected") sb.flash('strong:contains("Normal")', pause=1) sb.quit()
📝 This example scrapes Hacker News listings:
from seleniumbase import sb_cdp
sb = sb_cdp.Chrome() sb.goto("https://news.ycombinator.com/submitted?id=seleniumbase") elements = sb.find_elements("span.titleline > a") for element in elements:     print("* " + element.text)
🐙 Stealthy CDP Mode examples are located in ./examples/cdp_mode/.
🎭 Stealthy Playwright examples are located in ./examples/cdp_mode/playwright/.
⚙️ Stealthy architecture flowchart:
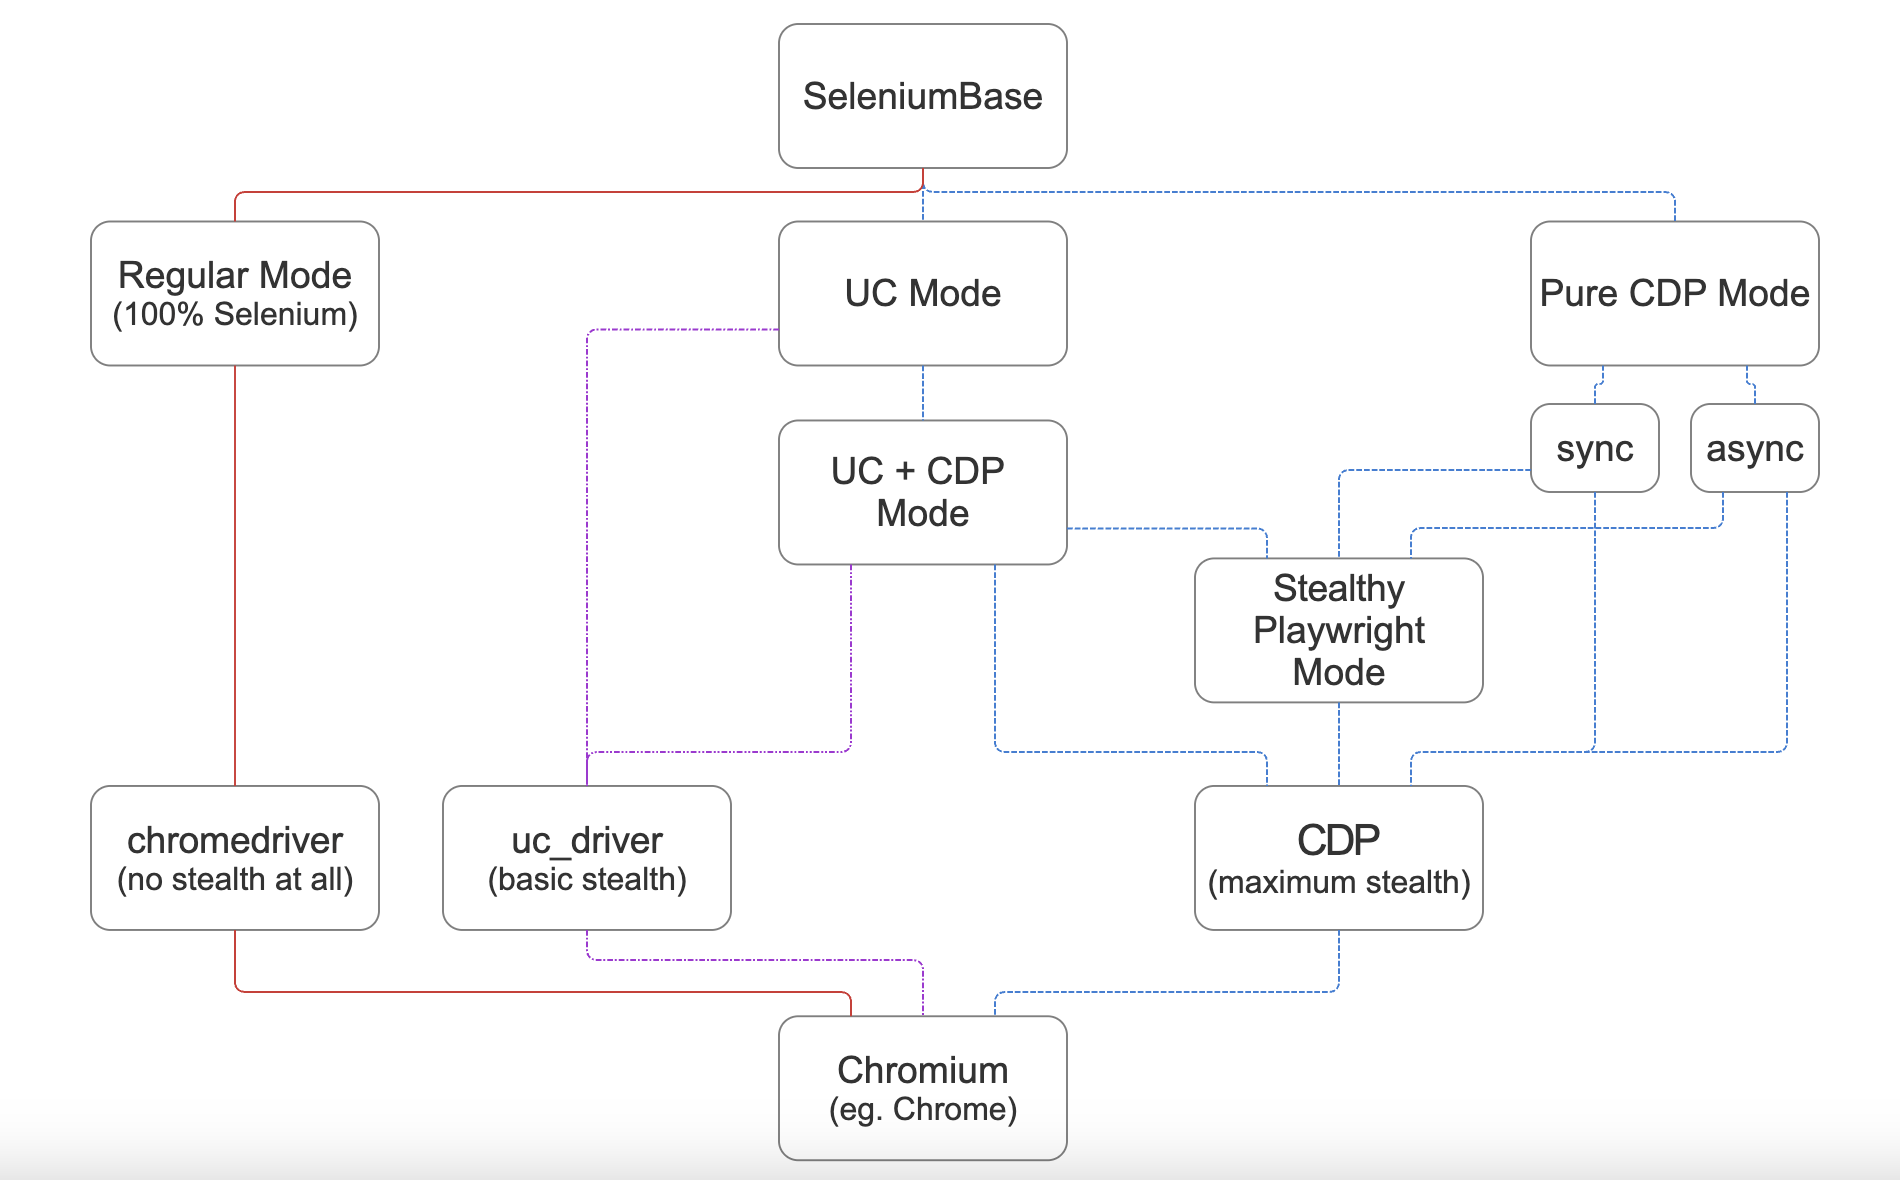
(For maximum stealth, use CDP Mode, which includes Stealthy Playwright Mode.)
🌐 CLI Options for Supported Chromium Browsers
💡 You can set the Chromium browser to use via command line parameters:
python SCRIPT.py --chromium  # Use the unbranded Chromium browser
python SCRIPT.py --cft  # Use Chrome-for-testing
python SCRIPT.py --edge  # Use Microsoft Edge
python SCRIPT.py --brave  # Use Brave browser
Google Chrome is the default browser. Only unbranded Chromium and Chrome-for-Testing get installed automatically if not already installed.
The Chromium browser can also be set via method args, eg: cft=True, use_chromium=True, browser="edge", browser="brave", etc. Eg:
sb = sbcdp.Chrome(usechromium=True)📝 This example saves Google Search results with UC + CDP Mode:
(Results are saved as PDF, HTML, and PNG files to ./latest_logs/)
from seleniumbase import SB
with SB(uc=True, test=True) as sb:     url = "https://google.com/ncr"     sb.activatecdpmode(url)     sb.clickifvisible('button:contains("Accept all")')     sb.type('[name="q"]', "SeleniumBase GitHub page")     sb.click('[value="Google Search"]')     sb.sleep(4)  # The "AI Overview" sometimes loads     print(sb.getpagetitle())     sb.saveaspdftologs()     sb.savepagesourcetologs()     sb.savescreenshotto_logs()     print("Logs have been saved to: ./latest_logs/")
📝 This example bypasses Cloudflare's challenge page with UC + CDP Mode:
(If the Turnstile isn't bypassed automatically, sb.solvecaptcha() handles it.)
from seleniumbase import SB
with SB(uc=True, test=True, locale="en") as sb:     url = "https://gitlab.com/users/sign_in"     sb.activatecdpmode(url)     sb.sleep(2)     sb.solve_captcha()     # (The rest is for testing and demo purposes)     sb.asserttext("Username", '[for="userlogin"]', timeout=3)     sb.assertelement('label[for="userlogin"]')     sb.highlight('button:contains("Sign in")')     sb.highlight('h1:contains("GitLab")')     sb.post_message("SeleniumBase wasn't detected", duration=4)


(Successfully bypassed bot-detection on a Cloudflare challenge page.)
💡 sb.solve_captcha() handles CAPTCHAs that aren't bypassed automatically.
(If no CAPTCHA is present on the current page, then nothing happens.)
📝 This example handles a CAPTCHA page with Pure CDP Mode:
from seleniumbase import sb_cdp
sb = sb_cdp.Chrome(incognito=True) sb.goto("https://gitlab.com/users/sign_in") sb.sleep(2) sb.solve_captcha() sb.highlight('h1:contains("GitLab")') sb.highlight('button:contains("Sign in")') sb.quit()
🧪 Comprehensive E2E Testing with pytest:
📚 The SeleniumBase/examples/ folder includes over 150 ready-to-run examples of E2E testing. Examples that start with test or end with test.py/tests.py run with pytest. Other examples run directly with raw python (those generally start with raw_ to avoid confusion).
📝 This example tests an e-commerce site with pytest:
from seleniumbase import BaseCase
BaseCase.main(name, file)  # Call pytest
class MyTestClass(BaseCase):     def testswaglabs(self):         self.goto("https://www.saucedemo.com")         self.type("#user-name", "standard_user")         self.type("#password", "secret_sauce\n")         self.assertelement("div.inventorylist")         self.click('button[name*="backpack"]')         self.click("#shoppingcartcontainer a")         self.asserttext("Backpack", "div.cartitem")         self.click("button#checkout")         self.type("input#first-name", "SeleniumBase")         self.type("input#last-name", "Automation")         self.type("input#postal-code", "77123")         self.click("input#continue")         self.click("button#finish")         self.assert_text("Thank you for your order!")
pytest testgetswag.py
📝 This example tests another e-commerce site with pytest:
pytest testcoffeecart.py --demo
(
--demomode slows down tests and highlights actions)
📝 This example covers multiple actions with pytest:
pytest testdemosite.py
Easy to type, click, select, toggle, drag & drop, and more.
(For more examples, see the SeleniumBase/examples/ folder.)
Explore the README:
💡 SeleniumBase is a Python framework for browser automation and testing. SeleniumBase uses Selenium/WebDriver APIs and incorporates test-runners such as 💡 SeleniumBase's driver manager gives you more control over automatic driver downloads. (Use 💡 SeleniumBase automatically detects between CSS Selectors and XPath, which means you don't need to specify the type of selector in your commands (but optionally you could). 💡 SeleniumBase methods often perform multiple actions in a single method call. For example, 💡 SeleniumBase uses default timeout values when not set: 💡 SeleniumBase lets you change the explicit timeout values of methods: 💡 SeleniumBase gives you clean error output when a test fails. With raw Selenium, error messages can get very messy. 💡 SeleniumBase gives you the option to generate a dashboard and reports for tests. It also saves screenshots from failing tests to the 💡 SeleniumBase includes desktop GUI apps for running tests, such as SeleniumBase Commander for 💡 SeleniumBase has its own Recorder / Test Generator for creating tests from manual browser actions. 💡 SeleniumBase comes with test case management software, ("CasePlans"), for organizing tests and step descriptions. 💡 SeleniumBase includes tools for building data apps, ("ChartMaker"), which can generate JavaScript from Python. ▶️ How is SeleniumBase different from raw Selenium? (click to expand)
pytest, pynose, and behave to provide organized structure, test discovery, test execution, test state (eg. passed, failed, or skipped), and command-line options for changing default settings (eg. browser selection). With raw Selenium, you would need to set up your own options-parser for configuring tests from the command-line.--driver-version=VER with your pytest run command to specify the version.) By default, SeleniumBase will download a driver version that matches your major browser version if not set.self.type(selector, text) does the following:
1. Waits for the element to be visible.
2. Waits for the element to be interactive.
3. Clears the text field.
4. Types in the new text.
5. Presses Enter/Submit if the text ends in "\n".
With raw Selenium, those actions require multiple method calls.
✅ self.click("button")
With raw Selenium, methods would fail instantly (by default) if an element needed more time to load:
❌ self.driver.find_element(by="css selector", value="button").click()
(Reliable code is better than unreliable code.)
✅ self.click("button", timeout=10)
With raw Selenium, that requires more code:
❌ WebDriverWait(driver, 10).until(EC.elementtobe_clickable("css selector", "button")).click()
(Simple code is better than complex code.)./latestlogs/ folder. Raw Selenium does not have these options out-of-the-box.pytest and SeleniumBase Behave GUI for behave.
📚 Learn about different ways of writing tests:
📗📝 Here's testsimplelogin.py, which uses BaseCase class inheritance, and runs with pytest or pynose. (Use self.driver to access Selenium's raw driver.)
from seleniumbase import BaseCase
BaseCase.main(name, file)
class TestSimpleLogin(BaseCase):     def testsimplelogin(self):         self.goto("seleniumbase.io/simple/login")         self.type("#username", "demo_user")         self.type("#password", "secret_pass")         self.click('a:contains("Sign in")')         self.assertexacttext("Welcome!", "h1")         self.assert_element("img#image1")         self.highlight("#image1")         self.click_link("Sign out")         self.asserttext("signed out", "#topmessage")
📘📝 Here's rawloginsb.py, which uses the SB Context Manager. Runs with pure python. (Use sb.driver to access Selenium's raw driver.)
from seleniumbase import SB
with SB() as sb:     sb.goto("seleniumbase.io/simple/login")     sb.type("#username", "demo_user")     sb.type("#password", "secret_pass")     sb.click('a:contains("Sign in")')     sb.assertexacttext("Welcome!", "h1")     sb.assert_element("img#image1")     sb.highlight("#image1")     sb.click_link("Sign out")     sb.asserttext("signed out", "#topmessage")
📙📝 Here's rawlogindriver.py, which uses the Driver Manager. Runs with pure python. (The driver is an improved version of Selenium's raw driver, with more methods.)
from seleniumbase import Driver
driver = Driver() try:     driver.goto("seleniumbase.io/simple/login")     driver.type("#username", "demo_user")     driver.type("#password", "secret_pass")     driver.click('a:contains("Sign in")')     driver.assertexacttext("Welcome!", "h1")     driver.assert_element("img#image1")     driver.highlight("#image1")     driver.click_link("Sign out")     driver.asserttext("signed out", "#topmessage") finally:     driver.quit()
 Set up Python & Git:

🔵 Add Python and Git to your System PATH.
🔵 Using a Python virtual env is recommended.
 Install SeleniumBase:
You can install seleniumbase from PyPI or GitHub:
🔵 How to install seleniumbase from PyPI:
pip install seleniumbase- (Add
--upgradeOR-Uto upgrade SeleniumBase.) - (Add
--force-reinstallto upgrade indirect packages.)
seleniumbase from a GitHub clone:
git clone https://github.com/seleniumbase/SeleniumBase.git
cd SeleniumBase/
pip install -e .
🔵 How to upgrade an existing install from a GitHub clone:
git pull
pip install -e .
🔵 Type seleniumbase or sbase to verify that SeleniumBase was installed successfully:
/ | | | () | ) __ \_ \/ -) / -) ' \| | \| | ' \ | \/chromedriver(-< -_) |/\|\|||||\,|||\|/\,/|_|
╭──────────────────────────────────────────────────╮ │ * USAGE: "seleniumbase [COMMAND] [PARAMETERS]" │ │ * OR: "sbase [COMMAND] [PARAMETERS]" │ │ │ │ COMMANDS: PARAMETERS / DESCRIPTIONS: │ │ get / install [DRIVER_NAME] [OPTIONS] │ │ methods (List common Python methods) │ │ options (List common pytest options) │ │ behave-options (List common behave options) │ │ gui / commander [OPTIONAL PATH or TEST FILE] │ │ behave-gui (SBase Commander for Behave) │ │ caseplans [OPTIONAL PATH or TEST FILE] │ │ mkdir [DIRECTORY] [OPTIONS] │ │ mkfile [FILE.py] [OPTIONS] │ │ mkrec / codegen [FILE.py] [OPTIONS] │ │ recorder (Open Recorder Desktop App.) │ │ record (If args: mkrec. Else: App.) │ │ mkpres [FILE.py] [LANG] │ │ mkchart [FILE.py] [LANG] │ │ print [FILE] [OPTIONS] │ │ translate [SB_FILE.py] [LANG] [ACTION] │ │ convert [WEBDRIVERUNITTESTFILE.py] │ │ extract-objects [SB_FILE.py] │ │ inject-objects [SB_FILE.py] [OPTIONS] │ │ objectify [SB_FILE.py] [OPTIONS] │ │ revert-objects [SB_FILE.py] [OPTIONS] │ │ encrypt / obfuscate │ │ decrypt / unobfuscate │ │ proxy (Start a basic proxy server) │ │ download server (Get Selenium Grid JAR file) │ │ grid-hub [start|stop] [OPTIONS] │ │ grid-node [start|stop] --hub=[HOST/IP] │ │ │ │ * EXAMPLE => "sbase get chromedriver stable" │ │ * For command info => "sbase help [COMMAND]" │ │ * For info on all commands => "sbase --help" │ ╰──────────────────────────────────────────────────╯</code></pre>
<h3>🔵 Downloading webdrivers:</h3>
✅ SeleniumBase automatically downloads webdrivers as needed, such as
.self.goto(url)<div></div> <details> <summary> ▶️ Here's sample output from a chromedriver download. (<b>click to expand</b>)</summary>
<pre><code class="lang-zsh">* chromedriver to download = 149.0.7827.54 (Latest Stable)
Downloading chromedriver-mac-arm64.zip from: https://storage.googleapis.com/chrome-for-testing-public/149.0.7827.54/mac-arm64/chromedriver-mac-arm64.zip ... Download Complete!
Extracting ['chromedriver'] from chromedriver-mac-arm64.zip ... Unzip Complete!
The file [chromedriver] was saved to: ~/github/SeleniumBase/seleniumbase/drivers/ chromedriver
Making [chromedriver 149.0.7827.54] executable ... [chromedriver 149.0.7827.54] is now ready for use!</code></pre>
</details>
<a id="basicexampleand_usage"></a> <h2><img src="https://seleniumbase.github.io/img/logo7.png" title="SeleniumBase" width="32" /> Basic Example / Usage:</h2>
🔵 If you've cloned SeleniumBase, you can run tests from the examples/ folder.
<p align="left">Here's <a href="https://github.com/seleniumbase/SeleniumBase/blob/master/examples/myfirsttest.py">myfirsttest.py</a>:</p>
<pre><code class="lang-zsh">cd examples/ pytest myfirsttest.py</code></pre>
<a href="https://github.com/seleniumbase/SeleniumBase/blob/master/examples/myfirsttest.py"><img src="https://seleniumbase.github.io/cdn/gif/fastswag2.gif" alt="SeleniumBase Test" width="500" /></a>
<p align="left"><b>Here's the full code for <a href="https://github.com/seleniumbase/SeleniumBase/blob/master/examples/myfirsttest.py">myfirsttest.py</a>:</b></p>
<pre><code class="lang-python">from seleniumbase import BaseCase BaseCase.main(name, file)
class MyTestClass(BaseCase): def testswaglabs(self): self.goto("https://www.saucedemo.com") self.type("#user-name", "standard_user") self.type("#password", "secret_sauce\n") self.assertelement("div.inventorylist") self.assertexacttext("Products", "span.title") self.click('button[name*="backpack"]') self.click("#shoppingcartcontainer a") self.assertexacttext("Your Cart", "span.title") self.asserttext("Backpack", "div.cartitem") self.click("button#checkout") self.type("#first-name", "SeleniumBase") self.type("#last-name", "Automation") self.type("#postal-code", "77123") self.click("input#continue") self.assert_text("Checkout: Overview") self.asserttext("Backpack", "div.cartitem") self.asserttext("29.99", "div.inventoryitem_price") self.click("button#finish") self.assertexacttext("Thank you for your order!", "h2") self.assert_element('img[alt="Pony Express"]') self.jsclick("a#logoutsidebar_link") self.assertelement("div#loginbutton_container")</code></pre>
- By default, CSS Selectors are used for finding page elements.
- If you're new to CSS Selectors, games like CSS Diner can help you learn.
- For more reading, here's an advanced guide on CSS attribute selectors.
<a id="common_methods"></a> <h3><img src="https://seleniumbase.github.io/img/logo7.png" title="SeleniumBase" width="32" /> Here are some common SeleniumBase methods:</h3>
<pre><code class="lang-python">self.goto(url) # Navigate the browser window to the URL. self.open(url) # Same as
self.activatecdpmode() # Activate CDP Mode from UC Mode. self.type(selector, text) # Update the field with the text. self.click(selector) # Click the element with the selector. self.clicklink(linktext) # Click the link containing text. self.go_back() # Navigate back to the previous URL. self.selectoptionbytext(dropdownselector, option) self.hoverandclick(hoverselector, clickselector) self.draganddrop(dragselector, dropselector) self.get_text(selector) # Get the text from the element. self.getcurrenturl() # Get the URL of the current page. self.getpagesource() # Get the HTML of the current page. self.get_attribute(selector, attribute) # Get element attribute. self.get_title() # Get the title of the current page. self.switchtoframe(frame) # Switch into the iframe container. self.switchtodefault_content() # Leave the iframe container. self.opennewwindow() # Open a new window in the same browser. self.switchtowindow(window) # Switch to the browser window. self.switchtodefault_window() # Switch to the original window. self.getnewdriver(OPTIONS) # Open a new driver with OPTIONS. self.switchtodriver(driver) # Switch to the browser driver. self.switchtodefault_driver() # Switch to the original driver. self.waitforelement(selector) # Wait until element is visible. self.iselementvisible(selector) # Return element visibility. self.istextvisible(text, selector) # Return text visibility. self.sleep(seconds) # Do nothing for the given amount of time. self.save_screenshot(name) # Save a screenshot in .png format. self.assert_element(selector) # Verify the element is visible. self.assert_text(text, selector) # Verify text in the element. self.assertexacttext(text, selector) # Verify text is exact. self.assert_title(title) # Verify the title of the web page. self.assertdownloadedfile(file) # Verify file was downloaded. self.assertno404_errors() # Verify there are no broken links. self.assertnojs_errors() # Verify there are no JS errors.</code></pre>sb🔵 For the complete list of SeleniumBase methods, see: <b><a href="https://github.com/seleniumbase/SeleniumBase/blob/master/helpdocs/methodsummary.md">Method Summary</a></b>
<a id="fun_facts"></a> <h2><img src="https://seleniumbase.github.io/img/logo7.png" title="SeleniumBase" width="32" /> Fun Facts / Learn More:</h2>
<p>✅ SeleniumBase automatically handles common <a href="https://www.selenium.dev/documentation/webdriver/" target="_blank">WebDriver</a> actions such as launching web browsers before tests, saving screenshots during failures, and closing web browsers after tests.</p>
<p>✅ SeleniumBase lets you customize tests via <a href="https://github.com/seleniumbase/SeleniumBase/blob/master/helpdocs/customizingtest_runs.md">command-line options</a>.</p>
<p>✅ SeleniumBase uses simple syntax for commands. Example:</p>
<pre><code class="lang-python">self.type("input", "dogs\n") # (The "\n" presses ENTER)</code></pre>
Most SeleniumBase scripts can be run with <code translate="no">pytest</code>, <code translate="no">pynose</code>, or pure <code translate="no">python</code>. Not all test runners can run all test formats. For example, tests that use the
pytest fixture can only be run withpytest. (See <a href="https://github.com/seleniumbase/SeleniumBase/blob/master/helpdocs/syntaxformats.md">Syntax Formats</a>) There's also a <a href="https://behave.readthedocs.io/en/stable/gherkin.html#features" target="blank">Gherkin</a> test format that runs with <a href="https://github.com/seleniumbase/SeleniumBase/blob/master/examples/behavebdd/ReadMe.md">behave</a>.test<pre><code class="lang-zsh">pytest coffeecarttests.py --rs pytest testsbfixture.py --demo pytest test_suite.py --rs --html=report.html --dashboard
pynose basic_test.py --mobile pynose test_suite.py --headless --report --show-report
python raw_sb.py python rawtestscripts.py
behave realworld.feature behave calculator.feature -D rs -D dashboard</code></pre>
<p>✅ <code translate="no">pytest</code> includes automatic test discovery. If you don't specify a specific file or folder to run, <code translate="no">pytest</code> will automatically search through all subdirectories for tests to run based on the following criteria:</p>
- Python files that start with
or end withtest.py.test_Python methods that start with . With a SeleniumBase pytest.ini file present, you can modify default discovery settings. The Python class name can be anything becauseseleniumbase.BaseCaseinheritsunittest.TestCaseto trigger autodiscovery.time.sleep(seconds)<p>✅ You can do a pre-flight check to see which tests would get discovered by <code translate="no">pytest</code> before the actual run:</p>
<pre><code class="lang-zsh">pytest --co -q</code></pre>
<p>✅ You can be more specific when calling <code translate="no">pytest</code> or <code translate="no">pynose</code> on a file:</p>
<pre><code class="lang-zsh">pytest [FILENAME.py]::[CLASSNAME]::[METHOD_NAME]
pynose [FILENAME.py]:[CLASSNAME].[METHOD_NAME]</code></pre>
<p>✅ No More Flaky Tests! SeleniumBase methods automatically wait for page elements to finish loading before interacting with them (<i>up to a timeout limit</i>).</p> <img src="https://img.shields.io/badge/Flaky%20Tests%3F-%20NO%21-11BBDD.svg" alt="NO MORE FLAKY TESTS!" />
✅ SeleniumBase supports all major browsers and operating systems: <p><b>Browsers:</b> Chrome, Edge, Firefox, and Safari.</p> <p><b>Systems:</b> Linux/Ubuntu, macOS, and Windows.</p>
✅ SeleniumBase works on all popular CI/CD platforms: <p><a href="https://github.com/seleniumbase/SeleniumBase/blob/master/integrations/github/workflows/ReadMe.md"><img alt="GitHub Actions integration" src="https://img.shields.io/badge/GitHubActions-12B2C2.svg?logo=GitHubActions&logoColor=CFFFC2" /></a> <a href="https://github.com/seleniumbase/SeleniumBase/blob/master/integrations/azure/jenkins/ReadMe.md"><img alt="Jenkins integration" src="https://img.shields.io/badge/Jenkins-32B242.svg?logo=jenkins&logoColor=white" /></a> <a href="https://github.com/seleniumbase/SeleniumBase/blob/master/integrations/azure/azurepipelines/ReadMe.md"><img alt="Azure integration" src="https://img.shields.io/badge/Azure-2288EE.svg?logo=AzurePipelines&logoColor=white" /></a> <a href="https://github.com/seleniumbase/SeleniumBase/blob/master/integrations/googlecloud/ReadMe.md"><img alt="Google Cloud integration" src="https://img.shields.io/badge/GoogleCloud-11CAE8.svg?logo=GoogleCloud&logoColor=EE0066" /></a> <a href="#utilizingadvancedfeatures"><img alt="AWS integration" src="https://img.shields.io/badge/AWS-4488DD.svg?logo=AmazonAWS&logoColor=FFFF44" /></a> <a href="https://en.wikipedia.org/wiki/Personalcomputer" target="blank"><img alt="Your Computer" src="https://img.shields.io/badge/💻YourComputer-44E6E6.svg" /></a></p>
<p>✅ SeleniumBase includes an automated/manual hybrid solution called <b><a href="https://github.com/seleniumbase/SeleniumBase/blob/master/examples/master_qa/ReadMe.md">MasterQA</a></b> to speed up manual testing with automation while manual testers handle validation.</p>
<p>✅ SeleniumBase supports <a href="https://github.com/seleniumbase/SeleniumBase/tree/master/examples/offline_examples">running tests while offline</a> (<i>assuming webdrivers have previously been downloaded when online</i>).</p>
<p>✅ For a full list of SeleniumBase features, <a href="https://github.com/seleniumbase/SeleniumBase/blob/master/helpdocs/featureslist.md">Click Here</a>.</p>
<a id="demomodeand_debugging"></a> <h2><img src="https://seleniumbase.github.io/img/logo7.png" title="SeleniumBase" width="32" /> Demo Mode / Debugging:</h2>
🔵 <b>Demo Mode</b> helps you see what a test is doing. If a test is moving too fast for your eyes, run it in <b>Demo Mode</b> to pause the browser briefly between actions, highlight page elements being acted on, and display assertions:
<pre><code class="lang-zsh">pytest myfirsttest.py --demo</code></pre>
🔵
can be used to make a test wait at a specific spot:pdb<pre><code class="lang-python">import time; time.sleep(3) # Do nothing for 3 seconds.</code></pre>
🔵 Debug Mode with Python's built-in pdb library helps you debug tests:
<pre><code class="lang-python">breakpoint() # Shortcut for "import pdb; pdb.set_trace()"</code></pre>
> (
commands:n,c,s,u,d=>next,continue,step,up,down)--pdb🔵 To pause an active test that throws an exception or error, (and keep the browser window open while Debug Mode begins in the console), add
as apytestoption:--trace<pre><code class="lang-zsh">pytest test_fail.py --pdb</code></pre>
🔵 To start tests in Debug Mode, add
as apytestoption:Chromium<pre><code class="lang-zsh">pytest testcoffeecart.py --trace</code></pre>
<a href="https://github.com/mdmintz/pdbp"><img src="https://seleniumbase.github.io/cdn/gif/coffee_pdbp.gif" alt="SeleniumBase test with the pdbp (Pdb+) debugger" title="SeleniumBase test with the pdbp (Pdb+) debugger" /></a>
<a id="commandlineoptions"></a> <h2>🔵 Command-line Options:</h2>
<a id="pytest_options"></a> ✅ Here are some useful command-line options that come with <code translate="no">pytest</code>:
<pre><code class="lang-zsh">-v # Verbose mode. Prints the full name of each test and shows more details. -q # Quiet mode. Print fewer details in the console output when running tests. -x # Stop running the tests after the first failure is reached. --html=report.html # Creates a detailed pytest-html report after tests finish. --co | --collect-only # Show what tests would get run. (Without running them) --co -q # (Both options together!) - Do a dry run with full test names shown. -n=NUM # Multithread the tests using that many threads. (Speed up test runs!) -s # See print statements. (Should be on by default with pytest.ini present.) --junit-xml=report.xml # Creates a junit-xml report after tests finish. --pdb # If a test fails, enter Post Mortem Debug Mode. (Don't use with CI!) --trace # Enter Debug Mode at the beginning of each test. (Don't use with CI!) -m=MARKER # Run tests with the specified pytest marker.</code></pre>
<a id="newpytestoptions"></a> ✅ SeleniumBase provides additional <code translate="no">pytest</code> command-line options for tests:
<pre><code class="lang-zsh">--browser=BROWSER # (The web browser to use. Default: "chrome".) --chrome # (Shortcut for "--browser=chrome". On by default.) --edge # (Shortcut for "--browser=edge".) --firefox # (Shortcut for "--browser=firefox".) --safari # (Shortcut for "--browser=safari".) --opera # (Shortcut for "--browser=opera".) --brave # (Shortcut for "--browser=brave".) --comet # (Shortcut for "--browser=comet".) --atlas # (Shortcut for "--browser=atlas".) --chromium # (Shortcut for using base
) --settings-file=FILE # (Override default SeleniumBase settings.) --env=ENV # (Set the test env. Access with "self.env" in tests.) --account=STR # (Set account. Access with "self.account" in tests.) --data=STRING # (Extra test data. Access with "self.data" in tests.) --var1=STRING # (Extra test data. Access with "self.var1" in tests.) --var2=STRING # (Extra test data. Access with "self.var2" in tests.) --var3=STRING # (Extra test data. Access with "self.var3" in tests.) --variables=DICT # (Extra test data. Access with "self.variables".) --user-data-dir=DIR # (Set the Chrome user data directory to use.) --protocol=PROTOCOL # (The Selenium Grid protocol: http|https.) --server=SERVER # (The Selenium Grid server/IP used for tests.) --port=PORT # (The Selenium Grid port used by the test server.) --cap-file=FILE # (The web browser's desired capabilities to use.) --cap-string=STRING # (The web browser's desired capabilities to use.) --proxy=SERVER:PORT # (Connect to a proxy server:port as tests are running) --proxy=USERNAME:PASSWORD@SERVER:PORT # (Use an authenticated proxy server) --proxy-bypass-list=STRING # (";"-separated hosts to bypass, Eg "*.foo.com") --proxy-pac-url=URL # (Connect to a proxy server using a PAC_URL.pac file.) --proxy-pac-url=USERNAME:PASSWORD@URL # (Authenticated proxy with PAC URL.) --proxy-driver # (If a driver download is needed, will use: --proxy=PROXY.) --multi-proxy # (Allow multiple authenticated proxies when multi-threaded.) --agent=STRING # (Modify the web browser's User-Agent string.) --mobile # (Use the mobile device emulator while running tests.) --metrics=STRING # (Set mobile metrics: "CSSWidth,CSSHeight,PixelRatio".) --chromium-arg="ARG=N,ARG2" # (Set Chromium args, ","-separated, no spaces.) --firefox-arg="ARG=N,ARG2" # (Set Firefox args, comma-separated, no spaces.) --firefox-pref=SET # (Set a Firefox preference:value set, comma-separated.) --extension-zip=ZIP # (Load a Chrome Extension .zip|.crx, comma-separated.) --extension-dir=DIR # (Load a Chrome Extension directory, comma-separated.) --disable-features="F1,F2" # (Disable features, comma-separated, no spaces.) --binary-location=PATH # (Set path of the Chromium browser binary to use.) --driver-version=VER # (Set the chromedriver or uc_driver version to use.) --sjw # (Skip JS Waits for readyState to be "complete" or Angular to load.) --wfa # (Wait for AngularJS to be done loading after specific web actions.) --pls=PLS # (Set pageLoadStrategy on Chrome: "normal", "eager", or "none".) --headless # (The default headless mode. Linux uses this mode by default.) --headless1 # (Use Chrome's old headless mode. Fast, but has limitations.) --headless2 # (Use Chrome's new headless mode, which supports extensions.) --headed # (Run tests in headed/GUI mode on Linux OS, where not default.) --xvfb # (Run tests using the Xvfb virtual display server on Linux OS.) --xvfb-metrics=STRING # (Set Xvfb display size on Linux: "Width,Height".) --locale=LOCALE_CODE # (Set the Language Locale Code for the web browser.) --interval=SECONDS # (The autoplay interval for presentations & tour steps) --start-page=URL # (The starting URL for the web browser when tests begin.) --archive-logs # (Archive existing log files instead of deleting them.) --archive-downloads # (Archive old downloads instead of deleting them.) --time-limit=SECONDS # (Safely fail any test that exceeds the time limit.) --slow # (Slow down the automation. Faster than using Demo Mode.) --demo # (Slow down and visually see test actions as they occur.) --demo-sleep=SECONDS # (Set the wait time after Slow & Demo Mode actions.) --highlights=NUM # (Number of highlight animations for Demo Mode actions.) --message-duration=SECONDS # (The time length for Messenger alerts.) --check-js # (Check for JavaScript errors after page loads.) --ad-block # (Block some types of display ads from loading.) --host-resolver-rules=RULES # (Set host-resolver-rules, comma-separated.) --block-images # (Block images from loading during tests.) --do-not-track # (Indicate to websites that you don't want to be tracked.) --verify-delay=SECONDS # (The delay before MasterQA verification checks.) --ee | --esc-end # (Lets the user end the current test via the ESC key.) --recorder # (Enables the Recorder for turning browser actions into code.) --rec-sb-mgr # (A Recorder Mode that generates SB() context manager code.) --rec-sb-cdp # (A Recorder Mode that generates Pure CDP Mode sb_cdp code.) --rec-behave # (Same as Recorder Mode, but also generates behave-gherkin.) --rec-sleep # (If the Recorder is enabled, also records self.sleep calls.) --rec-print # (If the Recorder is enabled, prints output after tests end.) --disable-cookies # (Disable Cookies on websites. Pages might break!) --disable-js # (Disable JavaScript on websites. Pages might break!) --disable-csp # (Disable the Content Security Policy of websites.) --disable-ws # (Disable Web Security on Chromium-based browsers.) --enable-ws # (Enable Web Security on Chromium-based browsers.) --enable-sync # (Enable "Chrome Sync" on websites.) --uc | --undetected # (Use undetected-chromedriver to evade bot-detection.) --uc-cdp-events # (Capture CDP events when running in "--undetected" mode.) --log-cdp # ("goog:loggingPrefs", {"performance": "ALL", "browser": "ALL"}) --remote-debug # (Sync to Chrome Remote Debugger chrome://inspect/#devices) --ftrace | --final-trace # (Debug Mode after each test. Don't use with CI!) --dashboard # (Enable the SeleniumBase Dashboard. Saved at: dashboard.html) --dash-title=STRING # (Set the title shown for the generated dashboard.) --enable-3d-apis # (Enables WebGL and 3D APIs.) --swiftshader # (Chrome "--use-gl=angle" / "--use-angle=swiftshader-webgl") --incognito # (Enable Chrome's Incognito mode.) --guest # (Enable Chrome's Guest mode.) --dark # (Enable Chrome's Dark mode.) --devtools # (Open Chrome's DevTools when the browser opens.) --rs | --reuse-session # (Reuse browser session for all tests.) --rcs | --reuse-class-session # (Reuse session for tests in class.) --crumbs # (Delete all cookies between tests reusing a session.) --disable-beforeunload # (Disable the "beforeunload" event on Chrome.) --window-position=X,Y # (Set the browser's starting window position.) --window-size=WIDTH,HEIGHT # (Set the browser's starting window size.) --maximize # (Start tests with the browser window maximized.) --screenshot # (Save a screenshot at the end of each test.) --no-screenshot # (No screenshots saved unless tests directly ask it.) --visual-baseline # (Set the visual baseline for Visual/Layout tests.) --external-pdf # (Set Chromium "plugins.alwaysopenpdf_externally":True.) --timeout-multiplier=MULTIPLIER # (Multiplies the default timeout values.) --list-fail-page # (After each failing test, list the URL of the failure.)</code></pre>latestlogs/(See the full list of command-line option definitions here. For detailed examples of command-line options, see customizingtestruns.md)
🔵 During test failures, logs and screenshots from the most recent test run will get saved to the
folder. Those logs will get moved toarchivedlogs/if you add --archivelogs to command-line options, or haveARCHIVEEXISTINGLOGSset to True in settings.py, otherwise log files with be cleaned up at the start of the next test run. Thetest_suite.pycollection contains tests that fail on purpose so that you can see how logging works.--settingsfile=customsettings.py<pre><code class="lang-zsh">cd examples/
pytest test_suite.py --chrome
pytest test_suite.py --firefox</code></pre>
An easy way to override seleniumbase/config/settings.py is by using a custom settings file. Here's the command-line option to add to tests: (See examples/custom_settings.py)
(Settings include default timeout values, a two-factor auth key, DB credentials, S3 credentials, and other important settings used by tests.)--data="ANY STRING"🔵 To pass additional data from the command-line to tests, add
. Inside your tests, you can useself.datato access that.pytest<a id="directory_configuration"></a> <h2><img src="https://seleniumbase.github.io/img/logo7.png" title="SeleniumBase" width="32" /> Directory Configuration:</h2>
🔵 When running tests with
, you'll want a copy of pytest.ini in your root folders. When running tests withpynose, you'll want a copy of setup.cfg in your root folders. These files specify default configuration details for tests. Test folders should also include a blank init.py file to allow your test files to import other files from that folder.sbase mkdir DIR🔵
creates a folder with config files and sample tests:-b<pre><code class="lang-zsh">sbase mkdir ui_tests</code></pre>
> That new folder will have these files:
<pre><code class="lang-zsh">ui_tests/ ├── init.py ├── myfirsttest.py ├── parameterized_test.py ├── pytest.ini ├── requirements.txt ├── setup.cfg ├── testdemosite.py └── boilerplates/ ├── init.py ├── basetestcase.py ├── boilerplate_test.py ├── classicobjtest.py ├── page_objects.py ├── sbfixturetest.py └── samples/ ├── init.py ├── google_objects.py ├── google_test.py ├── sbswagtest.py └── swaglabstest.py</code></pre>
<b>ProTip™:</b> You can also create a boilerplate folder without any sample tests in it by adding
or--basicto thesbase mkdircommand:pytest.ini<pre><code class="lang-zsh">sbase mkdir ui_tests --basic</code></pre>
> That new folder will have these files:
<pre><code class="lang-zsh">ui_tests/ ├── init.py ├── pytest.ini ├── requirements.txt └── setup.cfg</code></pre>
Of those files, the
config file is the most important, followed by a blankinit.pyfile. There's also asetup.cfgfile (for pynose). Finally, therequirements.txtfile can be used to help you install seleniumbase into your environments (if it's not already installed).--gha<b>ProTip™:</b> Add
to include a GitHub Actions.ymlfile with default settings:examples/<pre><code class="lang-zsh">ui_tests/ └── .github └── workflows/ └── python-package.yml</code></pre>
<h3><img src="https://seleniumbase.github.io/img/logo7.png" title="SeleniumBase" width="32" /> Log files from failed tests:</h3>
Let's try an example of a test that fails:
<pre><code class="lang-python">""" test_fail.py """ from seleniumbase import BaseCase BaseCase.main(name, file)
class MyTestClass(BaseCase):
def testfindarmyofrobotsonxkcddesertisland(self): self.goto("https://xkcd.com/731/") self.assertelement("div#ARMYOF_ROBOTS", timeout=1) # This should fail</code></pre>
You can run it from the
folder like this:./latestlogs/<pre><code class="lang-zsh">pytest test_fail.py</code></pre>
🔵 You'll notice that a logs folder,
, was created to hold information (and screenshots) about the failing test. During test runs, past results get moved to the archivedlogs folder if you have ARCHIVEEXISTINGLOGS set to True in settings.py, or if your run tests with --archive-logs. If you choose not to archive existing logs, they will be deleted and replaced by the logs of the latest test run.--dashboard
<a id="seleniumbase_dashboard"></a> <h2><img src="https://seleniumbase.github.io/img/logo7.png" title="SeleniumBase" width="32" /> SeleniumBase Dashboard:</h2>
🔵 The
option for pytest generates a SeleniumBase Dashboard located atdashboard.html, which updates automatically as tests run and produce results. Example:http.server<pre><code class="lang-zsh">pytest --dashboard --rs --headless</code></pre>
<img src="https://seleniumbase.github.io/cdn/img/dashboard_1.png" alt="The SeleniumBase Dashboard" title="The SeleniumBase Dashboard" width="380" />
🔵 Additionally, you can host your own SeleniumBase Dashboard Server on a port of your choice. Here's an example of that using Python's
:http://localhost:1948/dashboard.html<pre><code class="lang-zsh">python -m http.server 1948</code></pre>
🔵 Now you can navigate to
in order to view the dashboard as a web app. This requires two different terminal windows: one for running the server, and another for running the tests, which should be run from the same directory. (Use <kbd>Ctrl+C</kbd> to stop the http server.)--html=report.html🔵 Here's a full example of what the SeleniumBase Dashboard may look like:
<pre><code class="lang-zsh">pytest testsuite.py testimage_saving.py --dashboard --rs --headless</code></pre>
<img src="https://seleniumbase.github.io/cdn/img/dashboard_2.png" alt="The SeleniumBase Dashboard" title="The SeleniumBase Dashboard" width="520" />
<a id="creatingvisualreports"></a> <h2><img src="https://seleniumbase.github.io/img/logo7.png" title="SeleniumBase" width="32" /> Generating Test Reports:</h2>
<h3>🔵 <code>pytest</code> HTML Reports:</h3>
✅ Using
gives you a fancy report of the name specified after your test suite completes.--dashboard --html=dashboard.html<pre><code class="lang-zsh">pytest test_suite.py --html=report.html</code></pre>
<img src="https://seleniumbase.github.io/cdn/img/html_report.png" alt="Example Pytest Report" title="Example Pytest Report" width="520" />
✅ When combining pytest html reports with SeleniumBase Dashboard usage, the pie chart from the Dashboard will get added to the html report. Additionally, if you set the html report URL to be the same as the Dashboard URL when also using the dashboard, (example:
), then the Dashboard will become an advanced html report when all the tests complete.--junit-xml=report.xml✅ Here's an example of an upgraded html report:
<pre><code class="lang-zsh">pytest test_suite.py --dashboard --html=report.html</code></pre>
<img src="https://seleniumbase.github.io/cdn/img/dash_report.jpg" alt="Dashboard Pytest HTML Report" title="Dashboard Pytest HTML Report" width="520" />
If viewing pytest html reports in Jenkins, you may need to configure Jenkins settings for the html to render correctly. This is due to Jenkins CSP changes.
You can also use
to get an xml report instead. Jenkins can use this file to display better reporting for your tests.--report<pre><code class="lang-zsh">pytest test_suite.py --junit-xml=report.xml</code></pre>
<h3>🔵 <code>pynose</code> Reports:</h3>
The
option gives you a fancy report after your test suite completes.--show-report<pre><code class="lang-zsh">pynose test_suite.py --report</code></pre>
<img src="https://seleniumbase.github.io/cdn/img/nose_report.png" alt="Example pynose Report" title="Example pynose Report" width="320" />
(NOTE: You can add
to immediately display pynose reports after the test suite completes. Only use--show-reportwhen running tests locally because it pauses the test run.)--junit<h3>🔵 <code>behave</code> Dashboard & Reports:</h3>
(The behavebdd/ folder can be found in the examples/ folder.)
<pre><code class="lang-zsh">behave behave_bdd/features/ -D dashboard -D headless</code></pre>
<img src="https://seleniumbase.github.io/cdn/img/sbbehavedashboard.png" title="SeleniumBase" width="520">
You can also use
to get.xmlreports for each <code translate="no">behave</code> feature. Jenkins can use these files to display better reporting for your tests.allure-pytest<pre><code class="lang-zsh">behave behave_bdd/features/ --junit -D rs -D headless</code></pre>
<h3>🔵 Allure Reports:</h3>
See: https://allurereport.org/docs/pytest/
SeleniumBase no longer includes
as part of installed dependencies. If you want to use it, install it first:--proxy=IP_ADDRESS:PORT<pre><code class="lang-zsh">pip install allure-pytest</code></pre>
Now your tests can create Allure results files, which can be processed by Allure Reports.
<pre><code class="lang-zsh">pytest testsuite.py --alluredir=allureresults</code></pre>
<h3><img src="https://seleniumbase.github.io/img/logo7.png" title="SeleniumBase" width="32" /> Using a Proxy Server:</h3>
If you wish to use a proxy server for your browser tests (Chromium or Firefox), you can add
as an argument on the command line.--proxy=KEYFROMPROXYLIST<pre><code class="lang-zsh">pytest proxytest.py --proxy=IPADDRESS:PORT</code></pre>
If the proxy server that you wish to use requires authentication, you can do the following (Chromium only):
<pre><code class="lang-zsh">pytest proxytest.py --proxy=USERNAME:PASSWORD@IPADDRESS:PORT</code></pre>
SeleniumBase also supports SOCKS4 and SOCKS5 proxies:
<pre><code class="lang-zsh">pytest proxytest.py --proxy="socks4://IPADDRESS:PORT"
pytest proxytest.py --proxy="socks5://IPADDRESS:PORT"</code></pre>
To make things easier, you can add your frequently-used proxies to PROXYLIST in proxylist.py, and then use
to use the IPADDRESS:PORT of that key.<pre><code class="lang-zsh">pytest proxy_test.py --proxy=proxy1</code></pre>
<h3><img src="https://seleniumbase.github.io/img/logo7.png" title="SeleniumBase" width="32" /> Changing the User-Agent:</h3>
🔵 If you wish to change the User-Agent for your browser tests (Chromium and Firefox only), you can add --agent="USER AGENT STRING"` as an argument on the command-line.
pytest useragenttest.py --agent="Mozilla/5.0 (Nintendo 3DS; U; ; en) Version/1.7412.EU"
🔵
self.accept_alert()automatically waits for and accepts alert pop-ups.
README truncated. View on GitHub


