
OIDC certificate exchange server and client for Talos Linux. Enables OIDC-based access control for talosctl by issuing ephemeral short-lived client certificates signed by the Talos CA.
talosctl-oidc
OIDC certificate exchange server and client for Talos Linux. Enables OIDC-based access control for talosctl by issuing ephemeral short-lived client certificates signed by the Talos CA.
How It Works
Talos Linux uses mTLS (mutual TLS) with client certificates for API authentication. There is no native OIDC support in the Talos API. This tool bridges the gap through a certificate exchange server model:
- A server (
talosctl-oidc serve) runs alongside the cluster (on Kubernetes or standalone). It never holds the Talos CA private key. Instead it authenticates to the Talos API with its own client credential (a talosconfig) - A user runs
talosctl-oidc login, which opens a browser for OIDC authentication (Authorization Code + PKCE) - The client sends the resulting ID token to the server
- The server validates the token (signature, issuer, audience, expiry) and calls the Talos API method
GenerateClientConfiguration(the same RPCtalosctl config newuses) to mint an ephemeral short-lived client certificate (default: 5 minutes). The Talos node signs the certificate with the CA it already holds. The roles the server can grant are bounded by its own credential's roles (Talos rejects privilege escalation) - The client writes the certificate to
~/.talos/config(using atomic updates to prevent corruption) - Before expiry, the client can proactively renew the certificate using the OIDC refresh token, either on demand or in the background via the
--watchflag
sequenceDiagram
    participant User
    participant Browser
    participant Client as talosctl-oidc (client)
    participant OIDC as OIDC Provider
    participant Server as talosctl-oidc (server)
    participant Talos as Talos Node
User->>Client: talosctl-oidc login     Client->>Browser: Open authorization URL     Browser->>OIDC: Authorization Code + PKCE     OIDC->>Browser: Redirect with auth code     Browser->>Client: Callback with auth code     Client->>OIDC: Exchange code for tokens     OIDC->>Client: ID token + access token     Client->>Server: POST /exchange {id_token}     Server->>OIDC: Fetch JWKS & validate token     OIDC->>Server: Public keys     Server->>Talos: GenerateClientConfiguration (Talos API)     Talos->>Server: Ephemeral cert signed by the node's CA     Server->>Client: {ca, cert, key, endpoints}     Client->>Client: Write to ~/.talos/config     User->>Talos: talosctl version (mTLS with ephemeral cert)
Demo

Prerequisites
- Go 1.25+ (to build from source)
- A running Talos cluster with API access
- A Talos API client credential (a talosconfig) for the server. On Kubernetes this is provisioned automatically via Talos API access; standalone, you generate one with
talosctl config new - An OIDC provider with a configured client application (any OIDC-compliant provider works)
Installation
curl (recommended)
The quickest way to install on Linux or macOS:
curl -fsSL https://raw.githubusercontent.com/qjoly/talosctl-oidc/main/install.sh | shThe script:
- Detects your OS and architecture automatically
- Fetches the latest release from GitHub
- Verifies the SHA-256 checksum before installing
- Installs to
/usr/local/bin(falls back to~/.local/binif not writable)
curl -fsSL https://raw.githubusercontent.com/qjoly/talosctl-oidc/main/install.sh | VERSION=v0.0.2 shHomebrew (macOS / Linux)
brew install qjoly/tap/talosctl-oidcThe formula is updated automatically on every release.
Go install
If you have Go installed:
go install github.com/qjoly/talosctl-oidc@latestManual download
Download the binary for your platform directly from the releases page:
| OS | Architecture | Binary | |----|-------------|--------| | Linux | x86-64 | talosctl-oidc-linux-amd64 | | Linux | ARM64 | talosctl-oidc-linux-arm64 | | macOS | Intel | talosctl-oidc-darwin-amd64 | | macOS | Apple Silicon (M1/M2/M3) | talosctl-oidc-darwin-arm64 | | Windows | x86-64 | talosctl-oidc-windows-amd64.exe |
# Example: Linux amd64
curl -fsSL https://github.com/qjoly/talosctl-oidc/releases/latest/download/talosctl-oidc-linux-amd64 \
  -o /usr/local/bin/talosctl-oidc
chmod +x /usr/local/bin/talosctl-oidc
From source
git clone https://github.com/qjoly/talosctl-oidc.git
cd talosctl-oidc
go build -o talosctl-oidc .
sudo mv talosctl-oidc /usr/local/bin/
Setup
1. Configure your OIDC provider
Create a client application in your OIDC provider with the following settings:
| Setting | Value | |---------|-------| | Client type | Public | | Grant type | Authorization Code | | Redirect URI | http://127.0.0.1:8900/callback | | Scopes | openid, profile, email, offline_access | | PKCE | Enabled (S256) |
Authentik
- Go to Admin > Applications > Providers > Create
- Select OAuth2/OpenID Provider
- Set Client type to Public
- Set Redirect URIs to
http://127.0.0.1:8900/callback - Under Advanced, ensure Subject mode is set appropriately
- Add scopes
openid,profile,offline_accessandemail - Create an Application linked to this provider
Keycloak
- Go to your Keycloak admin console > Clients > Create client
- Set Client authentication to Off (public client)
- Enable Standard flow (Authorization Code)
- Set Valid redirect URIs to
http://127.0.0.1:8900/callback - Under Advanced > Proof Key for Code Exchange, set to
S256
Dex
staticClients:
  - id: talosctl
    name: "Talosctl OIDC"
    redirectURIs:
      - "http://127.0.0.1:8900/callback"
    public: true
2. Enable Talos API access
The server mints certificates by calling the Talos API, so it never needs the CA private key. Enable the kubernetesTalosAPIAccess feature on your control plane nodes and bound the roles and namespaces the API may grant.
Add this to your control plane machine config (then talosctl apply-config):
machine:
  features:
    kubernetesTalosAPIAccess:
      enabled: true
      allowedRoles:
        - os:admin
      allowedKubernetesNamespaces:
- talos-system # the namespace the server runs inNote: allowedRoles bounds the roles the server's credential can hold. The server can never grant a role beyond this set, since Talos rejects privilege escalation.
For a standalone (non-Kubernetes) deployment, you instead generate a talosconfig credential with talosctl config new (see the standalone section).
3. Start the server
The serve command can be configured via environment variables or a YAML configuration file. Environment variables take precedence over file values when both are set.
Option A: Configuration File (Recommended)
Create a config.yaml file and specify it with the --config flag:
talosctl-oidc serve --config config.yamlExample config.yaml:
issuer_url: https://idp.example.com/application/o/talos-oidc/
client_id: your-client-id
endpoints:
  - 10.0.0.1
  - 10.0.0.2
Path to the talosconfig credential used to call the Talos API.
Leave empty in-cluster to use the credential provisioned by the
talos.dev ServiceAccount at /var/run/secrets/talos.dev/config.
talos_config: /etc/talosctl-oidc/talosconfig
listen: ":8443"
cert_ttl: "5m"
Static roles — used when RBAC is disabled or no rule matches.
Set to [] to deny access when no RBAC rule matches.
roles:
  - os:admin
Optional: Rate limiting (disabled by default)
ratelimitrequests: 10
ratelimitwindow: "1m"
Optional: IP allowlist (empty = allow all)
ip_allowlist:
  - 192.168.1.0/24
  - 10.0.0.50
Optional: Dynamic RBAC — map OIDC claims to Talos roles
rbac:
  rules:
    - claim: groups
      value: platform-admins
      roles:
        - os:admin
    - claim: groups
      value: developers
      roles:
        - os:reader
You can also set the config file path via the TALOSCTLOIDCCONFIG environment variable:
export TALOSCTLOIDCCONFIG=/etc/talosctl-oidc/config.yaml
talosctl-oidc serve
Note: See the Configuration wiki page for complete documentation on config file options and precedence rules.
Option B: Environment Variables
Configure entirely via environment variables:
export TALOSCTLOIDCTALOS_CONFIG=/etc/talosctl-oidc/talosconfig
export TALOSCTLOIDCISSUER_URL=https://idp.example.com/application/o/talos-oidc/
export TALOSCTLOIDCCLIENT_ID=<your-client-id>
export TALOSCTLOIDCENDPOINTS=10.0.0.1,10.0.0.2
export TALOSCTLOIDCLISTEN=:8443
export TALOSCTLOIDCCERT_TTL=5m
export TALOSCTLOIDCROLES=os:admin
talosctl-oidc serve
By default, the server generates a self-signed TLS certificate at startup and logs the CA PEM. Save the CA PEM to a file and pass it to login --server-ca so the client trusts the server.
To use your own TLS certificates:
export TALOSCTLOIDCTLS_CERT=/path/to/server.crt
export TALOSCTLOIDCTLS_KEY=/path/to/server.key
talosctl-oidc serve
To run without TLS (not recommended for production):
export TALOSCTLOIDCINSECURE=true
talosctl-oidc serve
4. Login
# With self-signed TLS (default server mode), save the CA PEM from server logs:
talosctl-oidc login \
  --provider https://idp.example.com/application/o/talos-oidc/ \
  --client-id <your-client-id> \
  --server https://localhost:8443 \
  --server-ca server-ca.pem \
  --context-name oidc \
  --callback-port 8900
With insecure server:
talosctl-oidc login \
  --provider https://idp.example.com/application/o/talos-oidc/ \
  --client-id <your-client-id> \
  --server http://localhost:8443 \
  --insecure \
  --context-name oidc \
  --callback-port 8900
This will:
- Open your browser to the OIDC provider login page
- Wait for you to authenticate
- Exchange the ID token with the cert server for an ephemeral certificate (over TLS)
- Write the certificate to
~/.talos/configunder theoidccontext - (Optional) If
--watchis provided, stay in the foreground and refresh certificates as they approach expiry
5. Use talosctl
After login, talosctl works normally:
talosctl --context oidc version
talosctl --context oidc get members
talosctl --context oidc dashboard
Commands
serve
Start the certificate exchange server.
talosctl-oidc serveConfiguration
The server can be configured via YAML configuration file or environment variables:
- Use
--config <path>flag orTALOSCTLOIDCCONFIGenv var to specify a config file - Environment variables override config file values
- See the Configuration wiki page for details
Environment Variables
| Variable | Config File Field | Required | Default | Description | |----------|-------------------|----------|---------|-------------| | TALOSCTLOIDCTALOSCONFIG | talosconfig | No | | Path to the talosconfig credential used to call the Talos API. Empty in-cluster uses the credential provisioned at /var/run/secrets/talos.dev/config | | TALOSCTLOIDCISSUERURL | issuerurl | Yes | | OIDC issuer URL for token validation | | TALOSCTLOIDCCLIENTID | clientid | Yes | | Expected OIDC client ID / audience | | TALOSCTLOIDCENDPOINTS | endpoints | Yes | | Talos node endpoints (comma-separated) | | TALOSCTLOIDCCLIENTSECRET | clientsecret | No | | OIDC client secret (for HS256-signed tokens) | | TALOSCTLOIDCLISTEN | listen | No | :8443 | Address to listen on | | TALOSCTLOIDCCERTTTL | certttl | No | 5m | Lifetime of issued client certificates | | TALOSCTLOIDCROLES | roles | No | os:admin | Talos roles (comma-separated) | | TALOSCTLOIDCTLSCERT | tlscert | No | | Path to TLS certificate (HTTPS with provided cert) | | TALOSCTLOIDCTLSKEY | tlskey | No | | Path to TLS private key (must be set with TLS_CERT) | | TALOSCTLOIDCINSECURE | insecure | No | false | Set to true to serve plain HTTP | | TALOSCTLOIDCDATADIR | datadir | No | | Directory to persist self-signed TLS certs across restarts | | TALOSCTLOIDCAUDITLOG | auditlog | No | stdout | Path to audit log file (- for stdout) | | TALOSCTLOIDCADMINTOKEN | admintoken | No | | Bearer token to protect /admin/* endpoints (required to enable admin API) | | TALOSCTLOIDCRATELIMITREQUESTS | ratelimitrequests | No | 0 | Max requests per IP per window (0 = disabled) | | TALOSCTLOIDCRATELIMITWINDOW | ratelimitwindow | No | 1m | Rate limit time window (e.g., 1m, 5m, 1h) | | TALOSCTLOIDCIPALLOWLIST | ipallowlist | No | | Comma-separated list of allowed IPs/CIDRs (empty = allow all) | | TALOSCTLOIDCTRUSTEDPROXIES | trustedproxies | No | | Comma-separated IPs/CIDRs of reverse proxies allowed to set X-Forwarded-For (empty = header never trusted) | | DEBUG | — | No | | Set to any value to enable detailed debug logging (includes RBAC rule evaluation) |
TLS Modes
| Mode | Configuration | Description | |------|--------------|-------------| | Self-signed (default) | No TLS env vars | Generates a self-signed cert at startup, logs the CA PEM | | Self-signed + persisted | DATA_DIR=/data | Same as above, but cert is saved to disk and reused on restart | | Provided cert | TLSCERT + TLSKEY | HTTPS with your own certificate | | Insecure | INSECURE=true | Plain HTTP (not recommended for production) |
When TALOSCTLOIDCDATA_DIR is set, the self-signed CA and server certificate are saved to <DATA_DIR>/ca.crt, ca.key, server.crt, and server.key. On subsequent restarts, the same certificates are reloaded so the CA PEM stays stable and clients don't need to update their --server-ca file.
API Endpoints
| Endpoint | Method | Description | |----------|--------|-------------| | /exchange | POST | Exchange an OIDC ID token for an ephemeral certificate | | /healthz | GET | Health check (returns 200 OK) | | /ca | GET | Returns the self-signed CA PEM (only in self-signed mode) | | /admin/ | GET | Web dashboard with session-based auth | | /admin/login | POST | Login form submission | | /admin/logout | POST | Logout and clear session | | /admin/stats | GET | Server statistics (requires Authorization: Bearer <admin-token>) | | /admin/certs | GET | List active (non-expired) issued certs (requires Authorization: Bearer <admin-token>) |
Exchange request:
{"id_token": "eyJ..."}Exchange response:
{
  "ca": "-----BEGIN CERTIFICATE-----\n...",
  "cert": "-----BEGIN CERTIFICATE-----\n...",
  "key": "-----BEGIN ED25519 PRIVATE KEY-----\n...",
  "endpoints": ["10.0.0.1"],
  "ttl_seconds": 3600
}
login
Authenticate via OIDC and obtain ephemeral Talos credentials.
talosctl-oidc login [flags]| Flag | Required | Default | Description | |------|----------|---------|-------------| | --provider | Yes | | OIDC issuer URL | | --client-id | Yes | | OIDC client ID | | --server | Yes | | Cert exchange server URL (e.g. https://localhost:8443) | | --client-secret | No | | OIDC client secret (for confidential clients) | | --scopes | No | openid,profile,email,offline_access | OIDC scopes | | --callback-port | No | 8900 | Local callback server port | | --context-name | No | oidc | Name for the talosconfig context | | --talosconfig | No | ~/.talos/config | Path to talosconfig file | | --server-ca | No | | Path to PEM CA certificate to trust for the server (for self-signed TLS) | | --insecure | No | false | Allow plain HTTP connection to the server | | --watch | No | false | Run in the background and keep the Talos certificate fresh |
logout
Remove OIDC credentials and clear cached tokens.
talosctl-oidc logout [flags]| Flag | Required | Default | Description | |------|----------|---------|-------------| | --context-name | No | oidc | Name of the talosconfig context to remove | | --talosconfig | No | ~/.talos/config | Path to talosconfig file |
This removes:
- The OIDC token from the system keychain
- The context (including embedded certificates) from the talosconfig file
status
Display current authentication status.
talosctl-oidc status [flags]| Flag | Required | Default | Description | |------|----------|---------|-------------| | --context-name | No | oidc | Name of the talosconfig context to check | | --talosconfig | No | ~/.talos/config | Path to talosconfig file |
Deployment Methods
Choose the deployment method that best fits your infrastructure:
| Method | Best for | Complexity | Notes | |---|---|---|---| | Kubernetes Deployment | Multi-cluster, existing k8s platform | Medium | Needs external access from developer workstations | | Standalone systemd | Air-gapped, dedicated infra, simplicity | Low | Manual updates, needs a Linux host |
Deploying on Kubernetes
This method runs the server as a Kubernetes Deployment managed by a Helm chart. It is a good fit if you already have a Kubernetes cluster and want to share the server across multiple Talos clusters or teams.
Requirements: the server endpoint must be reachable from developer workstations, not just from inside the cluster. See Exposing the server below.
1. Add the Helm chart
The chart is published to GHCR as an OCI chart. Install the latest release directly:
helm install talosctl-oidc \
  oci://ghcr.io/qjoly/charts/talosctl-oidc \
  --version <version> \
  --namespace talos-system --create-namespace
Alternatively, clone the repository and install from the local path:
git clone https://github.com/qjoly/talosctl-oidc.git
cd talosctl-oidc
helm install talosctl-oidc charts/talosctl-oidc/ --namespace talos-system --create-namespace
The Helm chart deploys the server image (ghcr.io/qjoly/talosctl-oidc-server), which includes the system CA bundle at the standard/etc/ssl/certs/ca-certificates.crtpath and the binary at/talosctl-oidc.
2. Enable Talos API access
The server issues certificates by calling the Talos API (GenerateClientConfiguration), so it never holds the cluster CA private key. The Talos node signs each certificate, and the roles the server can grant are bounded by its own credential (Talos rejects privilege escalation).
Prerequisite: enable the feature on the nodes
In the Talos machine config of the control plane nodes:
machine:
  features:
    kubernetesTalosAPIAccess:
      enabled: true
      allowedRoles:
        - os:admin
      allowedKubernetesNamespaces:
        - talos-system   # the release namespace
Option A: Chart-managed credential (default)
With talos.apiAccess.enabled=true, the chart creates a serviceaccounts.talos.dev resource. Talos provisions a short-lived talosconfig into a secret that the pod mounts, so no manual secret handling is needed.
helm install talosctl-oidc charts/talosctl-oidc/ \
  --namespace talos-system --create-namespace \
  --set talos.apiAccess.enabled=true \
  --set "talos.apiAccess.roles={os:admin}" \
  --set config.issuerUrl=https://idp.example.com/application/o/talos-oidc/ \
  --set config.clientId=your-client-id \
  --set "config.endpoints={10.0.0.1,10.0.0.2}"
Option B: Existing credential secret
Provide a secret that already contains a talosconfig under the config key (e.g. one generated with talosctl config new), then point the chart at it:
helm install talosctl-oidc charts/talosctl-oidc/ \
  --namespace talos-system --create-namespace \
  --set talos.existingCredentialSecret=my-talosconfig \
  --set config.issuerUrl=https://idp.example.com/application/o/talos-oidc/ \
  --set config.clientId=your-client-id \
  --set "config.endpoints={10.0.0.1,10.0.0.2}"
3. Key chart values
| Value | Default | Description | |---|---|---| | config.issuerUrl | "" | OIDC issuer URL (required) | | config.clientId | "" | OIDC client ID (required) | | config.clientSecret | "" | OIDC client secret (optional) | | config.endpoints | [] | Talos node endpoints (required) | | config.roles | [os:admin] | Talos roles for issued certs | | config.certTTL | 5m | Lifetime of issued client certificates | | config.adminToken | "" | Bearer token to enable the admin API | | config.auditLog | - | Audit log destination (- for stdout) | | talos.apiAccess.enabled | true | Create a serviceaccounts.talos.dev resource so Talos provisions the API credential | | talos.apiAccess.roles | [os:admin] | Roles for the server's own credential (bounds the certs it can issue) | | talos.configMountPath | /var/run/secrets/talos.dev | Mount path for the provisioned talosconfig | | talos.existingCredentialSecret | "" | Use an existing talosconfig secret (config key) instead of creating the resource | | service.type | ClusterIP | Kubernetes Service type | | ingress.enabled | false | Enable Ingress | | tolerations | [] | Pod tolerations | | extraVolumes | [] | Additional volumes to attach to the pod | | extraVolumeMounts | [] | Additional volume mounts for the container |
To persist the self-signed TLS certificate across pod restarts (so the CA PEM stays stable), mount a PersistentVolumeClaim and set TALOSCTLOIDCDATA_DIR via extraVolumes / extraVolumeMounts:
helm upgrade talosctl-oidc charts/talosctl-oidc/ \
  --namespace talos-system \
  --set "extraVolumes[0].name=tls-data" \
  --set "extraVolumes[0].persistentVolumeClaim.claimName=talosctl-oidc-tls" \
  --set "extraVolumeMounts[0].name=tls-data" \
  --set "extraVolumeMounts[0].mountPath=/data" \
  --set "extraEnv[0].name=TALOSCTLOIDCDATA_DIR" \
  --set "extraEnv[0].value=/data"
4. Expose the server
The server handles its own TLS — the client verifies the server CA directly. Standard TLS-terminating ingresses will break the connection. Choose one of the options below.
Option A — LoadBalancer Service (simplest)
helm upgrade talosctl-oidc charts/talosctl-oidc/ \
  --namespace talos-system \
  --set service.type=LoadBalancer
kubectl get svc talosctl-oidc -n talos-system
NAME TYPE CLUSTER-IP EXTERNAL-IP PORT(S) AGE
talosctl-oidc LoadBalancer 10.96.12.34 203.0.113.10 8443:32443/TCP 1m
Users connect to https://203.0.113.10:8443.
Option B — NodePort Service
helm upgrade talosctl-oidc charts/talosctl-oidc/ \
  --namespace talos-system \
  --set service.type=NodePort
Users connect to https://<any-node-ip>:<node-port>.
Option C — Ingress
If you want to expose the server on a custom domain (e.g. https://oidc.example.com), you can use an ingress. Be careful that you should enable insecure mode and let the ingress handle TLS termination (which means the connection between the ingress and the server is unencrypted, but the client-server connection is still secure with TLS).
helm upgrade talosctl-oidc charts/talosctl-oidc/ \
  --namespace talos-system \
  --set ingress.enabled=true \
  --set ingress.className=traefik \
  --set "ingress.hosts[0].host=oidc.example.com" \
  --set "ingress.hosts[0].paths[0].path=/" \
  --set "ingress.hosts[0].paths[0].pathType=Prefix"
This could not be the most secure option since the traffic between the ingress and the server is unencrypted.
Another option could be to generate a TLS Certificate through cert-manager and map it to the server through a Kubernetes Secret (to configure SSL passthrough). This way, the connection between the ingress and the server is also encrypted, but it requires more setup (see issue)
5. Retrieve the server CA and log in
If you used the self-signed TLS mode, the CA PEM is stable across restarts if you set TALOSCTLOIDCDATA_DIR. You can retrieve it from the server's /ca endpoint:
# Fetch the self-signed CA from the /ca endpoint
curl -k https://<external-ip>:8443/ca > server-ca.pem
Log in
talosctl-oidc login \
  --provider https://idp.example.com/application/o/talos-oidc/ \
  --client-id your-client-id \
  --server https://<external-ip>:8443 \
  --server-ca server-ca.pem \
  --context-name oidc
This is not needed if you used your own TLS certificates.
Deploying as a Standalone systemd Service
This method runs the server directly on a Linux host (a jump host, a VM, or any machine that developer workstations can reach). No Kubernetes or Talos node is required.
1. Install the binary
From GitHub releases (replace the version as needed):
curl -L https://github.com/qjoly/talosctl-oidc/releases/latest/download/talosctl-oidc-linux-amd64 \
  -o /usr/local/bin/talosctl-oidc
chmod +x /usr/local/bin/talosctl-oidc
From source:
git clone https://github.com/qjoly/talosctl-oidc.git
cd talosctl-oidc
go build -o /usr/local/bin/talosctl-oidc .
2. Create a dedicated user and directories
useradd --system --no-create-home --shell /sbin/nologin talosctl-oidc
mkdir -p /etc/talosctl-oidc /var/lib/talosctl-oidc /var/log/talosctl-oidc chown talosctl-oidc:talosctl-oidc /var/lib/talosctl-oidc /var/log/talosctl-oidc chmod 750 /var/lib/talosctl-oidc
3. Provide a Talos API credential
The server authenticates to the Talos API with a talosconfig credential. From an admin machine that already has cluster access, generate a short-lived credential scoped to the roles the server should be able to grant:
# Generate a talosconfig for the server (adjust roles and TTL as needed)
talosctl config new --roles os:admin --crt-ttl 8760h /tmp/server-talosconfig
Copy it to the server host
cp /tmp/server-talosconfig /etc/talosctl-oidc/talosconfig
chown talosctl-oidc:talosctl-oidc /etc/talosctl-oidc/talosconfig
chmod 400 /etc/talosctl-oidc/talosconfig
The roles in this credential bound what the server can issue. Talos rejects any request for roles beyond them.
4. Create the environment file
cat > /etc/talosctl-oidc/env << 'EOF'
TALOSCTLOIDCTALOS_CONFIG=/etc/talosctl-oidc/talosconfig
TALOSCTLOIDCISSUER_URL=https://idp.example.com/application/o/talos-oidc/
TALOSCTLOIDCCLIENT_ID=your-client-id
TALOSCTLOIDCENDPOINTS=10.0.0.1,10.0.0.2
TALOSCTLOIDCCERT_TTL=5m
TALOSCTLOIDCROLES=os:admin
TALOSCTLOIDCDATA_DIR=/var/lib/talosctl-oidc
TALOSCTLOIDCAUDIT_LOG=/var/log/talosctl-oidc/audit.log
EOF
chmod 600 /etc/talosctl-oidc/env chown talosctl-oidc:talosctl-oidc /etc/talosctl-oidc/env
The env file contains the talosconfig path and OIDC client settings. Restrict access with chmod 600.
5. Create the systemd unit
cat > /etc/systemd/system/talosctl-oidc.service << 'EOF'
[Unit]
Description=talosctl-oidc certificate exchange server
Documentation=https://github.com/qjoly/talosctl-oidc
After=network-online.target
Wants=network-online.target
[Service] Type=simple User=talosctl-oidc Group=talosctl-oidc EnvironmentFile=/etc/talosctl-oidc/env ExecStart=/usr/local/bin/talosctl-oidc serve Restart=on-failure RestartSec=5s
Hardening
NoNewPrivileges=true
PrivateTmp=true
ProtectSystem=strict
ProtectHome=true
ReadWritePaths=/var/lib/talosctl-oidc /var/log/talosctl-oidc
[Install] WantedBy=multi-user.target EOF
6. Enable and start the service
systemctl daemon-reload
systemctl enable --now talosctl-oidc
Check status
systemctl status talosctl-oidc
View logs
journalctl -u talosctl-oidc -f
7. Open the firewall
Allow TCP port 8443 from developer workstations only. Example with ufw:
ufw allow from <developer-subnet> to any port 8443 proto tcpOr with firewalld:
firewall-cmd --add-rich-rule='rule family="ipv4" source address="<developer-subnet>" port port="8443" protocol="tcp" accept' --permanent
firewall-cmd --reload
8. Retrieve the server CA and log in
The CA PEM is stable across restarts when TALOSCTLOIDCDATA_DIR is set:
curl -k https://<host-ip>:8443/ca > server-ca.pem
talosctl-oidc login \   --provider https://idp.example.com/application/o/talos-oidc/ \   --client-id your-client-id \   --server https://<host-ip>:8443 \   --server-ca server-ca.pem \   --context-name oidc
Token Caching Behavior
OIDC tokens are cached in the system keychain (macOS Keychain, GNOME Keyring, KDE Wallet, or Windows Credential Manager).
| Scenario | Behavior | |----------|----------| | No cached token | Opens browser for full OIDC login | | Valid cached token | Skips browser, exchanges cached token for new cert | | Expired token with refresh token | Silently refreshes, no browser needed | | Expired token without refresh token | Opens browser for full OIDC login | | Refresh fails | Falls back to full OIDC login | | Certificate about to expire | Proactively renews using refresh token if --watch or rerun login |
The login flow has a 5-minute timeout. If the user does not complete authentication in the browser within that window, the command exits with an error.
Multiple Clusters
Use --context-name to manage credentials for different Talos clusters:
# Login to production cluster
talosctl-oidc login \
  --provider https://idp.example.com/realms/talos \
  --client-id talosctl \
  --server https://prod-oidc-server:8443 \
  --server-ca prod-ca.pem \
  --context-name prod
Login to staging cluster
talosctl-oidc login \
  --provider https://idp.example.com/realms/talos \
  --client-id talosctl \
  --server https://staging-oidc-server:8443 \
  --server-ca staging-ca.pem \
  --context-name staging
Switch between clusters
talosctl --context prod version
talosctl --context staging version
Check status of each
talosctl-oidc status --context-name prod
talosctl-oidc status --context-name staging
Audit Logging
The server emits structured JSON audit events for every authentication attempt and certificate issuance. Each event is a single JSON line written to the configured output.
Configuration
By default, audit events are written to stdout (mixed with regular log output). To write to a dedicated file:
export TALOSCTLOIDCAUDIT_LOG=/var/log/talosctl-oidc/audit.logEvent Types
| Event | Description | |-------|-------------| | auth_success | OIDC token validated successfully | | auth_failure | Token validation failed (invalid signature, expired, wrong audience, etc.) | | cert_issued | Ephemeral client certificate issued to authenticated user | | cert_error | Certificate generation failed after successful authentication |
Example Events
{"timestamp":"2026-02-17T14:30:00Z","type":"certissued","subject":"abc123","email":"user@example.com","issuer":"https://idp.example.com/","clientip":"192.168.1.10:52431","roles":["os:admin"],"certttl":"5m0s","certexpiry":"2026-02-17T14:35:00Z"}
{"timestamp":"2026-02-17T14:31:00Z","type":"authfailure","clientip":"10.0.0.5:48291","error":"token expired"}
Fields
| Field | Description | |-------|-------------| | timestamp | UTC timestamp of the event | | type | Event type (authsuccess, authfailure, certissued, certerror) | | subject | OIDC subject identifier (sub claim) | | email | User's email from the OIDC token | | issuer | OIDC issuer URL | | client_ip | Remote address of the client | | roles | Talos roles assigned to the issued certificate | | cert_ttl | Lifetime of the issued certificate | | cert_expiry | When the issued certificate expires | | error | Error message (for failure events) |
Admin API
The server provides optional admin endpoints for monitoring server activity and inspecting active certificates. These endpoints are protected by a bearer token.
Enabling the Admin API
Set the TALOSCTLOIDCADMIN_TOKEN environment variable to a secret value:
export TALOSCTLOIDCADMIN_TOKEN=$(openssl rand -hex 32)If this variable is not set, the admin endpoints return 403 Forbidden.
Endpoints
GET /admin/stats
Returns aggregate server statistics.
curl -s -H "Authorization: Bearer $TALOSCTLOIDCADMIN_TOKEN" \
  https://localhost:8443/admin/stats | jq .
{
"started_at": "2026-02-17T14:00:00Z",
"uptime": "2h30m0s",
"totalcertsissued": 42,
"active_certs": 5,
"totalauthsuccesses": 45,
"totalauthfailures": 3,
"totalcerterrors": 0
}GET /admin/certs
Returns the list of currently active (non-expired) issued certificates.
curl -s -H "Authorization: Bearer $TALOSCTLOIDCADMIN_TOKEN" \
  https://localhost:8443/admin/certs | jq .
[
{
"subject": "abc123",
"email": "user@example.com",
"issued_at": "2026-02-17T15:30:00Z",
"expires_at": "2026-02-17T16:30:00Z",
"client_ip": "192.168.1.10:52431",
"roles": ["os:admin"],
"ttl": "1h0m0s"
}
]Expired certificates are automatically pruned from the list on each request.
Web Dashboard
The server provides a web-based admin dashboard for visual monitoring. Navigate to /admin/ in your browser:
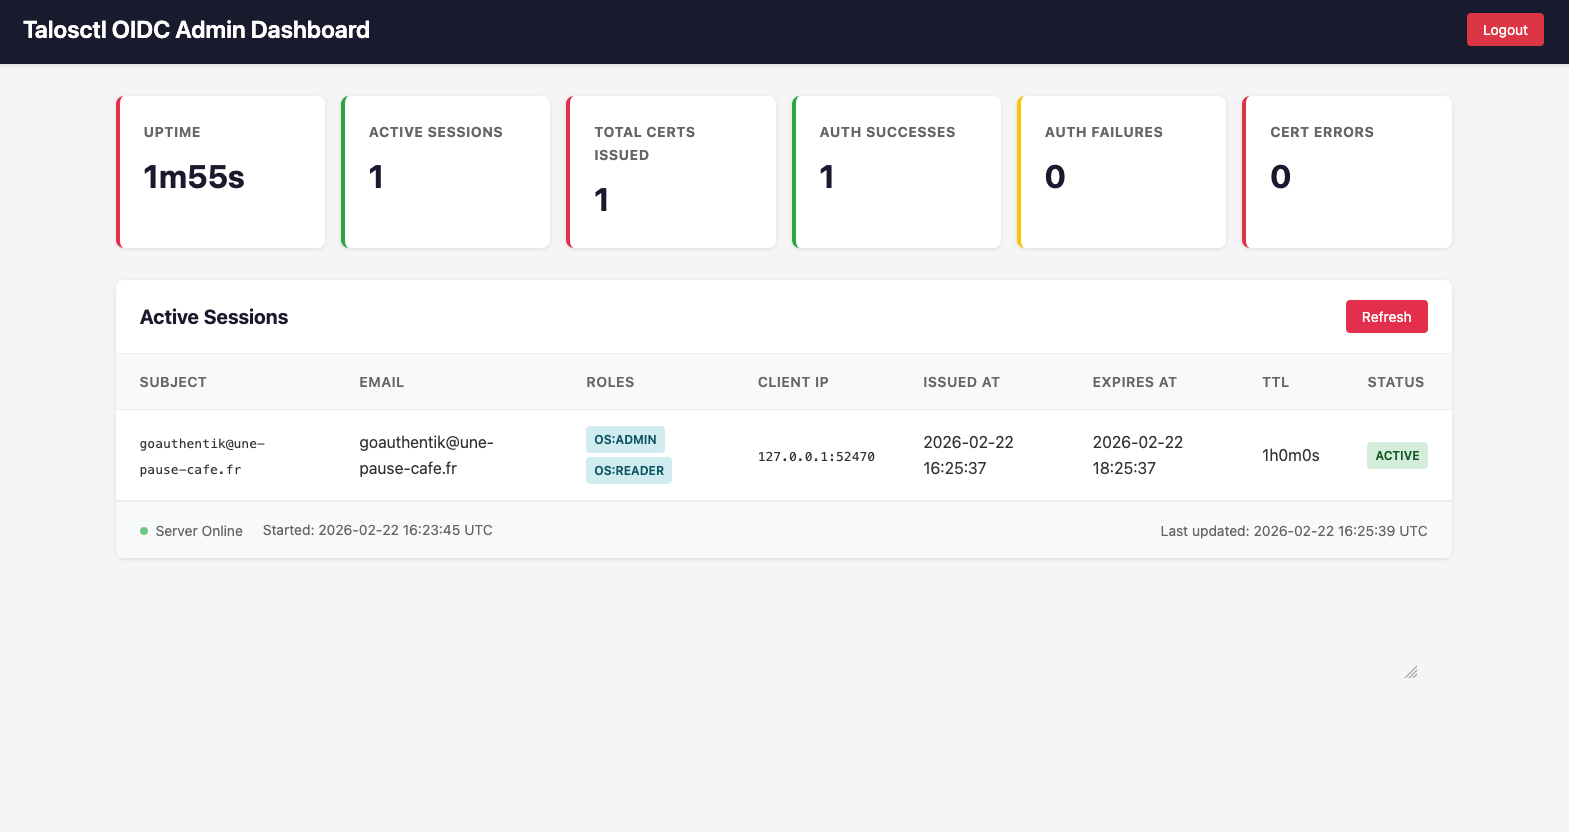
https://localhost:8443/admin/The dashboard provides:
- Login page with token-based authentication
- Real-time statistics showing uptime, active sessions, auth successes/failures
- Active sessions table with user details, roles, and certificate expiry
- Auto-refresh capability and logout functionality
Example:
- Open
https://localhost:8443/admin/in your browser - Enter your admin token when prompted
- View the dashboard with all statistics and active sessions
/admin/stats and /admin/certs) continue to accept Bearer tokens for programmatic access.
Rate Limiting and IP Allowlist
The server supports optional rate limiting and IP allowlisting on the /exchange endpoint to protect against abuse and brute-force attacks.
Rate Limiting
Rate limiting is disabled by default. When enabled, it applies a per-IP sliding window limit to the /exchange endpoint.
| Setting | Description | Default | |---------|-------------|---------| | ratelimitrequests | Maximum requests allowed per IP per window | 0 (disabled) | | ratelimitwindow | Time window for counting requests | 1m |
Configuration via environment variables:
export TALOSCTLOIDCRATELIMITREQUESTS=10 export TALOSCTLOIDCRATELIMITWINDOW=1mConfiguration via config file:
ratelimitrequests: 10 ratelimitwindow: "1m"Example: Allow 10 requests per minute per IP. Additional requests receive 429 Too Many Requests with a Retry-After header.
Per-IP key behind a proxy: the rate-limit bucket is keyed on the connection address by default.X-Forwarded-Foris only used when the request's direct peer is listed intrustedproxies— otherwise a client could rotate the header to mint a fresh bucket on every request, bypassing the limit. Settrustedproxies(envTALOSCTLOIDCTRUSTED_PROXIES) to your ingress/proxy network.
IP Allowlist
IP allowlisting restricts access to the /exchange endpoint to specific IP addresses or CIDR ranges.
| Setting | Description | Default | |---------|-------------|---------| | ip_allowlist | List of allowed IPs or CIDR ranges | (empty = allow all) |
Configuration via environment variables:
export TALOSCTLOIDCIP_ALLOWLIST="192.168.1.0/24,10.0.0.50,172.16.0.0/16"Configuration via config file:
ip_allowlist: - 192.168.1.0/24 - 10.0.0.50 - 172.16.0.0/16Note: Requests from IPs not in the allowlist receive 403 Forbidden.
Running behind a reverse proxy? TheX-Forwarded-Forheader is only honored when the request's direct peer is listed intrusted_proxies(see below). Otherwise the header is attacker-controlled and is ignored in favor of the real connection address — without this, anyone could forgeX-Forwarded-Forto bypass the allowlist.
export TALOSCTLOIDCTRUSTED_PROXIES="10.0.0.0/8,192.168.0.1"trusted_proxies:
- 10.0.0.0/8
- 192.168.0.1Helm Chart Configuration
config:
  rateLimitRequests: 10
  rateLimitWindow: "1m"
  ipAllowlist:
    - 192.168.1.0/24
    - 10.0.0.50
Role-Based Access Control (RBAC)
By default, every authenticated user receives the same static set of roles configured in roles. RBAC lets you map OIDC token claims (such as group membership) to different Talos roles dynamically, so users get only the permissions they need.
How It Works
When RBAC rules are configured, the server evaluates each rule against the claims in the validated ID token. Rules are checked in order; all matching rules' roles are combined (union). If no rule matches, the user receives the static roles list as a fallback.
If roles is empty and RBAC is enabled but no rules match, the exchange request is rejected with 403 Forbidden — enforcing least-privilege by default.
Configuration
Add an rbac block to your config.yaml:
# Fallback roles when no RBAC rule matches.
Set to [] to deny access when no rule matches.
roles: []
rbac:   rules:     # Users in the 'platform-admins' OIDC group get full admin access.     - claim: groups       value: platform-admins       roles:         - os:admin
# Users in the 'developers' group get read-only access.     - claim: groups       value: developers       roles:         - os:reader
# A separate claim can also be used (e.g., a custom 'department' claim).     - claim: department       value: sre       roles:         - os:admin
Supported Claim Types
The RBAC engine handles multiple ways OIDC providers encode claim values:
| Claim format | Example | Behaviour | |---|---|---| | String | "platform-admins" | Exact match | | Space-separated string | "group1 group2" | Splits on whitespace and checks each token | | JSON array of strings | ["platform-admins","developers"] | Checks each element |
RBAC Rules Reference
Each rule under rbac.rules has three fields:
| Field | Required | Description | |---|---|---| | claim | Yes | The OIDC claim name to inspect (e.g. groups, roles, email) | | value | Yes | The expected value that must appear in the claim | | roles | Yes | Talos roles to grant when this rule matches |
Available Talos Roles
| Role | Description | |---|---| | os:admin | Full administrative access to all Talos API operations | | os:reader | Read-only access (inspect nodes, services, config) | | os:etcd:backup | Permission to trigger etcd backups |
Interaction with Static roles
| RBAC configured | Rule matched | Result | |---|---|---| | No | — | Static roles applied to all users | | Yes | Yes | Matched rules' roles applied (static roles ignored) | | Yes | No | Static roles applied as fallback | | Yes | No | 403 Forbidden if roles: [] is also empty |
Debugging RBAC
Set DEBUG=1 on the server to see per-rule evaluation in the logs:
[DEBUG] [RBAC] Evaluating 3 RBAC rules against claims
[DEBUG] [RBAC] Rule 1: checking claim 'groups' = '[platform-admins developers]' against expected value 'platform-admins'
[DEBUG] [RBAC]   -> checking []interface{} with 2 items
[DEBUG] [RBAC]     item 0: platform-admins
[DEBUG] [RBAC]     -> MATCH at index 0
[DEBUG] [RBAC] Rule 1: MATCH! Assigning roles: [os:admin]
[DEBUG] [RBAC] RBAC evaluation complete. Assigned roles: [os:admin]
Provider-specific Notes
Authentik
Authentik sends group membership as a JSON array of strings in the groups claim. The group name is the full display name configured in Authentik (e.g. "authentik Admins" — note the space is part of the name, not a separator):
rbac:
  rules:
    - claim: groups
      value: "authentik Admins"
      roles:
        - os:admin
Keycloak
Keycloak can send roles as an array in roles or as realm/client roles nested under realm_access.roles. Use the top-level roles claim if you configure it as a mapper, or use a custom claim name:
rbac:
  rules:
    - claim: roles
      value: talos-admin
      roles:
        - os:admin
Dex
Dex passes group membership from upstream connectors in the groups claim as a string array. Configuration is the same as the standard example above.
Note: See the RBAC wiki page for more detailed examples and troubleshooting.
Security Considerations
- TLS by default: The server generates a self-signed TLS certificate at startup when no TLS configuration is provided. Plain HTTP requires explicitly setting
TALOSCTLOIDCINSECURE=true - Ephemeral certificates: Client certificates are short-lived (default 5 minutes). Users cannot extend or forge certificates without re-authenticating
- CA key isolation: The Talos CA private key is never held by this server. Certificates are minted by the Talos node via the Talos API, so the CA key never leaves the nodes that already hold it
- PKCE is mandatory: The OIDC flow uses S256 challenge method, protecting against authorization code interception
- OIDC tokens are stored in the system keychain, encrypted at rest by the operating system
- Token validation: The server validates ID tokens against the OIDC provider's JWKS (RS256, ES256, EdDSA) or HMAC secret (HS256)
- The callback server binds to
127.0.0.1only, preventing access from other machines - State parameter is used for CSRF protection during the OIDC flow
- Admin API is opt-in: The
/admin/*endpoints are disabled by default and require settingTALOSCTLOIDCADMIN_TOKEN. The token is compared using constant-time comparison to prevent timing attacks - Audit logging provides a tamper-evident record of all authentication events for compliance and security monitoring
- Rate limiting can be configured to prevent brute-force attacks on the
/exchangeendpoint (disabled by default) - IP allowlisting can restrict access to specific networks or IP addresses (disabled by default)
Certificate Revocation Strategy (ISO 27001 A.9.2.6)
Talos does not support CRL (Certificate Revocation List) or OCSP checks on client certificates. This means a compromised certificate cannot be invalidated before it expires. This is addressed through the following layered compensating controls:
| Control | Mechanism | Effect | |---|---|---| | Short certificate TTL | Set cert_ttl to 5–10 minutes (default: 5m) | A compromised certificate becomes invalid within minutes without any action | | Auto-renewal via --watch | Client renews automatically before expiry using the cached refresh token | Short TTLs are transparent to the user | | IdP refresh token revocation | Revoke the user's refresh token in your OIDC provider | Prevents the client from obtaining a new certificate after the current one expires |
Recommended response to a compromised credential:
- Immediately revoke the user's refresh token (and/or session) in your OIDC provider. This stops the
--watchloop and any subsequentloginfrom successfully renewing the certificate. - The existing certificate remains usable for at most the configured
cert_ttl(default 5 minutes). - Optionally, lower
cert_ttlto1mor less in your server configuration for higher-sensitivity environments. Note that this increases the frequency of cert-exchange requests.
- Authentik: Admin → Directory → Users → select user → Sessions → Revoke all, or revoke the specific token under Tokens
- Keycloak: Admin Console → Users → select user → Sessions → Log Out, or use the Token Introspection / Revocation API
- Dex: Revoke through the upstream connector (Dex itself has no revocation endpoint)
Debugging
You can enable detailed internal tracing for both the client and the server by setting the DEBUG environment variable to any non-empty value.
# Debug client-side login flow
DEBUG=1 talosctl-oidc login --provider ...
Debug server-side exchange flow
DEBUG=1 talosctl-oidc serve
Debug logs include information about OIDC discovery, PKCE challenges, token response fields, keychain/file storage operations, and certificate expiry calculations.
Troubleshooting
"invalid_client" error during login
The OIDC provider is rejecting the token request. Common causes:
- The provider is configured as a confidential client but no
--client-secretwas provided. Either switch to a public client or pass--client-secret - The Client ID is incorrect
"failed to listen on port 8900"
Another process is using port 8900. Use --callback-port to pick a different port. Make sure the redirect URI in your OIDC provider matches (e.g. http://127.0.0.1:9000/callback).
"OIDC discovery failed"
The tool could not reach the OIDC provider's /.well-known/openid-configuration endpoint. Verify:
- The
--provider/--issuer-urlis correct and reachable - Your network/proxy allows access to the provider
"state mismatch: possible CSRF attack"
The state parameter returned by the OIDC provider does not match what was sent. This could indicate a stale browser tab. Try the login again.
Server: "Talos API" error
The server could not call the Talos API to issue a certificate. Verify:
TALOSCTLOIDCTALOS_CONFIGpoints at a valid talosconfig, or the in-cluster credential is mounted at/var/run/secrets/talos.dev/config- The Talos nodes have
machine.features.kubernetesTalosAPIAccessenabled, with the server's namespace inallowedKubernetesNamespaces - The roles the server requests are within the credential's
allowedRoles(Talos rejects privilege escalation) - The configured
endpointsare reachable from the server
Keychain errors on Linux
On Linux, go-keyring requires a running secret service (GNOME Keyring or KDE Wallet). On headless servers:
sudo apt install gnome-keyring
eval $(gnome-keyring-daemon --start --components=secrets)
export GNOMEKEYRINGCONTROL


