
The All in One Framework to Build Undefeatable Scrapers
Last updated Jul 8, 2026
5.5k
Stars
485
Forks
58
Issues
+5.5k
Stars/day
Attention Score
84
Topics
#anti-bot#anti-detect#anti-detect-browser#anti-detection#antidetect-browser#bot-detection#bypass-cloudflare#cloudflare-bypass#cloudflare-scrape#python-scraper#python-web-scraper#python-web-scraping#scraping-framework#scraping-python#scraping-tool#undetectable#undetected#undetected-chromedriver#web-crawling#web-scraping-python
Language breakdown
Python 49.2%
TypeScript 47.6%
JavaScript 2.7%
Shell 0.2%
HTML 0.2%
Dockerfile 0.1%
▸ Files
click to expand
README

🤖 Botasaurus 🤖
The All in One Framework to Build Undefeatable Scrapers
The web has evolved. Finally, web scraping has too.


🐿️ Botasaurus In a Nutshell
How wonderful that of all the web scraping tools out there, you chose to learn about Botasaurus. Congratulations! And now that you are here, you are in for an exciting, unusual, and rewarding journey that will make your web scraping life a lot easier. Now, let me tell you about Botasaurus in bullet points. (Because as per marketing gurus, YOU as a member of the Developer Tribe have a VERY short attention span.) So, what is Botasaurus? Botasaurus is an all-in-one web scraping framework that enables you to build awesome scrapers in less time, with less code, and with more fun. We have put all our web scraping experience and best practices into Botasaurus to save you hundreds of hours of development time! Now, for the magical powers awaiting you after learning Botasaurus:- In terms of humaneness, what Superman is to Man, Botasaurus is to Selenium and Playwright. Easily pass every (Yes, E-V-E-R-Y) bot test, and build undetected scrapers.
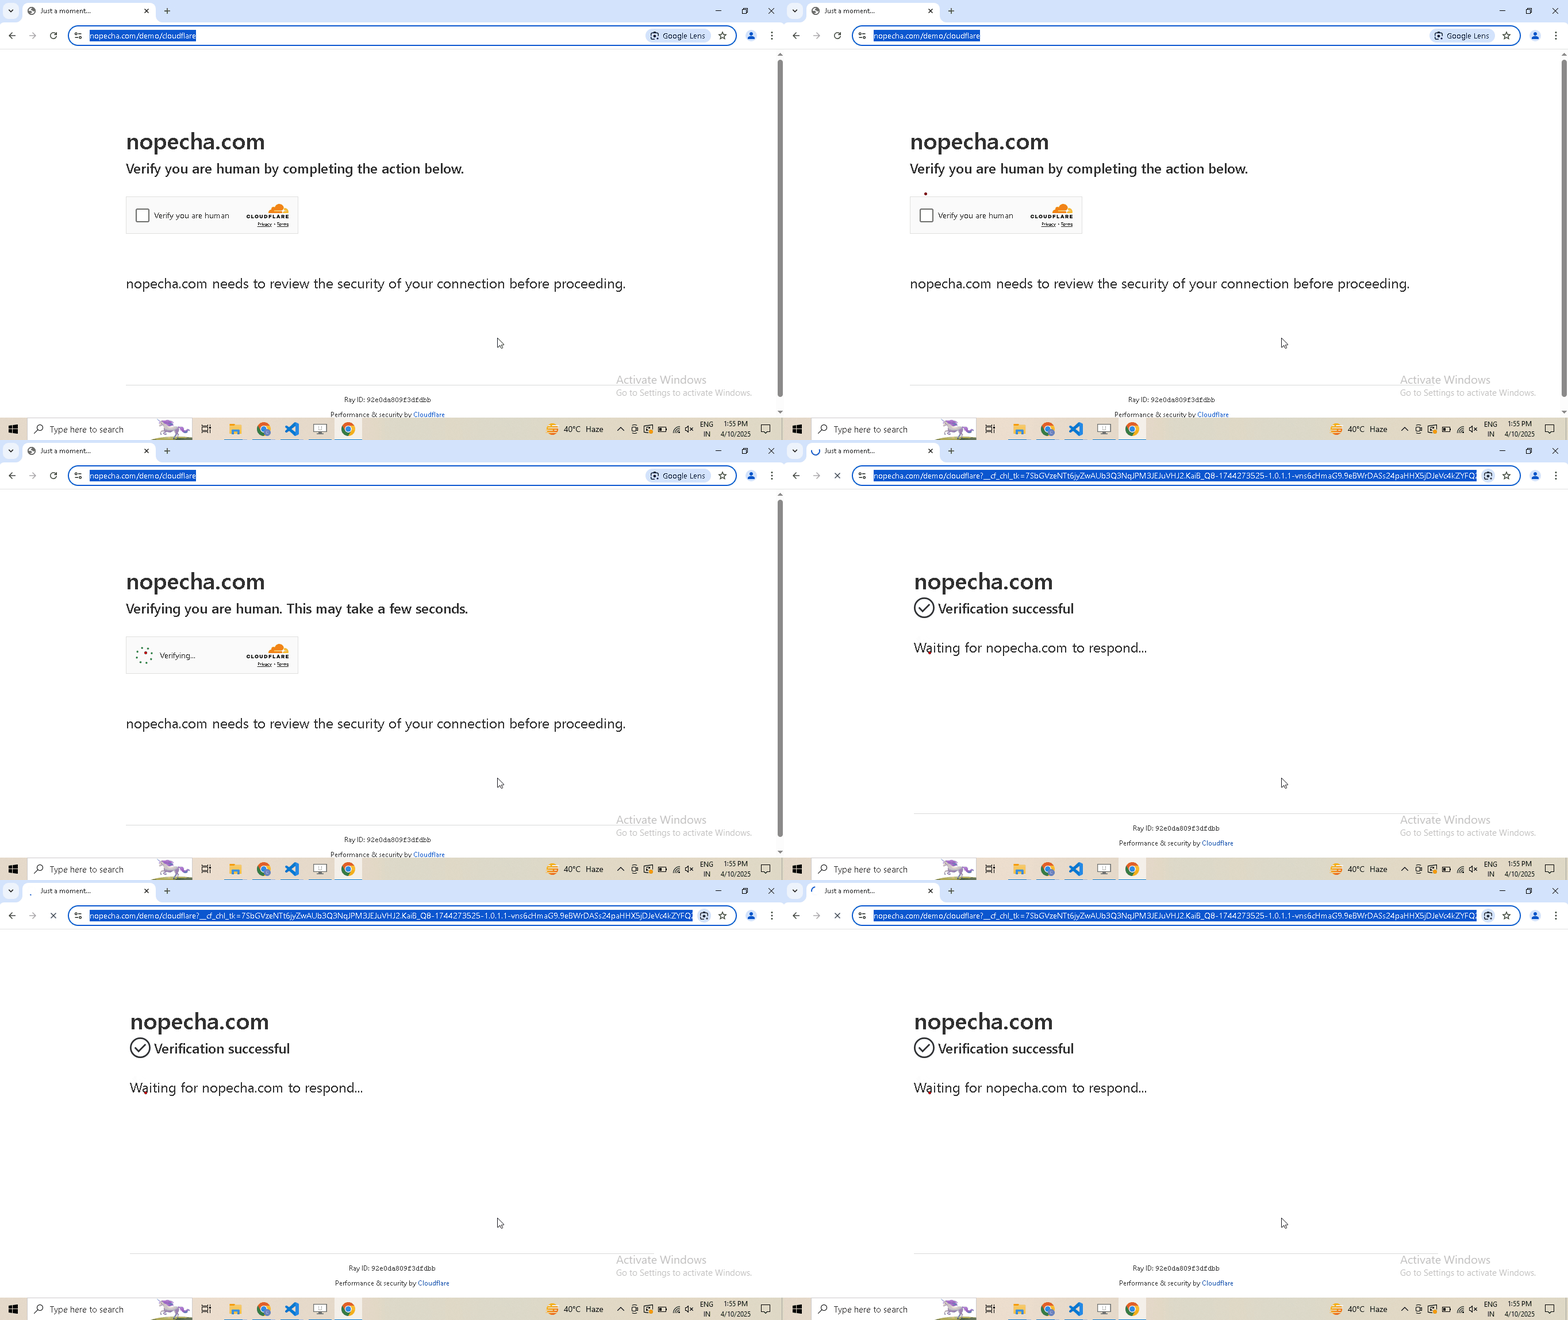
🔗 Want to try it yourself? See the code behind these tests here
- Perform realistic, human-like mouse movements and say sayonara to detection
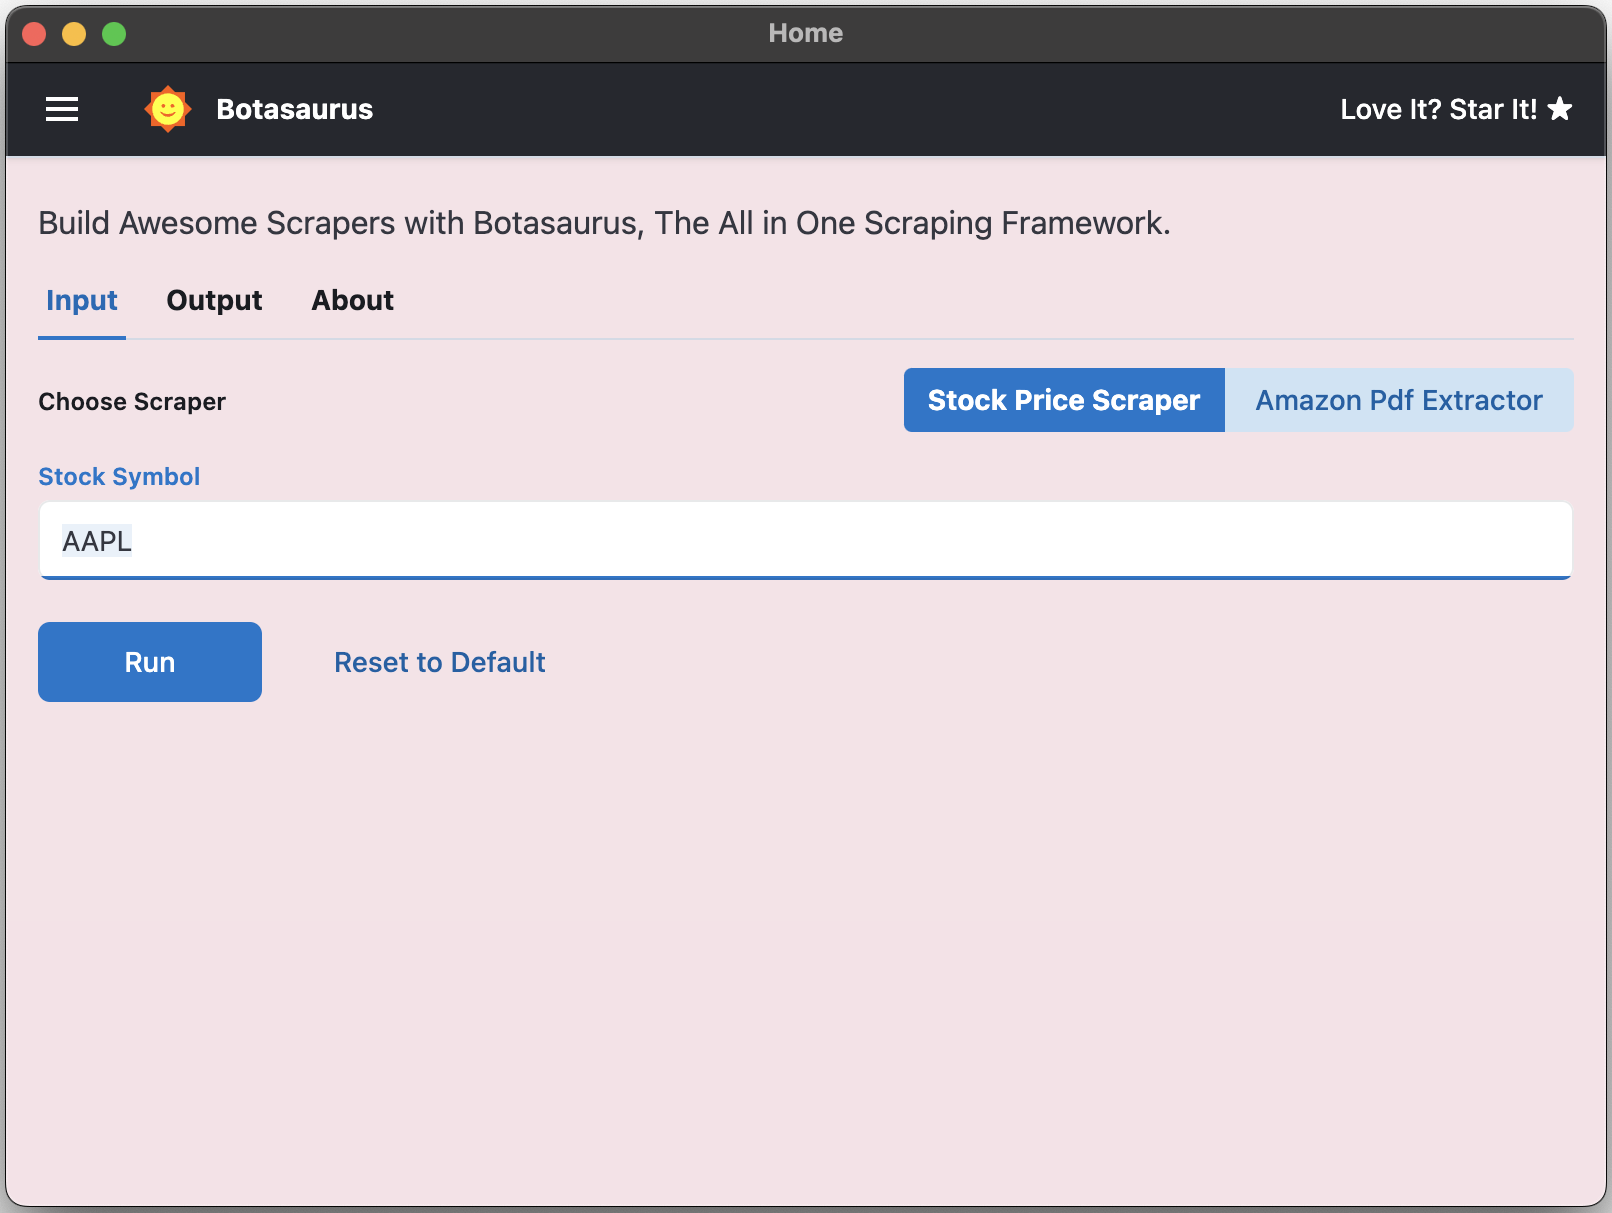
- Convert your scraper into a desktop app for Mac, Windows, and Linux in 1 day, so not only developers but everyone can use your web scraper.
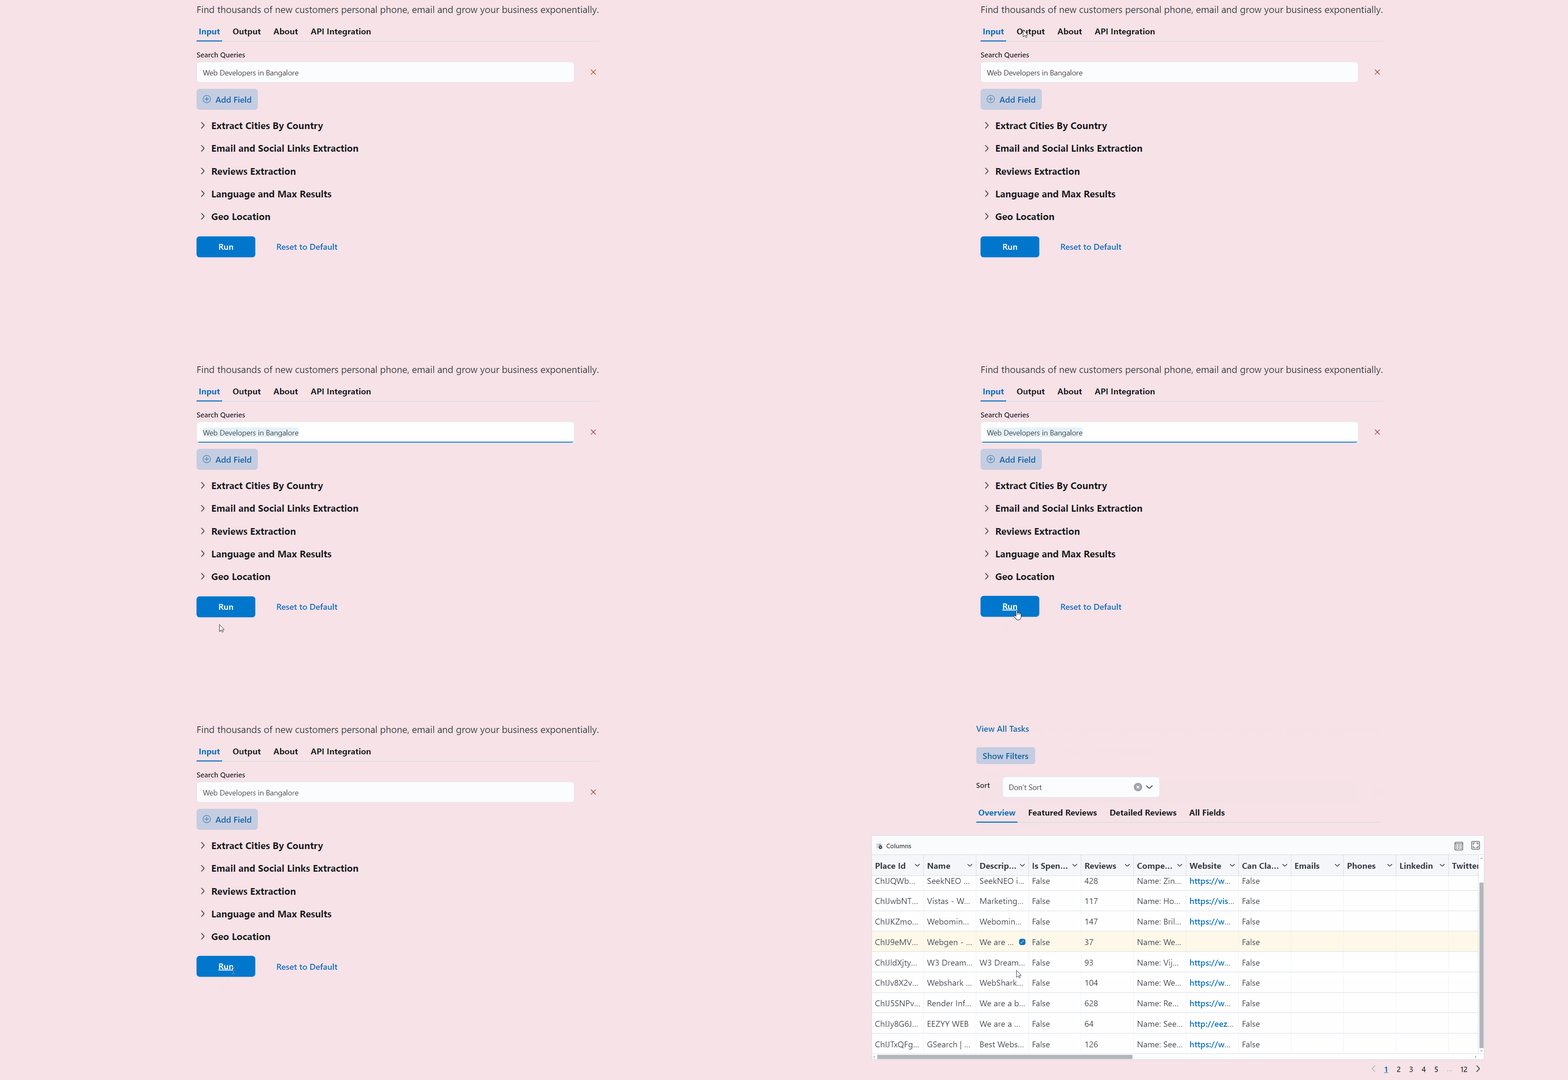
- Turn your scraper into a beautiful website, making it easy for your customers to use it from anywhere, anytime.
- Save up to 97%, yes 97%, on browser proxy costs by using browser-based fetch requests.
- Easily save hours of development time with easy parallelization, profiles, extensions, and proxy configuration. Botasaurus makes asynchronous, parallel scraping child's play.
- Use caching, sitemap, data cleaning, and other utilities to save hours of time spent writing and debugging code.
- Easily scale your scraper to multiple machines with Kubernetes, and get your data faster than ever.
🚀 Getting Started with Botasaurus
Let's dive right in with a straightforward example to understand Botasaurus. In this example, we will go through the steps to scrape the heading text from https://www.omkar.cloud/.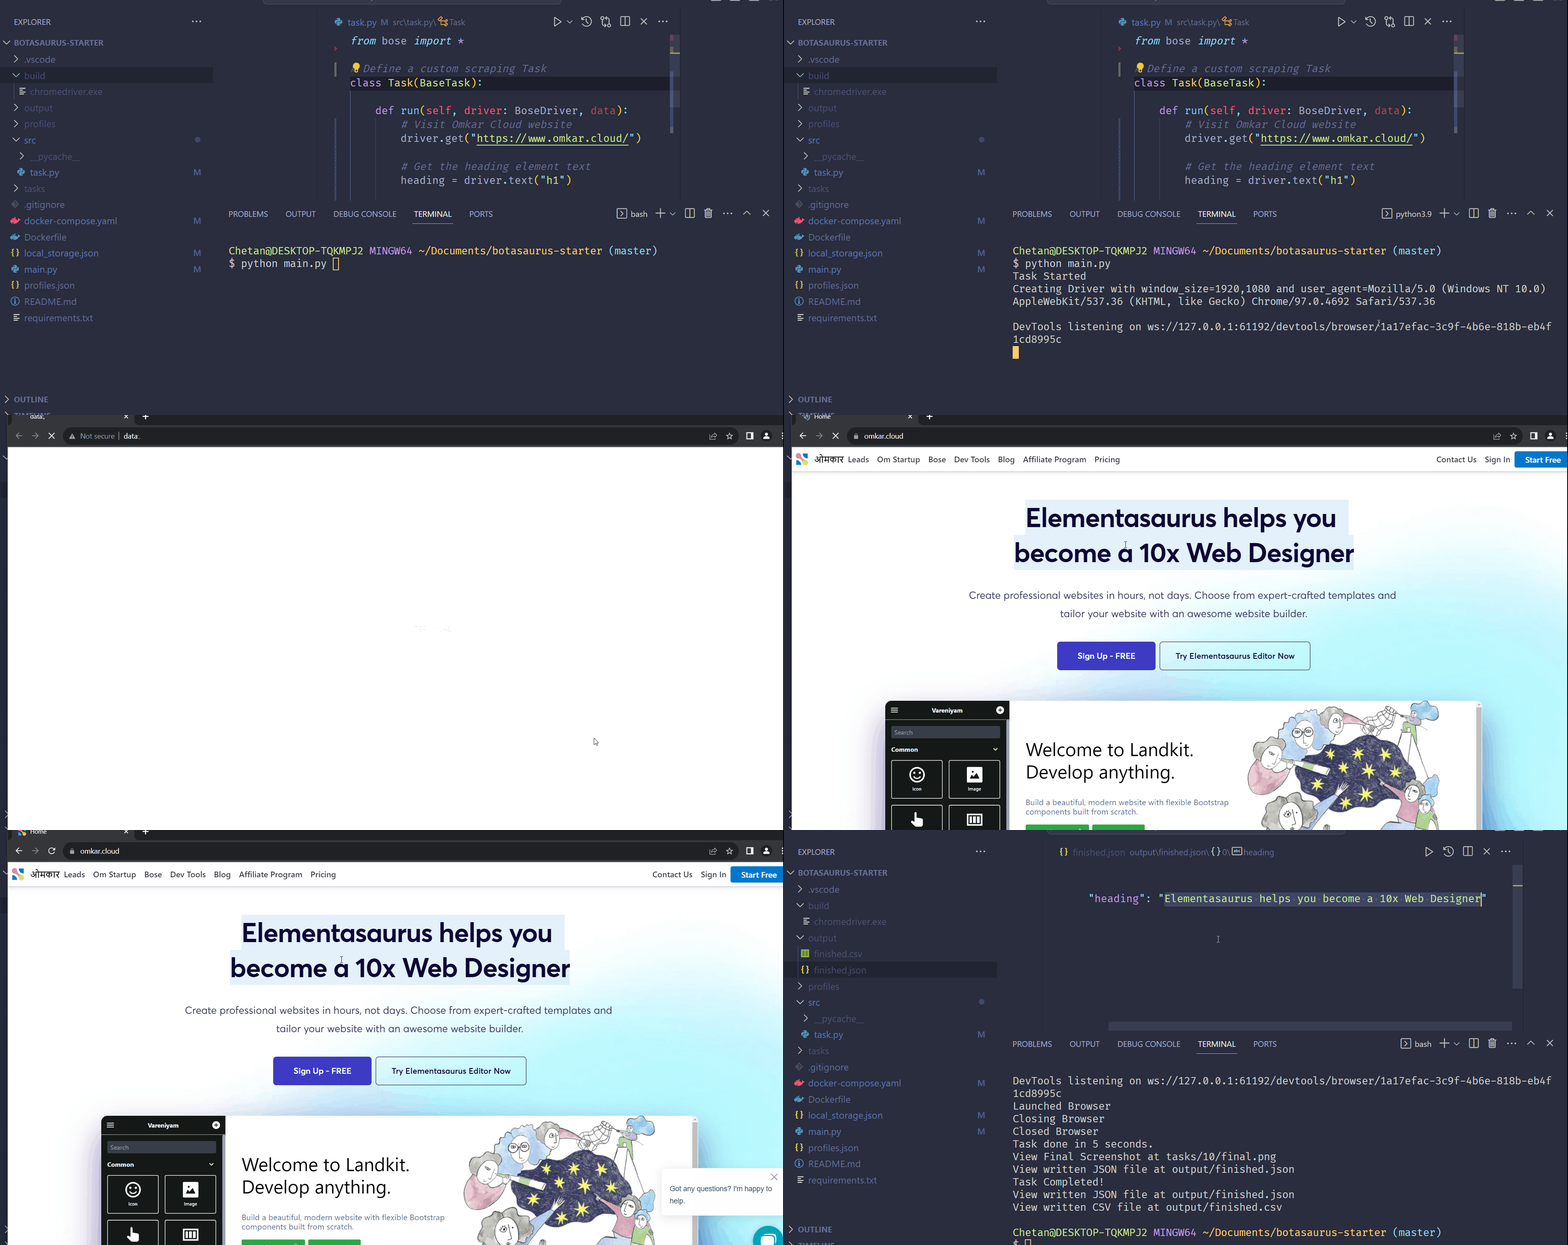
Step 1: Install Botasaurus
First things first, you need to install Botasaurus. Run the following command in your terminal:python -m pip install --upgrade botasaurusStep 2: Set Up Your Botasaurus Project
Next, let's set up the project:- Create a directory for your Botasaurus project and navigate into it:
mkdir my-botasaurus-project
 cd my-botasaurus-project
 code .  # This will open the project in VSCode if you have it installed
Step 3: Write the Scraping Code
Now, create a Python script namedmain.py in your project directory and paste the following code:
from botasaurus.browser import browser, Driver

 @browser
 def scrapeheadingtask(driver: Driver, data):
     # Visit the Omkar Cloud website
     driver.get("https://www.omkar.cloud/")

     # Retrieve the heading element's text
     heading = driver.get_text("h1")

     # Save the data as a JSON file in output/scrapeheadingtask.json
     return {
         "heading": heading
     }

 Initiate the web scraping task
scrapeheadingtask()- We define a custom scraping task,
scrapeheadingtask, decorated with@browser:
@browser
def scrapeheadingtask(driver: Driver, data):- Botasaurus automatically provides a Humane Driver to our function:
def scrapeheadingtask(driver: Driver, data):- Inside the function, we:
scrapeheadingtask.json by Botasaurus:
driver.get("https://www.omkar.cloud/")
     heading = driver.get_text("h1")
return {"heading": heading}- Finally, we initiate the scraping task:
# Initiate the web scraping task
 scrapeheadingtask()
Step 4: Run the Scraping Task
Time to run it:python main.py- Launch Google Chrome
- Visit omkar.cloud
- Extract the heading text
- Save it automatically as
output/scrapeheadingtask.json.
Now, let's explore another way to scrape the heading using the request module. Replace the previous code in main.py with the following:
from botasaurus.request import request, Request
 from botasaurus.soupify import soupify

 @request
 def scrapeheadingtask(request: Request, data):
     # Visit the Omkar Cloud website
     response = request.get("https://www.omkar.cloud/")

     # Create a BeautifulSoup object
     soup = soupify(response)

     # Retrieve the heading element's text
     heading = soup.find('h1').get_text()

     # Save the data as a JSON file in output/scrapeheadingtask.json
     return {
         "heading": heading
     }
 Initiate the web scraping task
scrapeheadingtask()- We scrape the HTML using
request, which is specifically designed for making browser-like humane requests.
- Next, we parse the HTML into a
BeautifulSoupobject usingsoupify()and extract the heading.
Step 5: Run the Scraping Task (which makes Humane HTTP Requests)
Finally, run it again:python main.py💡 Understanding Botasaurus
What is Botasaurus Driver, and why should I use it over Selenium and Playwright?
Botasaurus Driver is a web automation driver like Selenium, and the single most important reason to use it is because it is truly humane. You will not, and I repeat NOT, have any issues accessing any website. Plus, it is super fast to launch and use, and the API is designed by and for web scrapers, and you will love it.How do I access Cloudflare-protected pages using Botasaurus?
Cloudflare is the most popular protection system on the web. So, let's see how Botasaurus can help you solve various Cloudflare challenges. Connection Challenge This is the single most popular challenge and requires making a browser-like connection with appropriate headers. It's commonly used for:- Product Pages
- Blog Pages
- Search Result Pages
What Works?
- Visiting the website via Google Referrer (which makes it seem as if the user has arrived from a Google search).
from botasaurus.browser import browser, Driver

 @browser
 def scrapeheadingtask(driver: Driver, data):
     # Visit the website via Google Referrer
     driver.google_get("https://www.cloudflare.com/en-in/")
     driver.prompt()
     heading = driver.get_text('h1')
     return heading

scrapeheadingtask()- Use the request module. The Request Object is smart and, by default, visits any link with a Google Referrer. Although it works, you will need to use retries.
from botasaurus.request import request, Request

 @request(max_retry=10)
 def scrapeheadingtask(request: Request, data):
     response = request.get("https://www.cloudflare.com/en-in/")
     print(response.status_code)
     response.raiseforstatus()
     return response.text

scrapeheadingtask()- 5th Review page
- Auth pages
What Does Not Work?
Using@request does not work because although it can make browser-like HTTP requests, it cannot run JavaScript to solve the challenge.
What Works?
Pass thebypasscloudflare=True argument to the googleget method.
from botasaurus.browser import browser, Driver

 @browser
 def scrapeheadingtask(driver: Driver, data):
     driver.googleget("https://nopecha.com/demo/cloudflare", bypasscloudflare=True)
     driver.prompt()

 scrapeheadingtask()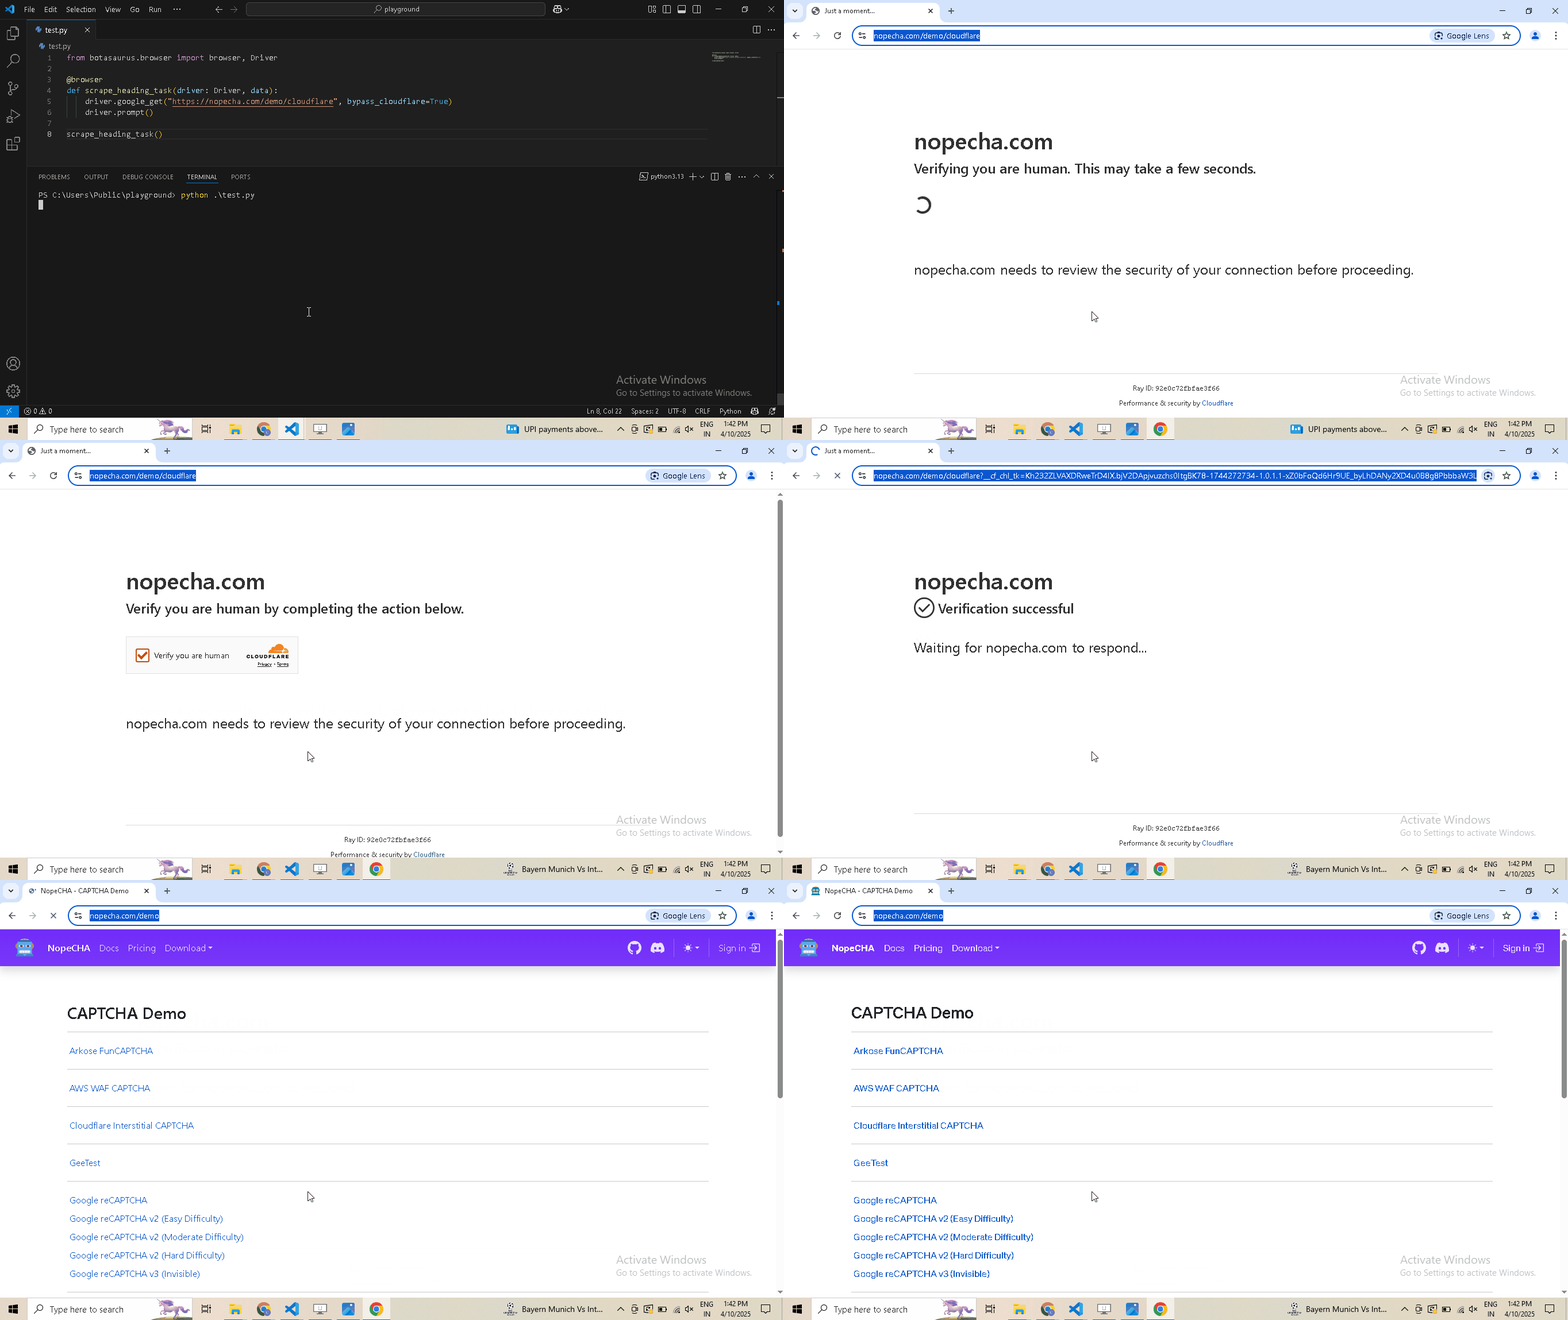
What are the benefits of a UI scraper?
Here are some benefits of creating a scraper with a user interface:- Simplify your scraper usage for customers, eliminating the need to teach them how to modify and run your code.
- Protect your code by hosting the scraper on the web and offering a monthly subscription, rather than providing full access to your code. This approach:
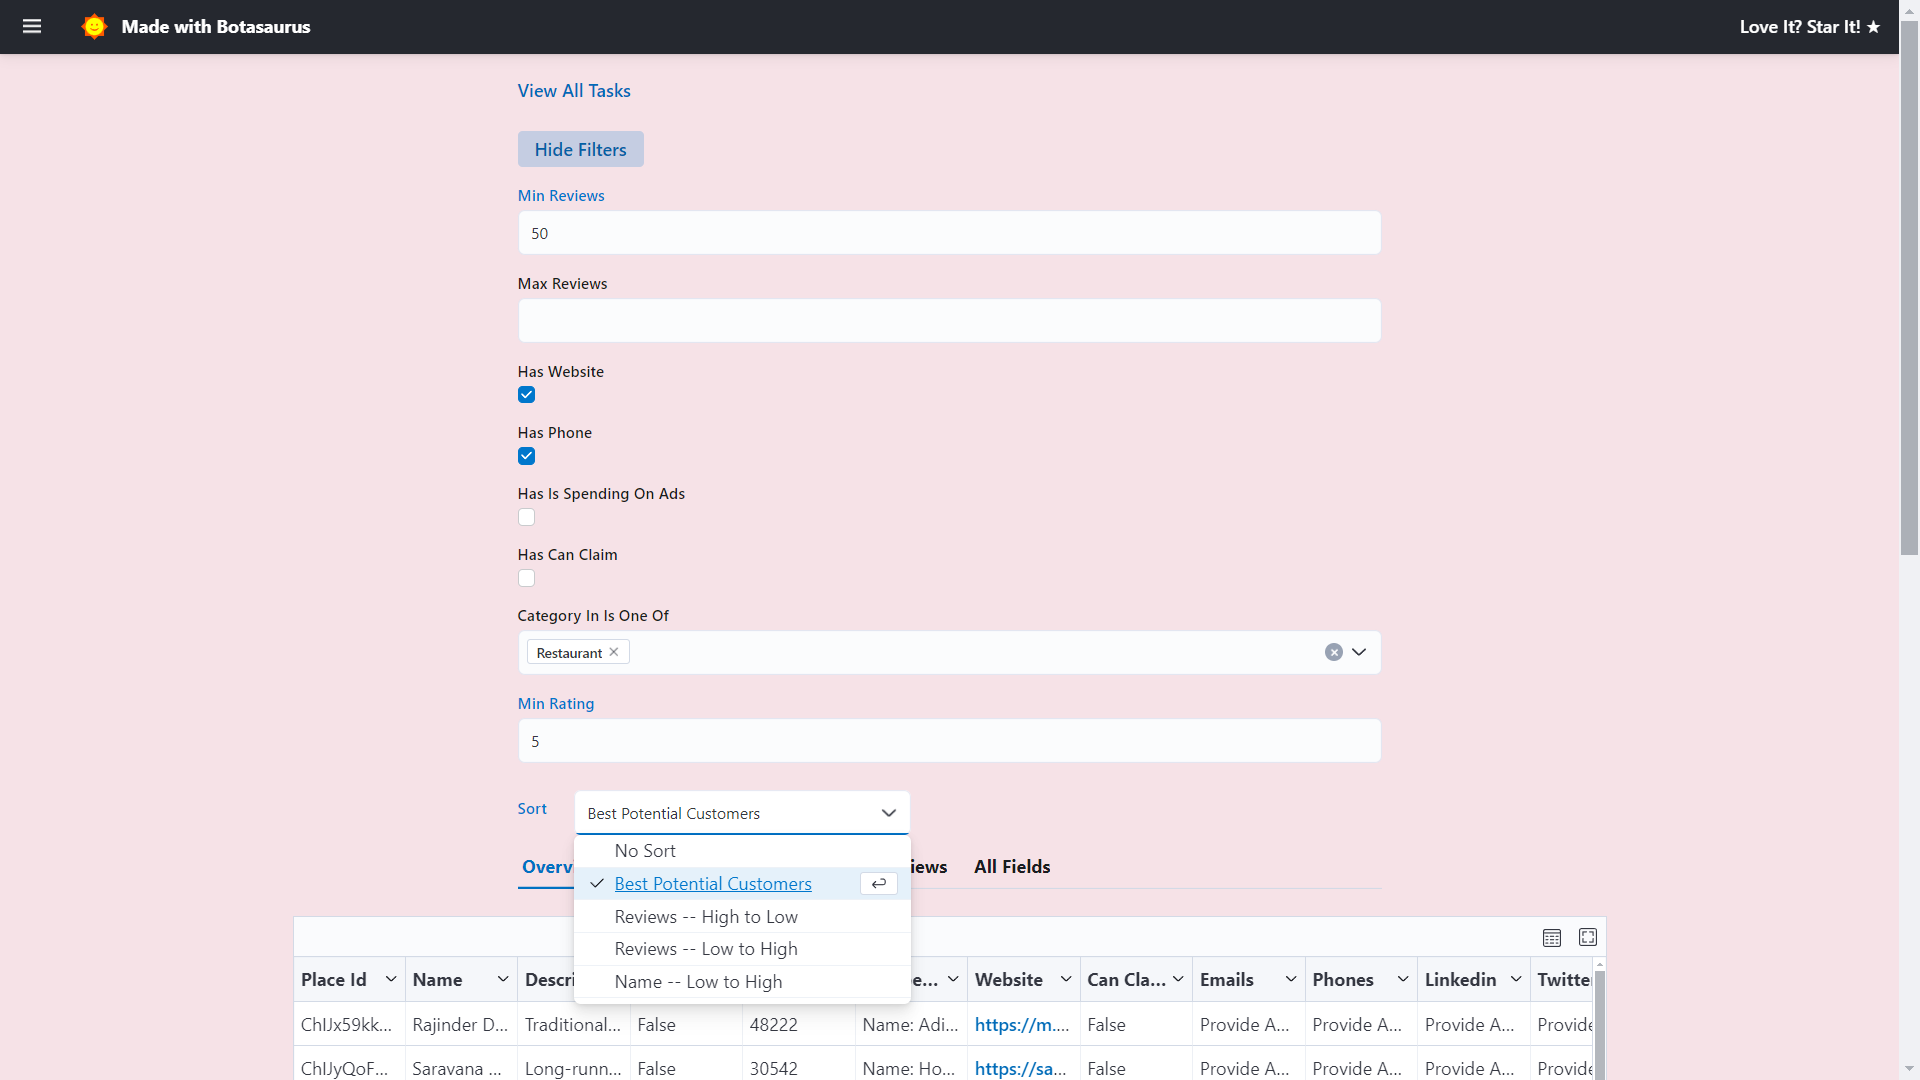
- Enable sorting, filtering, and downloading of data in various formats (JSON, Excel, CSV, etc.).
- Provide access via a REST API for seamless integration.
- Create a polished frontend, backend, and API integration with minimal code.
How to run a UI-based scraper?
Let's run the Botasaurus Starter Template (the recommended template for greenfield Botasaurus projects), which scrapes the heading of the provided link by following these steps:- Clone the Starter Template:
git clone https://github.com/omkarcloud/botasaurus-starter my-botasaurus-project
cd my-botasaurus-project- Install dependencies (will take a few minutes):
python -m pip install -r requirements.txt
python run.py install- Run the scraper:
python run.py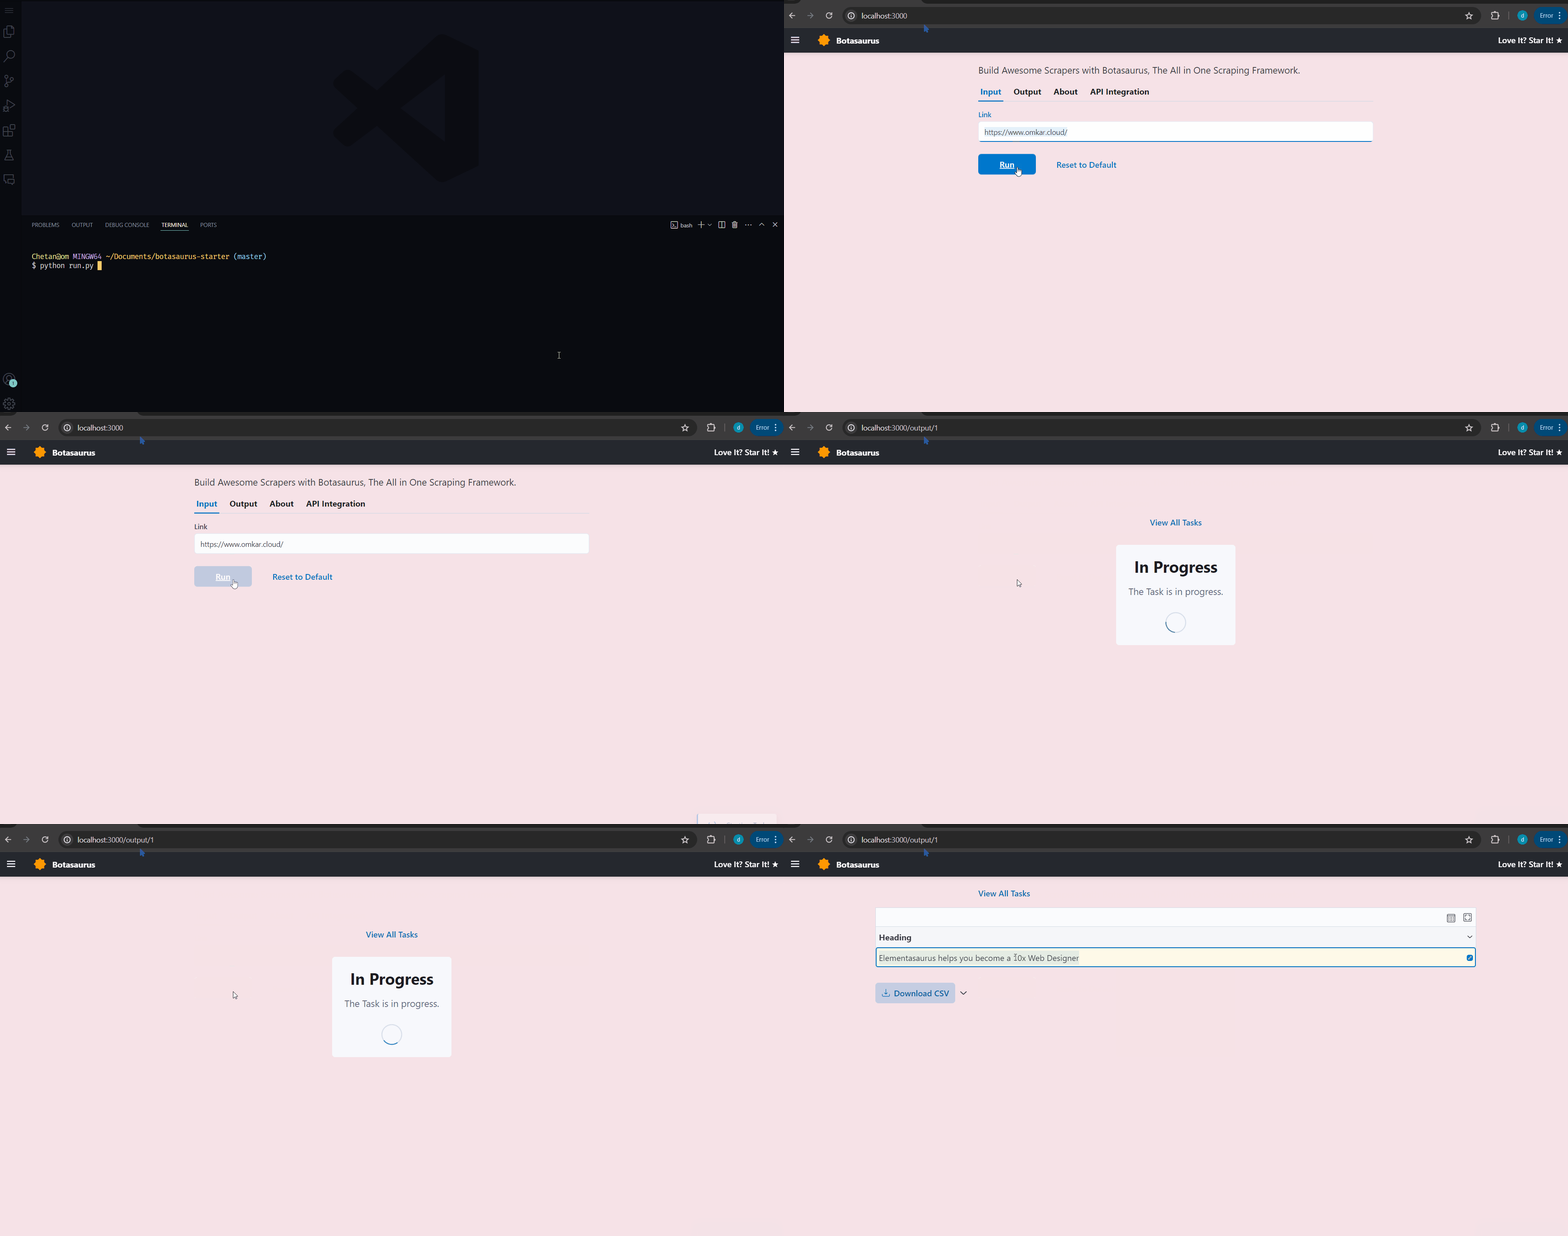 After some seconds, the data will be scraped.
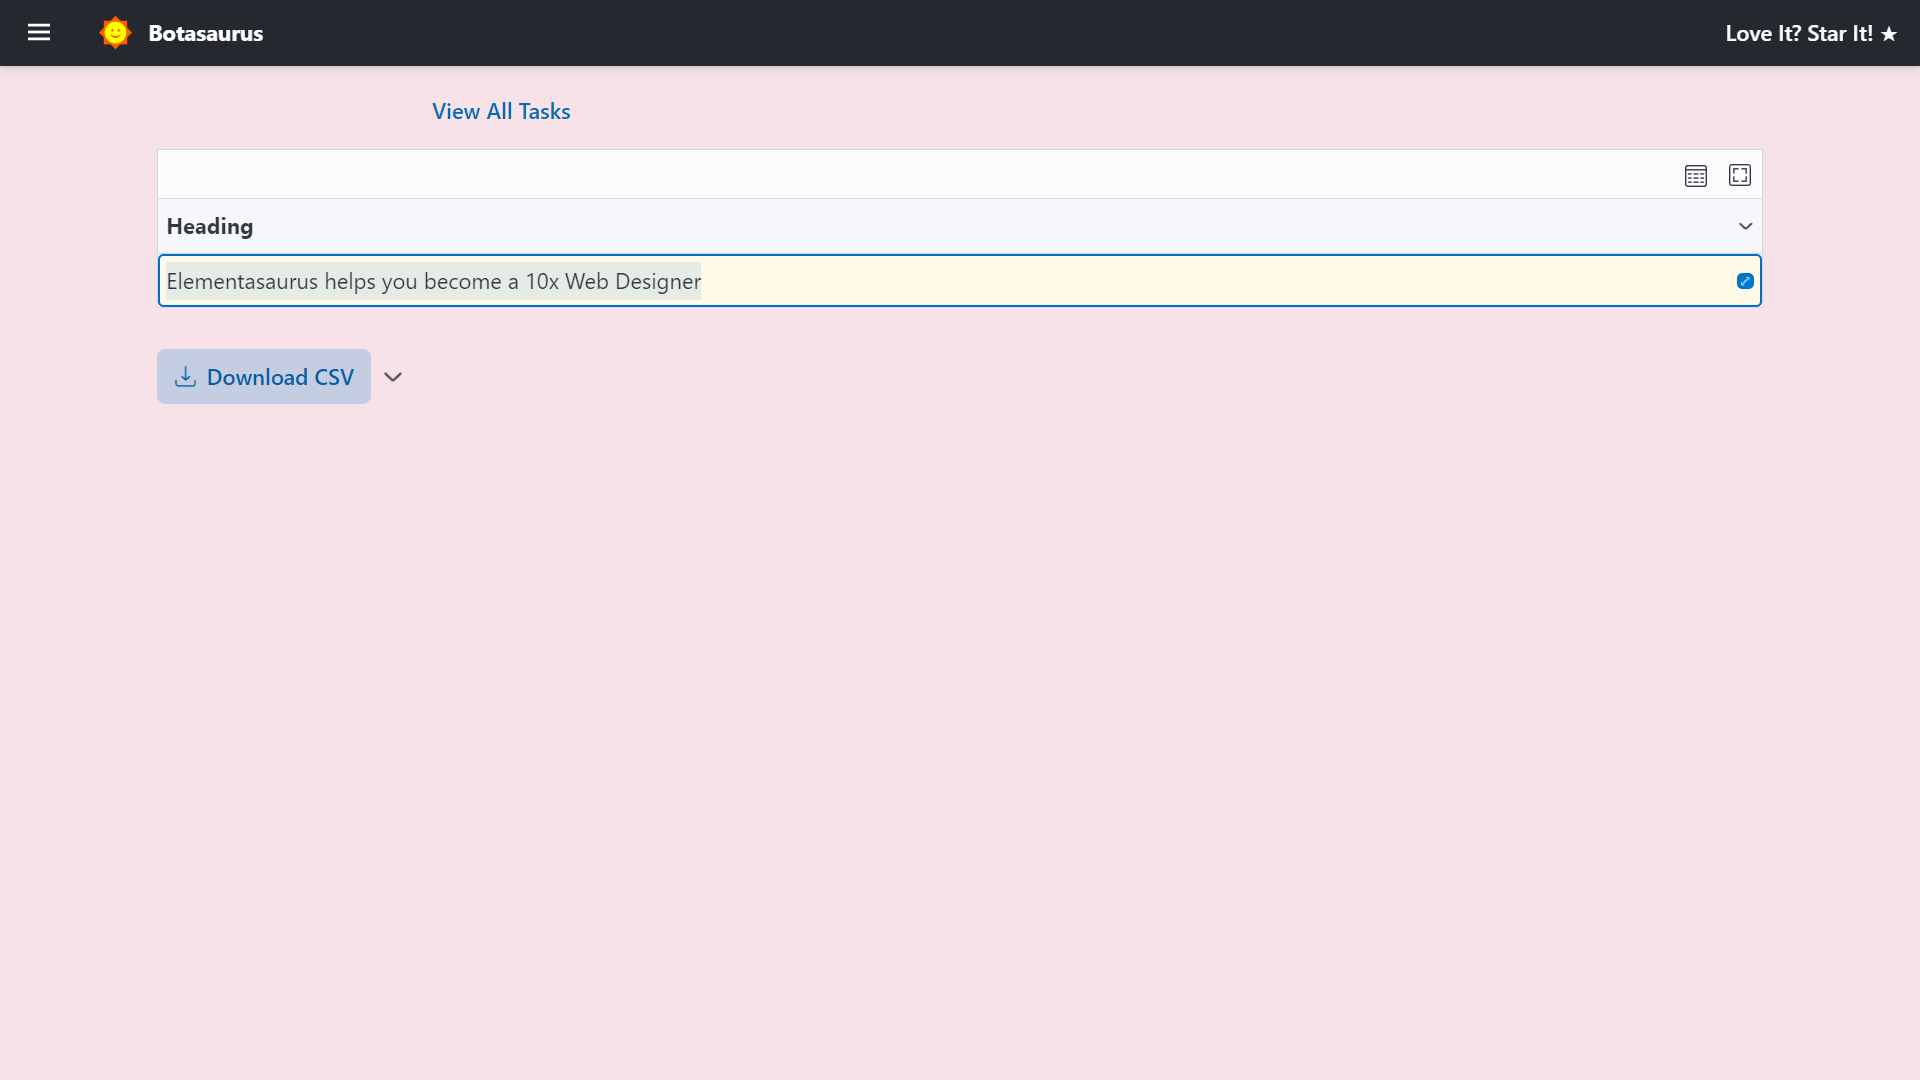 Visit http://localhost:3000/output to see all the tasks you have started.
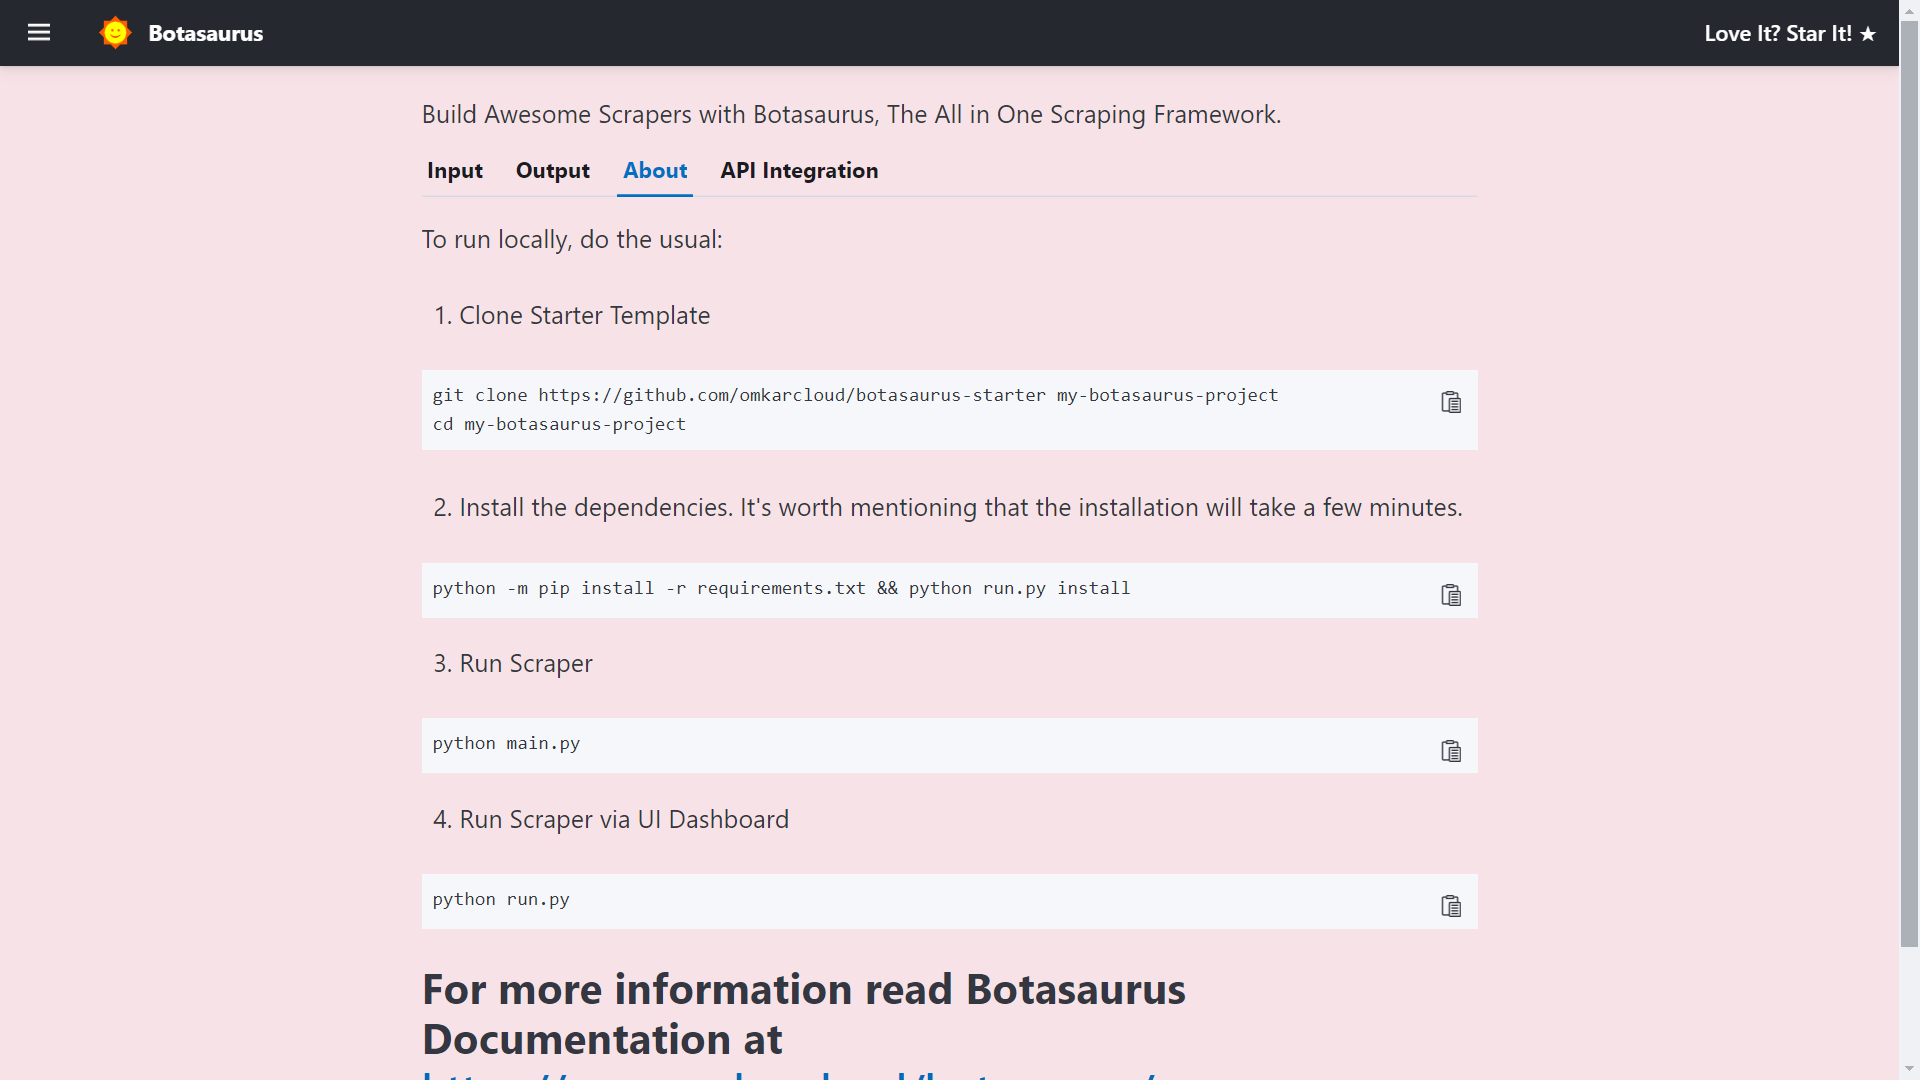
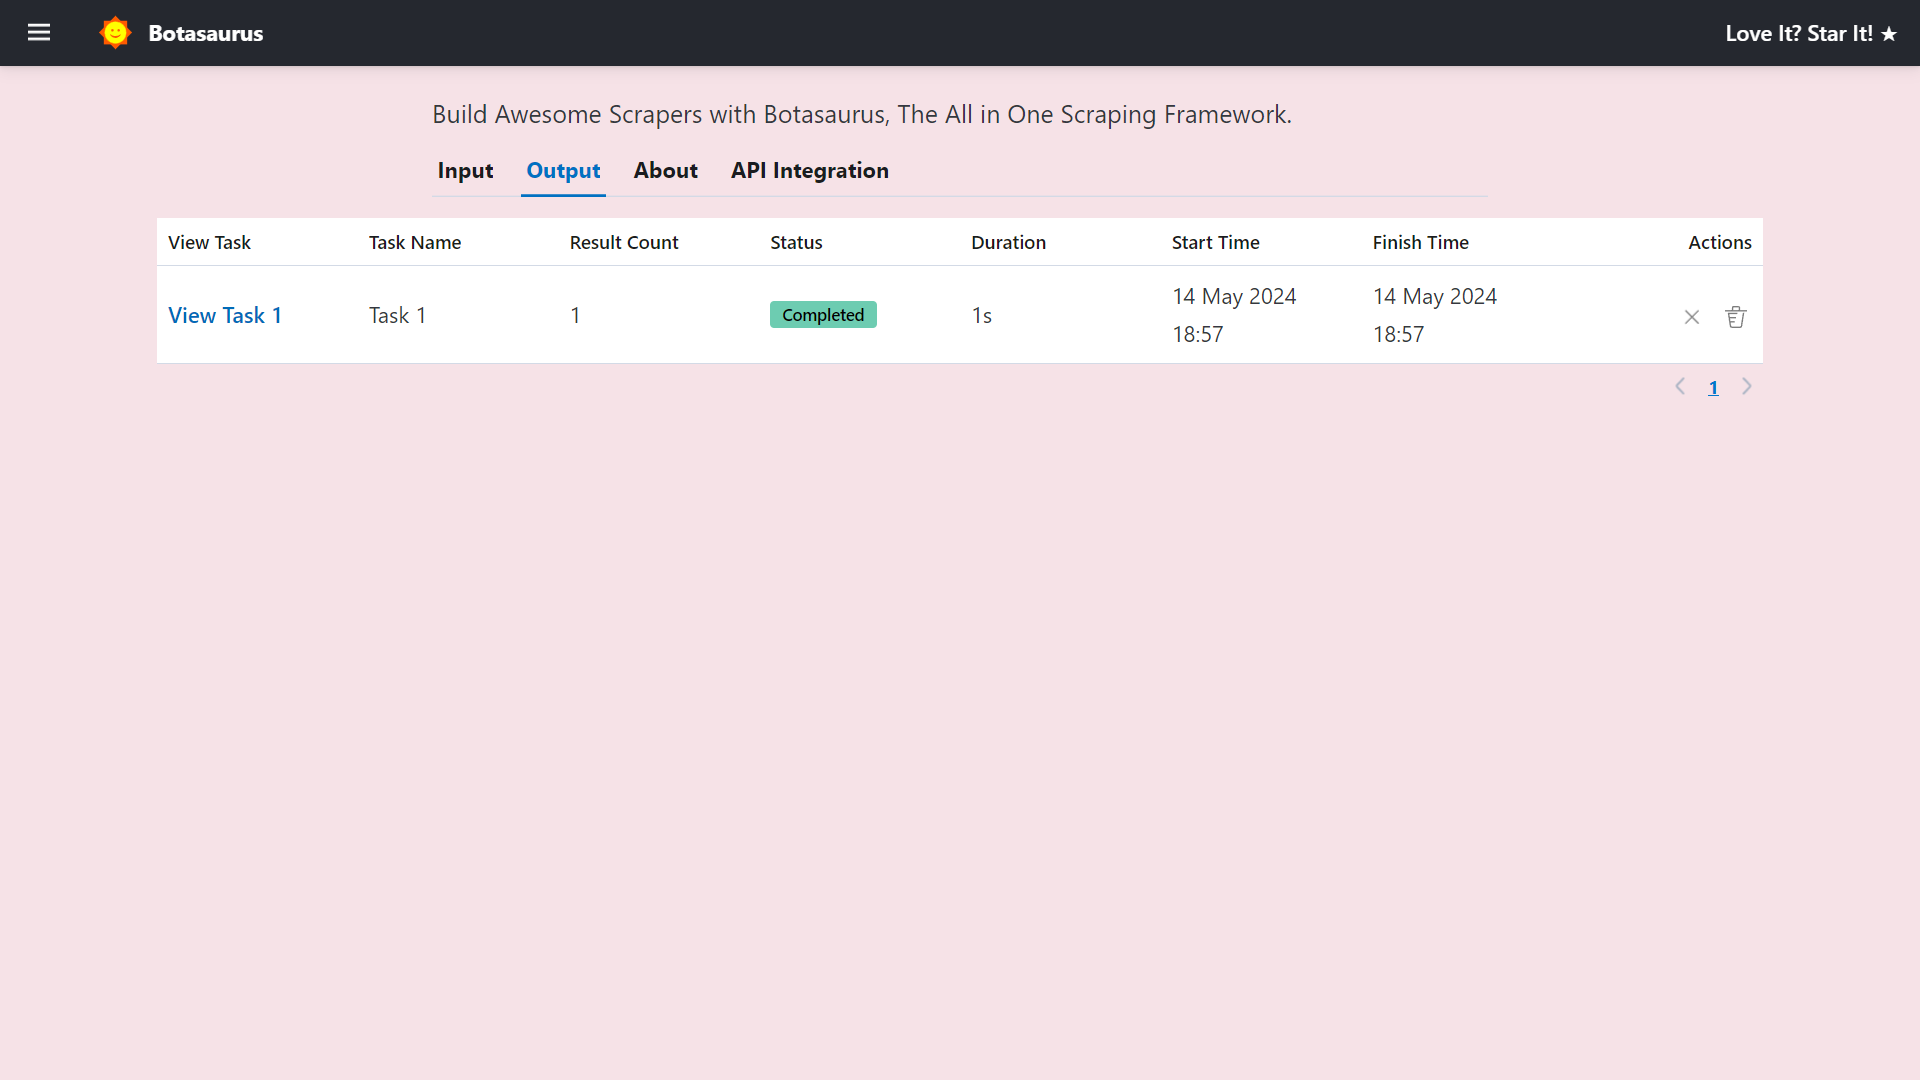 Go to http://localhost:3000/about to see the rendered README.md file of the project.
 Finally, visit http://localhost:3000/api-integration to see how to access the scraper via API.
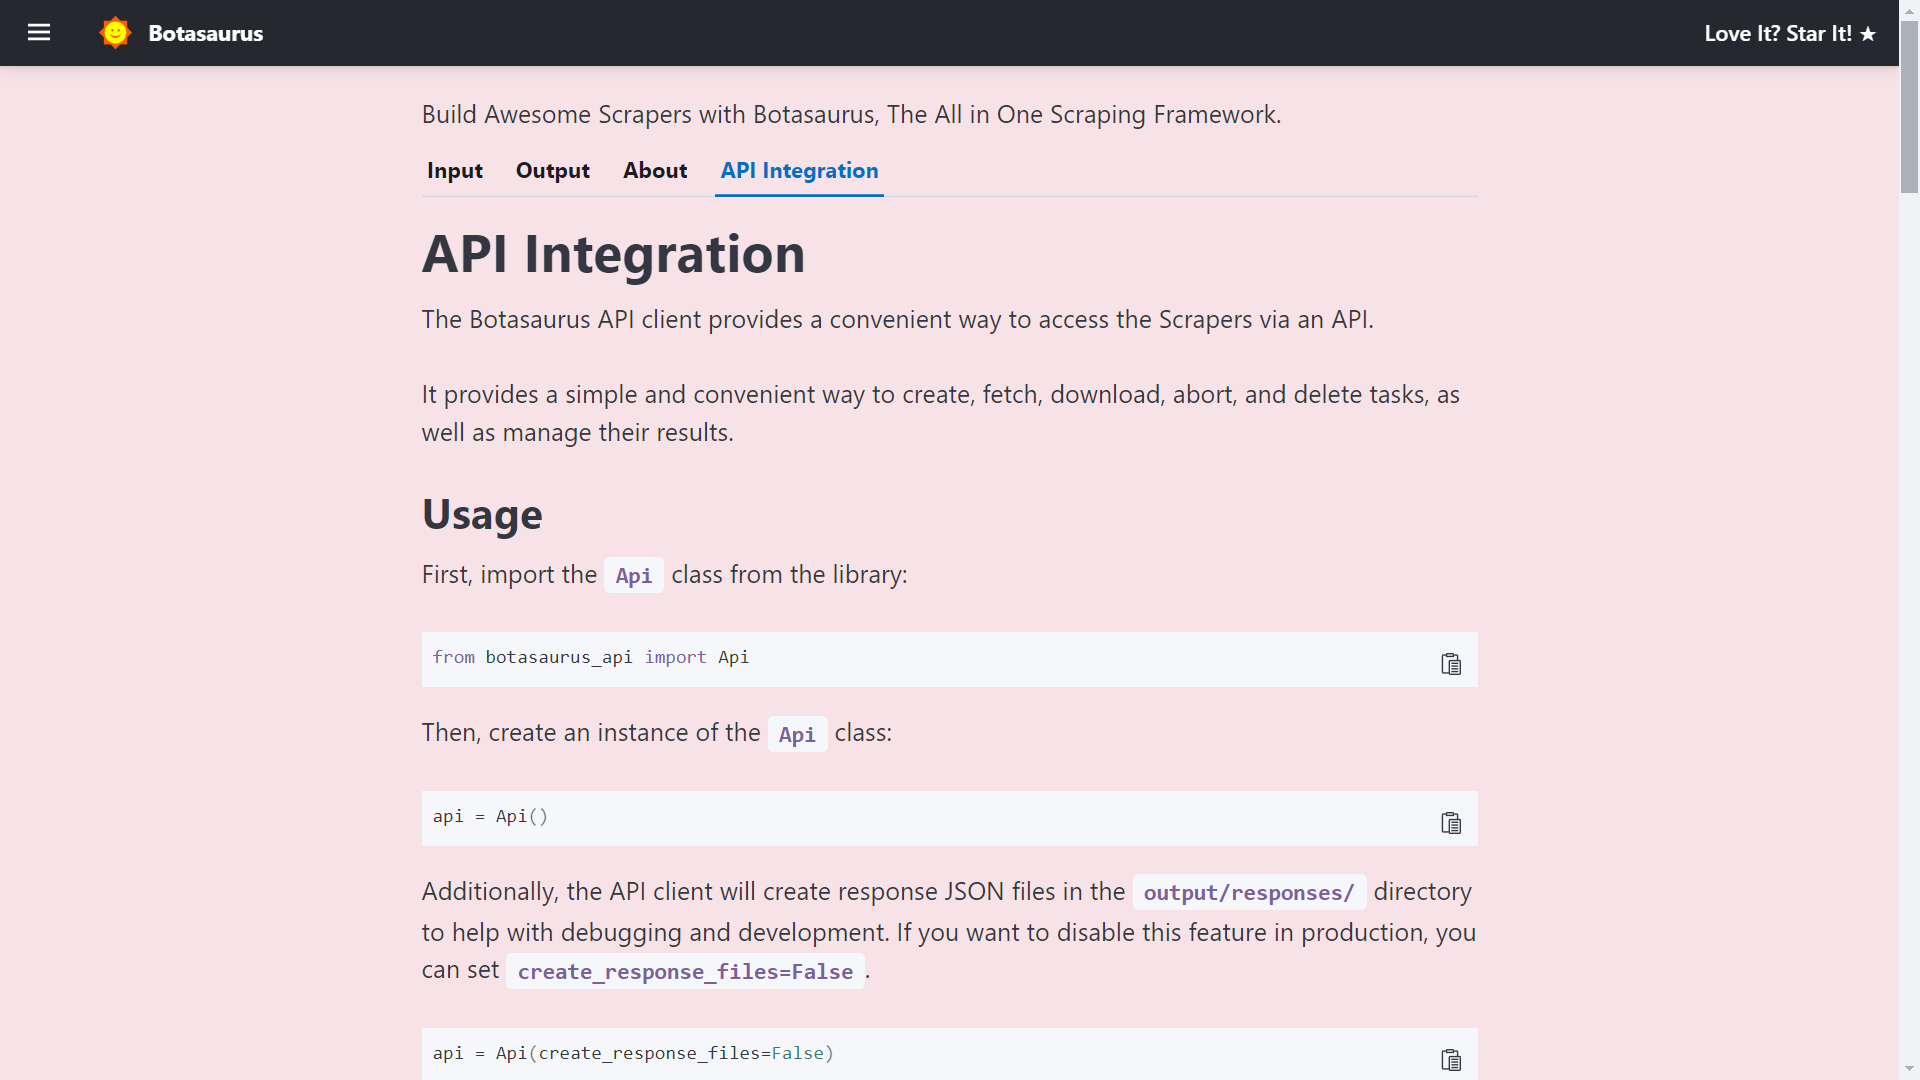 The API documentation is generated dynamically based on your scraper's inputs, sorts, filters, etc., and is unique to your scraper.
So, whenever you need to run the scraper via API, visit this tab and copy the code specific to your scraper.
The API documentation is generated dynamically based on your scraper's inputs, sorts, filters, etc., and is unique to your scraper.
So, whenever you need to run the scraper via API, visit this tab and copy the code specific to your scraper.
How to create a UI scraper using Botasaurus?
Creating a UI scraper with Botasaurus is a simple 3-step process:- Create your scraper function
- Add the scraper to the server using 1 line of code
- Define the input controls for the scraper
Step 1: Create the Scraper Function
Insrc/scrapeheadingtask.py, we define a scraping function that basically does the following:
- Receives a
dataobject and extracts the "link".
- Retrieves the HTML content of the webpage using the "link".
- Converts the HTML into a BeautifulSoup object.
- Locates the heading element, extracts its text content, and returns it.
from botasaurus.request import request, Request
 from botasaurus.soupify import soupify

 @request
 def scrapeheadingtask(request: Request, data):
     # Visit the Link
     response = request.get(data["link"])

     # Create a BeautifulSoup object
     soup = soupify(response)

     # Retrieve the heading element's text
     heading = soup.find('h1').get_text()

     # Save the data as a JSON file in output/scrapeheadingtask.json
     return {
         "heading": heading
     }
Step 2: Add the Scraper to the Server
Inbackend/scrapers.py, we:
- Import our scraping function
- Use
Server.add_scraper()to register the scraper
from botasaurus_server.server import Server
 from src.scrapeheadingtask import scrapeheadingtask

 Add the scraper to the server
 Server.addscraper(scrapeheading_task)
Step 3: Define the Input Controls
Inbackend/inputs/scrapeheadingtask.js, we:
- Define a
getInputfunction that takes the controls parameter
- Add a link input control to it
- Use JSDoc comments to enable IntelliSense Code Completion in VSCode as you won't be able to remember all the controls in botasaurus.
/**
  * @typedef {import('../../frontend/node_modules/botasaurus-controls/dist/index').Controls} Controls
  */

 /**
  * @param {Controls} controls
  */
 function getInput(controls) {
     controls
         // Render a Link Input, which is required, defaults to "https://stackoverflow.blog/open-source".
         .link('link', { isRequired: true, defaultValue: "https://stackoverflow.blog/open-source" })
}/**
* @typedef {import('../../frontend/node_modules/botasaurus-controls/dist/index').Controls} Controls
*/
/**
* @param {Controls} controls
*/
function getInput(controls) {
controls
.listOfTexts('queries', {
defaultValue: ["Web Developers in Bangalore"],
placeholder: "Web Developers in Bangalore",
label: 'Search Queries',
isRequired: true
})
.section("Email and Social Links Extraction", (section) => {
section.text('api_key', {
placeholder: "2e5d346ap4db8mce4fj7fc112s9h26s61e1192b6a526af51n9",
label: 'Email and Social Links Extraction API Key',
helpText: 'Enter your API key to extract email addresses and social media links.',
})
})
.section("Reviews Extraction", (section) => {
section
.switch('enablereviewsextraction', {
label: "Enable Reviews Extraction"
})
.numberGreaterThanOrEqualToZero('max_reviews', {
label: 'Max Reviews per Place (Leave empty to extract all reviews)',
placeholder: 20,
isShown: (data) => data['enablereviewsextraction'], defaultValue: 20,
})
.choose('reviews_sort', {
label: "Sort Reviews By",
isRequired: true, isShown: (data) => data['enablereviewsextraction'], defaultValue: 'newest', options: [{ value: 'newest', label: 'Newest' }, { value: 'mostrelevant', label: 'Most Relevant' }, { value: 'highestrating', label: 'Highest Rating' }, { value: 'lowest_rating', label: 'Lowest Rating' }]
})
})
.section("Language and Max Results", (section) => {
section
.addLangSelect()
.numberGreaterThanOrEqualToOne('max_results', {
placeholder: 100,
label: 'Max Results per Search Query (Leave empty to extract all places)'
})
})
.section("Geo Location", (section) => {
section
.text('coordinates', {
placeholder: '12.900490, 77.571466'
})
.numberGreaterThanOrEqualToOne('zoom_level', {
label: 'Zoom Level (1-21)',
defaultValue: 14,
placeholder: 14
})
})
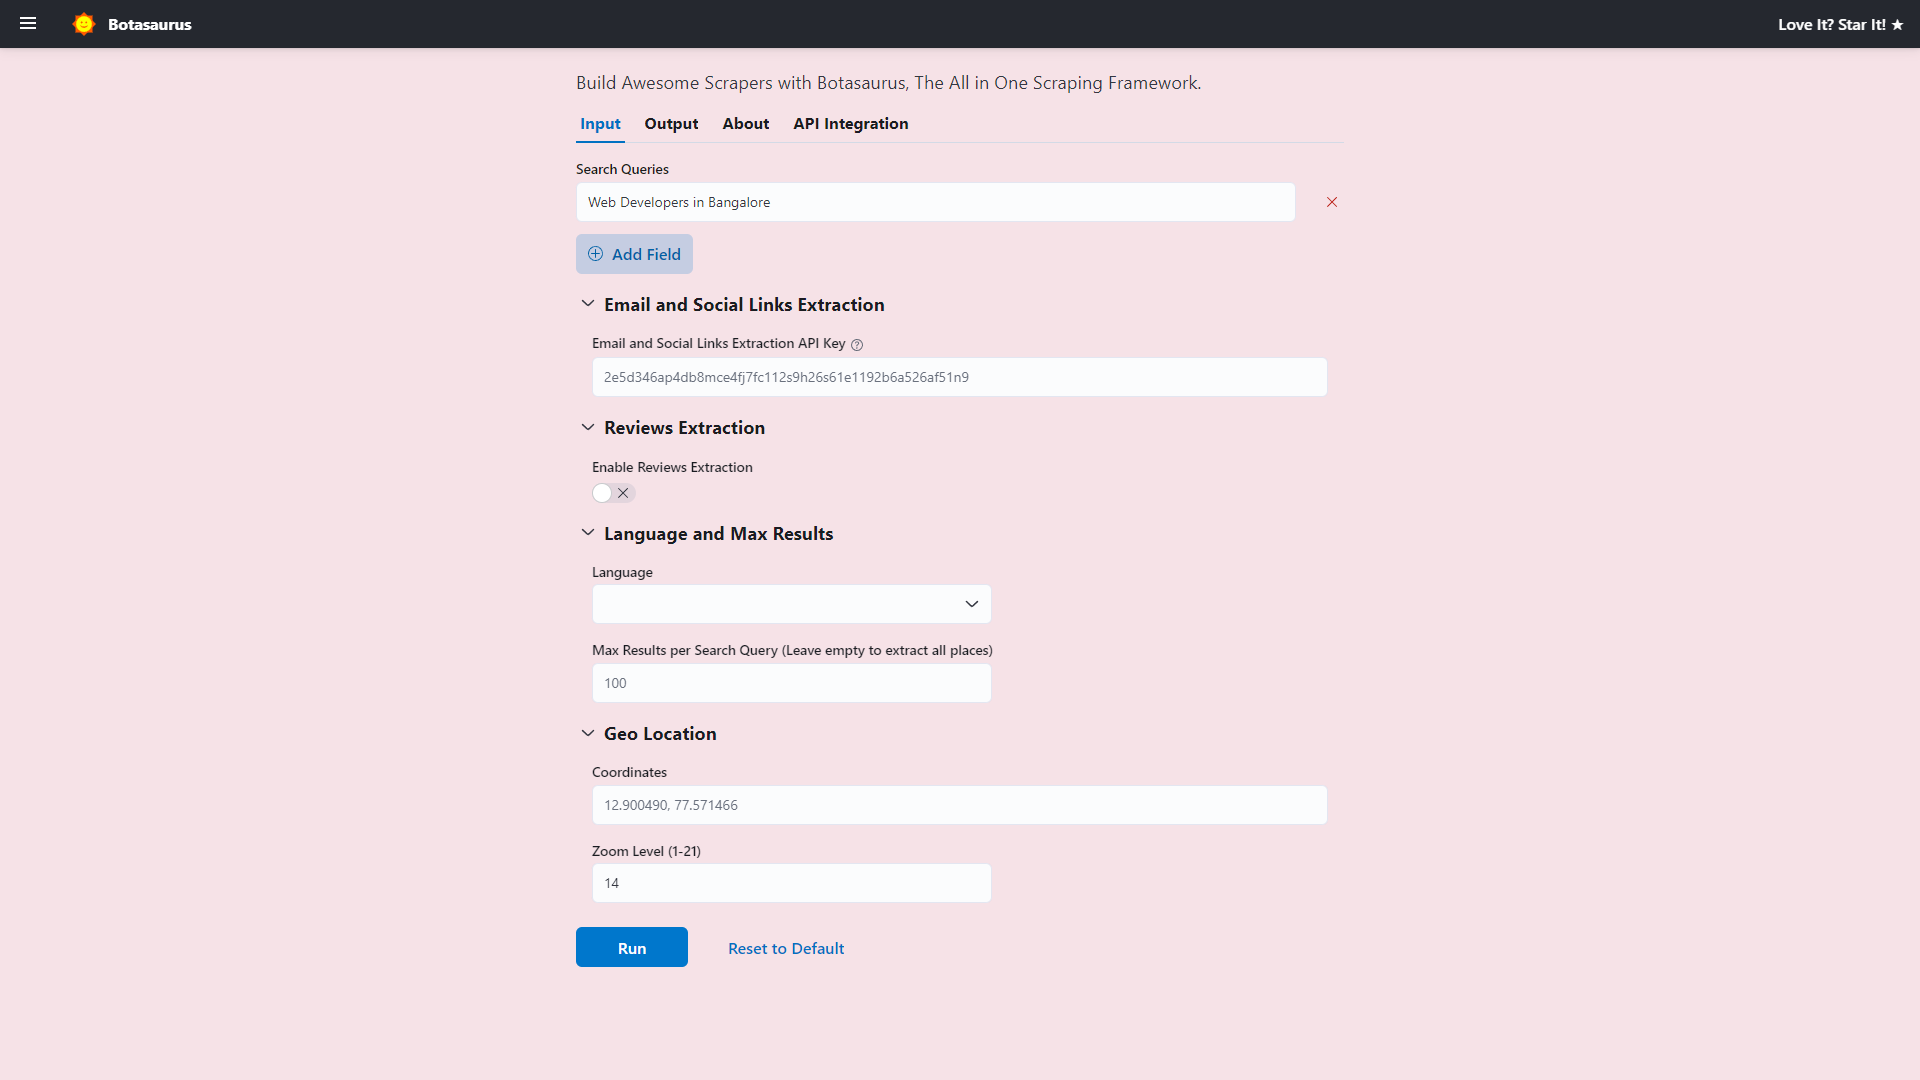
}backend/inputs/scrapeheadingtask.js and reload the page, and you will see a complex set of input controls like the image shown.
 Now, to use the Botasaurus UI for adding new scrapers, remember these points:
- Create a
backend/inputs/{yourscrapingfunction_name}.jsfile for each scraping function.
- Define the
getInputfunction in the file with the necessary controls.
- Use JSDoc comments to enable IntelliSense code completion in VSCode, as you won't be able to remember all the controls in Botasaurus.
/**
  * @typedef {import('../../frontend/node_modules/botasaurus-controls/dist/index').Controls} Controls
  */

 /**
  * @param {Controls} controls
  */
 function getInput(controls) {
     // Define your controls here.
 }
What is a Desktop Extractor?
A Desktop Extractor is a standalone application that runs on your computer and extracts specific data from websites, PDFs, Excel files, and other documents. Unlike web-based tools, desktop extractors run locally, giving faster performance and zero cloud costs.
What advantages do Desktop Scrapers have over web-based scrapers?
Desktop Scrapers offer key advantages over web-based scraper solutions like Outscraper:- Zero Infrastructure Costs:
- Faster Execution:
- Increased Customer Engagement:
- Cross-Platform Deployment in 1 Day:
How to Build a Desktop Extractor
Creating Desktop Extractors is easier than you think! All you need is a basic understanding of JavaScript. Once you're ready, read the Desktop Extraction Tutorial, where we'll guide you through building two practical extractors:- Yahoo Finance Stock Scraper – Extracts real-time stock prices from Yahoo Finance.
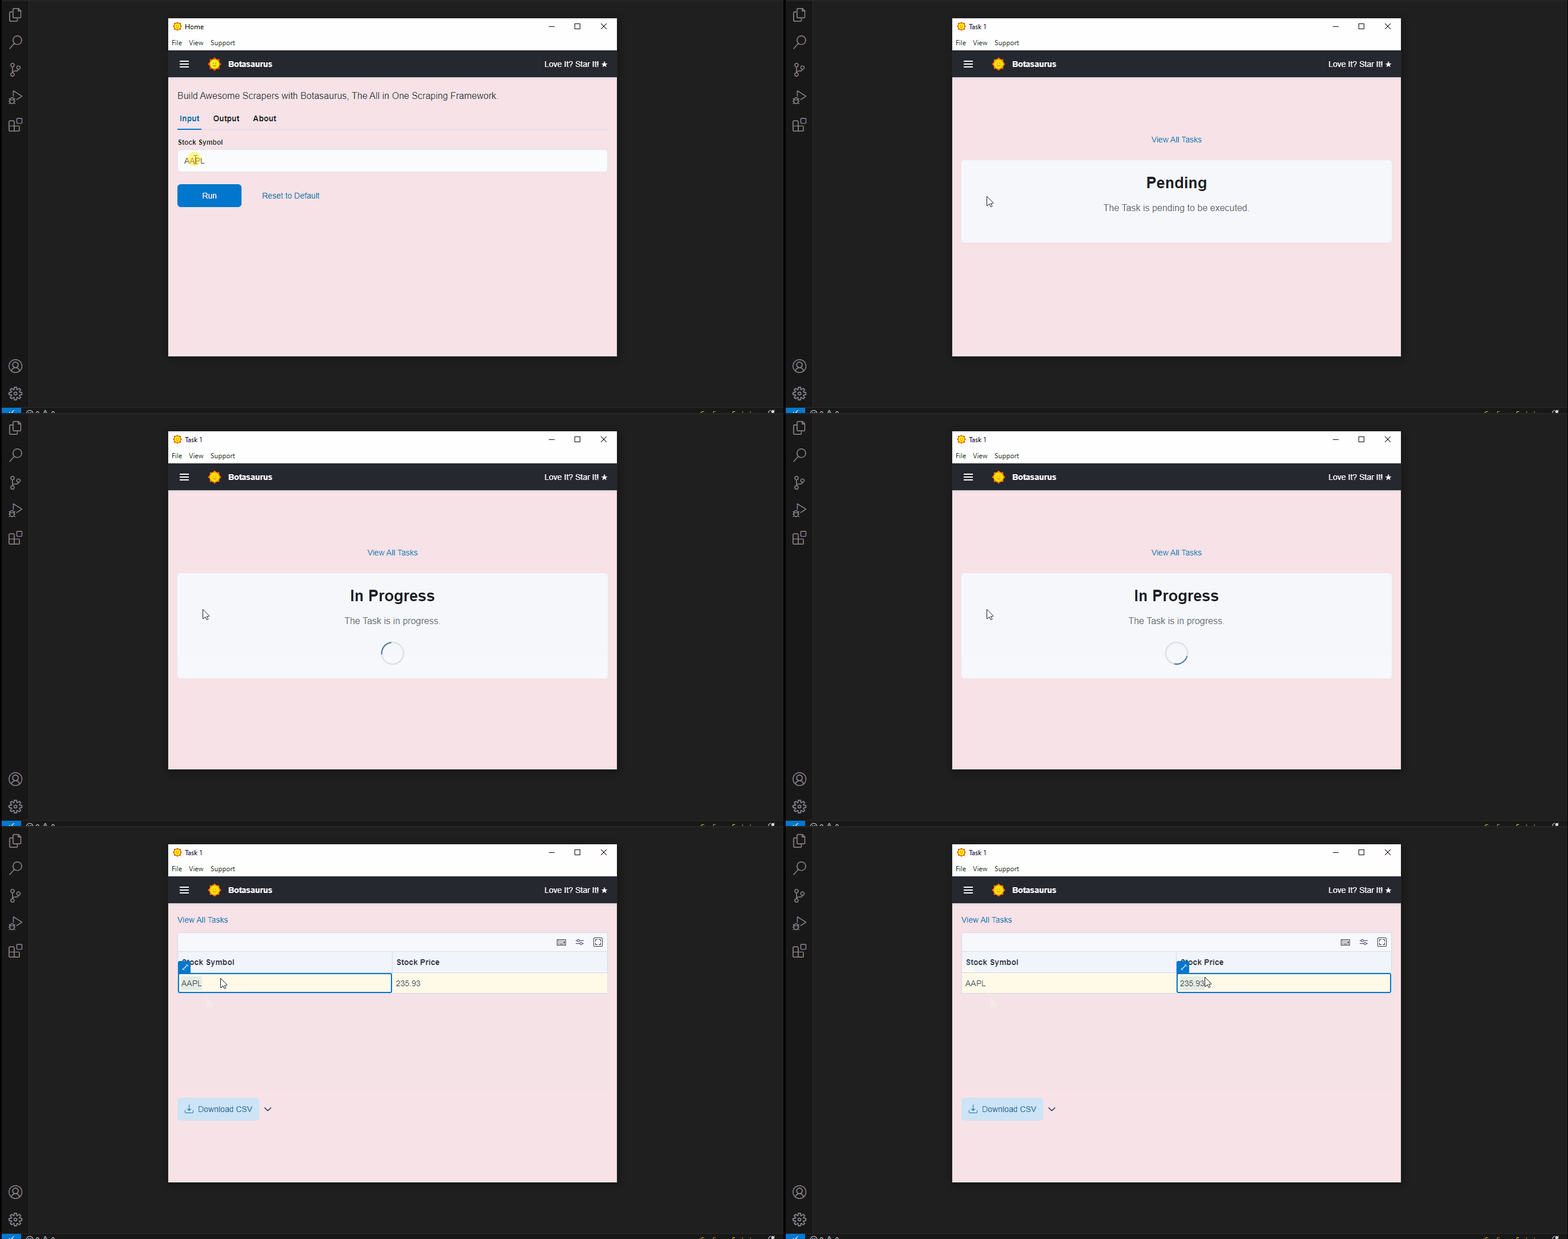
- Amazon Invoice PDF Extractor – Automates the extraction of key invoice data like Document Number, Document Date, and Place of Supply from Amazon PDFs.
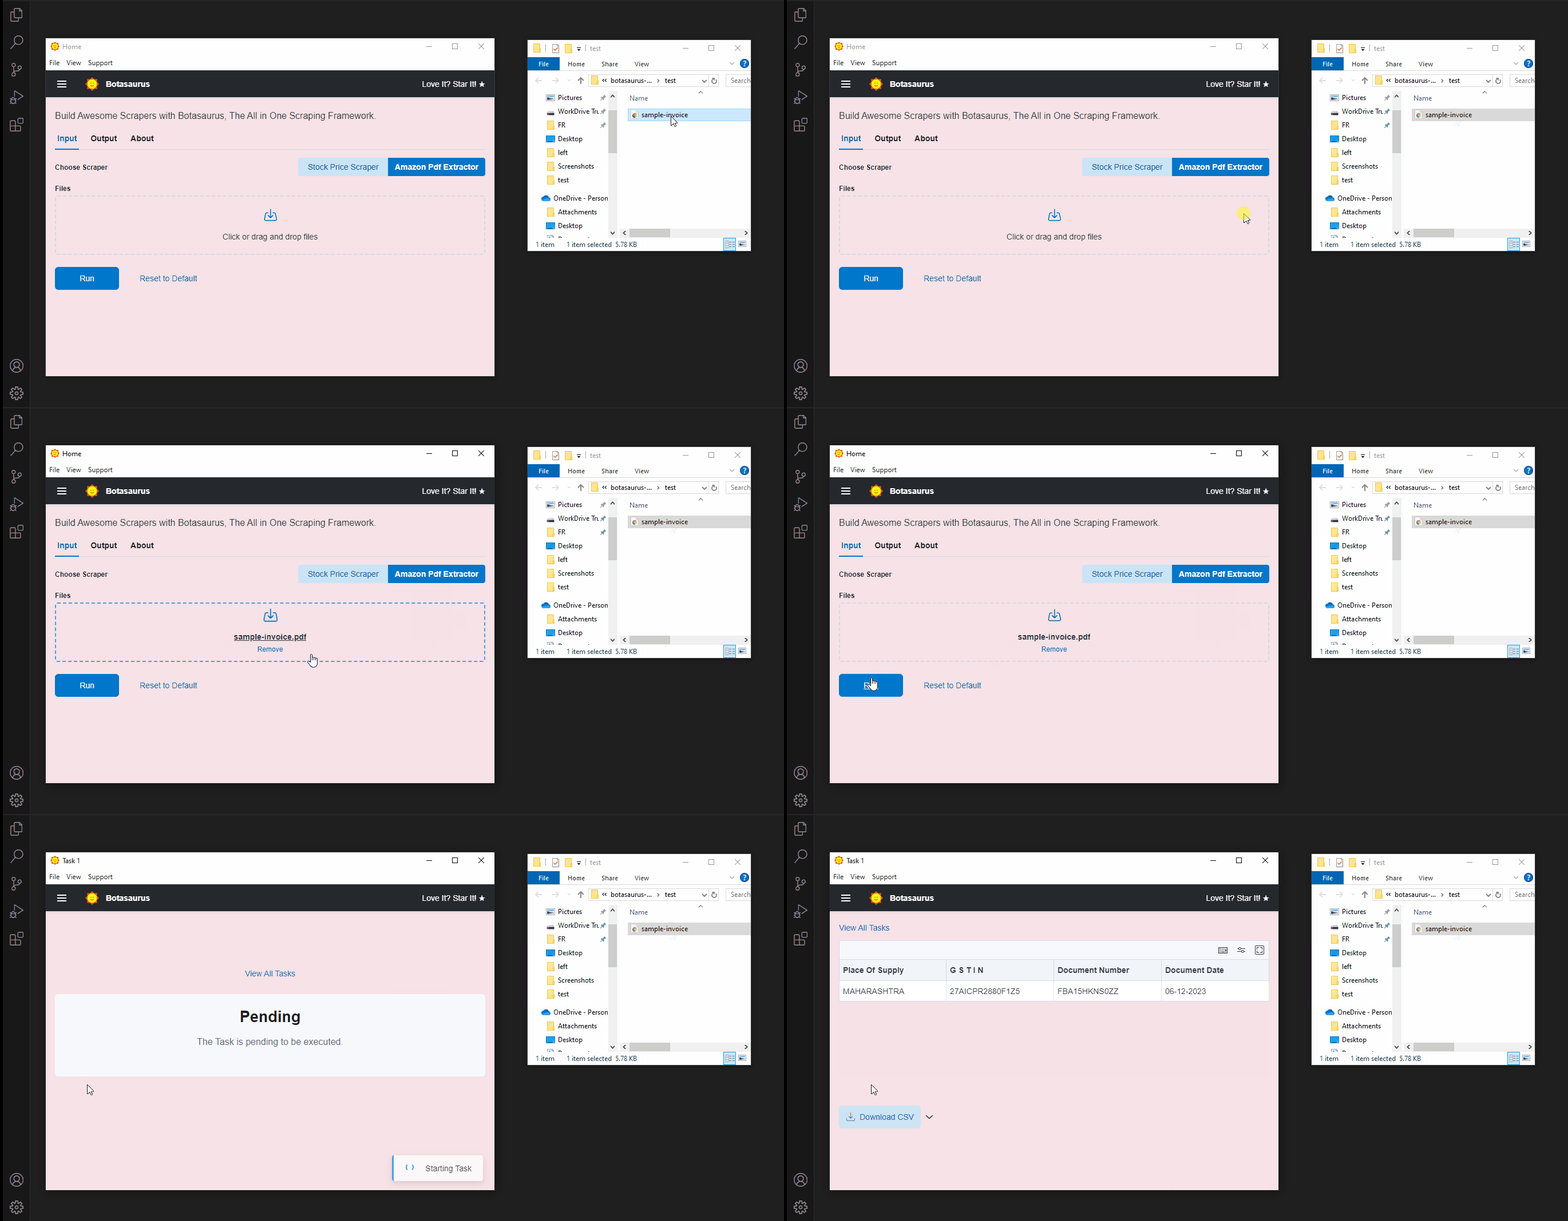 As a web scraper, you might naturally want to focus on web scraping. Still, I want you to create the Amazon Invoice PDF Extractor project. Why? Because many developers overlook the immense potential of extracting data from PDFs, Excel files, and other documents.
Document Data Extraction is a large untapped market. For example, even in most developed countries, accountants often spend hundreds of hours manually entering invoice data for tax filings. A desktop extractor can transform this tedious, error-prone process into a task that takes just minutes, delivering 100% accurate results.
Please read the step-by-step tutorial here. By the end of this short guide, you'll be able to create powerful desktop extractors in very little time.
As a web scraper, you might naturally want to focus on web scraping. Still, I want you to create the Amazon Invoice PDF Extractor project. Why? Because many developers overlook the immense potential of extracting data from PDFs, Excel files, and other documents.
Document Data Extraction is a large untapped market. For example, even in most developed countries, accountants often spend hundreds of hours manually entering invoice data for tax filings. A desktop extractor can transform this tedious, error-prone process into a task that takes just minutes, delivering 100% accurate results.
Please read the step-by-step tutorial here. By the end of this short guide, you'll be able to create powerful desktop extractors in very little time.
What is Botasaurus, and what are its main features?
Botasaurus is an all-in-one web scraping framework designed to achieve three main goals:- Provide essential web scraping utilities to streamline the scraping process.
@browser: For scraping web pages using a humane browser.
@request: For scraping web pages using lightweight and humane HTTP requests.
@task:
playwright or selenium.
- or, For running non-web scraping tasks, such as data processing (e.g., converting video to audio). Botasaurus is not limited to web scraping tasks; any Python function can be made accessible with a stunning UI and user-friendly API.
In practice, while developing with Botasaurus, you will spend most of your time in the following areas:
- Configuring your scrapers via decorators with settings like:
- Writing your core web scraping logic using BeautifulSoup (bs4) or the Botasaurus Driver.
bt: Mainly for writing JSON, EXCEL, and HTML temporary files, and for data cleaning.
Sitemap: For accessing the website's links and sitemap.
- Minor utilities like:
LocalStorage: For storing scraper state.
- soupify: For creating BeautifulSoup objects from Driver, Requests response, Driver Element, or HTML string.
- IPUtils: For obtaining information (IP, country, etc.) about the current IP address.
- Cache: For managing the cache.
By simply configuring these three decorators (@browser, @request, and @task) with arguments, you can easily create real-time scrapers and large-scale datasets, thus saving you countless hours that would otherwise be spent writing and debugging code from scratch.
- Offering a Python-based UI scraper that allows non-technical users to run scrapers online by simply visiting a website link. (As described in the previous FAQ)
- Make it easy to create desktop applications for Mac, Windows, and Linux, using JavaScript. More details can be found in the Botasaurus Desktop Documentation here.
How to use decorators in Botasaurus?
Decorators are the heart of Botasaurus. To use a decorator function, you can call it with:- A single item
- A list of items
scrapeheadingtask function:
from botasaurus.browser import browser, Driver

 @browser
 def scrapeheadingtask(driver: Driver, link):
     driver.get(link)
     heading = driver.get_text("h1")
     return heading

scrapeheadingtask(["https://www.omkar.cloud/", "https://www.omkar.cloud/blog/", "https://stackoverflow.com/"]) # <-- list of itemsoutput/scrapeheadingtask.json.
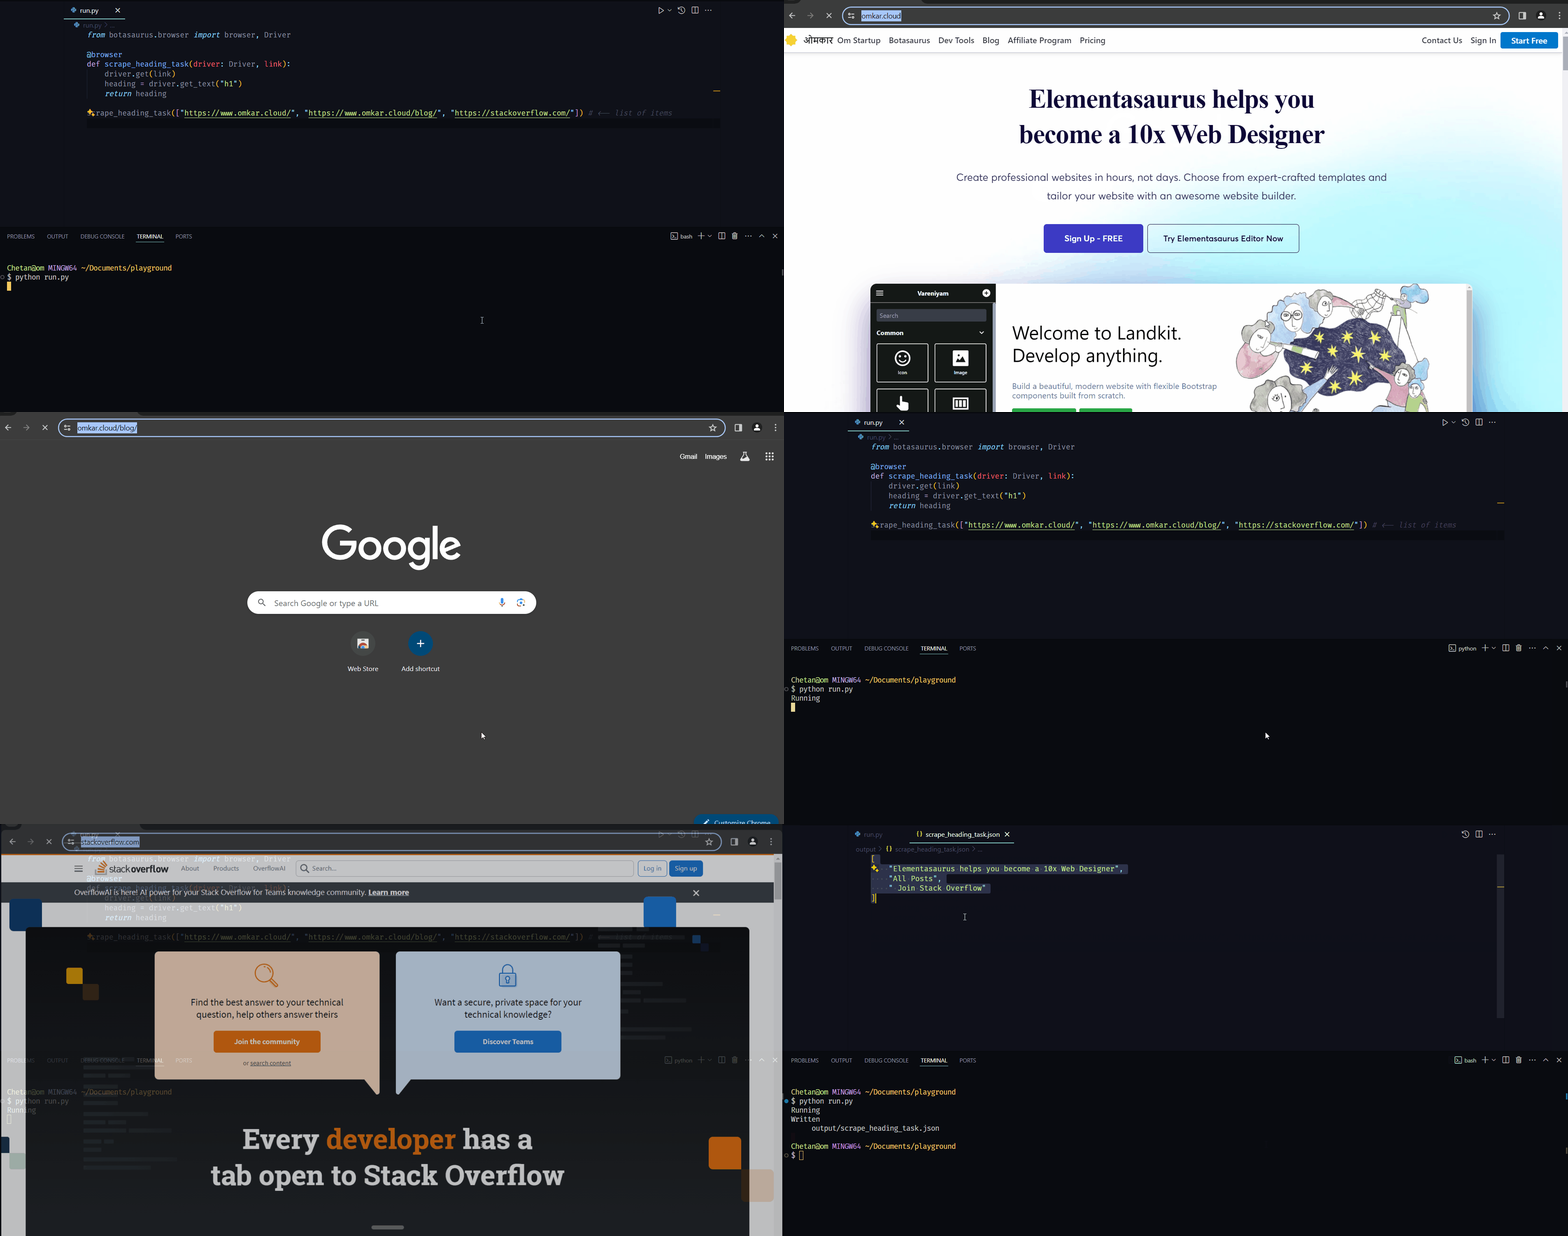
How does Botasaurus help me in debugging?
Botasaurus helps you in debugging by:- Easily viewing the result of the scraping function, as it is saved in
output/{yourscrapingfunction_name}.json. Say goodbye to print statements.
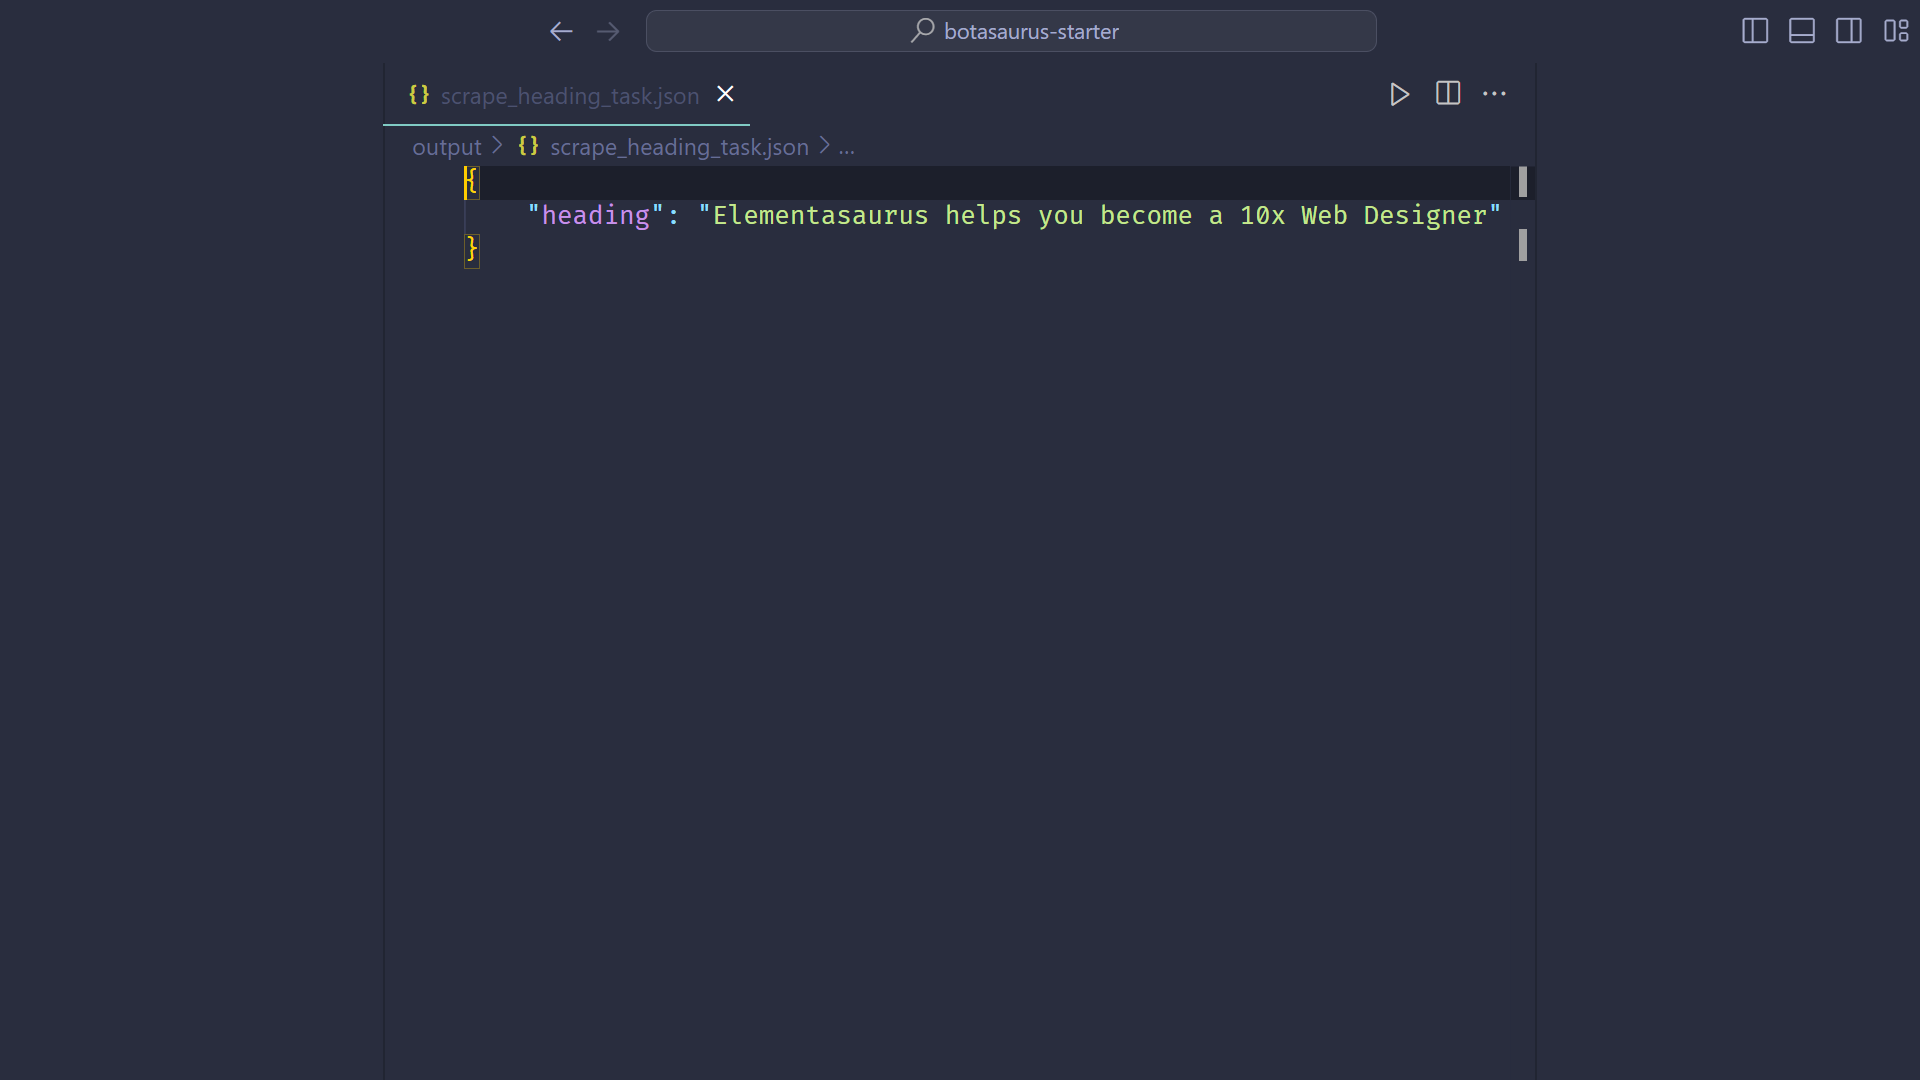
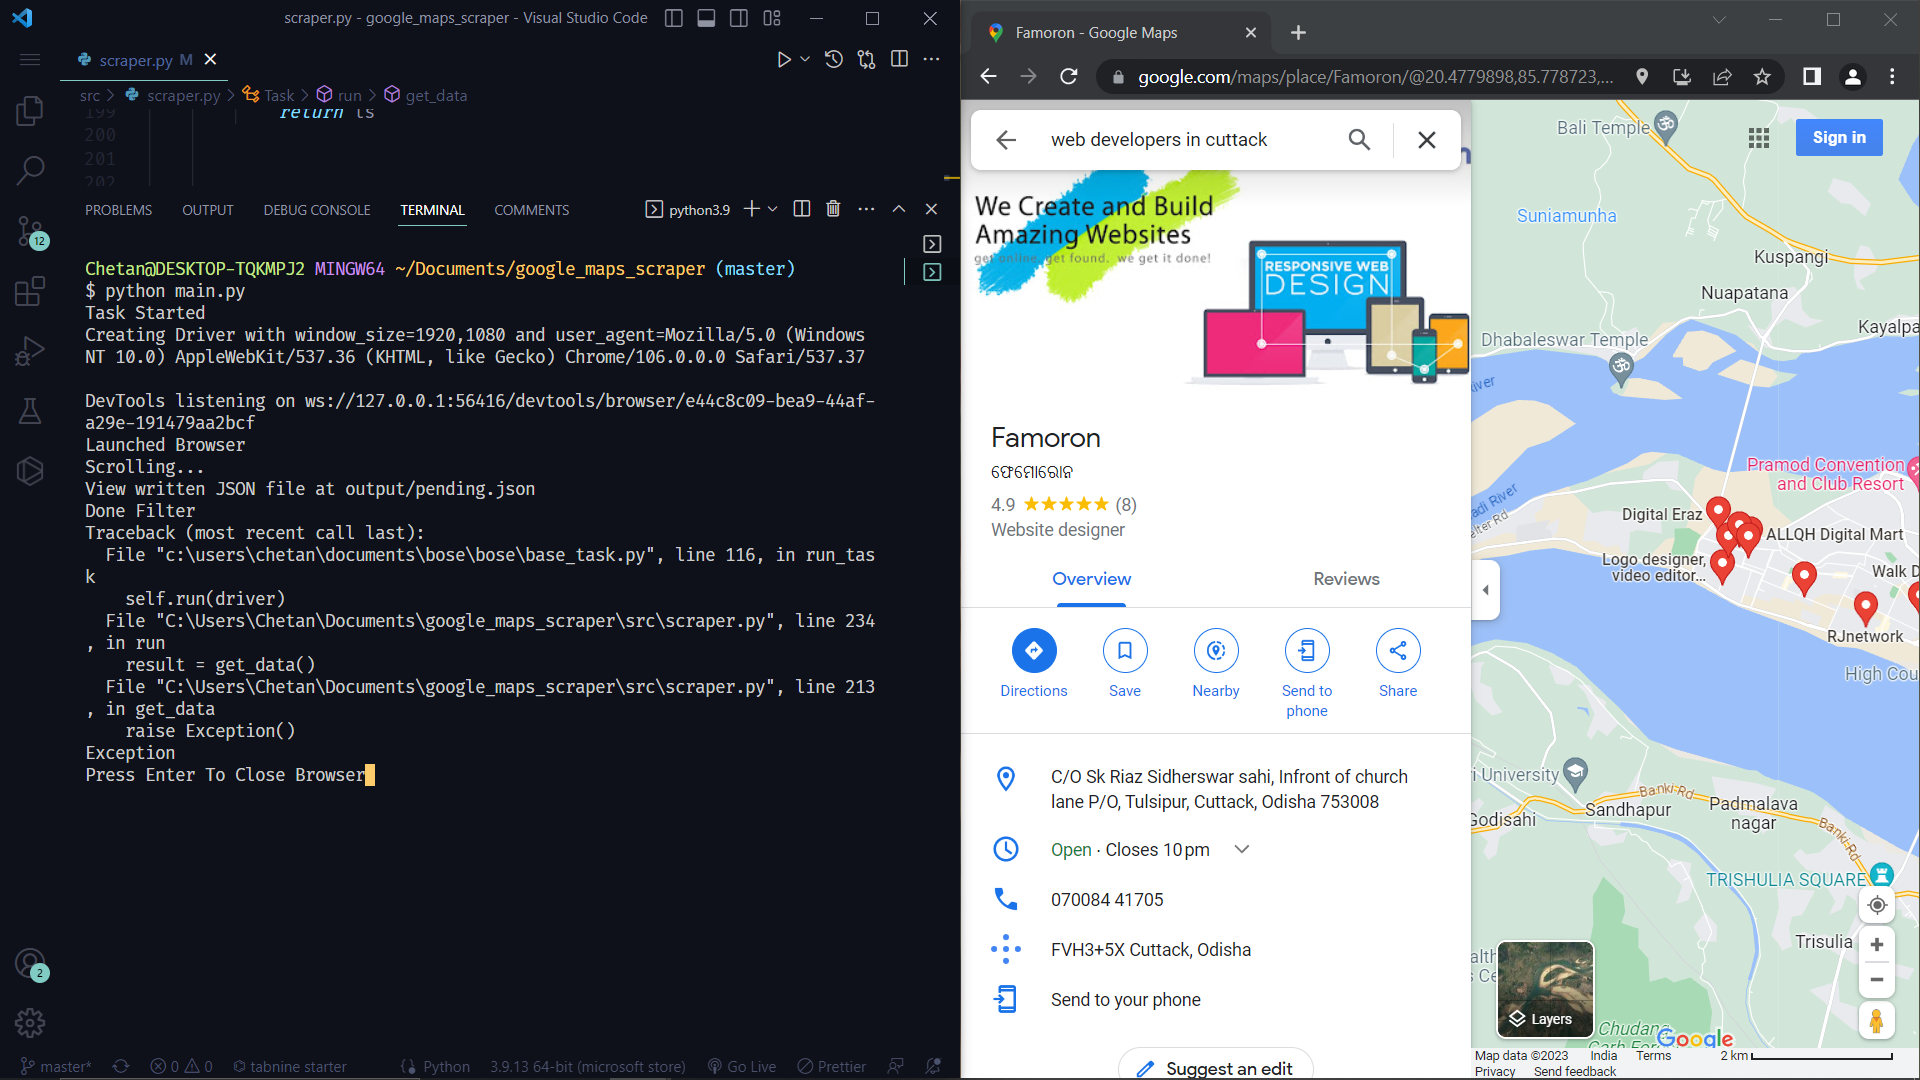
- Bringing your attention to errors in browser mode with a beep sound and pausing the browser, allowing you to debug the error on the spot.
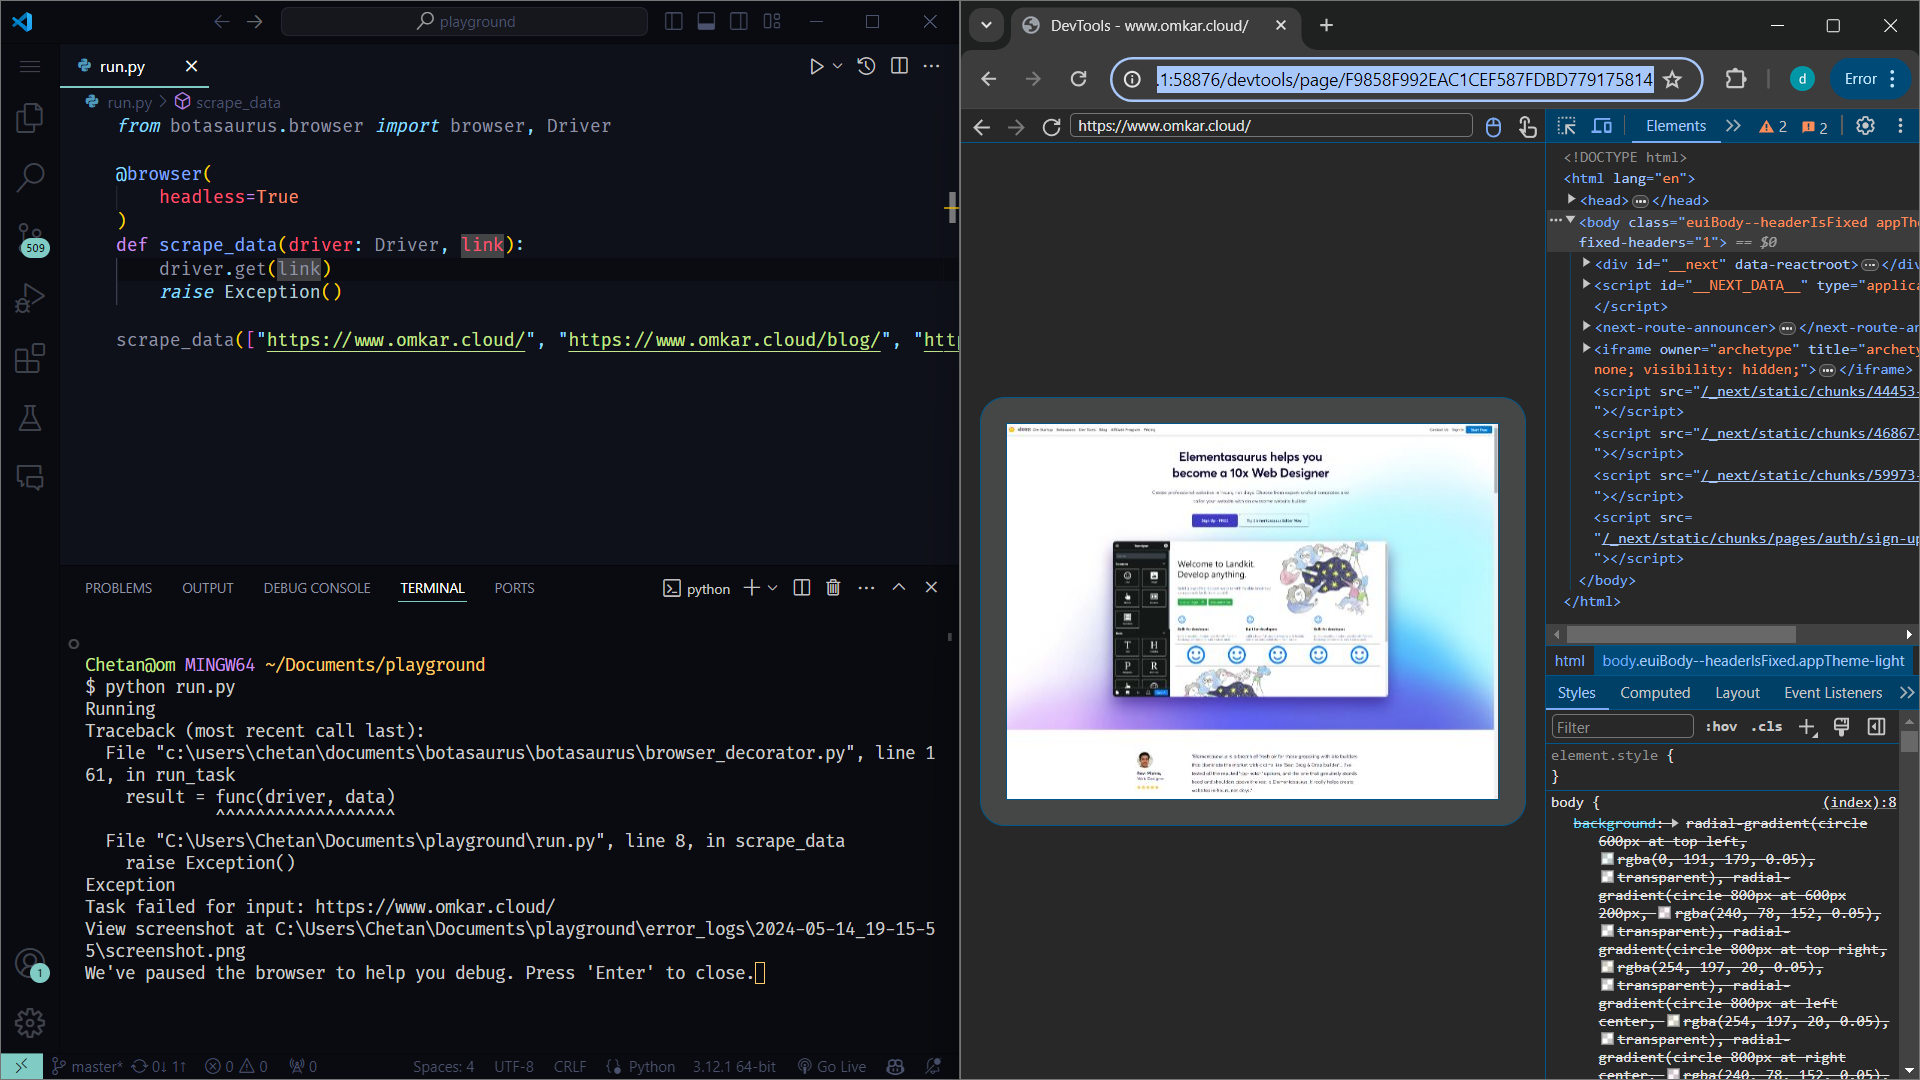
- Even if an exception is raised in headless mode, it will still open the website in your default browser, making it easier to debug code in a headless browser. (Isn't it cool?)
How to configure the Browser Decorator?
The Browser Decorator allows you to easily configure various aspects of the browser, such as:- Blocking images and CSS
- Setting up proxies
- Specifying profiles
- Enabling headless mode
- Using Chrome extensions
- Captcha Solving
- Selecting language
- Passing Arguments to Chrome
Blocking Images and CSS
Blocking images is one of the most important configurations when scraping at scale. Blocking images can significantly:- Speed up your web scraping tasks
- Reduce bandwidth usage
- And save money on proxies. (Best of All!)
block_images parameter:
@browser(
     block_images=True,
)blockimagesand_css:
@browser(
     blockimagesand_css=True,
 )
Proxies
To use proxies, simply specify theproxy parameter:
@browser(
     proxy="http://username:password@proxy-provider-domain:port"
 )
 def visitwhatismyip(driver: Driver, data):
     driver.get("https://whatismyipaddress.com/")
     driver.prompt()

visitwhatismyip()@browser(
proxy=[
"http://username:password@proxy-provider-domain:port",
"http://username2:password2@proxy-provider-domain:port"
]
)
def visitwhatismyip(driver: Driver, data):
driver.get("https://whatismyipaddress.com/")
driver.prompt()
visitwhatismyip()Profile
Easily specify the Chrome profile using theprofile option:
@browser(
     profile="pikachu"
)tiny_profile option, which is a lightweight alternative to Chrome profiles.
When creating hundreds of Chrome profiles, it is highly recommended to use the tiny_profile option because:
- Creating 1000 Chrome profiles will take at least 100 GB, whereas 1000 tiny profiles will take up only 1 MB of storage, making tiny profiles easy to store and back up.
- Tiny profiles are cross-platform, meaning you can create profiles on a Linux server, copy the
./profilesfolder to a Windows PC, and easily run them.
@browser(
     tiny_profile=True,
     profile="pikachu",
 )
Headless Mode
Enable headless mode withheadless=True:
@browser(
     headless=True
)Chrome Extensions
Botasaurus allows the use of ANY Chrome Extension with just 1 line of code. The example below shows how to use the Mouse Coordinates Chrome Extension to show current mouse X and Y coordinates on web pages:from botasaurus.browser import browser, Driver
from chromeextensionpython import Extension
@browser(
extensions=[
Extension(
"https://chromewebstore.google.com/detail/mouse-coordinates/mfohnjojhopfcahiddmeljeholnciakl"
)
],
)
def scrapewhileblocking_ads(driver: Driver, data):
driver.get("https://example.com/")
driver.prompt()
scrapewhileblocking_ads()Captcha Solving
Encountering captchas is common in web scraping. You can use the capsolverextension_python package to automatically solve CAPTCHAs with Capsolver. To use it, first install the package:python -m pip install capsolverextensionpythonfrom botasaurus.browser import browser, Driver
from capsolverextensionpython import Capsolver
Replace "CAP-MY_KEY" with your actual CapSolver API key
@browser(extensions=[Capsolver(apikey="CAP-MYKEY")])
def solve_captcha(driver: Driver, data):
driver.get("https://recaptcha-demo.appspot.com/recaptcha-v2-checkbox.php")
driver.prompt()
solve_captcha()Language
Specify the language using thelang option:
from botasaurus.lang import Lang

 @browser(
     lang=Lang.Hindi,
 )
User Agent and Window Size
To make the browser really humane, Botasaurus does not change browser fingerprints by default, because using fingerprints makes the browser easily identifiable by running CSS tests to find mismatches between the provided user agent and the actual user agent. However, if you need fingerprinting, use theuseragent and windowsize options:
from botasaurus.browser import browser, Driver
 from botasaurus.user_agent import UserAgent
 from botasaurus.window_size import WindowSize

 @browser(
     user_agent=UserAgent.RANDOM,
     window_size=WindowSize.RANDOM,
 )
 def visit_whatsmyua(driver: Driver, data):
     driver.get("https://www.whatsmyua.info/")
     driver.prompt()

visit_whatsmyua()HASHED option to generate a consistent user agent and window size based on the profile's hash:
from botasaurus.browser import browser, Driver
 from botasaurus.user_agent import UserAgent
 from botasaurus.window_size import WindowSize

 @browser(
     profile="pikachu",
     user_agent=UserAgent.HASHED,
     window_size=WindowSize.HASHED,
 )
 def visit_whatsmyua(driver: Driver, data):
     driver.get("https://www.whatsmyua.info/")
     driver.prompt()

 visit_whatsmyua()

 Everytime Same UserAgent and WindowSize
 visit_whatsmyua()
Passing Arguments to Chrome
To pass arguments to Chrome, use theadd_arguments option:
@browser(
     add_arguments=['--headless=new'],
)data parameter, pass a function:
def get_arguments(data):
     return ['--headless=new']

 @browser(
     addarguments=getarguments,
 )
Wait for Complete Page Load
By default, Botasaurus waits for all page resources (DOM, JavaScript, CSS, images, etc.) to load before calling your scraping function with the driver. However, sometimes the DOM is ready, but JavaScript, images, etc., take forever to load. In such cases, you can setwaitforcompletepageload to False to interact with the DOM as soon as the HTML is parsed and the DOM is ready:
@browser(
     waitforcompletepageload=False,
 )
Reuse Driver
Consider the following example:from botasaurus.browser import browser, Driver
@browser
def scrape_data(driver: Driver, link):
driver.get(link)
scrape_data(["https://www.omkar.cloud/", "https://www.omkar.cloud/blog/", "https://stackoverflow.com/"])reuse_driver option which is great for cases like:
- Scraping a large number of links and reusing the same browser instance for all page visits.
- Running your scraper in a cloud server to scrape data on demand, without recreating Chrome on each request.
reuse_driver which will reuse the same Chrome instance for visiting each link.
from botasaurus.browser import browser, Driver

 @browser(
     reuse_driver=True
 )
 def scrape_data(driver: Driver, link):
     driver.get(link)

 scrape_data(["https://www.omkar.cloud/", "https://www.omkar.cloud/blog/", "https://stackoverflow.com/"])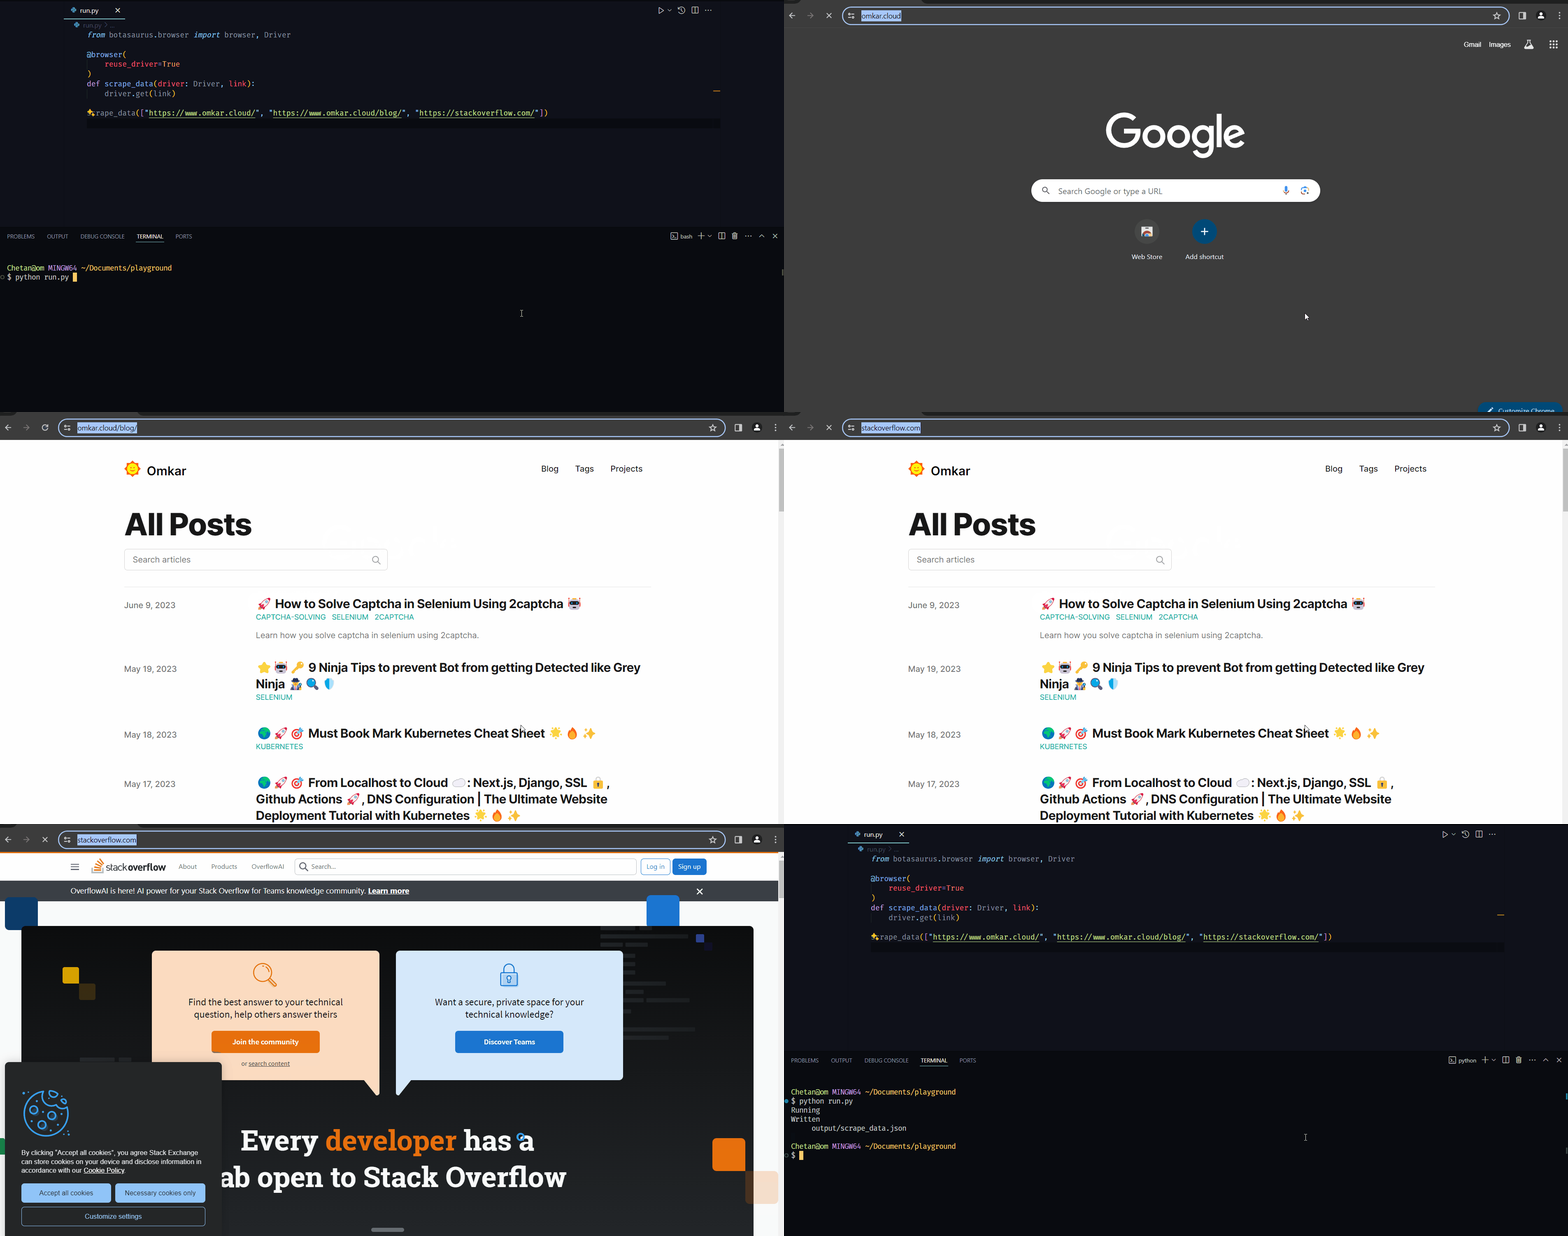
Also, by default, whenever the program ends or is canceled, Botasaurus smartly closes any open Chrome instances, leaving no instances running in the background. In rare cases, you may want to explicitly close the Chrome instance. For such scenarios, you can use the
.close() method on the scraping function:
scrape_data.close()How to Significantly Reduce Proxy Costs When Scraping at Scale?
Recently, we had a project requiring access to around 100,000 pages from a well-protected website, necessitating the use of Residential Proxies. Even after blocking images, we still required 250GB of proxy bandwidth, costing approximately $1050 (at $4.2 per GB with IP Royal). This was beyond our budget :( To solve this, we implemented a smart strategy:- We first visited the website normally.
- We then made requests for subsequent pages using the browser's
fetchAPI.
from botasaurus.browser import browser, Driver
 from botasaurus.soupify import soupify

 @browser(
     reuse_driver=True,  # Reuse the browser
     max_retry=5,        # Retry up to 5 times on failure
 )
 def scrape_data(driver: Driver, link):
     # If the browser is newly opened, first visit the link
     if driver.config.is_new:
         driver.google_get(link)

     # Make requests using the browser fetch API
     response = driver.requests.get(link)
     response.raiseforstatus()  # Ensure the request was successful
     html = response.text

     # Parse the HTML to extract the desired data
     soup = soupify(html)
     stockname = soup.selectone('[data-testid="quote-hdr"] h1').get_text()
     stockprice = soup.selectone('[data-testid="qsp-price"]').get_text()

     return {
         "stockname": stockname,
         "stockprice": stockprice,
     }

 List of URLs to scrape
 links = [
     "https://finance.yahoo.com/quote/AAPL/",
     "https://finance.yahoo.com/quote/GOOG/",
     "https://finance.yahoo.com/quote/MSFT/",
 ]

 Execute the scraping function for the list of links
scrape_data(links)- Dealing with 429 (Too Many Requests) Errors
driver.sleep(1.13)  # Delay to respect the rate limit
response = driver.requests.get(link)- Handling 400 Errors Due to Large Cookies
response = driver.requests.get(link)

    if response.status_code == 400:
        driver.delete_cookies()  # Delete cookies to resolve the error
        driver.shortrandomsleep()  # Short delay before retrying
response = driver.requests.get(link)- You can also use
driver.requests.get_mank(links)to make multiple requests in parallel, which is faster than making them sequentially.
How to Configure the Browser's Chrome Profile, Language, and Proxy Dynamically Based on Data Parameters?
The decorators in Botasaurus are really flexible, allowing you to pass a function that can derive the browser configuration based on the data item parameter. This is particularly useful when working with multiple Chrome profiles. You can dynamically configure the browser's Chrome profile and proxy using decorators in two ways:- Using functions to extract configuration values from data:
data parameter.
- Pass these functions as arguments to the @browser decorator.
Example:
from botasaurus.browser import browser, Driver

    def get_profile(data):
        return data["profile"]

    def get_proxy(data):
        return data["proxy"]

    @browser(profile=getprofile, proxy=getproxy)
    def scrapeheadingtask(driver: Driver, data):
        profile, proxy = driver.config.profile, driver.config.proxy
        print(profile, proxy)
        return profile, proxy

    data = [
        {"profile": "pikachu", "proxy": "http://142.250.77.228:8000"},
        {"profile": "greyninja", "proxy": "http://142.250.77.229:8000"},
    ]

scrapeheadingtask(data)- Directly passing configuration values when calling the decorated function:
from botasaurus.browser import browser, Driver

    @browser
    def scrapeheadingtask(driver: Driver, data):
        profile, proxy = driver.config.profile, driver.config.proxy
        print(profile, proxy)
        return profile, proxy

    scrapeheadingtask(
        profile='pikachu',  # Directly pass the profile
        proxy="http://142.250.77.228:8000",  # Directly pass the proxy
)What is the best way to manage profile-specific data like name, age across multiple profiles?
To store data related to the active profile, usedriver.profile. Here's an example:
from botasaurus.browser import browser, Driver

 def get_profile(data):
     return data["profile"]

 @browser(profile=get_profile)
 def runprofiletask(driver: Driver, data):
     # Set profile data
     driver.profile = {
         'name': 'Amit Sharma',
         'age': 30
     }

     # Update the name in the profile
     driver.profile['name'] = 'Amit Verma'

     # Delete the age from the profile
     del driver.profile['age']

     # Print the updated profile
     print(driver.profile)  # Output: {'name': 'Amit Verma'}

     # Delete the entire profile
     driver.profile = None

runprofiletask([{"profile": "amit"}])Profiles utility. Here's an example:
from botasaurus.profiles import Profiles

 Set profiles
 Profiles.set_profile('amit', {'name': 'Amit Sharma', 'age': 30})
 Profiles.set_profile('rahul', {'name': 'Rahul Verma', 'age': 30})

 Get a profile
 profile = Profiles.get_profile('amit')
 print(profile)  # Output: {'name': 'Amit Sharma', 'age': 30}

 Get all profiles
 allprofiles = Profiles.getprofiles()
 print(all_profiles)  # Output: [{'name': 'Amit Sharma', 'age': 30}, {'name': 'Rahul Verma', 'age': 30}]

 Get all profiles in random order
 randomprofiles = Profiles.getprofiles(random=True)
 print(random_profiles)  # Output: [{'name': 'Rahul Verma', 'age': 30}, {'name': 'Amit Sharma', 'age': 30}] in random order

 Delete a profile
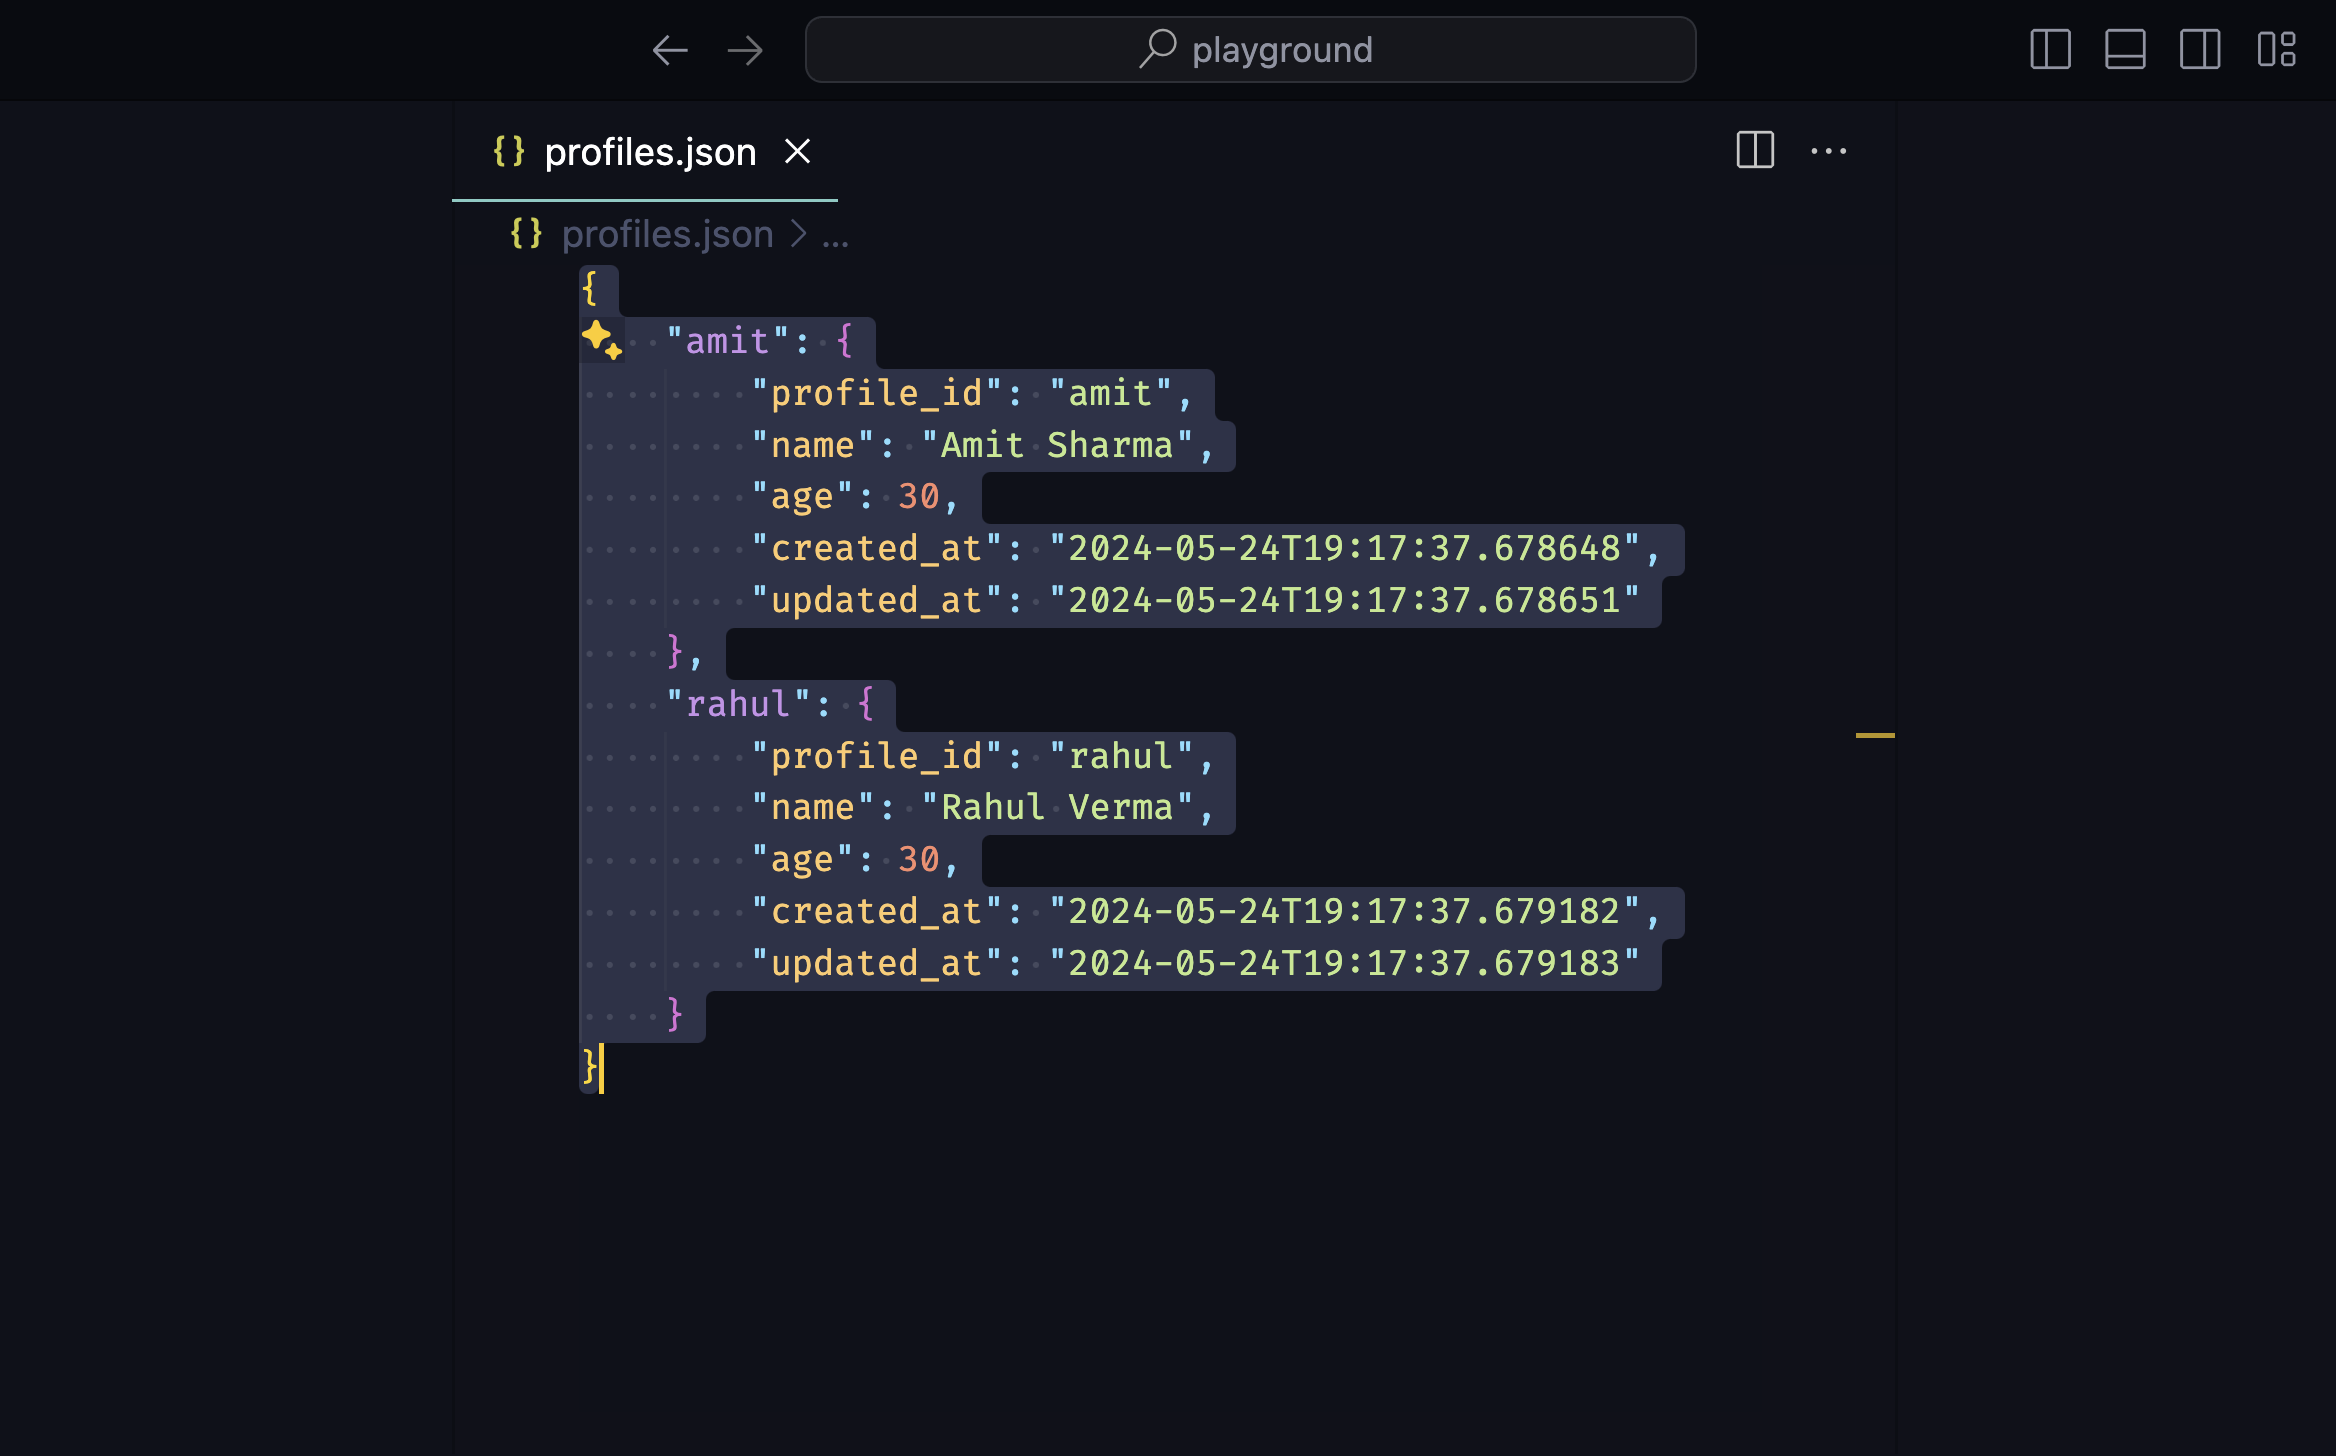
Profiles.delete_profile('amit')profiles.json file in the current working directory.
What are some common methods in Botasaurus Driver?
Botasaurus Driver provides several handy methods for web automation tasks, such as:- Visiting URLs:
driver.get("https://www.example.com")
   driver.google_get("https://www.example.com")  # Use Google as the referer [Recommended]
   driver.get_via("https://www.example.com", referer="https://duckduckgo.com/")  # Use custom referer
driver.getviathis_page("https://www.example.com") # Use current page as referer- Finding elements:
from botasaurus.browser import Wait
   search_results = driver.select(".search-results", wait=Wait.SHORT)  # Wait for up to 4 seconds for the element to be present, return None if not found
   alllinks = driver.selectall("a")  # Get all elements matching the selector
   searchresults = driver.waitfor_element(".search-results", wait=Wait.LONG)  # Wait for up to 8 seconds for the element to be present, raise exception if not found
hellomom = driver.getelementwithexacttext("Hello Mom", wait=Wait.VERYLONG) # Wait for up to 16 seconds for an element having the exact text "Hello Mom"- Interacting with elements:
driver.type("input[name='username']", "john_doe")  # Type into an input field
   driver.click("button.submit")  # Click an element
   element = driver.select("button.submit")
   element.click()  # Click on an element
element.select_option("select#fruits", index=2) # Select an option- Retrieving element properties:
headertext = driver.gettext("h1")  # Get text content
   errormessage = driver.getelementcontainingtext("Error: Invalid input")
imageurl = driver.select("img.logo").getattribute("src") # Get attribute value- Working with parent-child elements:
parent_element = driver.select(".parent")
   childelement = parentelement.select(".child")
child_element.click() # Click child element- Executing
result = driver.run_js("script.js") # Run a JavaScript file located in the current working directory.
   result = driver.run_js("return document.title")
   pikachu = driver.run_js("return args.pokemon", {"pokemon": 'pikachu'}) # args can be a dictionary, list, string, etc.
textcontent = driver.select("body").runjs("(el) => el.textContent")- Enable human mode to perform, human-like mouse movements and say sayonara to detection:
# Navigate to Cloudflare's Turnstile Captcha demo
   driver.get(
     "https://nopecha.com/demo/cloudflare",
   )

   # Wait for page to fully load
   driver.longrandomsleep()

   # Locate iframe containing the Cloudflare challenge
   iframe = driver.getelementat_point(160, 290)

   # Find checkbox element within the iframe
   checkbox = iframe.getelementat_point(30, 30)

   # Enable human mode for realistic, human-like mouse movements
   driver.enablehumanmode()

   # Click the checkbox to solve the challenge
   checkbox.click()

   # (Optional) Disable human mode if no longer needed
   driver.disablehumanmode()

   # Pause execution, for inspection
driver.prompt()- Drag and Drop:
# Open React DnD tutorial
   driver.get("https://react-dnd.github.io/react-dnd/examples/tutorial")

   # Select draggable and droppable elements
   draggable = driver.select('[draggable="true"]')
   droppable = driver.select('[data-testid="(3,6)"]')

   # Perform drag-and-drop
   draggable.draganddrop_to(droppable)

   # Pause execution, for inspection
   driver.prompt()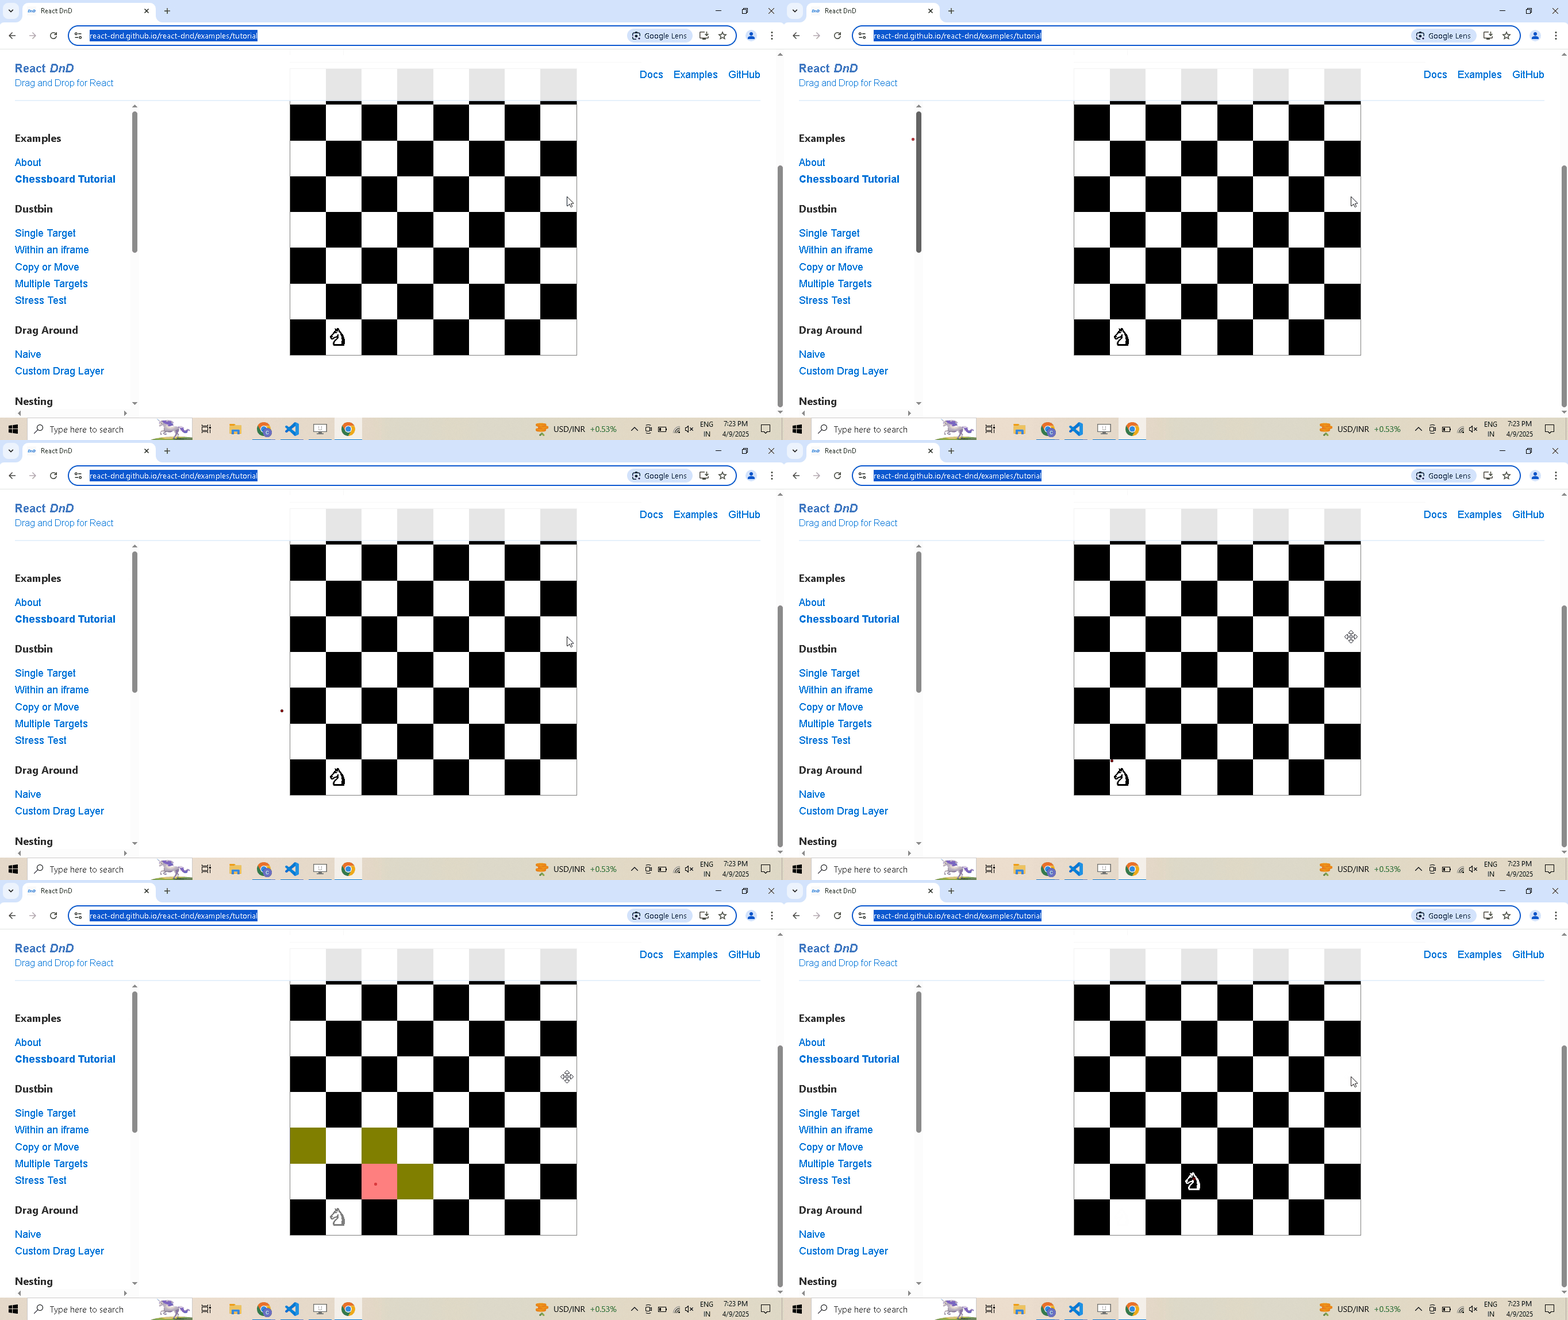
- Selecting Shadow Root Elements:
# Visit the website
   driver.get("https://nopecha.com/demo/cloudflare")

   # Wait for page to fully load
   driver.longrandomsleep()

   # Locate the element containing shadow root
   shadowrootelement = driver.select('[name="cf-turnstile-response"]').parent

   # Access the iframe
   iframe = shadowrootelement.getshadowroot()

   # Access the nested shadow DOM inside the iframe
   content = iframe.getshadowroot()

   # print the text content of the "label" element.
   print(content.select("label", wait = 8).text)

   # Pause execution, for inspection
   driver.prompt()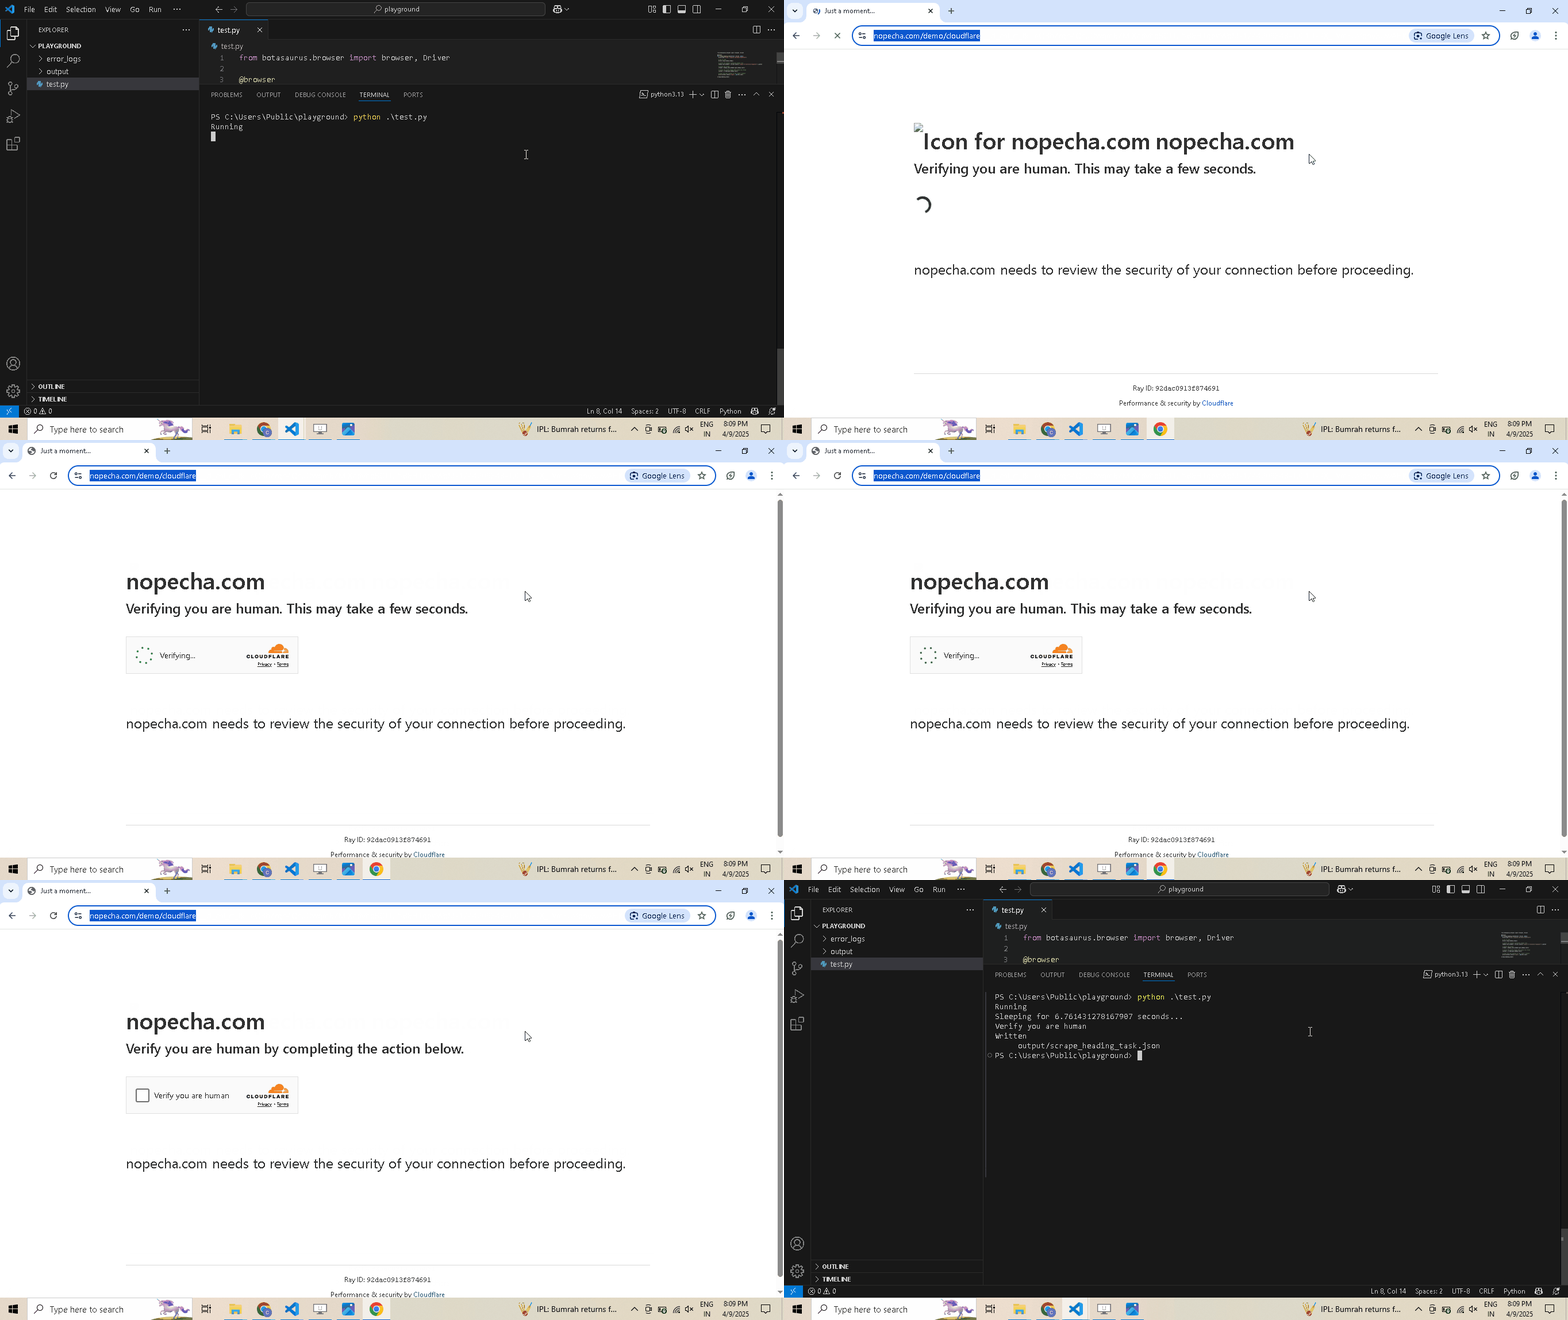
- Monitoring requests:
from botasaurus.browser import browser, Driver, cdp

   @browser()
   def scraperesponsestask(driver: Driver, data):
       # Define a handler function that will be called after a response is received
       def afterresponsehandler(
           request_id: str,
           response: cdp.network.Response,
           event: cdp.network.ResponseReceived,
       ):
           # Extract URL, status, and headers from the response
           url = response.url
           status = response.status
           headers = response.headers

           # Print the response details
           print(
               "afterresponsehandler",
               {
                   "requestid": requestid,
                   "url": url,
                   "status": status,
                   "headers": headers,
               },
           )

           # Append the request ID to the driver's responses list
           driver.responses.append(request_id)

       # Register the afterresponsehandler to be called after each response is received
       driver.afterresponsereceived(afterresponsehandler)

       # Navigate to the specified URL
       driver.get("https://example.com/")

       # Collect all the responses that were appended during the navigation
       collected_responses = driver.responses.collect()

       # Save it in output/scraperesponsestask.json
       return collected_responses

   # Execute the scraping task
scraperesponsestask()- Working with iframes:
driver.get("https://www.freecodecamp.org/news/using-entity-framework-core-with-mongodb/")
   iframe = driver.getiframeby_link("www.youtube.com/embed")
   # OR the following works as well
   # iframe = driver.select_iframe(".embed-wrapper iframe")
   freecodecampyoutubesubscribers_count = iframe.select(".ytp-title-expanded-subtitle").text
print(freecodecampyoutubesubscribers_count)- Executing CDP Command:
from botasaurus.browser import browser, Driver, cdp
driver.runcdpcommand(cdp.page.navigate(url='https://stackoverflow.blog/open-source'))- Miscellaneous:
form.type("input[name='password']", "secret_password")  # Type into a form field
   container.iselementpresent(".button")  # Check element presence
   pagehtml = driver.pagehtml  # Current page HTML
   driver.select(".footer").scrollintoview()  # Scroll element into view
   driver.close()  # Close the browser
How Can I Pause the Browser to Inspect Website when Developing the Scraper?
To pause the scraper and wait for user input before proceeding, usedriver.prompt():
driver.prompt()How do I configure authenticated proxies with SSL in Botasaurus?
Proxy providers like BrightData, IPRoyal, and others typically provide authenticated proxies in the format "http://username:password@proxy-provider-domain:port". For example, "http://greyninja:awesomepassword@geo.iproyal.com:12321". However, if you use an authenticated proxy with a library like seleniumwire to visit a website using Cloudflare, or Datadome, you are GUARANTEED to be identified because you are using a non-SSL connection. To verify this, run the following code: First, install the necessary packages:python -m pip install selenium_wirefrom seleniumwire import webdriver # Import from seleniumwire
Define the proxy
proxy_options = {
'proxy': {
'http': 'http://username:password@proxy-provider-domain:port', # TODO: Replace with your own proxy
'https': 'http://username:password@proxy-provider-domain:port', # TODO: Replace with your own proxy
}
}
Install and set up the driver
driver = webdriver.Chrome(seleniumwireoptions=proxyoptions)
Visit the desired URL
link = 'https://fingerprint.com/products/bot-detection/'
driver.get("https://www.google.com/")
driver.execute_script(f'window.location.href = "{link}"')
Prompt for user input
input("Press Enter to exit...")
Clean up
driver.quit()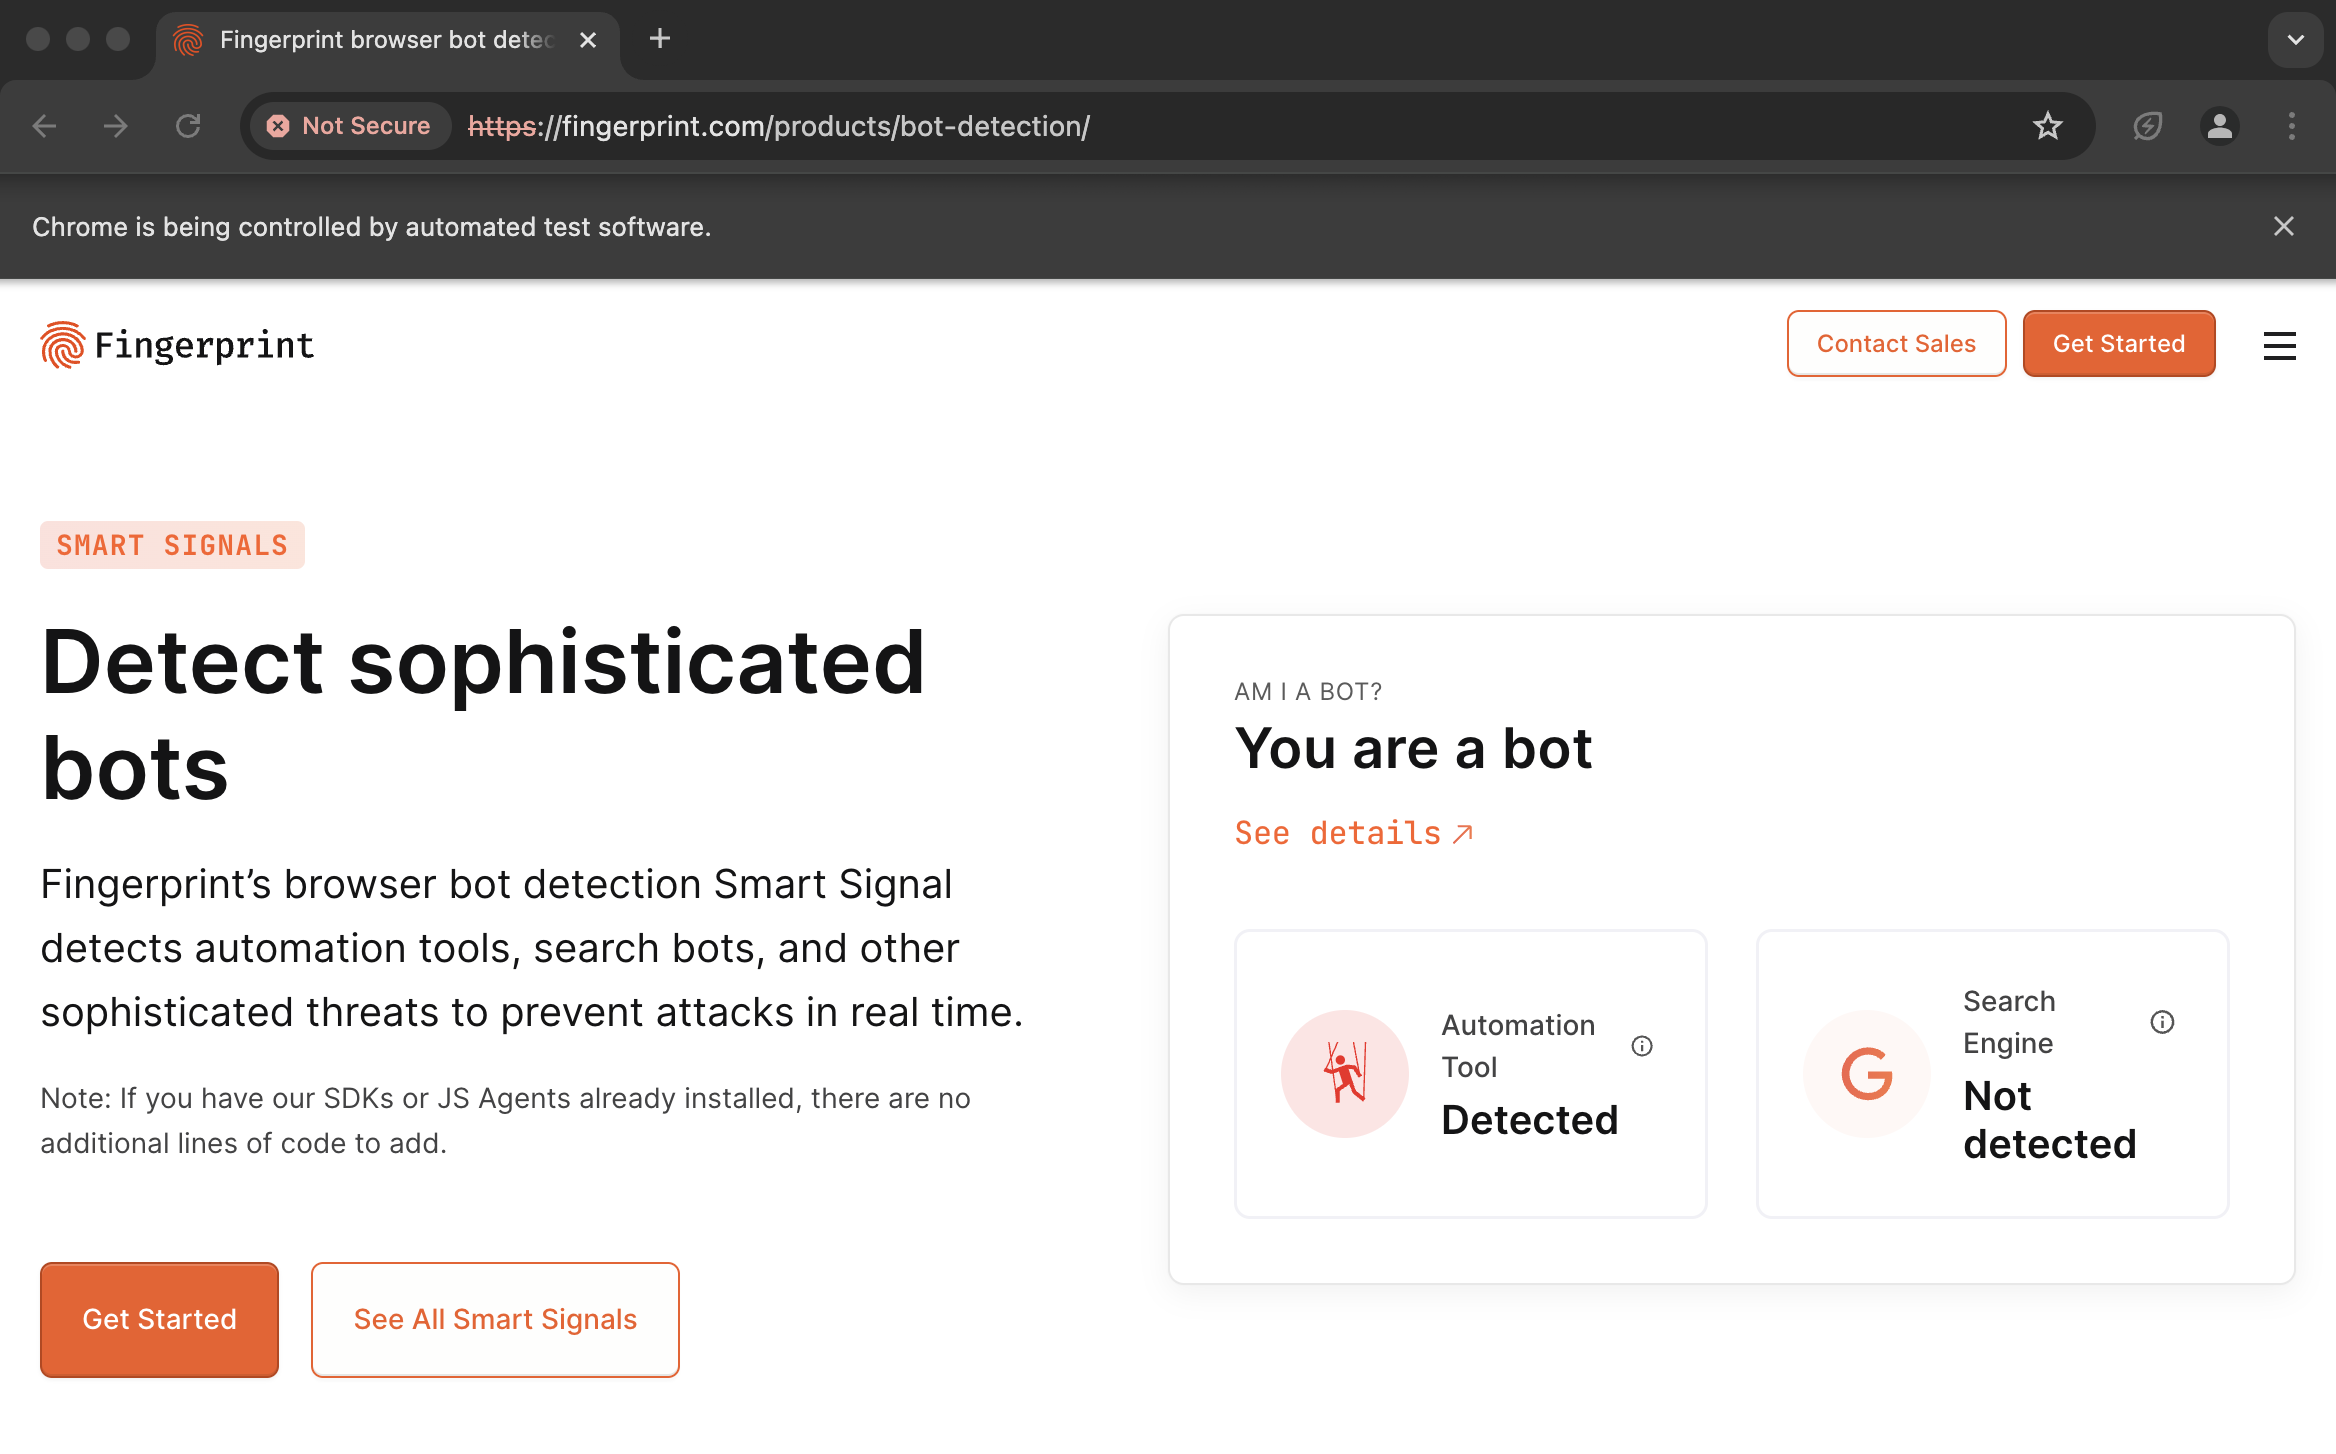 However, using proxies with Botasaurus solves this issue. See the difference by running the following code:
from botasaurus.browser import browser, Driver

 @browser(proxy="http://username:password@proxy-provider-domain:port") # TODO: Replace with your own proxy
 def scrapeheadingtask(driver: Driver, data):
     driver.google_get("https://fingerprint.com/products/bot-detection/")
     driver.prompt()

scrapeheadingtask()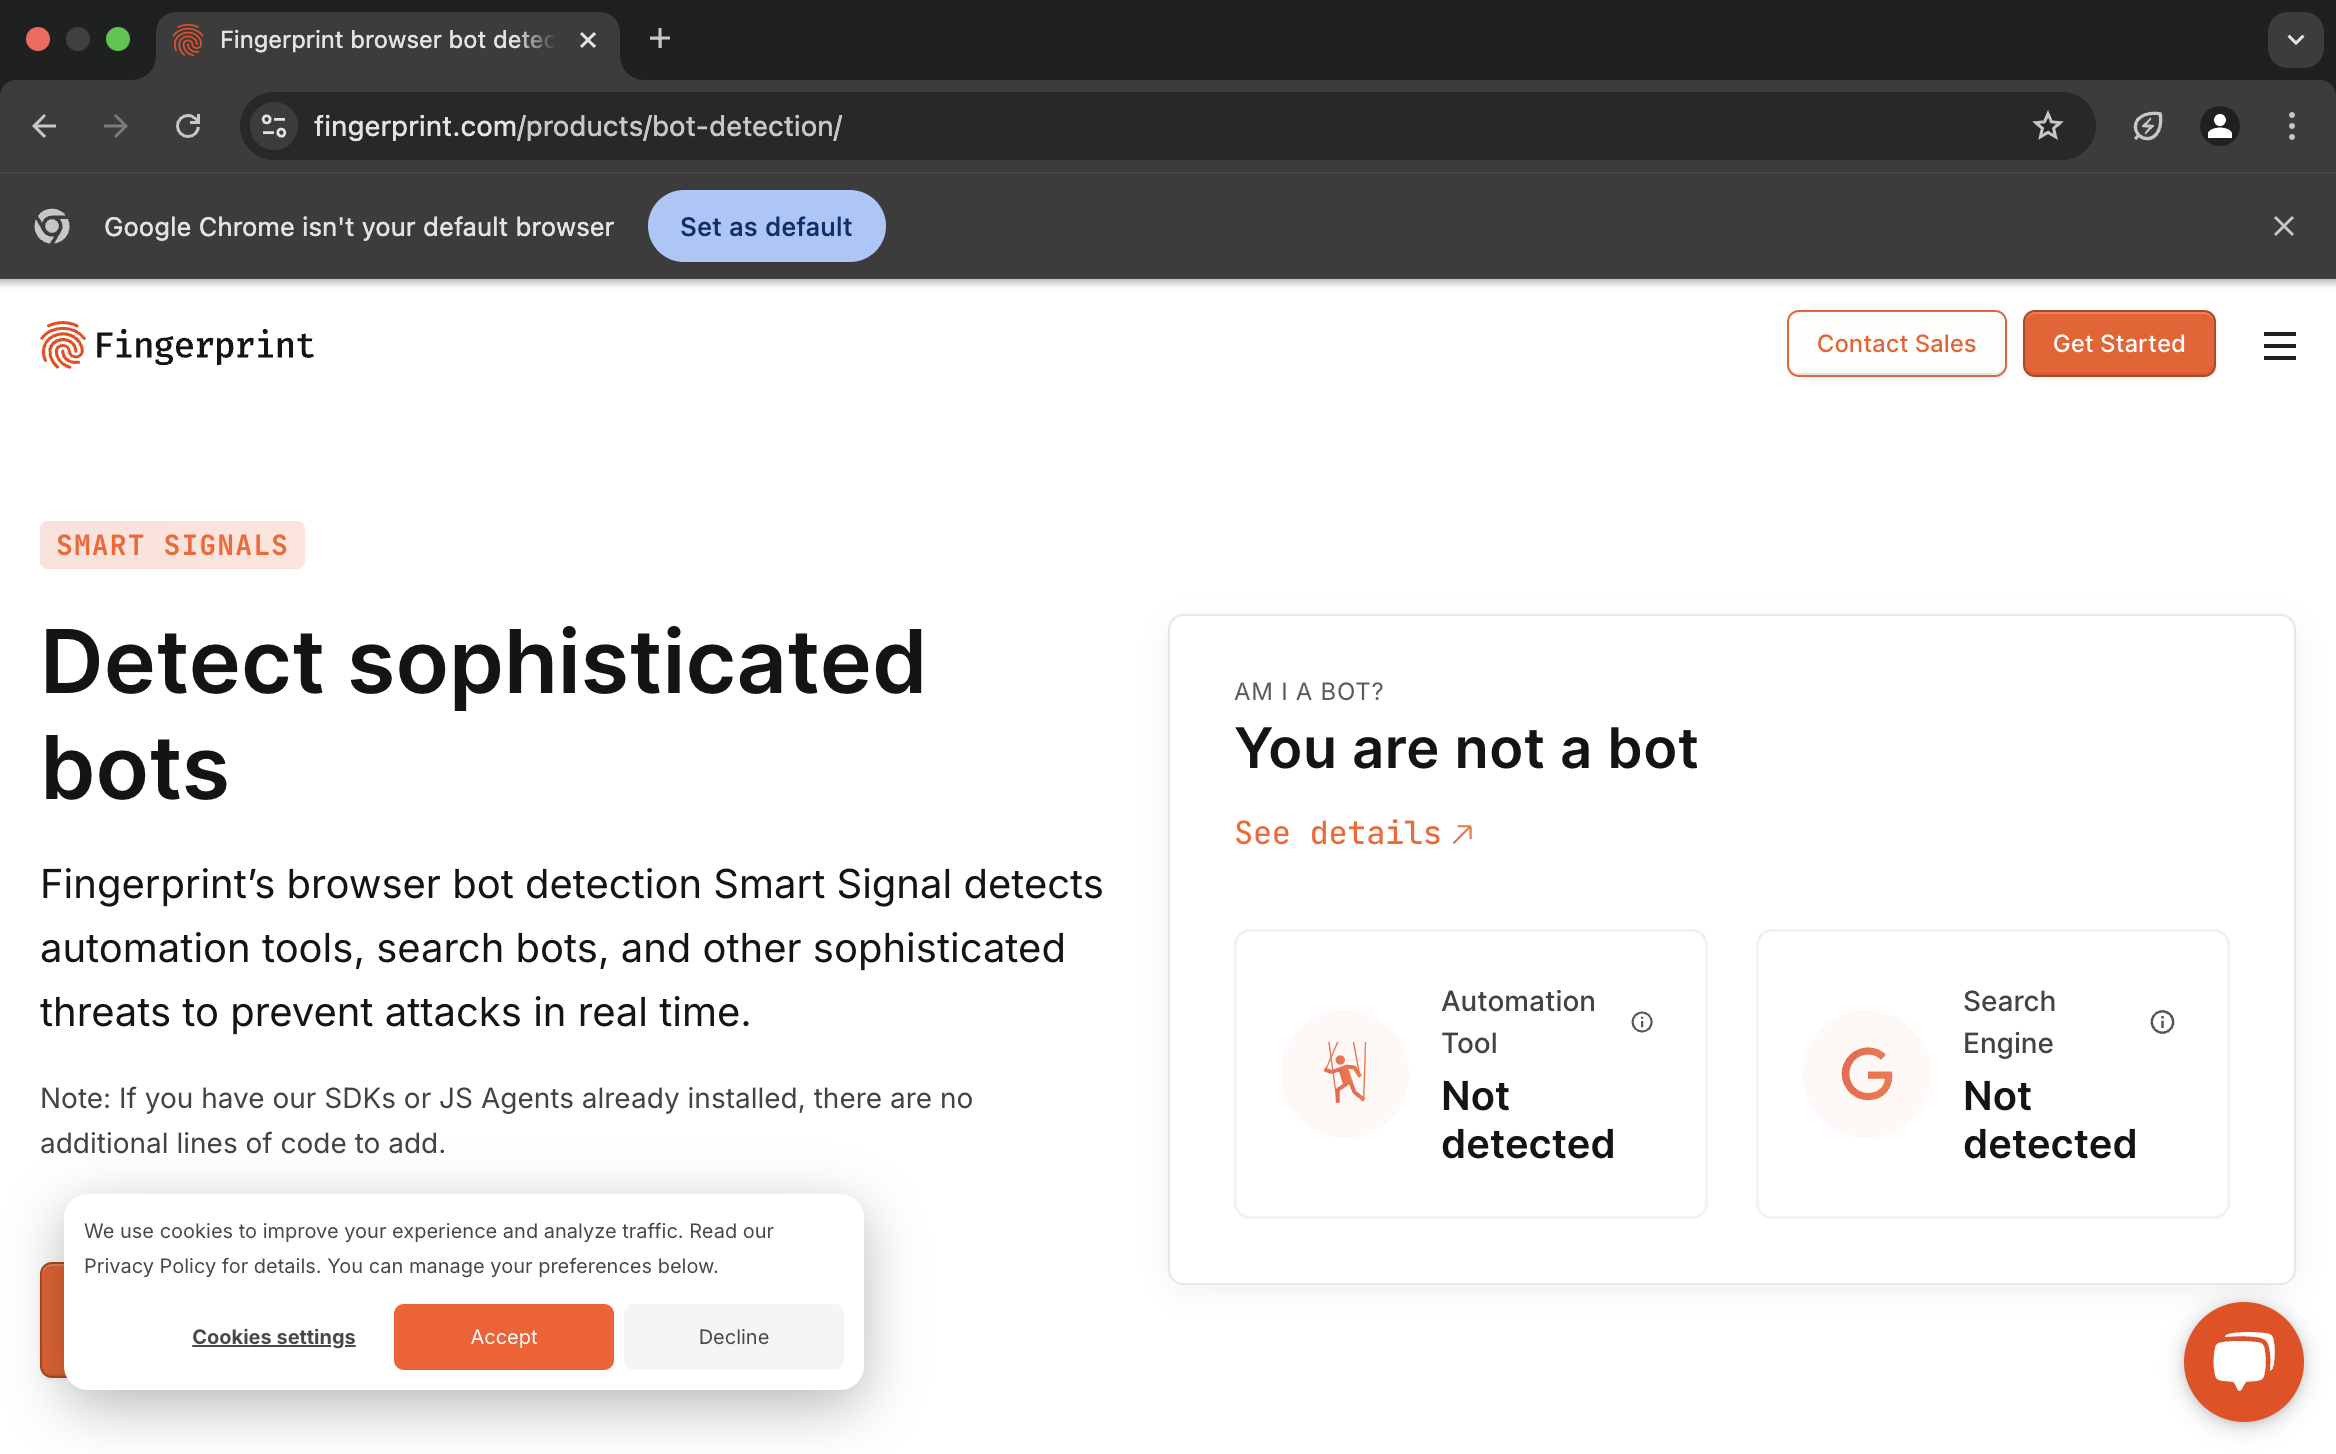 Important Note: To run the code above, you will need Node.js installed.
Why am I getting a socket connection error when using a proxy to access a website?
Certain proxy providers like BrightData will block access to specific websites. To determine if this is the case, run the following code:from botasaurus.browser import browser, Driver
@browser(proxy="http://username:password@proxy-provider-domain:port") # TODO: Replace with your own proxy
def visitwhatismyip(driver: Driver, data):
driver.get("https://whatismyipaddress.com/")
driver.prompt()
visitwhatismyip()- For Rotating Datacenter Proxies:
- For Rotating Residential Proxies: IPRoyal Royal Residential Proxies, which cost around $7 per GB on a pay-as-you-go basis. No KYC is required.
Which country should I choose when using proxies for web scraping?
The United States is often the best choice because:- The United States has a highly developed internet infrastructure and is home to numerous data centers, ensuring faster internet speeds.
- Most global companies host their websites in the US, so using a US proxy will result in faster scraping speeds.
Should I use a proxy for web scraping?
ONLY IF you encounter IP blocks. Sadly, most scrapers unnecessarily use proxies, even when they are not needed. Everything seems like a nail when you have a hammer. We have seen scrapers which can easily access hundreds of thousands of protected pages using the @browser module on home Wi-Fi without any issues. So, as a best practice scrape using the @browser module on your home Wi-Fi first. Only resort to proxies when you encounter IP blocks. This practice will save you a considerable amount of time (as proxies are really slow) and money (as proxies are expensive as well).How to configure the Request Decorator?
The Request Decorator is used to make humane requests. Under the hood, it uses botasaurus-requests, a library based on hrequests, which incorporates important features like:- Using browser-like headers in the correct order.
- Makes a browser-like connection with correct ciphers.
- Uses
google.comreferer by default to make it appear as if the user has arrived from google search.
@request(
     proxy="http://username:password@proxy-provider-domain:port"
 )
What Options Can I Configure in all 3 Decorators?
All 3 decorators allow you to configure the following options:- Parallel Execution:
- Caching Results
- Passing Common Metadata
- Asynchronous Queues
- Asynchronous Execution
- Handling Crashes
- Configuring Output
- Exception Handling
parallel
The parallel option allows you to scrape data in parallel by launching multiple browser/request/task instances simultaneously. This can significantly speed up the scraping process.
Run the example below to see parallelization in action:
from botasaurus.browser import browser, Driver

 @browser(parallel=3, data=["https://stackoverflow.blog/open-source", "https://stackoverflow.blog/ai", "https://stackoverflow.blog/productivity",])
 def scrapeheadingtask(driver: Driver, link):
     driver.get(link)
     heading = driver.get_text('h1')
     return heading

 scrapeheadingtask()
cache
The cache option enables caching of web scraping results to avoid re-scraping the same data. This can significantly improve performance and reduce redundant requests.
Run the example below to see how caching works:
from botasaurus.browser import browser, Driver

 @browser(cache=True, data=["https://stackoverflow.blog/open-source", "https://stackoverflow.blog/ai", "https://stackoverflow.blog/productivity",])
 def scrapeheadingtask(driver: Driver, link):
     driver.get(link)
     heading = driver.get_text('h1')
     return heading

 print(scrapeheadingtask())
print(scrapeheadingtask()) # Data will be fetched from cache immediatelymetadata
The metadata option allows you to pass common information shared across all data items. This can include things like API keys, browser cookies, or any other data that remains constant throughout the scraping process.
It is commonly used with caching to exclude details like API keys and browser cookies from the cache key.
Here's an example of how to use the metadata option:
```python
from botasaurus.task import task
@task()
def scrapeheadingtask(data, metadata):
print("metadata:", metadata)
print("data:", data)
data = [
{"profile": "pikachu", "proxy": "http://142.250.77.228:8000"},
{"profile": "greyninja", "proxy": "http://142.250.77.229:8000"},
]
scrape
README truncated. View on GitHub


