
Easy to use alarm system integration for Home Assistant
Alarmo

This is an alarm system integration for Home Assistant. It provides a user interface for setting up your own alarm system completely from the browser.
- Introduction - Features - Preview - Installation - Updating - Uninstalling - Usage - Alarm functionality - Arm modes - Alarmo entity - States - Attributes - Commands - Areas - Alarm Master - States - Commands - Sensor configuration - Sensor types - Configuration options - Sensor groups - Codes and users - Codes - Services - alarmo.arm - alarmo.disarm - alarmo.skip\delay - alarmo.enable\user - alarmo.disable\user - Events - alarmo\failed\to\arm - alarmo\command\success - alarmo\ready\to\arm\modes\updated - Creating readiness indicator entities - MQTT - State topic - Event topic - Command topic - Multiple area usage - Automations - Push notifications - Wildcards - Actionable notifications - Actions - Switching a device - Advanced actions - Automatic arming - Alarmo-card - Third party platforms - Android MQTT Alarm Panel - Apple Homekit - Google Home - Making Contributions - Say thank youIntroduction
This is an integration for thealarmcontrolpanel domain in HA.
It allows to combine existing sensors for creating a security system for your house.
The integration is comparable with the Manual Alarm in HA, but also has some additional features that makes it easier to use.
Alarmo consists of 3 parts:
- Alarmo component: a custom component for HA that controls the states of the alarm panel entities in HA.
- Alarmo panel: a GUI for configuring the settings of your alarm (sensors, delays, actions etc.)
- Alarmo card: a custom card for arming / disarming the alarm.
Features
- Fully compatible with Home Assistant and the Alarm Panel Card.
- Has an integrated panel for complete management via UI (no YAML required).
- No restarts required when making changes.
- Supports configuring your existing HA entities as security sensors. These sensors will be watched automatically.
- Allows setting up multiple users with individual pincode and permission levels.
- Will restore its previous state after restart of HA.
- Built-in actions: receive push notifications when anything changes in the alarm, activate a siren when the alarm is triggered, etc.
- Supports splitting up your house security system into multiple areas which can be armed independently.
Preview
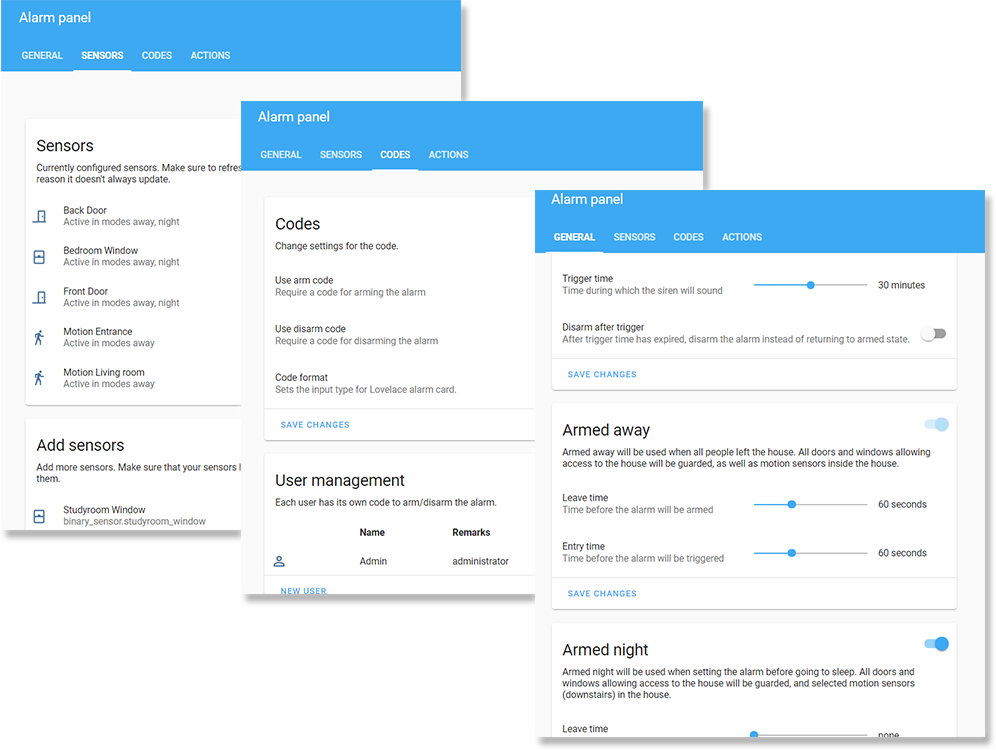
Installation

Click to show installation instructions
In the HACS panel, go to integrations and click the big orange '+' button. Search for 'Alarmo' and click 'Install this repository in HACS'.
Download the latest release as a zip file and extract it into the custom_components folder in your HA installation.
Updating
Click to show updating instructions
In the HACS panel, there should be an notification when a new version is available. Follow the instructions within HACS to update the installation files.
Download the latest release as a zip file and extract it into the custom_components folder in your HA installation, overwriting the previous installation.
In HA, go to Configuration -> Integrations. In the Alarmo card, you should see a link with '1 device', click it. In the table click the 'Alarmo' device, and you should see the Device info. The 'firmware version' represents the installed version number.
In the Alarmo configuration panel, the version number is displayed in the top right. If the version does not match with the backend version, your browser has an outdated version stored in the cache.
To clear the cache, you should do a force refresh of your browser.
Uninstalling
Click to show uninstall instructions
In HA go to Configuration -> Integrations. In the Alarmo card, click the button with the 3 dots, and click 'Delete'.
In the HACS panel go to integrations and look for Alarmo. Click the button with the 3 dots and click 'Uninstall'.
In the custom_components directory, remove the 'alarmo' folder.
Usage
Alarm functionality
The following diagram describes the operational states of the alarm and provides a simplified overview of the functionality.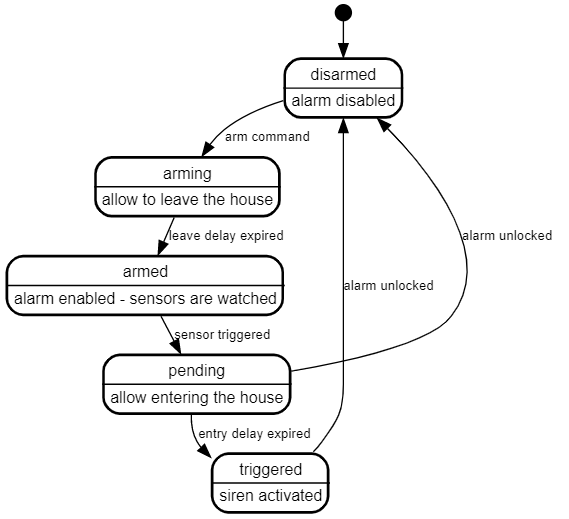
Arm modes
The alarm can be activated (armed) in a certain mode. This mode defines a certain set of sensors and represents the security zone (or perimeter).The following modes are supported:
- Armed away
- Armed night
- Armed home
- Armed vacation
In the tab general you can find the settings for each mode. There are flip switches to enable/disable modes.
Alarmo entity
After installing Alarmo the entity alarmcontrolpanel.alarmo shall be added to HA. You can use this entity together with the Alarm panel card, or in conjuction with automations to automatically arm/disarm the alarm.
States
The Alarmo entity follows the state definitions as defined by HA:| State | Description | | -------------------------- | ---------------------------------------------------------------------------------------- | | disarmed | The alarm is disabled/off. | | arming | The alarm is arming.
After the leave delay has expired, the alarm will be armed. | | armed_away | The alarm is armed in away mode. | | armed_home | The alarm is armed in home mode. | | armed_night | The alarm is armed in night mode. | | armed_vacation | The alarm is armed in vacation mode. | | armedcustombypass | The alarm is armed in custom mode. | | pending | The alarm is pending.
After the entry delay has expired, the alarm will be triggered. | | triggered | The alarm is triggered. | | unavailableunknown | Something is wrong.
Check the logs for more information. |
Attributes
The Alarmo entity defines the following attributes:
| Attribute | Default value | Example value when set | Description | | ------------------ | ----------------------- | ------------------------------ | -------------------------------------------------------------------------------------------------------------------------------------------------------------------------------------------------------------------------------------------------------------------------------------------------------------------------------------------------------------------------------------------------------------------------------- | | armmode | null | armedaway | The current active arm mode.
Defined in all states except disarmed. | | nextstate | (same as current state) | armedaway | When alarm is in state arming: nextstate is equal to the armmode.
When alarm is in state pending: nextstate is triggered.
When alarm is in state triggered: nextstate is triggered (if no trigger time is configured), disarmed (if 'disarm after triggering' setting is enabled) or equal to the armmode (otherwise).
In other cases, the nextstate will be equal to the current state. | | changed_by | null | Niels | User who last armed or disarmed the alarm.
Detected from the entered code.
Cleared when alarm is armed or disarmed without a code. | | opensensors | null | {binarysensor.backdoor: on} | Dictionary of sensors with their entity-ID + state, that caused the alarm to change state.
Set when arming attempt failed (due to one or more sensors).
Set when alarm is triggered (only first sensor that caused the triggering is stored). | | bypassedsensors | null | [binarysensor.backdoor] | List of sensors that are temporarily excluded from the alarm, due to arming in force. | | delay | null | 30 | Duration of the exit or entry delay. Only set in the arming and pending states, null otherwise. | | last_triggered | null | 2025-05-14 20:33:00 | Date and time of the last occurrence of the entity reaching the triggered state. |
Commands
The Alarmo entities support the following commands:| Command | Description | Conditions | | ------------------- | -------------------------------------------- | -------------------------------------------------------------------------------------------------------------------------------------------------------------- | | ARMAWAY | Arm the alarm in mode armedaway. | - The entity has the mode away enabled.
- The current alarm state is disarmed, armedhome, armednight, armedvacation or armedcustom_bypass. | | ARMHOME | Arm the alarm in mode armedhome. | - The entity has the mode home enabled.
- The current alarm state is disarmed, armedaway, armednight, armedvacation or armedcustom_bypass. | | ARMNIGHT | Arm the alarm in mode armednight. | - The entity has the mode night enabled.
- The current alarm state is disarmed, armedaway, armedhome, armedvacation or armedcustom_bypass. | | ARMVACATION | Arm the alarm in mode armedvacation. | - The entity has the mode vacation enabled.
- The current alarm state is disarmed, armedaway, armedhome, armednight or armedcustom_bypass. | | ARMCUSTOMBYPASS | Arm the alarm in mode armedcustombypass. | - The entity has the mode custom enabled.
- The current alarm state is disarmed, armedaway, armedhome, armedvacation or armednight. | | DISARM | Disarm the alarm. | - The current alarm state is not disarmed |
Areas
An area is a physical compartment of your house, such as a garage, 1st floor of the house, garden, etc. Alarmo will create analarmcontrolpanel entity for each area which can be armed and disarmed independently. An area has its own set of sensors and can have dedicated configuration for arm modes, exit/entry times and automations.
In the general tab of the Alarmo configuration UI, there is a card showing the areas in your setup. You can add additional areas, as well as rename or remove existing areas. Alarmo requires at least 1 area to be set up to be functional.
The name of an area defines the entity ID as well. The entity will be instantly renamed after saving.
Warning: renaming an area changes the entity ID, which might break your Lovelace cards and automations outside of Alarmo, so treat it with care.
Alarm Master
Alarmo has the option for enabling an alarm master. The option appears in the general tab in general settings if you have multiple areas defined.The alarm master is meant for operating your areas synchronously. An extra alarmcontrolpanel entity is created for the master, which watches the state of the areas for and mirrors its own state with that.
##### States The Alarm Master will watch the states of the area entities and updates its own state accordingly. The following table shows the rules which are implemented to determine the the master alarm state (in order of priority):
| Condition | Master Alarm state | | --------------------------------------------------------------------------------------------------------------------------------------------- | ------------------------ | | One or more areas have state triggered | triggered | | One or more areas have state pending | pending | | One or more areas have state arming, others have state armedaway, armedhome, armednight, armedvacation or armedcustombypass | arming | | All areas have state armedaway | armedaway | | All areas have state armedhome | armedhome | | All areas have state armednight | armednight | | All areas have state armedvacation | armedvacation | | All areas have state armedcustombypass | armedcustombypass | | All areas have state disarmed | disarmed | | Otherwise | (previous state is kept) |
Notes:
- The Alarm Master cannot determine its state if some are disarmed while others are armed. If the Alarm Master is used for arming/disarming the alarm, this condition should not occur.
- If the areas are independently operated, the user is reponsible to maintain synchronism between the areas. If independent operation is desired, usage of the Master Alarm is not recommended.
Commands
Arming / disarming the master will cause the action to be propagated to all areas.If the arming of an area fails (due to blocking sensors), the arming procedure will be aborted and all areas are disarmed.
The available arm modes for the Master Alarm are determined from the areas. Only arm modes which are in common for all areas are available for the Master Alarm.
Sensor configuration
Currently Alarmo supports sensors of type binarysensor. Alarmo will check the device class of each sensor, and only supports sensors that are related to security.
Available sensors should show up automatically in the sensors tab in the Add sensors card. Simply check the sensors that you wish to include in the alarm, and click 'add to alarm'. Review the configuration for each sensor in the sensors card.
Sensor types
The sensor configuration in the Alarmo panel allows defining a type for each sensor entity.
Setting a type for a sensor has the benefit that the appropriate configuration is automatically set. HA defines device classes for binary sensors. When assigning sensors to Alarmo, the type of the sensor is automatically determined based on this property (if it is defined).
Note that assigning a sensor type is not mandatory, and all configuration settings can also be set manually. It is also possible to deviate from the predefined configuration after setting a type.
The following table defines the sensor types and the predefined configuration: | Type | Device classes | Arm modes | Enabled configuration options | | ------------- | -------------------------------------------------------------------------- | ------------------------------------------------------------------ | ----------------------------------------- | | Door | door
garage_doorlock
opening | Armed Away
Armed HomeArmed NightArmed Vacation | Arm after closing
Use entry delay | | Window | window | Armed AwayArmed HomeArmed NightArmed Vacation | - | | Motion | motionmovingoccupancypresence | Armed AwayArmed Vacation | Use exit delayUse entry delay | | Tamper | tampersoundvibration | Armed AwayArmed HomeArmed NightArmed Vacation | - | | Environmental | carbon_monoxidegas
heatmoisturesmokesafety | N/A | Always on |
Configuration options
The following table summarizes the configuration options available per sensor.Note that depending on the sensor type, some options may be hidden. This is done for your convenience, if this is undesired you can clear the sensor type to have all options selectable.
| Option | Description | Recommended usage | | -------------------------- | ----------------------------------------------------------------------------------------------------------------------------------------------------------------------------------------------------------------------------------------------------------------------------------------------------------------------------------------------------------------------- | -------------------------------------------------------------------------------------------------------- | | Use exit delay | Allow the sensor to be active when arming starts.
If disabled, the sensor must be inactive prior to arming the alarm, otherwise the arming will fail.
Only applies to arm modes having an exit delay.
Only applies to the moment of arming: after the exit delay has started, the sensor may become active (allows you to leave the house). | Motion sensors (and optionally doors) in the path between your alarm panel and the exit. | | Use entry delay | Use entry delay (as set for the arm modes) for the sensor.
If enabled, the sensor triggers the alarm after the entry delay, otherwise this happens immediately.br>Only applies to arm modes having an entry delay. | Motion + door sensors in the path between entering the house and reaching the alarm panel. | | Always on | Activation of the sensor always triggers the alarm, even when the alarm is disarmed.
The triggering is immediate (entry delay is not used). | Safety sensors, such as fire detectors. | | Allow open after arming | Sensor is allowed to remain active until after the alarm is set to armed.
The initial activation is ignored, a second activation (after becoming inactive) triggers the alarm. | Motion sensors which have a long delay until being reset (longer than the exit delay). | | Arm after closing | Deactivation of the sensor during the exit delay causes the alarm to proceed to armed state.
If other sensors are still active at this moment, the arming fails.
Alarmo uses a built-in 5 seconds delay to allow for contact bounce (the chattering of a door when pulling it shut). | Front door sensor (combined with Allow open after arming on motion sensors which may be still active). | | Bypass automatically | If the sensor is still active when the alarm is armed, the sensor will be excluded from the alarm (instead of causing the arming to fail) until the alarm is disarmed again.
This setting can be defined per arm mode. | Windows that may be left open (e.g. when going to sleep). | | Trigger when unavailable | If the sensor state becomes unavailable this is treated the same as the sensor being activated.
HA defines the unavailable state for sensors for which the state is undeterminate (can be either open or closed). This usually occurs when a battery-powered sensor loses connection to the gateway, but it could also be the result of tampering of the sensor. | Sensors for which reliability is important. |
Sensor groups
This functionality is aimed to reduce the risk of false triggers in your house, which are (unfortunately) a reality - especially with PIR motion sensors.In a group, the triggering of a single sensor is ignored, but consecutive events (of 2 different sensors) will trigger the alarm.
Any sensor can be added to a group, but a sensor can only be member of 1 group. The amount of groups is unlimited, though it is recommended to minimize this (e.g. one group per room or floor).
A sensor group needs to have at least 2 sensors to function correctly (else it would never be triggered), and needs to be configured with a time-out time, after which consecutive sensor events are not longer considered related.
Clicking the 'setup groups' button while editing a sensor brings you to an overview of existing groups and allows you to create new ones and edit existing ones.
Codes and users
By default, the alarm has no code and can be locked and unlocked by anyone who has access to HA. It is recommended to set a code for disarming the alarm as minumum security level.
To do so, go to the codes tab, and enable the setting 'use disarm code'.
Next, set up a user and give it a name and code. It is recommended to use the same name as your HA account, but this is not required.
Codes
A code can be a sequence of digits (4 or more) or contain a mix of letters, characters etc. Make sure to use a code that matches with the code format setting in the codes tab. This setting is detected by the alarm panel card, and will automatically show either a number pad or a text field.Your code is stored completely secure. It is encrypted in the same way as your login credentials, and stored in the HA storage registry. When you enter a code, this will be encrypted too, and the encrypted values will be compared for a match. So it is impossible to recover your pin code. This also means that if you lose your pincode, you cannot unlock the alarm (there is no backup code!)
Services
Alarmo exposesalarmcontrolpanel entities. These can be interacted with from automations by using services.
HA defines a set of generic services which can be used to control the alarm entities, see here.
The following sections define the Alarmo-specific services that are supported.
alarmo.arm
Arm the alarm. Can also be used to transition between arm modes.The following table provides the settings that can be provided with the alarmo.arm service:
| Setting | Optional/required | Description | Example value | | ------------ | ----------------- | -------------------------------------------------------------------------------------------------- | ---------------------------- | | entityid | Required | Entity-ID of the alarm. | alarmcontrol_panel.alarmo | | code | Optional | Code used for arming the alarm. Only needed if a code is required for arming. | 1234 | | mode | Required | Mode in which to arm the alarm to. Valid values are away, home, night, vacation, custom. | away | | skip_delay | Optional | Set to true to arm without any exit delay. | true | | force | Optional | Set to true for enforced arming, causing any open sensors to be bypassed. | true |
alarmo.disarm
Disarm the alarm. Equivalent to the servicealarmcontrolpanel.alarm_disarm.
The following table provides the settings that can be provided with the alarmo.disarm service:
| Setting | Optional/required | Description | Example value | | ----------- | ----------------- | ----------------------------------------------------------------------------------- | ---------------------------- | | entityid | Required | Entity-ID of the alarm. | alarmcontrol_panel.alarmo | | code | Optional | Code used for disarming the alarm. Only needed if a code is required for disarming. | 1234 |
alarmo.skip_delay
Skip the remaining delay time and proceed to the next state. This service only has effect when the alarm entity is in thearming or pending state.
| Setting | Optional/required | Description | Example value |
| ----------- | ----------------- | ----------------------- | ---------------------------- |
| entityid | Required | Entity-ID of the alarm. | alarmcontrol_panel.alarmo |
alarmo.enable_user
Enable a user for operating the alarm using his/her configured code.| Setting | Optional/required | Description | Example value | | ------- | ----------------- | ------------------------------- | ------------- | | name | Required | Name of the user to be enabled. | Frank |
alarmo.disable_user
Disable a user for operating the alarm using his/her configured code.| Setting | Optional/required | Description | Example value | | ------- | ----------------- | -------------------------------- | ------------- | | name | Required | Name of the user to be disabled. | Frank |
Events
Alarmo exposes several events in HA, which can be used within automations or template entities for user-specific needs.alarmofailedto_arm
The Failed To Arm event is sent by Alarmo in case an arming or disarming attempt was made, but could not be completed. The event will provide feedback regarding the cause of the failure.The following table provides the data that is provided with the alarmofailedto_arm event: | Property | Description | Example value | | -------------- | ----------------------------------------------------------------------------------------------------------------------------------------------------------------------------------------------------- | ---------------------------- | | entityid | Entity-ID of the alarm. Particularly useful in case multiple areas are configured. | alarmcontrol_panel.alarmo | | areaid | Internal ID assigned by Alarmo to the area. Particularly useful in case multiple areas are configured. Unaffected by renaming of the area (in contrast to entityid). | 12345678 | | reason | Reason/context of why the arming failed. Possible values: opensensors, notallowed, invalid_code. | sensors | | sensors | list of entity-IDs of the sensors causing the failure. Only set if reason equals opensensors. | [binarysensor.front_door] | | command | Arming mode used for the operation (which has failed). | arm_away | | contextid | If alarmo.arm or alarmo.disarm service was used prior to the failure and contextid was provided with this service, the same value will be returned. Otherwise this parameter will not be sent. | 23 |
alarmocommandsuccess
The Command Success event will be sent when an arming/disarming command was successfully executed.The following table provides the data that is provided with the alarmocommandsuccess event: | Property | Description | Example value | | ------------ | ----------------------------------------------------------------------------------------------------------------------------------------------------------------------- | ---------------------------- | | entityid | Entity-ID of the alarm. Particularly useful in case multiple areas are configured. | alarmcontrol_panel.alarmo | | areaid | Internal ID assigned by Alarmo to the area. Particularly useful in case multiple areas are configured. Unaffected by renaming of the area (in contrast to entityid). | 12345678 | | action | Action that was performed. Possible values: arm, disarm. | arm | | arm_mode | Arm mode in which the alarm was armed. Only set if action equals arm. | away | | delay | Delay time used (in seconds) until the alarm will be set to the arm_mode. Only set if action equals arm. | 30 | | contextid | If alarmo.arm or alarmo.disarm service was used prior to the failure and contextid was provided with this service, the same value will be returned. | 23 |
alarmoreadytoarmmodes_updated
This event indicates whether the alarm is ready to arm. Alarmo internally monitors the states of all configured sensors to check whether the conditions for arming into a each arm mode are met. The event provides a prediction whether all conditions are satisfied (e.g. all windows and doors are closed), prior to arming.Note: While the alarm entity is disarmed, sensors which have type motion are not watched. This is done to prevent excessive recalculation while people are inside the house. It is advised to configure the alarm such that motion sensors should never cause arming to fail (e.g. by setting an exit delay which is sufficiently large).
The following table provides the data that is provided with the alarmoreadytoarmmodes_updated event: | Property | Description | Example value | | --------------------- | --------------------------------------------------------------------------------------------------------------------------------------------------------------------------------------------------------------- | ---------------------------- | | entityid | Entity-ID of the alarm. Particularly useful in case multiple areas are configured. | alarmcontrol_panel.alarmo | | areaid | Internal ID assigned by Alarmo to the area. Particularly useful in case multiple areas are configured. Unaffected by renaming of the area (in contrast to entityid). | 12345678 | | armedaway | Indicates whether or not all conditions for arming in mode armedaway are met. Possible values: true, false. Only provided in case the arm mode armed_away is enabled for the entity. | true | | armedhome | Indicates whether or not all conditions for arming in mode armedhome are met. Possible values: true, false. Only provided in case the arm mode armed_home is enabled for the entity. | true | | armednight | Indicates whether or not all conditions for arming in mode armednight are met. Possible values: true, false. Only provided in case the arm mode armed_night is enabled for the entity. | true | | armedcustombypass | Indicates whether or not all conditions for arming in mode armedcustombypass are met. Possible values: true, false. Only provided in case the arm mode armedcustombypass is enabled for the entity | true | | armedvacation | Indicates whether or not all conditions for arming in mode armedvacation are met. Possible values: true, false. Only provided in case the arm mode armed_vacation is enabled for the entity. | true |
Creating readiness indicator entities
Thealarmoreadytoarmmodes_updated event can be converted into an entity such that readiness information can be shown on a dashboard (similar to the green/red indicators on the arming buttons of alarmo-card).
Below is a code example for creating a binary sensor indicating whether the alarm can be set to mode armed away:
template: - triggers: - trigger: event eventtype: alarmoreadytoarmmodesupdated event_data: entityid: alarmcontrol_panel.alarmo binary_sensor: - name: "Alarmo Ready To Arm Away" state: '{{ trigger.event.data.armed_away }}'MQTT
Alarmo supports MQTT for external control of the alarm. This function is intended for third-party alarm panels (such as a touch screen in the hallway).The MQTT support needs to be enabled before it can be used. This setting is available in tab "General".
State topic
The state topic is used to publish state changes of thealarmcontrolpanel entities.
The state topic is an output topic, i.e. the data is sent by Alarmo and should be received by another application (such as a wall panel display).
Default state topic (can be configured):
alarmo/stateAlarmo will send the current state of the Alarmo entity as payload (string). See here for the complete list of payloads. The payload which is sent per state can be configured if desired.
The data published on the state topic shall be sent with a retain flag. This means that the last sent payload shall be stored in the broker, and as soon as an application subscribed to the topic, the most recent data shall be available for it.
Event topic
The event topic is used for publishing additional status updates of thealarmcontrolpanel entities.
The event topic is an output topic, i.e. the data is sent by Alarmo and should be received by another application (such as a wall panel display).
Default event topic (can be configured):
alarmo/eventThe published payloads on this topic are formatted as JSON struct, which contains the event name, and optionally some extra parameters.
The following table shows the events which are published on the event topic, together with the parameters which are sent for a certain event):
| Event | Description | Parameters | | ----------------------- | ------------------------------------------------------------------------------------------------------------------ | ------------------------------------------------------------------------------------------------------------------------------------------------------------------------------------------------------------------------------------------------------------------------------------------------------------------------- | | ARMAWAY | The alarm has been armed in mode armedaway | - delay: exit delay (in seconds) configured for the operation (i.e. time during which the alarm is in state arming). | | ARMHOME | The alarm has been armed in mode armedhome | - delay: exit delay (in seconds) configured for the operation (i.e. time during which the alarm is in state arming). | | ARMNIGHT | The alarm has been armed in mode armednight | - delay: exit delay (in seconds) configured for the operation (i.e. time during which the alarm is in state arming). | | ARMVACATION | The alarm has been armed in mode armedvacation | - delay: exit delay (in seconds) configured for the operation (i.e. time during which the alarm is in state arming). | | ARMCUSTOMBYPASS | The alarm has been armed in mode armedcustombypass | - delay: exit delay (in seconds) configured for the operation (i.e. time during which the alarm is in state arming). | | TRIGGER | The alarm has been triggered | - sensors: list of sensors (usually a single sensor) which caused the triggering of the alarm. Each list item is a struct with the entity_id and name of the sensor entity).
- delay: entry delay (in seconds) configured to postpone the triggering (i.e. time during which the alarm is in state pending). | | FAILEDTOARM | The arming was prevented or cancelled due to one or more blocking sensors. | - sensors: list of sensors which prevented the arming operation. Each list item is a struct with the entity_id and name of the sensor entity). | | COMMANDNOTALLOWED | The conditions for which the command is allowed are not met (see commands). | - state: current state of the alarm entity.
- command: the command that was provided by the user. | | NOCODEPROVIDED | The command was rejected because no code was provided, while the operation requires a code. | | | INVALIDCODEPROVIDED | The command was rejected because a wrong code was provided, or the provided code is not allowed for the operation. | |
Example payload on the event topic (Consider the scenario where the alarm is armed in state armed_away and the front door is opened):
{ "event": "TRIGGER", "sensors": [ # list of sensor(s) that causes the triggering { "entityid": "binarysensor.frontdoor", "name": "Front Door" } ], "delay": 60 # entry delay }Command topic
The command topic can be used for external control of Alarmo through MQTT.
The command topic is an input topic, i.e. the topic is watched by Alarmo and data should be sent by another application (such as a wall panel). The data should never be sent with retain flag, as this might give undesired behaviour when HA is restarted.
Default command topic (can be configured):
alarmo/commandIf Alarmo is configured to require a pincode or password for the (arm/disarm) command, the payload must be formatted as JSON according to the following format:
{ "command": "<my command>", "code": "<my pin or password>" }The supported commands can be found in commands.
If the provided payload does not have the correct format, lacks a code when it is required or contains a wrong code, the command shall be ignored. In other cases, you should see a change in the state topic.
Notes:
- The pin or password value should always be sent as a text/string value. A numeric value is not supported. This is due to the fact that a pincode could contain leading zeros (e.g. 0012), which would be lost if sent as a number.
- The command is treated as case-insensitive.
Multiple area usage
The MQTT functionality can be used in combination with a multiple area configuration.Alarmo shall publish the state updates for the Master Alarm and the areas in dedicated state topics:
- Master Alarm:
alarmo/state - Area:
alarmo/<area_name>/state
{ "command": "<my command>", "code": "<my pin or password>", "area": "<area_name>" }Notes:
- The MQTT configuration allows defining the topics for the Master Alarm only. The input topics (state/event topics) for the areas are automatically derived by inserting the area name. Example: setting state topic to
my/custom/topicgivesmy/custom/<area_name>/topicas state topic for an area.
<areaname> is a slug* of the name that is given to an area. This means that the name shall be in lowercase and all non-alphanumerical characters are replaced by underscores (similar to the entityIDs in HA). - If no area is provided, the command is addressed to the Master Alarm. If the Master Alarm is disabled, the command is ignored.
Automations
Push notifications
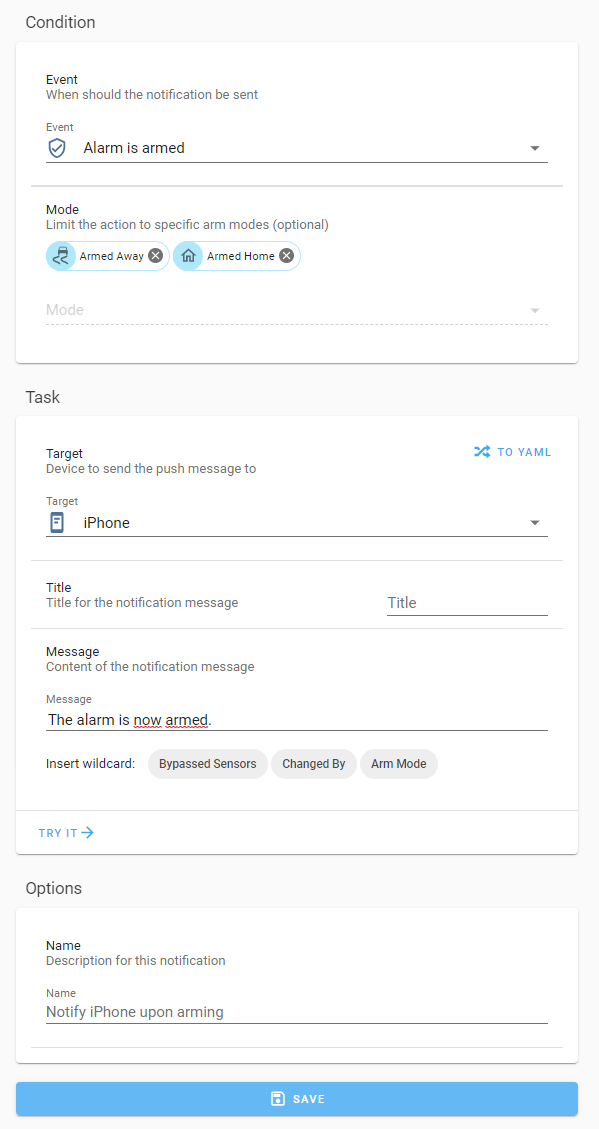
Alarmo can send a push message to your phone when the alarm is armed, disarmed, triggered, something went wrong, etc. For using this, you first need to install the HA app on your iOS or Android device.Procedure for setting up a notification
- In the Alarmo configuration panel, click "Actions" in the top menu.
- In the panel labeled "Notifications", click on "New Notification".
- Choose an event for which you would like to receive a push message, and choose the message content + title. Pick your device as target, and save the automation.
- Now Alarmo should start sending you messages :tada:
Wildcards
The alarmo notifications editor contains some wildcards which can be used to provide adaptive info to your push message. By adding the wildcard in a message (including the brackets) it will be automatically be replaced by the applicable text.| Wildcard | Description | Example Text | Suitable events | | ---------------------- | -------------------------------------------------------------- | ------------------ | ------------------------------------- | | {{open_sensors}} | List of sensors (with their states) which are currently active | Backdoor is open | Failed to arm
Triggered
Entry | | {{bypassed_sensors}} | List of sensors which are bypassed | Bedroom window | Armed | | {{arm_mode}} | Current arming mode. | Armed Away | Leave
Armed | | {{changed_by}} | User who's code has been entered. | Niels | Armed
Disarmed | | {{delay}} | Delay in seconds until armed or the alarm is triggered | 30 | Arming
Pending |
Actionable notifications
This function adds buttons to a push message, that can be clicked to interact with Alarmo.Alarmo has built-in support for actionable push notification with the 'failed to arm' condition.
Example:

Available actions
The following actions are defined in Alarmo and can be used in actionable notifications:
| action | Description | Suitable events | | ----------------------------------------------------------------------------------------------------------------------- | -------------------------------------------------------------------------------------------------------------------------------- | -------------------------------------------------- | | ALARMORETRYARM | Repeats the command that failed before.
Will only succeed in case the issue blocking the arming before has been restored. | Failed to arm | | ALARMOFORCEARM | Repeats the command that failed before.
The sensor/sensors that failed, shall be ignored (bypassed) while the alarm is armed. | Failed to arm | | ALARMO_DISARM | Disarm the alarm. | Armed, Leave, Entry, Triggered | | ALARMOARMAWAY
ALARMOARMHOME
ALARMOARMNIGHT
ALARMOARMVACATION
ALARMOARMCUSTOM_BYPASS | Arm the alarm in the corresponding mode. | None (intended for automations outside of alarmo). | Set up notification with actions
In the Alarmo notifications editor, create a notification and select an event. Choose your iOS/Android device as target, set a message and title as you want.
Switch to YAML mode. Look for the part that has data, and extend it as follows:
data: ... # your message and title should be here already data: actions: - action: ALARMORETRYARM title: Retry Arm # feel free to change this text - action: ALARMOFORCEARM title: Force Arm # feel free to change this textFor more info about actionable notifications in HA, see here.
Note: In case you have multiple areas set up, the actionable notifications only work for the alarm master (since no area info can be sent along with the action data).
Actions
Switching a device
An important feature of a security system are the actuators (such as siren, lights, ...), which will hopefully cause a burglar threspassing your property to flee.
Alarmo features a built-in panel which can be used for switching devices on/off, depending on the state of the alarm.
Procedure for setting up an action
- In the Alarmo configuration panel, click "Actions" in the top menu.
- In the panel labeled "Actions", click on "New Action".
- Choose an event for which you would like to trigger a device, pick the HA entity from the list, choose whether it should be switched on, and save the automation.
- Now the device should automatically be triggered together with the alarm :tada:
switch, input_boolean, light, script.
The actions are currently limited to turning on or turning off a HA entity.
Advanced actions
In case the built-in Actions panel does not offer the flexibility you are looking for, you can set up more flexible automations in HA.It is recommended to trigger on a state change of the alarmcontrolpanel entity.
Example:
trigger: - platform: state entityid: alarmcontrol_panel.alarmo to: 'triggered' action: - service: switch.turn_on target: entityid: swich.mysirenFor the "failed to arm" condition, you can trigger on event instead:
trigger: - platform: event eventtype: alarmofailedtoarm condition: - condition: template valuetemplate: '{{ trigger.event.data.reason == ''opensensors'' }}' action: - service: notify.mobileappmy_phone data: message: > Could not arm because of the following problems: {% for entity_id in trigger.event.data.sensors %} - {{ stateattr(entityid, 'friendlyname') }} is {{ states(entityid) }} {% endfor %} title: testStructure of the event data:
{ "reason": "opensensors", //other options: notallowed, invalid_code "sensors": [ //only applicable if reason = open_sensors "binarysensor.balconydoor" ], }Automatic arming
If you want to control the state of Alarmo through an external device (e.g. a keyfob, button panel, or phoneREADME truncated. View on GitHub


