
Example project showing how to build a Spring Boot App providing a GUI with Vue.js
spring-boot-vuejs
















If you´re a JavaMagazin / blog.codecentric.de / Softwerker reader, consider switching to vue-cli-v2-webpack-v3

A live deployment is available on Heroku: https://spring-boot-vuejs.herokuapp.com
This project is used as example in a variety of articles & as eBook:



blog.codecentric.de/en/2018/04/spring-boot-vuejs | JavaMagazin 8.2018 | entwickler.press shortcuts 229 | softwerker Vol.12
Upgrade procedure
Get newest node & npm:
brew upgrade node npm install -g npm@latestUpdate vue-cli
npm install -g @vue/cliUpdate Vue components/plugins (see https://cli.vuejs.org/migrating-from-v3/#upgrade-all-plugins-at-once)
vue upgradeIn Search of a new Web Frontend-Framework after 2 Years of absence...
Well, I’m not a Frontend developer. I’m more like playing around with Spring Boot, Web- & Microservices & Docker, automating things with Ansible and Docker, Scaling things with Spring Cloud, Docker Compose, and Traefik... And the only GUIs I’m building are the "new JS framework in town"-app every two years... :) So the last one was Angular 1 - and it felt, as it was a good choice! I loved the coding experience and after a day of training, I felt able to write awesome Frontends...
But now we’re 2 years later and I heard from afar, that there was a complete rewrite of Angular (2), a new kid in town from Facebook (React) and lots of ES201x stuff and dependency managers like bower and Co. So I’m now in the new 2-year-cycle of trying to cope up again - and so glad I found this article: https://medium.com/reverdev/why-we-moved-from-angular-2-to-vue-js-and-why-we-didnt-choose-react-ef807d9f4163
Key points are:
- Angular 2 isn’t the way to go if you know version 1 (complete re-write, only with Typescript, loss of many of 1’s advantages, Angular 4 is coming)
- React (facebookish problems (licence), need to choose btw. Redux & MObX, harder learning curve, slower coding speed)
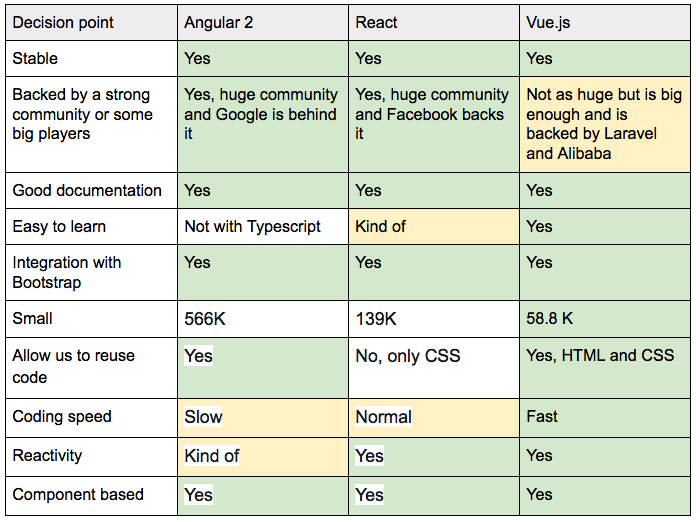
And the introduction phrase sounds really great:
Vue (pronounced /vjuː/, like view) is a progressive framework for building user interfaces. Unlike other monolithic frameworks, Vue is designed from the ground up to be incrementally adoptable. The core library is focused on the view layer only and is very easy to pick up and integrate with other libraries or existing projects. On the other hand, Vue is also perfectly capable of powering sophisticated Single-Page Applications when used in combination with modern tooling and supporting libraries.
So I think, it could be a good idea to invest a day or so into Vue.js. Let’s have a look here!
Setup Vue.js & Spring Boot
Prerequisites
MacOSX
brew install node
npm install -g @vue/cli
Linux
sudo apt update
sudo apt install node
npm install -g @vue/cli
Windows
choco install npm
npm install -g @vue/cli
Project setup
spring-boot-vuejs
├─┬ backend     → backend module with Spring Boot code
│ ├── src
│ └── pom.xml
├─┬ frontend    → frontend module with Vue.js code
│ ├── src
│ └── pom.xml
└── pom.xml     → Maven parent pom managing both modules
Backend
Go to https://start.spring.io/ and initialize a Spring Boot app with Web and Actuator. Place the zip’s contents in the backend folder.
Customize pom to copy content from Frontend for serving it later with the embedded Tomcat:
<build>
  <plugins>
    <plugin>
      <groupId>org.springframework.boot</groupId>
      <artifactId>spring-boot-maven-plugin</artifactId>
    </plugin>
    <plugin>
      <artifactId>maven-resources-plugin</artifactId>
      <executions>
        <execution>
          <id>copy Vue.js frontend content</id>
          <phase>generate-resources</phase>
          <goals>
            <goal>copy-resources</goal>
          </goals>
          <configuration>
            <outputDirectory>src/main/resources/public</outputDirectory>
            <overwrite>true</overwrite>
            <resources>
              <resource>
                <directory>${project.parent.basedir}/frontend/target/dist</directory>
                <includes>
                  <include>static/</include>
                  <include>index.html</include>
                  <include>favicon.ico</include>
                </includes>
              </resource>
            </resources>
          </configuration>
        </execution>
      </executions>
    </plugin>
  </plugins>
</build>
Frontend
Creating our frontend project is done by the slightly changed (we use --no-git here, because our parent project is already a git repository and otherwise vue CLI 3 would initialize an new one):
vue create frontend --no-gitsee https://cli.vuejs.org/guide/
This will initialize a project skeleton for Vue.js in /frontend directory - it, therefore, asks some questions in the cli:
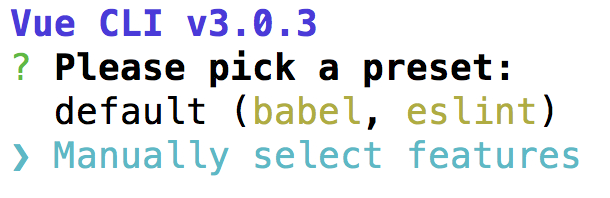
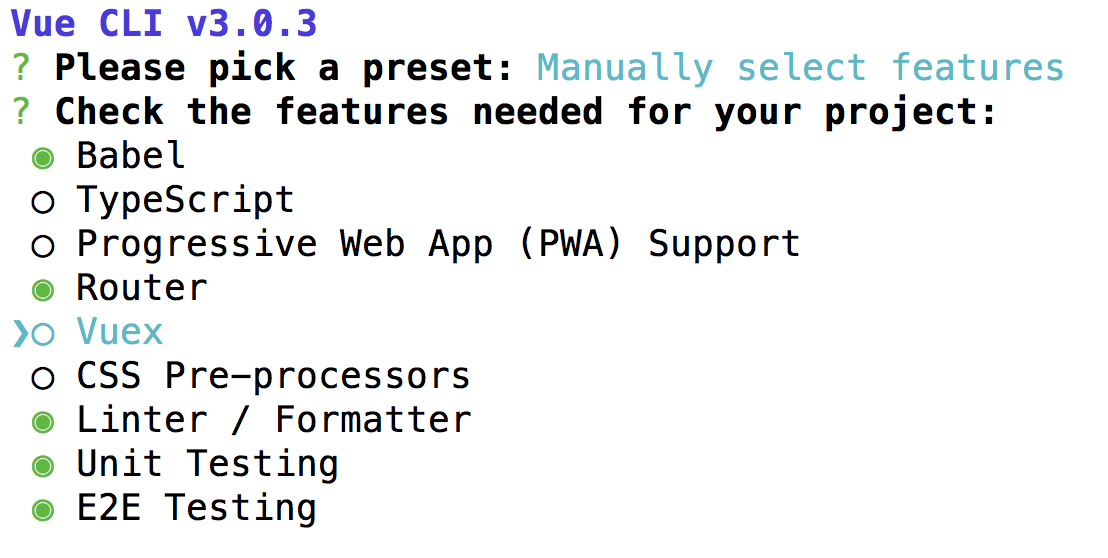
Do not choose the default preset with default (babel, eslint), because we need some more plugins for our project here (choose the Plugins with the space bar):
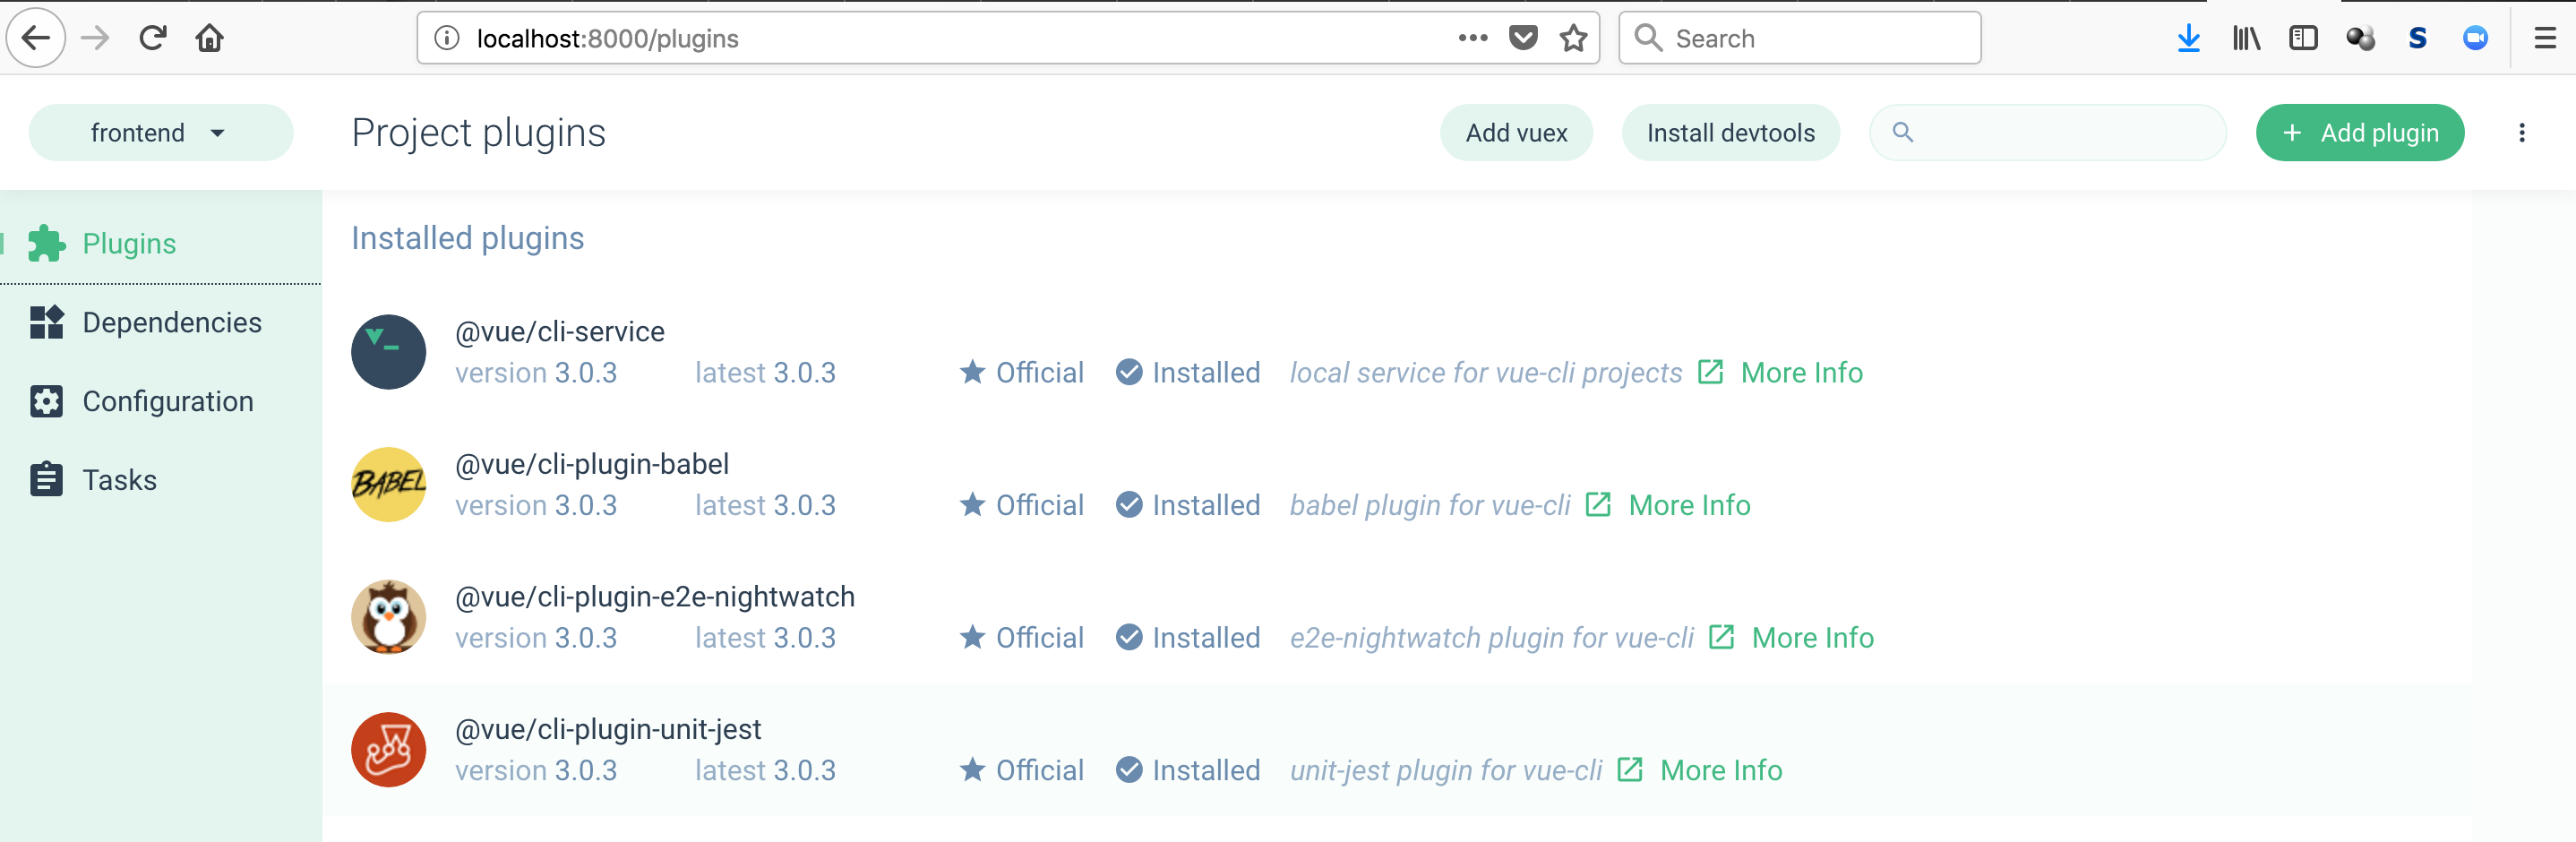
You can now also use the new vue ui command/feature to configure your project:
If you want to learn more about installing Vue.js, head over to the docs: https://vuejs.org/v2/guide/installation.html
Use frontend-maven-plugin to handle NPM, Node, Bower, Grunt, Gulp, Webpack and so on :)
If you’re a backend dev like me, this Maven plugin here https://github.com/eirslett/frontend-maven-plugin is a great help for you - because, if you know Maven, that’s everything you need! Just add this plugin to the frontend’s pom.xml:
<build>
    <plugins>
        <plugin>
            <groupId>com.github.eirslett</groupId>
            <artifactId>frontend-maven-plugin</artifactId>
            <version>${frontend-maven-plugin.version}</version>
            <executions>
                <!-- Install our node and npm version to run npm/node scripts-->
                <execution>
                    <id>install node and npm</id>
                    <goals>
                        <goal>install-node-and-npm</goal>
                    </goals>
                    <configuration>
                        <nodeVersion>v10.10.0</nodeVersion>
                    </configuration>
                </execution>
                <!-- Install all project dependencies -->
                <execution>
                    <id>npm install</id>
                    <goals>
                        <goal>npm</goal>
                    </goals>
                    <!-- optional: default phase is "generate-resources" -->
                    <phase>generate-resources</phase>
                    <!-- Optional configuration which provides for running any npm command -->
                    <configuration>
                        <arguments>install</arguments>
                    </configuration>
                </execution>
                <!-- Build and minify static files -->
                <execution>
                    <id>npm run build</id>
                    <goals>
                        <goal>npm</goal>
                    </goals>
                    <configuration>
                        <arguments>run build</arguments>
        </configuration>
                </execution>
            </executions>
        </plugin>
    </plugins>
</build>
Tell Webpack to output the dist/ contents to target/
Commonly, node projects will create a dist/ directory for builds which contains the minified source code of the web app - but we want it all in /target. Therefore we need to create the optional vue.config.js and configure the outputDir and assetsDir correctly:
module.exports = {
  ...
  // Change build paths to make them Maven compatible
  // see https://cli.vuejs.org/config/
  outputDir;: 'target/dist',
  assetsDir;: 'static';
}
First App run
Inside the root directory, do a:
mvn clean installRun our complete Spring Boot App:
mvn --projects backend spring-boot:runNow go to http://localhost:8098/ and have a look at your first Vue.js Spring Boot App.
Faster feedback with webpack-dev-server
The webpack-dev-server, which will update and build every change through all the parts of the JavaScript build-chain, is pre-configured in Vue.js out-of-the-box! So the only thing needed to get fast feedback development-cycle is to cd into frontend and run:
npm run serveThat’s it!
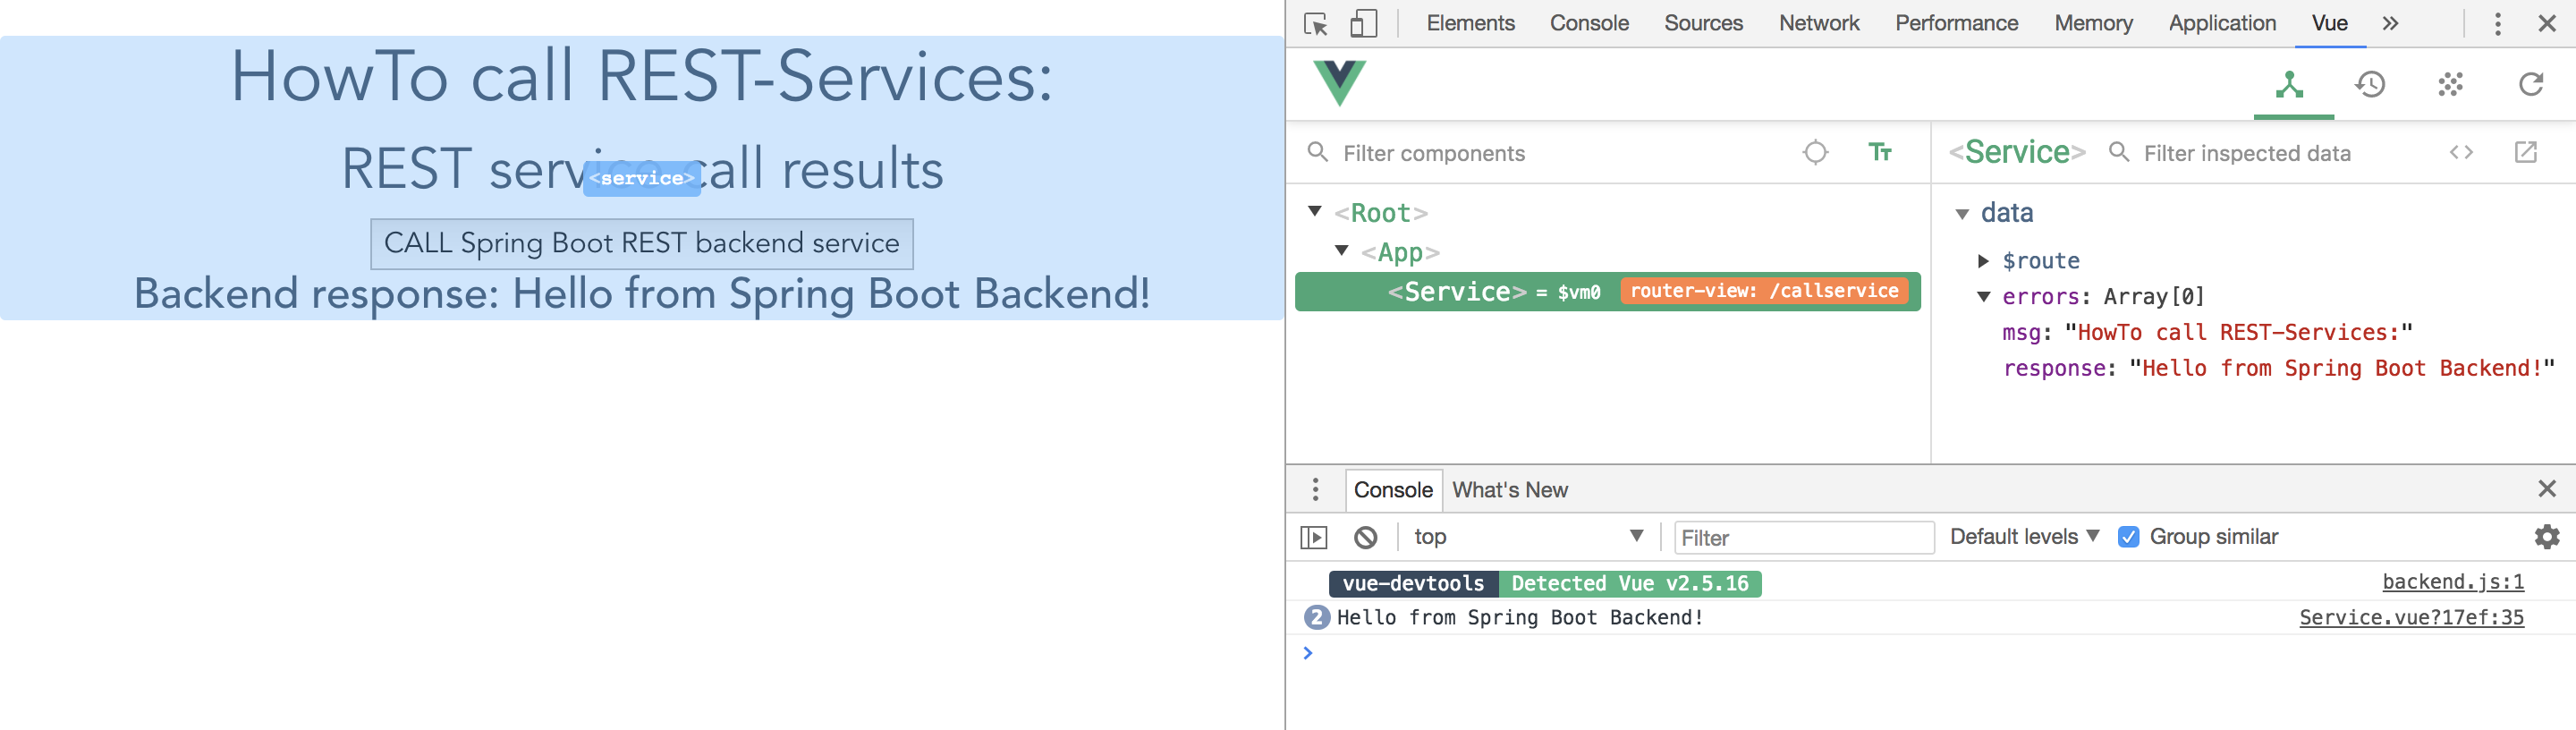
Browser developer tools extension
Install vue-devtools Browser extension https://github.com/vuejs/vue-devtools and get better feedback, e.g. in Chrome:
IntelliJ integration
There's a blog post: https://blog.jetbrains.com/webstorm/2018/01/working-with-vue-js-in-webstorm/
Especially the New... Vue Component looks quite cool :)
HTTP calls from Vue.js to (Spring Boot) REST backend
Prior to Vue 2.0, there was a build in solution (vue-resource). But from 2.0 on, 3rd party libraries are necessary. One of them is Axios - also see blog post https://alligator.io/vuejs/rest-api-axios/
npm install axios --saveCalling a REST service with Axios is simple. Go into the script area of your component, e.g. Hello.vue and add:
import axios from 'axios'
data ();{   return {     response: [],     errors: []   } },
callRestService ();{   axios.get(api/hello)     .then(response => {       // JSON responses are automatically parsed.       this.response = response.data     })     .catch(e => {       this.errors.push(e)     }) } }
In your template area you can now request a service call via calling callRestService() method and access response data:
<button class=”Search__button” @click="callRestService()">CALL Spring Boot REST backend service</button>
<h3>{{ response }}</h3>
The problem with SOP
Single-Origin Policy (SOP) could be a problem if we want to develop our app. Because the webpack-dev-server runs on http://localhost:8080 and our Spring Boot REST backend on http://localhost:8098.
We need to use Cross-Origin Resource Sharing Protocol (CORS) to handle that (read more background info about CORS here https://developer.mozilla.org/en-US/docs/Web/HTTP/AccesscontrolCORS)
Enabling Axios CORS support
Create a central Axios configuration file called http-commons.js:
import axios from 'axios'
export const AXIOS = axios.create({   baseURL: http://localhost:8098,   headers: {     'Access-Control-Allow-Origin': 'http://localhost:8080'   } })
Here we allow requests to the base URL of our Spring Boot App on port 8098 to be accessible from 8080.
Now we could use this configuration inside our Components, e.g. in Hello.vue:
import {AXIOS} from './http-common'
export default {   name: 'hello',
data () {     return {       posts: [],       errors: []     }   },   methods: {     // Fetches posts when the component is created.     callRestService () {       AXIOS.get(hello)         .then(response => {           // JSON responses are automatically parsed.           this.posts = response.data         })         .catch(e => {           this.errors.push(e)         })     }   }
Enabling Spring Boot CORS support
Additionally, we need to configure our Spring Boot backend to answer with the appropriate CORS HTTP Headers in its responses (there's a good tutorial here: https://spring.io/guides/gs/rest-service-cors/). Therefore we add the annotation @CrossOrigin to our BackendController:
@CrossOrigin(origins = "http://localhost:8080")
@RequestMapping(path = "/hello")
public @ResponseBody String sayHello() {
    LOG.info("GET called on /hello resource");
    return HELLO_TEXT;
}
Now our Backend will respond CORS-enabled and will accept requests from 8080. But as this only enables CORS on one method, we have to repeatedly add this annotation to all of our REST endpoints, which isn’t a nice style. We should use a global solution to allow access with CORS enabled to all of our REST resources. This could be done in the SpringBootVuejsApplication.class:
// Enable CORS globally
@Bean
public WebMvcConfigurer corsConfigurer() {
  return new WebMvcConfigurerAdapter() {
    @Override
    public void addCorsMappings(CorsRegistry registry) {
      registry.addMapping("/api/*").allowedOrigins("http://localhost:8080");
    }
  };
}
Now all calls to resources behind api/ will return the correct CORS headers.
But STOP! Webpack & Vue have something much smarter for us to help us with SOP!
Thanks to my colleague Daniel who pointed me to the nice proxying feature of Webpack dev-server, we don't need to configure all the complex CORS stuff anymore!
According to the Vue CLI 3 docs the only thing we need to configure is a devserver-proxy for our webpack devserver requests. This could be done easily in the optional vue.config.js inside devServer.proxy:
module.exports = {
  // proxy all webpack dev-server requests starting with /api
  // to our Spring Boot backend (localhost:8098) using http-proxy-middleware
  // see https://cli.vuejs.org/config/#devserver-proxy
  devServer: {
    proxy: {
      '/api': {
        target: 'http://localhost:8098',
        ws: true,
        changeOrigin: true
      }
    }
  },
  ...
}
With this configuration in place, the webpack dev-server uses the http-proxy-middleware, which is a really handy component, to proxy all frontend-requests from http://localhost:8080 --> http://localhost:8098 - incl. Changing the Origin accordingly.
This is used in the webpack build process to configure the proxyMiddleware (you don't need to change something here!):
// proxy api requests
Object.keys(proxyTable).forEach(function (context) {
  var options = proxyTable[context];
  if (typeof options === 'string') {
    options = { target: options }
  }
  app.use(proxyMiddleware(options.filter || context, options))
})
Using history mode for nicer URLs
If we use the default configuration of the generated Vue.js template, we see URLs with a # inside them - like this:
http://localhost:8098/#/bootstrap
or
http://localhost:8098/#/user
With the usage of HTML5 history mode, we can achieve much nicer URLs without the # in them. Only thing to do in the Vue.js frontend is to configure our router accordingly inside the router.js:
...
Vue.use(Router);
const router = new Router({     mode: 'history', // uris without hashes #, see https://router.vuejs.org/guide/essentials/history-mode.html#html5-history-mode     routes:          { path: '/', component: Hello },         { path: '/callservice', component: Service },         ...
That's nearly everything. BUT only nearly! If one clicks on a link inside our frontend, the user is correctly send to the wished component.
But if the user enters the URL directly into the Browser, we get a Whitelabel Error Page because our Spring Boot backend gives us a HTTP 404 - since this URL isn't present in the backend:
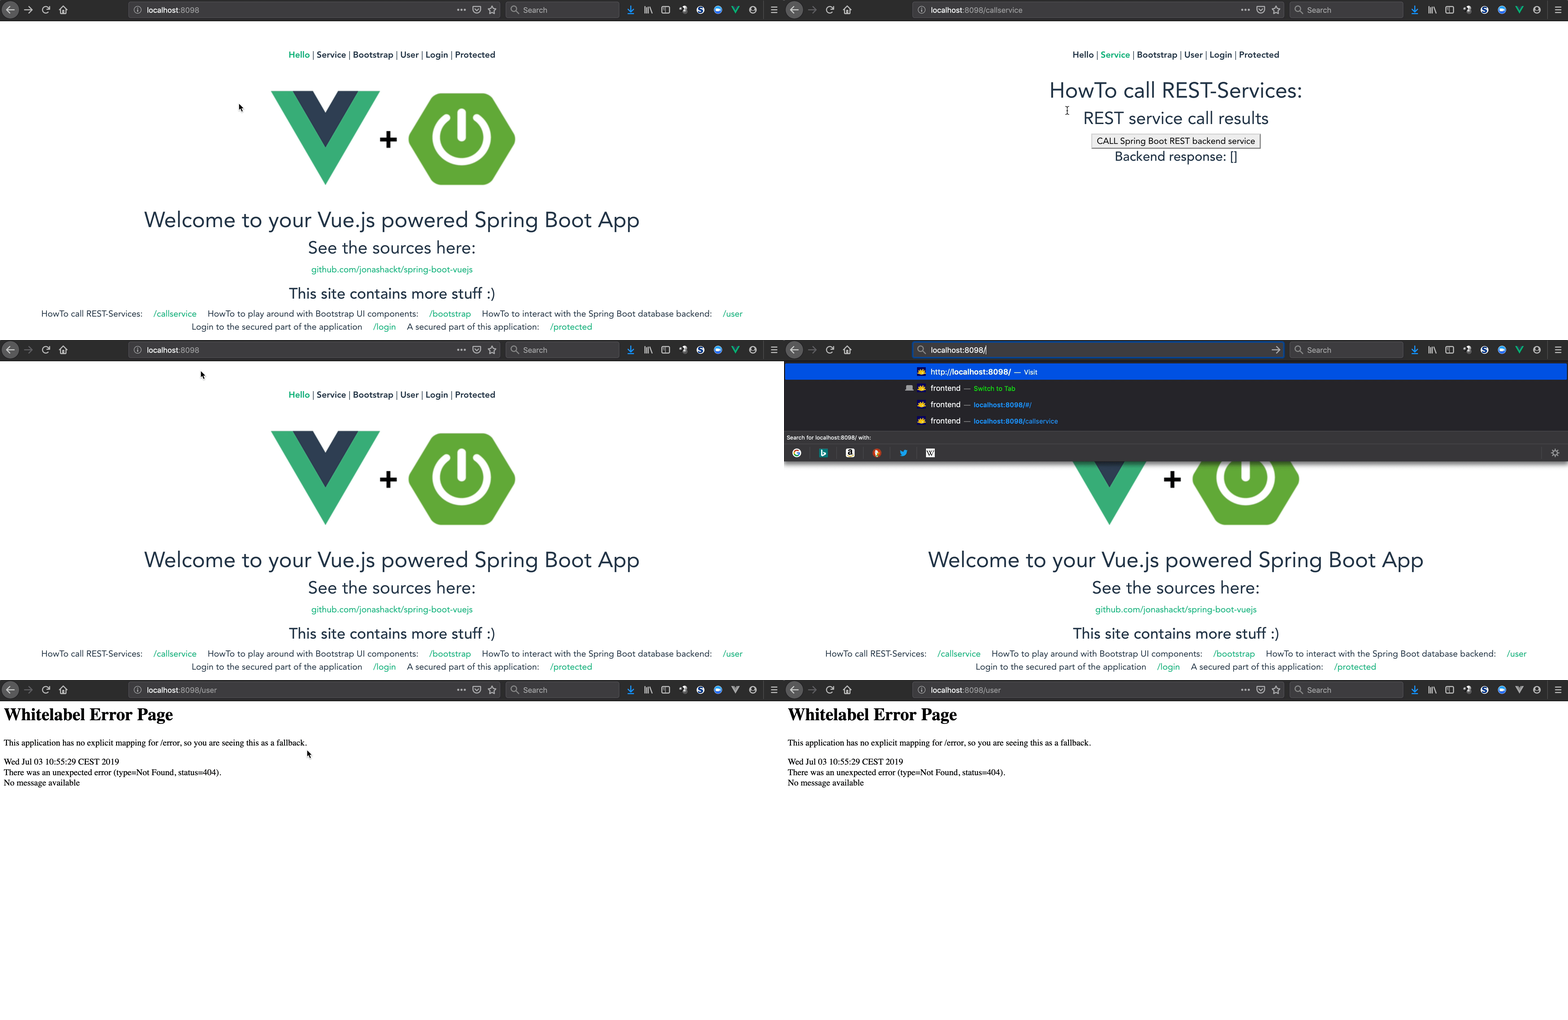
The solution is to redirect or better forward the user to the frontend (router) again. The [Vue.js docs don't provide an example configuration for Spring Boot, but luckily there are other resources. In essence we have to implement a forwarding controller in our BackendController:
// Forwards all routes to FrontEnd except: '/', '/index.html', '/api', '/api/**'
    // Required because of 'mode: history' usage in frontend routing, see README for further details
    @RequestMapping(value = "{_:^(?!index\\.html|api).$}")
    public String redirectApi() {
        LOG.info("URL entered directly into the Browser, so we need to redirect...");
        return "forward:/";
    }
This controller will forward every request other then '/', '/index.html', '/api', '/api/**' to our Vue.js frontend.
Bootstrap & Vue.js
There’s a nice integration of Bootstrap in Vue.js: https://bootstrap-vue.js.org/
npm install bootstrap-vueNow you can use all the pretty Bootstrap stuff with ease like:
<b-btn @click="callRestService()">CALL Spring Boot REST backend service</b-btn>instead of
<button type="button" class=”btn” @click="callRestService()">CALL Spring Boot REST backend service</button>The docs contain all the possible components: https://bootstrap-vue.js.org/docs/components/alert/
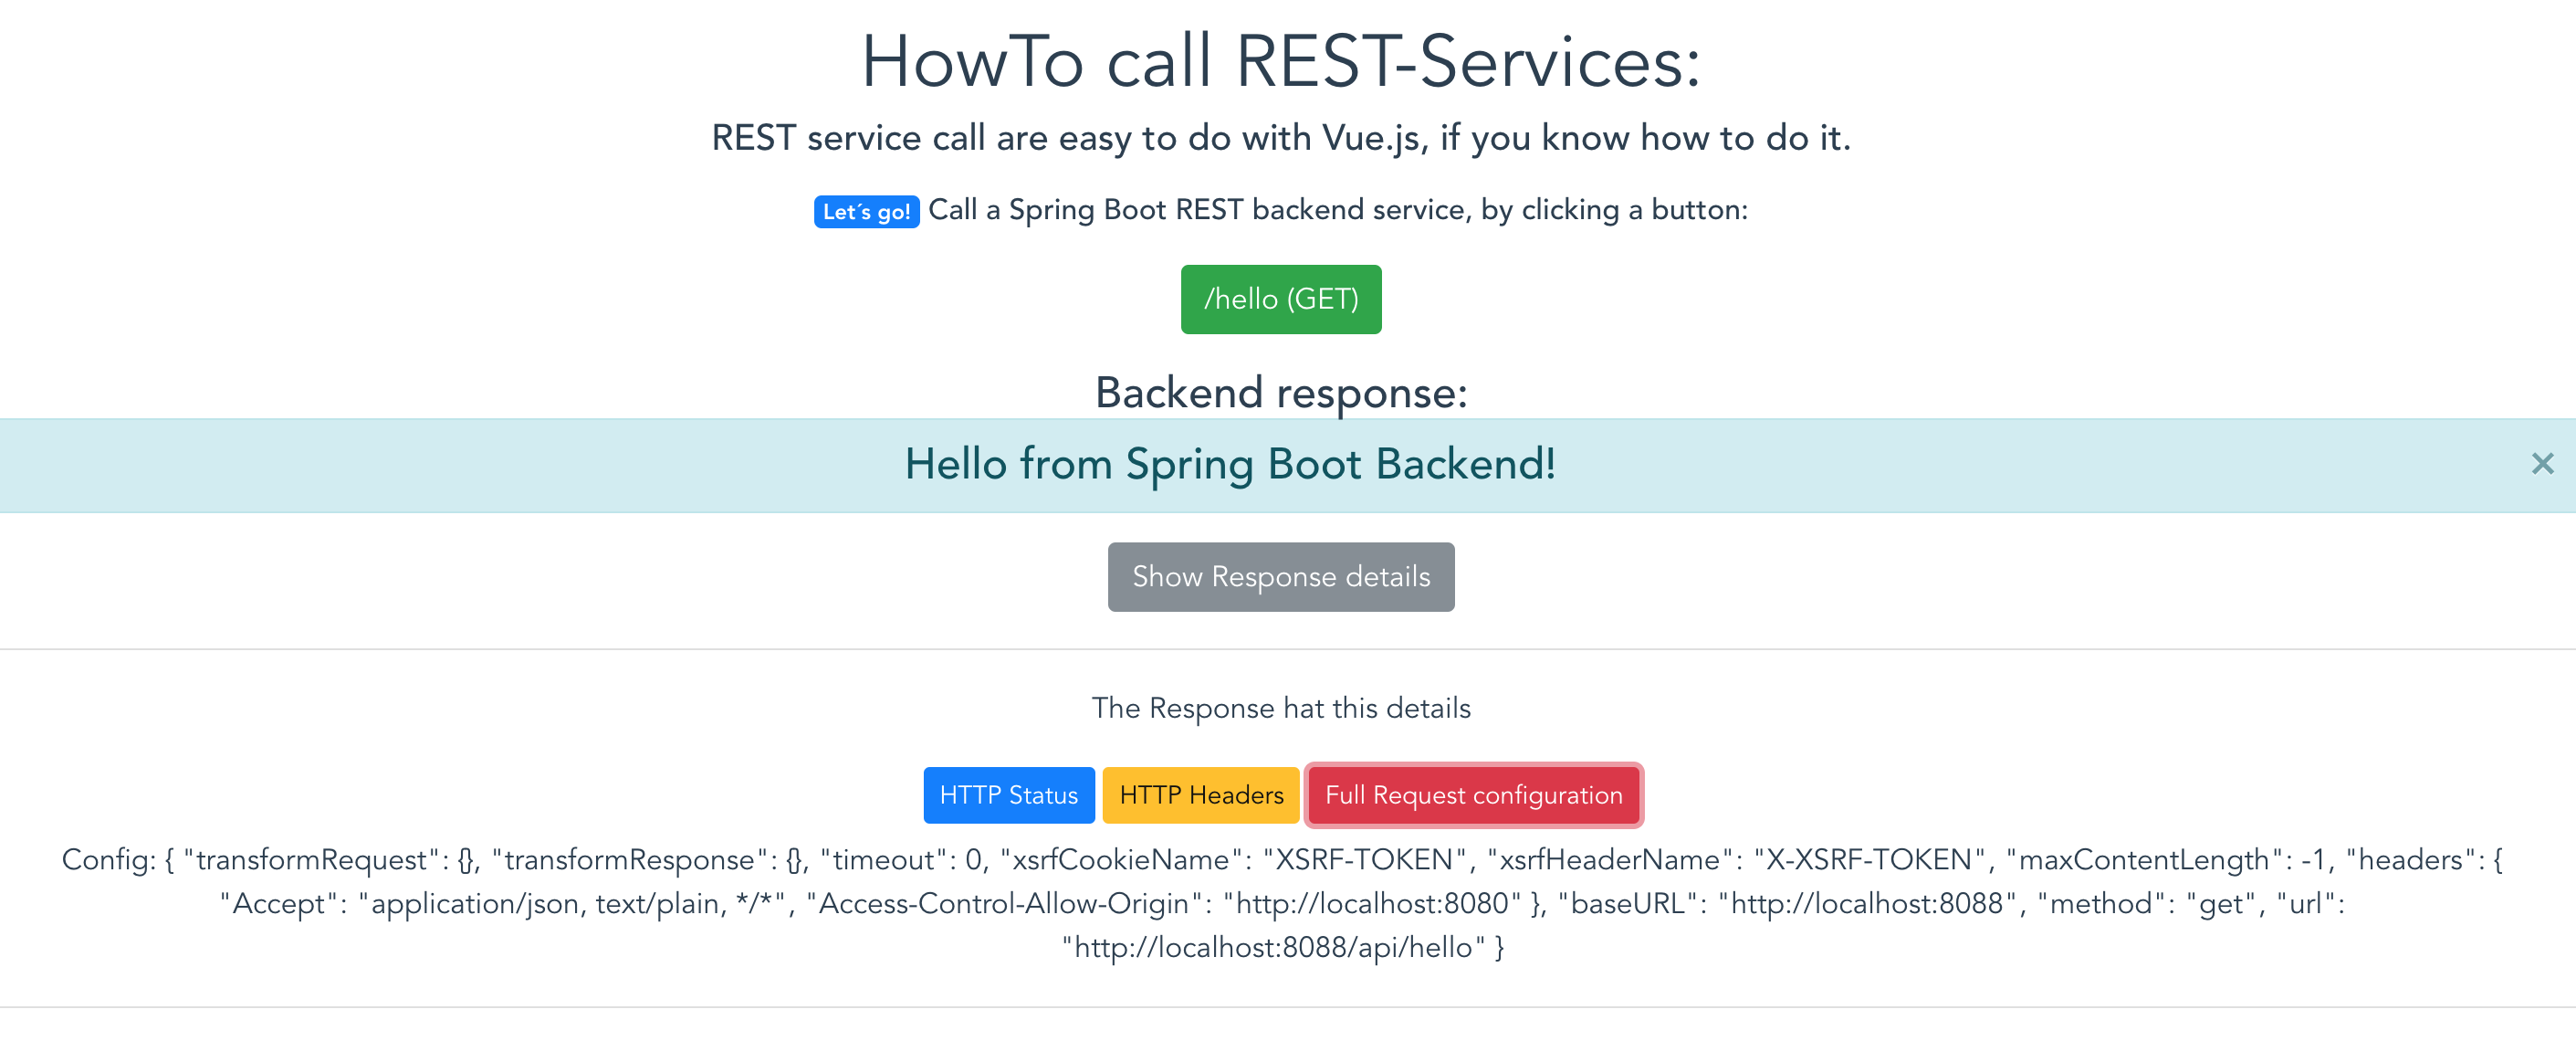
See some elements, when you go to http://localhost:8080/#/bootstrap/ - this should look like this:
A good discussion about various UI component frameworks: http://vuetips.com/bootstrap
Heroku Deployment
As you may already read, the app is automatically deployed to Heroku on https://spring-boot-vuejs.herokuapp.com/.
The project makes use of the nice Heroku Pipelines feature, where we do get a full Continuous Delivery pipeline with nearly no effort:
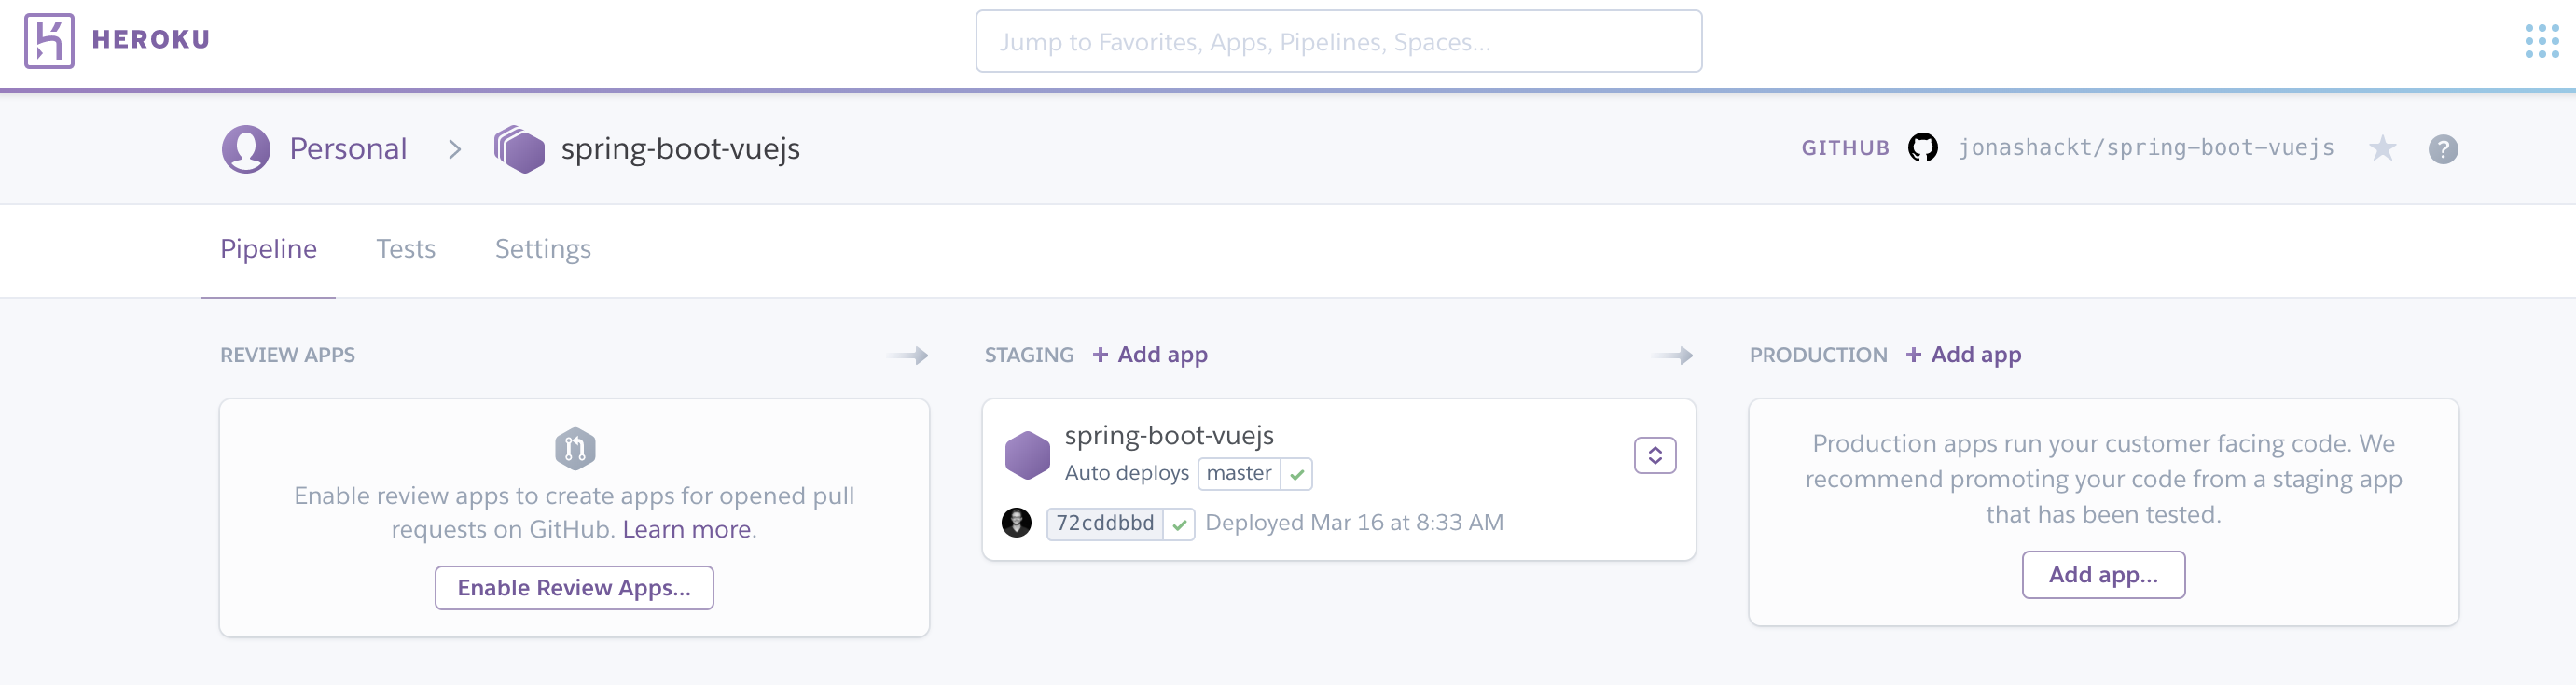
And with the help of super cool Automatic deploys, we have our GitHub Actions build our app after every push to master - and with the checkbox set to Wait for CI to pass before deploy - the app gets also automatically deployed to Heroku - but only, if the GitHub Actions (and Codegov...) build succeeded:
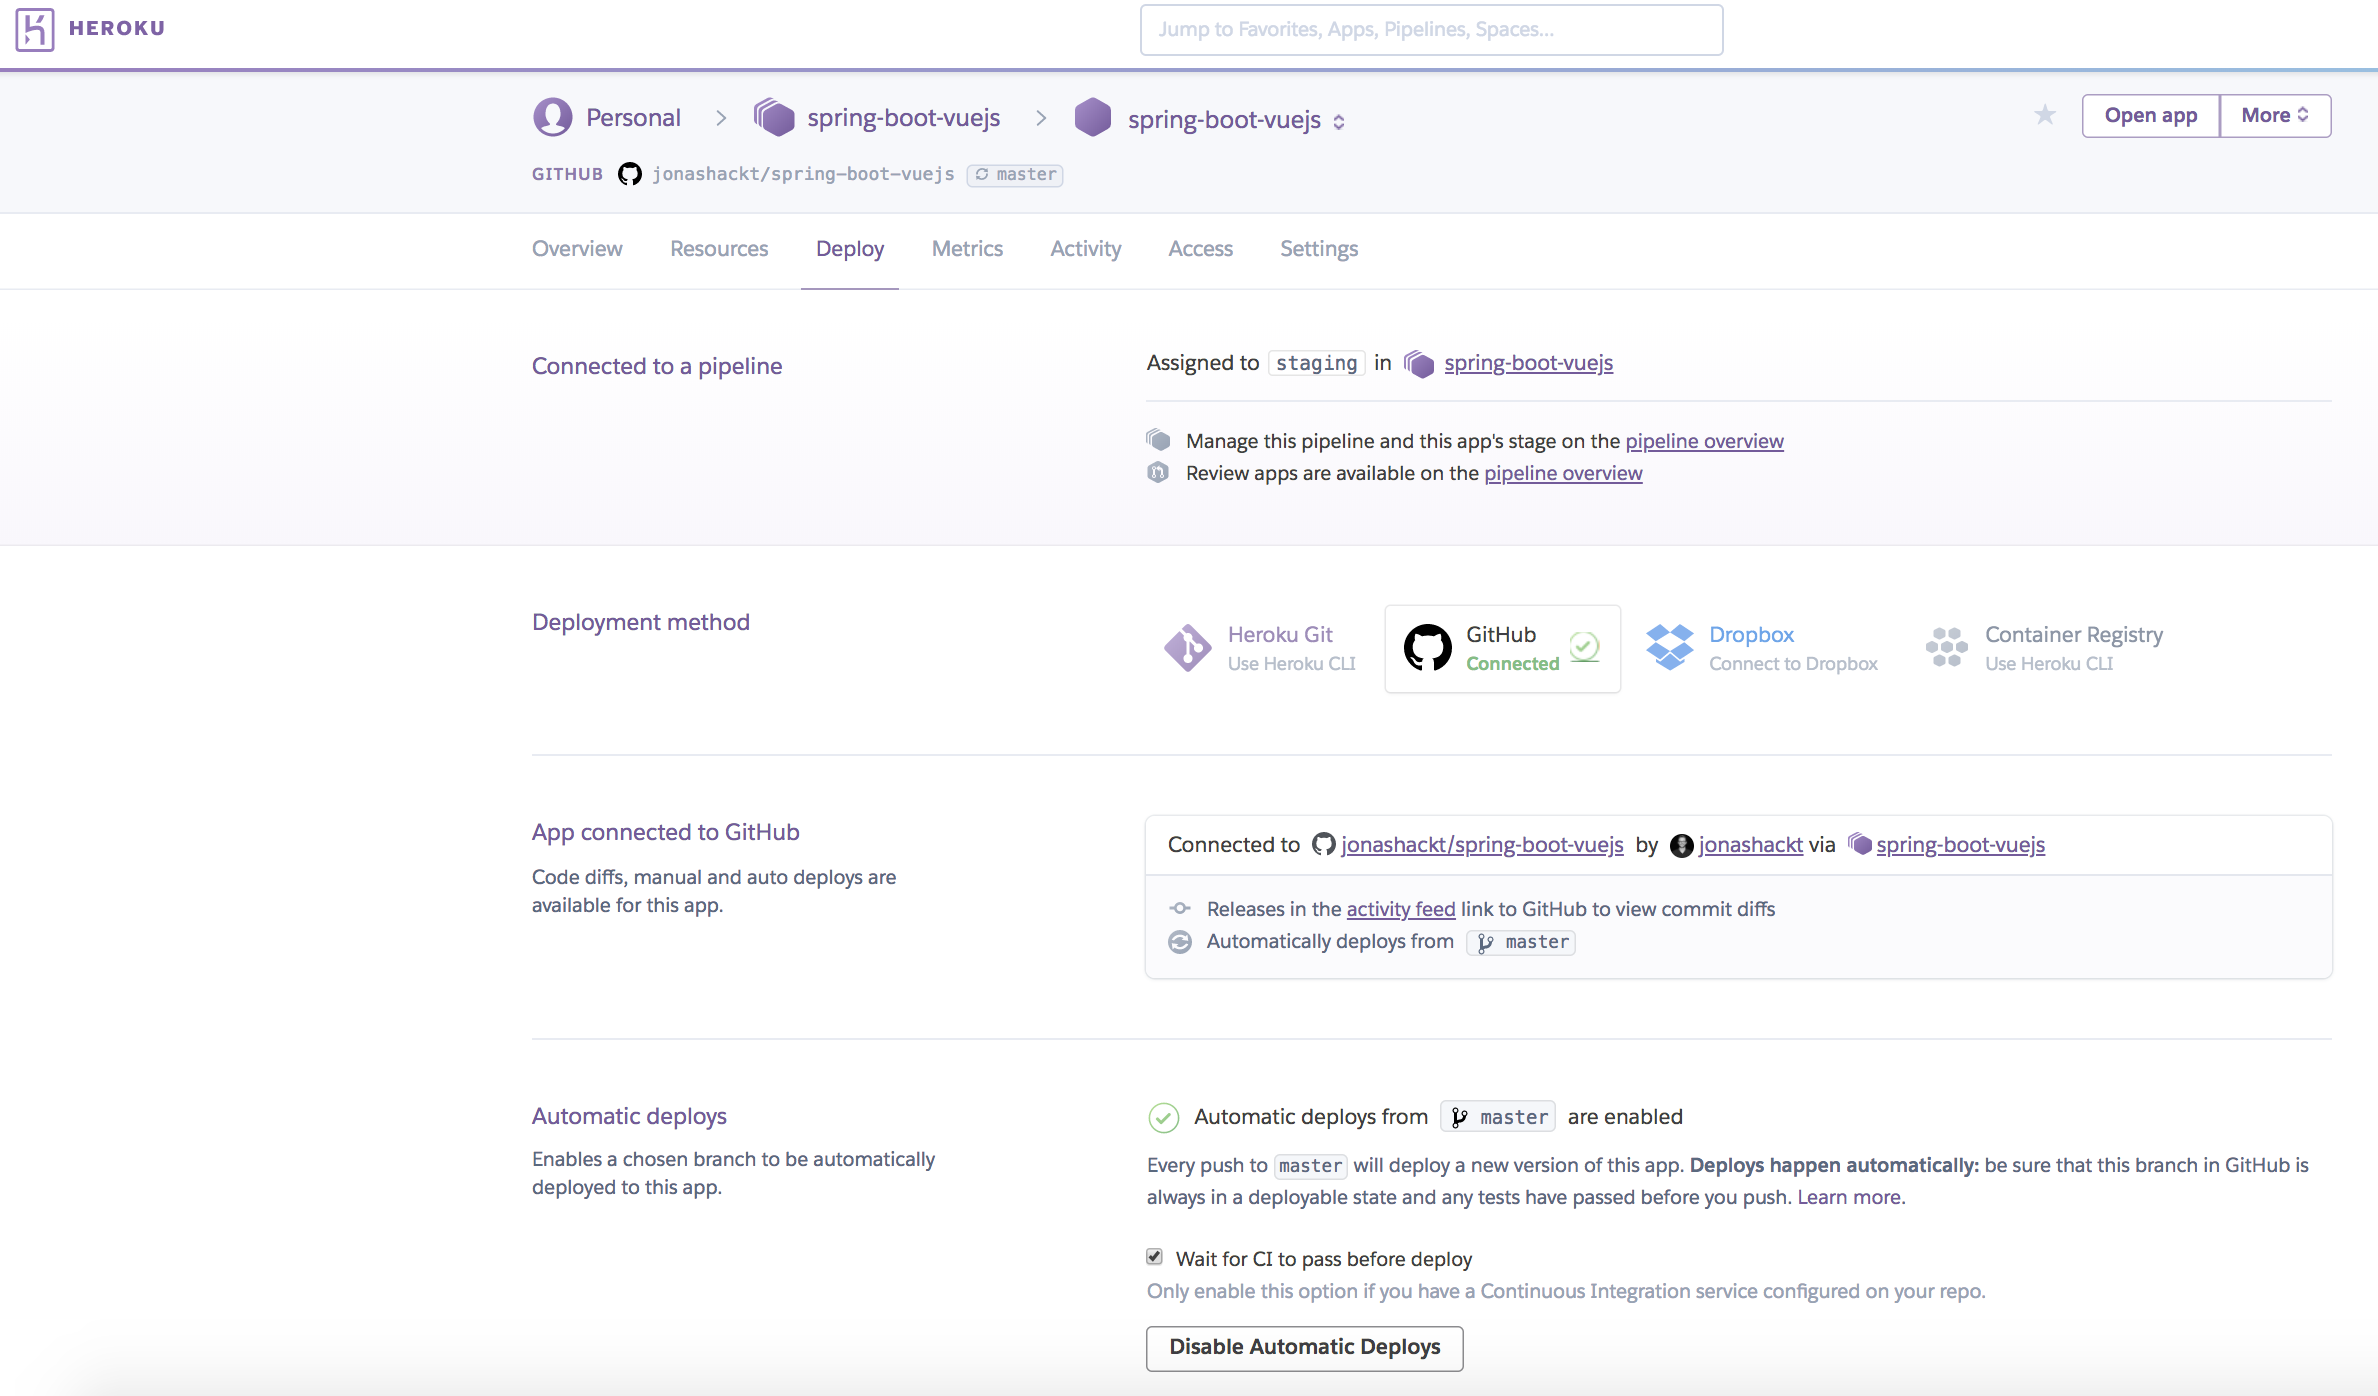
You only have to connect your Heroku app to GitHub, activate Automatic deploys and set the named checkbox. That's everything!
Accessing Spring Boot REST backend on Heroku from Vue.js frontend
Frontend needs to know the Port of our Spring Boot backend API, which is automatically set by Heroku every time, we (re-)start our App.
You can try out your Heroku app locally! Just create a .env-File with all your Environment variables and run heroku local!
To access the Heroku set port, we need to use relative paths inside our Vue.js application instead of hard-coded hosts and ports!
All we need to do is to configure Axios in such a way inside our frontend/src/components/http-common.js:
export const AXIOS = axios.create({
  baseURL: /api
})
Using Heroku's Postgres as Database for Spring Boot backend and Vue.js frontend
First, add Heroku Postgres database for your Heroku app.
Then follow these instructions on Stackoverflow to configure all needed Environment variables in Heroku: https://stackoverflow.com/a/49978310/4964553
Mind the addition to the backend's pom.xml described here: https://stackoverflow.com/a/49970142/4964553
Now you're able to use Spring Data's magic - all you need is an Interface like UserRepository.java:
package de.jonashackt.springbootvuejs.repository;
import de.jonashackt.springbootvuejs.domain.User; import org.springframework.data.repository.CrudRepository; import org.springframework.data.repository.query.Param;
import java.util.List;
public interface UserRepository extends CrudRepository<User, Long> {
List<User> findByLastName(@Param("lastname") String lastname);
List<User> findByFirstName(@Param("firstname") String firstname);
}
Now write your Testcases accordingly like UserRepositoryTest.java:
package de.jonashackt.springbootvuejs.repository;
import de.jonashackt.springbootvuejs.domain.User; import org.junit.Before; import org.junit.Test; import org.junit.runner.RunWith; import org.springframework.beans.factory.annotation.Autowired; import org.springframework.boot.test.autoconfigure.orm.jpa.DataJpaTest; import org.springframework.boot.test.autoconfigure.orm.jpa.TestEntityManager; import org.springframework.test.context.junit4.SpringRunner;
import java.util.List;
import static org.hamcrest.Matchers.contains; import static org.junit.Assert.*;
@RunWith(SpringRunner.class) @DataJpaTest public class UserRepositoryTest {
@Autowired   private TestEntityManager entityManager;
@Autowired   private UserRepository users;
private final User norbertSiegmund = new User("Norbert", "Siegmund");   private final User jonasHecht = new User("Jonas", "Hecht");
@Before   public void fillSomeDataIntoOurDb() {     // Add new Users to Database     entityManager.persist(norbertSiegmund);     entityManager.persist(jonasHecht);   }
@Test   public void testFindByLastName() throws Exception {     // Search for specific User in Database according to lastname     List<User> usersWithLastNameSiegmund = users.findByLastName("Siegmund");
assertThat(usersWithLastNameSiegmund, contains(norbertSiegmund));   }
@Test   public void testFindByFirstName() throws Exception {     // Search for specific User in Database according to firstname     List<User> usersWithFirstNameJonas = users.findByFirstName("Jonas");
assertThat(usersWithFirstNameJonas, contains(jonasHecht));   }
}
Then include this functionality in your REST-API - see BackendController.java:
@RequestMapping(path = "/user", method = RequestMethod.POST)
    @ResponseStatus(HttpStatus.CREATED)
    public @ResponseBody long addNewUser (@RequestParam String firstName, @RequestParam String lastName) {
        User user = new User(firstName, lastName);
        userRepository.save(user);
LOG.info(user.toString() + " successfully saved into DB");
return user.getId();     }
<template>
<div class="user">
 <h1>Create User</h1>
<h3>Just some database interaction...</h3>
<input type="text" v-model="user.firstName" placeholder="first name">  <input type="text" v-model="user.lastName" placeholder="last name">
<button @click="createUser()">Create User</button>
<div v-if="showResponse"><h6>User created with Id: {{ response }}</h6></div>
<button v-if="showResponse" @click="retrieveUser()">Retrieve user {{user.id}} data from database</button>
<h4 v-if="showRetrievedUser">Retrieved User {{retrievedUser.firstName}} {{retrievedUser.lastName}}</h4>
</div> </template>
Testing
Install vue-test-utils
https://github.com/vuejs/vue-test-utils
npm install --save-dev @vue/test-utils
Jest
Jest is a new shooting star in the sky of JavaScript testing frameworks: https://facebook.github.io/jest/
Intro-Blogpost: https://blog.codecentric.de/2017/06/javascript-unit-tests-sind-schwer-aufzusetzen-keep-calm-use-jest/
Examples: https://github.com/vuejs/vue-test-utils-jest-example
Vue.js Jest Docs: https://vue-test-utils.vuejs.org/guides/#testing-single-file-components-with-jest
A Jest Unittest looks like Hello.spec.js:
import { shallowMount } from '@vue/test-utils';
import Hello from '@/components/Hello'
describe('Hello.vue', () => {   it('should render correct hello message', () => {     // Given     const hellowrapped = shallowMount(Hello, {       propsData: { hellomsg: 'Welcome to your Jest powered Vue.js App' },       stubs: ['router-link', 'router-view']     });
// When     const contentH1 = hellowrapped.find('h1');
// Then     expect(contentH1.text()).toEqual('Welcome to your Jest powered Vue.js App');   }) })
To pass Component props while using Vue.js Router, see https://stackoverflow.com/a/37940045/4964553.
How to test components with router-view or router-link https://vue-test-utils.vuejs.org/guides/using-with-vue-router.html#testing-components-that-use-router-link-or-router-view.
The test files itself could be named xyz.spec.js or xyz.test.js - and could reside nearly everywhere in the project.
Jest Configuration
The Jest run-configuration is done inside the package.json:
"scripts";: {
    ...
    "test:unit";: "vue-cli-service test:unit --coverage",;
    ....
  },
Jest can be configured via jest.config.js in your project root, or the jest field in package.json. In our case we especially need to configure coverageDirectory:
],
  "jest": {
    ...
    "coverageDirectory": "<rootDir>/tests/unit/coverage",
    "collectCoverageFrom": [
      "src/*/.{js,vue}",
      "!src/main.js",
      "!src/router/index.js",
      "!/node_modules/"
    ]
  }
}
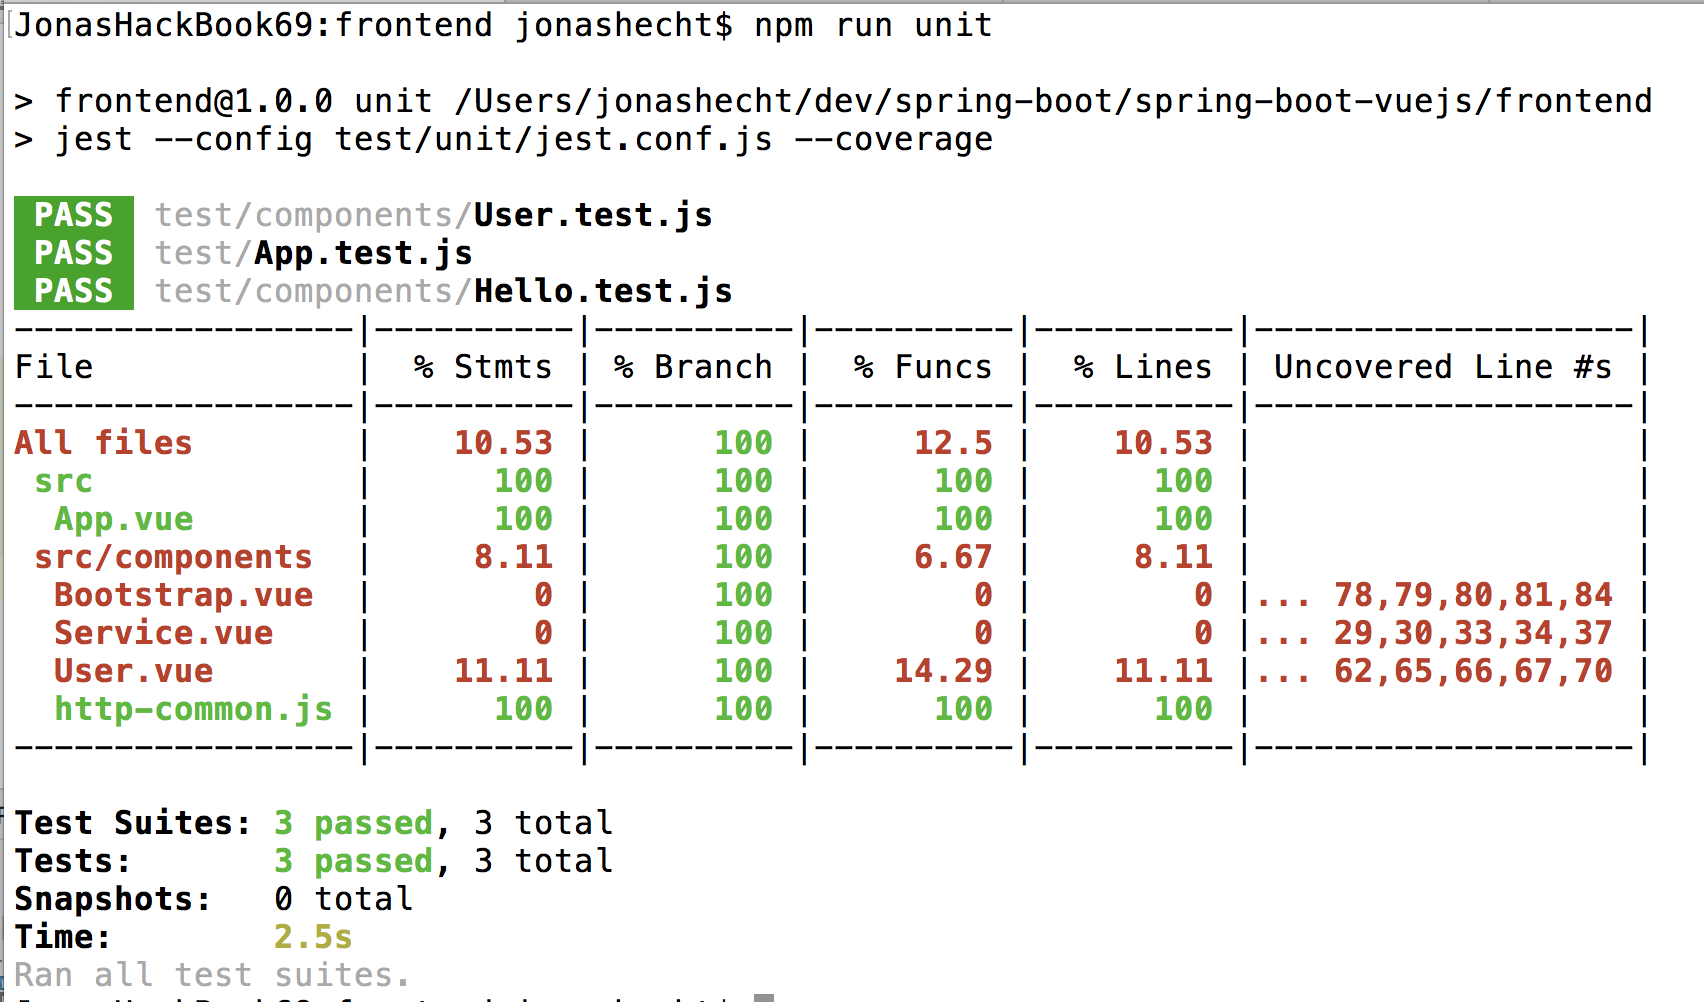
Jest needs to know the right output directory /tests/unit/coverage to show a correct output when npm run test:unit is run (or the corresponding Maven build). If you run the Jest Unit tests now with:
npm run test:unit
- you´ll recognize the table of test covered files:
Integration in Maven build (via frontend-maven-plugin)
Inside the pom.xml we always automatically run the Jest Unittests with the following configuration:
<!-- Run Unit tests -->
  <execution>
    <id>npm run test:unit</id>
    <goals>
      <goal>npm</goal>
    </goals>
    <!-- optional: default phase is "generate-resources" -->
    <phase>test</phase>
    <!-- Optional configuration which provides for running any npm command -->
    <configuration>
      <arguments>run test:unit</arguments>
    </configuration>
  </execution>
This will integrate the Jest Unittests right after the npm run build command, just you are used to in Java-style projects:
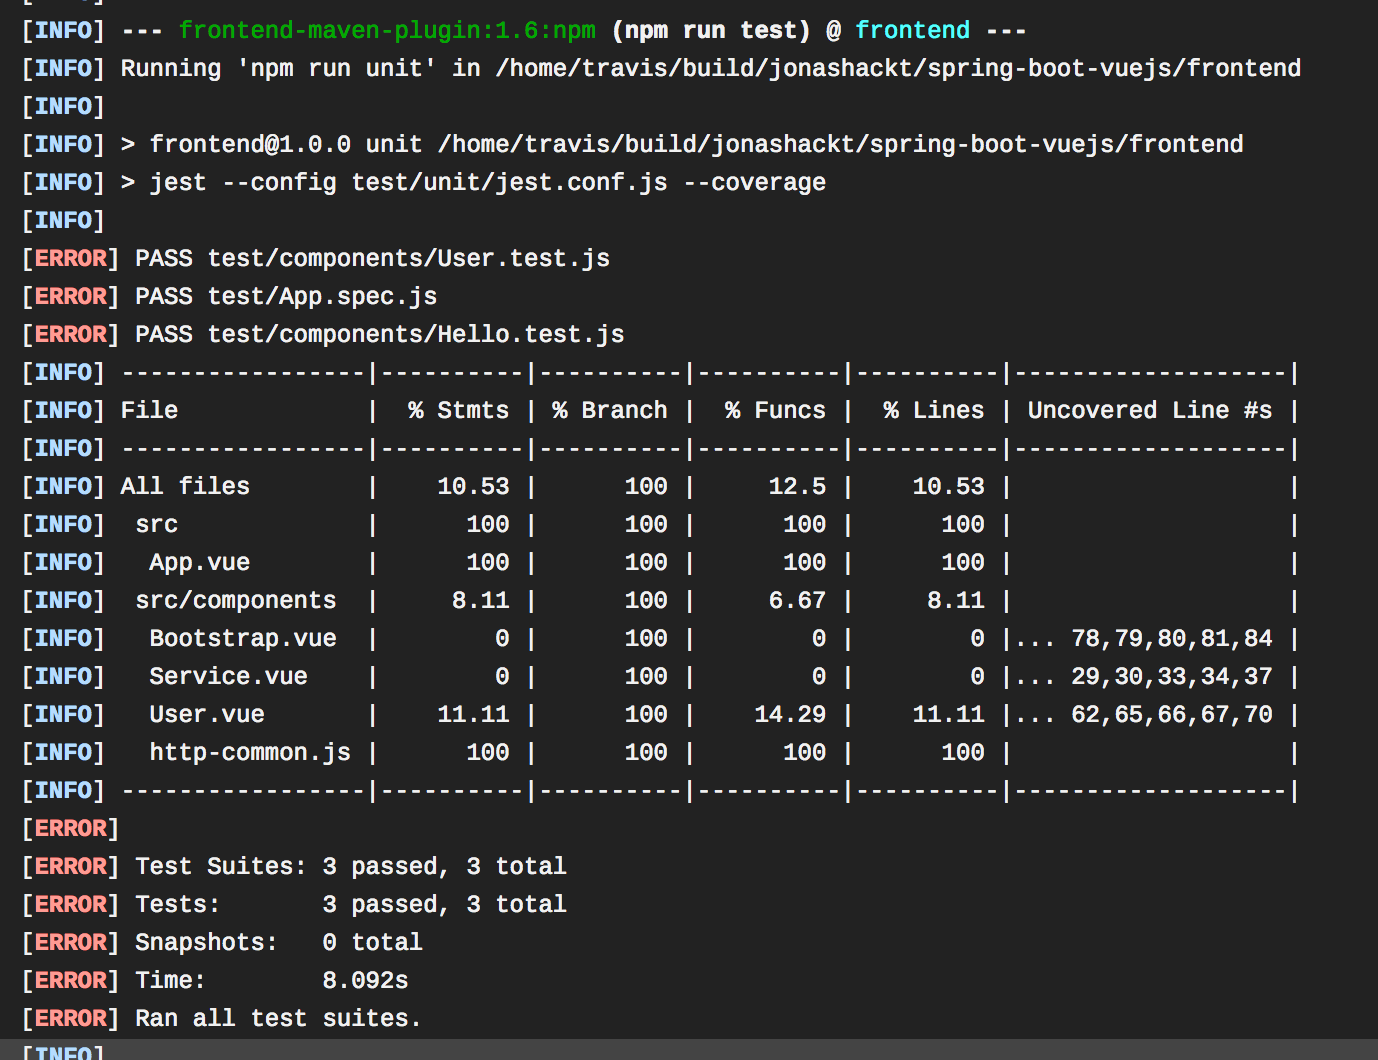
And don't mind the depiction with ERROR - this is just a known bug: https://github.com/eirslett/frontend-maven-plugin/issues/584
Run Jest tests inside IntelliJ
First, we need to install the NodeJS IntelliJ plugin (https://www.jetbrains.com/help/idea/developing-node-js-applications.html), which isn't bundled with IntelliJ by default:
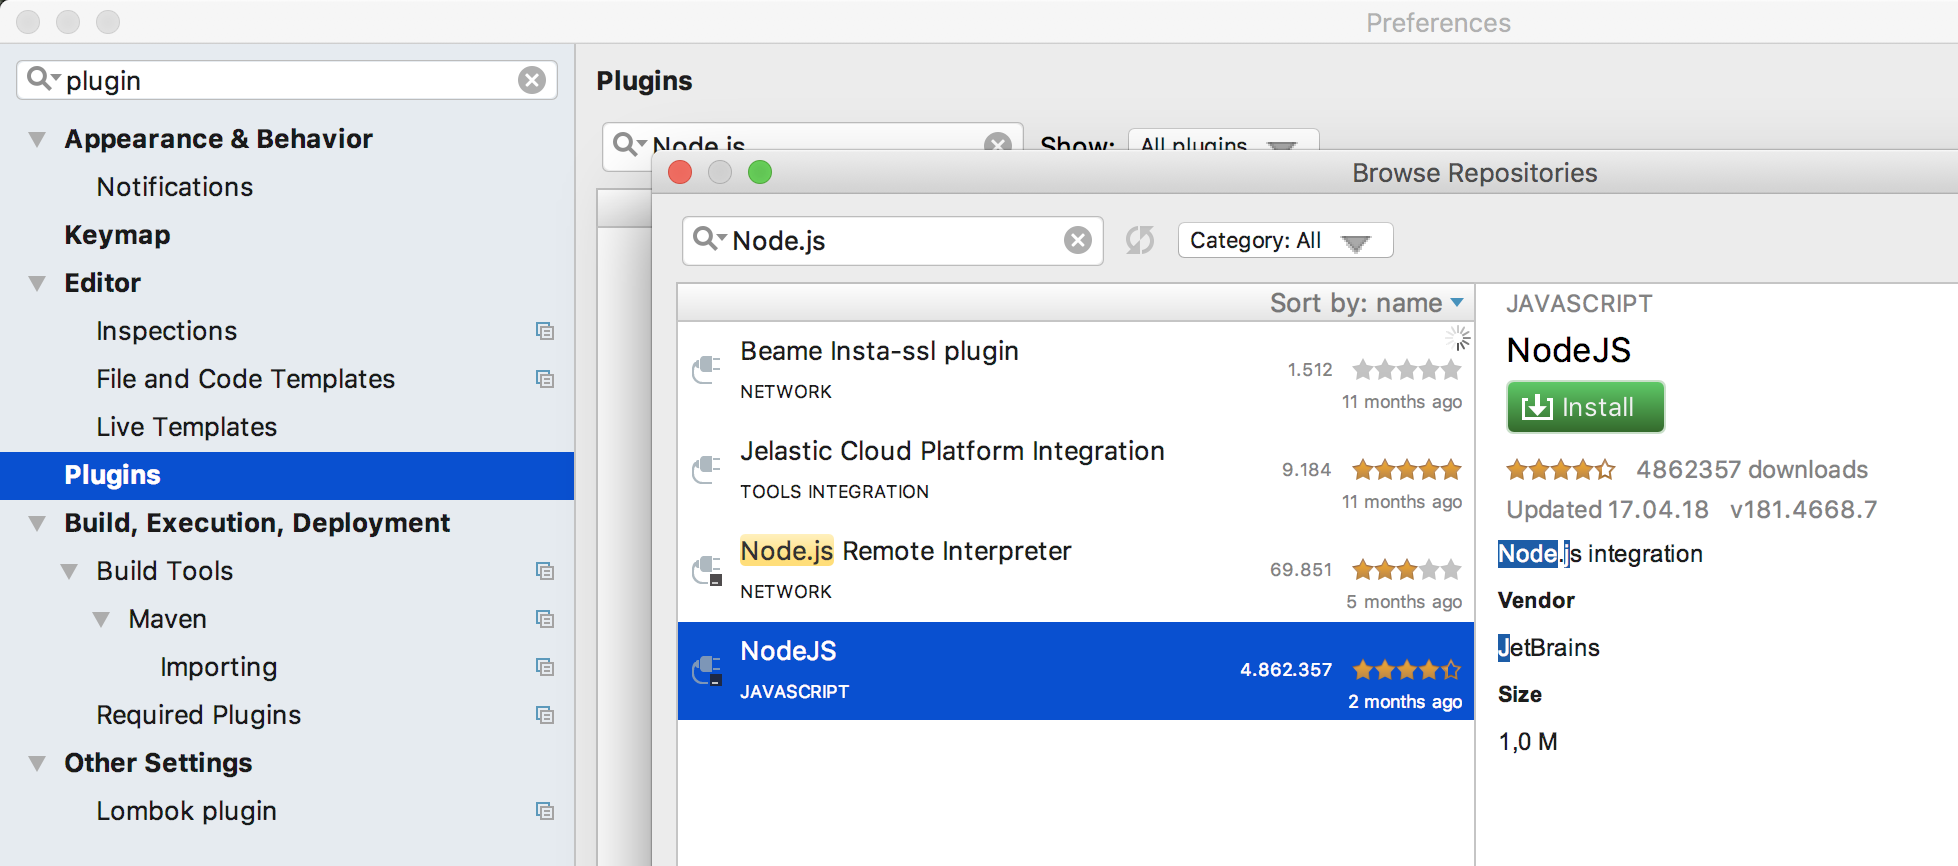
IntelliJ Jest integration docs: https://www.jetbrains.com/help/idea/running-unit-tests-on-jest.html
The automatic search inside the package.json for the Jest configuration file jest.conf.js doesn't seem to work right now, so we have to manually configure the scripts part of:
"unit": "jest --config test/unit/jest.conf.js --coverage",inside the Run Configuration under Jest and All Tests:
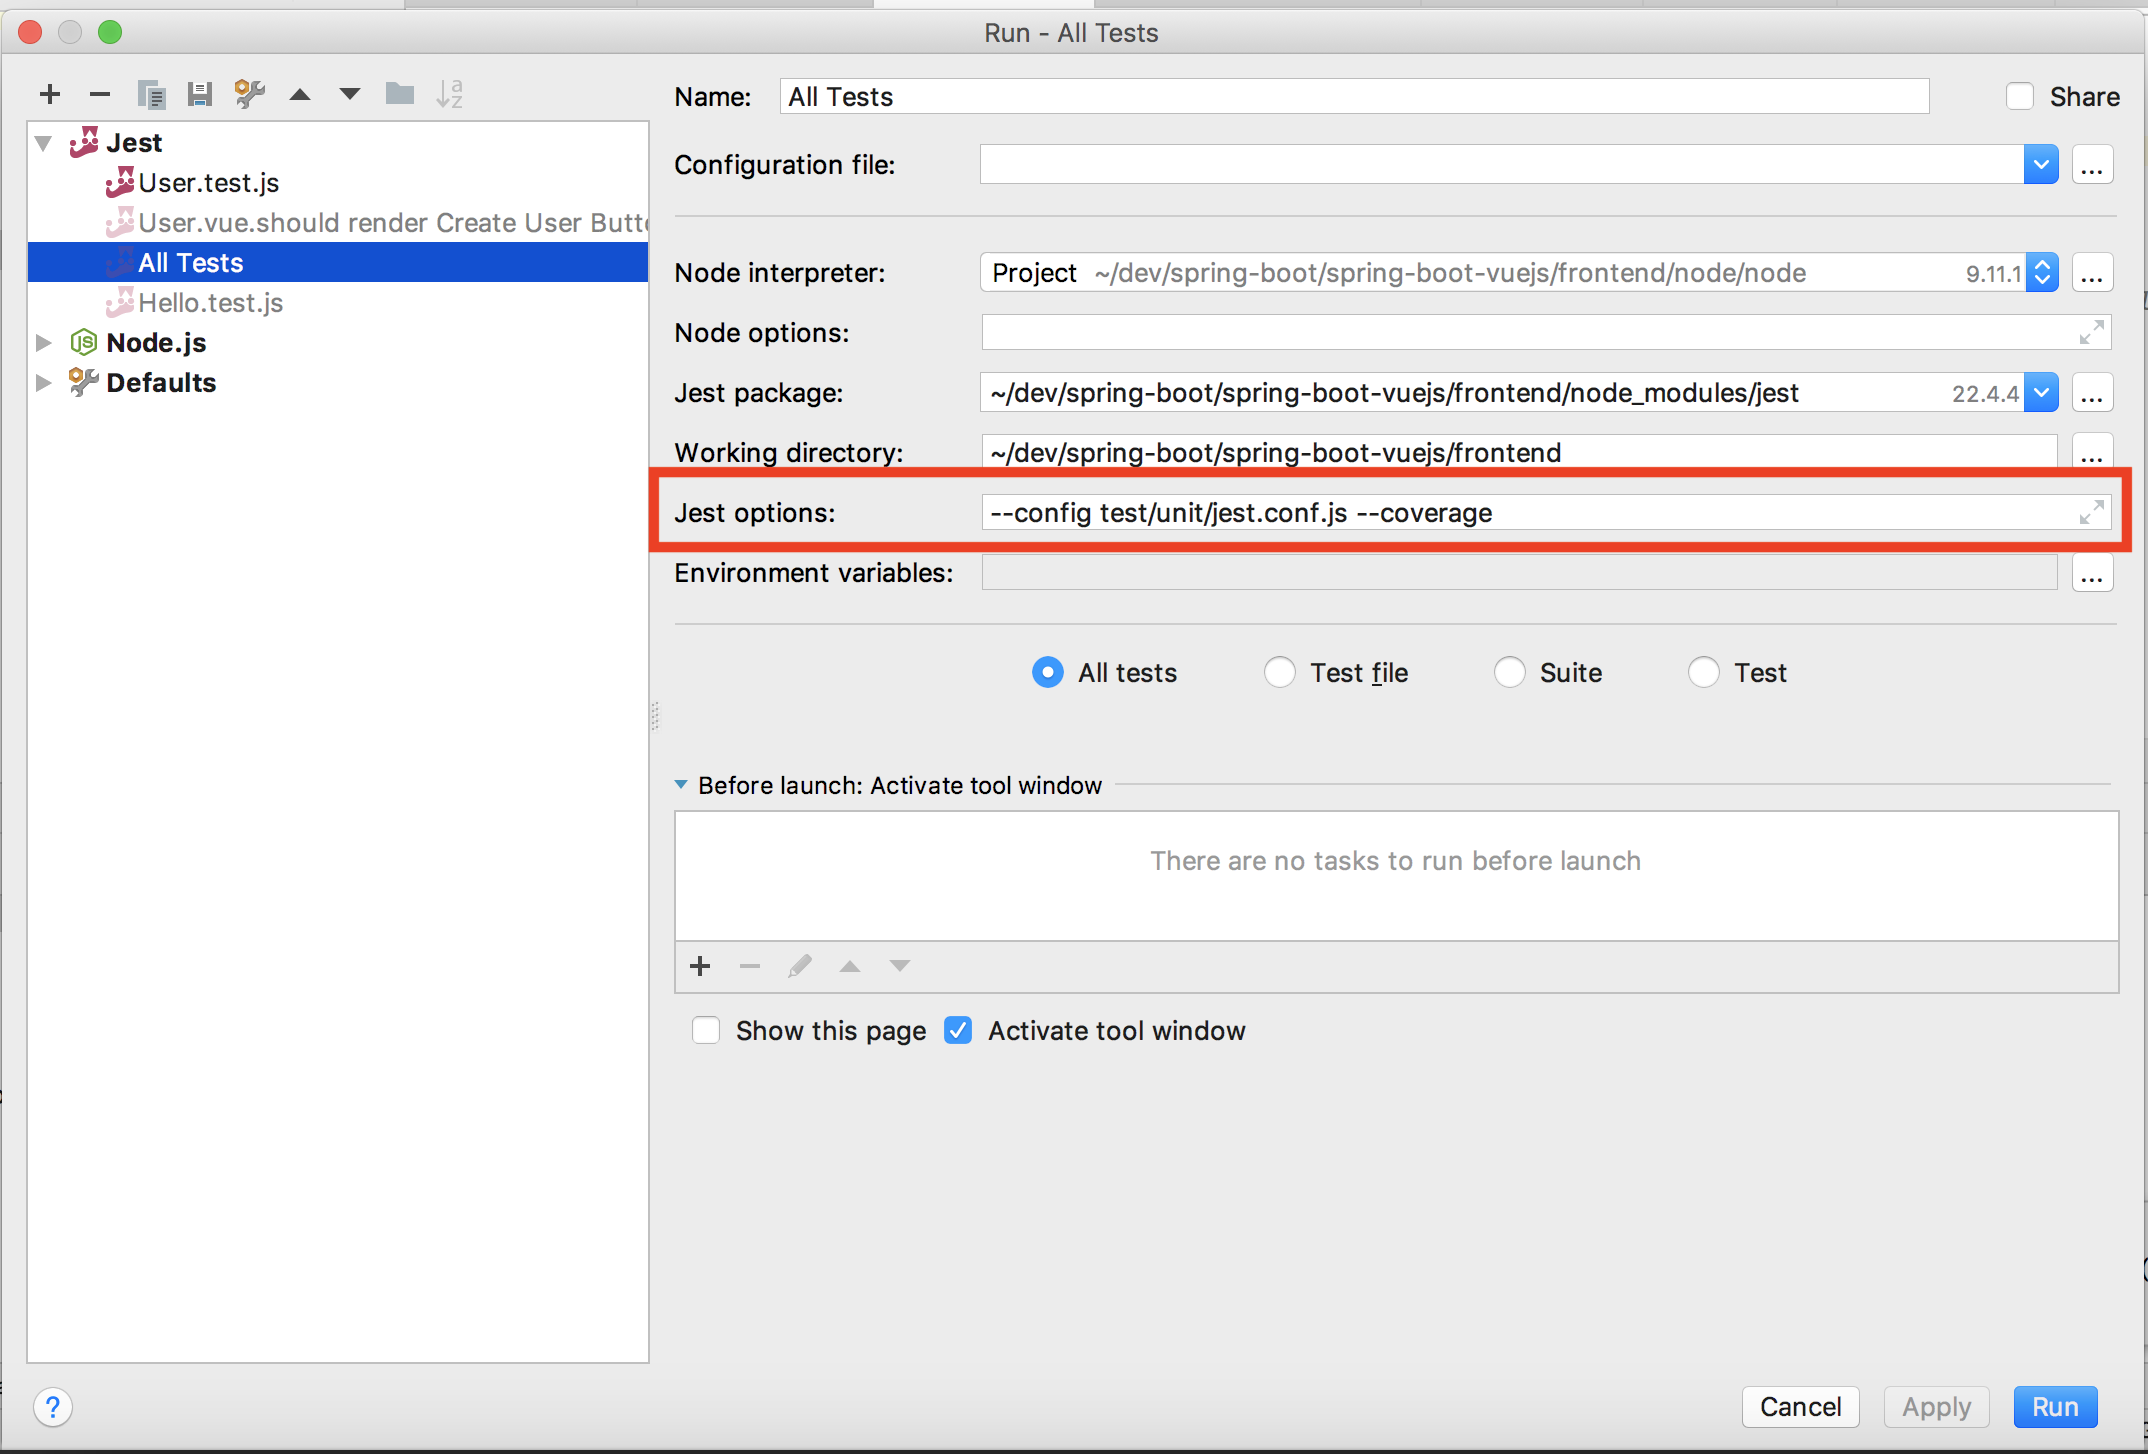
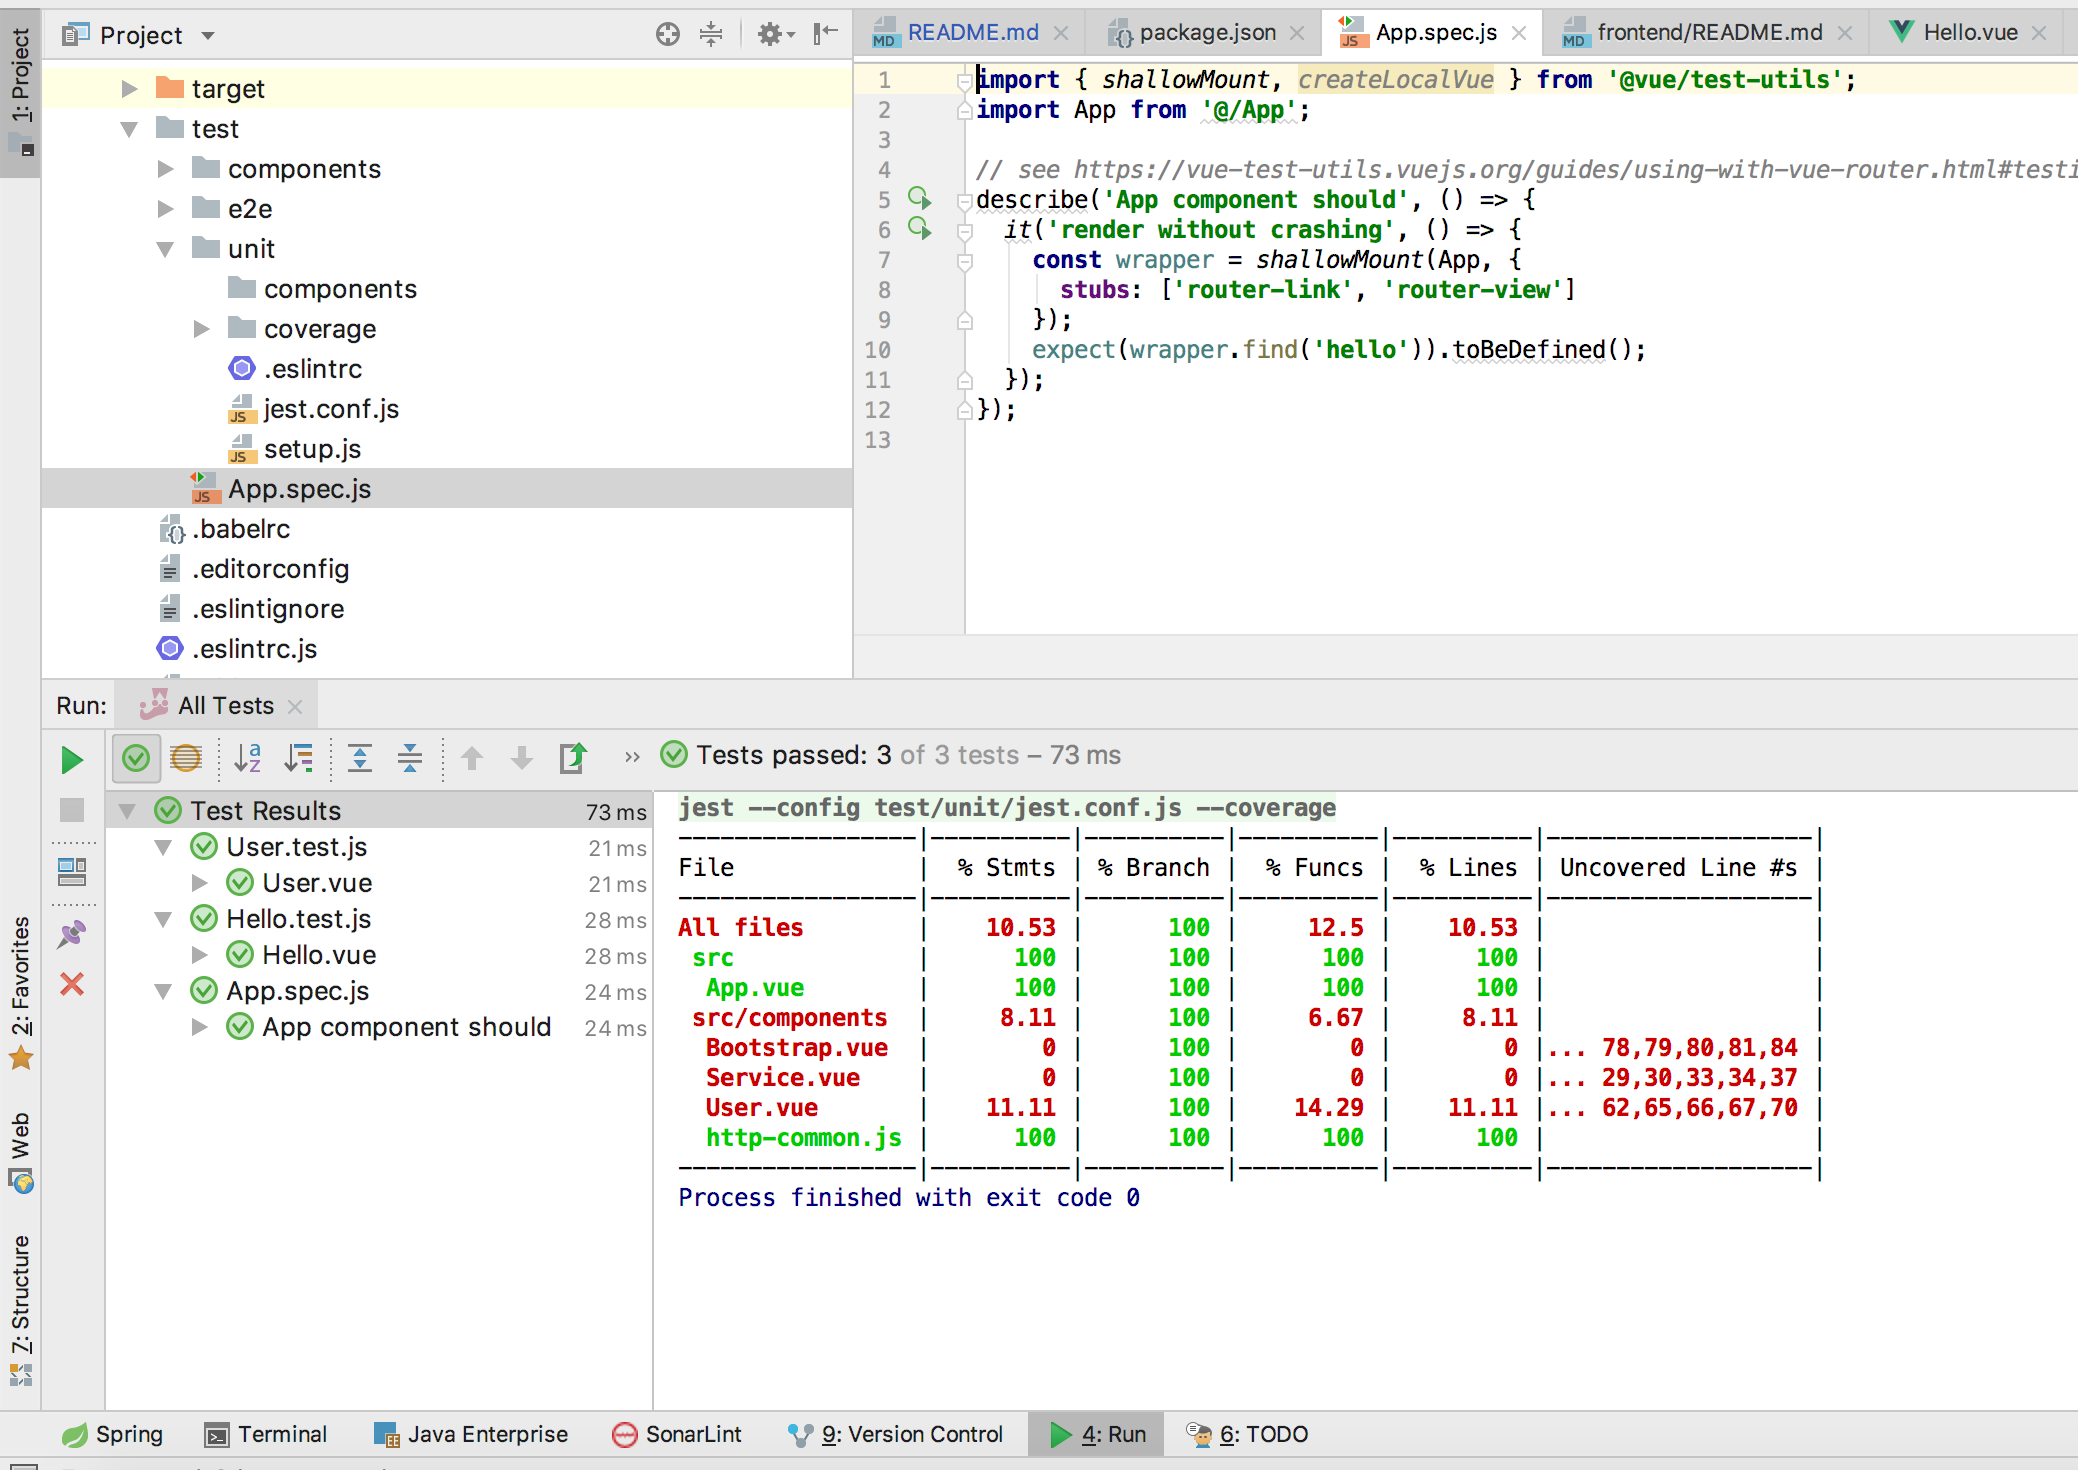
Now, when running All Tests, this should look like you're already used to Unittest IntelliJ-Integration:
End-2-End (E2E) tests with Nightwatch
Great tooling: http://nightwatchjs.org/ - Nightwatch controls WebDriver / Selenium standalone Server in own child process and abstracts from those, providing a handy DSL for Acceptance tests:
Docs: http://nightwatchjs.org/gettingstarted/#browser-drivers-setup
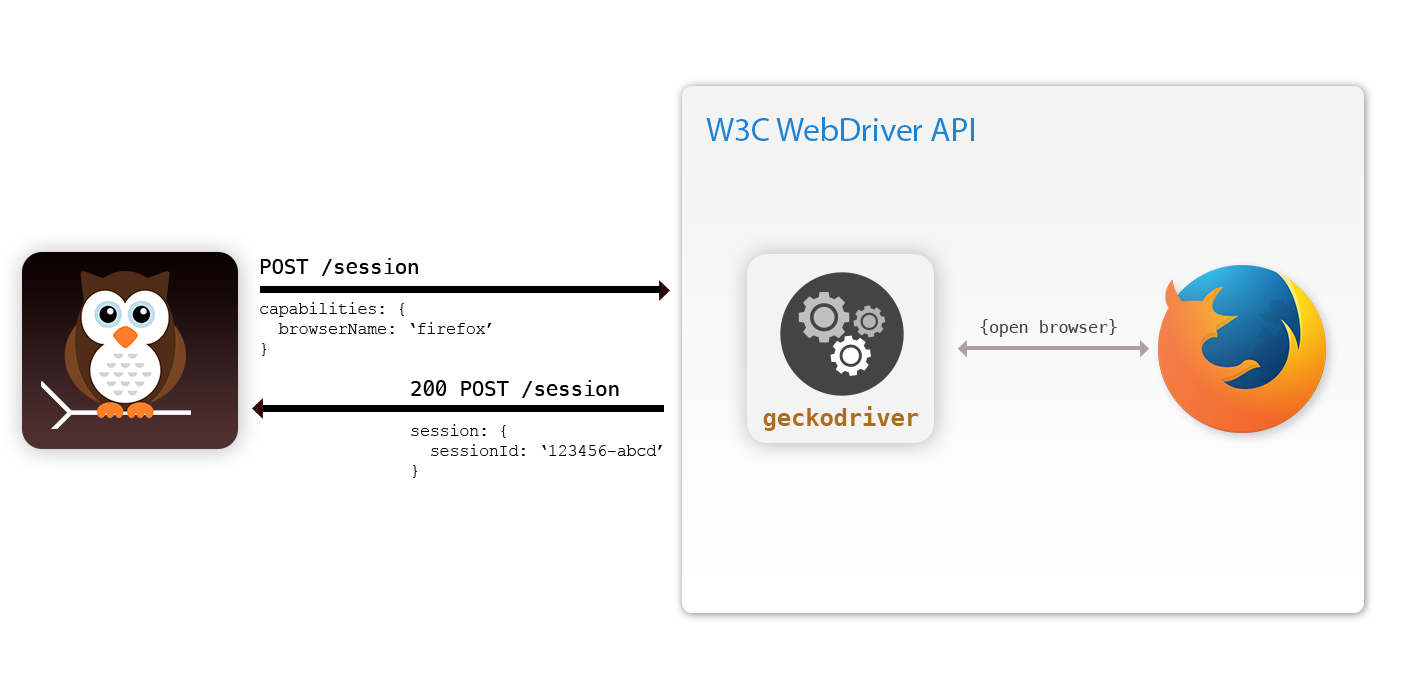
Nightwatch is configured through the nightwatch.conf.js. Watch out for breaking changes in 1.x: https://github.com/nightwatchjs/nightwatch/wiki/Migrating-to-Nightwatch-1.0
More options could be found in the docs: http://nightwatchjs.org/gettingstarted/#settings-file
Write Nightwatch tests
An example Nightwatch test is provided in HelloAcceptance.test.js:
module.exports = {
    'default e2e tests': browser => {
        browser
            .url(process.env.VUEDEVSERVER_URL)
            .waitForElementVisible('#app', 5000)
            .assert.elementPresent('.hello')
            .assert.containsText('h1', 'Welcome to your Vue.js powered Spring Boot App')
            .assert.elementCount('img', 1)
            .end()
    }
}
Run E2E Tests
npm run test:e2e
Run all tests
npm test
NPM Security
npm Security - npm@6
https://medium.com/npm-inc/announcing-npm-6-5d0b1799a905
npm audit
https://blog.npmjs.org/post/173719309445/npm-audit-identify-and-fix-insecure
Run npm audit fix to update the vulnerable packages. Only in situations, where nothing else helps, try npm audit fix --force (this will also install braking changes)
https://nodejs.org/en/blog/vulnerability/june-2018-security-releases/
---> Update NPM regularly
https://docs.npmjs.com/troubleshooting/try-the-latest-stable-version-of-npm
npm install -g npm@latest
---> Update Packages regularly
https://docs.npmjs.com/getting-started/updating-local-packages
npm outdated
npm update
Shift from templates to plugin-based architecture in Vue Cli 3
In the long run, templates like the main webpack are deprecated in the Vue.js universe:
https://vuejsdevelopers.com/2018/03/26/vue-cli-3/
Plugins bring the following benefits compared to templates:
- No lock in, as plugins can be added at any point in the development lifecycle
- Zero config plugins allow you to spend time developing rather than configuring
- Easy to upgrade, as configuration can be customized without “ejecting”
- Allows developers to make their own plugins and presets
OMG! My package.json is so small - Vue CLI 3 Plugins
From https://cli.vuejs.org/guide/plugins-and-presets.html:
Vue CLI uses a plugin-based architecture. If you inspect a newly created project's package.json, you will find dependencies that start with@vue/cli-plugin-. Plugins can modify the internal webpack configuration and inject commands tovue-cli-service. Most of the features listed during the project creation process are implemented as plugins.
With plugings, extensions to an existing project could also be made via: vue add pluginName. E.g. if you want to add Nightwatch E2E tests to your project, just run vue add @vue/e2e-nightwatch. All scoped packages are available here: https://github.com/vuejs/vue-cli/tree/dev/packages/%40vue
These new Vue CLI 3 plugin architecture cleans our big package.json to a really neat compact thing. This was the old big dependency block:
json
"devDependencies": {
"@vue/test-utils": "^1.0.0-beta.25",
"autoprefixer": "^7.1.2",
"babel-core": "^6.26.3",
"babel-helper-vue-jsx-merge-props": "^2.0.3",
"babel-jest": "^21.0.2",
"babel-loader": "^7.1.5",
"babel-plugin-dynamic-import-node": "^1.2.0",
"babel-plugin-syntax-jsx": "^6.18.0",
"babel-plugin-transform-es2015-modules-commonjs": "^6.26.0",
"babel-plugin-transform-runtime": "^6.22.0",
"babel-plugin-transform-vue-jsx": "^3.5.0",
"babel-preset-env": "^1.7.0",
"babel-preset-stage-2": "^6.22.0",
"babel-register": "^6.22.0",
"chalk": "^2.4.1",
"chromedriver": "^2.41.0",
"copy-webpack-plugin": "^4.5.2",
"cross-spawn": "^5.0.1",
"css-loader": "^0.28.0",
"extract-text-webpack-plugin": "^3.0.0",
"file-loader": "^1.1.4",
"friendly-errors-webpack-plugin": "^1.6.1",
"html-webpack-plugin": "^2.30.1",
"jest": "^22.0.4",
"jest-serializer-vue": "^0.3.0",
"nightwatch": "^1.0.11",
"node-notifier": "^5.1.2",
"optimize-css-assets-webpack-plugin": "^3.2.0",
"ora": "^1.2.0",
"portfinder": "^1.0.17",
"postcss-import": "^11.0.0",
"postcss-loader": "^2.1.6",
"postcss-url": "^7.2.1",
"rimraf": "^2.6.0",
"selenium-server": "^3.14.0",
"semver": "^5.5.1",
"shelljs": "^0.7.6",
"uglifyjs-webpack-plugin": "^1.3.0",
"url-loader": "^1.1.1",
"vue-jest": "^1.0.2",
"vue-loader": "^13.7.3",
"vue-style-loader": "^3.0.1",
"vue-template-compiler": "^2.5.17",
"webpack": "^3.6.0",
"webpack-bundle-analyzer": "^2.13.1",
"webpack-dev-server": "^2.11.3",
"webpack-merge": "^4.1.4"
},</code></pre>
As you can see, we´re not only maintaining our high-level libraries of choice like nightwatch, jest and so on. We´re also maintaining libraries that they use itself. Now this is over with Vue CLI 3. Let´s have a look at the super clean dependency block now:
"devDependencies": {
"@vue/cli-plugin-babel": "^3.0.3",
"@vue/cli-plugin-e2e-nightwatch": "^3.0.3",
"@vue/cli-plugin-unit-jest": "^3.0.3",
"@vue/cli-service": "^3.0.3",
"@vue/test-utils": "^1.0.0-beta.20",
"babel-core": "7.0.0-bridge.0",
"babel-jest": "^23.0.1",
"node-sass": "^4.9.0",
"sass-loader": "^7.0.1",
"vue-template-compiler": "^2.5.17"
},
As you dig into the directories like node_modules/@vue/cli-plugin-e2e-nightwatch, you´ll find where the used libraries of nightwatch are configured - in the respective package.json there:
"dependencies": {
"@vue/cli-shared-utils": "^3.0.2",
"chromedriver": "^2.40.0",
"deepmerge": "^2.1.1",
"execa": "^0.10.0",
"nightwatch": "^0.9.21",
"selenium-server": "^3.13.0"
},
This is really cool, I have to admit!
The vue.config.js file
Vue CLI 3 removes the need for explicit configuration files - and thus you wont find any build or config directories in your projects root any more. This now implements a "convention over configuration" approach, which makes it much easier to kick-start a Vue.js project, as it provides widly used defaults to webpack etc. It also eases the upgradeability of Vue.js projects - or even makes it possible.
But: How do we configure webpack etc. for CORS handling, the build directories and so on? This could be done with the optional vue.config.js:
module.exports = {
// proxy all webpack dev-server requests starting with /api
// to our Spring Boot backend (localhost:8098) using http-proxy-middleware
// see https://cli.vuejs.org/config/#devserver-proxy
devServer: {
proxy: {
'/api': {
target: 'http://localhost:8098',
ws: true,
changeOrigin: true
}
}
},
// Change build paths to make them Maven compatible
// see https://cli.vuejs.org/config/
outputDir: 'target/dist'
}
Updating Vue in an existing project
Update your local @vue/cli to the latest version:
npm install -g @vue/cli
Then update Vue.js and all your other JS dependencies with:
cd frontend
npm update
Upgrade to Vue.js 3.x/4.x next
Let's move from 2.6.x -> 3.x/4.x next here.
Be aware that the latest version of vue currently is 2.6.x and 3.x is considered next!
There are some resources:
https://v3.vuejs.org/guide/migration/introduction.html#quickstart
https://johnpapa.net/vue2-to-vue3/
And if we are using 3.x, we can even migrate to 4.x: https://cli.vuejs.org/migrating-from-v3/
Upgrade from 2.x to 3.x
There's a migration tooling, simply use:
vue add vue-next
This took around 3 minutes or more on my MacBook and changed some files:
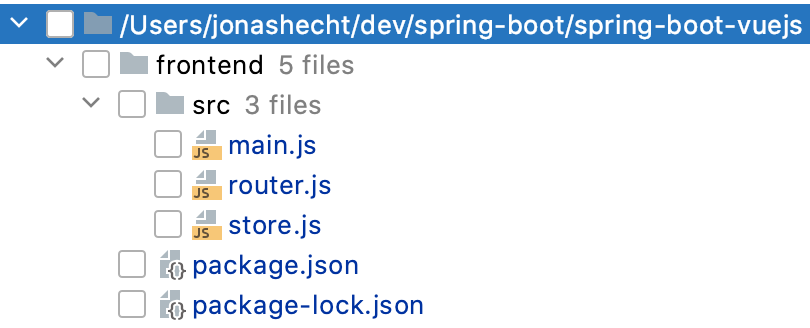
The package.json got some new or upgraded deps:
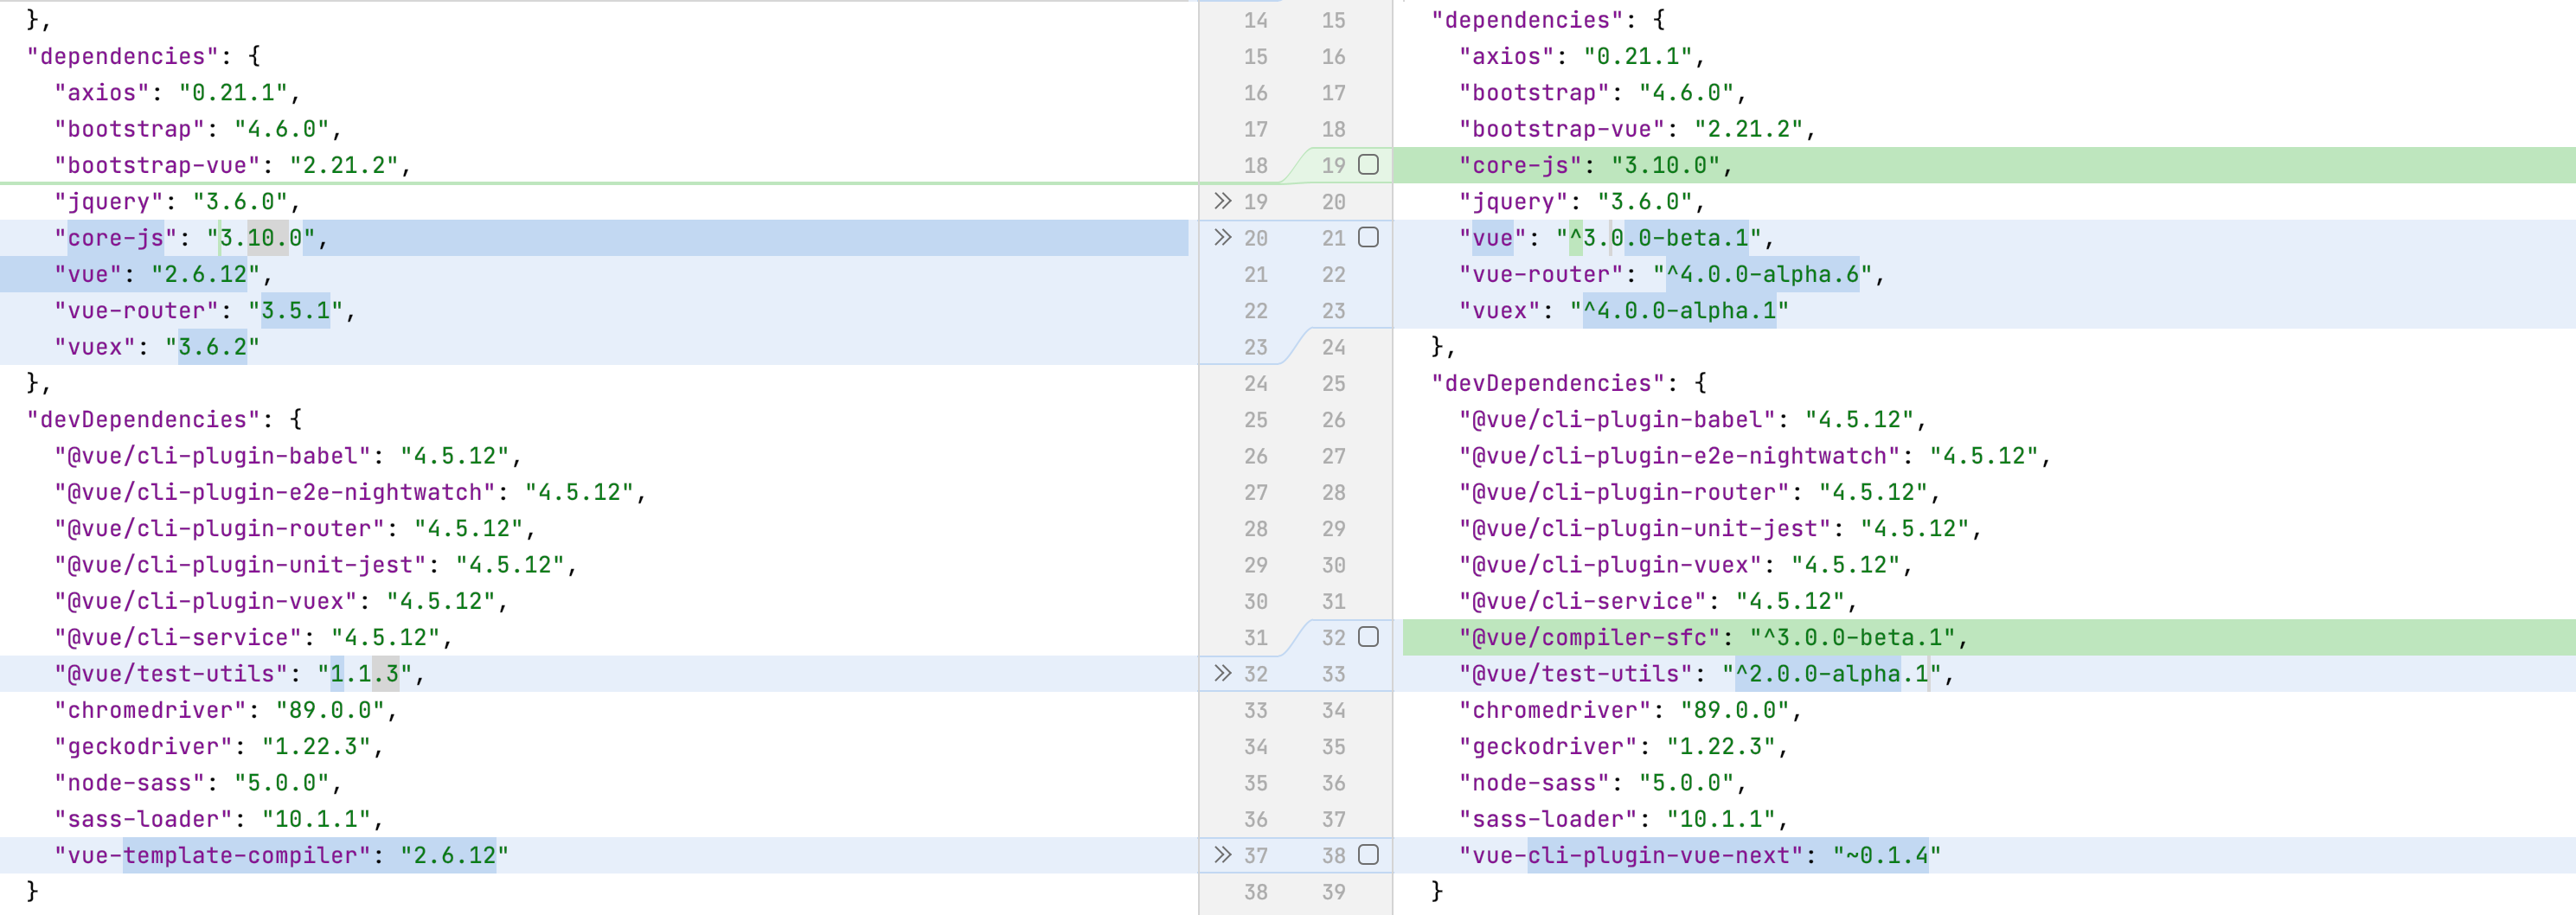
As John stated in his post it's strange to find beta versions with vue, vue-router and vuex.
So in order to see what a fresh skeleton would produce, let's also create one in another dir (I assume you have npm install -g @vue/cli installed:
mkdir vue3test && cd vue3test
vue create hello-vue3
I aligned my project to match the latest skeleton generation much better: So router, store and api got their own directories. The views are now in the correct folder views - and I extracted one component to use from the newly introduced Home.vue view: the HelloSpringWorld.vue component.
I also went over the package.json and upgraded to the latest release versions instead of alphas (except @vue/test-utils which only has a rc atm).
All imports were refactored too. Coming from this style:
import Vue from 'vue'
import Router from 'vue-router'
everything now reads:
import { createApp } from 'vue';
import { createRouter, createWebHistory } from 'vue-router'
Also check your router.js or router/index.js! Using a path redirect like this leads to a non working routing configuration:
// otherwise redirect to home
{ path: '*', redirect: '/' }
The error in the Browser console states:
Uncaught Error: Catch all routes ("*") must now be defined using a param with a custom regexp.
See more at https://next.router.vuejs.org/guide/migration/#removed-star-or-catch-all-routes.
I changed it to the new param with regex syntax like this:
// otherwise redirect to home
{ path: '/:pathMatch(.)', redirect: '/' }
A crucial point to get jest to work again, was to add the following to the jest.config.js:
transform: {
'^.+\\.vue$': 'vue-jest'
}
Otherwise my tests ran into the following error:
npm run test:unit
> frontend@4.0.0 test:unit > vue-cli-service test:unit --coverage
FAIL tests/unit/views/User.spec.js ● Test suite failed to run
Vue packages version mismatch:
- vue@3.0.11 (/Users/jonashecht/dev/spring-boot/spring-boot-vuejs/frontend/node_modules/vue/index.js) - vue-template-compiler@2.6.12 (/Users/jonashecht/dev/spring-boot/spring-boot-vuejs/frontend/node_modules/vue-template-compiler/package.json)
This may cause things to work incorrectly. Make sure to use the same version for both. If you are using vue-loader@>=10.0, simply update vue-template-compiler. If you are using vue-loader@<10.0 or vueify, re-installing vue-loader/vueify should bump vue-template-compiler to the latest.
at Object.<anonymous> (node_modules/vue-template-compiler/index.js:10:9)
Luckily this so answer helped me out: https://stackoverflow.com/a/65111966/4964553
And finally Bootstrap Vue doesn't support Vue 3.x right now: https://github.com/bootstrap-vue/bootstrap-vue/issues/5196 - So I temporarily commented out the imports.
Add TypeScript
Vue 3.x is now build with TypeScript: https://v3.vuejs.org/guide/typescript-support.html
A static type system can help prevent many potential runtime errors as applications grow, which is why Vue 3 is written in TypeScript. This means you don't need any additional tooling to use TypeScript with Vue - it has first-class citizen support.
There's also a huge documentation of TypeScript itself at https://www.typescriptlang.org/docs/ I can also recommend https://medium.com/js-dojo/adding-typescript-to-your-existing-vuejs-2-6-app-aaa896c2d40a
To migrate your project there's the command:
vue add typescript
The first question arises: Use class-style component syntax? (Y/n) whether to use class-style component syntax or not. I didn't use it. I think the interface definitions of components are concise enough without the class-style. But let's see how this will work out.
So this was the output:
vue add typescript
WARN There are uncommitted changes in the current repository, it's recommended to commit or stash them first.
? Still proceed? Yes
📦 Installing @vue/cli-plugin-typescript...
added 59 packages, removed 58 packages, and audited 2219 packages in 6s
85 packages are looking for funding run npm fund for details
3 low severity vulnerabilities
To address all issues (including breaking changes), run: npm audit fix --force
Run npm audit for details. ✔ Successfully installed plugin: @vue/cli-plugin-typescript
? Use class-style component syntax? No ? Use Babel alongside TypeScript (required for modern mode, auto-detected polyfills, transpiling JSX)? Yes ? Use TSLint? Yes ? Pick lint features: Lint on save ? Convert all .js files to .ts? Yes ? Allow .js files to be compiled? Yes ? Skip type checking of all declaration files (recommended for apps)? Yes
🚀 Invoking generator for @vue/cli-plugin-typescript... 📦 Installing additional dependencies...
added 2 packages, and audited 2221 packages in 3s ... ✔ Successfully invoked generator for plugin: @vue/cli-plugin-typescript
Now I went through all the componentes and views and extended <script> to <script lang="ts">.
Also I changed
export default {
to
import { defineComponent } from 'vue';
export default defineComponent({
Now we need to transform our JavaScript code into TypeScript.
A really good introduction could be found here: https://www.vuemastery.com/blog/getting-started-with-typescript-and-vuejs/
This process will take a while, depending on your code - and mainly on your knowledge about TypeScript. But I think it's a great path to go!
Don't forget to deactivate source control for .js and .map files in src, because these will now be generated (aka transpiled) from TypeScript and shouldn't be checked in (anymore).
I enhanced my frontend/.gitignore like this:
# TypeScript
*.map
src/*.js
test/*.js
Vuex Store with TypeScript
According to https://next.vuex.vuejs.org/guide/typescript-support.html#typing-store-property-in-vue-component in order to use vuex store with TypeScript, we:
must declare your own module augmentation.
TLDR; we need to create a file src/vuex.d.ts:
import { ComponentCustomProperties } from 'vue'
import { Store } from 'vuex'
declare module '@vue/runtime-core' { // declare your own store states interface State { count: number }
// provide typings for this.$store interface ComponentCustomProperties { $store: Store<State> } }
Bootstrap support for Vue.js 3/Next
Our View Bootstrap.vue is based on the library bootstrap-vue, which brings in some nice Bootstrap CSS stylings & components.
But bootstrap-vue isn't compatible with Vue.js 3/Next: https://github.com/bootstrap-vue/bootstrap-vue/issues/5196 and it's unclear, when it's going to support it - or even if at all.
With the upgrade to Vue.js 3.x our bootstrap-vue based component view stopped working.
There's also another change: Bootstrap 5.x is here to be the next evolutionary step - and it even dropped the need for JQuery.
But also Bootstrap 5.x isn't supported by bootstrap-vue right now. So let's try to use Bootstrap without it?!
Therefore install bootstrap next (which - as like Vue.js - stands for the new version 5):
npm i bootstrap@next
npm i @popperjs/core
Since Bootstrap 5 depends on popperjs for tooltips (see https://getbootstrap.com/docs/5.0/getting-started/introduction/#js), we also need to include it.
We can remove "bootstrap-vue": "2.21.2" and "jquery": "3.6.0", from our package.json.
We also need to import Bootstrap inside our main.ts:
import "bootstrap/dist/css/bootstrap.min.css";
import "bootstrap";
Let's try to use Bootstrap 5 inside our Bootstrap.vue.
And also inside the Login.vue and the Protected.vue. Using Bootstrap 5.x components without bootstrap-vue seems to be no problem (see docs how to use here: https://getbootstrap.com/docs/5.0/components/badge/).
Build and run with Docker
In the issue jonashackt/spring-boot-vuejs/issues/25 the question on how to build and run our spring-boot-vuejs app with Docker.
As already stated in the issue there are multiple ways of doing this. One I want to outline here is a more in-depth variant, where you'll know exacltly what's going on behind the scenes.
First we'll make use of Docker's multi-stage build feature - in the first stage we'll build our Spring Boot Vue.js app using our established Maven build process. Let's have a look into our Dockerfile:
# Docker multi-stage build
1. Building the App with Maven
FROM maven:3-jdk-11
ADD . /springbootvuejs WORKDIR /springbootvuejs
Just echo so we can see, if everything is there :)
RUN ls -l
Run Maven build
RUN mvn clean install
A crucial part here is to add all necessary files into our Docker build context - but leaving out the underlying OS specific node libraries! As not leaving them out would lead to errors like:
Node Sass could not find a binding for your current environment: Linux 64-bit with Node.js 11.x
Therefore we create a .dockerignore file and leave out the directories frontend/nodemodules & frontend/node completely using the frontend/node* configuration:
# exclude underlying OS specific node modules
frontend/node*
also leave out pre-build output folders
frontend/target
backend/target
We also ignore the pre-build output directories.
In the second stage of our Dockerfile we use the build output of the first stage and prepare everything to run our Spring Boot powered Vue.js app later:
# Just using the build artifact and then removing the build-container
FROM openjdk:11-jdk
MAINTAINER Jonas Hecht
VOLUME /tmp
Add Spring Boot app.jar to Container
COPY --from=0 "/springbootvuejs/backend/target/backend-0.0.1-SNAPSHOT.jar" app.jar
ENV JAVA_OPTS=""
Fire up our Spring Boot app by default
ENTRYPOINT [ "sh", "-c", "java $JAVA_OPTS -Djava.security.egd=file:/dev/./urandom -jar /app.jar" ]
Now we should everything prepared to run our Docker build:
docker build . --tag spring-boot-vuejs:latest
This build can take a while, since all Maven and NPM dependencies need to be downloaded for the build.
When the build is finished, simply start a Docker container based on the newly build image and prepare the correct port to be bound to the Docker host for easier access later:
docker run -d -p 8098:8098 --name myspringvuejs spring-boot-vuejs
Have a look into your running Docker containers with docker ps and you should see the new container:
$ docker ps
CONTAINER ID IMAGE COMMAND CREATED STATUS PORTS NAMES
745e854d7781 spring-boot-vuejs "sh -c 'java $JAVA_O…" 12 seconds ago Up 11 seconds 0.0.0.0:8098->8098/tcp myspringvuejs
If you want to see the typical Spring Boot startup logs, just use docker logs 745e854d7781 --follow:
$ docker logs 745e854d7781 --follow
. _ /\\ / ' () _ \ \ \ \ ( ( )\_ | ' | '| | ' \/ | \ \ \ \ \\/ _)| |)| | | | | || (| | ) ) ) ) ' |_| .|| ||| |\_, | / / / / =========||==============|_/=//// :: Spring Boot :: (v2.1.2.RELEASE)
2019-01-29 09:42:07.621 INFO 8 --- [ main] d.j.s.SpringBootVuejsApplication : Starting SpringBootVuejsApplication v0.0.1-SNAPSHOT on 745e854d7781 with PID 8 (/app.jar started by root in /) 2019-01-29 09:42:07.627 INFO 8 --- [ main] d.j.s.SpringBootVuejsApplication : No active profile set, falling back to default profiles: default 2019-01-29 09:42:09.001 INFO 8 --- [ main] .s.d.r.c.RepositoryConfigurationDelegate : Bootstrapping Spring Data repositories in DEFAULT mode. 2019-01-29 09:42:09.103 INFO 8 --- [ main] .s.d.r.c.RepositoryConfigurationDelegate : Finished Spring Data repository scanning in 90ms. Found 1 repository interfaces. 2019-01-29 09:42:09.899 INFO 8 --- [ main] trationDelegate$BeanPostProcessorChecker : Bean 'org.springframework.transaction.annotation.ProxyTransactionManagementConfiguration' of type [org.springframework.transaction.annotation.ProxyTransactionManagementConfiguration$$EnhancerBySpringCGLIB$$bb072d94] is not eligible for getting processed by all BeanPostProcessors (for example: not eligible for auto-proxying) 2019-01-29 09:42:10.715 INFO 8 --- [ main] o.s.b.w.embedded.tomcat.TomcatWebServer : Tomcat initialized with port(s): 8098 (http) 2019-01-29 09:42:10.765 INFO 8 --- [ main] o.apache.catalina.core.StandardService : Starting service [Tomcat] 2019-01-29 09:42:10.765 INFO 8 --- [ main] org.apache.catalina.core.StandardEngine : Starting Servlet engine: [Apache Tomcat/9.0.14] 2019-01-29 09:42:10.783 INFO 8 --- [ main] o.a.catalina.core.AprLifecycleListener : The APR based Apache Tomcat Native library which allows optimal performance in production environments was not found on the java.library.path: [/usr/java/packages/lib:/usr/lib/x8664-linux-gnu/jni:/lib/x8664-linux-gnu:/usr/lib/x86_64-linux-gnu:/usr/lib/jni:/lib:/usr/lib] 2019-01-29 09:42:10.920 INFO 8 --- [ main] o.a.c.c.C.[Tomcat].[localhost].[/] : Initializing Spring embedded WebApplicationContext 2019-01-29 09:42:10.921 INFO 8 --- [ main] o.s.web.context.ContextLoader : Root WebApplicationContext: initialization completed in 3209 ms 2019-01-29 09:42:11.822 INFO 8 --- [ main] com.zaxxer.hikari.HikariDataSource : HikariPool-1 - Starting... 2019-01-29 09:42:12.177 INFO 8 --- [ main] com.zaxxer.hikari.HikariDataSource : HikariPool-1 - Start completed. 2019-01-29 09:42:12.350 INFO 8 --- [ main] o.hibernate.jpa.internal.util.LogHelper : HHH000204: Processing PersistenceUnitInfo [ name: default ...] 2019-01-29 09:42:12.520 INFO 8 --- [ main] org.hibernate.Version : HHH000412: Hibernate Core {5.3.7.Final} 2019-01-29 09:42:12.522 INFO 8 --- [ main] org.hibernate.cfg.Environment : HHH000206: hibernate.properties not found 2019-01-29 09:42:12.984 INFO 8 --- [ main] o.hibernate.annotations.common.Version : HCANN000001: Hibernate Commons Annotations {5.0.4.Final} 2019-01-29 09:42:13.894 INFO 8 --- [ main] org.hibernate.dialect.Dialect : HHH000400: Using dialect: org.hibernate.dialect.H2Dialect 2019-01-29 09:42:15.644 INFO 8 --- [ main] o.h.t.schema.internal.SchemaCreatorImpl : HHH000476: Executing import script 'org.hibernate.tool.schema.internal.exec.ScriptSourceInputNonExistentImpl@64524dd' 2019-01-29 09:42:15.649 INFO 8 --- [ main] j.LocalContainerEntityManagerFactoryBean : Initialized JPA EntityManagerFactory for persistence unit 'default' 2019-01-29 09:42:16.810 INFO 8 --- [ main] o.s.s.concurrent.ThreadPoolTaskExecutor : Initializing ExecutorService 'applicationTaskExecutor' 2019-01-29 09:42:16.903 WARN 8 --- [ main] aWebConfiguration$JpaWebMvcConfiguration : spring.jpa.open-in-view is enabled by default. Therefore, database queries may be performed during view rendering. Explicitly configure spring.jpa.open-in-view to disable this warning 2019-01-29 09:42:17.116 INFO 8 --- [ main] o.s.b.a.w.s.WelcomePageHandlerMapping : Adding welcome page: class path resource [public/index.html] 2019-01-29 09:42:17.604 INFO 8 --- [ main] o.s.b.a.e.web.EndpointLinksResolver : Exposing 2 endpoint(s) beneath base path '/actuator' 2019-01-29 09:42:17.740 INFO 8 --- [ main] o.s.b.w.embedded.tomcat.TomcatWebServer : Tomcat started on port(s): 8098 (http) with context path '' 2019-01-29 09:42:17.745 INFO 8 --- [ main] d.j.s.SpringBootVuejsApplication : Started SpringBootVuejsApplication in 10.823 seconds (JVM running for 11.485)</code></pre>
Now access your Dockerized Spring Boot powererd Vue.js app inside your Browser at http://localhost:8098.
If you have played enough with your Dockerized app, don't forget to stop (
docker stop 745e854d7781) and remove (docker rm 745e854d7781) it in the end.
Autorelease to Docker Hub on hub.docker.com
We also want to have the current version of our code build and released to https://hub.docker.com/. Therefore head to the repositories tab in Docker Hub and click
Create Repository`:
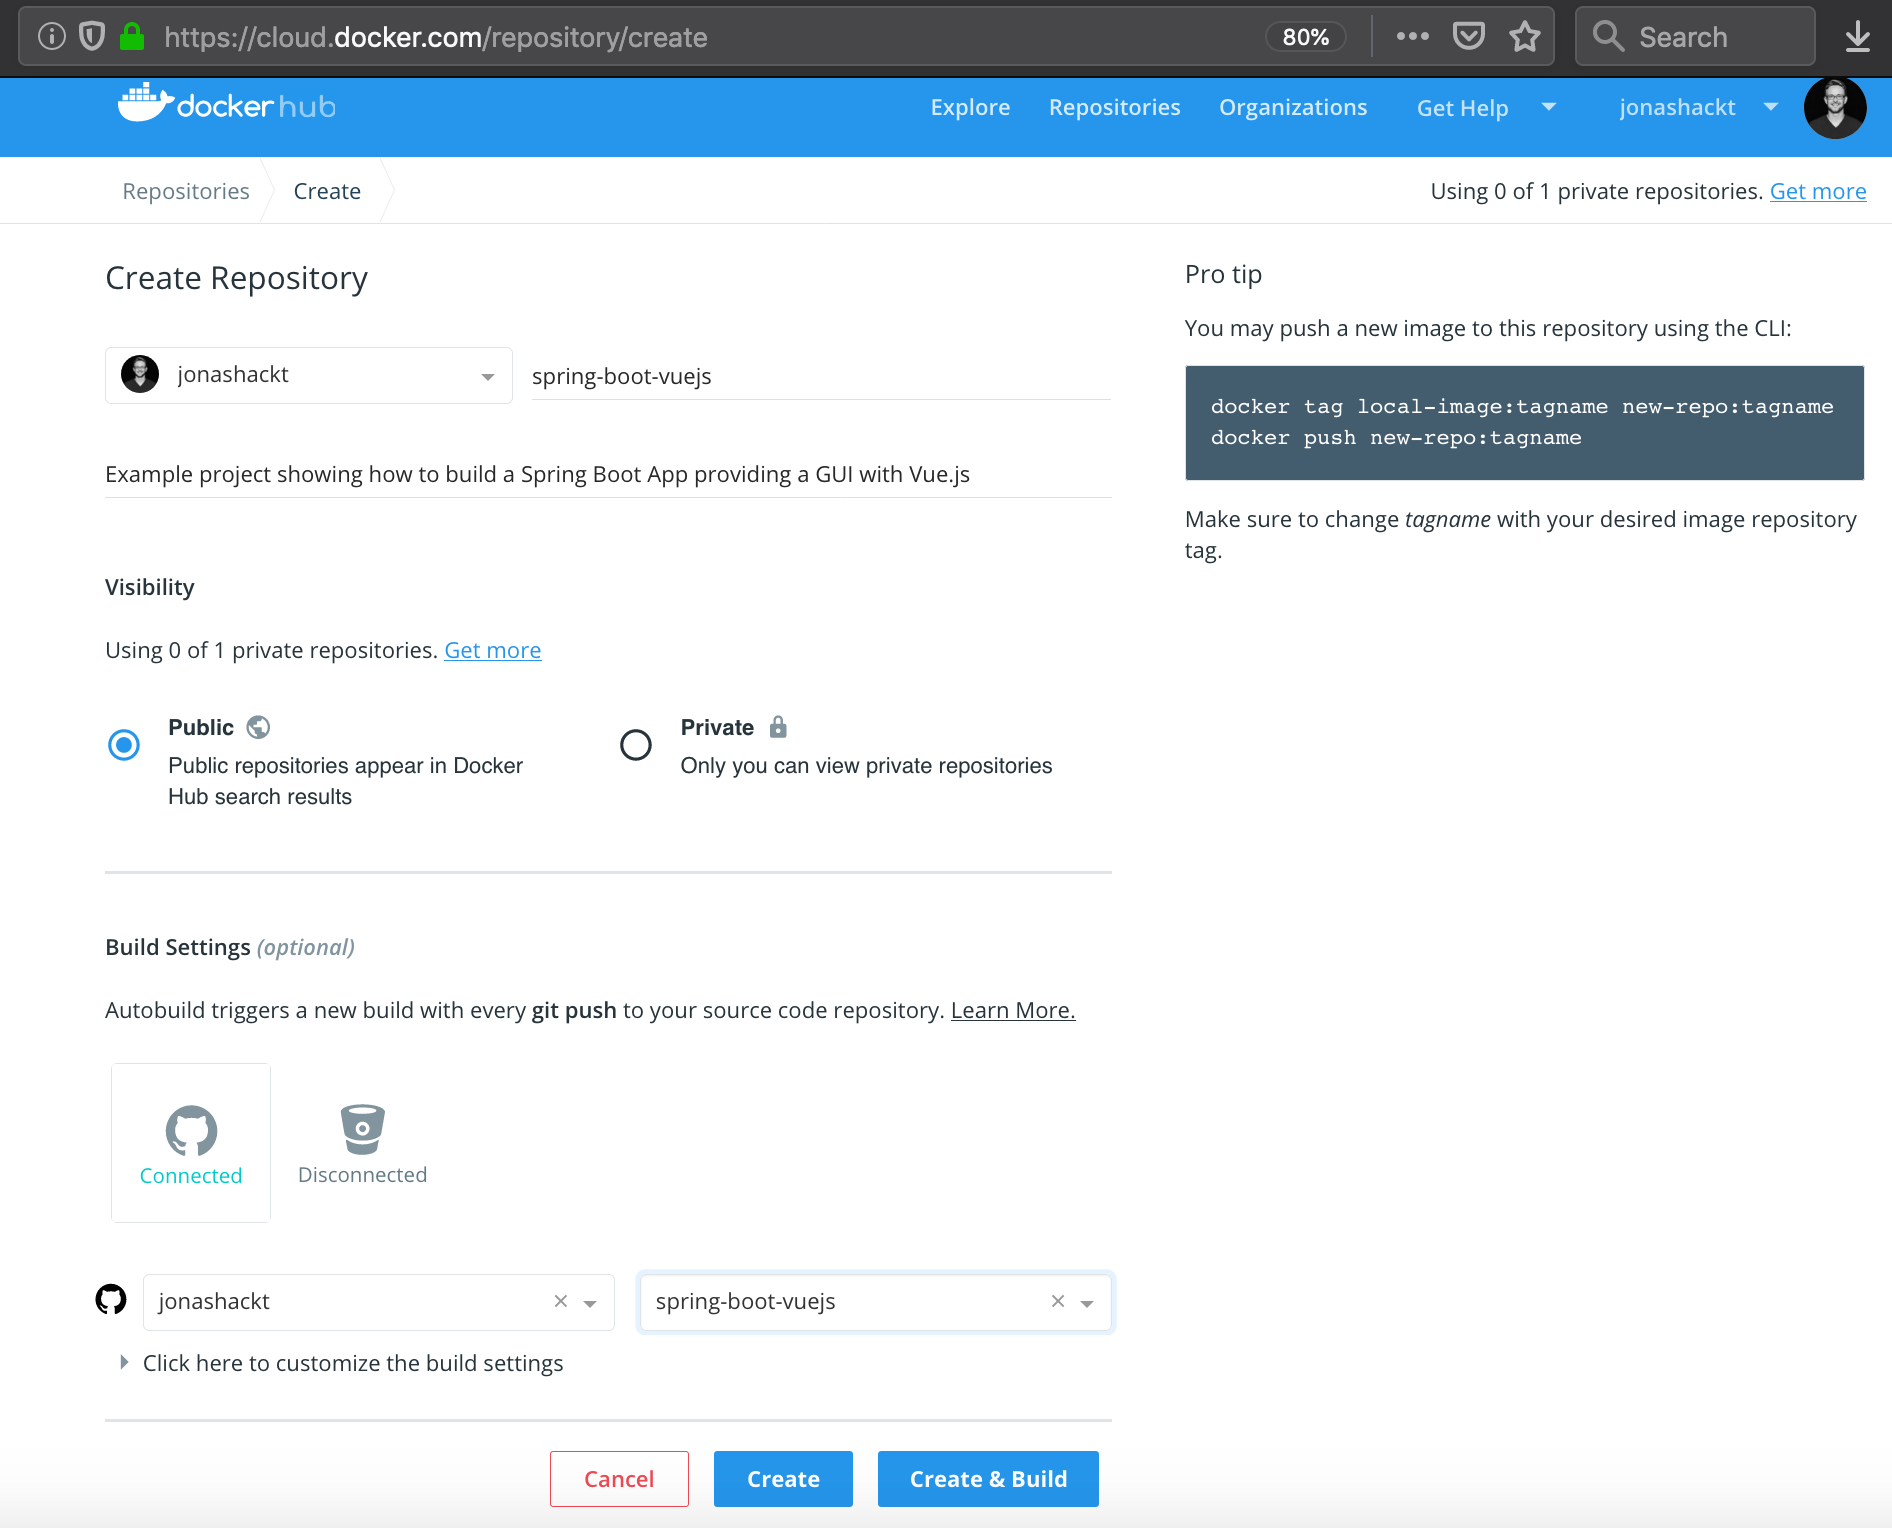
As the docs state, there are some config options to setup automat
README truncated. [View on GitHub


