
Make Instructions: Airgapped raspberry pi computer for working with blockchains featuring LUKS full disk encryption and using qr-codes to pass encrypted files and offline transaction instructions across the airgap.
Private Key Vault - Click for Open Source Make Instructions
Airgapped raspberry pi computer with touch screen and camera
Featuring LUKS full disk encryption
For secure offline blockchain transactions and for secure encrypted messaging
Move files across the airgap to other devices using QR-Codes
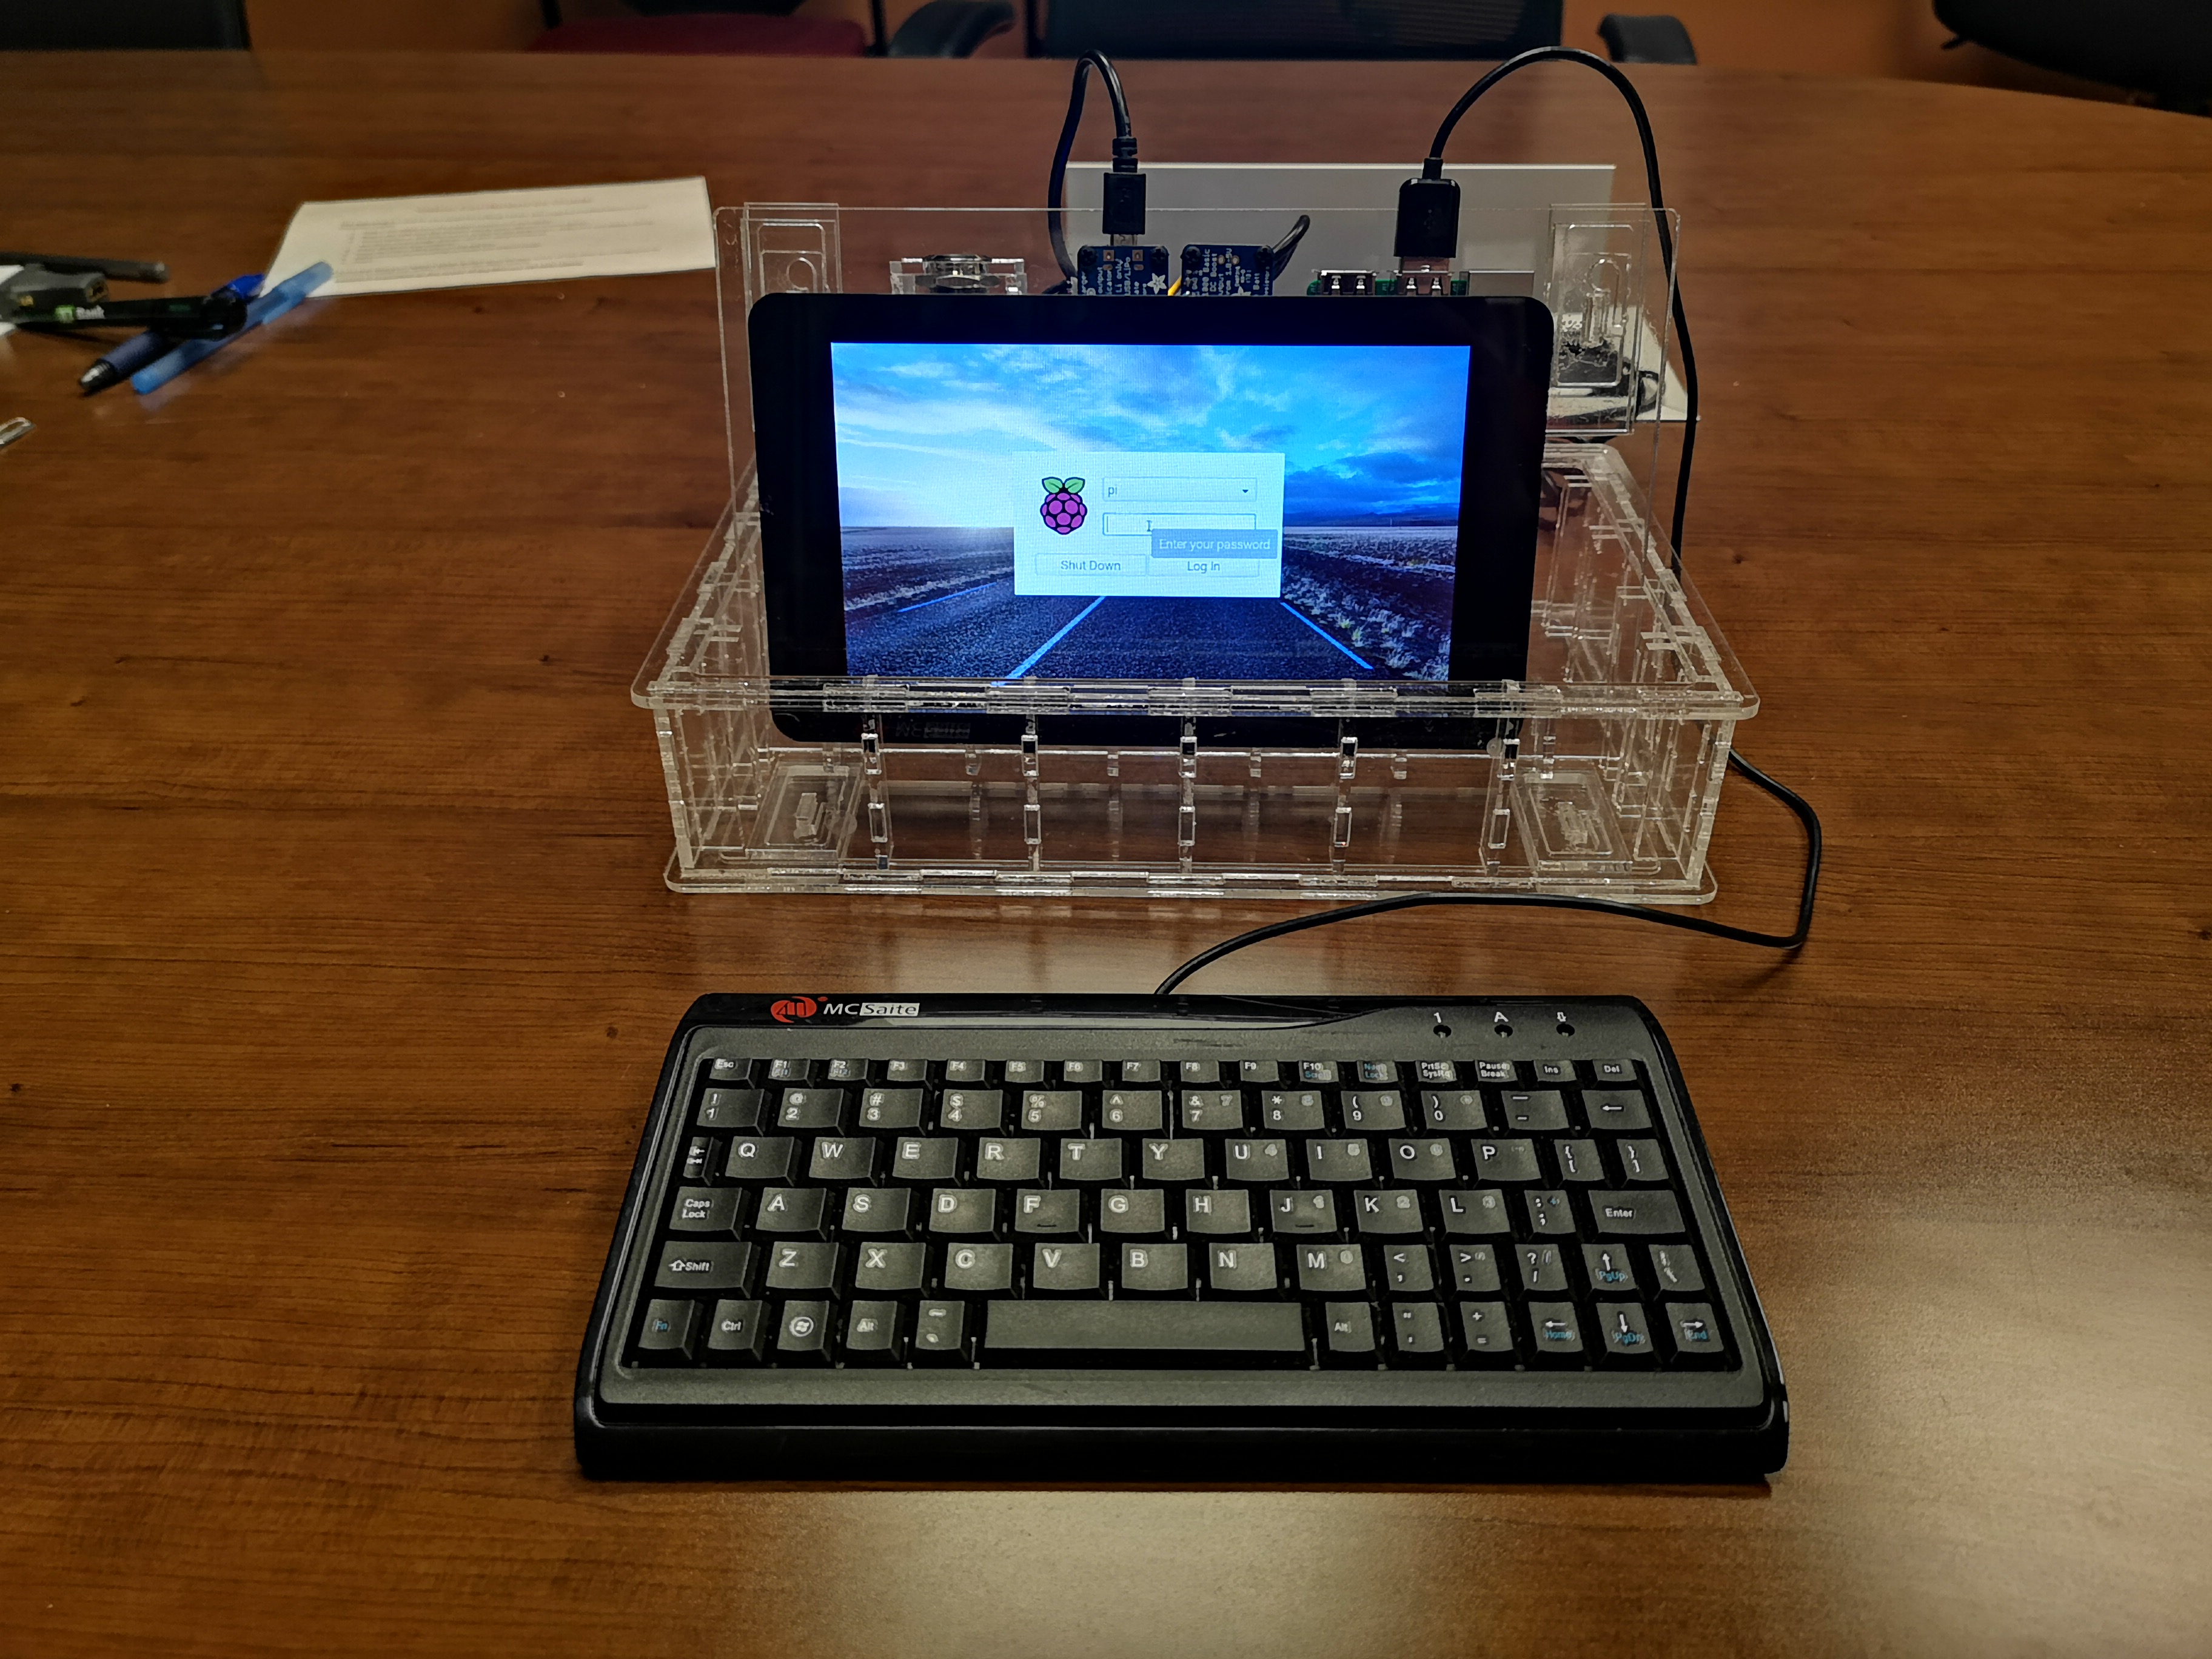
Does anything a regular computer does and more.
Full disk encryption keeps your private keys and personal information safe in case the device is stolen.
Easily clone the micro SD card with all the encryption intact using only the Private Key Vault to do the cloning. So there is never a need to put your SD card into any other device.
Use it to:
- Securely move assets on the Ethereum blockchain without exposing your private keys to any other device.
- Work on airgapped IOTA wallet has been started.
- Securely read and edit all types of files behind the airgap where remote viewing and key logging is not possible.
- No WiFi, No BlueTooth, No Cables, No USB ThumbDrives
- Move files across the airgap to other devices using QR-Codes
- GPG encrypted messaging is easy using this device.
- Crypto-Journalism: Now anyone can safely create a journalistic body of work and prove that they authored the entire work and that it has not been tampered with all while allowing the author to remain anonymous if he or she so chooses. Protected sources. No more fake news.
- Added Value For People In Developing Countries The PrivateKeyVault is the cheapest computer you can have and it does double duty as a regular Internet connected computer simply by swapping out the encrypted micro SD card containing private information with another one set up for business, education, browsing, and casual use. Now, not only can everyone with Internet reach our planet wide distributed public ledgers - Finally they can learn to use them.
What's In It For You?-----What's In It For Me?-----What's In It For Us?
All you really need is a raspberry pi 2, a raspberry pi camera, a micro SD card and an AC power supply. You probably have a keyboard, mouse, and monitor laying around already. You are responsible for making sure there are no keyloggers or radio transmitters installed on any of these devices. So click here if you just want to install the software on your raspberry pi
Or continue reading if you would like to build the device as it is shown here.
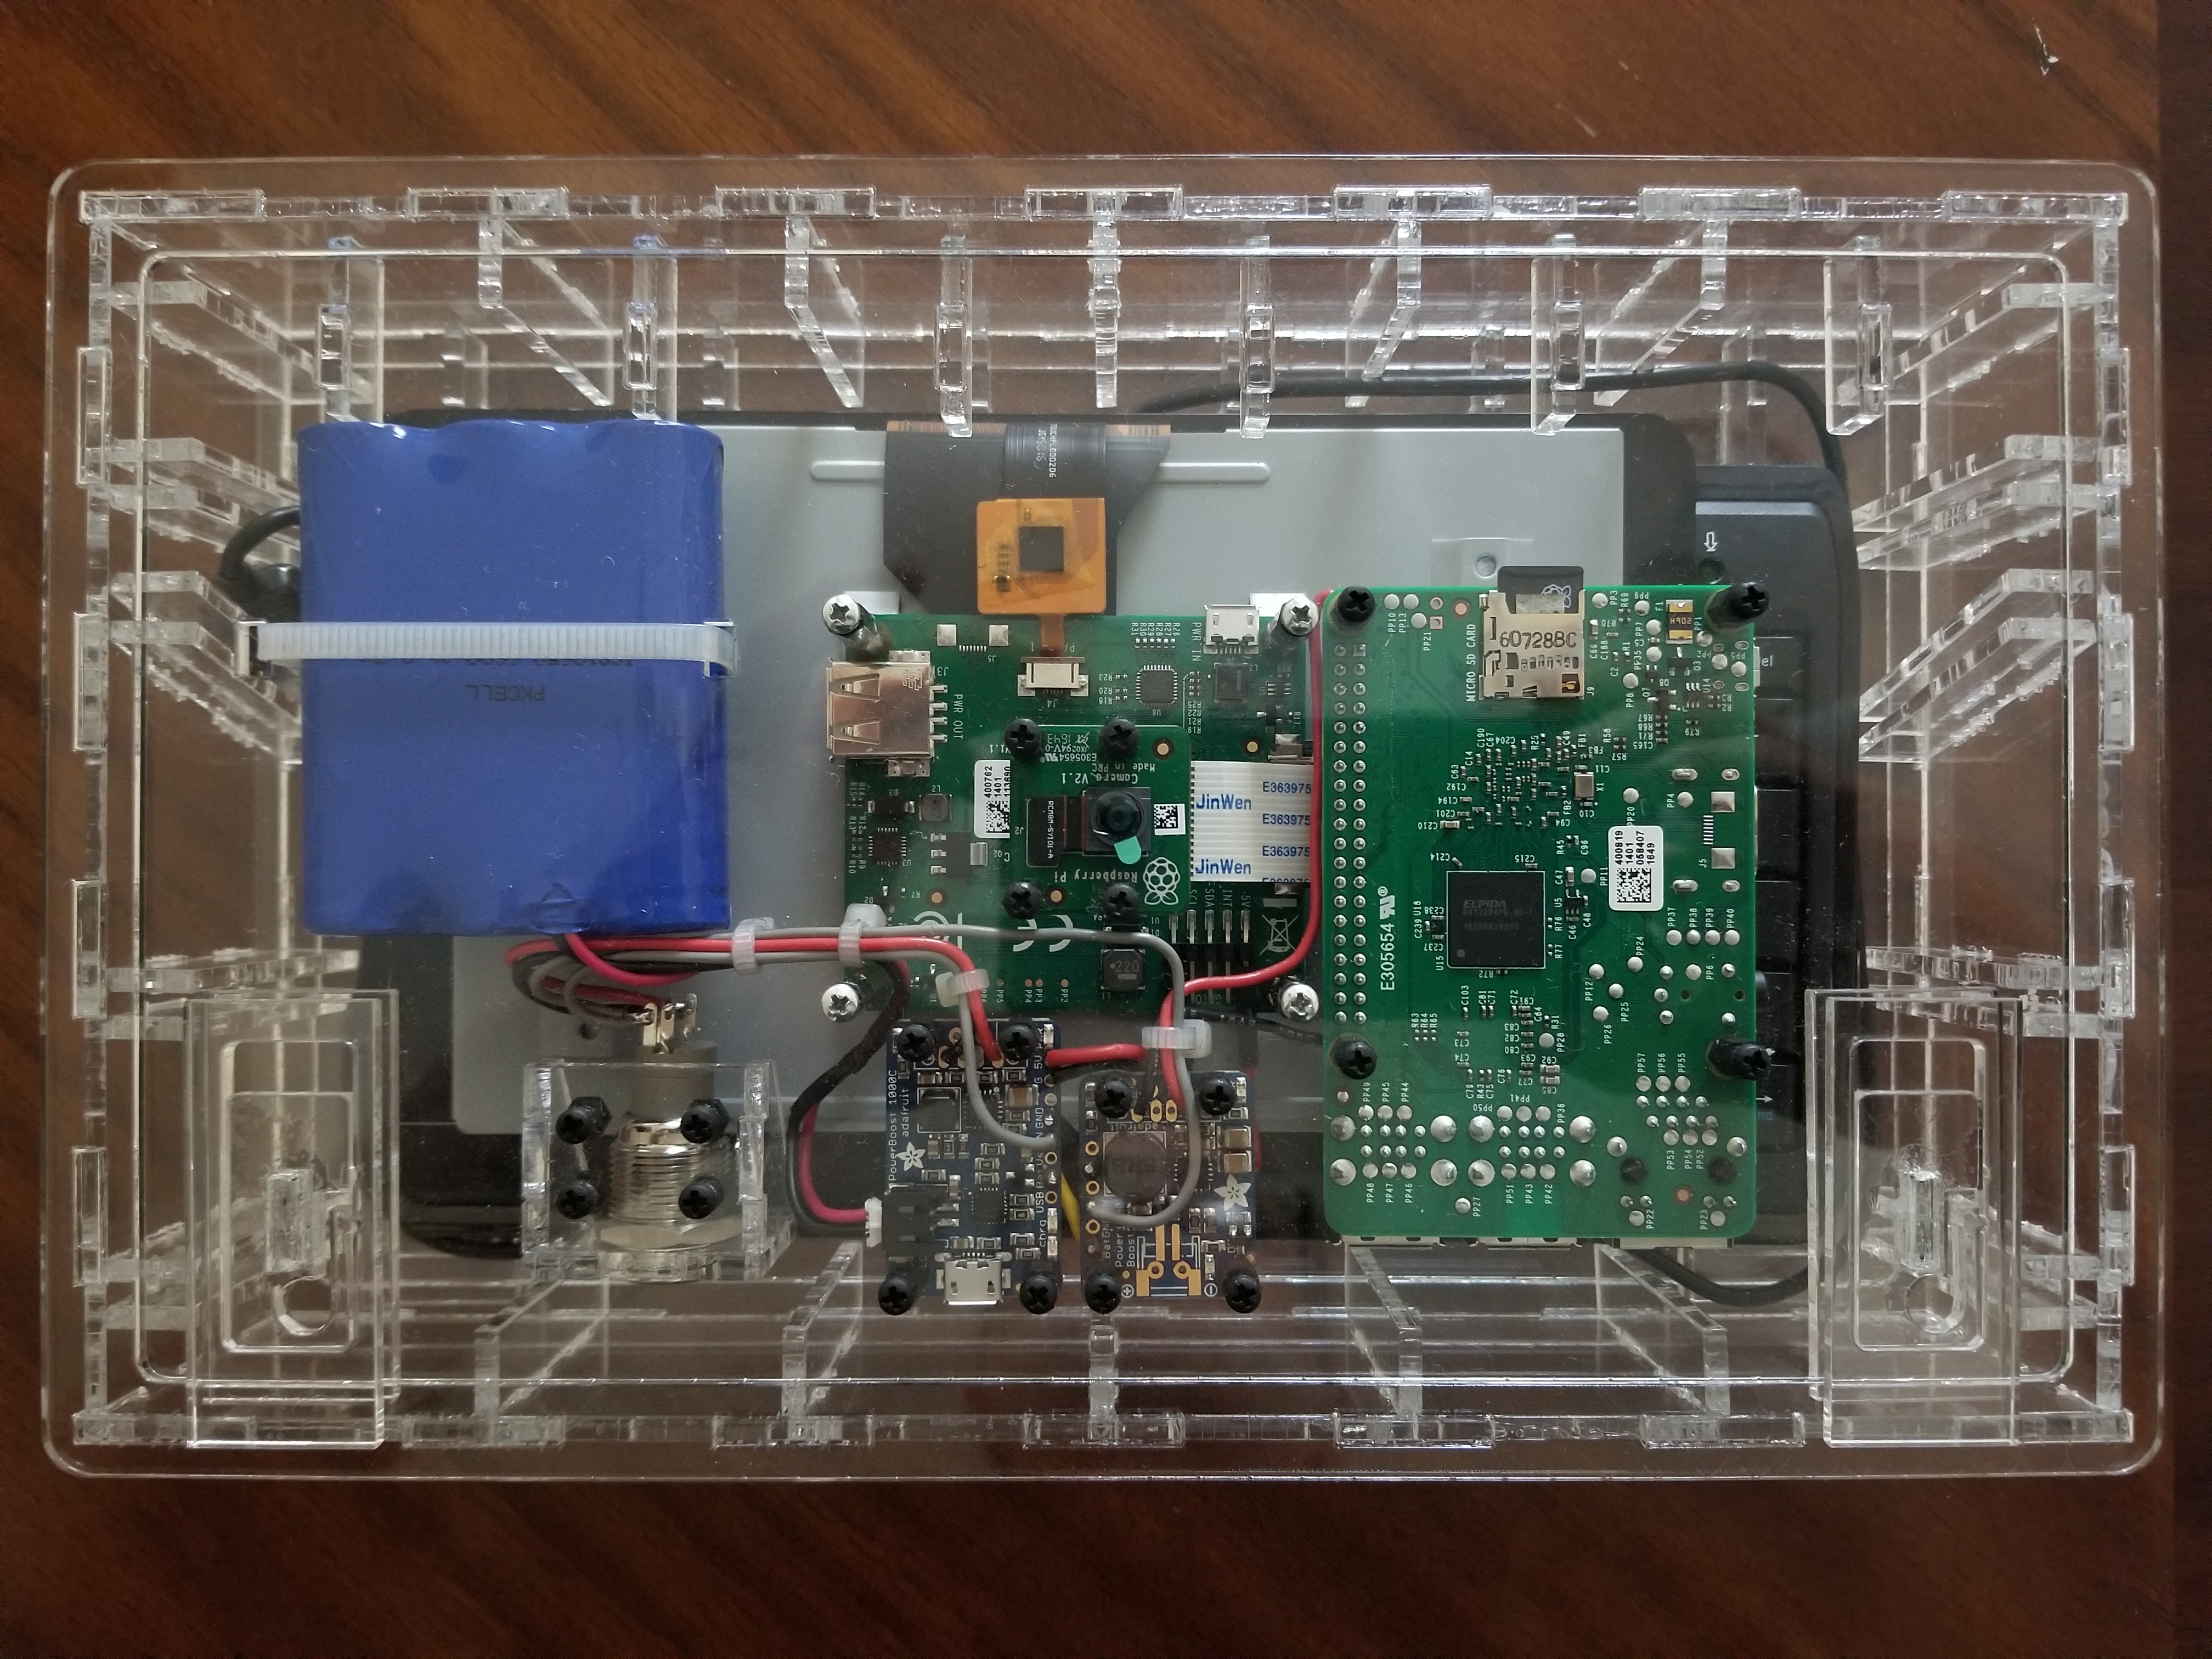
Computer and keyboard store in a transparent tamper evident case which can not be opened without the owner knowing the device has been tampered with.
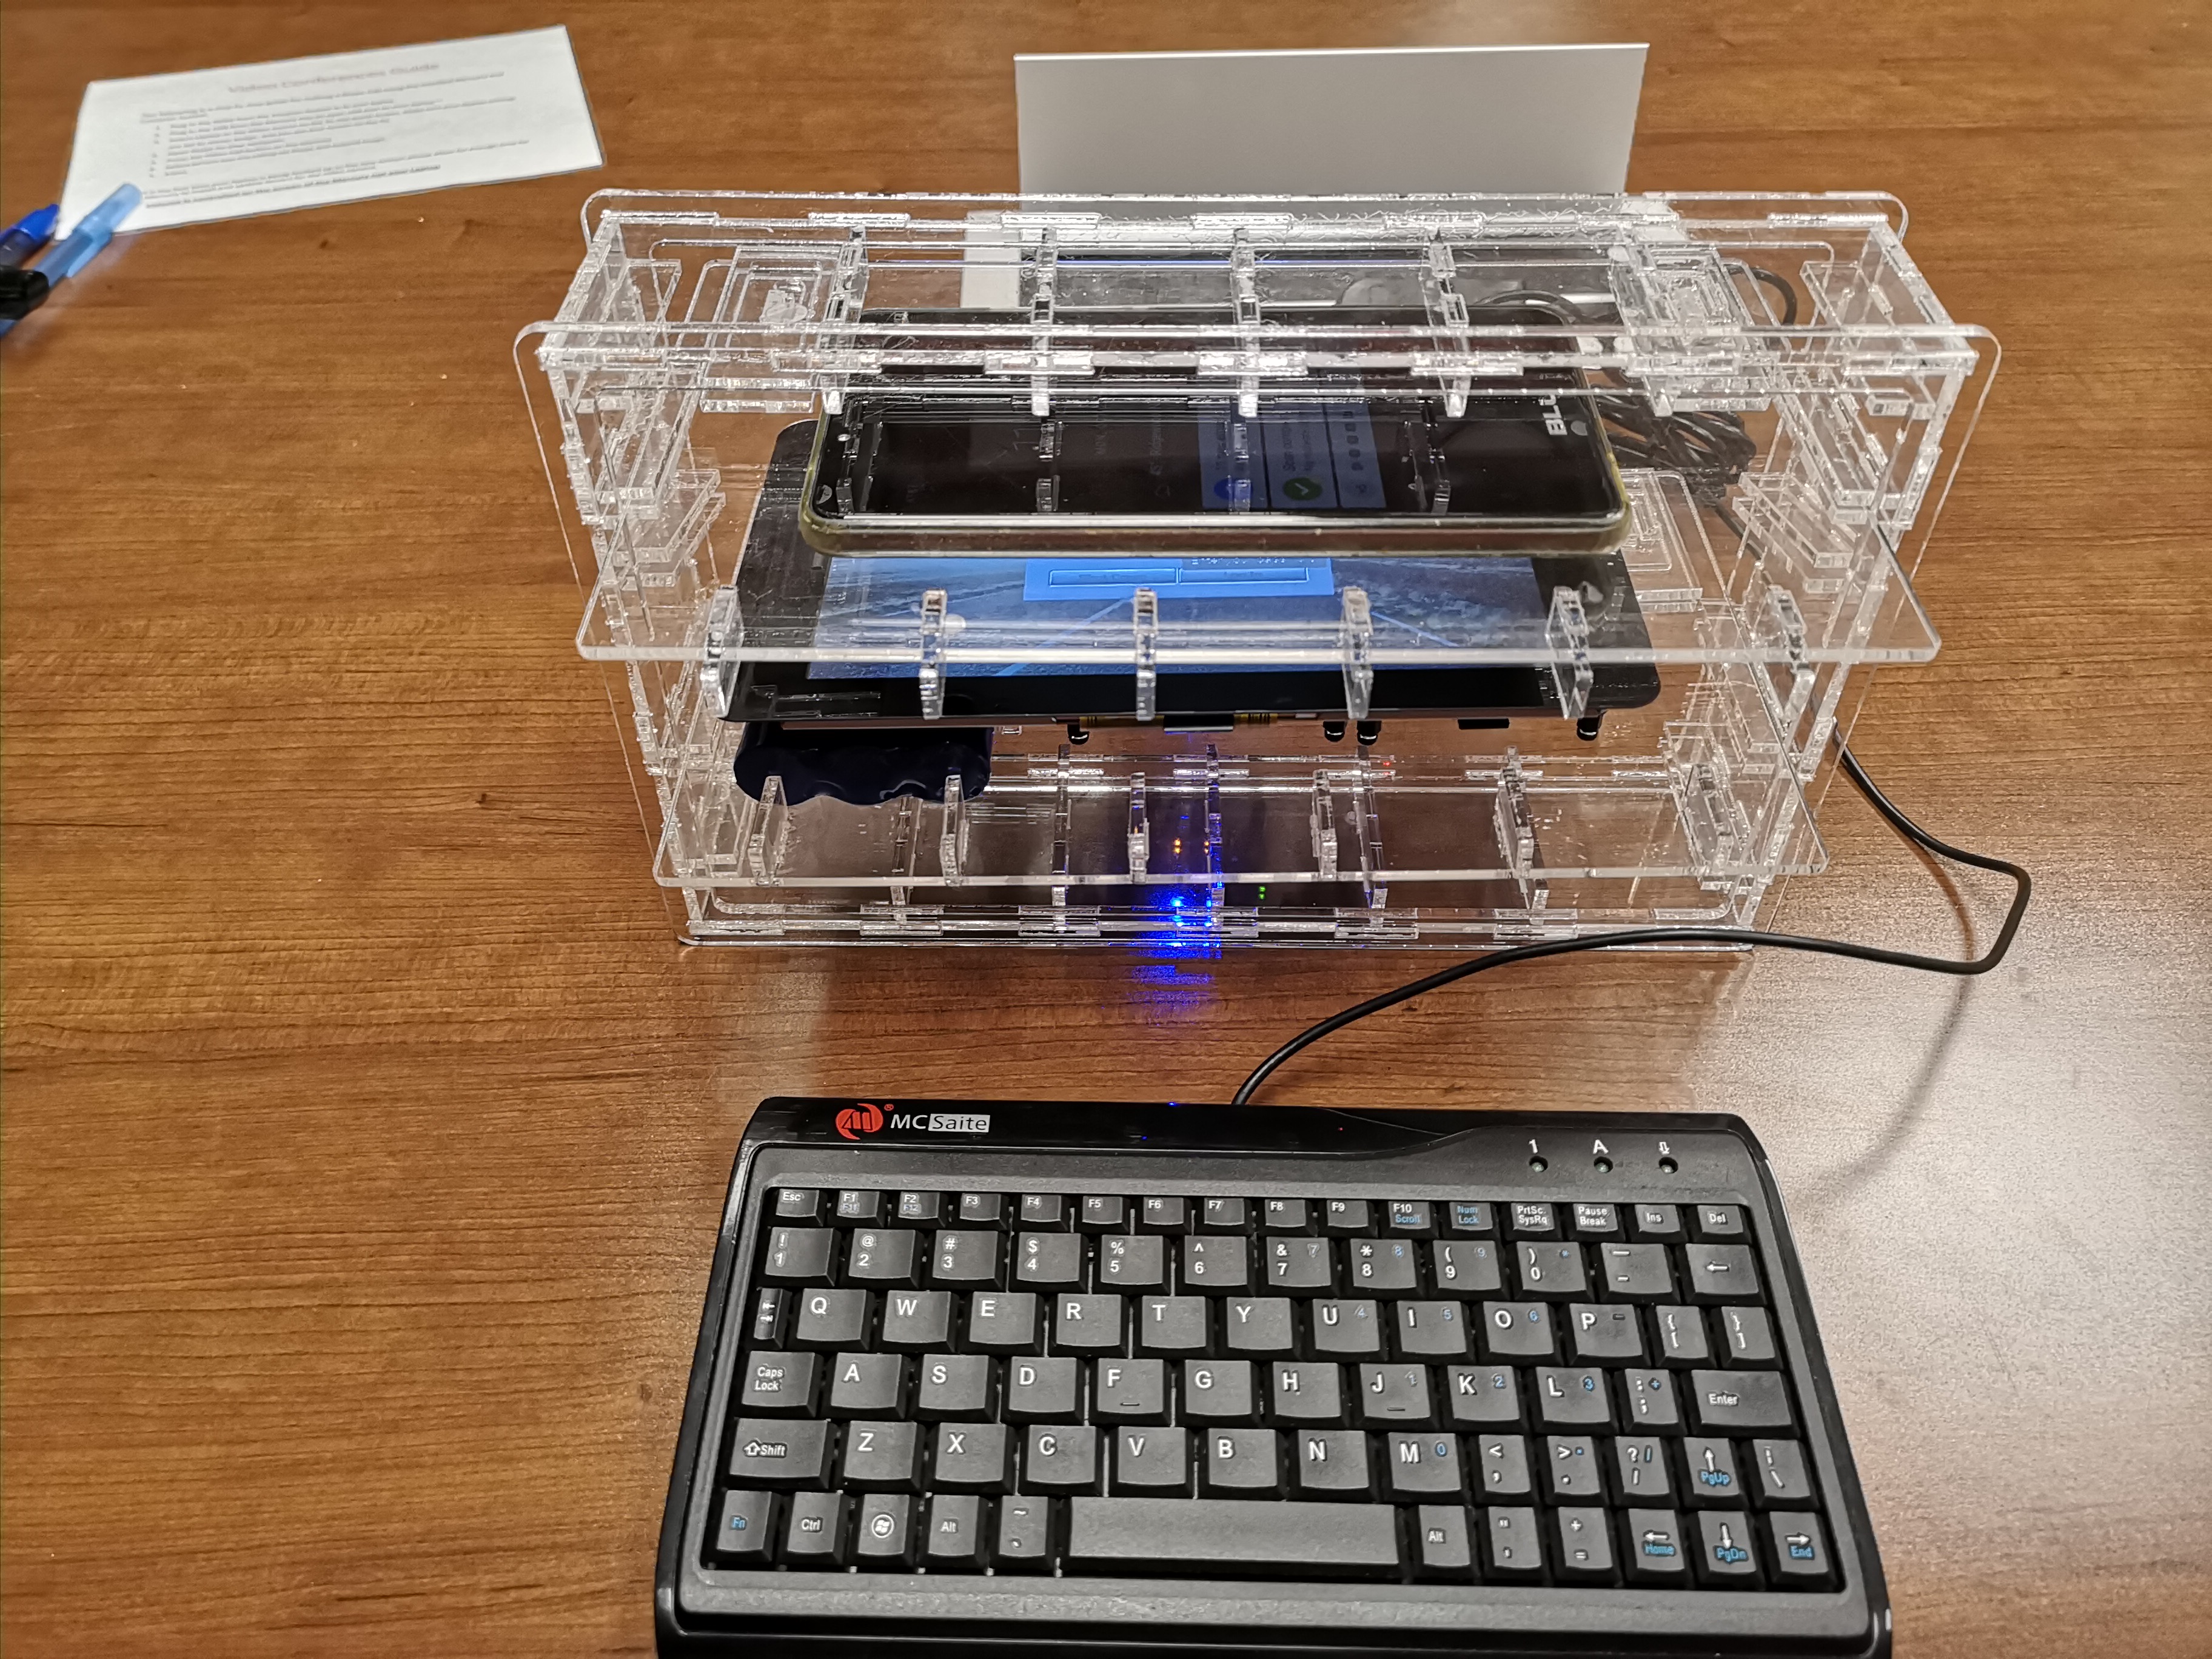 Click on image above to see a YouTube video showing how files are passed out of the PrivateKeyVault to a phone. Transparent case facilitates transfer of files and transaction instructions out of the Vault across the airgap using a parade of qr-codes flashed across the screen which are received by the phone's camera. The reverse process transfers files into the Vault from the phone. Click here to see that. The device has no WiFi or BlueTooth and it is never connected to another computer - not by cable, not by thumbdrive, nor by any other means. All data moving in or out of the device stands for inspection and approval before crossing the airgap.
This is the fully open source documentation of the physical build and all the software.
CorelDraw files are included for laser cutting the case You don't need the transparent case for your PrivateKeyVault, but it's nice and it solves a lot of problems. All you really need is a Pi 2, a Pi camera, a micro SD card, and an AC adaptor for power. You probably have a mouse, screen and keyboard laying around already. You are responsible for making sure there are no keyloggers or radio transmitters installed on any of these devices. So click here if you just want to install the software on your raspberry pi
Wiring Instructions As mentioned above you don't need battery power provided by all the special wiring. An AC adaptor is enough to power a basic raspberry pi. But battery power is nice so follow the link above if you would like battery power for your PrivateKeyVault.
This Video shows how an offline transaction is made on the Ethereum blockchain using the first prototype of the PrivateKeyVault. The procedure for making an offline transaction using the newer Vault or using a plain raspberry pi 2 is still the same so have a look if you want to see how an offline transaction is made on the Ethereum blockchain.
Basic support for the IOTA tangle at the NodeJS console is here. A client/server multi-signature wallet suitable for government, enterprise, and individuals is under construction.
The PrivateKeyVault has a touchscreen on one side, and a camera on the back. It is battery powered or powered by AC. The unit is self-contained. Everything required to make keypairs, make keystore files, and make encrypted offline transaction instructions is built into the machine. So there is never a need to show your private keys to any other device. There is no WiFi nor Bluetooth - just a camera, a touch screen, and a keyboard for input and qr-codes displayed on the screen for output. Account numbers are scanned in through the camera in the form of qr-codes or entered manually through on the keyboard. Encrypted transaction instructions are displayed on the touch screen in the form of qr-codes to be scanned into a smartphone. A smartphone scans the qr-code containing the encrypted instructions and broadcasts those instructions to the Ethereum blockchain. If the miners can decrypt your transaction instructions using your public key then they know that you are in possession of the private key without needing to see it. It is easy and quick to use but is also as safe as any cold storage method because all work with the private keys are done on this air-gapped machine and never shown to any other device. And because you never plug into a computer as is required with hardware wallets, you never have to worry about key loggers, remote viewing or remote control, nor do you need to worry about unknowingly transacting with a phony website pretending to be the digital wallet you normally use.
The PrivateKeyVault is fully compatible with LUKS full disk encryption and instructions are provided below to encrypt the SD card containing your operating system and all your data. So the Vault can be used to store all your sensitive files and all your secret passwords.
Finally, GPG comes installed with the Raspbian OS so the PrivateKeyVault can be used for secure encrypted messaging and for digitally signing documents. Any size file can be passed across the airgap via qr-codes so there is never a need to connect with other devices. This video shows how to work with GPG encrypted messaging on the PrivateKeyVault. The USB ports are only used to plug in the secure keyboard and for cloning the SD card containing the operating system and all your encrypted data.
When people read or write encrypted messages on devices that connect to the Internet or that connect with other devices, bad actors don't even need to break the encryption - all they need do is install remote viewing software or key loggers via the Internet or via some infected device. Then they can read the message at the same time you read it - after it has been decrypted. Encrypted messaging is much more secure when using the PrivateKeyVault compared with using a regular phone or computer. With the PrivateKeyVault, you don't decrypt the files until after they have crossed the airgap where remote control of your vault and remote viewing of your documents is not possible.
Quite likely there are already back doors built into many of the devices we have all come to trust. An airgap makes sense not only because it keeps our devices safe from spyware, but moreover because deals with the possibility that all our devices have already been compromised before we even purchase them and yet they must be used anyway to make secure cryptocurrency transactions or to pass secure encrypted messages. When you work with the PKV, all messages stand for inspection before and after crossing the airgap so you will know if the device is not doing what you expect before any secrets have been stolen.
The plan here is to teach people for free via this document and via YouTube how to make and use the PrivateKeyVault. Using this documentation, you can build your own PrivateKeyVault. Or you can set up your own business to do the same without giving us any money or recognition. Hooray Open Source! Now that people all across the world can set up their own accounts on a super secure device in their own homes or businesses when they are alone, there is never any doubt that only they can command their accounts and that their accounts are safe from hackers thieves and oppressive governments.
Contents
Motivation- By providing a single secure device for managing secrets, I hope to facilitate wide scale adoption of blockchain technology.
- What's In It For You?
- What's In It For Me?
- What's In It For Us?
- Crypto-Journalism:
- Added Value For People In Developing Countries
- Write the image to the SD Card
- Booting the Pi For the First Time
- Chose interfacing options, Expand File System
- Setting up VNC
- Switch to American keyboard layout if you are American
- Setup WiFi
- Purge Wolfram
- Screen lockers are a Security Risk
- Screen Blanking is a Security Risk
- Prevent Xsession and Display Power Management from Blanking the Screen
- Using xset to working with Xsession and DPMS at runtime
- Setup This Custom Version of MyEtherWallet On Your Pi Which Has Been Optimized For This Project
- Install the Camera and QR-Code reader
- Install a button on the Application Launch Bar to start the zbarcam QR-Code reader
- Put another button on the Application Launch Bar to kill the zbarcam process
- Enable Right Click
- Install Nodejs and NPM
- Install the npm packages required for working with Ethereum
- Get the program required to get a public address given a private key
- Installing Software for Getting Text and Files Into and Out Of the PrivateKeyVault Using QR-Code
- Cloning Your Encrypted SD card Using Only the Raspberry Pi
- Setup LUKS Full Disk Encryption
- Airgapping Your PrivateKeyVault
- Lock Down Your Pi
- Change your password and user-name
- Setting time without and Internet connection
- Deleting information on an SD card is impossible
- Sending an Offline Transaction to the Ethereum Blockchain
- Sending an Encrypted Message
- Create your private key
- Generating the public address or public key for use on the Ethereum Blockchain
- Check that your public and private key work together
- Warning About Quantum Computers
- Generate a Keystore File from a private key
- Preventing the Evil Maid Attack
- Conclusion
Physically Building the PrivateKeyVault
The rest of this document shows you how to build and use the PrivateKeyVault.Parts List
The items you will need are as follows. PrivateKeyVault has no finacial relationship with these vendors. * Qty (2) Acrylic Sheets - 18 inches X 12 inches X .115 inches thick * Small BD-25/2 Hypo Applicator * TAP Acrylic Cement (4 oz)- Raspberry pi 2 board
- Official raspberry pi 7 inch touchscreen
- Official raspberry pi camera
- (Qty 3) 16 GB micro SD cards
- Ethernet cable
- WiFi dongle for USB port
- 32Mb thumbdrive
- Miniature Keyboard- Microcontroller-Friendly PS/2 and USB
- 5V 2.5A Switching Power Supply with 20AWG MicroUSB Cable
- Power Boost 1000 Charger
- PowerBoost 1000 Basic - 5V USB Boost @ 1000mA from 1.8V+
- Lithium Ion Battery Pack - 3.7V 6600mAh
- Rugged Metal On/Off Switch with Green LED Ring - 16mm Green On/Off
- BRASS M2.5 STANDOFFS FOR PI HATS - BLACK PLATED - PACK OF 2
- 2.5 mm steel screws 6 mm long.
- A wire tie to hold the battery.
- Heat shrink tubing 1/16 inch diameter.
- A 3/32 inch in diameter drill bit.
- USB DIY Slim Connector Shell - A-M Plug for shortening keyboard cable.
- Jumper Wires Premium 6" F/F - 20 AWG (10 Pack)
- Wire, PVC, Red, 20 AWG, 25 ft, 7.6 m
- Wire, PVC, Black, 20 AWG, 25 ft, 7.6 m
Laser Cutting and Building the Transparent Case
Wiring Instructions
Installing the OS and Setting Up Basic Functionality.
The following is the written tutorial from which these notes are made. Setup Headless, Security, WiFi, VNC, Camera, and Much More
The following YouTube playlist follows the written tutorial exactly. Setup Headless, Security, WiFi, VNC, Camera - YouTube Playlist
Make a folder and name it perhaps PiSetup
Download Win32 Disk Imager found here to PiSetup and install it to the same directory. Source forge does not seem to offer a hash to check that the downloaded file has not been tampered with but the application does generate hashes so you can use it to check the validity of other files. When using it for that purpose, be careful not to accidentally trash your C: drive.
Download 7-zip found here to PiSetupand install it.
Download Raspbian Jessie with Pixel found here to PiSetup Do not download Stretch (the latest version of raspbian). As of this writing. I have not yet heard of anyone achiving LUKS full disk encryption when using Stretch as the operating system without using a second Linux computer to do the encryption.
If you want to, you can use the Win32 Disk Imager to check that the SHA1 hash of your zip file is the same as the SHA1 hash listed on the raspberry pi website (this is the easiest option). Or you can use NodeJS at the command line to check that the downloaded zip file has not been tampered with. This takes a bit more time but it is good to have two completely different methods to hash a file. Assuming NodeJS is installed - Open your favorite command line interpreter. I use PowerShell.
cd to the directory where downloaded zip file is located.
Start node by executing the following command. node
Then execute the following commands one at a time. Change the file name parameter to the name of the zip file before executing the last command, of course.
var fs = require('fs')
var crypto = require('crypto')
fs.createReadStream('/some/file/name.zip').pipe(crypto.createHash('sha1').setEncoding('hex')).on('finish', function () {   console.log(this.read()) //the hash })
Download VNC client found here to PiSetup No install is required. The SHA256 hash is given just below the download button. Node does not have native ability to run a SHA256 hash so I found this package Hasha which seem to be very popular. Keep in mind that The Win32 Disk Imager can accomplish the same thing but it's good to have several different methods of getting a hash.
Installing and using Hasha if you want to: Using your favorite Command Line interpreter, cd into your PiSetup directory.
Assuming NPM is installed, Initialize a project. This creates a package.json file which is necessary to install packages. Execute the following command. npm init Then answer the questions at the command line.
Next install the hasha package. Execute the following command. npm install --save hasha
Then execute the following commands one at a time. The file name parameter will be different for you of course.
const hasha = require('hasha'); hasha.fromFileSync('VNC-Viewer-6.1.1-Windows-64bit.exe', {algorithm: 'sha256'});Look up Hasha on NPM to learn about other ways to use this utility.
Write the image to the SD Card
Purchase the highest quality SD card that you can afford. I can not make a recommendation except to say do some research online.
Ensure that the write protection switch on the SD card adaptor is set to allow writing to the SD card.
Insert SD card into laptop.
Open Win32 Disk Imager.
Point the imager app at the image file (Raspian).
Point the imager at the target SD card by selecting it from the Device pulldown menu. All data currently on the SD card will be lost when the Raspian image file is installed on the SD card. Be very careful NOT to target your hard drive.
Click on the Write button and then click Yes button.
The previously untitled SD card is now called boot.
The disk imager has the ability to create hashes if required.
Booting the Pi For the First Time
Now eject the SD card from your computer and insert it into the pi.Insert one end of the Ethernet cable into the pi and the other end into your computer. Energize the pi and let it cook for a minute or more. Future boots will go much faster.
Important Note: When using your finger to resize windows: tap on the title bar of the window near an edge until the cursor changes to become a two headed arrow with heads pointing in opposite directions. Now you will know that the window is ready to be resized. Touch the cursor again and hold your finger for a short moment on the cursor. Now move your finger to resize the window. If you do not follow this method exactly then resizing the window can be maddeningly difficult.
Chose interfacing options, Expand File System.
Open a Terminal window by clicking the Terminal Window icon on the taskbar.Next type: sudo raspi-config at the command prompt and press Enter You will only be able to access this utility from the keyboard. The mouse will not work.
First, change the password. Make it difficult to guess and write it down so you don't forget it.
Then under Boot Options select Option B1 DeskTop / CLI. When that screen appears select option B3 DeskTop GUI requiring user to login
Next under Interfacing Options, Enable VNC and Camera.
Under Advanced Options, Select Expand File System.
Select Finish and accept the offer to reboot.
Setting up VNC
VNC can be used to configure your pi and to transfer files from PC.Make sure there is an Ethernet cable plugged in between your computer and your pi. Get the IP address of your pi by taping on the Networking icon near the upper right of the Task Bar. Double click on VNC-Viewer-6.1.1-Windows-64bit.exe in the PiSetup folder on your computer. Enter the IP address of your pi into the VNC window on your PC and press Enter on the keyboard. Your remote VNC session will start. Remember you can find out your Ethernet IP address by clicking the WiFi icon one or more times slowly until it shows up. The IP address for the Ethernet connection will be labeled eth0. This is the one you want to enter into the VNC dialog box on your computer. The IP address associated with your WiFi dongle will be labeled wlan0. This is for access to the Internet - it is not used for connecting to your computer.
You may get some security questions the first time you login with VNC because the VNC client has never seen that host before. Select responses that indicate that you trust the pi and you will be allowed to continue.
When prompted, login in with the username pi and with the new password you just created.
Change the System Font Size and Type
Buttons on system dialog boxes will be off the screen and you will not be able to access them unless you set the system font size. You will have to make the font small at first and then you can make it large again. This forces the system to put values in some configuration file where currently none exist. Press the CTRL+ESC to open the main menu. Or if you want click on the raspberry. Arrow down to Preferences and then select the Appearance Settings menu option. Click on the System tab. Select a small font and then click the OK button. Then do the same thing again but select a larger font Roboto 12 is the font I use. This seems to be the largest font I can have that will allow the entire dialog box to fit on the screen.Switch to American keyboard layout if you are American
Open the raspberry pi's command line interpreter. It's the forth icon from the top left on the menu bar. At the command line, execute the following line of code.sudo leafpad /etc/default/keyboard
Then change XKBLAYOUT="gb" to XKBLAYOUT="us"
Setup WiFi
Insert your WiFi dongle and reboot the pi. After the pi reboots, you will see a WiFi icon in the task bar near the right side. You will recognize the icon as a blue up arrow and a down arrow next to each other. If the icon does not appear then pulling out the dongle and reinserting will probably fix your problem. If you are still having trouble you can check that your WiFi hub is broadcasting and reciving at a slow enough bandwith for the dongle you are using. Click on the icon. After a few seconds your wireless router will appear in a dropdown list. Click on the list item representing your router. A dialog box will appear asking for your router's password. Enter the password and the pi will connect to the Internet through your router. It will now be possible to use the browser and to download files from the Internet.Now start a new VNC session between this computer and your raspberry pi via Ethernet cable. This will allow you to copy and paste commands from this document into the raspberry pi's command line interpreter.
Purge Unused Applications to Save Space on the SD Card
Execute the following line of code in your pi's terminal window:sudo apt-get purge bluej greenfoot games scratch sonic python-pygame python3-pygame python-gamera minecraft-pi wolfram-engine claws-mail
Running the following command in the terminal window will get you even more free space. apt-get autoremove
Screen lockers are a Security Risk
Logging out and then back in again is accomplished by selecting the Shutdown option on the main menu and then selecting the Logout button. This will log the user out and then present the user with a login screen to start a new session if desired. This is fail safe because if the login service crashes or is hacked no one is logged in. But if a screen lock is used then the user is still logged in so if the screen lock crashes or is hacked then the users's session becomes accessable to the attacker. Obviously, applications are closed when the user logs out so logging out is a bit inconvenient when compared with a screen saver but the extra security makes the effort worthwhile. Jamie Zawinski explains in detail hereScreen Blanking is a Security Risk
Screen blanking is a security risk because if a screen goes dark then the user might mistakenly think that the machine is off when in fact a mere touch will bring the screen back to life with the users session available.Prevent Xsession and Display Power Management from Blanking the Screen:
Run the following command in xTerminal to edit lightdm.conf:sudo leafpad /etc/lightdm/lightdm.conf
in section [Seat:*] add or adjust line to say: xserver-command=X -s 0 -dpms
I was having trouble getting the pi to stop blanking the screen until I put the above line of code in every section of the file. Now the screen stays on all the time. That's what I want.
Using xset to working with Xsession and DPMS at runtime:
At the pi's command line interface (xTerminal) you could execute the following to accomplish the same thing as above but it will only be in effect for the current session.xset s off -dpms
To view your Xsession settings, use this command: xset q
More on xset, Xsession, and DPMS here
Setup This Custom Version of MyEtherWallet On Your Pi Which Has Been Optimized For This Project
Using the Chrome Browser on your Raspberry Pi navigate to the following repository: https://github.com/johnshearing/MyEtherWalletOfflineWe are going to download the repository onto your raspberry pi. Look on the right side and scroll down a bit until you see a green button that reads Clone or download Click on that button. A small popup window will appear under the button. Click on the link which reads Download ZIP The ZIP file will download into your Downloads folder.
Now we are going to extract the files. Now open your file manager by clicking on the third icon from the upper left on your Start Bar. The icon looks like a folder. Click on that. Next navigate to the downloads folder. You will see an icon that reads MyEtherWalletOffline-master.zip Double click on that. An application called Xarchiver will open. Xarchiver looks a lot like a file manager. We will use Xarchiver to extract files from the ZIP file we just downloaded. Click on the Action menu option. Then click on the Extract menu item. A dialog box will open entitled Extract Files Click on the button on the bottom right labeled Extract Wait a few seconds for the Xarchiver to extract the file and then close the Xarchiver applicaition.
You will now see a new folder next to the zip file that you downloaded. This new folder is labeled MyEtherWalletOffline-master Double click on this new folder to open it. Now you will see a folder labeled dist. We are going to rename this folder MEW. Click once on the dist folder just to highlight it. Then open the Edit menu at the upper left and select the Rename menu option. When the Rename dialog box opens, rename the dist folder MEW.
Finally we are going to move the newly named MEW folder up to the pi directory. Click the newly named MEW folder once just to highlight it. Then on the Edit menu select Cut. Now navigate up to the pi folder and select Paste from the Edit menu. The MEW folder has now been moved up into the pi folder.
If you want to, you may now go back to your Downloads folder and delete the ZIP file: MyEtherWalletOffline-master.zip. You may also delete the extracted folder: MyEtherWalletOffline-master. You will not need these anymore. To delete a file or folder - click on the item and then under the Edit Menu click Remove.
Do not change anything inside the MEW folder If you change anything inside the MEW folder it may break the application.
Change the Chrome Browser Settings So That MyEtherWallet Will Run When Chrome Starts.
Open the Chrome browser by clicking the second icon from the top left on the Start Bar. The icon is round and blue and with lines of latitude and Longitude. It looks like a globe. Click on that to open the browser.Click the browser control icon at the right - it's the vertical ellipsis. It's three dots arranged vertically. The Control menu will open. Select settings from the menu options. This will bring you to the settings page. On the On Startup options: select the radio button marked "Open a specific page or set of pages". Then click the link next to the radio button marked "Set pages". Assuming you downloaded and extracted MyEtherWallet into the same directory I did then entering the following into the Startup Pages dialog box will cause your local copy of MyEtherWallet to load. file:///home/pi/MEW/index.html#offline-transaction Now close the browser and open it again. When it opens again the MyEtherWallet application should be open.
Important Don't put any private keys into MyEtherWallet until you have finished working through this document and you have committed to disconnecting your pi from the Internet. Once your private keys have been entered into the pi you must never ever connect the pi to the Internet nor to any other device. If you do, you will likely lose all your ether. You Have Been Warned
Setup MyEtherWallet Using the Original Repository.
Normal users can skip this section. This section is only for developers and users who do not want to use my customized fork of the MyEtherWallet repository. If you have already installed my fork of the MyEtherWallet repository as instructed in the last section of this document then you can skip this section and go on to the next. For developers and users, the latest MEW project unaltered by me is found here.Read everything on that page and then click on the link near the top of the readme file entitled Download the Latest Release
Developers will download the source code to their computers and will follow the developer's instructions on that webpage.
Here is the gist of it from Taylor at MEW: clone the repo enter that folder install node / npm and then do npm install gulp in your command line. Now you can make changes via the /app/ folder and it will recompile and show up in the dist/index.html. If you want to remove big pieces, you can adjust things in app/scripts/main.js or app/layouts/index.html If you want to adjust items on certain pages, you can remove via the components in app/includes/ And then you have a mess of styles in /app/styles/ running gulp prep will compile it all down using the ES5 babel transform. You need this if you are using slightly older browsers.Users will download the compiled version (dist-vX.X.X.X.zip) directly to their pi and unzip it. Keep all the unzipped files together as they were when they were unzipped on the pi. Do not move them around. Leave them undisturbed.
I find that the easiest way to install MEW on the pi is to use the pi's browser and go to MyEtherWallet.com. Then scroll to the bottom of the webpage and click on the link entitled Latest Release Download the distribution zip file and then move the whole zip file into a folder which I name MEW. Then unzip the file into this same folder.
Be very careful when going to MyEtherWallet.com that you type the WebAddress in yourself or use one of your own bookmarks. If you use someone else's link then you will find yourself at a counterfeit website that will steal your private keys and take all your ether. Remember it's myetherwallet.com not .org, not .net or dot anything else. Also, there have been counterfeit websites that use the numeral 1 instead of the letter l in URL. Using this site will cause you to lose all your ether. For these reasons you should always type the URL into your browser yourself, or use one of your own bookmarks. You have been warned
To use MyEtherWallet on your pi, run index.html in your browser. Assuming you downloaded and extracted MyEtherWallet into the same directory I did then the following command in the terminal window will run it. chromium-browser --app=URL file:///home/pi/MEW/index.html#offline-transaction
Don't put any private keys into MyEtherWallet until you have finished working through this document and you have committed to disconnecting your pi from the Internet. Once your private keys have been entered into the pi you must never ever connect the pi to the Internet nor to any other device. If you do, you will likely lose all your ether. You Have Been Warned
Install the Camera and QR-Code reader
If you have been following along then the camera was already enabled usingsudo raspi-config
Now you will need to focus the camera. This is because you will be using the camera to take pictures and videos of qr-codes on your phone which will be held about 2 3/8 inches from your camera. This really matters if you are using the camera to read qr-codes. You simply will not be able to read qr-codes with your camera if it is not focused for a distance of 2 3/8 inches.
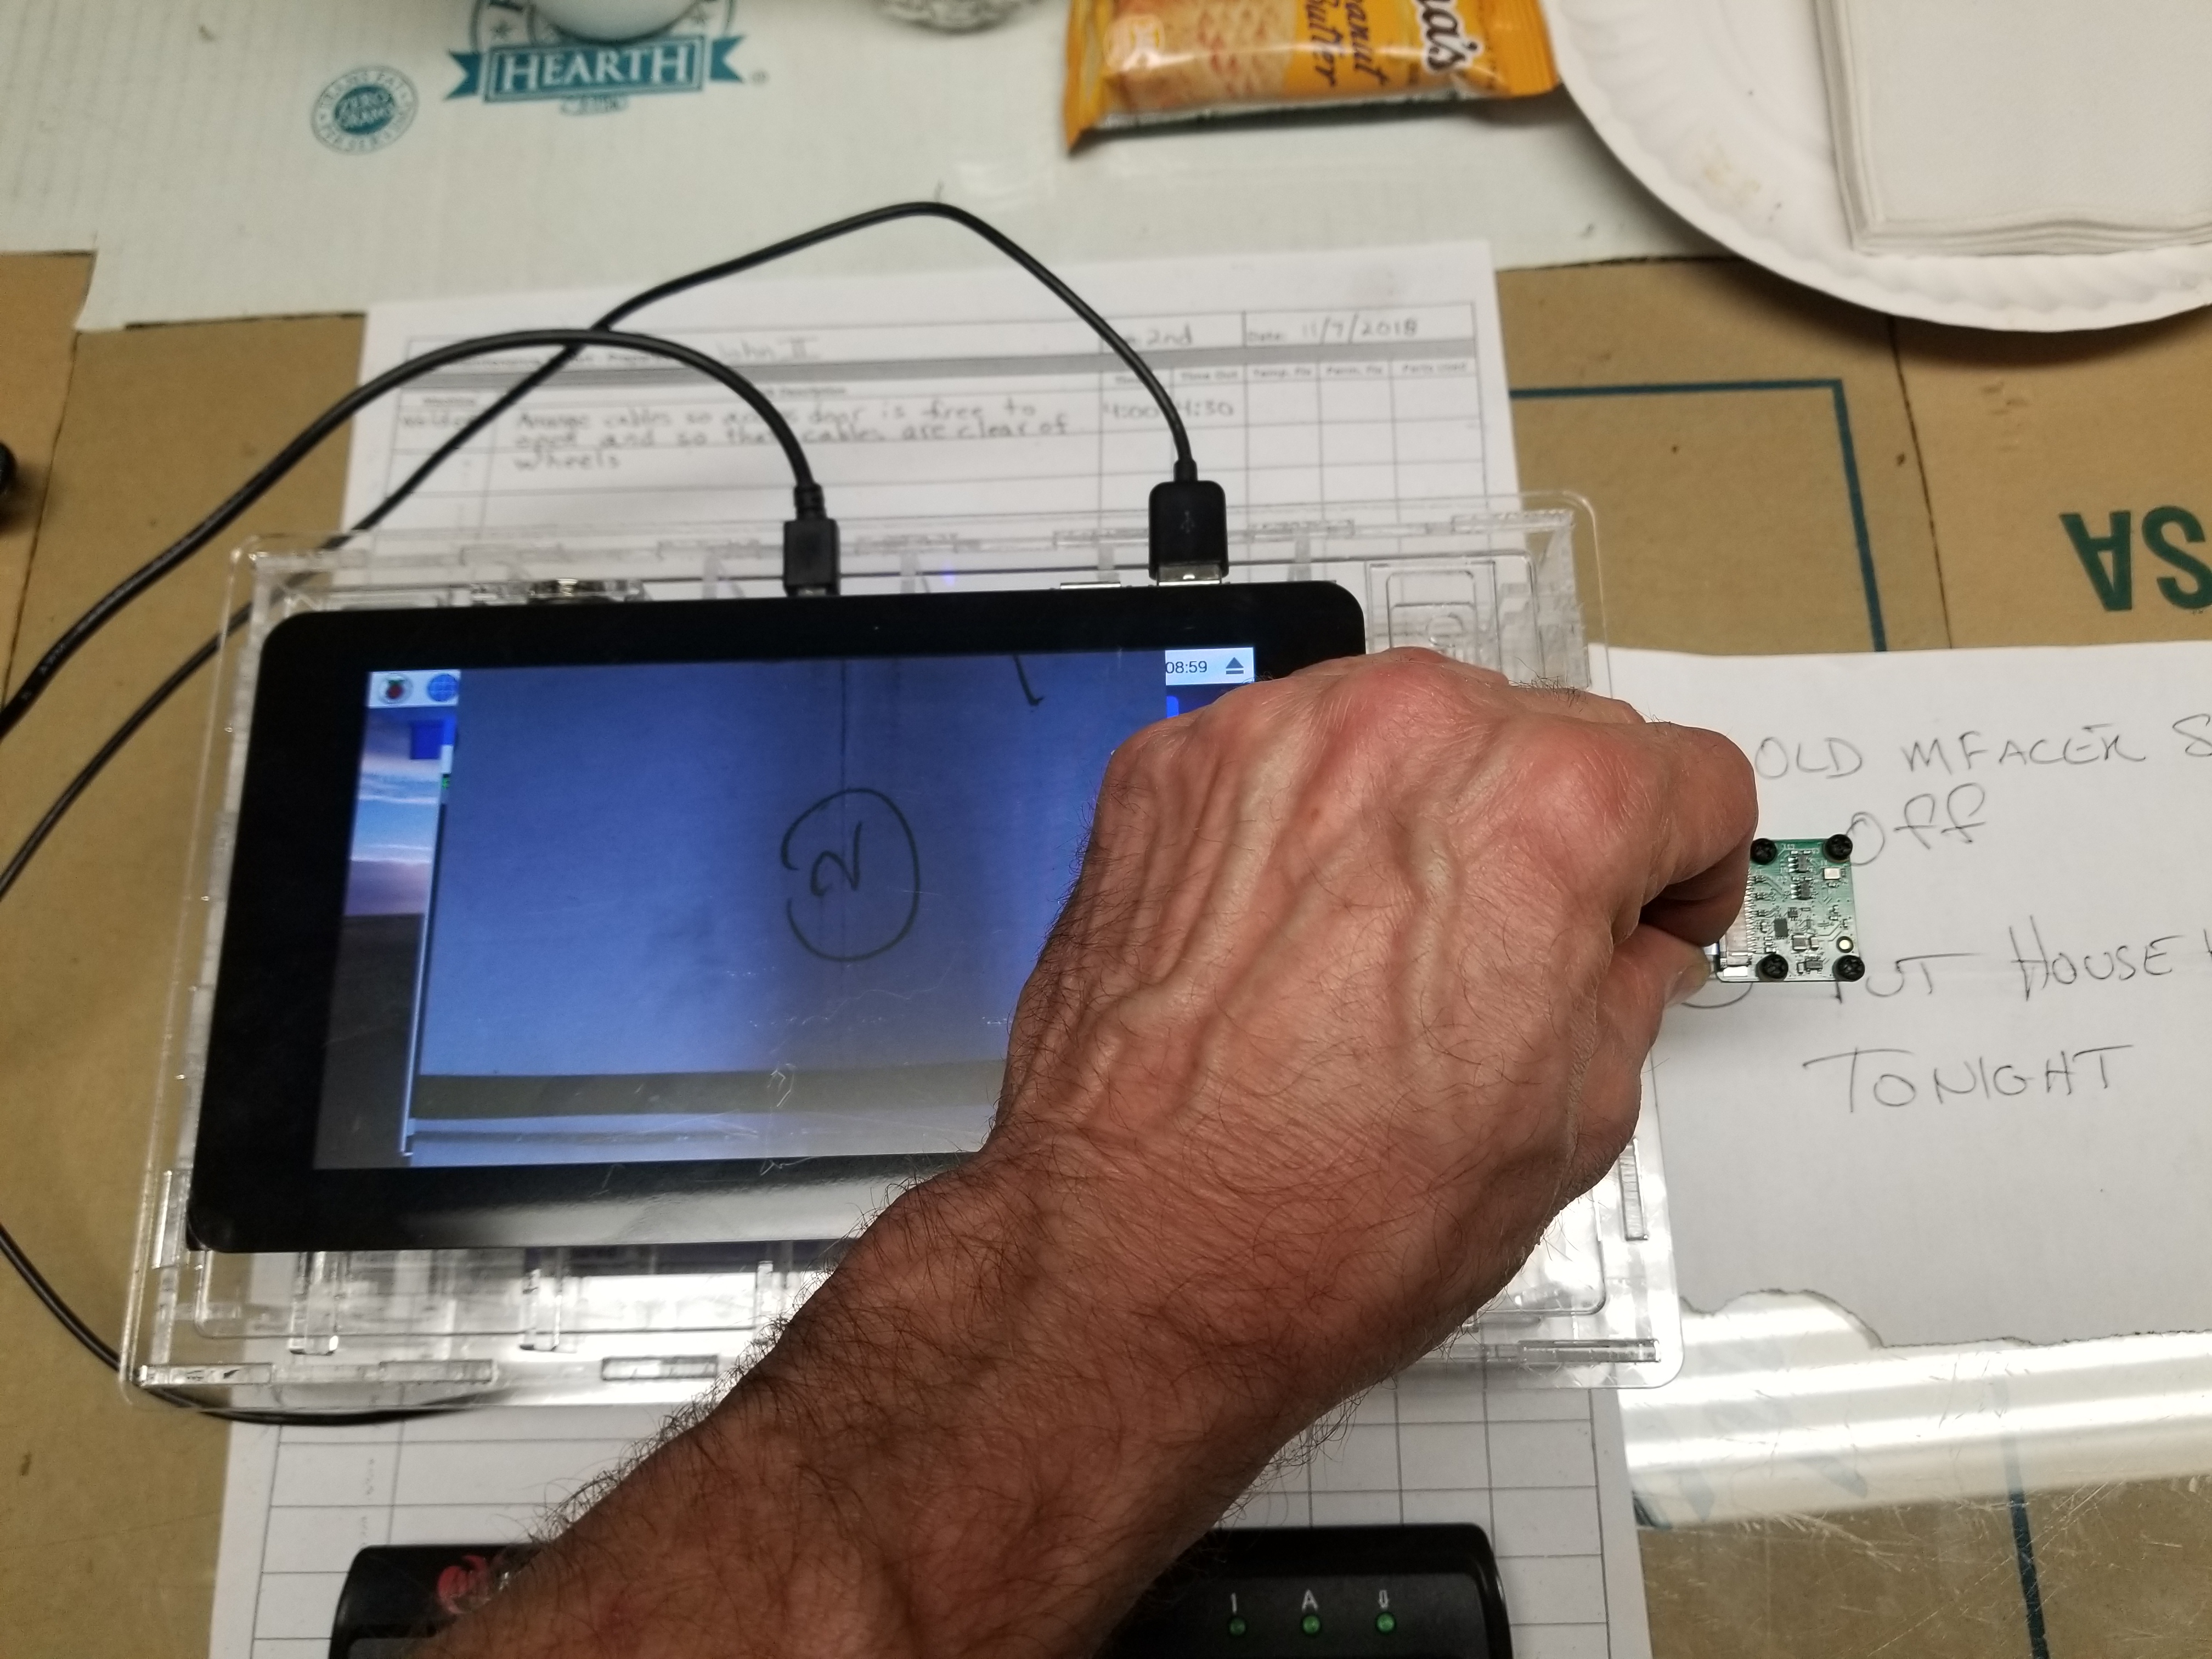
You will need to remove the touch screen in order to remove the camera and then temporarily put it back together as show in the photo above in order to focus the camera.
When you have the Vault powered up again in this new configuration execute the following command at the terminal window to set up the camera focus raspistill -t 0 --rotation 270 Now the touchscreen will show what the camera sees. Adjust the focus to about 2 3/8 inches as measured from lens to object. The next photo shows how to make the adjustment.
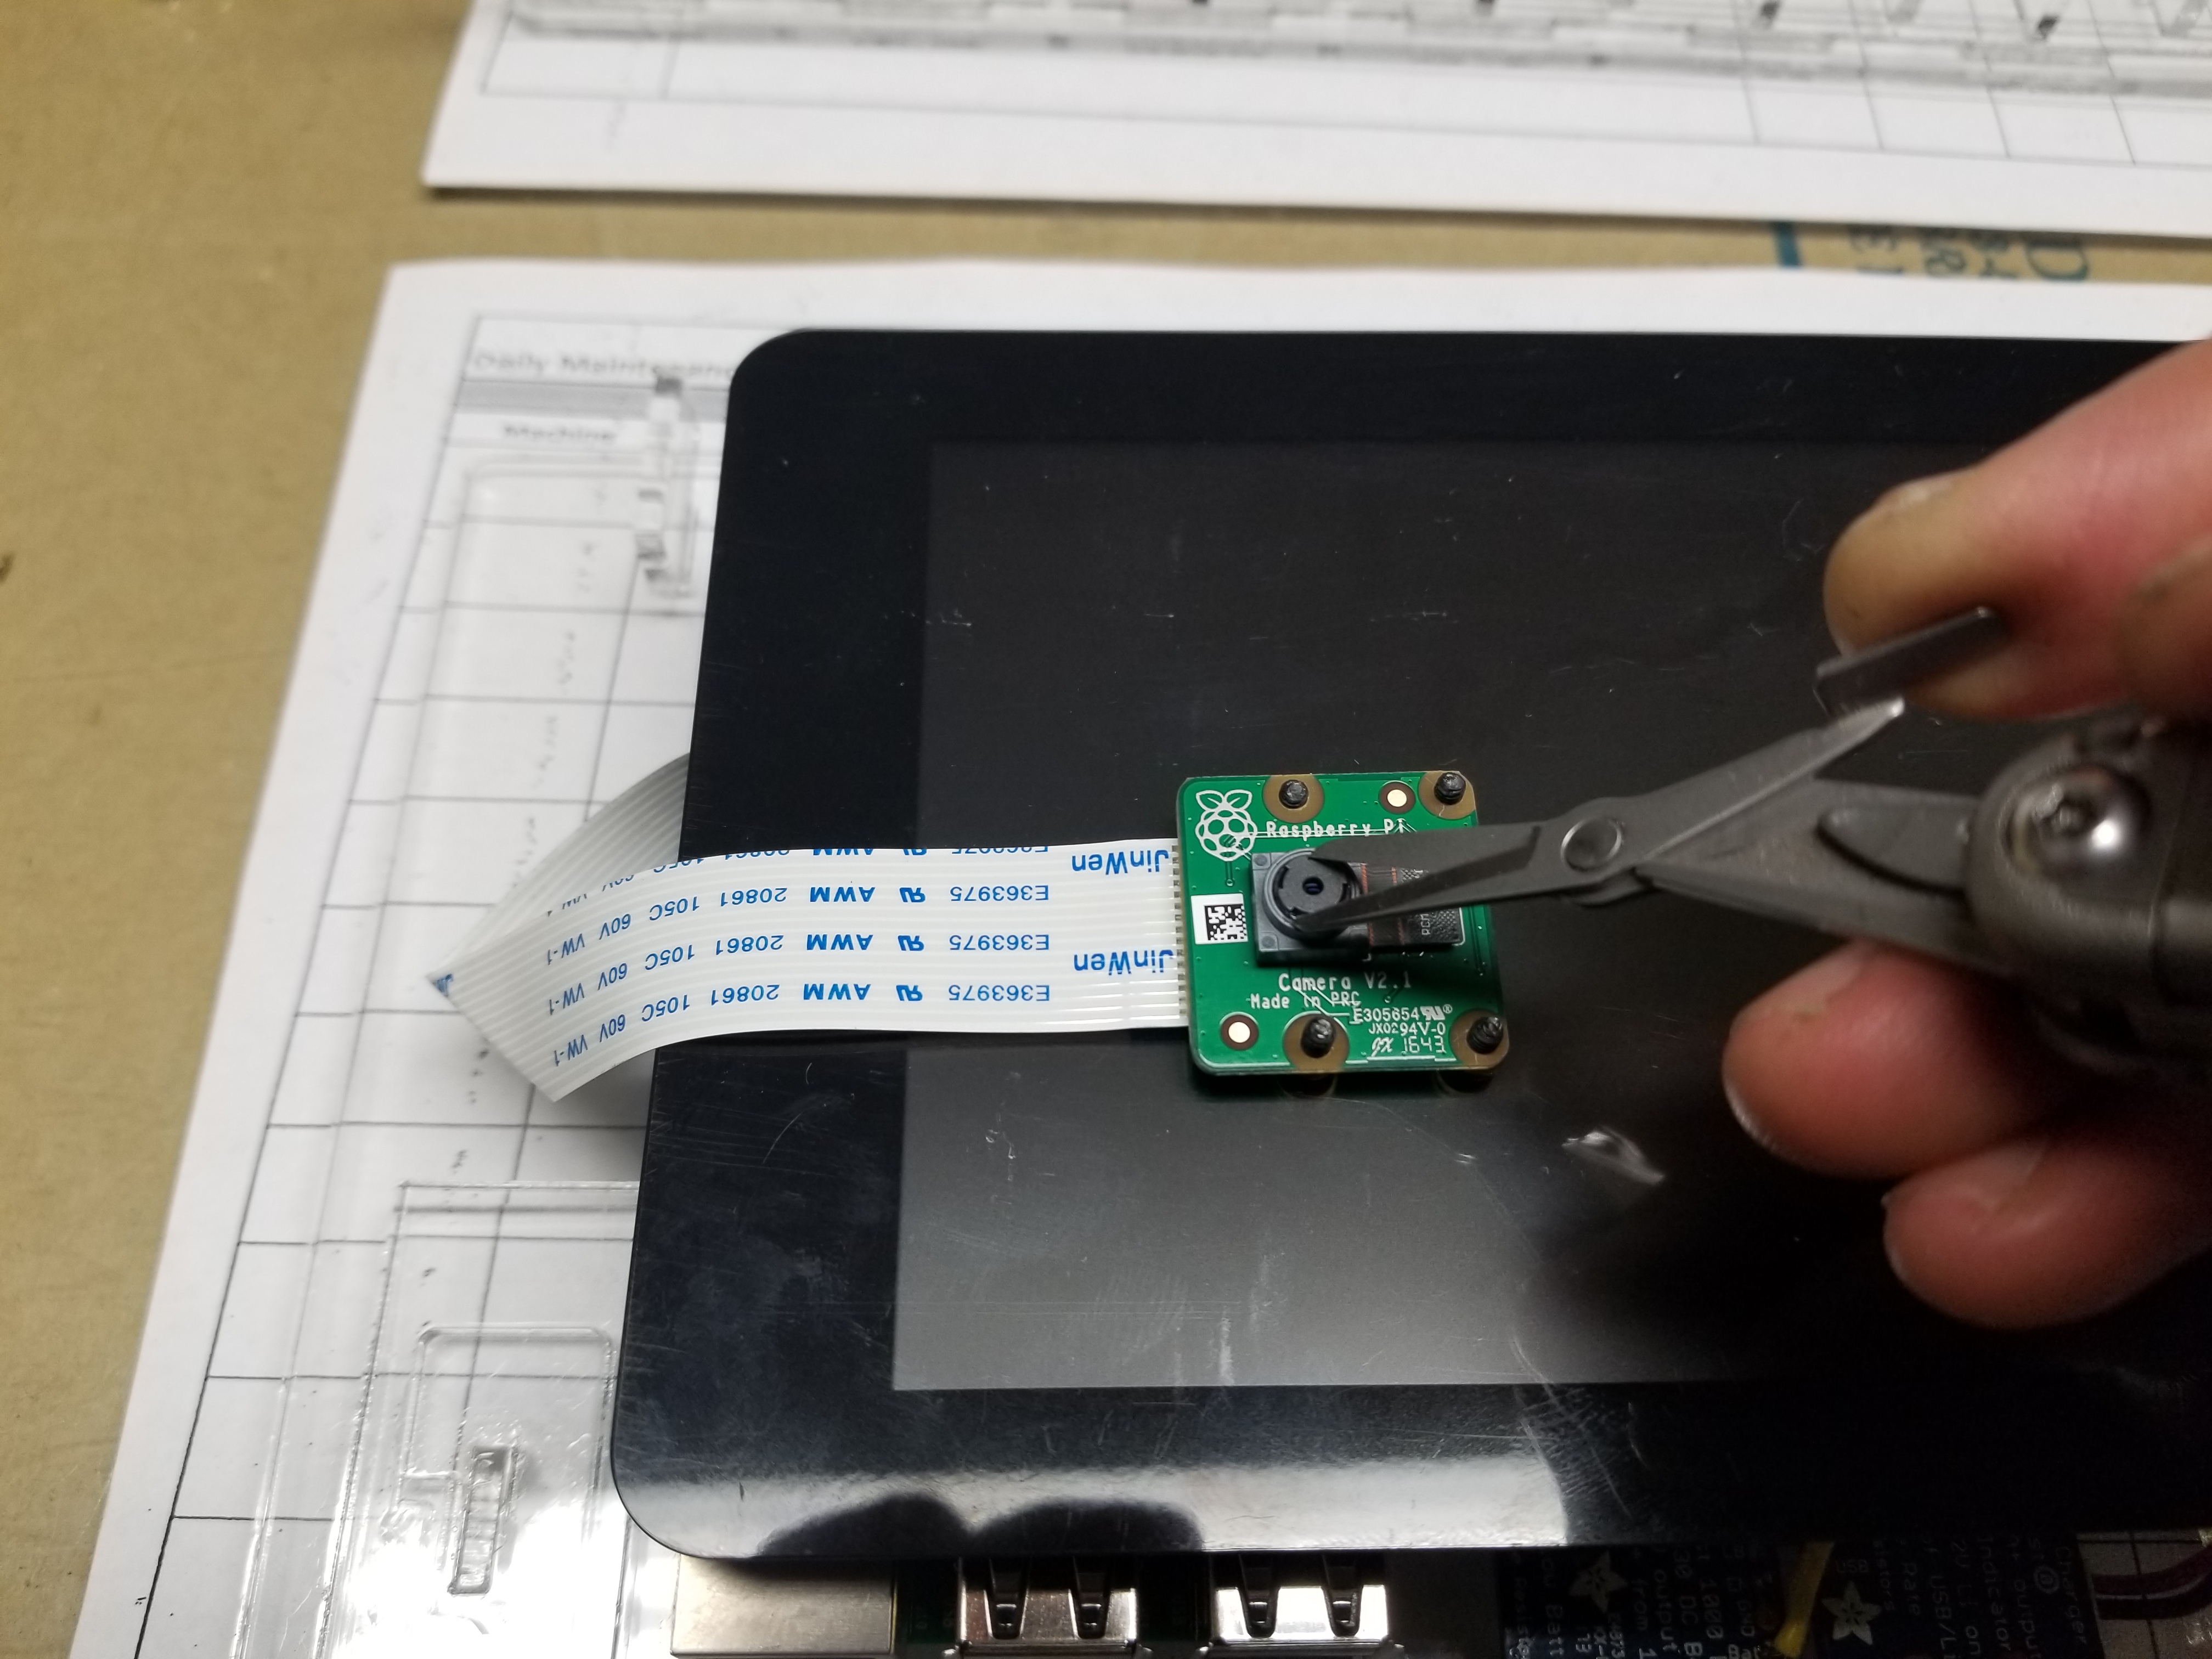
The focus comes set at infinity. Small sharp sissors are good for turning the retaining ring. Counter clock wise moves the focus closer. Some of the cameras come from the vendor with a dot of glue on the retaining ring to keep the focus set at infinity. If the dot of glue is present then some force will be required to break the dots of glue that hold the retaining ring in place. Keep turning the retaining ring and checking focus until focus is sharp at 2 3/8 inches. When focus is good shut down and power off and then remount the camera at it's normal position. It might be good to put a tiny dot of super glue on the retaining ring when finished adjusting the focus but I haven't tried doing it. To see what is possible with raspistill execute raspistill --help
Install zbarcam. This is the program that decodes QR code. Run the following command in the pi's terminal window one at a time. sudo apt-get update sudo apt-get install zbar-tools
Download and compile "crikey. This takes output from the zbarcam and pipes it to the active input control. sudo apt-get install libx11-dev x11proto-xext-dev libxt-dev libxtst-dev wget http://www.shallowsky.com/software/crikey/crikey-0.8.3.tar.gz tar -xzf crikey-0.8.3.tar.gz cd crikey-0.8.3 make sudo cp crikey /usr/local/bin Help with crikey can be found by emailing fmft71 at yahoo dot es
Execute the following line of code in the pi's terminal window to make the pi cam visible to zbarcam. sudo modprobe bcm2835-v4l2
Even better, load the module at every boot Add bcm2835-v4l2 to the file /etc/modules
I like to use the LeafPad text editor. Enter the following command in the pi's terminal window to open the correct file for adding the code above. sudo leafpad /etc/modules
Reboot your pi to see the changes take effect.
Execute the following command in the pi's terminal window to start zbarcam zbarcam --nodisplay --raw --quiet -Sdisable -Sqrcode.enable --verbose --prescale=640x480 | crikey -i Pressing ctrl + C will stop the zbarcam.
Install a button on the Application Launch Bar to start the zbarcam QR-Code reader
Three files are involved: My source of information on this topic can be found hereFirst, create a file in the pi directory called ldqrreader.sh The name stands for Load QR-Code Reader. The location of the file is important. Using the Terminal Window, execute the following command: sudo leafpad /home/pi/ldqrreader.sh
Paste the following into the file and save it to the pi directory:
#/usr/bin/sh
zbarcam --nodisplay --raw --quiet -Sdisable -Sqrcode.enable --verbose --prescale=640x480  | crikey -i
Next, Grant read, write, and execute permissions to everyone. Execute the following command in the pi's terminal window: sudo chmod 777 /home/pi/ldqrreader.sh
Second File: Get two nice icons from the internet. One you will click on to start the QR-Code reader and the other will be used to stop it after getting a good read. Save these to the following directory: /usr/share/icons/ Be sure to convert them to the png format using a paint like program before saving it to the pi. I called my icon QR-Code.png It can be found here This is already in the correct format. The other icon - Kill_QR-Code.png is found here
We will refer to the icons later by the names already given to them. Be sure to save these in the /usr/share/icons/ directory.
Next, Grant read, write, and execute permissions to all users. Execute the following commands in the pi's terminal window: sudo chmod 777 /usr/share/icons/QR-Code.png sudo chmod 777 /usr/share/icons/Kill_QR-Code.png
Third File: The Desktop file - This is file determines the properties of the short cut. Execute the following command in the pi's terminal window sudo leafpad /home/pi/.local/share/applications/ldqrreader.desktop It could have been named anything but the location maters.
Paste the following code into the file:
[Desktop Entry] Name=Start QR_Code Reader Comment=Start the QR_Code reader Icon=/usr/share/icons/QR-Code.png Exec=sudo /home/pi/ldqrreader.sh Type=Application Encoding=UTF-8 Terminal=false Categories=Utility;Next, Grant read, write, and execute permissions to every one. Execute the following command in the pi's terminal window: sudo chmod 777 /home/pi/.local/share/applications/ldqrreader.desktop
Reboot the pi and then right click on the Application Launch Bar so that you can edit its properties in the same way that was shown for the Florence virtual keyboard above. Select your new desktop item (It can be found in accessories) and place it onto the Application Launch Bar.
Put another button on the Application Launch Bar to kill the zbarcam process.
Three files are involved:This article covers killing processes. Use killall and the name of the program
The First File: Make a copy of your scanner icon and mark it up with the paint program to signify turning off the QR-Code scanner. Save it to the pi in the following directory: If you have been following along then this is already done in the previous step. /usr/share/icons/ Be sure to convert it to the png format using a paint like program before saving it to the pi. I called mine Kill_QR-Code.png We will refer to the icon by this name.
Next, Grant read, write, and execute permissions to every one. Using the pi's terminal window, navigate to the /usr/share/icons/ directory. Then execute the following command in the pi's terminal window: sudo chmod 777 Kill_QR-Code.png Again, this has already been done if you have been following along.
Second file: Next, create a file in the pi directory called killqrreader.sh The name stands for Kill QR-Code Reader. We will refer to the file by this name. The location of the file is important too. Using the Terminal Window, navigate to the pi directory and execute the following command. sudo leafpad /home/pi/killqrreader.sh
Paste the following into the file and save it to the pi directory:
#/usr/bin/sh
sudo killall zbarcam
Next, Grant read, write, and execute permissions to every one. Execute the following command in the pi's terminal window: sudo chmod 777 /home/pi/killqrreader.sh
Third File: The Desktop file - This is file determines the properties of the short cut. Execute the following command in the pi's terminal window sudo leafpad /home/pi/.local/share/applications/killqrreader.desktop It could have been named anything but the location maters.
Paste the following code into the file:
[Desktop Entry] Name=Stop QR_Code Reader Comment=Stop the QR_Code reader Icon=/usr/share/icons/Kill_QR-Code.png Exec=sudo /home/pi/killqrreader.sh Type=Application Encoding=UTF-8 Terminal=false Categories=Utility;Next, Grant read, write, and execute permissions to every one. Execute the following command in the pi's terminal window: sudo chmod 777 /home/pi/.local/share/applications/killqrreader.desktop
Reboot the pi and then right click on the Application Launch Bar so that you can edit its properties in the same way that was shown for the Florence virtual keyboard above. Select your new desktop item (It can be found in accessories) and place it onto the Application Launch Bar.
At some point in the future it might fun to have the buttons which turn on and off the QR-Code scanner behave like radio buttons where the active button is depressed. This article covers changing the Application Launch Bar programaticlly
ENABLE RIGHT CLICK
Normally right click functionality on a touch screen is achieved with a long press on the screen. However, the official 7 inch raspberry pi touch screen does not support that although long press to get the context sensitive menu is available in the pi's Chrome Browser. To get the context sensitive menu everywhere else there is an application called twofing. As you have probably guessed pressing two fingers on the touch screen initiates the context sensitive menu.
Here is the complete installation instructions from scratch... The source of these instructions for install without errors is found here
Execute the following commands at your pi's command prompt:
Install the required packages on your pi sudo apt-get update && sudo apt-get install build-essential libx11-dev libxi-dev x11proto-randr-dev libxrandr-dev libxtst-dev xserver-xorg-input-evdev
Install and compile twofing cd ~ wget http://plippo.de/dwl/twofing/twofing-0.1.2.tar.gz tar -xvzf twofing-0.1.2.tar.gz cd twofing-0.1.2 make && sudo make install
Create a new rule-file sudo leafpad /etc/udev/rules.d/70-touchscreen-raspberrypi.rules
Add the following line KERNEL=="event*",ATTRS{name}=="FT5406 memory based driver",SYMLINK+="twofingtouch",MODE="0440"
Open X11 config in your text editor sudo leafpad /usr/share/X11/xorg.conf.d/40-libinput.conf
Add the following lines at the end of the file
Section "InputClass"      Identifier "calibration"      Driver "evdev"      MatchProduct "FT5406 memory based driver"
Option "EmulateThirdButton" "1"      Option "EmulateThirdButtonTimeout" "750"      Option "EmulateThirdButtonMoveThreshold" "30"   EndSection
sudo reboot
Check if twofing is working twofing --debug
Add twofing to autostart sudo leafpad ~/.config/lxsession/LXDE-pi/autostart
Add the following line at the end @/usr/bin/twofing
Cleanup cd ~ rm -rf ~/twofing-0.1.2
Starting and Stopping Twofing For now, enable by executing the following command at the terminal window. twofing To disable twofing execute the following killall twofing
Install Nodejs and NPM
Remove any the older version of node if one is installed: sudo apt purge nodejs
Install a newer version of node. There are two ways that you can do this. Install using nvm Install using apt NOTE: If you want to keep node fully updated, you should use nvm. If you use apt you have to keep adding repositories every time a new major release comes out.
Recommended install method Install using nvm: Install nvm: wget -qO- https://raw.githubusercontent.com/creationix/nvm/master/install.sh | bash Now Reboot: sudo shutdown --halt now --reboot Now you can install the latest version of node by running nvm install node This seems to install npm as well. Reboot again sudo shutdown --halt now --reboot
Not recommended. better to use method above instead Install NodeJS using apt: Add the NodeSource repository sudo curl -sL https://deb.nodesource.com/setup_8.x | bash Install by running sudo apt install node nodejs npm
Install the npm packages required for working with Ethereum.
These packages are only necessary if you will be working at the command line. Eventually most users will need MyEtherWallet only, but for now direct interaction with NodeJS is required. Make a new working directory call it perhaps Ethereum Hint: do not name it the same as any packages you intend to install.mkdir ethereum
At the command line cd into the Ethereum directory Then type the following and hit enter for each command. npm init Then follow the prompts to create a package.json file.
The following installs take time. Be patient during the install process.
Required for making public and private keypairs: npm install web3 --save npm install ethereumjs-util --save
Required to make offline transactions at the command line: npm install ethereumjs-tx --save
Required to work with smart contracts at the command line: npm install solc --save
Required to generate a Keystore file from a private key. npm install ethereumjs-wallet --save
The above commands will install the latest versions of the packages.
Get the program required to get a public address given a private key.
Execute the following commands in your pi's terminal window:Navigate to your the ethereum directory on your pi if you are not already there. cd /home/pi/ethereum
Start your Nano text editor. sudo nano keygen.js
Now paste the following code into Nano
var EthUtil = require("ethereumjs-util")
var pkey = new Buffer(process.argv[2],"hex");
var privateKeyToAddress = function(privateKey) {     return "0x" + EthUtil.privateToAddress(pkey).toString('hex') }
console.log(privateKeyToAddress(process.argv[2]))
Press CTRL + O to save the stream. That's the letter ooh not zero.
Answer yes to the default name of the file.
Press CTRL + X to quit Nano.
We will see how to use this program shortly.
Installing Software for Getting Text and Files Into and Out Of the PrivateKeyVault Using QR-Code
Since the PrivateKeyVault does not connect to any other devices there must be a way to transfer text and files into and out of the device in some transparent manner that gives the user complete control and the ability to inspect what information is moving in and out of the device at every stage of the transfer. We will be doing this job with QR-Codes.The following 4 minute video gives a general idea of how QR-Code is used to transfer information into and out of the PrivateKeyVault. It is also a full demonstration of how to securely send ether on the Ethereum block chain. To see the video click here
The following instructions were made from information acquired from the following videos. You can view these if you are interested in seeing where the idea came from. These videos are made for security experts and penetration testers. These people, who work within the law, are hired to test network security by stealing information. They then return the information and report on security weaknesses. We are not doing any of that. We are only using QR-Codes to optically transfer files into and out of the PrivateKeyVault whi
README truncated. View on GitHub


