
A zero to complete walk through of setting up HashiCorp Consul on AWS from scratch!
Getting into Consul
This is the repo used in the Getting into HashiCorp Consul series where we walk through building out a Consul based architecture and cluster, on AWS, from scratch.
This repo is split into branches, each representing a part in the series:
- Part 0 - Beginning of the Project
- Part 1 - Configuring Server and Client on AWS
- Part 2 - Configuring Service Discovery for Consul on AWS
- Part 3 - Scaling, Outage Recovery, and Metrics for Consul on AWS
- Part 4 - Security, Traffice Encryption, and ACLs
- Part 5 - All About Access Control Lists (ACLs)
- Part 6a - Configuring Consul with HCP Vault and Auto-Config
- Part 6b - Mostly Manual Configuration for Part-7 and beyond (use this)
- Part 7 - Enabling Consul Service Mesh
- Part 8 - Traffic Shaping and Envoy Debugging
- Part 9 - Metrics with Prometheus
- Part 10 - Terminating and Ingress Gateways
- Part 11 - Mesh Federation
- Part 12 - Using HCP Consul
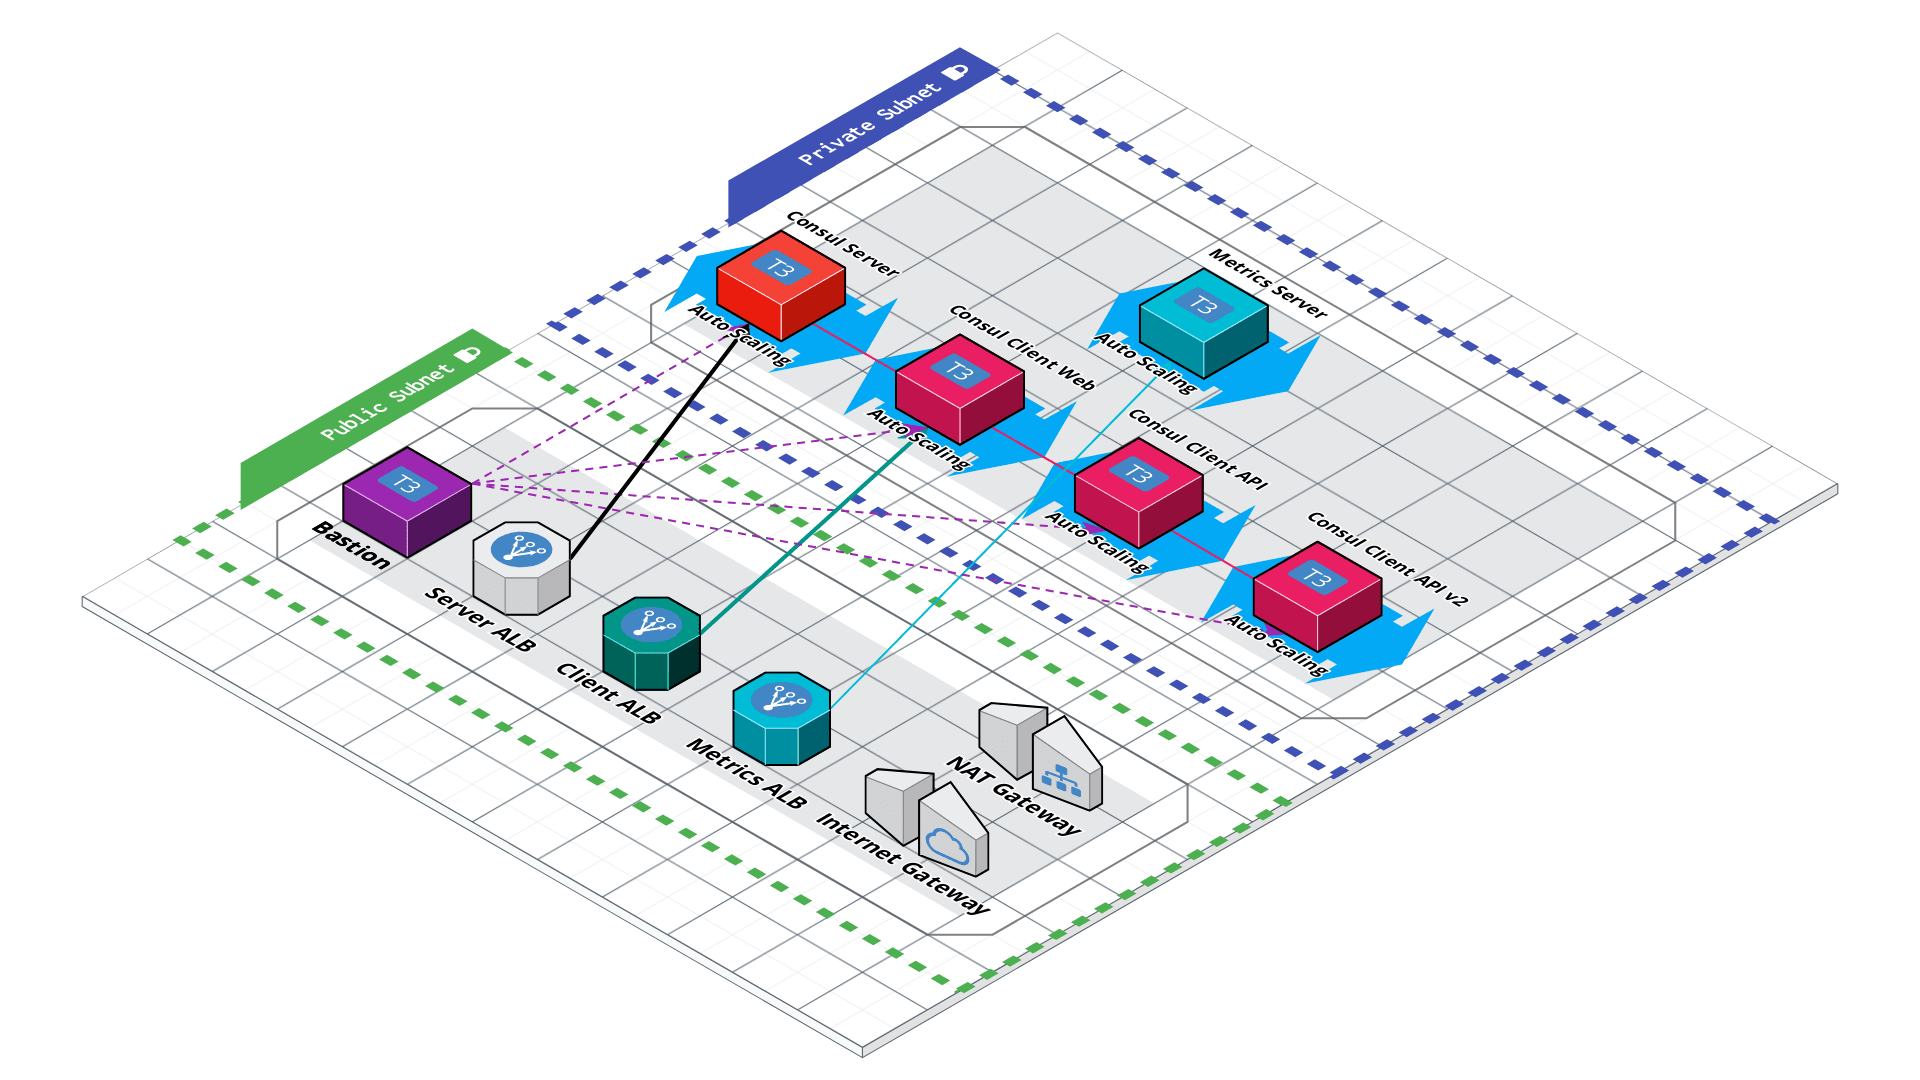
The Architecture So Far:
Getting Started
To set use this repo, take the following steps:
- Have an AWS Account.
- Ensure you have the following things installed locally:
- Either use the root user for your account, or create a new IAM user with either Admin or PowerUser permissions.
- Set up AWS credentials locally either through environment variables, through the AWS CLI, or directly in
~/.aws/credentialsand~/.aws/config. More information on authenticating with AWS for Terraform.
- Create an EC2 Keypair, download the key, and add the private key identity to the auth agent. More information on creating an EC2 Keypair.
# After downloading the key from AWS, on Mac for example
	chmod 400 ~/Downloads/yourawsec2_key.pem
# Optionally move it to another directory 	mv ~/Downloads/yourawsec2_key.pem ~/.ssh/
# Add the key to your auth agent 	ssh-add -k ~/.ssh/yourawsec2_key.pem
- Create a
terraform.tfvarsfile and add the name of your key for theec2keypair_namevariable:
ec2keypairname = "yourawsec2key"- Run
terraform apply!
- After the apply is complete, run the post apply script:
# this will output two things:
# 1. Sensitive values needed in a local file 'tokens.txt'
# 2. Values required by the metrics_module
# 3. Detailed setup instructions which are also listed below 	bash scripts/post-apply.sh
- SSH into
bastionand then into yourgetting-into-consul-apinodes...
clientapinodeidtoken from tokens.txt to the /etc/consul.d/consul.hcl file in the acl.tokens block.
2. Add the clientapiservice_token from tokens.txt to the /etc/consul.d/api.hcl file in the service.token block.
3. Add the clientapiservice_token from tokens.txt to the /etc/systemd/system/consul-envoy.service.
4. Restart both consul, api, and consul-envoy service:
sudo systemctl daemon-reload
sudo systemctl restart consul api consul-envoyconsul-envoy will fail to start if consul isn't given enough time to start up. Simply restart consul-envoy again if this is the case.
- SSH into
bastionand then into yourgetting-into-consul-webnodes...
clientwebnodeidtoken from tokens.txt to the /etc/consul.d/consul.hcl file in the acl.tokens block.
2. Add the clientwebservice_token from tokens.txt to the /etc/consul.d/web.hcl file in the service.token block.
3. Add the clientwebservice_token from tokens.txt to the /etc/systemd/system/consul-envoy.service.
4. Restart both consul, web, and consul-envoy service:
sudo systemctl daemon-reload
sudo systemctl restart consul web consul-envoyconsul-envoy will fail to start if consul isn't given enough time to start up. Simply restart consul-envoy again if this is the case.
- Head to the Consul UI via your
consul_serveroutput from Terraform (theapplication load balancerDNS for the server).
consul_token output, you can find it in your state file)
- To verify everything is working, check out your Consul UI...
- To verify the web service is up and running, head to the DNS printed in the terraform output as
web_server
body of the api server with an IP address in dc1.
Deploy the Optional Metrics Server
There's also another module nested in this repository that will stand up a prometheus deployment to monitor your Consul cluster. To deploy it.
- Ensure that the above "Getting Started" instructions have been followed.
post-apply.sh script that creates needed variables for the metrics deployment.
- Run the
post-apply-metrics.shscript:
bash scripts/post-apply-metrics.sh- Navigate to the nested
metrics_module.
cd metrics_module/- Initialize the nested Terraform Module:
terraform init- Deploy it:
terraform apply- Afterwards, it'll output
metrics_endpointwhich is the endpoint you can visit to view your metrics.
Setting Things Up Manually
Although this repo is set up so that you can get everything working via terraform apply, if you'd like to take the manual steps for learning, you can reference these documents:
- From Part 1 to Part 2 Manual Steps
- From Part 2 to Part 3 Manual Steps
- From Part 3 to Part 4 Manual Steps
- From Part 4 to Part 5 Manual Steps
- Follow the Steps on this README to get to Part 6
- From Part 6 to Part 7 Manual Steps
- From Part 7 to Part 8 Manual Steps
- From Part 8 to Part 9 Manual Steps
Troubleshooting
502 Bad Gateway Error when visiting the Consul Server UI
The most likely cause of this is a failure to fetch and install consul on the servers due to a failure to get the required GPG key. The most straightforward way to fix this is to terraform destroy the infrastructure and reapply it via terraform apply.
web service fails to reach the api service
If everything deployed fine and you can see the Consul UI and the web service is reachable but is saying that the api can't be reached, it's likely Consul Intentions. To fix:
- Login with your consul bootstrap token.
- Click the Web service and then click on the Topology tab.
- Click on the red arrow between the web and the api boxes and click Create to create a new intention that allows the
webto access theapiservice.
Notes
- Cloud Auto-Join is set up for part 1, despite not being in the stream itself.


