
InfluxDB 2.0 python client
influxdb-client-python






This repository contains the Python client library for use with InfluxDB 2.x and Flux. InfluxDB 3.x users should instead use the lightweight v3 client library. InfluxDB 1.x users should use the v1 client library.
For ease of migration and a consistent query and write experience, v2 users should consider using InfluxQL and the v1 client library.
The API of the influxdb-client-python is not the backwards-compatible with the old one - influxdb-python.
Documentation
This section contains links to the client library documentation.
InfluxDB 2.0 client features
- Querying data
- Writing data using
- InfluxDB 2.0 API client for management
- InfluxDB 1.8 API compatibility
- Examples
Installation
InfluxDB python library uses RxPY - The Reactive Extensions for Python (RxPY).
Python 3.7 or later is required.
:warning:
It is recommended to useciso8601with client for parsing dates.ciso8601is much faster than built-in Python datetime. Since it's written as aCmodule the best way is build it from sources:
Windows:
You have to install Visual C++ Build Tools 2015 to build ciso8601 by pip.
conda:
Install from sources: conda install -c conda-forge/label/cf202003 ciso8601.
pip install
The python package is hosted on PyPI, you can install latest version directly:
sh
pip install 'influxdb-client[ciso]'
Then import the package:
python
import influxdb_client
If your application uses async/await in Python you can install with the async extra:
sh
$ pip install influxdb-client[async]
For more info see How to use Asyncio.
Setuptools
Install via Setuptools.
sh
python setup.py install --user
(or sudo python setup.py install to install the package for all users)
Getting Started
Please follow the Installation and then run the following:
python
from influxdb_client import InfluxDBClient, Point
from influxdbclient.client.writeapi import SYNCHRONOUS
bucket = "my-bucket"
client = InfluxDBClient(url="http://localhost:8086", token="my-token", org="my-org")
writeapi = client.writeapi(write_options=SYNCHRONOUS) queryapi = client.queryapi()
p = Point("my_measurement").tag("location", "Prague").field("temperature", 25.3)
write_api.write(bucket=bucket, record=p)
using Table structure
tables = query_api.query('from(bucket:"my-bucket") |> range(start: -10m)')
for table in tables:     print(table)     for row in table.records:         print (row.values)
using csv library
csvresult = queryapi.query_csv('from(bucket:"my-bucket") |> range(start: -10m)')
val_count = 0
for row in csv_result:
    for cell in row:
        val_count += 1
Client configuration
Via File
A client can be configured via *.ini file in segment influx2.
The following options are supported:
-
url- the url to connect to InfluxDB -
org- default destination organization for writes and queries -
token- the token to use for the authorization -
timeout- socket timeout in ms (default value is 10000) -
verify_ssl- set this to false to skip verifying SSL certificate when calling API from https server -
sslcacert- set this to customize the certificate file to verify the peer -
cert_file- path to the certificate that will be used for mTLS authentication -
certkeyfile- path to the file contains private key for mTLS certificate -
certkeypassword- string or function which returns password for decrypting the mTLS private key -
connectionpoolmaxsize- set the number of connections to save that can be reused by urllib3 -
auth_basic- enable http basic authentication when talking to a InfluxDB 1.8.x without authentication but is accessed via reverse proxy with basic authentication (defaults to false) -
profilers- set the list of enabled Flux profilers
python
self.client = InfluxDBClient.fromconfigfile("config.ini")
ini
[influx2]
url=http://localhost:8086
org=my-org
token=my-token
timeout=6000
verify_ssl=FalseVia Environment Properties
A client can be configured via environment properties.
Supported properties are:
-
INFLUXDBV2URL- the url to connect to InfluxDB -
INFLUXDBV2ORG- default destination organization for writes and queries -
INFLUXDBV2TOKEN- the token to use for the authorization -
INFLUXDBV2TIMEOUT- socket timeout in ms (default value is 10000) -
INFLUXDBV2VERIFY_SSL- set this to false to skip verifying SSL certificate when calling API from https server -
INFLUXDBV2SSLCACERT- set this to customize the certificate file to verify the peer -
INFLUXDBV2CERT_FILE- path to the certificate that will be used for mTLS authentication -
INFLUXDBV2CERTKEYFILE- path to the file contains private key for mTLS certificate -
INFLUXDBV2CERTKEYPASSWORD- string or function which returns password for decrypting the mTLS private key -
INFLUXDBV2CONNECTIONPOOLMAXSIZE- set the number of connections to save that can be reused by urllib3 -
INFLUXDBV2AUTH_BASIC- enable http basic authentication when talking to a InfluxDB 1.8.x without authentication but is accessed via reverse proxy with basic authentication (defaults to false) -
INFLUXDBV2PROFILERS- set the list of enabled Flux profilers
python
self.client = InfluxDBClient.fromenvproperties()
Profile query
The Flux Profiler package provides performance profiling tools for Flux queries and operations.
You can enable printing profiler information of the Flux query in client library by:
- set QueryOptions.profilers in QueryApi,
- set
INFLUXDBV2PROFILERSenvironment variable, - set
profilersoption in configuration file.
FluxCSVParser excludes "profiler/" measurements from result.
Example how to enable profilers using API:
python
q = '''
    from(bucket: stringParam)
      |> range(start: -5m, stop: now())
      |> filter(fn: (r) => r._measurement == "mem")
      |> filter(fn: (r) => r.field == "available" or r.field == "free" or r._field == "used")
      |> aggregateWindow(every: 1m, fn: mean)
      |> pivot(rowKey:["time"], columnKey: ["field"], valueColumn: "_value")
'''
p = {
    "stringParam": "my-bucket",
}
queryapi = client.queryapi(query_options=QueryOptions(profilers=["query", "operator"])) csvresult = queryapi.query(query=q, params=p)
Example of a profiler output:
text
===============
Profiler: query
===============
from(bucket: stringParam)   |> range(start: -5m, stop: now())   |> filter(fn: (r) => r._measurement == "mem")   |> filter(fn: (r) => r.field == "available" or r.field == "free" or r._field == "used")   |> aggregateWindow(every: 1m, fn: mean)   |> pivot(rowKey:["time"], columnKey: ["field"], valueColumn: "_value")
======================== Profiler: profiler/query ======================== result              : _profiler table               : 0 _measurement        : profiler/query TotalDuration       : 8924700 CompileDuration     : 350900 QueueDuration       : 33800 PlanDuration        : 0 RequeueDuration     : 0 ExecuteDuration     : 8486500 Concurrency         : 0 MaxAllocated        : 2072 TotalAllocated      : 0 flux/query-plan     :
digraph {   ReadWindowAggregateByTime11   // every = 1m, aggregates = [mean], createEmpty = true, timeColumn = "_stop"   pivot8   generated_yield
ReadWindowAggregateByTime11 -> pivot8   pivot8 -> generated_yield }
influxdb/scanned-bytes: 0 influxdb/scanned-values: 0
=========================== Profiler: profiler/operator =========================== result              : _profiler table               : 1 _measurement        : profiler/operator Type                : *universe.pivotTransformation Label               : pivot8 Count               : 3 MinDuration         : 32600 MaxDuration         : 126200 DurationSum         : 193400 MeanDuration        : 64466.666666666664
=========================== Profiler: profiler/operator =========================== result              : _profiler table               : 1 _measurement        : profiler/operator Type                : *influxdb.readWindowAggregateSource Label               : ReadWindowAggregateByTime11 Count               : 1 MinDuration         : 940500 MaxDuration         : 940500 DurationSum         : 940500 MeanDuration        : 940500.0
You can also use callback function to get profilers output. Return value of this callback is type of FluxRecord.
Example how to use profilers with callback:
python
class ProfilersCallback(object):
   def init(self):
       self.records = []
def call(self, flux_record):        self.records.append(flux_record.values)
callback = ProfilersCallback()
queryapi = client.queryapi(queryoptions=QueryOptions(profilers=["query", "operator"], profilercallback=callback)) tables = query_api.query('from(bucket:"my-bucket") |> range(start: -10m)')
for profiler in callback.records:    print(f'Custom processing of profiler result: {profiler}')
Example output of this callback:
text
Custom processing of profiler result: {'result': 'profiler', 'table': 0, 'measurement': 'profiler/query', 'TotalDuration': 18843792, 'CompileDuration': 1078666, 'QueueDuration': 93375, 'PlanDuration': 0, 'RequeueDuration': 0, 'ExecuteDuration': 17371000, 'Concurrency': 0, 'MaxAllocated': 448, 'TotalAllocated': 0, 'RuntimeErrors': None, 'flux/query-plan': 'digraph {\r\n  ReadRange2\r\n  generatedyield\r\n\r\n  ReadRange2 -> generatedyield\r\n}\r\n\r\n', 'influxdb/scanned-bytes': 0, 'influxdb/scanned-values': 0}
Custom processing of profiler result: {'result': 'profiler', 'table': 1, 'measurement': 'profiler/operator', 'Type': '*influxdb.readFilterSource', 'Label': 'ReadRange2', 'Count': 1, 'MinDuration': 3274084, 'MaxDuration': 3274084, 'DurationSum': 3274084, 'MeanDuration': 3274084.0}
How to use
Writes
The WriteApi supports synchronous, asynchronous and batching writes into InfluxDB 2.0. The data should be passed as a InfluxDB Line Protocol, Data Point or Observable stream.
:warning:
The WriteApi in batching mode (default mode) is supposed to run as a
singleton. To flush all your data you should wrap the execution using
with client.writeapi(...) as writeapi: statement or call
write_api.close() at the end of your script.
The default instance of WriteApi use batching.
The data could be written as
-
stringorbytesthat is formatted as a InfluxDB's line protocol - Data Point structure
- Dictionary style mapping with keys:
measurement,tags,fieldsandtimeor custom structure - NamedTuple
- Data Classes
- Pandas DataFrame
- List of above items
- A
batchingtype of write also supports anObservablethat produce one of an above item
Batching
The batching is configurable by write_options:
| Property | Description | Default Value | |----------------------|-----------------------------------------------------------------------------------------------------------------------------------------------------------------------------------------------------------------------------------------------------------------------------------------------------------------------------------------------------------------------------------------------------------------------------------------------------------------------------------------|---------------| | batch_size | the number of data point to collect in a batch | 1000 | | flush_interval | the number of milliseconds before the batch is written | 1000 | | jitter_interval | the number of milliseconds to increase the batch flush interval by a random amount | 0 | | retry_interval | the number of milliseconds to retry first unsuccessful write. The next retry delay is computed using exponential random backoff. The retry interval is used when the InfluxDB server does not specify \"Retry-After\" header. | 5000 | | maxretrytime | maximum total retry timeout in milliseconds. | 180_000 | | max_retries | the number of max retries when write fails | 5 | | maxretrydelay | the maximum delay between each retry attempt in milliseconds | 125_000 | | maxclosewait | the maximum amount of time to wait for batches to flush when .close() is called | 300_000 | | exponentialbase | the base for the exponential retry delay, the next delay is computed using random exponential backoff as a random value within the interval retryinterval exponentialbase^(attempts-1) and retryinterval exponentialbase^(attempts). Example for retryinterval=5000, exponentialbase=2, maxretrydelay=125000, total=5 Retry delays are random distributed values within the ranges of [5000-10000, 10000-20000, 20000-40000, 40000-80000, 80000-125_000] | 2 |
python
from datetime import datetime, timedelta, timezone
import pandas as pd import reactivex as rx from reactivex import operators as ops
from influxdb_client import InfluxDBClient, Point, WriteOptions
with InfluxDBClient(url="http://localhost:8086", token="my-token", org="my-org") as _client:
with client.writeapi(writeoptions=WriteOptions(batchsize=500,                                                       flushinterval=10000,                                                       jitterinterval=2000,                                                       retryinterval=5000,                                                       max_retries=5,                                                       maxretrydelay=30_000,                                                       maxclosewait=300_000,                                                       exponentialbase=2)) as write_client:
"""         Write Line Protocol formatted as string         """         writeclient.write("my-bucket", "my-org", "h2ofeet,location=coyotecreek water_level=1.0 1")         writeclient.write("my-bucket", "my-org", ["h2ofeet,location=coyotecreek water_level=2.0 2",                                                     "h2ofeet,location=coyotecreek water_level=3.0 3"])
"""         Write Line Protocol formatted as byte array         """         writeclient.write("my-bucket", "my-org", "h2ofeet,location=coyotecreek water_level=1.0 1".encode())         writeclient.write("my-bucket", "my-org", ["h2ofeet,location=coyotecreek water_level=2.0 2".encode(),                                                     "h2ofeet,location=coyotecreek water_level=3.0 3".encode()])
"""         Write Dictionary-style object         """         writeclient.write("my-bucket", "my-org", {"measurement": "h2ofeet", "tags": {"location": "coyotecreek"},                                                     "fields": {"water_level": 1.0}, "time": 1})         writeclient.write("my-bucket", "my-org", [{"measurement": "h2ofeet", "tags": {"location": "coyotecreek"},                                                      "fields": {"water_level": 2.0}, "time": 2},                                                     {"measurement": "h2ofeet", "tags": {"location": "coyotecreek"},                                                      "fields": {"water_level": 3.0}, "time": 3}])
"""         Write Data Point         """         writeclient.write("my-bucket", "my-org",                             Point("h2ofeet").tag("location", "coyotecreek").field("water_level", 4.0).time(4))         writeclient.write("my-bucket", "my-org",                             [Point("h2ofeet").tag("location", "coyotecreek").field("water_level", 5.0).time(5),                              Point("h2ofeet").tag("location", "coyotecreek").field("water_level", 6.0).time(6)])
"""         Write Observable stream         """         _data = rx \             .range(7, 11) \             .pipe(ops.map(lambda i: "h2ofeet,location=coyotecreek water_level={0}.0 {0}".format(i)))
writeclient.write("my-bucket", "my-org", _data)
"""         Write Pandas DataFrame         """         _now = datetime.now(tz=timezone.utc)         dataframe = pd.DataFrame(data=[["coyotecreek", 1.0], ["coyotecreek", 2.0]],                                    index=[now, now + timedelta(hours=1)],                                    columns=["location", "water_level"])
writeclient.write("my-bucket", "my-org", record=dataframe, dataframemeasurementname='h2ofeet',                             dataframetag_columns=['location'])
Default Tags
Sometimes is useful to store same information in every measurement e.g. hostname, location, customer. The client is able to use static value or env property as a tag value.
The expressions:
-
California Miner- static value -
${env.hostname}- environment property
Via API
python
point_settings = PointSettings()
pointsettings.adddefault_tag("id", "132-987-655")
pointsettings.adddefault_tag("customer", "California Miner")
pointsettings.adddefaulttag("datacenter", "${env.data_center}")
self.writeclient = self.client.writeapi(writeoptions=SYNCHRONOUS, pointsettings=point_settings)
python
self.writeclient = self.client.writeapi(write_options=SYNCHRONOUS,
                                              point_settings=PointSettings(**{"id": "132-987-655",
                                                                              "customer": "California Miner"}))
Via Configuration file
In an init configuration file you are able to specify default tags by tags segment.
python
self.client = InfluxDBClient.fromconfigfile("config.ini")
[influx2]
url=http://localhost:8086
org=my-org
token=my-token
timeout=6000
[tags] id = 132-987-655 customer = California Miner datacenter = ${env.datacenter}
You can also use a TOML or aJSON format for the configuration file.
Via Environment Properties
You are able to specify default tags by environment properties with prefix INFLUXDBV2TAG_.
Examples:
-
INFLUXDBV2TAG_ID -
INFLUXDBV2TAG_HOSTNAME
python
self.client = InfluxDBClient.fromenvproperties()
Synchronous client
Data are writes in a synchronous HTTP request.
python
from influxdb_client import InfluxDBClient, Point
from influxdbclient .client.writeapi import SYNCHRONOUS
client = InfluxDBClient(url="http://localhost:8086", token="my-token", org="my-org") writeapi = client.writeapi(write_options=SYNCHRONOUS)
point1 = Point("mymeasurement").tag("location", "Prague").field("temperature", 25.3) point2 = Point("mymeasurement").tag("location", "New York").field("temperature", 24.3)
writeapi.write(bucket="my-bucket", record=[point1, _point2])
client.close()
Queries
The result retrieved by QueryApi could be formatted as a:
- Flux data structure: FluxTable, FluxColumn and FluxRecord
-
influxdbclient.client.fluxtable.CSVIteratorwhich will iterate over CSV lines - Raw unprocessed results as a
striterator - Pandas DataFrame
FluxRecord via querystream, see example below:
python
from influxdb_client import InfluxDBClient, Point, Dialect
from influxdbclient.client.writeapi import SYNCHRONOUS
client = InfluxDBClient(url="http://localhost:8086", token="my-token", org="my-org")
writeapi = client.writeapi(write_options=SYNCHRONOUS) queryapi = client.queryapi()
""" Prepare data """
point1 = Point("mymeasurement").tag("location", "Prague").field("temperature", 25.3) point2 = Point("mymeasurement").tag("location", "New York").field("temperature", 24.3)
writeapi.write(bucket="my-bucket", record=[point1, _point2])
""" Query: using Table structure """ tables = query_api.query('from(bucket:"my-bucket") |> range(start: -10m)')
for table in tables:     print(table)     for record in table.records:         print(record.values)
print() print()
""" Query: using Bind parameters """
p = {"_start": datetime.timedelta(hours=-1),      "_location": "Prague",      "_desc": True,      "_floatParam": 25.1,      "_every": datetime.timedelta(minutes=5)      }
tables = query_api.query('''     from(bucket:"my-bucket") |> range(start: _start)         |> filter(fn: (r) => r["measurement"] == "mymeasurement")         |> filter(fn: (r) => r["_field"] == "temperature")         |> filter(fn: (r) => r["location"] == location and r["value"] > _floatParam)         |> aggregateWindow(every: _every, fn: mean, createEmpty: true)         |> sort(columns: ["time"], desc: desc) ''', params=p)
for table in tables:     print(table)     for record in table.records:         print(str(record["time"]) + " - " + record["location"] + ": " + str(record["value"]))
print() print()
""" Query: using Stream """ records = queryapi.querystream('from(bucket:"my-bucket") |> range(start: -10m)')
for record in records:     print(f'Temperature in {record["location"]} is {record["_value"]}')
""" Interrupt a stream after retrieve a required data """ largestream = queryapi.query_stream('from(bucket:"my-bucket") |> range(start: -100d)') for record in large_stream:     if record["location"] == "New York":         print(f'New York temperature: {record["_value"]}')         break
large_stream.close()
print() print()
""" Query: using csv library """ csvresult = queryapi.query_csv('from(bucket:"my-bucket") |> range(start: -10m)',                                  dialect=Dialect(header=False, delimiter=",", comment_prefix="#", annotations=[],                                                  datetimeformat="RFC3339")) for csvline in csvresult:     if not len(csv_line) == 0:         print(f'Temperature in {csvline[9]} is {csvline[6]}')
""" Close client """ client.close()
Pandas DataFrame
:warning:
For DataFrame querying you should install Pandas dependency via pip install 'influxdb-client[extra]'.
:warning:
Note that if a query returns more then one table than the client generates a DataFrame for each of them.
The client is able to retrieve data in Pandas DataFrame format thought querydata_frame:
python
from influxdb_client import InfluxDBClient, Point, Dialect
from influxdbclient.client.writeapi import SYNCHRONOUS
client = InfluxDBClient(url="http://localhost:8086", token="my-token", org="my-org")
writeapi = client.writeapi(write_options=SYNCHRONOUS) queryapi = client.queryapi()
""" Prepare data """
point1 = Point("mymeasurement").tag("location", "Prague").field("temperature", 25.3) point2 = Point("mymeasurement").tag("location", "New York").field("temperature", 24.3)
writeapi.write(bucket="my-bucket", record=[point1, _point2])
""" Query: using Pandas DataFrame """ dataframe = queryapi.querydataframe('from(bucket:"my-bucket") '                                         '|> range(start: -10m) '                                         '|> pivot(rowKey:["time"], columnKey: ["field"], valueColumn: "_value") '                                         '|> keep(columns: ["location", "temperature"])') print(dataframe.tostring())
""" Close client """ client.close()
Output:
text
result table  location  temperature
0  _result     0  New York         24.3
1  _result     1    Prague         25.3
Examples
How to efficiently import large dataset
The following example shows how to import dataset with a dozen megabytes. If you would like to import gigabytes of data then use our multiprocessing example: importdataset_multiprocessing.py for use a full capability of your hardware.
- sources - importdata_set.py
python
"""
Import VIX - CBOE Volatility Index - from "vix-daily.csv" file into InfluxDB 2.0
https://datahub.io/core/finance-vix#data """
from collections import OrderedDict from csv import DictReader
import reactivex as rx from reactivex import operators as ops
from influxdb_client import InfluxDBClient, Point, WriteOptions
def parse_row(row: OrderedDict):     """Parse row of CSV file into Point with structure:
financial-analysis,type=ily close=18.47,high=19.82,low=18.28,open=19.82 1198195200000000000
CSV format:         Date,VIX Open,VIX High,VIX Low,VIX Close\n         2004-01-02,17.96,18.68,17.54,18.22\n         2004-01-05,18.45,18.49,17.44,17.49\n         2004-01-06,17.66,17.67,16.19,16.73\n         2004-01-07,16.72,16.75,15.5,15.5\n         2004-01-08,15.42,15.68,15.32,15.61\n         2004-01-09,16.15,16.88,15.57,16.75\n         ...
:param row: the row of CSV file     :return: Parsed csv row to [Point]     """
"""      For better performance is sometimes useful directly create a LineProtocol to avoid unnecessary escaping overhead:      """      # from datetime import timezone      # import ciso8601      # from influxdb_client.client.write.point import EPOCH      #      # time = (ciso8601.parsedatetime(row["Date"]).replace(tzinfo=timezone.utc) - EPOCH).totalseconds() * 1e9      # return f"financial-analysis,type=vix-daily" \      #        f" close={float(row['VIX Close'])},high={float(row['VIX High'])},low={float(row['VIX Low'])},open={float(row['VIX Open'])} " \      #        f" {int(time)}"
return Point("financial-analysis") \         .tag("type", "vix-daily") \         .field("open", float(row['VIX Open'])) \         .field("high", float(row['VIX High'])) \         .field("low", float(row['VIX Low'])) \         .field("close", float(row['VIX Close'])) \         .time(row['Date'])
""" Converts vix-daily.csv into sequence of datad point """ data = rx \     .from_iterable(DictReader(open('vix-daily.csv', 'r'))) \     .pipe(ops.map(lambda row: parse_row(row)))
client = InfluxDBClient(url="http://localhost:8086", token="my-token", org="my-org", debug=True)
""" Create client that writes data in batches with 50_000 items. """ writeapi = client.writeapi(writeoptions=WriteOptions(batchsize=50000, flushinterval=10_000))
""" Write data into InfluxDB """ write_api.write(bucket="my-bucket", record=data) write_api.close()
""" Querying max value of CBOE Volatility Index """ query = 'from(bucket:"my-bucket")' \         ' |> range(start: 0, stop: now())' \         ' |> filter(fn: (r) => r._measurement == "financial-analysis")' \         ' |> max()' result = client.query_api().query(query=query)
""" Processing results """ print() print("=== results ===") print() for table in result:     for record in table.records:         print('max {0:5} = {1}'.format(record.getfield(), record.getvalue()))
""" Close client """ client.close()
Efficiency write data from IOT sensor
- sources - iot_sensor.py
python
"""
Efficiency write data from IOT sensor - write changed temperature every minute
"""
import atexit
import platform
from datetime import timedelta
import psutil as psutil import reactivex as rx from reactivex import operators as ops
from influxdb_client import InfluxDBClient, WriteApi, WriteOptions
def onexit(dbclient: InfluxDBClient, write_api: WriteApi):     """Close clients after terminate a script.
:param db_client: InfluxDB client     :param write_api: WriteApi     :return: nothing     """     write_api.close()     db_client.close()
def sensor_temperature():     """Read a CPU temperature. The [psutil] doesn't support MacOS so we use [sysctl].
:return: actual CPU temperature     """     os_name = platform.system()     if os_name == 'Darwin':         from subprocess import check_output         output = checkoutput(["sysctl", "machdep.xcpm.cputhermal_level"])         import re         return re.findall(r'\d+', str(output))[0]     else:         return psutil.sensors_temperatures()["coretemp"][0]
def line_protocol(temperature):     """Create a InfluxDB line protocol with structure:
iotsensor,hostname=minesensor_12,type=temperature value=68
:param temperature: the sensor temperature     :return: Line protocol to write into InfluxDB     """
import socket     return 'iot_sensor,hostname={},type=temperature value={}'.format(socket.gethostname(), temperature)
""" Read temperature every minute; distinctuntilchanged - produce only if temperature change """ data = rx\     .interval(period=timedelta(seconds=60))\     .pipe(ops.map(lambda t: sensor_temperature()),           ops.distinctuntilchanged(),           ops.map(lambda temperature: line_protocol(temperature)))
dbclient = InfluxDBClient(url="http://localhost:8086", token="my-token", org="my-org", debug=True)
""" Create client that writes data into InfluxDB """ writeapi = dbclient.writeapi(writeoptions=WriteOptions(batch_size=1)) writeapi.write(bucket="my-bucket", record=data)
""" Call after terminate a script """ atexit.register(onexit, dbclient, write_api)
input()
Connect to InfluxDB Cloud
The following example demonstrate the simplest way how to write and query date with the InfluxDB Cloud.
At first point you should create an authentication token as is described here.
After that you should configure properties: influxcloudurl,influxcloudtoken, bucket and org in a influx_cloud.py example.
The last step is run a python script via: python3 influx_cloud.py.
- sources - influx_cloud.py
python
"""
Connect to InfluxDB 2.0 - write data and query them
"""
from datetime import datetime, timezone
from influxdb_client import Point, InfluxDBClient from influxdbclient.client.writeapi import SYNCHRONOUS
""" Configure credentials """ influxcloudurl = 'https://us-west-2-1.aws.cloud2.influxdata.com' influxcloudtoken = '...' bucket = '...' org = '...'
client = InfluxDBClient(url=influxcloudurl, token=influxcloudtoken) try:     kind = 'temperature'     host = 'host1'     device = 'opt-123'
"""     Write data by Point structure     """     point = Point(kind).tag('host', host).tag('device', device).field('value', 25.3).time(time=datetime.now(tz=timezone.utc))
print(f'Writing to InfluxDB cloud: {point.tolineprotocol()} ...')
writeapi = client.writeapi(write_options=SYNCHRONOUS)     write_api.write(bucket=bucket, org=org, record=point)
print()     print('success')     print()     print()
"""     Query written data     """     query = f'from(bucket: "{bucket}") |> range(start: -1d) |> filter(fn: (r) => r._measurement == "{kind}")'     print(f'Querying from InfluxDB cloud: "{query}" ...')     print()
queryapi = client.queryapi()     tables = query_api.query(query=query, org=org)
for table in tables:         for row in table.records:             print(f'{row.values["_time"]}: host={row.values["host"]},device={row.values["device"]} '                   f'{row.values["_value"]} °C')
print()     print('success')
except Exception as e:     print(e) finally:     client.close()
How to use Jupyter + Pandas + InfluxDB 2
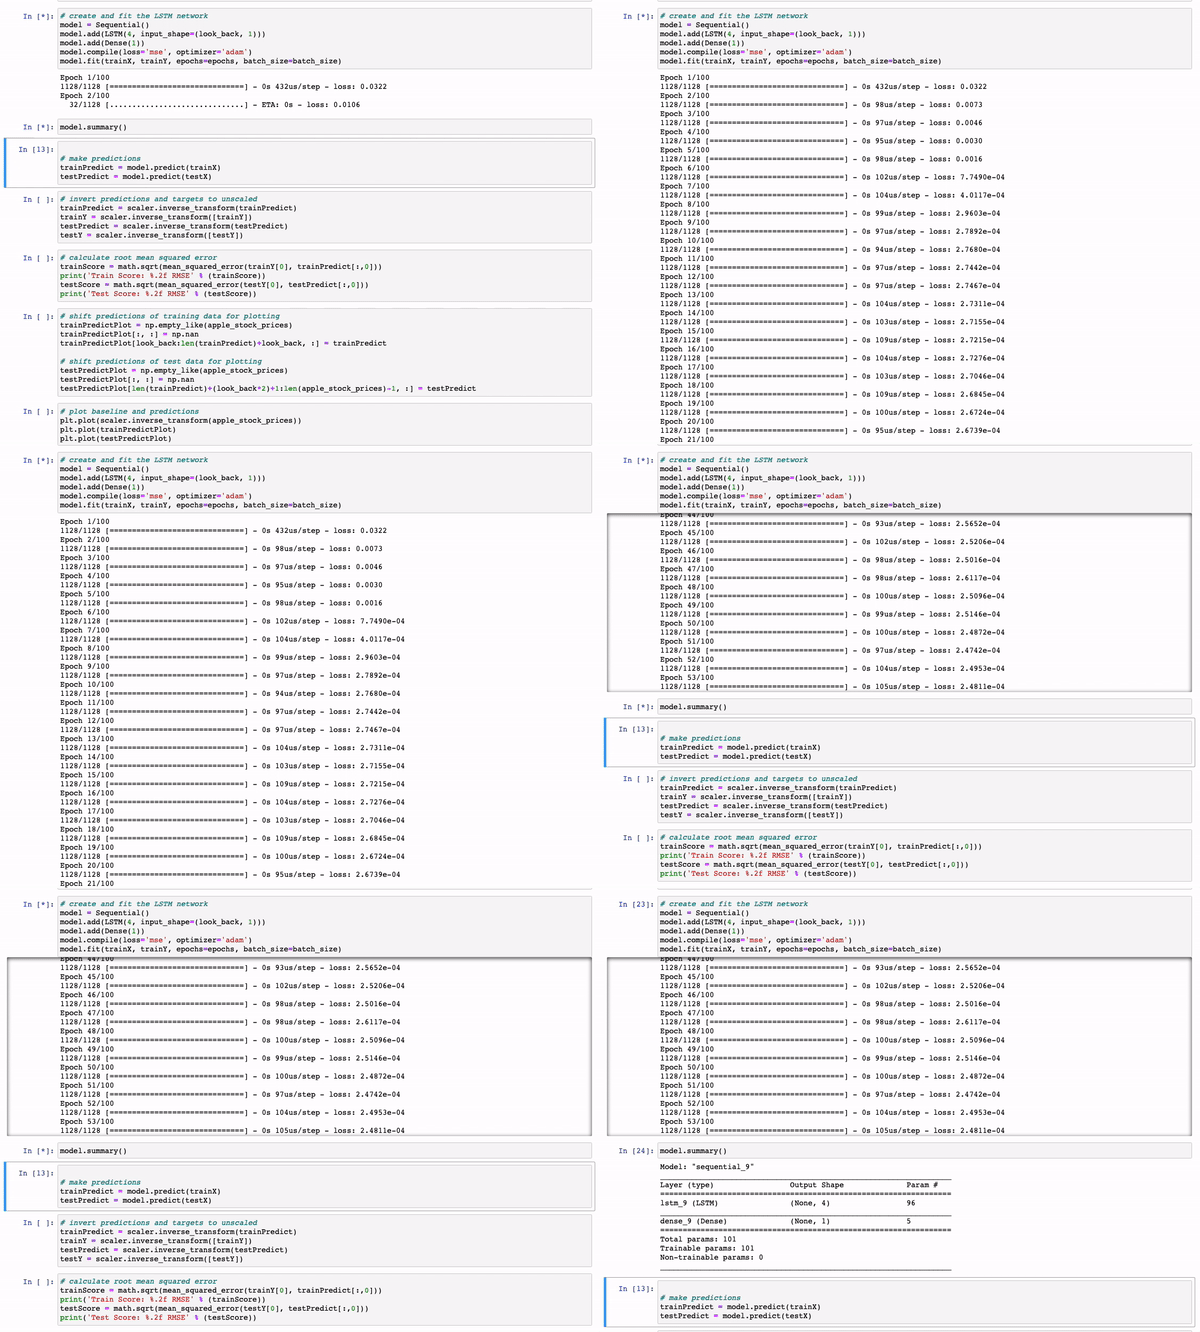
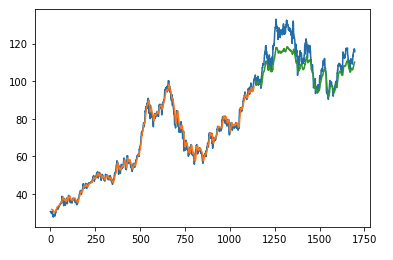
The first example shows how to use client capabilities to predict stock price via Keras, TensorFlow, sklearn:
The example is taken from Kaggle.
- sources - stock-predictions.ipynb
Result:
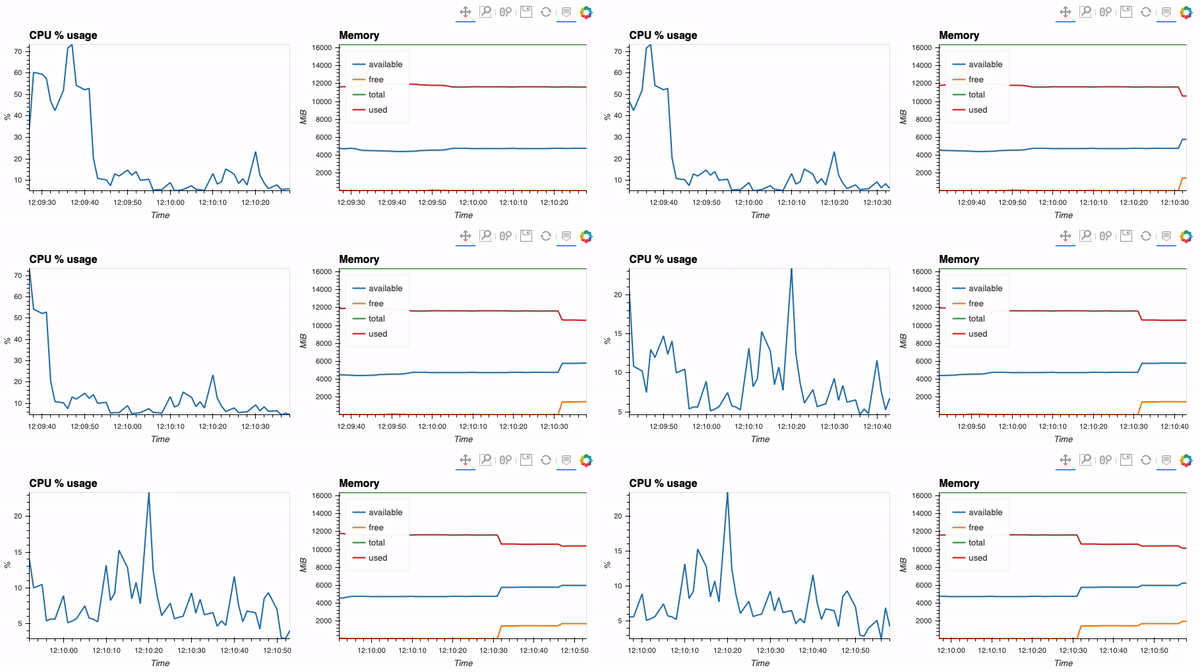
The second example shows how to use client capabilities to realtime visualization via hvPlot, Streamz, RxPY:
- sources - realtime-stream.ipynb
Other examples
You can find all examples at GitHub: influxdb-client-python/examples.
Advanced Usage
Gzip support
InfluxDBClient does not enable gzip compression for http requests by default. If you want to enable gzip to reduce transfer data's size, you can call:
python
from influxdb_client import InfluxDBClient
dbclient = InfluxDBClient(url="http://localhost:8086", token="my-token", org="my-org", enable_gzip=True)
Authenticate to the InfluxDB
InfluxDBClient supports three options how to authorize a connection:
- Token
- Username & Password
- HTTP Basic
Token
Use the token to authenticate to the InfluxDB API. In your API requests, an Authorization header will be sent. The header value, provide the word Token followed by a space and an InfluxDB API token. The word token is case-sensitive.
python
from influxdb_client import InfluxDBClient
with InfluxDBClient(url="http://localhost:8086", token="my-token") as client
:warning:
Note that this is a preferred way how to authenticate to InfluxDB API.
Username & Password
Authenticates via username and password credentials. If successful, creates a new session for the user.
python
from influxdb_client import InfluxDBClient
with InfluxDBClient(url="http://localhost:8086", username="my-user", password="my-password") as client
:warning:
Theusername/passwordauth is based on the HTTP "Basic" authentication. The authorization expires when the time-to-live (TTL) (default 60 minutes) is reached and client producesunauthorized exception.
HTTP Basic
Use this to enable basic authentication when talking to a InfluxDB 1.8.x that does not use auth-enabled but is protected by a reverse proxy with basic authentication.
python
from influxdb_client import InfluxDBClient
with InfluxDBClient(url="http://localhost:8086", auth_basic=True, token="my-proxy-secret") as client
:warning:
Don't use this when directly talking to InfluxDB 2.
Proxy configuration
You can configure the client to tunnel requests through an HTTP proxy. The following proxy options are supported:
-
proxy- Set this to configure the http proxy to be used, ex.http://localhost:3128 -
proxy_headers- A dictionary containing headers that will be sent to the proxy. Could be used for proxy authentication.
python
from influxdb_client import InfluxDBClient
with InfluxDBClient(url="http://localhost:8086",                     token="my-token",                     org="my-org",                     proxy="http://localhost:3128") as client:
If your proxy notify the client with permanent redirect (HTTP 301) to different host. The client removes Authorization header, because otherwise the contents of Authorization is sent to third parties which is a security vulnerability.
You can change this behavior by doing this in older urllib3 versions < 2.5.0 :
python
from urllib3 import Retry
Retry.DEFAULTREMOVEHEADERSONREDIRECT = frozenset()
Retry.DEFAULT.removeheadersonredirect = Retry.DEFAULTREMOVEHEADERSON_REDIRECT
In the newer urllib3 versions >= 2.5.0, try to use this for redirect requests and stop urllib3 from removing the Authorization header: :
python
retries = Retry(redirect=1, removeheaderson_redirect=[])
self.influxdb_client = InfluxDBClient(url="http://localhost", token="my-token", org="my-org", retries=retries)
Delete data
The deleteapi.py supports deletes points from an InfluxDB bucket.
python
from influxdb_client import InfluxDBClient
client = InfluxDBClient(url="http://localhost:8086", token="my-token")
deleteapi = client.deleteapi()
""" Delete Data """ start = "1970-01-01T00:00:00Z" stop = "2021-02-01T00:00:00Z" deleteapi.delete(start, stop, 'measurement="my_measurement"', bucket='my-bucket', org='my-org')
""" Close client """ client.close()
InfluxDB 1.8 API compatibility
InfluxDB 1.8.0 introduced forward compatibility APIs for InfluxDB 2.0. This allows you to easily move from InfluxDB 1.x to InfluxDB 2.0 Cloud or open source.
The following forward compatible APIs are available:
| API | Endpoint | Description | |-----------------------------------------------------|------------------------------------------------------------------------------------------------|----------------------------------------------------------------------------------------------------------------------------------------------------------------------------------------------------------------------------------------------------------| | queryapi.py | /api/v2/query | Query data in InfluxDB 1.8.0+ using the InfluxDB 2.0 API and Flux (endpoint should be enabled by flux-enabled option) | | writeapi.py | /api/v2/write | Write data to InfluxDB 1.8.0+ using the InfluxDB 2.0 API | | ping() | /ping | Check the status of your InfluxDB instance |
For detail info see InfluxDB 1.8 example.
Handling Errors
Errors happen, and it's important that your code is prepared for them. All client related exceptions are delivered from InfluxDBError. If the exception cannot be recovered in the client it is returned to the application. These exceptions are left for the developer to handle.
Almost all APIs directly return unrecoverable exceptions to be handled this way:
python
from influxdb_client import InfluxDBClient
from influxdb_client.client.exceptions import InfluxDBError
from influxdbclient.client.writeapi import SYNCHRONOUS
with InfluxDBClient(url="http://localhost:8086", token="my-token", org="my-org") as client:     try:         client.writeapi(writeoptions=SYNCHRONOUS).write("my-bucket", record="mem,tag=a value=86")     except InfluxDBError as e:         if e.response.status == 401:             raise Exception(f"Insufficient write permissions to 'my-bucket'.") from e         raise
The only exception is batching WriteAPI (for more info see Batching) where you need to register custom callbacks to handle batch events. This is because this API runs in the background in a separate thread and isn't possible to directly return underlying exceptions.
python
from influxdb_client import InfluxDBClient
from influxdb_client.client.exceptions import InfluxDBError
class BatchingCallback(object):
def success(self, conf: (str, str, str), data: str):         print(f"Written batch: {conf}, data: {data}")
def error(self, conf: (str, str, str), data: str, exception: InfluxDBError):         print(f"Cannot write batch: {conf}, data: {data} due: {exception}")
def retry(self, conf: (str, str, str), data: str, exception: InfluxDBError):         print(f"Retryable error occurs for batch: {conf}, data: {data} retry: {exception}")
with InfluxDBClient(url="http://localhost:8086", token="my-token", org="my-org") as client:     callback = BatchingCallback()     with client.writeapi(successcallback=callback.success,                           error_callback=callback.error,                           retrycallback=callback.retry) as writeapi:         pass
HTTP Retry Strategy
By default, the client uses a retry strategy only for batching writes (for more info see Batching). For other HTTP requests there is no one retry strategy, but it could be configured by retries parameter of InfluxDBClient.
For more info about how configure HTTP retry see details in urllib3 documentation.
python
from urllib3 import Retry
from influxdb_client import InfluxDBClient
retries = Retry(connect=5, read=2, redirect=5) client = InfluxDBClient(url="http://localhost:8086", token="my-token", org="my-org", retries=retries)
Nanosecond precision
The Python's datetime doesn't support precision with nanoseconds so the library during writes and queries ignores everything after microseconds.
If you would like to use datetime with nanosecond precision you should use pandas.Timestamp that is replacement for python datetime.datetime object, and also you should set a proper DateTimeHelper to the client.
- sources - nanosecond_precision.py
python
from influxdb_client import Point, InfluxDBClient
from influxdbclient.client.util.dateutils_pandas import PandasDateTimeHelper
from influxdbclient.client.writeapi import SYNCHRONOUS
""" Set PandasDate helper which supports nanoseconds. """ import influxdbclient.client.util.dateutils as date_utils
dateutils.datehelper = PandasDateTimeHelper()
""" Prepare client. """ client = InfluxDBClient(url="http://localhost:8086", token="my-token", org="my-org")
writeapi = client.writeapi(write_options=SYNCHRONOUS) queryapi = client.queryapi()
""" Prepare data """
point = Point("h2o_feet") \     .field("water_level", 10) \     .tag("location", "pacific") \     .time('1996-02-25T21:20:00.001001231Z')
print(f'Time serialized with nanosecond precision: {point.tolineprotocol()}') print()
write_api.write(bucket="my-bucket", record=point)
""" Query: using Stream """ query = ''' from(bucket:"my-bucket")         |> range(start: 0, stop: now())         |> filter(fn: (r) => r.measurement == "h2ofeet") ''' records = queryapi.querystream(query)
for record in records:     print(f'Temperature in {record["location"]} is {record["value"]} at time: {record["time"]}')
""" Close client """ client.close()
How to use Asyncio
Starting from version 1.27.0 for Python 3.7+ the influxdb-client package supports async/await based on asyncio, aiohttp and aiocsv. You can install aiohttp and aiocsv directly:
> $ python -m pip install influxdb-client aiohttp aiocsv >bash
or use the [async] extra:
> $ python -m pip install influxdb-client[async] >bash
:warning:
TheInfluxDBClientAsyncshould be initialised insideasync coroutineotherwise there can be unexpected behaviour. For more info see: Why is creating a ClientSession outside an event loop dangerous?.
Async APIs
All async APIs are available via influxdbclient.client.influxdbclient_async.InfluxDBClientAsync. The async version of the client supports following asynchronous APIs:
-
influxdbclient.client.writeapi_async.WriteApiAsync -
influxdbclient.client.queryapi_async.QueryApiAsync -
influxdbclient.client.deleteapi_async.DeleteApiAsync - Management services into
influxdb_client.servicesupports async
and also check to readiness of the InfluxDB via /ping endpoint:
The InfluxDBClientAsync constructor accepts a number of configuration properties. Most useful among these are:
connectionpoolmaxsize - The total number of simultaneous connections. Defaults to multiprocessing.cpu_count() 5.
enable_gzip- enable gzip compression duringwriteandquerycalls. Defaults tofalse.proxy- URL of an HTTP proxy to be used.timeout- The maximum number of milliseconds for handling HTTP requests from initial handshake to handling response data. This is passed directly to the underlying transport library. If large amounts of data are anticipated, for example fromqueryapi.querystream(...), this should be increased to avoidTimeoutErrororCancelledError. Defaults to 10_000 ms.
> import asyncio > > from influxdbclient.client.influxdbclient_async import InfluxDBClientAsync > > > async def main(): > async with InfluxDBClientAsync(url="http://localhost:8086", token="my-token", org="my-org") as client: > ready = await client.ping() > print(f"InfluxDB: {ready}") > > > if name == "main": > asyncio.run(main()) >python
Async Write API
The influxdbclient.client.writeapi_async.WriteApiAsync supports ingesting data as:
-
stringorbytesthat is formatted as a InfluxDB\'s line protocol - Data Point structure
- Dictionary style mapping with keys:
measurement,tags,fieldsandtimeor custom structure - NamedTuple
- Data Classes
- Pandas DataFrame
- List of above items
> import asyncio > > from influxdb_client import Point > from influxdbclient.client.influxdbclient_async import InfluxDBClientAsync > > > async def main(): > async with InfluxDBClientAsync(url="http://localhost:8086", token="my-token", org="my-org") as client: > > writeapi = client.writeapi() > > point1 = Point("asyncm").tag("location", "Prague").field("temperature", 25.3) > point2 = Point("asyncm").tag("location", "New York").field("temperature", 24.3) > > successfully = await writeapi.write(bucket="my-bucket", record=[point1, _point2]) > > print(f" > successfully: {successfully}") > > > if name == "main": > asyncio.run(main()) >python
Async Query API
The influxdbclient.client.queryapi_async.QueryApiAsync supports retrieve data as:
- List of
influxdbclient.client.fluxtable.FluxTable - Stream of
influxdbclient.client.fluxtable.FluxRecordviatyping.AsyncGenerator - Pandas DataFrame
- Stream of Pandas DataFrame via
typing.AsyncGenerator - Raw
stroutput
> import asyncio > > from influxdbclient.client.influxdbclient_async import InfluxDBClientAsync > > > async def main(): > async with InfluxDBClientAsync(url="http://localhost:8086", token="my-token", org="my-org") as client: > # Stream of FluxRecords > queryapi = client.queryapi() > records = await queryapi.querystream('from(bucket:"my-bucket") ' > '|> range(start: -10m) ' > '|> filter(fn: (r) => r["measurement"] == "asyncm")') > async for record in records: > print(record) > > > if name == "main": > asyncio.run(main()) >python
Async Delete API
> import asyncio > from datetime import datetime > > from influxdbclient.client.influxdbclient_async import InfluxDBClientAsync > > > async def main(): > async with InfluxDBClientAsync(url="http://localhost:8086", token="my-token", org="my-org") as client: > start = datetime.fromtimestamp(0) > stop = datetime.now() > # Delete data with location = 'Prague' > successfully = await client.delete_api().delete(start=start, stop=stop, bucket="my-bucket", > predicate="location = \"Prague\"") > print(f" > successfully: {successfully}") > > > if name == "main": > asyncio.run(main()) >python
Management API
``` python
import asyncio>
from influxdb_client import OrganizationsService
from influxdbclient.client.influxdbclient_async import InfluxDBClientAsync> >
async def main():
async with InfluxDBClientA
README truncated. View on GitHub


