
:boom: WebOps platform for development teams.
Last updated Oct 15, 2025
91
Stars
35
Forks
43
Issues
0
Stars/day
Attention Score
29
Topics
Language breakdown
No language data available.
▸ Files
click to expand
README
Catapult #
 Catapult defines a best-practice infrastructure and release management workflow, saving you thousands of engineering hours - it also aligns with Agile methodologies, like Scrum, to afford you everything you need to develop, deploy, and maintain a website with ease.
 :boom: Catapult is a complete website and workflow management platform built from leading and affordable technologies.
:earth_americas: Our mission is to create a lean platform that orchestrates DevOps for website lifecycles with familiar technologies.
:rocket: Our vision is to afford organizations reduced risk and improved performance while lowering barriers to entry.
:boom: Catapult is a complete website and workflow management platform built from leading and affordable technologies.
:earth_americas: Our mission is to create a lean platform that orchestrates DevOps for website lifecycles with familiar technologies.
:rocket: Our vision is to afford organizations reduced risk and improved performance while lowering barriers to entry.
Do you need a website and workflow management platform? Here are a few triggers.
- Production is down.
- We need a test site.
- Why is this costing so much?
- Are my environments safe?
- Is my website backed up?
- How quickly can I recover my website after a disaster?
- Can I easily scale my website for more traffic?
- What is my uptime?
- Catapult is an open-source, complete, and distributed architecture
- Catapult only orchestrates - it is not required to run your infrastructure
- Catapult uses platform native shell scripting rather than configuration management tools such as Chef, Puppet, or Salt
- Catapult features Gitflow workflow while enforcing exactly matching, branch-driven environments
- Catapult features a unique software workflow model - upstream or downstream
- Catapult overlays seamlessly with Scrum methodology
- Catapult is very cost-effective
Security Disclosure ##
Security is very important to us. If you have any issue regarding security, please disclose the information responsibly by sending an email to security@devopsgroup.io and not by creating a GitHub issue.Platform Overview ##
Catapult orchestrates the following key components of DevOps to provide you with a full-featured infrastructure. Implementing both a Red Hat stack for PHP software and a Windows stack for .NET software.
- Security Management
- Source Code Management
- Environment Management
- Environment Virtualization
- DNS Management
- Release Management
- Monitoring and Performance
Table of Contents ##
- Security Disclosure - Platform Overview - Table of Contents - Supported Website Software - Platform Comparison - Developer Setup - Instance Setup - Services Setup - Provision Environments - Configure Automated Deployments - Software Workflow - Downstream - Upstream - Catapult Configuration - Company - Environments - Websites - Website Development - Website Repositories - Software Fresh Installs - Software Auto Updates - HTTPS and Certificates - Forcing www - Debug Output - Cache Busting - Progressive Web App - Email - Upload Limits - Database Migrations - Refreshing Databases - Connecting to Databases - Production Hotfixes - Automated Deployment Cycle - Maintenance Cycle - Daily - Weekly - Disaster Recovery - Server Rebuilding - Website Rollbacks - Preventive Controls - Detective Controls - Corrective Controls - Data Protection - United States - Europe - Cloud Compliance - Self Compliance - Bandwidth Optimizations - Caching Optimizations - Geographic Optimizations - Recommended Optimizations - Increasing Capacity - Load Balancer - Website Concurrency Maximum - Interpreting Apache AB Results - Vagrant Convenience Commands - Rotating Secrets - ReleasesSupported Website Software ##
Catapult intelligently manages the following website software that have been chosen from trending usage statistics from BuiltWith and aligns with the CentOS 7 and Software Collections trunks: Software | Key | Minimum PHP Version | Running PHP Version | Released | End-of-Life ---------|------------------|---------------------|---------------------|----------|------------ CodeIgniter 2 |codeigniter2 | 5.1.6 | 5.4 | January 28, 2011 | October 31, 2015
CodeIgniter 3 | codeigniter3 | 5.6 | 7.1 | March 30, 2015 |
concrete5 8 | concrete58 | 5.5.9 | 7.1 | December 1, 2016 |
Drupal 6 | drupal6 | 5.4 | 5.4 | February 13, 2008 | February 24, 2016
Drupal 7 | drupal7 | 5.2.5 | 7.1 | January 5, 2011 |
Drupal 8 | drupal8 | 7.0.8 | 7.2 | November 19, 2015 |
Elgg 1 | elgg1 | 5.4 | 5.4 | August 20, 2008 |
Elgg 2 | elgg2 | 5.6 | 7.1 | December 14, 2015 |
ExpressionEngine 3 | expressionengine3 | 5.3.10 | 5.4 | October 13, 2015 | December 14, 2018
Joomla 3 | joomla3 | 5.3.10 | 7.1 | September 27, 2012 |
Laravel 5 | laravel5 | 7.0.0 | 7.1 | February 4, 2015 |
MediaWiki 1 | mediawiki1 | 5.5.9 | 7.1 | December 8, 2003 |
Moodle 3 | moodle3 | 5.6.5 | 7.1 | November 16, 2015 |
SilverStripe 3 | silverstripe3 | 5.3.3 | 5.4 | June 29, 2012 |
SuiteCRM 7 | suitecrm7 | 5.5 | 7.1 | October 21, 2013 | November 15, 2019
WordPress 4 | wordpress4 | 5.2 | 7.1 | September 4, 2014 |
WordPress 5 | wordpress5 | 5.6 | 7.2 | December 6, 2018 |
WordPress 6 | wordpress6 | 5.6 | 7.3 | May 24, 2022 |
XenForo 1 | xenforo1 | 5.2.11 | 5.4 | March 8, 2011 | December 31, 2019
XenForo 2 | xenforo2 | 5.4.0 | 7.1 | November 28, 2017 |
Zend Framework 2 | zendframework2 | 5.3.23 | 5.4 | September 5, 2012 |
If you do not see your website software listed, Catapult supports basic PHP projects that do not have a database requirement.
- When an above software type is not defined, the default PHP version that is used is PHP 5.4. This is not configurable.
- PHP-less static site generators, such as, Jekyll, are supported.
PHP Versions ###
Catapult maintains a high level of integrity when it comes to PHP versions, through maintaining security, backwards compatibility, performance, and new features. Below is an overview of the PHP versions used in Catapult and when you can expect these versions to be End-of-Life (EOL). We will bump to the next highest version of PHP in the list when nearing the EOL - this provides ample time for support of the newer PHP version by the software. In cases where a software version is sunsetting, the CentOS Long-term Support (LTS) version of PHP is used. PHP Version | End-of-Life | Maintainer | Updater ------------|-------------|------------|-------- 5.4 | June 30, 2024 | CentOS | Red Hat 7.1 | December 1, 2019 | Software Collections | Red Hat 7.2 | November 30, 2020 | Software Collections | Red Hat 7.3 | June 30, 2024 | Jan Staněk | Red HatEnd-of-Life (EOL) ###
Catapult tracks vendor announced EOL dates for website software and a red EOL date will be displayed duringvagrant status if one of your website's software is EOL. Currently Catapult has no plan to block Catapult supported software that is past its EOL date - it is up to you to move to the next major supported version.
Platform Comparision ##
Here, we compare similar platforms to shed light on where we are and we're headed. Catapult's approach is holistic, meaning, there are no optional features - the platform includes everything in its default state and its default state is the only state of the platform. Some platforms offer and support optional third-party features that need configured - these are excluded. Platform Feature | Catapult | Pantheon | Acquia -----------------|----------|----------|-------- Source | Open | Closed | Closed Subscription Feature Set | Bundled | Separated | Separated Traditional Tooling (VMs & Shell) | :whitecheckmark: | :x: | :x: Multi-Platform (Linux & Windows) | :whitecheckmark: | :x: | :x: Supported PHP Software | 20+ | 2 | 1 Supported .NET Software | TBA | :x: | :x: Minimum BundledMonthly Cost | $45 | $400 | $134 Websites per instance | Unlimited | 1 | 1 Managed Workflow | Git Flow (branch-based environments) | :x: | :x: Managed Software Workflow Model | Upstream or Downstream | :x: | :x: Agile Methodology Focus | Scrum | :x: | :x: Managed Continuous Integration | :whitecheckmark: | :x: | :x: Environments | LocalDev, Test, QC, Production | Multidev, Dev, Test, Live | Dev Desktop, Dev, Stage, Prod Exacting Configuration | :whitecheckmark: | :x:2| :x:3 Approach | Virtual Machine | Container | Virtual Machine Data Center | DigitalOcean and AWS | Rackspace | AWS Scaling | Horizontal | Horizontal | Vertical Scaling Management | Manual | Automatic | Manual Development Environment | Unlimited Local | 5 Cloud | Unlimited Local Development Environment Approach | Exact | Exact | Similar Dashboard - Control | CLI | CLI & Web | CLI & Web Dashboard - Monitor | Web | Web | Web Managed Public Git Website Repository Support | GitHub & Bitbucket | :x: | :x: Managed DNS | CloudFlare | :x: | :x: Managed Free HTTPS Certificates | CloudFlare/Let's Encrypt | :x: | :x: Managed Server Monitoring | New Relic | :x: | Proprietary Managed Application Error Logs | New Relic | Proprietary | Proprietary Managed Application Performance Monitoring | New Relic | :x: | :x: Managed Browser Performance Monitoring | New Relic | :x: | :x: Managed Synthetic Monitoring | New Relic | :x: | :x: See an error or have a suggestion? Email competition@devopsgroup.io - we appreciate all feedback.
Setup Catapult #
Catapult requires a Developer Setup, Instance Setup, and Services Setup as described in the following sections. There are two roles when using Catapult, Catapult User and Catapult Admin.- Catapult Users are developers who use Catapult for developing within the websites that the Catapult Admin has added and configured
- Catapult Admins are administrators who setup their organization's Catapult instance and required services
- It is advised to turn off any antivirus software that you may have installed during setup and usage of Catapult - tasks such as forwarding ports and writing hosts files may be blocked.
- Virtualizaion must be enabled in the BIOS of the developer's workstation - follow this how-to to get started.
- It is recommended to disable Internet Service Provider (ISP) Domain Name System (DNS) helpers, such as opting out of the Verizon DNS Assitance.
- Using a VPN client during usage of LocalDev may result in lost communication between your workstation and the guests, requiring a
vagrant reloadto regain communication.
Developer Setup ##
Catapult uses Vagrant and the command line of a developer's workstation, below is a list of required software that will need to be installed.- macOS workstations: Compatible and supported
- Linux workstations: Compatible and supported
- Windows workstations: Limited testing and support
- Terminal
- GPG2
~/.gnupg/gpg.conf
- Git
- Hypervisor
sudo apt-get install virtualbox
* Using Linux (Fedora, Red Hat, Suse)?
1. Download and install the latest version of VirtualBox using Yellowdog Updater, Modified (yum) sudo yum install virtualbox
- Vagrant
xcode-select --install from the Terminal
2. Download and install the latest version of Vagrant v2.x from https://releases.hashicorp.com/vagrant/
* Using macOS with Apple silicon?
1. Download and install the latest version of Vagrant VMware Utility from https://developer.hashicorp.com/vagrant/downloads/vmware
* Using Windows?
1. Download and install the latest version of Vagrant v2.x from https://releases.hashicorp.com/vagrant/
* Using Linux (Debian, Ubuntu)?
1. Download the latest version of Vagrant v2.x respective to your architecture from https://releases.hashicorp.com/vagrant/ by running e.g. wget https://releases.hashicorp.com/vagrant/2.2.9/vagrant2.2.9x86_64.deb
2. Install Vagrant using dpkg e.g. sudo dpkg --install vagrant2.2.9x86_64.deb
3. Install Network File System (NFS) sudo apt-get install nfs-kernel-server
* Using Linux (Fedora, Red Hat, Suse)?
1. Download the latest version of Vagrant v2.x respective to your architecture from https://releases.hashicorp.com/vagrant/ by running e.g. wget https://releases.hashicorp.com/vagrant/2.2.9/vagrant2.2.9x86_64.rpm
2. Install Vagrant using yum e.g. sudo yum install vagrant2.2.9x86_64.rpm
- Java SE Development Kit
- Instance Configuration
vagrant status to verify the correct workstation software is installed and to generate your Catapult user files
2. Set ~/secrets/configuration-user.yml["settings"]["admin"] to true
3. Enable Git credential caching by following the instructions outlined for your system to store your Git credentials. This will allow you to push changes to your Catapult instance without a prompt for credentials.
2. If you are a Catapult user:
1. Using Git, clone your team's Catapult instance repository
2. Once cloned, from your workstation's terminal, change the directory into the root of the newly cloned Catapult repository
3. Run vagrant status to verify the correct workstation software is installed and to generate your Catapult user files
4. Contact your Catapult admin for your Catapult instance's GPG passphrase and place at ~/secrets/configuration-user.yml["settings"]["gpg_key"]
5. You may stop at this point and contact your Catapult admin for the next steps. The following Instance Setup and Services Setup will be or have been, completed by your Catapult admin
3. Any role: personal accounts:
1. Users can choose to specify a personal Bamboo user (rather than the company user) for certain Bamboo calls that originate locally
1. Set ~/secrets/configuration-user.yml["settings"]["bamboo_username"] to the username for this Bamboo user
2. Set ~/secrets/configuration-user.yml["settings"]["bamboo_password"] to the password for this Bamboo user
8. If you are a Catapult User, contact your Catapult Admin for next steps. If you are a Catapult Admin, continue to the Instance Setup and Services Setup.
Instance Setup ##
Catapult is quick to setup. You have the option of using GitHub (public) or Bitbucket (private) to store your Catapult instance. Your Catapult secrets are encrypted and safe, but please use your best judgment when choosing a destination for your Catapult instance.- Fork Catapult
- Admin Mode
vagrant status to verify the correct workstation software is installed and to generate your Catapult user files
3. Set ~/secrets/configuration-user.yml["settings"]["admin"] to true
4. Enable Git credential caching by following the instructions outlined for your system to store your Git credentials
- GPG Edit Mode
~/secrets/configuration-user.yml["settings"]["gpg_edit"] (false by default) and is used to encrypt your Catapult configuration secrets using your GPG Passphrase:
1. ~/secrets/idrsa as ~/secrets/idrsa.gpg
2. ~/secrets/idrsa.pub as ~/secrets/idrsa.pub.gpg
3. ~/secrets/configuration.yml as ~/secrets/configuration.yml.gpg
1. GPG Edit Mode requires that you are on your Catapult fork's develop branch.
3. Running any Vagrant command (e.g. vagrant status) will encrypt your configuration, of which, will allow you to commit and push safely to your public Catapult fork.
- SSH Key Pair
idrsa and idrsa.pub in the ~/secrets/ folder.
- GPG Passphrase
~/secrets/configuration-user.yml["settings"]["gpg_key"]
6. It is recommended to print a QR code of the passphrase to distribute to your team, please visit http://educastellano.github.io/qr-code/demo/
7. Remember! Effective security is equal parts process and technology.
Services Setup ##
Catapult is designed with a distributed services model, below are the required third-party services and their sign-up and configuration steps. Service | Product | Use Case | Monthly Cost --------|---------|----------|------------- †Cloud Hosting: Red Hat (PHP) | DigitalOcean Droplets | Web and Database Servers (6) | \*$30+ †Cloud Hosting: Windows (.NET) | Amazon Web Services (AWS) EC2 | Web and Database Servers (6) | \*$80+ Source Code Repositories | Atlassian Bitbucket | Private Repositories | Free Source Code Repositories | GitHub | Public Repositories | Free Automated Deployments / Continuous Integration | Atlassian Bamboo Server | Build Server | $15 DNS | CloudFlare | Cloud DNS | Free Monitoring | New Relic Application Performance Monitoring (APM), Browser, Server, and \**Synthetics | Performance and Infrastructure Monitoring | Free Total | | | †$45+ † Only one platform (Red Hat or Windows) is required to have a full-featured infrastructure. Generally speaking, the industry-standard Red Hat platform will be used. \* Depending on load, resources may need to be increased, starting at an additional $5 per month per server. \** New Relic customers receive a trial "pro" period ranging from 14-days to 30-days, however, there is no free tier beyond the trial1. Cloud Hosting:
- DigitalOcean sign-up and configuration
~/secrets/configuration.yml["company"]["digitaloceanpersonalaccess_token"]
3. Go to your DigitalOcean Security Dashboard https://cloud.digitalocean.com/settings/security
1. Add a new SSH Key named "Vagrant" with your newly created idrsa.pub from ~/secrets/idrsa.pub key
- Amazon Web Services (AWS) sign-up and configuration
~/secrets/configuration.yml["company"]["awsaccesskey"]
3. Place the Secret Access Key at ~/secrets/configuration.yml["company"]["awssecretkey"]
4. Go to your AWS Identity and Access Management (IAM) Groups Dashboard https://console.aws.amazon.com/iam/home#groups
1. Create a "Catapult" group.
2. Attach the "AmazonEC2FullAccess" policy to the "Catapult" group.
5. Go back to your AWS Identity and Access Management (IAM) Groups Dashboard https://console.aws.amazon.com/iam/home#groups
1. Select your newly created "Catapult" group.
2. Select Add Users to Group and add your newly created "Catapult" user.
6. Go to your AWS EC2 Key Pairs Dashboard https://console.aws.amazon.com/ec2/home#KeyPairs
1. Select "N. Virginia" from the top navigation
2. Click Import Key Pair
3. Add your newly created idrsa.pub from ~/secrets/idrsa.pub key
4. Set the Key pair name to "Catapult"
7. Go to your AWS EC2 Security Groups Dashboard https://console.aws.amazon.com/ec2/home#SecurityGroups
1. Select the "default" Group Name
2. Select the Inbound tab and click Edit
3. Change Source to "Anywhere"
4. Click Save
2. Repositories:
Bitbucket provides free private repositories and GitHub provides free public repositories, you will need to sign up for both. If you already have Bitbucket and GitHub accounts you may use them, however, it's best to setup a machine user if you're using Catapult with your team.- Bitbucket sign-up and configuration
~/secrets/configuration.yml["company"]["bitbucket_username"]
2. Create an App password at https://bitbucket.org/account/settings/app-passwords/
1. Create an App password with the label of "Catapult" and check off all Read permissions, with the exception of "Repositories", check up to Admin permissions.
1. Place the App password at ~/secrets/configuration.yml["company"]["bitbucket_password"]
2. Add your newly created idrsa.pub from ~/secrets/idrsa.pub key in https://bitbucket.org/account/user/your-user-here/ssh-keys/ named "Catapult"
- GitHub sign-up and configuration
~/secrets/configuration.yml["company"]["github_username"]
2. Place the password of the account for GitHub at ~/secrets/configuration.yml["company"]["github_password"]
2. Go to your account then Settings, Developer settings, and Personal access tokens.
1. Create a personal access token and name it Catapult. Enable repo, admin:public_key, and user permissions.
2. Place the personal access token at ~/secrets/configuration.yml["company"]["githubpersonalaccess_token"]
3. Add your newly created idrsa.pub from ~/secrets/idrsa.pub key in https://github.com/settings/ssh named "Catapult"
3. Automated Deployments:
Bamboo Server set-up- Sign up for an Atlassian account at https://my.atlassian.com/
- Purchase the $10 Bamboo Server license from https://www.atlassian.com/purchase/product/bamboo
- It's now time to bring up your build server, please run
vagrant up ~/secrets/configuration.yml["company"]["name"]-build
up will take some time, please be patient
- Login to DigitalOcean to obtain the IP address of the virtual machine to access via URL
~/secrets/configuration.yml["company"]["bamboobaseurl"], the format should be http://[digitalocean-ip-here]/
- Once your Bamboo Server instance is accessible via URL, you will be prompted with a license prompt, enter your license. Select Express installation.
- You will next be prompted to enter the following information:
~/secrets/configuration.yml["company"]["name"]
* Email - use ~/secrets/configuration.yml["company"]["email"]
Bamboo Configuration
- Place your Bamboo username at
~/secrets/configuration.yml["company"]["bamboo_username"]
- Place your Bamboo password at
~/secrets/configuration.yml["company"]["bamboo_password"]
- Allow anonymous users to trigger remote repository change detection by clicking the gear at the top right and going to Overview
vagrant status, Catapult will automatically detect its existence and automatically configure the settings required.
Otherwise, the manual setup configuration steps are outlined below:
- Disable anonymous user access by clicking the gear at the top right and going to Overview
- Click Create > Create a new plan from the top navigation:
4. DNS:
- CloudFlare sign-up and configuration
~/secrets/configuration.yml["company"]["cloudflareapikey"]
4. Place the email address of the email address that you used to sign up for Cloudflare at ~/secrets/configuration.yml["company"]["cloudflare_email"]
5. Monitoring:
- New Relic sign-up and configuration
~/secrets/configuration.yml["company"]["newrelicapikey"]
7. Generate and place another User API key at ~/secrets/configuration.yml["company"]["newrelicadminapi_key"]
6. Generate and place an Ingest - License key at ~/secrets/configuration.yml["company"]["newreliclicensekey"]
6. Email:
- SendGrid sign-up and configuration
~/secrets/configuration.yml["company"]["sendgridapikey"]
1. Place the username "apikey" at ~/secrets/configuration.yml["company"]["sendgrid_username"]
2. Place the API key at ~/secrets/configuration.yml["company"]["sendgrid_password"]
7. Verify Configuration:
- To verify all of the configurations that you just set, open your command line and change the directory into your fork of Catapult, then run
vagrant status. Catapult will confirm the connection to all of the Services and inform you of any problems.
Setup Environments #
To start using Catapult you will need to Provision Environments and Configure Automated Deployments.Provision Environments ##
Environment | LocalDev | Test | QC | Production ------------|----------|------|----|----------- Server Provider | Locally via VirtualBox and VMware Fusion | Hosted via DigitalOcean | Hosted via DigitalOcean | Hosted via DigitalOcean Server Provisioning | Manually via Vagrant | Manually via Vagrant | Manually via Vagrant | Manually via Vagrant For each Environment you will need to:- Web Servers
vagrant up ~/secrets/configuration.yml["company"]["name"]-dev-redhat
* vagrant up ~/secrets/configuration.yml["company"]["name"]-test-redhat
* vagrant up ~/secrets/configuration.yml["company"]["name"]-qc-redhat
* vagrant up ~/secrets/configuration.yml["company"]["name"]-production-redhat
- Database Servers
vagrant up ~/secrets/configuration.yml["company"]["name"]-dev-redhat-mysql
* vagrant up ~/secrets/configuration.yml["company"]["name"]-test-redhat-mysql
* vagrant up ~/secrets/configuration.yml["company"]["name"]-qc-redhat-mysql
* vagrant up ~/secrets/configuration.yml["company"]["name"]-production-redhat-mysql
Configure Automated Deployments ##
Once the Web and Database Servers are up and running, it's then time to configure your Bamboo Catapult project's TEST, QC, and PROD plans. To avoid having to manually configure the Bamboo project, plans, stages, jobs, and tasks configuration, you may optionally install and purchase the "Bob Swift Atlassian Add-ons - Bamboo CLI Connector" Bamboo add-on. Otherwise, the manual setup configuration steps are outlined below:- Sign in to your new custom Bamboo instance
~/secrets/configuration.yml["company"]["bamboobaseurl"]
- Click Build > All build plans from the header:
- From the Build Dashboard and under the Catapult project:
shell
3. Script Location: Inline
6. Script body: bash /catapult/provisioners/redhat/provision.sh "build" "https://github.com/[your-name-here]/catapult" "~/secrets/configuration-user.yml["settings"]["gpg_key"]" "bamboo"
7. Click Save
* Configure Catapult Project TEST Plan
1. Click the edit icon for the TEST plan
2. From the Stages tab, select Default Job
3. Remove all tasks that may have been added by default during initial setup
4. Click Add task
1. Search for SSH Task and select it
2. Host: ~/secrets/configuration.yml["environments"]["test"]["servers"]["redhat"]["ip"]
3. Username: root
4. Authentication Type: Key without passphrase
5. SSH Key: ~/secrets/id_rsa
6. SSH command: bash /catapult/provisioners/redhat/provision.sh "test" "https://github.com/[your-name-here]/catapult" "~/secrets/configuration-user.yml["settings"]["gpg_key"]" "apache"
7. Click Save
5. Click Add task
1. Search for SSH Task and select it
2. Host: ~/secrets/configuration.yml["environments"]["test"]["servers"]["redhat_mysql"]["ip"]
3. Username: root
4. Authentication Type: Key without passphrase
5. SSH Key: ~/secrets/id_rsa
6. SSH command: bash /catapult/provisioners/redhat/provision.sh "test" "https://github.com/[your-name-here]/catapult" "~/secrets/configuration-user.yml["settings"]["gpg_key"]" "mysql"
7. Click Save
* Configure Catapult Project QC Plan
1. Click the edit icon for the QC plan
2. From the Stages tab, select Default Job
3. Remove all tasks that may have been added by default during initial setup
4. Click Add task
1. Search for SSH Task and select it
2. Host: ~/secrets/configuration.yml["environments"]["qc"]["servers"]["redhat"]["ip"]
3. Username: root
4. Authentication Type: Key without passphrase
5. SSH Key: ~/secrets/id_rsa
6. SSH command: bash /catapult/provisioners/redhat/provision.sh "qc" "https://github.com/[your-name-here]/catapult" "~/secrets/configuration-user.yml["settings"]["gpg_key"]" "apache"
7. Click Save
5. Click Add task
1. Search for SSH Task and select it
2. Host: ~/secrets/configuration.yml["environments"]["qc"]["servers"]["redhat_mysql"]["ip"]
3. Username: root
4. Authentication Type: Key without passphrase
5. SSH Key: ~/secrets/id_rsa
6. SSH command: bash /catapult/provisioners/redhat/provision.sh "qc" "https://github.com/[your-name-here]/catapult" "~/secrets/configuration-user.yml["settings"]["gpg_key"]" "mysql"
7. Click Save
* Configure Catapult Project PRODUCTION Plan
1. Click the edit icon for the PRODUCTION plan
2. From the Stages tab, select Default Job
3. Remove all tasks that may have been added by default during initial setup
4. Click Add task
1. Search for SSH Task and select it
2. Host: ~/secrets/configuration.yml["environments"]["production"]["servers"]["redhat"]["ip"]
3. Username: root
4. Authentication Type: Key without passphrase
5. SSH Key: ~/secrets/id_rsa
6. SSH command: bash /catapult/provisioners/redhat/provision.sh "production" "https://github.com/[your-name-here]/catapult" "~/secrets/configuration-user.yml["settings"]["gpg_key"]" "apache"
7. Click Save
5. Click Add task
1. Search for SSH Task and select it
2. Host: ~/secrets/configuration.yml["environments"]["production"]["servers"]["redhat_mysql"]["ip"]
3. Username: root
4. Authentication Type: Key without passphrase
5. SSH Key: ~/secrets/id_rsa
6. SSH command: bash /catapult/provisioners/redhat/provision.sh "production" "https://github.com/your-name-here/catapult" "~/secrets/configuration-user.yml["settings"]["gpg_key"]" "mysql"
7. Click Save
* Configure Catapult Project WINTEST Plan
1. Click the edit icon for the WINTEST plan
2. From the Stages tab, select Default Job
3. Remove all tasks that may have been added by default during initial setup
4. Click Add task
1. Search for Script Task and select it
2. Interpreter: shell
3. Script Location: Inline
4. Script body: python /catapult/provisioners/windows/provision.py "~/secrets/configuration.yml["environments"]["test"]["servers"]["windows"]["ip"]" "Administrator" "~/secrets/configuration.yml["environments"]["test"]["servers"]["windows"]["adminpassword"]" "test" "https://github.com/[your-name-here]/catapult" "~/secrets/configuration-user.yml["settings"]["gpgkey"]" "iis"
5. Click Save
5. Click Add task
1. Search for Script Task and select it
2. Interpreter: shell
3. Script Location: Inline
4. Script body: python /catapult/provisioners/windows/provision.py "~/secrets/configuration.yml["environments"]["test"]["servers"]["windowsmssql"]["ip"]" "Administrator" "~/secrets/configuration.yml["environments"]["test"]["servers"]["windowsmssql"]["adminpassword"]" "test" "https://github.com/[your-name-here]/catapult" "~/secrets/configuration-user.yml["settings"]["gpgkey"]" "mssql"
5. Click Save
* Configure Catapult Project WINQC Plan
1. Click the edit icon for the WINQC plan
2. From the Stages tab, select Default Job
3. Remove all tasks that may have been added by default during initial setup
4. Click Add task
1. Search for Script Task and select it
2. Interpreter: shell
3. Script Location: Inline
4. Script body: python /catapult/provisioners/windows/provision.py "~/secrets/configuration.yml["environments"]["qc"]["servers"]["windows"]["ip"]" "Administrator" "~/secrets/configuration.yml["environments"]["qc"]["servers"]["windows"]["adminpassword"]" "qc" "https://github.com/[your-name-here]/catapult" "~/secrets/configuration-user.yml["settings"]["gpgkey"]" "iis"
5. Click Save
5. Click Add task
1. Search for Script Task and select it
2. Interpreter: shell
3. Script Location: Inline
4. Script body: python /catapult/provisioners/windows/provision.py "~/secrets/configuration.yml["environments"]["qc"]["servers"]["windowsmssql"]["ip"]" "Administrator" "~/secrets/configuration.yml["environments"]["qc"]["servers"]["windowsmssql"]["adminpassword"]" "qc" "https://github.com/[your-name-here]/catapult" "~/secrets/configuration-user.yml["settings"]["gpgkey"]" "mssql"
5. Click Save
* Configure Catapult Project WINPROD Plan
1. Click the edit icon for the WINPROD plan
2. From the Stages tab, select Default Job
3. Remove all tasks that may have been added by default during initial setup
4. Click Add task
1. Search for Script Task and select it
2. Interpreter: shell
3. Script Location: Inline
4. Script body: python /catapult/provisioners/windows/provision.py "~/secrets/configuration.yml["environments"]["production"]["servers"]["windows"]["ip"]" "Administrator" "~/secrets/configuration.yml["environments"]["production"]["servers"]["windows"]["adminpassword"]" "production" "https://github.com/[your-name-here]/catapult" "~/secrets/configuration-user.yml["settings"]["gpgkey"]" "iis"
5. Click Save
5. Click Add task
1. Search for Script Task and select it
2. Interpreter: shell
3. Script Location: Inline
4. Script body: python /catapult/provisioners/windows/provision.py "~/secrets/configuration.yml["environments"]["production"]["servers"]["windowsmssql"]["ip"]" "Administrator" "~/secrets/configuration.yml["environments"]["production"]["servers"]["windowsmssql"]["adminpassword"]" "production" "https://github.com/[your-name-here]/catapult" "~/secrets/configuration-user.yml["settings"]["gpgkey"]" "mssql"
5. Click Save
Release Management #
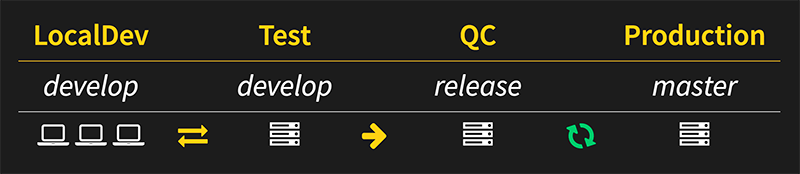
Catapult follows Gitflow for its infrastructure configuration and website development model - each environment is branch-based and changesets are introduced into each environment by pull requests from one branch to the next. 1
| | LocalDev | Test | QC | Production
|------------|----------|------|----|-----------
Running Branch | develop | develop | release | master
Automated Deployments | No, manually via
1
| | LocalDev | Test | QC | Production
|------------|----------|------|----|-----------
Running Branch | develop | develop | release | master
Automated Deployments | No, manually via vagrant provision | Yes, triggered by new commits to develop | Yes, nightly or manually via Bamboo | Yes, nightly or manually via Bamboo
Testing Activities | Component Test | Integration Test, System Test | Acceptance Test, Release Test | Operational Qualification
Scrum Activity | Sprint Start: Development of User Stories | Daily Scrum | Sprint Review | Sprint End: Accepted Product Release
Scrum Roles | Development Team | Scrum Master, Development Team, Product Owner (optional) | Scrum Master, Development Team, Product Owner | Product Owner
Software Workflow ##
Catapult enforces a unique solution to Release Management of a website, Software Workflow. Software Workflow offers two modes, downstream or upstream, creating a "golden environment".
Downstream ###
| | LocalDev | Test | QC | Production |------------|----------|------|----|----------- Downstream Software Workflow - Database | Restore from develop~/sql folder of website repo | Restore from develop ~/sql folder of website repo | Restore from release ~/sql folder of website repo | Auto-commit one backup per day (up to 500MB or 1) to master ~/sql folder of website repo
Downstream Software Workflow - Untracked File Stores | rsync file stores from Production | rsync file stores from Production | rsync file stores from Production |
Downstream Software Workflow - Tracked File Stores | Pull file stores from develop | Pull file stores from develop | Pull file stores from release | Auto-commit file stores (up to 750MB each) to master of website repo
Note: Catapult will automatically pull the master branch into the develop branch of a website's repository when in the Downstream Software Workflow direction.
Upstream ###
| | LocalDev | Test | QC | Production |------------|----------|------|----|----------- Upstream Software Workflow - Database | Restore from develop~/sql folder of website repo | Auto-commit one backup per day (up to 500MB or 1) to develop ~/sql folder of website repo | Restore from release ~/sql folder of website repo | Restore from master ~/sql folder of website repo
Upstream Software Workflow - Untracked File Stores | rsync file stores from Test | | rsync file stores from Test | rsync file stores from Test
Upstream Software Workflow - Tracked File Stores | Pull file stores from develop | Auto-commit file stores (up to 750MB each) to develop of website repo | Pull file stores from release | Pull file stores from master
Catapult Configuration ##
All Catapult configuration is stored in~/secrets/configuration.yml and encrypted as ~/secrets/configuration.yml.gpg. There are three main sections - Company, Environments, and Websites.
Company ###
The exclusive Company entry contains top-level company information and service credentials, configured during Setup Catapult.name:
email:
timezone_redhat:
timezone_windows:
digitaloceanpersonalaccess_token
bitbucket_username
bitbucket_password
github_username
github_password
githubpersonalaccess_token
bamboobaseurl
bamboo_username
bamboo_password
awsaccesskey
awssecretkey
bamboo_password
cloudflareapikey
cloudflare_email
newrelicadminapi_key
newrelicapikey
newreliclicensekey
sendgridapikey
sendgrid_username
sendgrid_password
Environments ###
The setup- and maintenance-free Environments entries contain environment configurations such as IP addresses and system credentials - all of which are automatically set during Setup Catapult and Setup Environments.Websites ###
Adding websites to Catapult is driven by simple configuration. After establishing a repository at GitHub or Bitbucket, simply add entries to~/secrets/configuration.yml. The entries must be ordered alphabetically by domain name and all entries exist under the single websites: key as reflected in this example:
websites:
  apache:
  - domain: devopsgroup.io
    repo: git@github.com:devopsgroup-io/devopsgroup-io.git
  - domain: example.com
repo: git@github.com:example-company/example.com.gitdomain:
domain: example.com
* example: domain: subdomain.example.com
* this root domain entry is the Production canonical domain name without www.
* a www. subdomain is created for you
* the key for all management orchestration of this website
* one subdomain level is supported for this root domain entry (subdomain.example.com)
* manages DNS of LocalDev (via hosts file) and Test, QC, Production (via CloudFlare)
* dev.example.com, test.example.com, qc.example.com, example.com
* www.dev.example.com, www.test.example.com, www.qc.example.com, www.example.com
domaintldoverride:
domaintldoverride: mycompany.com
* a domain name under your name server authority to append to the top-level-domain (e.g. .com)
* configures a vhost at the domain and domain.domaintldoverride
README truncated. View on GitHub


