
Udacity Full Stack Web Developer Nanodegree program (FSND) course materials
README

Udacity Full Stack Developer Nanodegree program
Brendon Smith (br3ndonland)

Code in this repository is provided under the terms of the MIT license.

 Launch in Binder container
Table of Contents
- Projects - Lessons - Keymapping - Package management - Shell - Version control - Text editor - Browsers - JavaScript - PythonDescription
This is a repository for Udacity Full Stack Web Developer Nanodegree program (FSND) course notes and materials. The full program description and syllabus can be found on the Udacity website, in this repo, and via PDF download.
Full stack web developers work on all aspects of websites and apps, from front end (features that users see) to back end (servers and databases). In this program, I built skills including:
- Developing webpages based on mockup images from designers
- Querying and manipulating large databases with SQL
- Creating functional multi-page web apps with databases and sign-ins
- Fetching data from Application Programming Interfaces (APIs)
- Deploying apps to Linux servers
Strategies
Projects
- Focus on projects. The Nanodegree is awarded for projects, not lessons and quizzes. As you advance past the fundamentals into the project topics, you may want to just skip directly to the projects, and go back through the lessons as needed. Other students have succeeded with this project-focused approach.
- Master Markdown.
- Keep computational narratives.
- Break projects down into actionable steps.
Lessons
- Limit lesson time. Speed up videos to 1.5x or 2x, and set a timer when working through the lessons. I used the Pomodoro technique, and limited myself to 25 minutes max per lesson section. I would often complete 2-3 lesson sections per 25 minute interval.
- Limit quiz attempts. When I was getting started, I aimed to complete 100% of the lesson material, and I took the quizzes too seriously. I pushed myself to answer quiz questions correctly without checking solutions. This led me to hit sticking points, and I would sometimes take 1-2 days just to complete a quiz. As I went on, I set a limit of three quiz attempts. If I didn't get it in three attempts, I would check the solution and move on.
- Take notes on the lessons. See
H1 for the title at the top, like # Lesson 1. Shell workshop.
- Reserve H2 (##) for breaking the lesson into different sections. If the lesson just has one section, I would recommend calling it ## Concepts, like Udacity does.
- Paste in the sections of the lesson from the Udacity interface, and set each one to H3 (###).
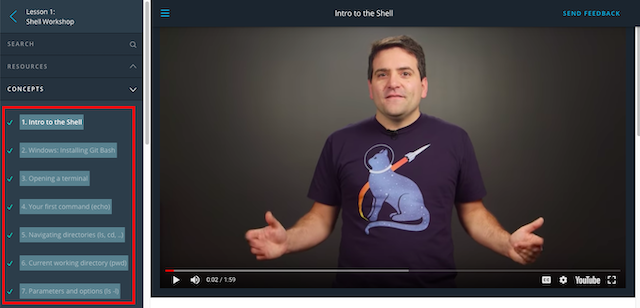
- As with projects, use the lesson notes file as a computational narrative while you work through each part of the lesson. - At the end of the lesson, I generate a Table of Contents from the headers, using the "Create Table of Contents" feature of the Markdown All In One VSCode extension.
See my program feedback for more comments.
Computing environment
Here are some suggestions for your computing environment. I use macOS, but these suggestions are easy to adapt for Linux or Windows. For full details on my personal setup, see my dotfiles_ repo on GitHub.
Keymapping
- I use a Microsoft Sculpt ergonomic keyboard.
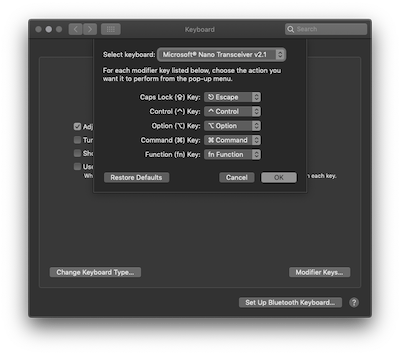
- I remap the caps lock key to escape. This is built in to macOS now (System Preferences -> Keyboard -> Keyboard -> Modifier Keys)
- For more elaborate keymapping, check out Karabiner.
Package management
- I use Homebrew on macOS.
- Install Homebrew from the command line:
/usr/bin/ruby -e "$(curl -fsSL https://raw.githubusercontent.com/Homebrew/install/master/install)"- Install Homebrew packages with
brew install:
# Homebrew packages
  brew install git node python3 pipenv zsh zsh-completions zsh-syntax-highlighting
# Homebrew casks   brew cask install visual-studio-code
- Update with
brew updateandbrew upgrade. - Check health of installation with
brew doctor. - Searching with
brew search <name>now also searches casks. - View info with
brew info <name>. - See the Homebrew docs for further info.
Shell
- A shell is a command-line interface that connects a user with the operating system.
- In order to see your shell, you need to use a terminal program, also sometimes called a terminal emulator. Popular terminal emulators include:
- There are many different shells with unique features.
- I use Zsh, which is like Bash but with more features. See the Wes Bos Command Line Power User course for a tutorial. There is a version included with macOS, but it may be out of date. Install with Homebrew (
brew install zsh), and configure in
npm install --global pure-prompt- Add the prompt to ~/.zshrc:
# .zshrc continues above
    # Pure prompt: https://github.com/sindresorhus/pure
    autoload -U promptinit
    promptinit
    prompt pure
    # .zshrc continues below
- Try it out:
brew --version
echo 'stay udacious'- trash-cli: Moves files to the trash instead of permanently deleting with
rm.
touch file.txt
    trash file.txt
Version control
- Git is recommended for version control.
- I use the following general Git commit practices.
- Here's how the commit message might look:
Imperative commit title limited to 50 characters
  # Blank line
  - More detailed commit message body
  - List of key points and updates that the commit provides
- Lines need to be manually wrapped at 72 characters- See how to make a Git commit message and the Udacity Git Commit Message Style Guide. Udacity recommends specifying the type of commit, like
feat: commit title. - Branching may not be needed in these projects, but in more complicated projects:
master and dev branches are generally long-running branches.
- Short-lived feature branches are merged to dev, then deleted.
- The only commits to master are production-ready merges from dev.
- See Atlassian's comparing workflows page for more.
- Undoing commits
Text editor
- I use Microsoft Visual Studio Code (VSCode). My complete settings are available in my dotfiles repo on GitHub.
- Theme: Material Theme Palenight
- Font: Dank Mono is my favorite. I particularly like the ligatures.
- See the VSCode docs to get started.
- Key features:
- Useful extensions:
Browsers
- Helpful dev tools, especially for CSS Grid - Built on Chromium, the same engine as Google Chrome. - Has many of the features of Chrome, including dev tools. - Much better than Chrome for privacy. Blocks trackers by default, and loads websites up to 6x faster than Chrome.Code syntax
Decisive autoformatters save time and prevent bikeshedding. Try changing the formatting of fizzbuzz.js or fizzbuzz.py_, then formatting with Standard (for JavaScript) or Black (for Python) as described below, to see what I mean.
JavaScript
- I recommend JavaScript Standard Style or Prettier.
- JavaScript Standard Style:
"semi": false. Some users may also want to add "trailingComma": "es5", or extend the default 80 character line length to 100.
- There is a Prettier VSCode extension.
Python
- Helpful VSCode resources:
- Use Python 3 (modern Python). Python 2 (legacy Python) is nearing its end of life.
- I recommend installing
python3andpipenvwith Homebrew. After installingpython3,pipcan be updated withpip3 install --upgrade pip setuptools wheel. - I format Python code with Black.
--dev flag: pipenv install black --dev
2. Allowing pre-releases into the lock file: pipenv lock --pre
- If you prefer the less-decisive PEP 8 format, I recommend autopep8 for autoformatting. VSCode also has built-in Python formatting support for autopep8.
- Jupyter
brew install python3
    brew install pipenv
    brew install jupyter
    cd path/where/you/want/jupyterlab
    # On first install: pipenv install jupyterlab requests numpy statistics twilio
    # After Pipfile is generated
    pipenv install
    pipenv shell
    # Install any JupyterLab extensions at this point
    (pipenv) $ jupyter labextension install @jupyterlab/toc
    (pipenv) $ jupyter lab
- I previously used Anaconda to manage my Python and R distributions, and now use Homebrew. I switched because Anaconda is a very large installation, not as flexible or general as Homebrew, and not as important for virtual environments now that we have Pipenv. - There are two options for running the Jupyter Notebooks in the cloud: Google Colaboratory and Binder.


