
AWS Cloud9 and CodeCommit alternative with GitOps pipeline
sample-developer-environment
This solution deploys a complete browser-based development environment with VS Code, version control, and automated deployments using a single AWS CloudFormation template.
🚀 Now includes Kiro IDE and Kiro CLI
Quick Navigation
- Repository Structure
- Key Features
- Quick Start
- Configuration Options
- Useful File locations
- Kiro Setup
- AWS IAM Roles
- Architecture
- Sample Application
- Security Considerations
Repository Structure
.
├── .kiro/                            # Kiro workspace configuration directory
│   └── agents/                       # Agent configuration directory
│       └── platform-engineer.json    # Platform engineering agent with MCP servers
│       └── data-engineer.json        # Data engineering agent with MCP servers
├── dev/                              # Development workspace
│   └── README.md                     # Development guide
├── release/                          # Sample Terraform application
│   ├── main.tf                       # Core infrastructure
│   ├── provider.tf                   # AWS provider configuration
│   ├── variables.tf                  # Input variables
│   ├── versions.tf                   # Provider versions and backend
│   ├── website.tf                    # Sample static website
│   └── terraform.tfvars              # Variable defaults
│── devbox-setup.sh                   # EC2 Bootstrap script
└── sample-developer-environment.yml  # Main CloudFormation template
Key Features
- Browser-based VS Code using code-server accessed through Amazon CloudFront
- Kiro CLI with uv and uvenv for installing MCP servers
- Optional desktop environment with Kiro IDE accessed through DCV
- Git version control using git-remote-s3 with Amazon S3 storage
- Automated deployments using AWS CodePipeline and AWS CodeBuild
- Password rotation using AWS Secrets Manager (30-day automatic rotation)
- Pre-configured AWS development environment:
Quick Start
- Launch the AWS CloudFormation template
sample-developer-environment.yml - Choose your initial workspace content:
GitHubRepo parameter, OR
- Provide S3 bucket name S3AssetBucket and S3AssetPrefix parameters
- Access VS Code through the provided CloudFormation output URL
- Get your password from AWS Secrets Manager (link in outputs)
- Click File > Open Folder and navigate to
/home/ec2-user/my-workspace. This is the git/S3 initialized project directory - Test code in
dev, copy torelease, commit and push to trigger deployment
Configuration Options
| Parameter | Description | |-----------|-------------| | CodeServerVersion | Version of code-server to install | | GitHubRepo | Public repository to clone as initial workspace. Note: Using a custom repository will not include the sample application | | GitHubBranch | GitHub branch to use for devbox-setup.sh script (default: main) | | S3AssetBucket | (Optional) S3 bucket containing initial workspace content. Overwrites GitHubRepo if provided | | S3AssetPrefix | (Optional) S3 bucket asset prefix path. Only required when S3AssetBucket is specified. Needs to end with / | | DeployPipeline | Enable AWS CodePipeline deployments | | RotateSecret | Enable AWS Secrets Manager rotation | | AutoSetDeveloperProfile | Automatically set Developer profile as default in code-server terminal sessions without requiring manual elevation | | EnableKiroIDE | Enable Kiro IDE desktop application with DCV | | InstallDotNet | Install .NET SDK | | InstanceArchitecture | Choose between ARM (arm64) and x86 (amd64) architecture (Kiro IDE requires x86) | | InstanceType | Pick Amazon EC2 instance type (t3a.large and up recommended for Kiro IDE) |
Useful File Locations
Here are some handy files you'll find on the EC2 instance:
| File | Description | |------|-------------| | /etc/devbox-env.sh | Environment variables file | | /var/lib/cloud/instance/setup-status.log | Installation status tracking file | | /var/lib/cloud/scripts/per-boot/setup.sh | Setup script location (runs on every boot) | | /var/log/devbox-setup.log | Log file for setup script output |
Kiro Setup
Prerequisites
- Enable IAM Identity Center if you haven't already
- Create an IAM Identity Center user if needed
- Follow the Subscribing your team to Kiro guide
Kiro CLI
From the code-server terminal:
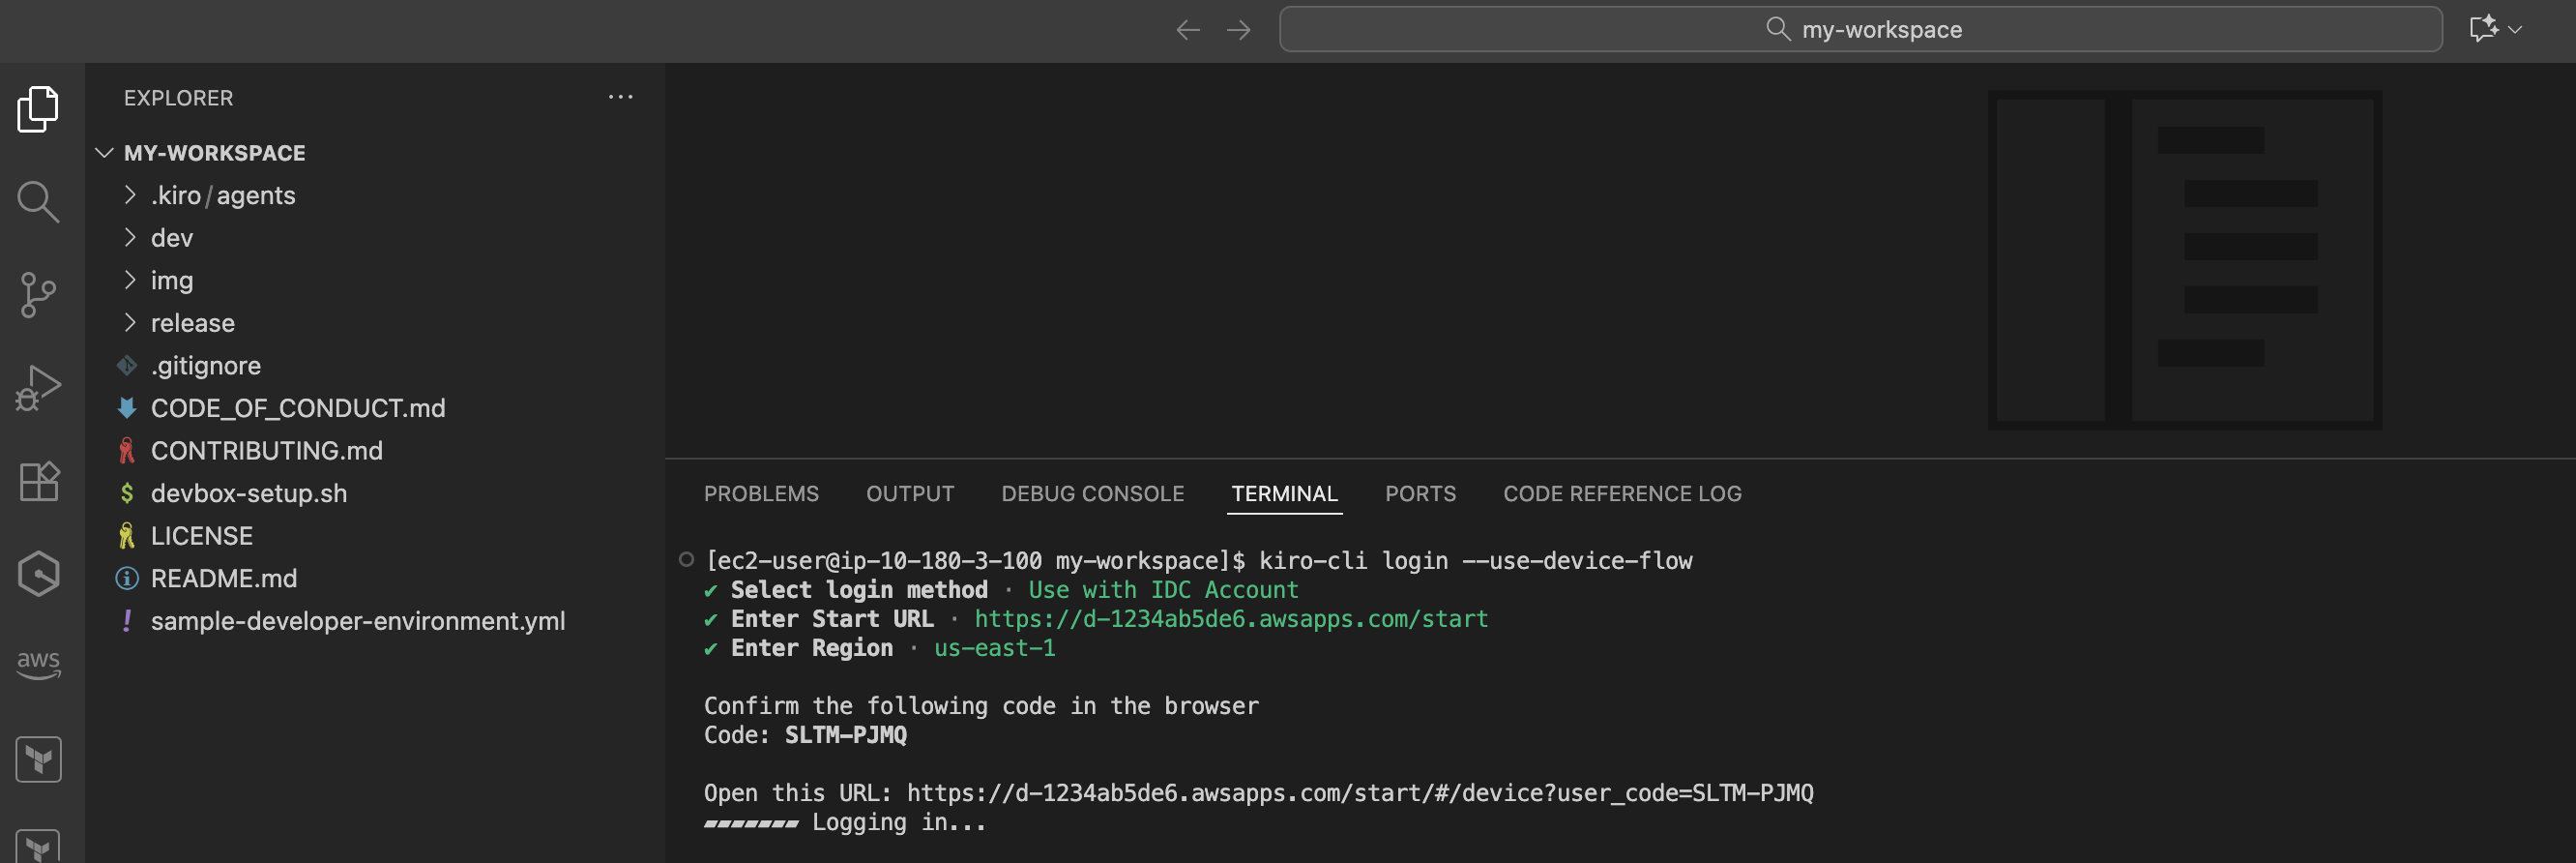
- Run
kiro-cli login --use-device-flowand follow prompts for headless authentication
- Navigate to workspace:
cd /home/ec2-user/workspace/my-workspace - (optional) Set the default agent:
kiro-cli settings chat.defaultAgent platform-engineer - Start with
kiro-cliorkiro-cli --agent platform-engineer - Use
/modelto select AI model,/toolsto see available MCP tools - Browse AWS Labs MCP for additional MCP servers
- Create additional agents by adding new files to
.kiro/agents/ - Use Kiro CLI to accelerate your development 🚀
Kiro IDE (Desktop Application)
When EnableKiroIDE=true, access the full desktop environment through DCV using either a web browser or Amazon DCV Client:
Browser Access
- Get the DCV connection URL from CloudFormation stack outputs (DCVWebUrl)
- Login with username and password from Secrets Manager
- Launch Kiro IDE from the applications menu or run
kiro-idein terminal - Firefox opens automatically for IAM Identity Center authentication (may take ~10 seconds)
- Open
/home/ec2-user/workspace/my-workspacefolder (git-enabled workspace)
Amazon DCV Client
For better performance and additional features, use the Amazon DCV Client:- Download Amazon DCV Client for your operating system
- Get the DCV connection URL from CloudFormation stack outputs (DCVWebUrl)
- Open the DCV Client and connect using the URL
- Login with username and password from Secrets Manager
- Launch Kiro IDE from the applications menu or run
kiro-idein terminal - Firefox opens automatically for IAM Identity Center authentication if required (may take ~10 seconds)
- Open
/home/ec2-user/workspace/my-workspacefolder (git-enabled workspace)
AWS IAM Roles
The environment is configured with two IAM roles:
- EC2 instance role - Basic permissions for the instance
- Developer role - Elevated permissions for AWS operations
This separation ensures the EC2 instance runs with minimal permissions by default, while allowing controlled elevation of privileges when needed.
ℹ️ Tip: Run echo 'export AWS_PROFILE=developer' >> ~/.bashrc && source ~/.bashrc to make the developer profile default for all terminal sessions.
If you wish to have elevated AWS permissions automatically enabled in all new terminal sessions without requiring manual profile switching, set AutoSetDeveloperProfile to true. While convenient, this bypasses the security practice of explicit privilege elevation.
Architecture
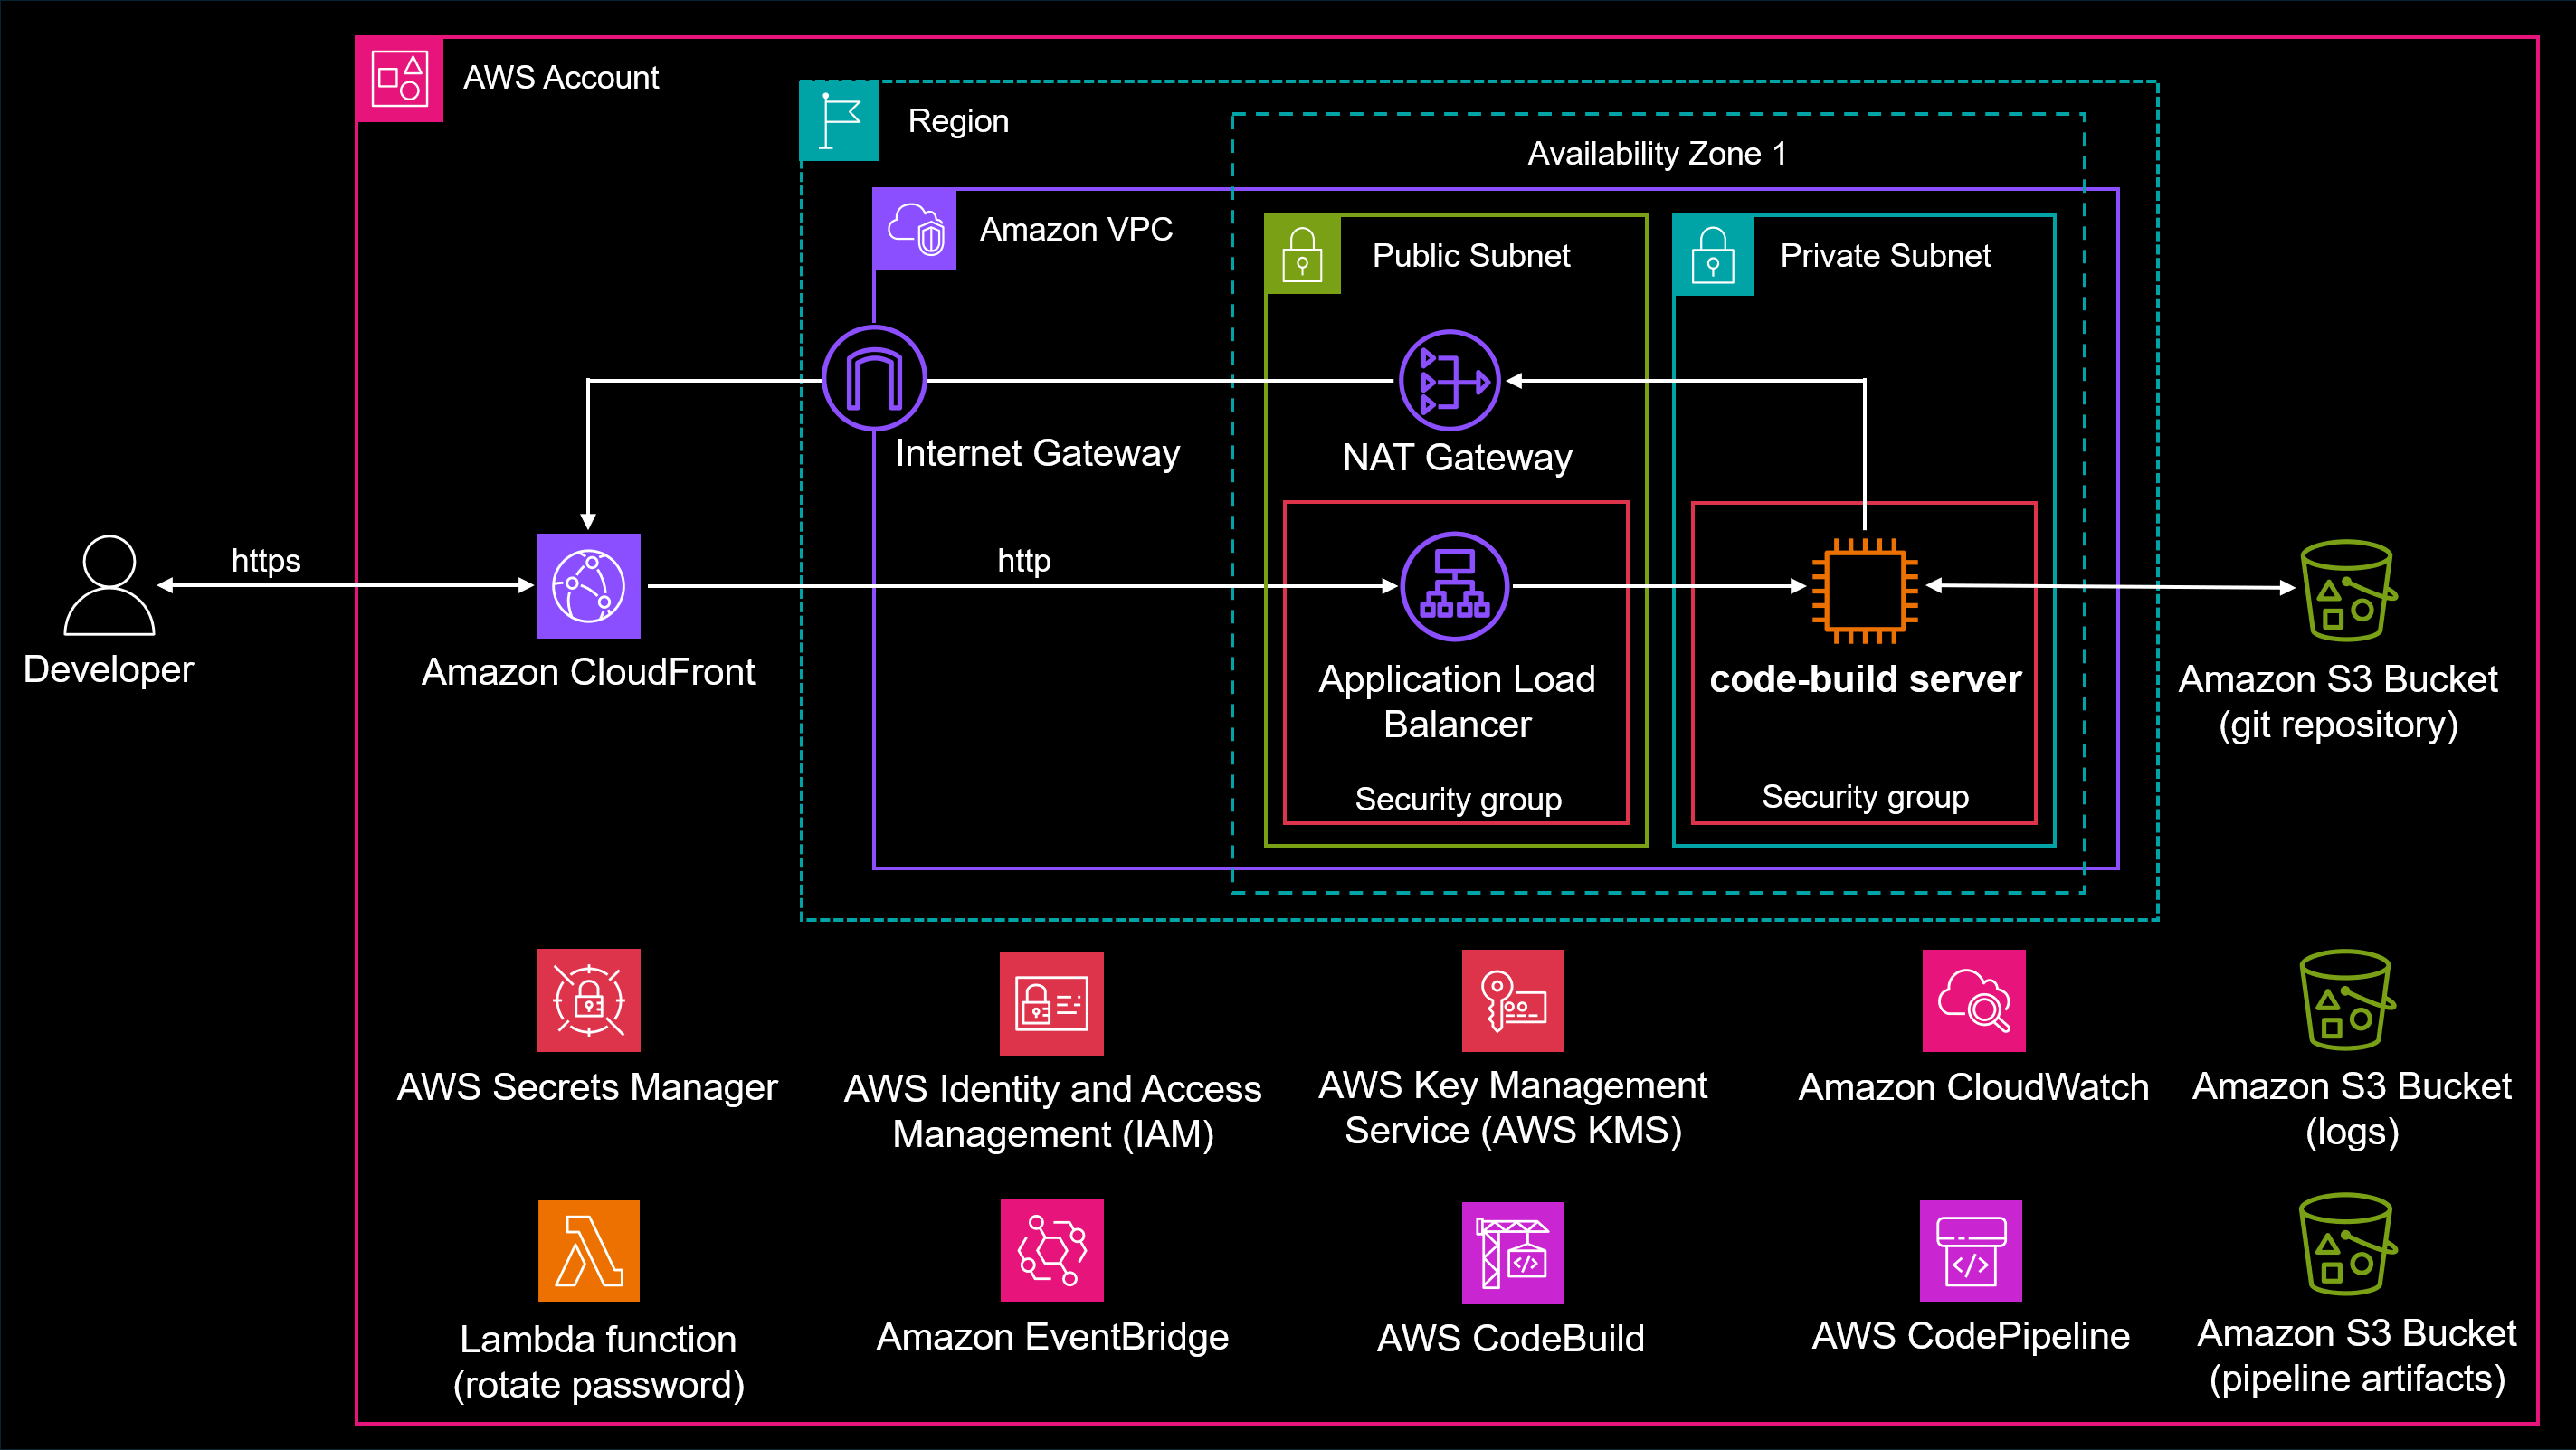
The environment runs in a private subnet with CloudFront access, using S3 for git storage and CodePipeline for automated deployments.
Sample Application
ℹ️ Note: The sample application is only available when using the default value for GitHubRepo. If you specify either a custom GitHubRepo or S3AssetBucket, you will need to provide your own Terraform application code.
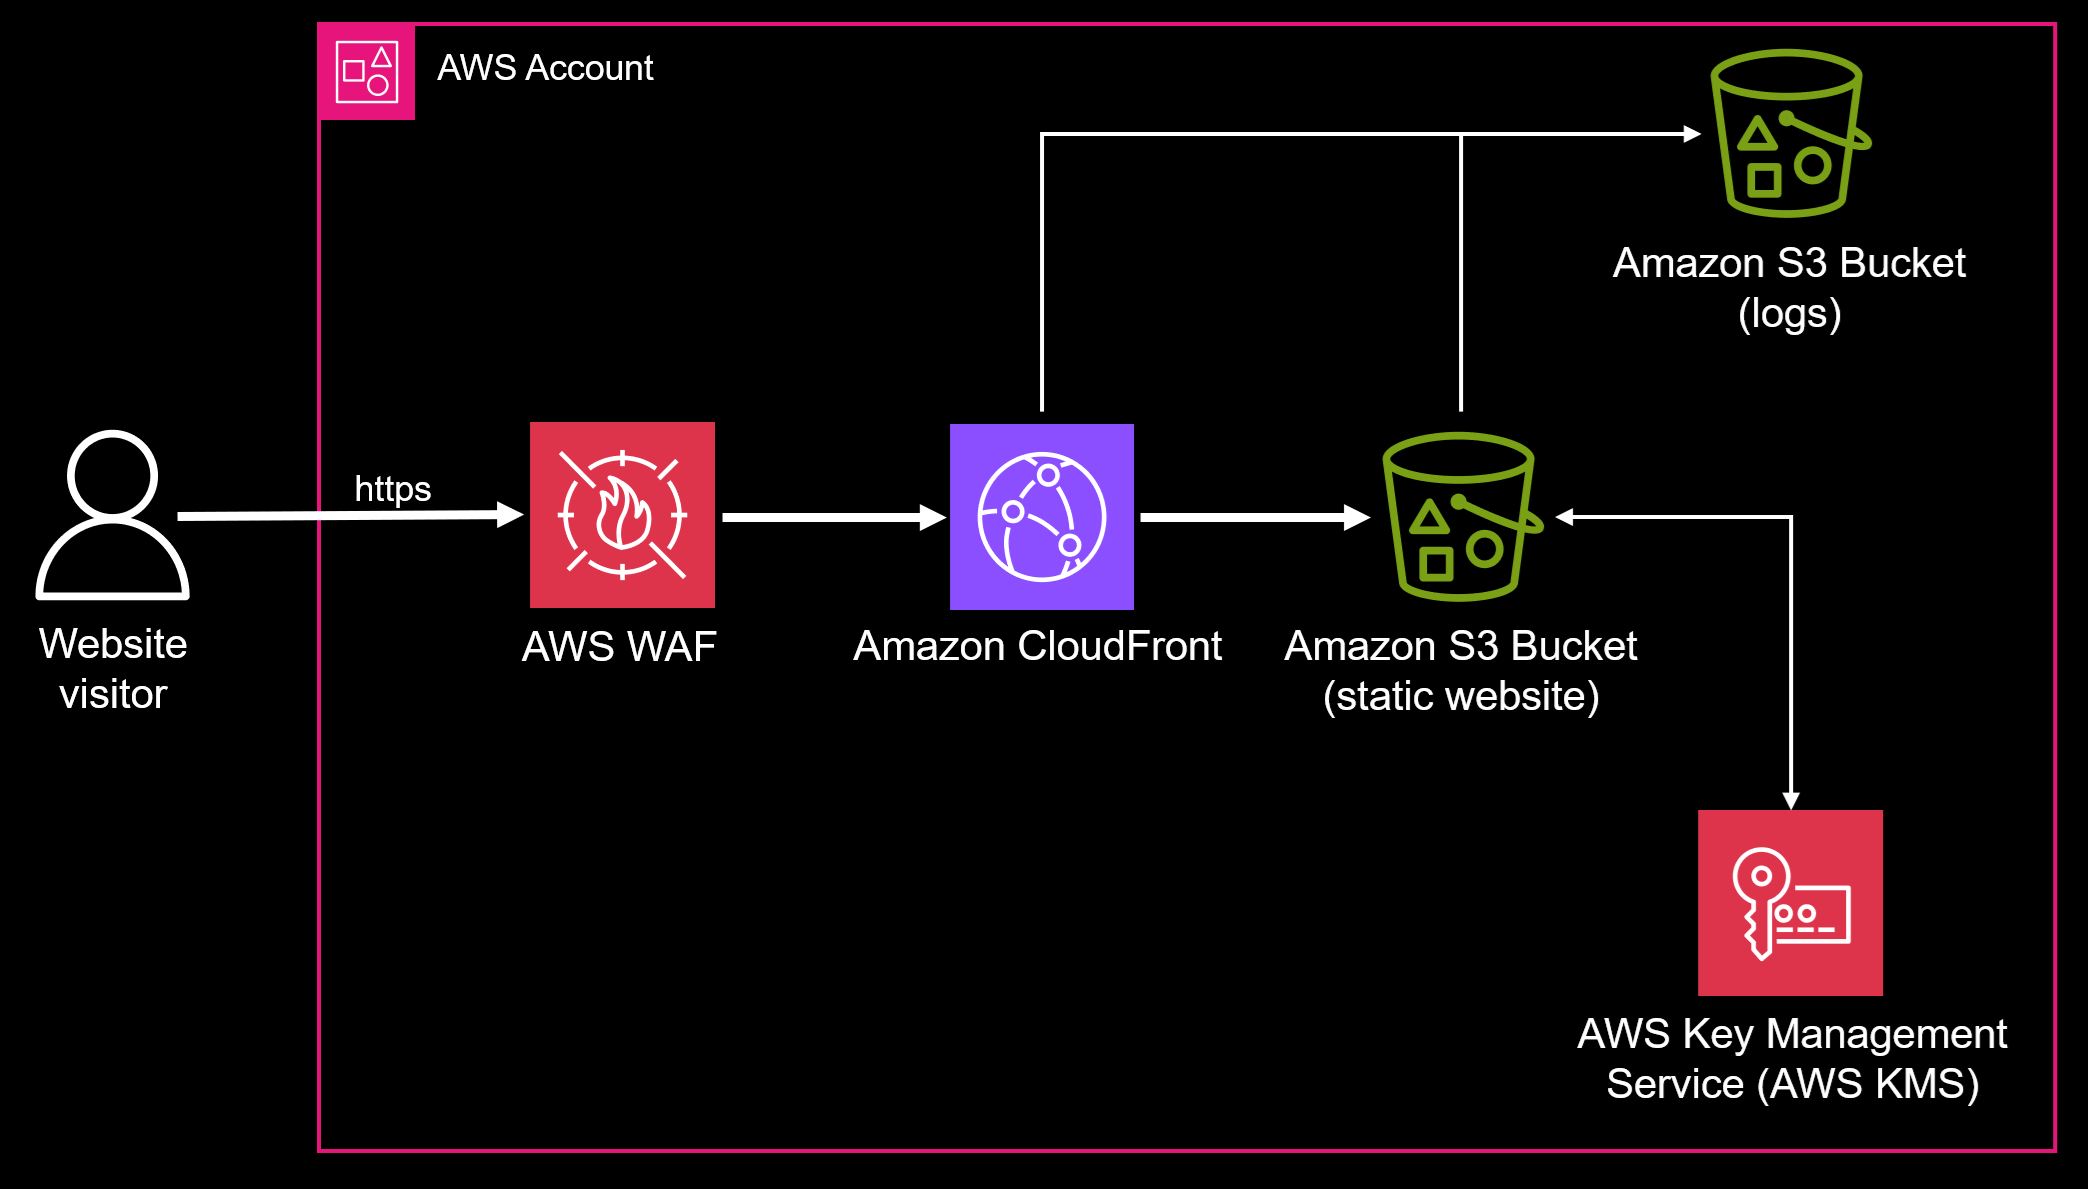
The repository includes a Terraform application that deploys:
- Static website hosted on Amazon S3
- Amazon CloudFront distribution with AWS WAF protection
- Security headers and AWS KMS encryption
- Amazon CloudWatch logging
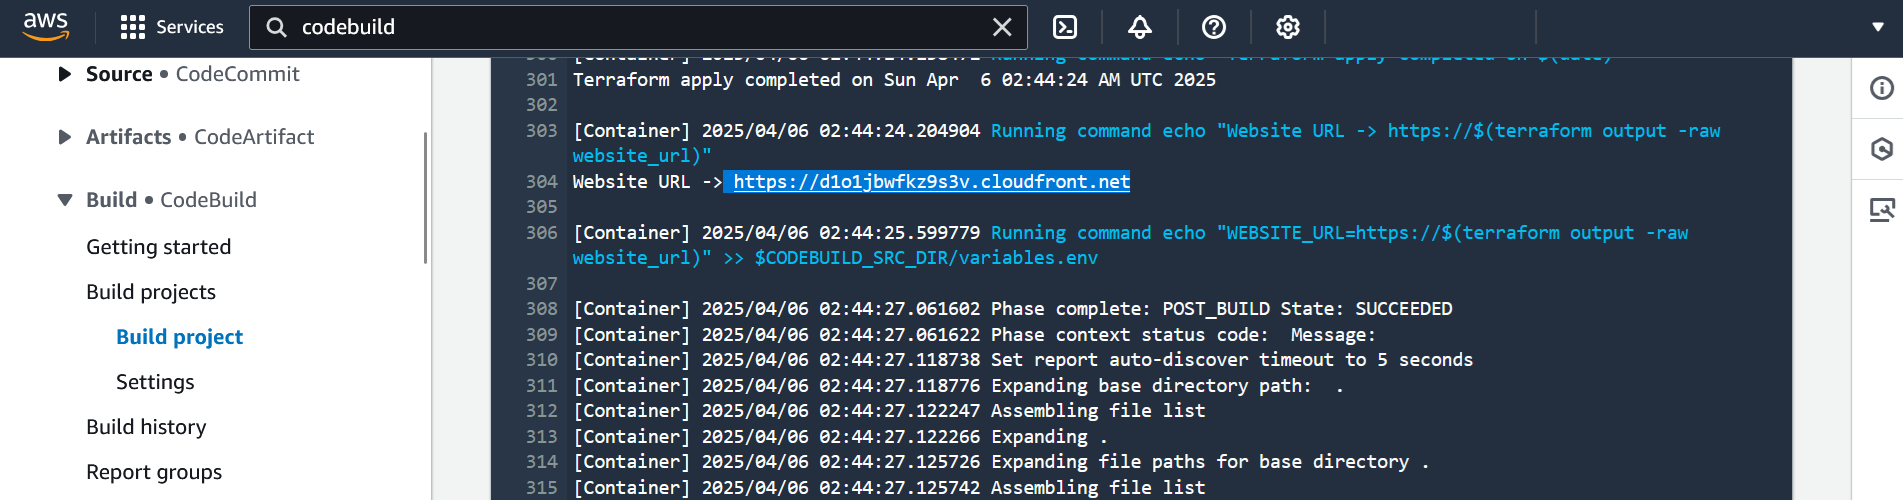
The application deploys automatically when you set the CloudFormation parameter DeployPipeline to true. Once deployment completes, you can locate the website URL in the final output of the CodeBuild job.
⚠️ WARNING: If using CodePipeline (DeployPipeline=true), before removing the CloudFormation stack:
- Run the 'terraform-destroy' pipeline in CodePipeline
- Approve the manual approval step when prompted
- Wait for pipeline completion
Security Considerations
⚠️ IMPORTANT: This sample uses HTTP for internal traffic between the Application Load Balancer and code-server Amazon EC2 instance. While external traffic is secured through CloudFront HTTPS, it is strongly recommended to:
- Configure end-to-end HTTPS using custom SSL certificates on the ALB
- Update ALB listener and target group to use HTTPS/443
- Use a custom domain name with AWS Certificate Manager (ACM) certificates
Security
See CONTRIBUTING for more information.
License
This library is licensed under the MIT-0 License. See the LICENSE file.
Disclaimer
This repository is intended for demonstration and learning purposes only. It is not intended for production use. The code provided here is for educational purposes and should not be used in a live environment without proper testing, validation, and modifications. Use at your own risk. The authors are not responsible for any issues, damages, or losses that may result from using this code in production.


