
Deploy an IAP-secured application to Cloud Run using Terraform (e.g. an admin portal or internal company app)
IAP Terraform Sample for Cloud Run
This sample deploys a Cloud Run service with VPC [ingress controls] that only allows traffic from Cloud HTTPS load balancer that has [IAP (Identity Aware Proxy)][iap] enabled.
[iap]: https://cloud.google.com/iap [ingress controls]: https://cloud.google.com/run/docs/securing/ingress
IAP authenticates users with a Google account (or other external IdP) and checks if the user is allowed to access the deployed service.
Prerequisites
You must have a domain name registered, for which you can modify certain DNS settings. You can use a subdomain as well.Deploy
Create a project
Create a new project, if you don't want to re-use an existing project. For example:gcloud projects create cloud-run-iap-terraform-demo-1 --name="IAP Cloud Run Demo" --set-as-defaultIf this project isn't set as your current default project, use:
gcloud config set project cloud-run-iap-terraform-demo-1Enable billing
Enable billing, if you haven't done this yet, for the project. First get your billing account ID:gcloud beta billing accounts listThis returns something like:
ACCOUNTID NAME OPEN MASTERACCOUNT_ID 0X0X0X-0X0X0X-0X0X0X My Billing Account TrueNow enable billing for your new project:
gcloud beta billing projects link cloud-run-iap-terraform-demo-1 --billing-account 0X0X0X-0X0X0X-0X0X0XEnable APIs
Enable the following APIs in your (currently selected) project:gcloud services enable \
run.googleapis.com \
containerregistry.googleapis.com \
compute.googleapis.com \
iap.googleapis.com \
vpcaccess.googleapis.comIt might take a minute to complete. Optionally verify that these services are enabled for your current project:
gcloud services listCreate an OAuth2 web application
Create OAuth2 web application (and note its clientid and clientsecret) from https://console.cloud.google.com/apis/credentials.If it asks you to Configure a consent screen first, then do so:
- Choose 'External' for User Type
- Fill in 'App name', e.g.
IAP Cloud Run Demo - Select your email address from the dropdown, for 'User support email'
- You can leave the 'App domain' section blank
- Fill in your email address at the 'Developer contact information'
- Click on 'save and continue' on the next screens and then the 'Credentials' menu link in the left menu bar
Execute Terraform
First initialize the Terraform:terraform init(Optional) preview what resources will be created:
terraform apply -var project_id=<project-id> \ -var region=<region> \ -var domain=<domain> \ -var lbname=<lbname> \ -var iapclientid=<client_id> \ -var iapclientsecret=<client_secret>Deploy using Terraform, this will take several minutes to complete:
terraform apply -var project_id=<project-id> \
    -var region=<region> \
    -var domain=<domain> \
    -var lbname=<lbname> \
    -var iapclientid=<client_id> \
    -var iapclientsecret=<client_secret> \
    -auto-approve
In this command fill in:
- project-id: the project id, e.g.
cloud-run-iap-terraform-demo-1 - region: the region, this is optional, will default to
us-central1 - domain: the domain name you want to use, e.g.
corpapp.ahmet.dev - lb_name: name for the load balancer, this is optional, will default to
iap-lb - iapclientid: the client id for the oAuth client you created earlier
- iapclientsecret: the client secret for the oAuth client you created earlier. You can view it by editing the oAuth client.
Troubleshooting errors
Note: if you get an error sayingOutput refers to sensitive values, add sensitive = true to backend_services in .terraform/modules/lb-http/modules/serverless_negs/outputs.tf.
If you get an error like Error: Error creating Connector: googleapi: Error 403: The caller does not have permission, it means the account which is used to execute the terraform, does not have enough permissions. You can fix this by running:
gcloud auth application-default loginIf that still doesn't solve the issue, you can view the service account of your project in the GCP console under IAM & Admin -> 'Service Accounts' named e.g. Default compute service account. From there you can troubleshoot which permissions might be missing.
Post-deployment steps
After the deployment is complete:- Configure DNS records of the used domain name with the given IP address. In other words, add a record named
wwwor
A pointing to your ipv4 IP address, which was the output of your terraform command.
It will take 10-30 minutes until the load balancer starts functioning.
- Go back to Credentials page and add a the
oauth2redirecturioutput to the
Now, you should be able to authenticate to your web application based on the users/group specified in main.tf by visiting your domain.
Cleanup
:warning: Do not lose the .tfstate file created in this directory.
Run the previous terraform apply command as terraform destroy to clean up the created resources.
Infrastructure
The following diagram shows the infrastructure created.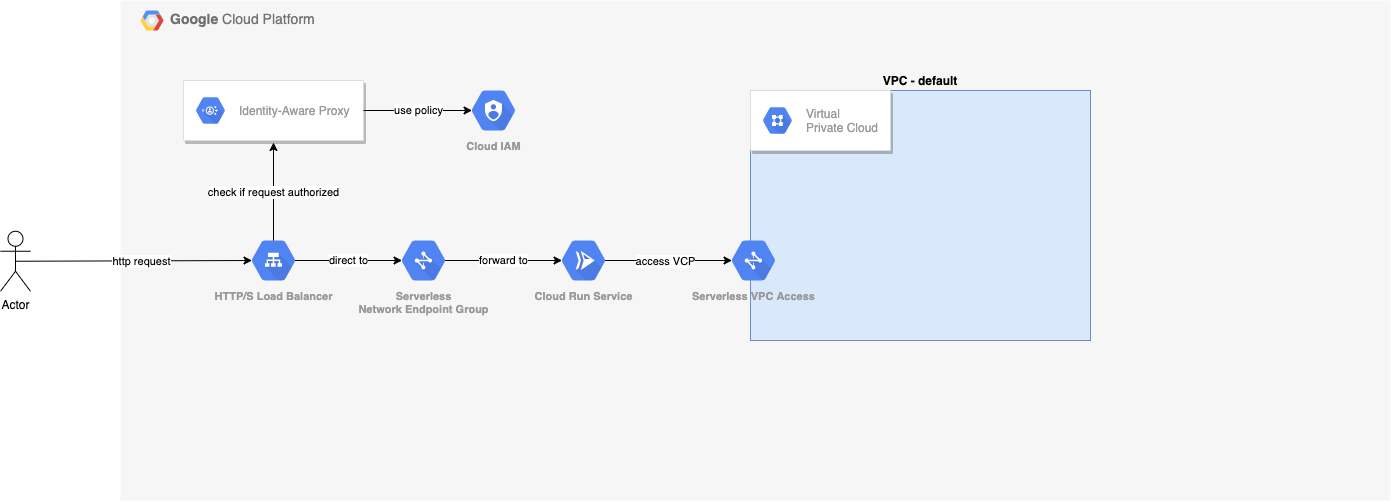
Serverless VPC Access Connector
The [Serverless VPC Access][serverless vpc access] is the connection between your Cloud Run service and resources inside your VPC.Cloud Run Service
The [Cloud Run Service][cloud run] is a compute service which actually runs your website. In this example a simple hello world Docker container.Serverless Network Endpoint Group
The [Serverless Network Endpoint Group][serverless neg] is the connection between your Load Balancer and your Cloud Run service. It allows requests to the load balancer, to be routed to the serverless app backend.HTTP/S Load Balancer
The [HTTP/S Load Balancer][load balancer] listens to incoming traffic on an IP address and directs this to a backend service. A [terraform module][tf lb] is used which creates several resources, such as:- Global Address
- HTTP Proxy
- Forwarding rules
- Managed SSL certificate
- Serverless NEG as backend
IAM Policy
The [IAM Policy][iam policy] defines which members will be granted the roleiap.httpsResourceAccessor. With it, you
manage who will have access to your website and who doesn't.
IAM Policy for Identity-Aware Proxy WebBackendService
The [IAM Policy for Identity-Aware Proxy WebBackendService][iap] configures the [Identity-Aware Proxy][iap], and binds the IAM Policy you defined to the Load Balancer. From here you can select the HTTPS resource, click on the info panel and add or remove members from theIAP-secured Web App User role.
[serverless vpc access]: https://console.cloud.google.com/networking/connectors [cloud run]: https://console.cloud.google.com/run [serverless neg]: https://console.cloud.google.com/compute/networkendpointgroups/list [load balancer]: https://console.cloud.google.com/net-services/loadbalancing/loadBalancers/list [tf lb]: https://github.com/terraform-google-modules/terraform-google-lb-http [iam policy]: https://console.cloud.google.com/iam-admin/roles/details/roles%3Ciap.httpsResourceAccessor [iap]: https://console.cloud.google.com/security/iap
External resources
This is not an official tutorial and can go out of date. Please read the documentation for more up-to-date info.


