
Setup for a K8s home lab running on a single host (e.g. Intel NUC)
Important Notice
I archived this repository as I haven't been running this tech stack for years and mainly switched to Talos Linux as my go-to Kubernetes distribution.Kubernetes in a Home Lab Environment
This repository should contain all required steps, manifests and resources to set up a K8s in a home lab environment. Its status should be viewed as "work in progress" since I plan to improve various things in the future.This technology stack should not be viewed as production ready, since the chaining of the different tools and their configurations has not been tested really well.
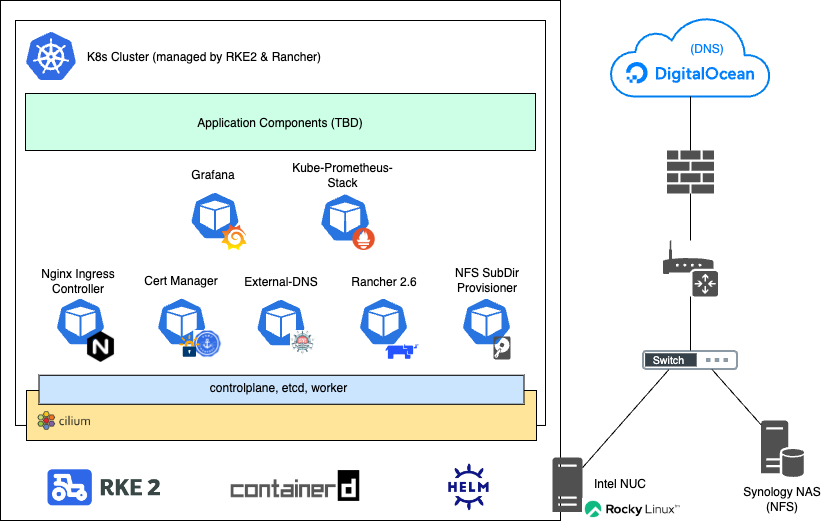
Technologies
The technologies down here will probably change in the future. Nevertheless, the following table should provide you a small overview over currently used technologies.| What | Technology | Status | | ---------------------- | ------------------------------------------------- | ---------- | | DNS Provider | DigitalOcean (automated with External-DNS) | Done | | OS (Intel NUC) | Rocky Linux 9.1 | Done | | Distributon | Rancher (RKE2) | Done | | CRI | containerd (included in RKE2) | Done | | CNI | Cilium | Done | | CSI | NFS SubDir External Provisioner | Done | | Certificate Handling | Cert-Manager with Let's Encrypt (DNS Challenge) | Done | | Ingress Controller | Nginx | Done | | Monitoring | Grafana & Kube-Prometheus-Stack | Done | | Cluster Management | Rancher 2.8 | Done |
Table of Content
- Host OS - Disable Swap - Disk Space - Working Directory - Kubectl, Helm \& RKE2 - RKE2 Setup - Basic Configuration - Firewall - Firewalld (nftables) - Cilium Host Policies - Prevent RKE2 Package Updates - Starting RKE2 - Configure Kubectl (on RKE2 Host) - Troubleshooting RKE2 - Networking using Cilium (CNI) - Cilium Prerequisites - Cilium Installation - Cilium Host Policies - Persistent Storage using NFS-SubDir-External-Provisioner - NFS-SubDir-External-Provisioner Prerequisites - NFS-SubDir-External-Provisioner Installation - Deploy Nginx Ingress Controller - Nginx Ingress Controller Prerequisites - Nginx Ingress Controller Installation - Cert-Manager - Cert-Manager Prerequisites - Cert-Manager Installation - Let's Encrypt DNS-Challenge DigitalOcean ClusterIssuer - External-DNS - External-DNS Prerequisites - External-DNS Installation - Rancher (2.8.0) - Rancher Prerequisites - Rancher Installation - Grafana - Grafana Prerequisites - Grafana Installation - Kube-Prometheus-Stack - Kube-Prometheus-Stack Prerequisites - Kube-Prometheus-Stack InstallationHardware
One goal of this setup is that it should be runnable on a single host. The only exceptions are the external NFS storage from a Synology NAS and the DNS service from DigitalOcean.In my case, I use an Intel NUC (NUC10i7FNH2) with a 12 core CPU (Intel(R) Core(TM) i7-10710U CPU @ 1.10GHz) and 64 GB memory (2 x 32 GB DDR4-2666).
Prerequisites
Host OS
Download Rocky Linux 9.1 from https://rockylinux.org/download and install it using a USB stick. To flash the ISO to the USB, I'll recommend you Etcher.Disable Swap
free -h
sudo swapoff -a
sudo sed -i.bak -r 's/(.+ swap .+)/#\1/' /etc/fstab
free -h
Disk Space
Ensure/var/lib/ has enough space available (20GB+ for test/dev, 50GB+ for production). RKE2 will create /var/lib/rancher and store images etc. there:
df -h /var/libIf not, symlink to another partition where's enough disk space available, e.g., /mnt:
sudo mkdir -p /mnt/rancher sudo ln -s /mnt/rancher /var/lib/rancherCaution: Be aware that this change might cause SELinux issues if you have it enabled and /mnt/rancher doesn't have the same SELinux context.
Working Directory
Create a working directory where e.g. Helmvalues.yaml files will be stored in the future:
mkdir -p ~/rke2
cd ~/rke2
Kubectl, Helm & RKE2
Installkubectl, helm and RKE2 to the host system:
BINARY_DIR="/usr/local/bin"
cd /tmp
Helm
curl -LO https://get.helm.sh/helm-v3.13.3-linux-amd64.tar.gz
tar -zxvf helm-*-linux-amd64.tar.gz
sudo mv linux-amd64/helm $BINARY_DIR/helm
sudo chmod +x $BINARY_DIR/helm
Kubectl
curl -LO "https://storage.googleapis.com/kubernetes-release/release/$(curl -s https://storage.googleapis.com/kubernetes-release/release/stable.txt)/bin/linux/amd64/kubectl"
chmod +x ./kubectl
sudo mv ./kubectl $BINARY_DIR/kubectl
sudo dnf install -y bash-completion
echo 'alias k="kubectl"' >>~/.bashrc
echo 'alias kgp="kubectl get pods"' >>~/.bashrc
echo 'alias kgn="kubectl get nodes"' >>~/.bashrc
echo 'alias kga="kubectl get all -A"' >>~/.bashrc
echo 'alias fpods="kubectl get pods -A -o wide | grep -v 1/1 | grep -v 2/2 | grep -v 3/3 | grep -v 4/4 | grep -v 5/5 | grep -v 6/6 | grep -v 7/7 | grep -v Completed"' >>~/.bashrc
echo 'source <(kubectl completion bash)' >>~/.bashrc
echo 'complete -F _startkubectl k' >>~/.bashrc
source ~/.bashrc
RKE2
curl -sfL https://get.rke2.io | sudo INSTALLRKE2CHANNEL=v1.27 sh -
Verification:
# Helm $ helm version version.BuildInfo{Version:"v3.13.3", GitCommit:"c8b948945e52abba22ff885446a1486cb5fd3474", GitTreeState:"clean", GoVersion:"go1.20.11"} Kubectl
$ kubectl version --client=true Client Version: v1.29.0 Kustomize Version: v5.0.4-0.20230601165947-6ce0bf390ce3 RKE2
$ rke2 --version rke2 version v1.27.9+rke2r1 (378bd59c4f0f97094c23c350d668f37f33aba406) go version go1.20.12 X:boringcryptoOptional: Install kubectl plugins kubens, kubectx and tree via krew:
# Krew installation sudo dnf install -y git ( set -x; cd "$(mktemp -d)" && OS="$(uname | tr '[:upper:]' '[:lower:]')" && ARCH="$(uname -m | sed -e 's/x86_64/amd64/' -e 's/\(arm\)\(64\)\?.*/\1\2/' -e 's/aarch64$/arm64/')" && KREW="krew-${OS}_${ARCH}" && curl -fsSLO "https://github.com/kubernetes-sigs/krew/releases/latest/download/${KREW}.tar.gz" && tar zxvf "${KREW}.tar.gz" && ./"${KREW}" install krew ) echo 'export PATH="${KREW_ROOT:-$HOME/.krew}/bin:$PATH"' >>~/.bashrc source ~/.bashrc Install kubens and kubectx
kubectl krew install ctx kubectl krew install ns Install kubectl tree
kubectl krew install tree Install fzf to use kubens and kubectx in interactive mode
git clone --depth 1 https://github.com/junegunn/fzf.git ~/.fzf ~/.fzf/install Add aliases to bashrc
echo 'alias kctx="kubectl-ctx"' >>~/.bashrc echo 'alias kns="kubectl-ns"' >>~/.bashrc source ~/.bashrcSources:
- https://helm.sh/docs/intro/install/
- https://kubernetes.io/docs/tasks/tools/install-kubectl/#install-kubectl-on-linux
- https://docs.rke2.io/install/methods/#rpm
- https://kubernetes.io/docs/tasks/tools/install-kubectl/#optional-kubectl-configurations
- https://krew.sigs.k8s.io/docs/user-guide/setup/install/#bash
- https://github.com/ahmetb/kubectx#kubectl-plugins-macos-and-linux
- https://github.com/junegunn/fzf#using-git
K8s Cluster Setup
RKE2 Setup
Basic Configuration
Create a RKE2 config file (/etc/rancher/rke2/config.yaml) with the following content:
write-kubeconfig-mode: "0644"
tls-san:
- "k8s.example.com"
Make a etcd snapshot every 2 hours
etcd-snapshot-schedule-cron: " /2 "
Keep 56 etcd snapshorts (equals to 2 weeks with 6 a day)
etcd-snapshot-retention: 56
cni:
- none
disable-kube-proxy: "true"
cluster-cidr: "100.64.0.0/14"
service-cidr: "100.68.0.0/16"
cluster-dns: "100.68.0.10"
selinux: "true"
disable:
- rke2-ingress-nginx
kubelet-arg:
- "max-pods=100"
- "eviction-hard=memory.available<250Mi"
- "eviction-soft=memory.available<1Gi"
- "eviction-soft-grace-period=memory.available=2m"
- "kube-reserved=cpu=200m,memory=500Mi"
- "system-reserved=cpu=200m,memory=500Mi"
kube-apiserver-arg:
- "--admission-control-config-file=/etc/kubernetes/pss/cluster-default-pss-config.yaml"
kube-apiserver-extra-mount:
- "/etc/rancher/rke2/pss:/etc/kubernetes/pss"
- I set
disable-kube-proxytotrueandcnitonone, since I plan to install Cilium as CNI in "kube-proxy less mode" (kubeProxyReplacement: "strict"). Do not disable kube-proxy if you use another CNI - it will not work afterwards! - I also disabled
rke2-ingress-nginxsince I wanted to install and configure the Nginx Ingress Controller according to my taste (Daemonset in host network namespace). - Please be aware that you'll need this same configuration on every single master node when you set up a multi-node cluster. In such a case, you additionally need to configure
tokenandserver(more details in the official RKE2 server configuration reference).
AdmissionConfiguration which specifies the default PodSecurityStandard (PSS) policy for all namespaces.
Create a file called cluster-default-pss-config.yaml inside the path /etc/rancher/rke2/pss and add the following content:
apiVersion: apiserver.config.k8s.io/v1 kind: AdmissionConfiguration plugins: - name: PodSecurity
configuration: apiVersion: pod-security.admission.config.k8s.io/v1beta1 kind: PodSecurityConfiguration defaults: enforce: "baseline" enforce-version: "v1.27" audit: "baseline" audit-version: "v1.27" warn: "baseline" warn-version: "v1.27" exemptions: usernames: [] runtimeClasses: [] namespaces: - kube-systemThis functions as a default configuration and can be overridden on namespace level. To do so, you simply need to specify the less restrictive PodSecurityStandard (privileged) via labels on the namespace resources. Here an example for demobackend:
kubectl label namespace demobackend pod-security.kubernetes.io/enforce=privileged kubectl label namespace demobackend pod-security.kubernetes.io/enforce-version=v1.27 kubectl label namespace demobackend pod-security.kubernetes.io/audit=privileged kubectl label namespace demobackend pod-security.kubernetes.io/audit-version=v1.27 kubectl label namespace demobackend pod-security.kubernetes.io/warn=privileged kubectl label namespace demobackend pod-security.kubernetes.io/warn-version=v1.27Important: Please be aware that setting a Namespaces' PSS policy to privileged basically means its workload can do anything without any restriction! For that reason, it's absolutely key to only configure this policy when there is really no other option - especially in production. Also, I would highly recommend you to also deploy OPA Gatekeeper in addition to PSA to enforce custom constraints and therefore restrict various dangerous configurations.
Verification: Testing PSS enforcement once the rke2-server service is started and the cluster is up & running (not yet, for later):
$ echo 'apiVersion: v1 > kind: Pod > metadata: > name: tshoot > spec: > containers: > - args: > - "sleep 3600" > image: ghcr.io/philipschmid/tshoot:latest > name: tshoot > securityContext: > capabilities: > add: ["NETADMIN", "SYSTIME"] > ' | k apply -f- Error from server (Forbidden): error when creating "STDIN": pods "tshoot" is forbidden: violates PodSecurity "baseline:v1.23": non-default capabilities (container "tshoot" must not include "NETADMIN", "SYSTIME" in securityContext.capabilities.add)Sources:
- https://kubernetes.io/docs/tutorials/security/cluster-level-pss/
- https://kubernetes.io/docs/concepts/security/pod-security-standards/
- https://kubernetes.io/docs/tasks/configure-pod-container/enforce-standards-namespace-labels/
Firewall
Firewalld (nftables)
In case you have a host firewall installed and don't want to use Cilium Host Firewall, ensure to open the required ports:### RKE2 specific ports
sudo firewall-cmd --add-port=6443/tcp --permanent
sudo firewall-cmd --add-port=10250/tcp --permanent
Only required when NodePort services are used:
#sudo firewall-cmd --add-port=30000-32767/tcp --permanent
Only required in a multi-node cluster setup:
ETCD client communication
#sudo firewall-cmd --add-port=2379/tcp --permanent
ETCD peer communication
#sudo firewall-cmd --add-port=2380/tcp --permanent
ETCD metrics
#sudo firewall-cmd --add-port=2381/tcp --permanent
RKE2 management port
#sudo firewall-cmd --add-port=9345/tcp --permanent
Allow Rancher Monitoring to scrape metrics
Node Exporter
sudo firewall-cmd --add-port=9100/tcp --permanent
RKE2 Kubelet
sudo firewall-cmd --add-port=10250/tcp --permanent
CNI specific ports
4244/TCP is required when the Hubble Relay is enabled and therefore needs to connect to all agents to collect the flows
sudo firewall-cmd --add-port=4244/tcp --permanent
Only required in a multi-node cluster setup:
Cilium healthcheck related permits:
#sudo firewall-cmd --add-port=4240/tcp --permanent
#sudo firewall-cmd --remove-icmp-block=echo-request --permanent
#sudo firewall-cmd --remove-icmp-block=echo-reply --permanent
Cilium with VXLAN as overlay:
#sudo firewall-cmd --add-port=8472/udp --permanent
Used for the Rancher Monitoring to scrape Cilium metrics
sudo firewall-cmd --add-port=9962/tcp --permanent
sudo firewall-cmd --add-port=9963/tcp --permanent
sudo firewall-cmd --add-port=9965/tcp --permanent
Ingress Controller specific ports
sudo firewall-cmd --add-port=80/tcp --permanent
sudo firewall-cmd --add-port=443/tcp --permanent
sudo firewall-cmd --add-port=10254/tcp --permanent
Finally apply all the firewall changes
sudo firewall-cmd --reloadSource:
- https://docs.rke2.io/install/requirements/#networking
Cilium Host Policies
In this guide we use Cilium as CNI. Therefore we have another option to firewall our node instead of using traditional technologies like Firewalld (nftables). Cilium offers a quite powerful feature called Host Firewall which allows it to manage firewall rules for the host itself via Kubernetes resources (CiliumClusterwideNetworkPolicy). Cilium then uses its advanced eBPF capabilities to actually implement & enforce these rules of host level.
We need a running K8s cluster and Cilium in order to activate Cilium Host Policies. Therefore its configuration is described later in an own Chilium subchapter.
Prevent RKE2 Package Updates
To provide more stability, I chose to DNF/YUM "mark/hold" the RKE2 related packages so adnf update/yum update does not mess around with them.
Add the following line to /etc/dnf/dnf.conf and/or /etc/yum.conf:
exclude=rke2-*This will cause the following packages to be kept back at this exact version as long as the exclude configuration is in place:
$ sudo rpm -qa "rke2" rke2-selinux-0.17-1.el9.noarch rke2-common-1.27.9~rke2r1-0.el9.x86_64 rke2-server-1.27.9~rke2r1-0.el9.x86_64Sources:
- https://www.systutorials.com/making-dnf-yum-not-update-certain-packages/
- https://www.commandlinefu.com/commands/view/1451/search-through-all-installed-packages-names-on-rpm-systems
Starting RKE2
Enable therke2-server service and start it: sudo systemctl enable rke2-server --nowVerification:
sudo systemctl status rke2-server sudo journalctl -u rke2-server -fConfigure Kubectl (on RKE2 Host)
mkdir ~/.kube
cp /etc/rancher/rke2/rke2.yaml ~/.kube/config
chmod 600 ~/.kube/config
Verification:
$ kubectl get nodes NAME STATUS ROLES AGE VERSION node1.example.com NotReady control-plane,etcd,master 79s v1.27.9+rke2r1Troubleshooting RKE2
Show RKE2 containers (locally on a RKE2 node):# Check if all relevant static pod containers are running:
sudo /var/lib/rancher/rke2/bin/crictl --config /var/lib/rancher/rke2/agent/etc/crictl.yaml ps -a
If there are exited static pod containers, check their log (e.g. of the kube-apiserver container):
sudo /var/lib/rancher/rke2/bin/crictl --config /var/lib/rancher/rke2/agent/etc/crictl.yaml logs <container-id>
If the static pod container is running, you can exec into it to even troubleshoot it even more:
sudo /var/lib/rancher/rke2/bin/crictl --config /var/lib/rancher/rke2/agent/etc/crictl.yaml exec -it <container-id>Show RKE2 nodes (locally on a RKE2 server node):
sudo /var/lib/rancher/rke2/bin/kubectl --kubeconfig /etc/rancher/rke2/rke2.yaml get nodesShow status uf RKE2 related services:
# On server node: sudo systemctl status rke2-server sudo journalctl -fu rke2-server On worker node:
sudo systemctl status rke2-agent sudo journalctl -fu rke2-agentImportant RKE2 (log) files:
- Static RKE2 pods:
/var/lib/rancher/rke2/agent/pod-manifests/* HelmChart/HelmChartConfigCRs on RKE2 servers:/var/lib/rancher/rke2/server/manifests/*- Kubelet log:
/var/lib/rancher/rke2/agent/logs/kubelet.log - Containerd Config TOML:
/var/lib/rancher/rke2/agent/etc/containerd/config.toml - Containerd log:
/var/lib/rancher/rke2/agent/containerd/containerd.log
Basic Infrastructure Components
Networking using Cilium (CNI)
Cilium Prerequisites
Ensure the eBFP file system is mounted (which should already be the case on RHEL 9 based distros):
mount | grep /sys/fs/bpf if present should output, e.g. "none on /sys/fs/bpf type bpf"...
If that's not the case, mount it using the commands down here:
sudo mount bpffs -t bpf /sys/fs/bpf sudo bash -c 'cat <<EOF >> /etc/fstab none /sys/fs/bpf bpf rw,relatime 0 0 EOF'Prepare & add the Helm chart repo:
mkdir -p ~/rke2/cilium cd ~/rke2/cilium helm repo add cilium https://helm.cilium.io/ helm repo update ciliumSources:
- https://docs.cilium.io/en/stable/operations/system_requirements/#mounted-ebpf-filesystem
Cilium Installation
Install dependency CRDs:# Install Cert-Manager CRDs kubectl apply -f https://github.com/cert-manager/cert-manager/releases/download/v1.12.7/cert-manager.crds.yaml Install Prometheus CRDs
kubectl apply -f https://github.com/prometheus-operator/prometheus-operator/releases/download/v0.70.0/stripped-down-crds.yamlCreate a values.yaml file with the following configuration:
# Enable/disable debug logging debug:   enabled: false   # -- Configure verbosity levels for debug logging   # This option is used to enable debug messages for operations related to such   # sub-system such as (e.g. kvstore, envoy, datapath or policy), and flow is   # for enabling debug messages emitted per request, message and connection.   #   # Applicable values:   # - flow   # - kvstore   # - envoy   # - datapath   # - policy   verbose: ~
Configure unique cluster name & ID
cluster:
  name: cl01
  id: 1
Set kubeProxyReplacement to "true" in order to prevent CVE-2020-8554 and fully remove kube-proxy.
See https://cilium.io/blog/2020/12/11/kube-proxy-free-cve-mitigation for more information.
kubeProxyReplacement: "true"
The following two "k8sService.*" properties are required when Cilium is configured to fully replace kube-proxy since otherways it tries to reach the kube-apiserver on startup via the Service IP which does of course does not work without kube-proxy (iptables rules).
k8sServiceHost: <node-ip-of-node-where-kube-apiserver-is-running>
k8sServicePort: 6443
Let's use VXLAN-based encapsulation with tunnel-based routing
tunnelProtocol: "vxlan"
routingMode: "tunnel"
IMPORTANT: Only enable hostFirewall if you're planing to use this feature and you are not using firewalld etc.
hostFirewall:
  enabled: true
hubble:   metrics:     serviceMonitor:       enabled: true     enableOpenMetrics: true     enabled:     # https://docs.cilium.io/en/stable/observability/metrics/#hubble-exported-metrics     # Remove ;query from the dns line for production -> bad metrics cardinality     - dns:labelsContext=sourcenamespace,destinationnamespace;query     - drop:labelsContext=sourcenamespace,destinationnamespace     - tcp:labelsContext=sourcenamespace,destinationnamespace     - port-distribution:labelsContext=sourcenamespace,destinationnamespace     - icmp:labelsContext=sourcenamespace,destinationnamespace;sourceContext=workload-name|reserved-identity;destinationContext=workload-name|reserved-identity     - flow:sourceContext=workload-name|reserved-identity;destinationContext=workload-name|reserved-identity;labelsContext=sourcenamespace,destinationnamespace     - "httpV2:exemplars=true;labelsContext=sourceip,sourcenamespace,sourceworkload,destinationip,destinationnamespace,destinationworkload,traffic_direction;sourceContext=workload-name|reserved-identity;destinationContext=workload-name|reserved-identity"     - "policy:sourceContext=app|workload-name|pod|reserved-identity;destinationContext=app|workload-name|pod|dns|reserved-identity;labelsContext=sourcenamespace,destinationnamespace"     dashboards:       enabled: true       annotations:         grafana_folder: "Cilium Hubble Dashboards"   ui:     enabled: true     ingress:       enabled: true       hosts:         - hubble.example.com       annotations:         cert-manager.io/cluster-issuer: lets-encrypt-dns01-production-do       tls:       - secretName: letsencrypt-hubble-ui         hosts:         - hubble.example.com   relay:     enabled: true     prometheus:       enabled: true       serviceMonitor:         enabled: true
Cilium Operator
operator:
  # Since we only have 1 node, we only need 1 replica:
  replicas: 1
  prometheus:
    enabled: true
    serviceMonitor:
      enabled: true
  dashboards:
    enabled: true
    annotations:
      grafana_folder: "Cilium Operator Dashboards"
Configure IPAM/PodCIDR
ipam:
  mode: cluster-pool
  operator:
    clusterPoolIPv4PodCIDRList:
    - "100.64.0.0/14"
    clusterPoolIPv4MaskSize: 24
Enable Cilium Agent metrics
prometheus:
  enabled: true
  serviceMonitor:
    enabled: true
Cilium Agent Dashboards
dashboards:
  enabled: true
  annotations:
    grafana_folder: "Cilium Agent Dashboards"
Disable IPv6 support if IPv6 isn't used
ipv6:
enabled: falseFinally install the Cilium helm chart:
helm upgrade -i cilium cilium/cilium \ --version 1.14.5 \ --namespace kube-system \ --set upgradeCompatibility=1.11 \ -f values.yamlHint 1: The --set upgradeCompatibility=1.11 flag is only recommended when upgrading an already existing Cilium version. The value (in this example 1.11) should be set to the initial version of Cilium which was installed in this cluster. More details about this can be seen in the official documentation.
Hint 2: When upgrading from an older Cilium version, it's recommended to run the pre-flight check first:
helm template cilium/cilium --version 1.14.5 \ --namespace=kube-system \ --set preflight.enabled=true \ --set agent=false \ --set operator.enabled=false \ --set k8sServiceHost=<node-ip-of-node-where-kube-apiserver-is-running> \ --set k8sServicePort=6443 \ > cilium-preflight.yaml kubectl create -f cilium-preflight.yamlIf all pods of this check are up and running, you can clean it up and run the actual helm upgrade command from above. Pre-flight status and cleanup:
# Check if all replicas are up and ready: kubectl get daemonset -n kube-system | sed -n '1p;/cilium/p' kubectl get deployment -n kube-system cilium-pre-flight-check -w Cleanup:
kubectl delete -f cilium-preflight.yamlThe pre-flight validates existing CiliumNetworkPolicies for the new Cilium version and also "pre-pulls" the images. This therefore helps reducing the downtime during the actual upgrade. In addition, it helps to detect potential ErrImagePull errors in advance.
Sources:
- https://docs.cilium.io/en/stable/gettingstarted/k8s-install-default/
- https://docs.cilium.io/en/stable/network/kubernetes/kubeproxy-free/#kubeproxy-free
- https://docs.cilium.io/en/stable/operations/upgrade/#running-pre-flight-check-required
Cilium Host Policies
Important: Only continue with this subchapter if you are not using traditional host firewalls and want to use Cilium Host Policies instead!Since we are only running a single host (with all three K8s roles (etcd, control plane, worker)), the rule set here will be quite small and straight forward. We only plan to filter ingress traffic. If you plan to deploy Cilium Host Policies on a multi-node cluster, please consider having a look at my other guide over in the Puzzle ITC blog post, the cilium-netpol-demo and/or at the very good and detailed blog post from Charles-Edouard Brétéché.
So, let's get started:
First, stop and disable firewalld:
sudo systemctl disable --now firewalld sudo systemctl mask --now firewalldNext, enable PolicyAuditMode. This is a crucial to-do before applying any host policy custom resources because it’s easy to lock yourself out of your Kubernetes node!
CILIUM_NAMESPACE=kube-system for NODE_NAME in $(kubectl get nodes --no-headers=true | awk '{print $1}') do CILIUMPODNAME=$(kubectl -n $CILIUM_NAMESPACE get pods -l "k8s-app=cilium" -o js) HOSTEPID=$(kubectl -n $CILIUMNAMESPACE exec $CILIUMPOD_NAME -c cilium-agent -- cilium endpoint list -o js) kubectl -n $CILIUMNAMESPACE exec $CILIUMPODNAME -c cilium-agent -- cilium endpoint config $HOSTEP_ID PolicyAuditMode=Enabled kubectl -n $CILIUMNAMESPACE exec $CILIUMPODNAME -c cilium-agent -- cilium endpoint config $HOSTEP_ID | grep PolicyAuditMode doneTo validate the activated POLICY (ingress) ENFORCEMENT mode, use this command here and search for the endpoint with the label reserved:host and identity 1. It should be Disabled.
CILIUM_NAMESPACE=kube-system for NODE_NAME in $(kubectl get nodes --no-headers=true | awk '{print $1}') do CILIUMPODNAME=$(kubectl -n $CILIUM_NAMESPACE get pods -l "k8s-app=cilium" -o js) kubectl -n $CILIUMNAMESPACE exec $CILIUMPOD_NAME -c cilium-agent -- cilium endpoint list doneNow we can create our CiliumClusterwideNetworkPolicy YAML manifest (ccnp-rke2-singlehost-host-rule-set.yaml):
apiVersion: "cilium.io/v2" kind: CiliumClusterwideNetworkPolicy metadata: name: "rke2-singlehost-host-rule-set" spec: description: "Cilium host policy set for RKE2 single nodes" nodeSelector: matchLabels: node.kubernetes.io/instance-type: rke2 ingress: - fromEntities: - all toPorts: - ports: # SSH - port: "22" protocol: TCP # Ingress HTTP - port: "80" protocol: TCP # Ingress HTTPS - port: "443" protocol: TCP # Kubernetes API - port: "6443" protocol: TCP - fromEntities: - cluster toPorts: - ports: # Cilium Hubble server - port: "4244" protocol: TCP # Node Exporter metrics - port: "9100" protocol: TCP # Cilium cilium-agent Prometheus metrics - port: "9962" protocol: TCP # Rancher monitoring Cilium operator metrics - port: "9963" protocol: TCP # Cilium cilium-hubble Prometheus metrics - port: "9965" protocol: TCP # RKE2 Kubelet - port: "10250" protocol: TCPApply the just created CiliumClusterwideNetworkPolicy:
kubectl apply -f ccnp-rke2-singlehost-host-rule-set.yamlIf you now run the command to check the activated POLICY (ingress) ENFORCEMENT mode once again, you will see it changed from Disabled to Disabled (Audit) (remember searching for the endpoint with the label reserved:host and identity 1):
CILIUM_NAMESPACE=kube-system for NODE_NAME in $(kubectl get nodes --no-headers=true | awk '{print $1}') do CILIUMPODNAME=$(kubectl -n $CILIUM_NAMESPACE get pods -l "k8s-app=cilium" -o js) kubectl -n $CILIUMNAMESPACE exec $CILIUMPOD_NAME -c cilium-agent -- cilium endpoint list doneIn my example, the endpoint output looks like this:
ENDPOINT POLICY (ingress) POLICY (egress) IDENTITY LABELS (source:key[=value]) IPv6 IPv4 STATUS ENFORCEMENT ENFORCEMENT 46 Disabled (Audit) Disabled 1 k8s:node-role.kubernetes.io/control-plane=true ready k8s:node-role.kubernetes.io/etcd=true k8s:node-role.kubernetes.io/master=true k8s:node.kubernetes.io/instance-type=rke2 reserved:hostBefore we now disable the PolicyAuditMode, we need to have a look at the packets which would have been dropped if the rules were already enforced:
# Set Cilium namespace CILIUM_NAMESPACE=kube-system Print Cilium pod names to console:
CILIUMPODNAME=$(kubectl -n $CILIUM_NAMESPACE get pods -l "k8s-app=cilium" -o js) Output all connections - in my case HOSTEPID was "46"
kubectl -n $CILIUMNAMESPACE exec $CILIUMPOD_NAME -c cilium-agent -- hubble observe -t policy-verdict -f --identity 1In my example, I only saw allowed connections (INGRESS ALLOWED) for some relevant ports:
$ kubectl -n $CILIUMNAMESPACE exec $CILIUMPOD_NAME -c cilium-agent -- hubble observe -t policy-verdict -f --identity 1 Sep 4 20:09:21.849: <hidden-ip>:61199 (world) -> 10.0.0.4:6443 (host) policy-verdict:L4-Only INGRESS ALLOWED (TCP Flags: SYN) Sep 4 20:10:23.292: <hidden-ip>:61206 (world) -> 10.0.0.4:22 (host) policy-verdict:L4-Only INGRESS ALLOWED (TCP Flags: SYN)Once we're confident that the rule set is fine and no essential connections get blocked, set the policy mode to enforcing (by disabling PolicyAuditMode):
for NODE_NAME in $(kubectl get nodes --no-headers=true | awk '{print $1}') do CILIUMPODNAME=$(kubectl -n $CILIUM_NAMESPACE get pods -l "k8s-app=cilium" -o js) HOSTEPID=$(kubectl -n $CILIUMNAMESPACE exec $CILIUMPOD_NAME -c cilium-agent -- cilium endpoint list -o js) kubectl -n $CILIUMNAMESPACE exec $CILIUMPODNAME -c cilium-agent -- cilium endpoint config $HOSTEP_ID PolicyAuditMode=Disabled doneThe node is now firewalled via Cilium with eBPF in the background, while we can manage the required rules in the same easy way as any other “traditional” Kubernetes NetworkPolicy – via Kubernetes (custom) resources.
Sources:
- https://docs.cilium.io/en/stable/gettingstarted/host-firewall/
- https://github.com/PhilipSchmid/cilium-netpol-demo
- https://www.puzzle.ch/de/blog/articles/2021/12/16/cilium-host-policies
Persistent Storage using NFS-SubDir-External-Provisioner
Used to provide persistent storage via NFS from the Synology NAS. It creates subdirectories for every Persistent Volume created on the K8s cluster (name schema:${namespace}-${pvcName}-${pvName}).
Sources:
- https://github.com/kubernetes-sigs/nfs-subdir-external-provisioner
NFS-SubDir-External-Provisioner Prerequisites
Prepare & add the Helm chart repo:mkdir -p ~/rke2/nfs-subdir-external-provisioner cd ~/rke2/nfs-subdir-external-provisioner helm repo add nfs-subdir-external-provisioner https://kubernetes-sigs.github.io/nfs-subdir-external-provisioner/ helm repo update nfs-subdir-external-provisionerEnsure the nfs protocol is known to the host system:
sudo dnf install -y nfs-utilsNFS-SubDir-External-Provisioner Installation
Create avalues.yaml file with the following configuration:
nfs:
  server: <nfs-server-ip-here>
  path: /volume1/nfs
storageClass:   create: true   defaultClass: true   name: nfs   accessModes: ReadWriteMany
Finally, install the NFS SubDir external provisioner helm chart:
helm upgrade -i --create-namespace nfs-subdir-external-provisioner nfs-subdir-external-provisioner/nfs-subdir-external-provisioner \ --version 4.0.18 \ --namespace nfs-subdir-provisioner \ -f values.yamlSources:
- https://github.com/kubernetes-sigs/nfs-subdir-external-provisioner/tree/master/charts/nfs-subdir-external-provisioner
Infrastructure related Components
Deploy Nginx Ingress Controller
The Nginx ingress controller is deployed as Daemonset within the host network namespace. This way the Nginx ingress controller can see the actual client IP where this would not be possible without any workarounds when the Nginx ingress controller would be deployed as Deployment outside the host's network namespace.Nginx Ingress Controller Prerequisites
Prepare & add the Helm chart repo:mkdir -p ~/rke2/ingress-nginx
cd ~/rke2/ingress-nginx
helm repo add ingress-nginx https://kubernetes.github.io/ingress-nginx
helm repo update ingress-nginxNginx Ingress Controller Installation
Create avalues.yaml file with the following configuration:
controller:
  ingressClassResource:
    name: nginx
    enabled: true
    default: true
    controllerValue: "k8s.io/ingress-nginx"
  ingressClass: nginx
  watchIngressWithoutClass: true
kind: "DaemonSet"   hostPort:     enabled: true     ports:       http: 80       https: 443
service:     type: ClusterIP
metrics:     enabled: true     serviceMonitor:       enabled: true
serviceAccount:     create: true
admissionWebhooks:     enabled: false
As our Nginx ingress controller runs in host namespace and uses host ports, it can't comply with our default PSS policy baseline. We therefore create the namespace before installing the actual Helm chart so we are able to already set its PSS policy to privileged:
kubectl create namespace ingress-nginx
kubectl label namespace ingress-nginx pod-security.kubernetes.io/enforce=privileged
kubectl label namespace ingress-nginx pod-security.kubernetes.io/enforce-version=v1.27
kubectl label namespace ingress-nginx pod-security.kubernetes.io/audit=privileged
kubectl label namespace ingress-nginx pod-security.kubernetes.io/audit-version=v1.27
kubectl label namespace ingress-nginx pod-security.kubernetes.io/warn=privileged
kubectl label namespace ingress-nginx pod-security.kubernetes.io/warn-version=v1.27
Finally, install the Nginx ingress controller helm chart:
helm upgrade -i --create-namespace nginx ingress-nginx/ingress-nginx \ --version 4.9.0 \ --namespace ingress-nginx \ -f values.yamlSources:
- https://kubernetes.github.io/ingress-nginx/deploy/#using-helm
- https://github.com/kubernetes/ingress-nginx/tree/master/charts/ingress-nginx
- https://github.com/kubernetes/ingress-nginx/tree/helm-chart-4.9.0/charts/ingress-nginx
Cert-Manager
Cert-Manager Prerequisites
Prepare & add the Helm chart repo:helm repo add jetstack https://charts.jetstack.io
helm repo update jetstackCert-Manager Installation
Install the Cert-Manager controller helm chart:helm upgrade -i --create-namespace cert-manager jetstack/cert-manager \
--namespace cert-manager \
--set installCRDs=false \
--version v1.12.7Verification:
$ kubectl get pods --namespace cert-manager NAME READY STATUS RESTARTS AGE cert-manager-5468bbb5fd-rpshg 1/1 Running 0 29s cert-manager-cainjector-6f455799dd-kglxp 1/1 Running 0 29s cert-manager-webhook-54bd8d56d6-k8j5d 1/1 Running 0 29sSources:
- https://cert-manager.io/docs/installation/kubernetes/#installing-with-helm
Let's Encrypt DNS-Challenge DigitalOcean ClusterIssuer
Create a Cert-Manager ClusterIssuer, which can issue Let's Encrypt certificates using the DNS01 challenge via DigitalOcean.mkdir ~/rke2/cert-manager
touch lets-encrypt-dns01-do.yamlPaste the following YAML into lets-encrypt-dns01-do.yaml:
--- apiVersion: v1 kind: Secret metadata: name: digitalocean-dns namespace: cert-manager stringData: access-token: "plaintext access-token here"
apiVersion: cert-manager.io/v1 kind: ClusterIssuer metadata: name: lets-encrypt-dns01-staging-do spec: acme: email: me@example.com server: https://acme-staging-v02.api.letsencrypt.org/directory privateKeySecretRef: name: letsencrypt-stag solvers: - dns01: digitalocean: tokenSecretRef: name: digitalocean-dns key: access-token
apiVersion: cert-manager.io/v1 kind: ClusterIssuer metadata: name: lets-encrypt-dns01-production-do spec: acme: email: me@example.com server: https://acme-v02.api.letsencrypt.org/directory privateKeySecretRef: name: letsencrypt-prod solvers: - dns01: digitalocean: tokenSecretRef: name: digitalocean-dns key: access-tokenApply the lets-encrypt-dns01-do.yaml manifest:
kubectl apply -f lets-encrypt-dns01-do.yamlVerification:
$ k get clusterissuer NAME READY AGE lets-encrypt-dns01-production-do True 5s lets-encrypt-dns01-staging-do True 5sSources:
- https://cert-manager.io/docs/configuration/acme/dns01/
- https://cert-manager.io/docs/configuration/acme/dns01/digitalocean/
External-DNS
Used to automatically create new DNS A records for new Ingress objects (on DigitalOcean).Sources:
- https://github.com/kubernetes-sigs/external-dns
- https://github.com/bitnami/charts/tree/master/bitnami/external-dns
External-DNS Prerequisites
Prepare & add the Helm chart repo:mkdir -p ~/rke2/external-dns
cd ~/rke2/external-dns
helm repo add bitnami https://charts.bitnami.com/bitnami
helm repo update bitnamiExternal-DNS Installation
Create avalues.yaml file with the following configuration:
provider: digitalocean
domainFilters:
- "example.com"
digitalocean:
apiToken: "access-token here"Finally, install the External-DNS helm chart:
helm upgrade -i --create-namespace external-dns bitnami/external-dns \ --version 6.29.0 \ --namespace external-dns \ -f values.yamlVerification:
$ kubectl --namespace=external-dns get pods -l "app.kubernetes.io/name=external-dns,app.kubernetes.io/instance=external-dns" NAME READY STATUS RESTARTS AGE external-dns-76f6458459-7nbd4 1/1 Running 0 12sRancher (2.8.0)
Rancher Prerequisites
Prepare & add the Helm chart repo:mkdir -p ~/rke2/rancher
cd ~/rke2/rancher
helm repo add rancher-latest https://releases.rancher.com/server-charts/latest
helm repo update rancher-latestRancher Installation
Create acertificate.yaml file to issue a Certificate manually:
apiVersion: cert-manager.io/v1
kind: Certificate
metadata:
  name: tls-rancher-ingress
  namespace: cattle-system
spec:
  secretName: tls-rancher-ingress
  commonName: rancher.example.com
  dnsNames:
  - rancher.example.com
  issuerRef:
    name: lets-encrypt-dns01-production-do
    kind: ClusterIssuer
Apply Certificate:
kubectl create ns cattle-system kubectl apply -f certificate.yamlVerify the Certificate:
# Wait a few seconds up to a few minutes $ kubectl get certificate -n cattle-system NAME READY SECRET AGE tls-rancher-ingress True tls-rancher-ingress 2m31sCreate a values.yaml file with the following configuration:
hostname: rancher.example.com ingress: tls: source: secret replicas: 1 auditLog: level: 1 bootstrapPassword: <super-secret-generated-password-here>Finally, install the Rancher helm chart:
helm upgrade -i --create-namespace rancher rancher-latest/rancher \ --version 2.8.0 \ --namespace cattle-system \ -f values.yamlVerification:
$ kubectl -n cattle-system rollout status deploy/rancher Waiting for deployment "rancher" rollout to finish: 0 of 1 updated replicas are available... deployment "rancher" successfully rolled out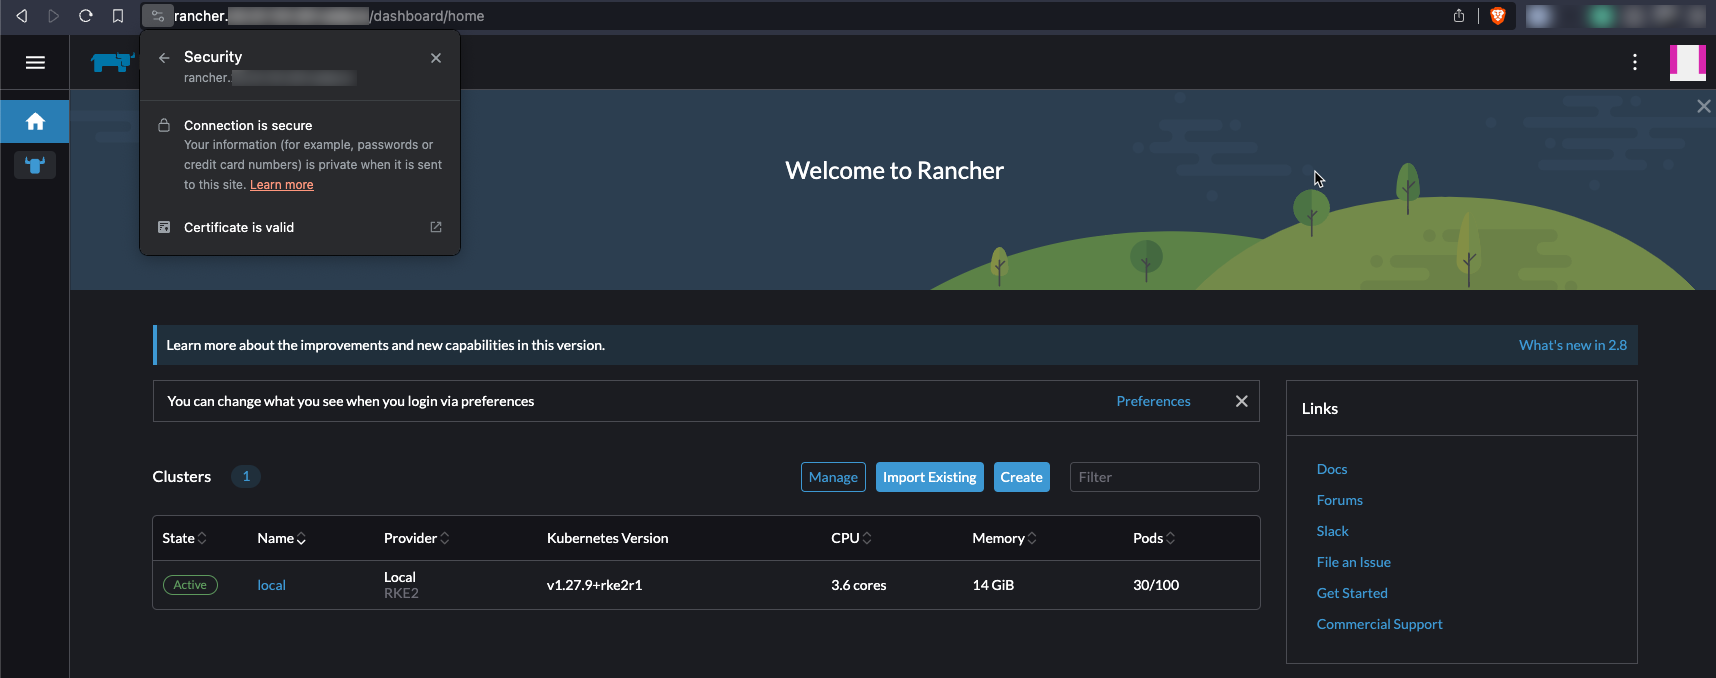
Sources:
- https://rancher.com/docs/rancher/v2.8/en/installation/install-rancher-on-k8s/chart-options/
- https://github.com/rancher/rancher/issues/26850#issuecomment-658644922
- https://rancher.com/docs/rancher/v2.8/en/installation/install-rancher-on-k8s/
Grafana
Grafana Prerequisites
Prepare & add the Helm chart repo:mkdir -p ~/rke2/grafana
cd ~/rke2/grafana
helm repo add grafana https://grafana.github.io/helm-charts
helm repo update grafanaGrafana Installation
Create avalues.yaml file with the following configuration:
adminPassword: <generate-top-secret-pw>
sidecar:
  dashboards:
    enabled: true
    label: grafana_dashboard
    labelValue: "1"
    searchNamespace: ALL
    folderAnnotation: grafana_folder
    provider:
      foldersFromFilesStructure: true
datasources:
  datasources.yaml:
    apiVersion: 1
    datasources:
    - name: prometheus
      type: prometheus
      url: http://kube-prometheus-stack-prometheus.monitoring.svc.cluster.local.:9090
      access: proxy
      isDefault: true
persistence:
  enabled: true
  size: 2Gi
  storageClassName: nfs
ingress:
  enabled: true
  annotations:
    cert-manager.io/cluster-issuer: lets-encrypt-dns01-production-do
  ingressClassName: nginx
  hosts:
  - grafana.example.com
  tls:
  - secretName: grafana-tls
    hosts:
    - grafana.example.com
Finally, install the Grafana helm chart:
helm upgrade -i grafana grafana/grafana \ --create-namespace \ -n monitoring \ --version 7.0.22 \ -f values.yamlVerification:
$ kubectl get pods --namespace monitoring NAME READY STATUS RESTARTS AGE grafana-6b7f6b6dd7-2x5hg 2/2 Running 0 82sSources:
- https://github.com/grafana/helm-charts
Kube-Prometheus-Stack
Kube-Prometheus-Stack Prerequisites
Prepare & add the Helm chart repo:mkdir -p ~/rke2/prometheus
cd ~/rke2/prometheus
helm repo add prometheus-community https://prometheus-community.github.io/helm-charts
helm repo update prometheus-communityApply PSA privileged to the monitoring namespace as Node Exporter needs hostPath mounts to extract metrics:
kubectl label namespace monitoring pod-security.kubernetes.io/enforce=privileged kubectl label namespace monitoring pod-security.kubernetes.io/enforce-version=v1.27 kubectl label namespace monitoring pod-security.kubernetes.io/audit=privileged kubectl label namespace monitoring pod-security.kubernetes.io/audit-version=v1.27 kubectl label namespace monitoring pod-security.kubernetes.io/warn=privileged kubectl label namespace monitoring pod-security.kubernetes.io/warn-version=v1.27Kube-Prometheus-Stack Installation
Create avalues.yaml file with the following configuration:
# Disable kube-proxy because we use Cilium KubeProxyReplacement
kubeProxy:
  enabled: false
The following components are disable because we didn't configure kubeadm to expose those metric endpoints to far:
kubeControllerManager:
  enabled: false
kubeScheduler:
  enabled: false
kubeEtcd:
  enabled: false
prometheus:
  ingress:
    enabled: true
    ingressClassName: nginx
    annotations:
      cert-manager.io/cluster-issuer: lets-encrypt-dns01-production-do
    hosts:
    - prometheus.example.com
    tls:
    - secretName: prometheus-tls
      hosts:
      - prometheus.example.com
  # We only deploy a single Prometheus. This one should therefore watch for all CRs.
  prometheusSpec:
    ruleSelectorNilUsesHelmValues: false
    serviceMonitorSelectorNilUsesHelmValues: false
    podMonitorSelectorNilUsesHelmValues: false
    probeSelectorNilUsesHelmValues: false
    scrapeConfigSelectorNilUsesHelmValues: false
alertmanager:
  ingress:
    enabled: true
    ingressClassName: nginx
    annotations:
      cert-manager.io/cluster-issuer: lets-encrypt-dns01-production-do
    hosts:
    - alertmanager.example.com
    tls:
    - secretName: alertmanager-tls
      hosts:
      - alertmanager.example.com
Finally, install the Kube-Prometheus-Stack helm chart:
helm upgrade -i kube-prometheus-stack prometheus-community/kube-prometheus-stack \ --skip-crds \ --create-namespace \ -n monitoring \ --version 55.7.0 \ -f values.yamlVerification:
$ kubectl get pods --namespace monitoring NAME READY STATUS RESTARTS AGE alertmanager-kube-prometheus-stack-alertmanager-0 2/2 Running 0 18m grafana-64446977f6-bhj8v 2/2 Running 0 97s kube-prometheus-stack-grafana-696495cfc8-n75fp 3/3 Running 0 18m kube-prometheus-stack-kube-state-metrics-776cff966c-dnjvq 1/1 Running 0 18m kube-prometheus-stack-operator-68688565f4-2w4wv 1/1 Running 0 18m prometheus-kube-prometheus-stack-prometheus-0 2/2 Running 0 18mSources:
- https://github.com/prometheus-community/helm-charts/tree/main/charts/kube-prometheus-stack


