
This code pattern shows how to model a supply-chain network using the IBM Blockchain Platform and is based on a collaboration with Brooklyn Roasting Company. The story, along with the supply-chain documents that were used to model this network, can be found at: https://www.ibm.com/blockchainbean. Note that the 'view the blockchain' button is being migrated''
WARNING: This repository is no longer maintained :warning:
This repository will not be updated. I will check periodically for pull requests, but do not expect a quick response.
Create a fair trade supply network with Hyperledger Fabric and IBM Blockchain Platform V2
This code pattern is based on a recent proof-of-concept developed in collaboration with a coffee roasting company that was nice enough to let us use their supply-chain documents. The finished product of this code pattern is a cloud-based blockchain API, that any other UI app can call. An example UI app that leverages our blockchain API can be found in the screenshots below.
Each cup has a history based on which batch of coffee was used make the cup, which you can see below. Additionally, you can see other details such as who poured the cup, at what time the cup was poured, which type of beans were used, etc. For example, a sample cup 'NJB123' for the result shown below.
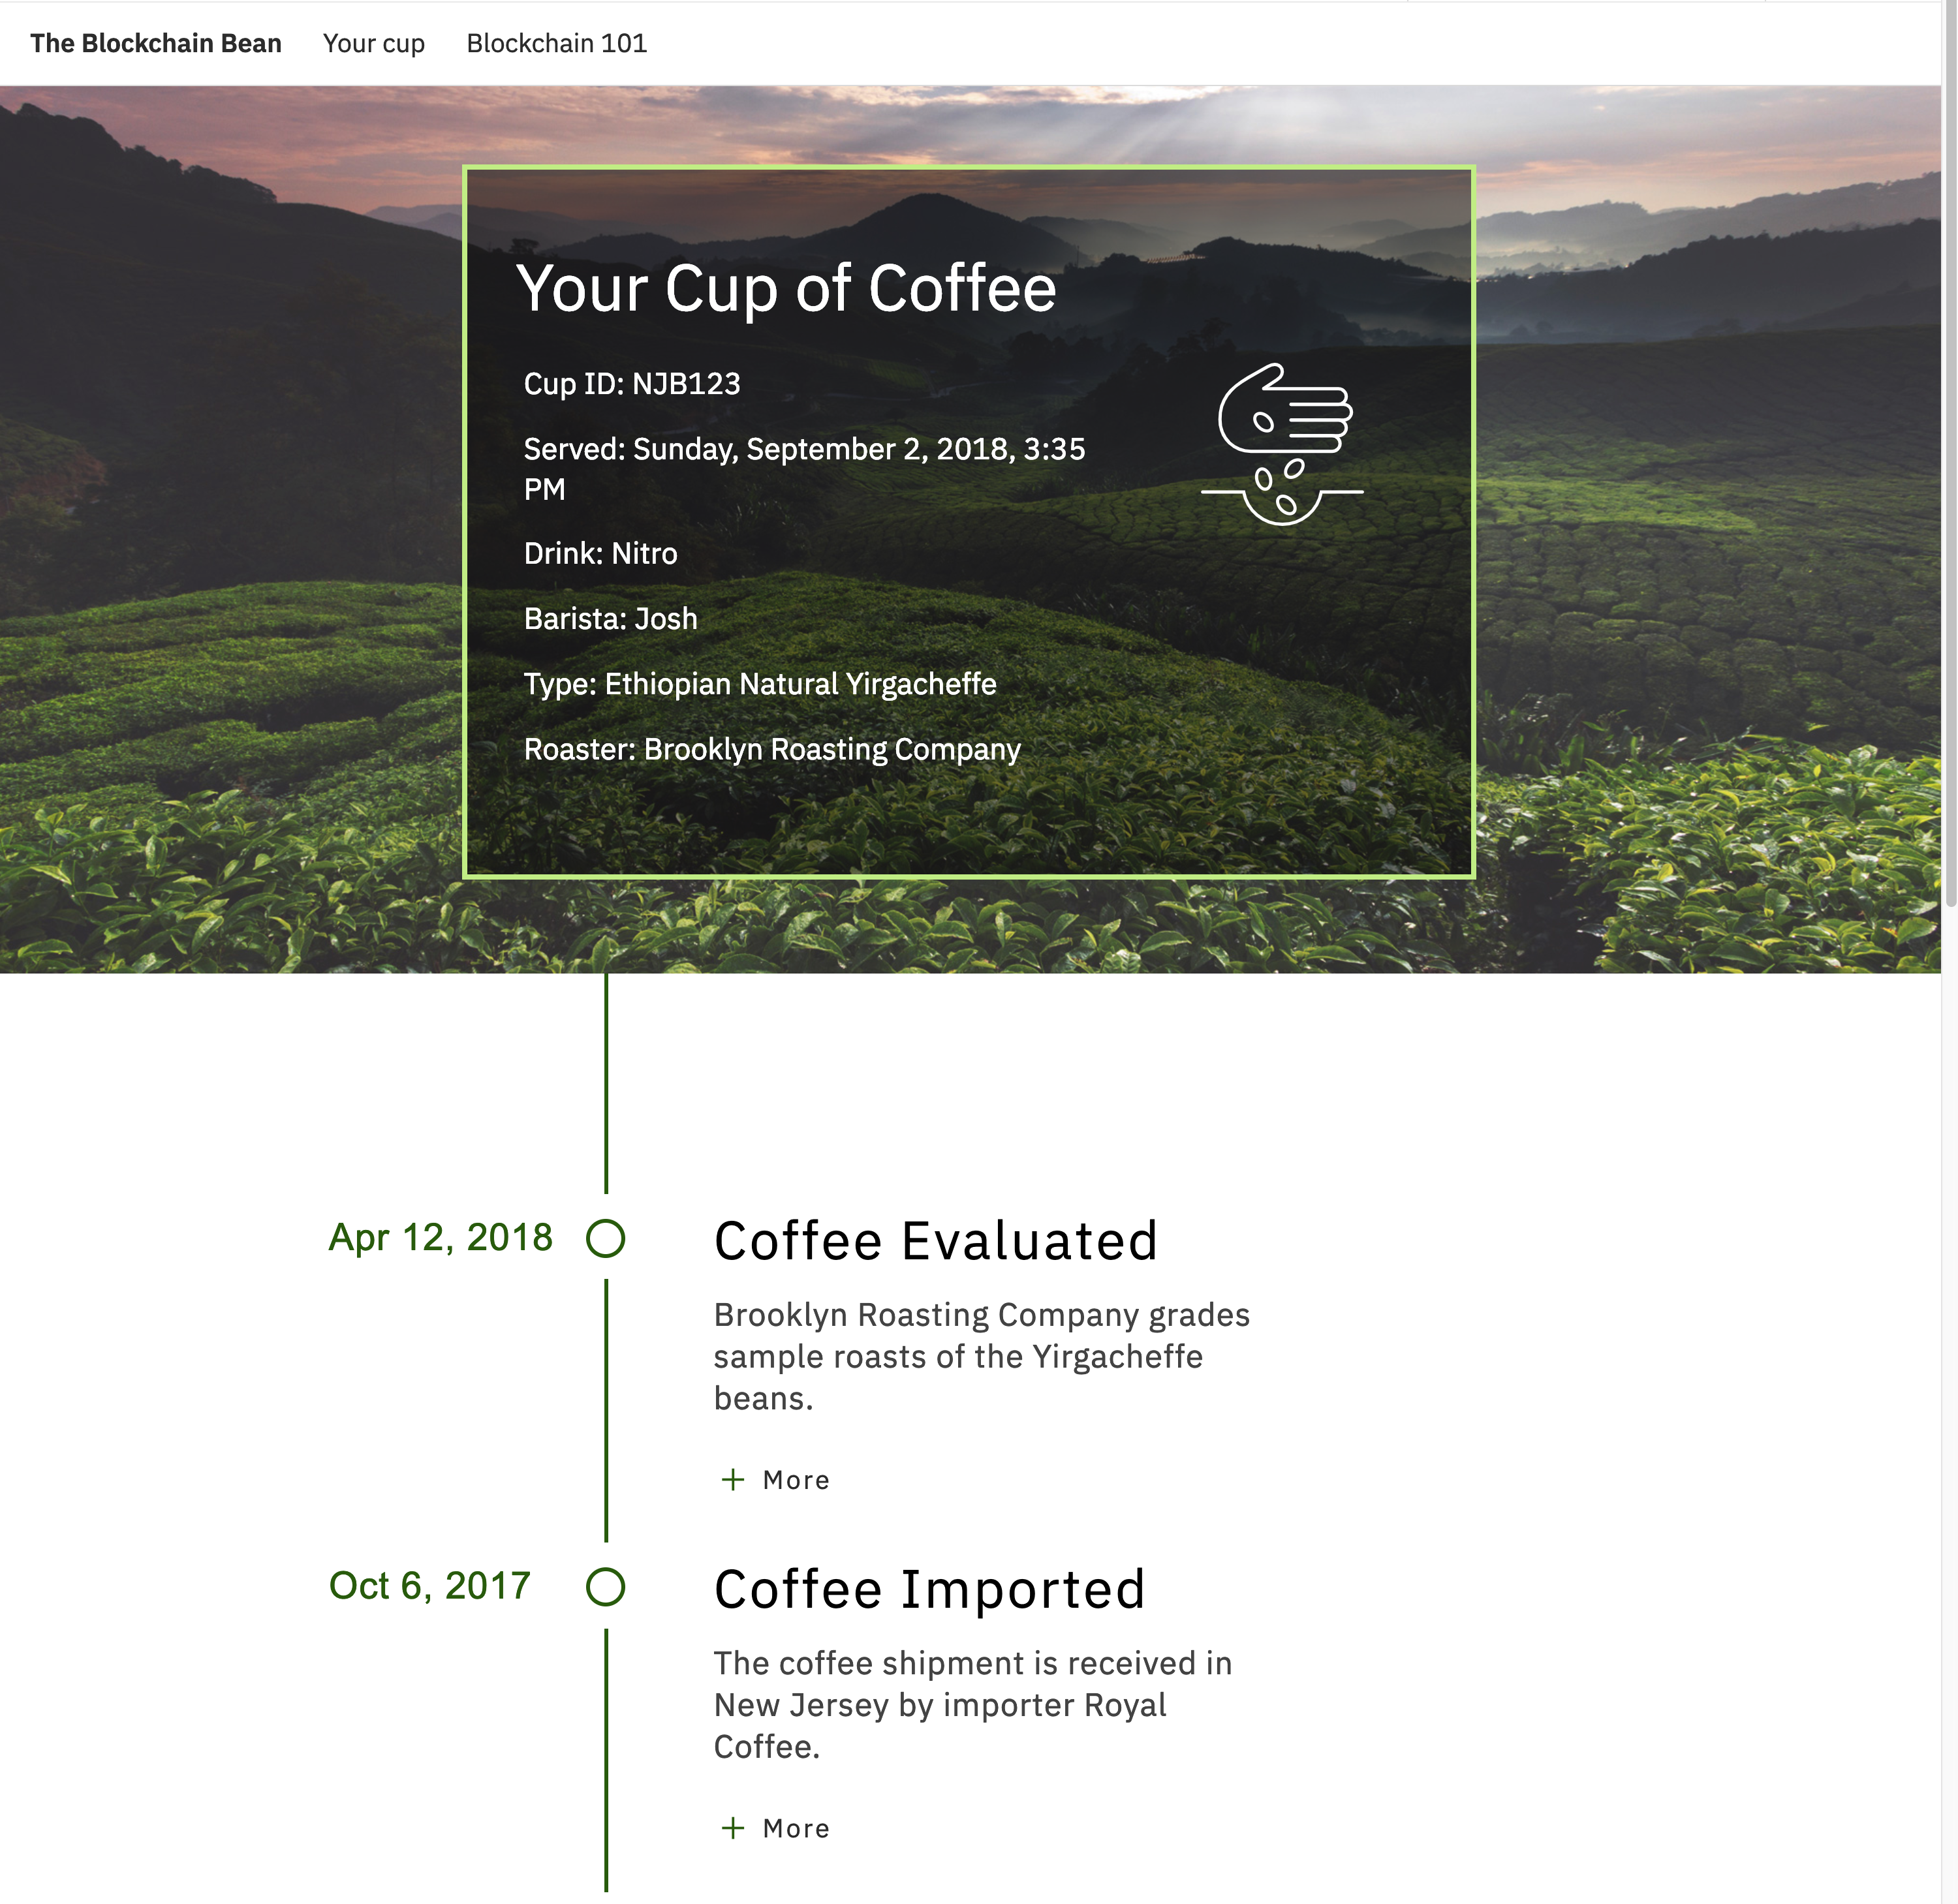
In this code pattern we will create a blockchain app that increases visibility and efficiency in the supply chain of a coffee retailer using IBM Blockchain Platform V2 Beta. We will use different transactions to show different possible actions for the different participants in the supply chain. This sample application will record all transactions on the IBM Blockchain Platform V2 Beta, and enable a coffee retailer to ensure the customer that their coffee is organic and fair-trade. The code pattern can be useful to developers that are looking into learning more about creating applications that integrate supply chains with Hyperledger Fabric.
When the reader has completed this code pattern, they will understand how to:
- Interact with the (free) IBM Blockchain Platform V2 Beta
- Build a blockchain back-end using Hyperledger Fabric
- Create and use a (free) Kubernetes Cluster
- Deploy a Node.js app in the cloud that will interact with our smart contract
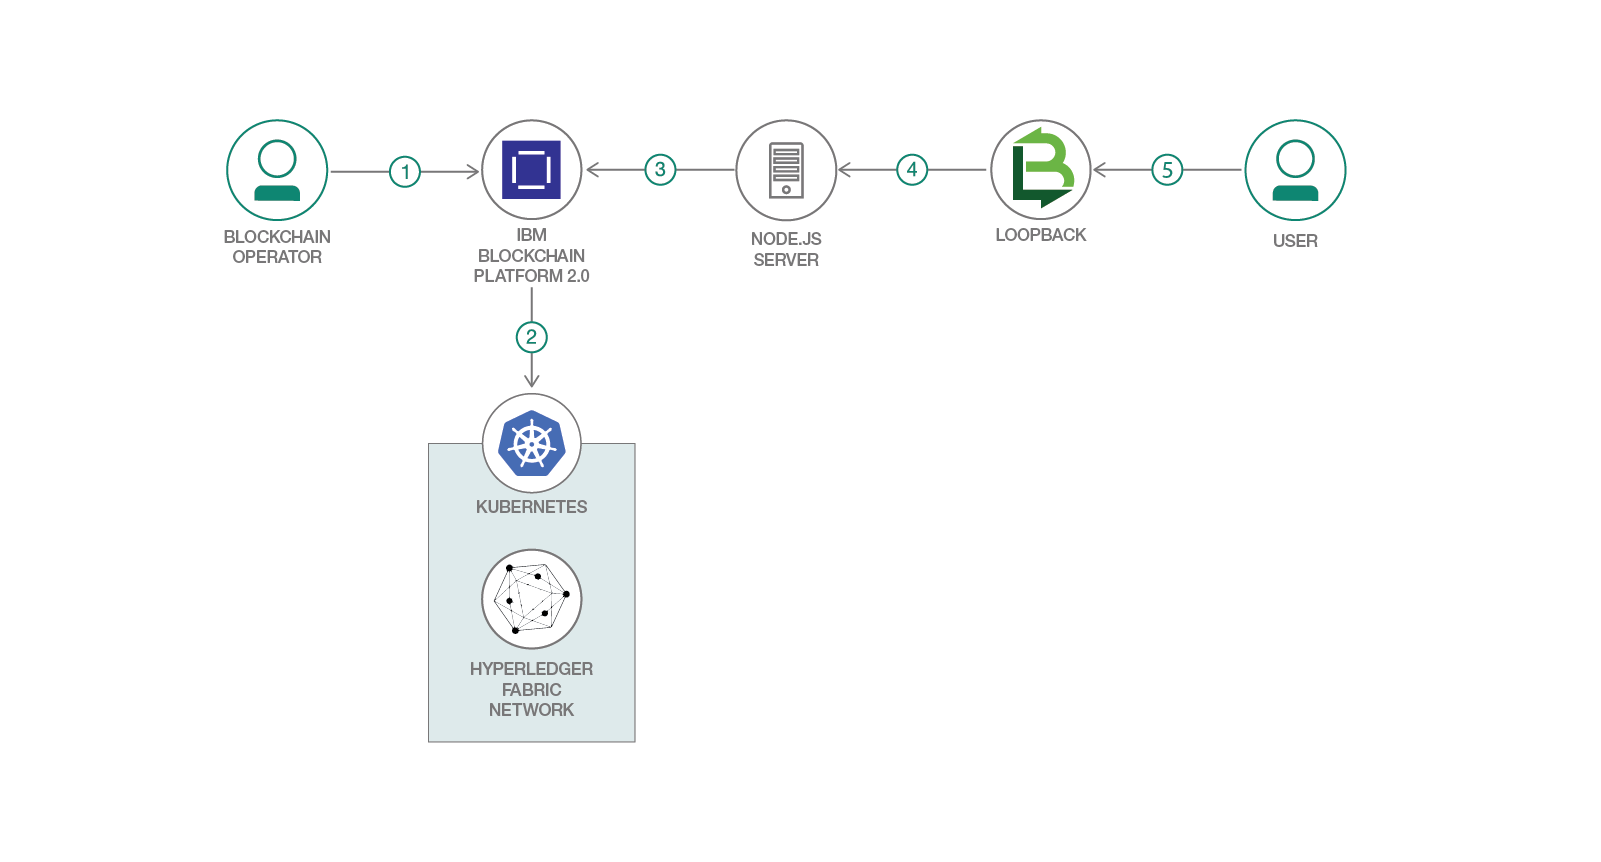
Flow Diagram
Flow Description
- The blockchain operator sets up the IBM Blockchain Platform 2.0 service.
- The IBM Blockchain Platform 2.0 creates a Hyperledger Fabric network on an IBM Kubernetes
- The Node.js application server uses the Fabric SDK to interact with the deployed network on IBM Blockchain Platform 2.0 and creates APIs for a web client.
- The Loopback 4 client uses the Node.js application API to interact with the network.
- The user interacts with the Loopback 4 web interface to update and query the blockchain ledger and state.
Included components
* IBM Blockchain Platform V2 Beta gives you total control of your blockchain network with a user interface that can simplify and accelerate your journey to deploy and manage blockchain components on the IBM Cloud Kubernetes Service. * IBM Cloud Kubernetes Service creates a cluster of compute hosts and deploys highly available containers. A Kubernetes cluster lets you securely manage the resources that you need to quickly deploy, update, and scale applications.- IBM Blockchain Platform Extension for VS Code is designed to assist users in developing, testing, and deploying smart contracts -- including connecting to Hyperledger Fabric environments.
Featured technologies
- Hyperledger Fabric v1.4 is a platform for distributed ledger solutions, underpinned by a modular architecture that delivers high degrees of confidentiality, resiliency, flexibility, and scalability.
- Node.js is an open source, cross-platform JavaScript run-time environment that executes server-side JavaScript code.
- Loopback 4 LoopBack is a highly-extensible, open-source Node.js framework that enables you to: Create dynamic end-to-end REST APIs with little or no coding. Access data from major relational databases, MongoDB, SOAP and REST APIs. Incorporate model relationships and access controls for complex APIs.
Watch the Video - Create a fair trade supply network with Hyperledger Fabric 1.4 (Cloud)
Watch the Video - Create a fair trade supply network with Hyperledger Fabric 1.4 (Local)
Prerequisites
This pattern assumes you have an IBM Cloud account, VSCode and IBM Blockchain Platform Extension for VSCode installed
- IBM Cloud account
- Install VSCode
- Install IBM Blockchain Platform Extension for VSCode
- Node v8.x or greater and npm v5.x or greater
Steps (Cloud Deployment)
To run a local network, you can find steps here.
- Clone the Repo
- Install Dependencies
- Package Contract
- Create IBM Cloud services
- Build a network
- Deploy blockchainbean2 Smart Contract on the network
- Connect application to the network
- Run the application
Step 1. Clone the Repo
Git clone this repo onto your computer in the destination of your choice, then go into the web-app folder:
HoreaPorutiu$ git clone https://github.com/horeaporutiu/blockchainbean2.gitweb-app directory: HoreaPorutiu$ cd blockchainbean2/web-appStep 2. Install Dependencies
Install required dependencies using NPM:
web-app$ npm install --ignore-scriptsStep 3. Package Contract
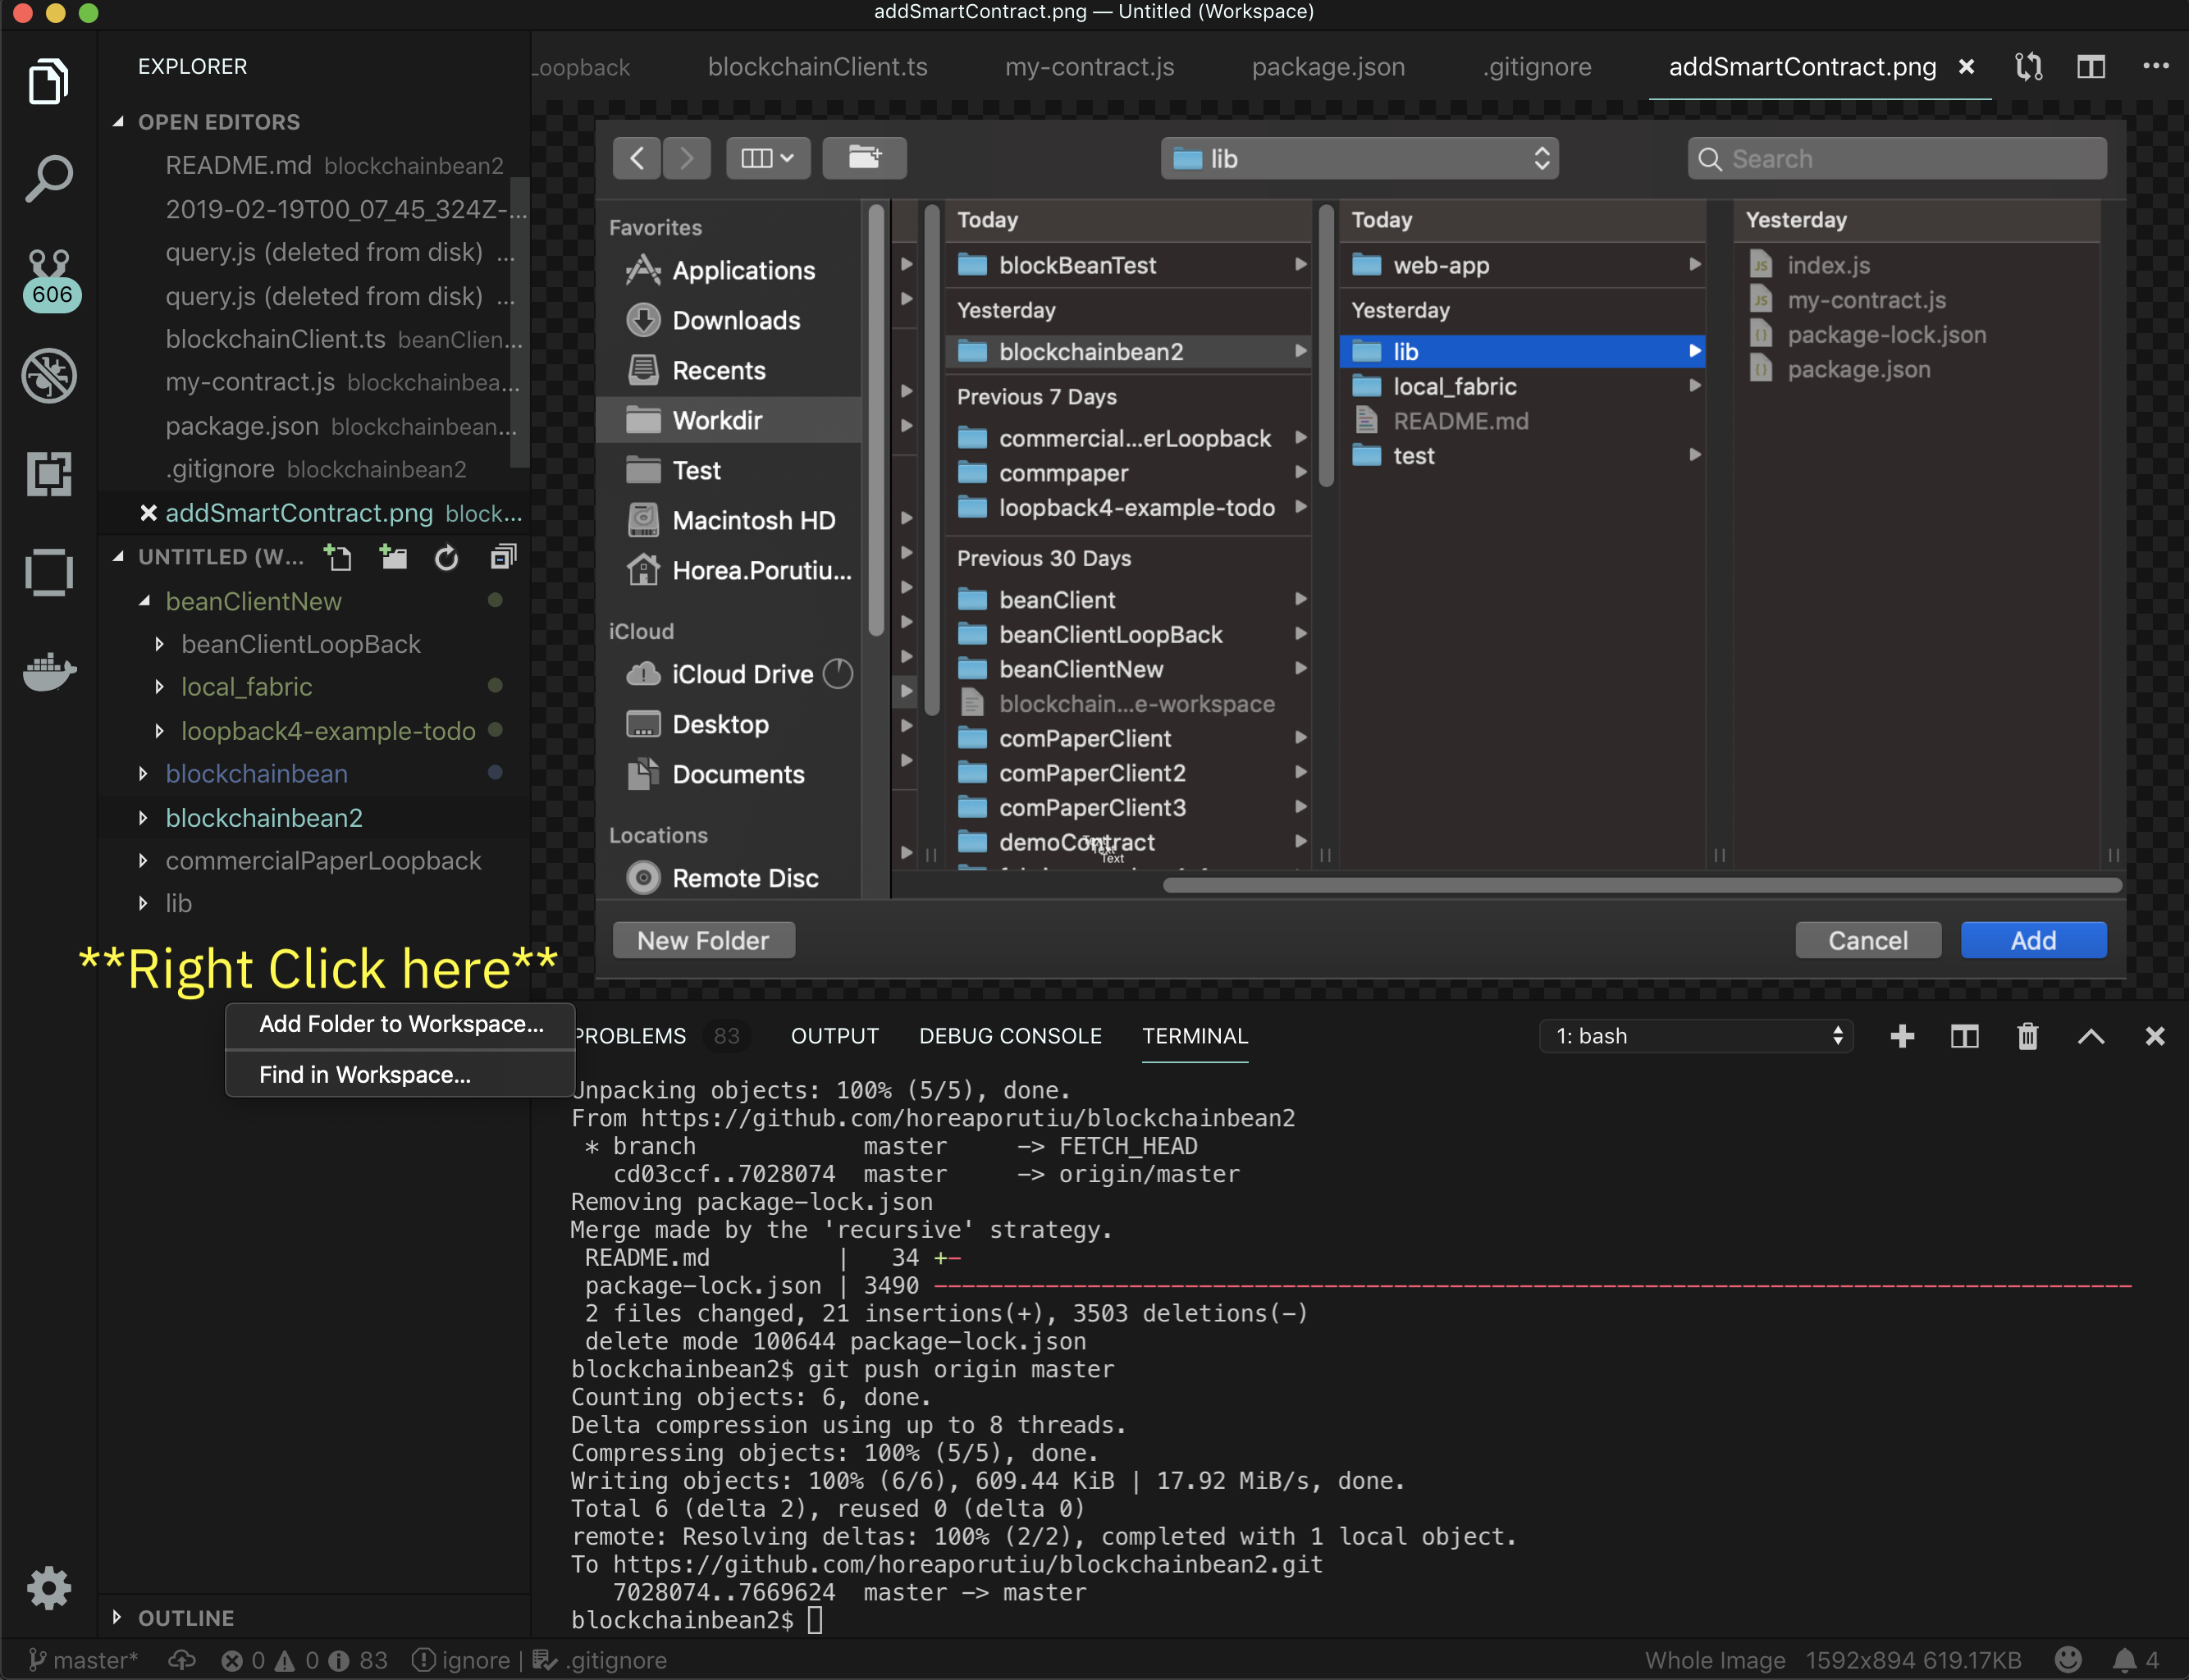 Right-click under your folders in your workspace area and then click Add Folder to Workspace and then highlight the
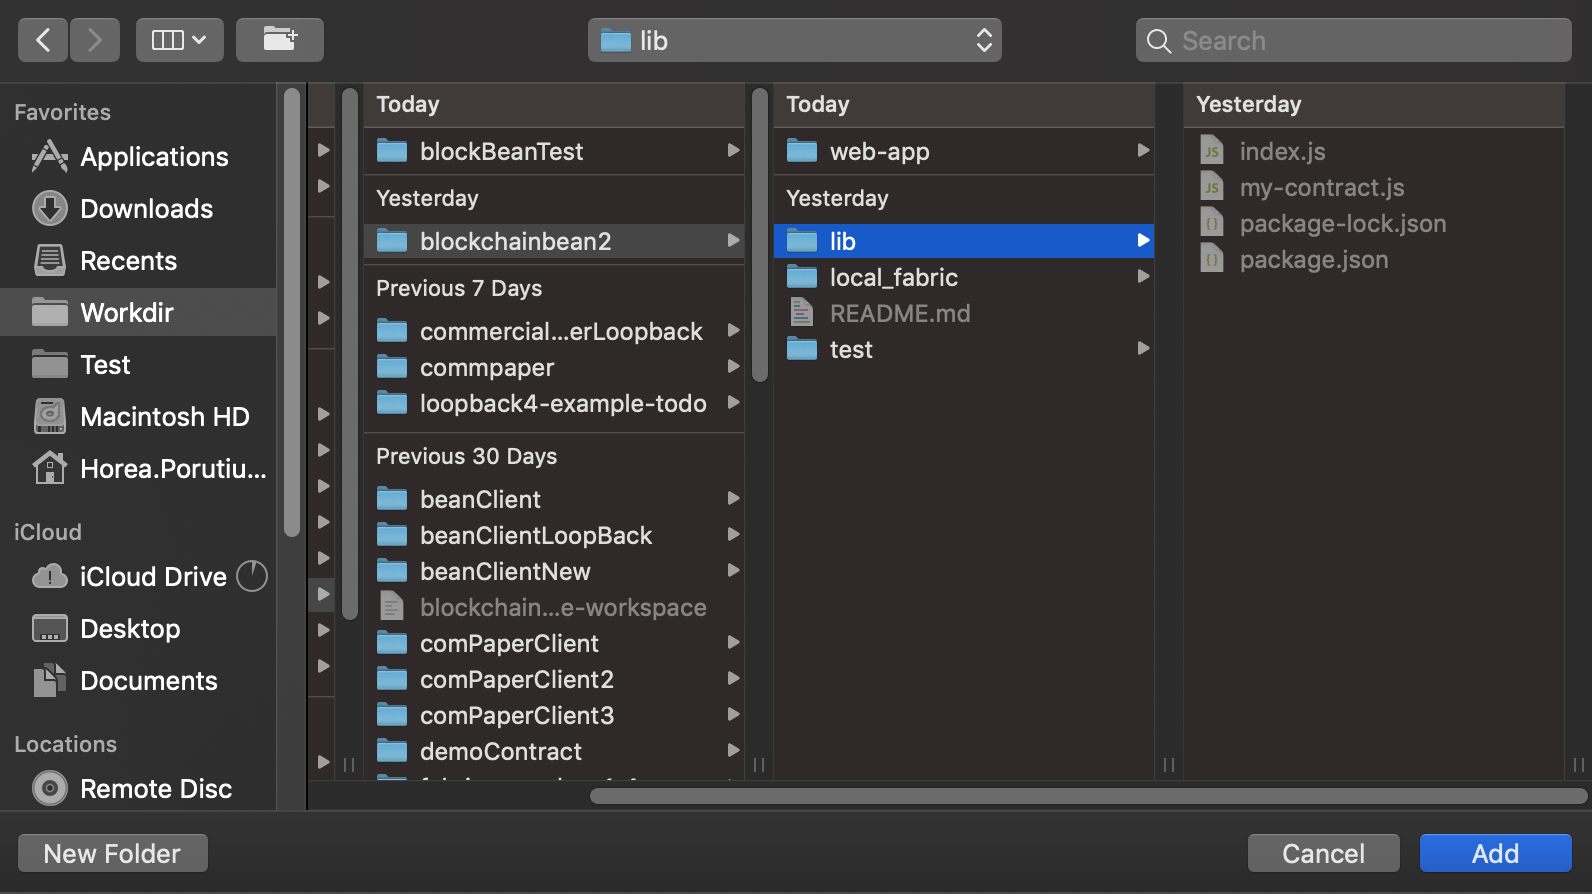
 blockchainbean/lib directory as shown in the picture below, and then click on add:
Next, we have to package the smart contract. Click on the F1 button on your keyboard, which will bring up the VSCode command palette. From there, navigate and click on Package a Smart Contract Project. 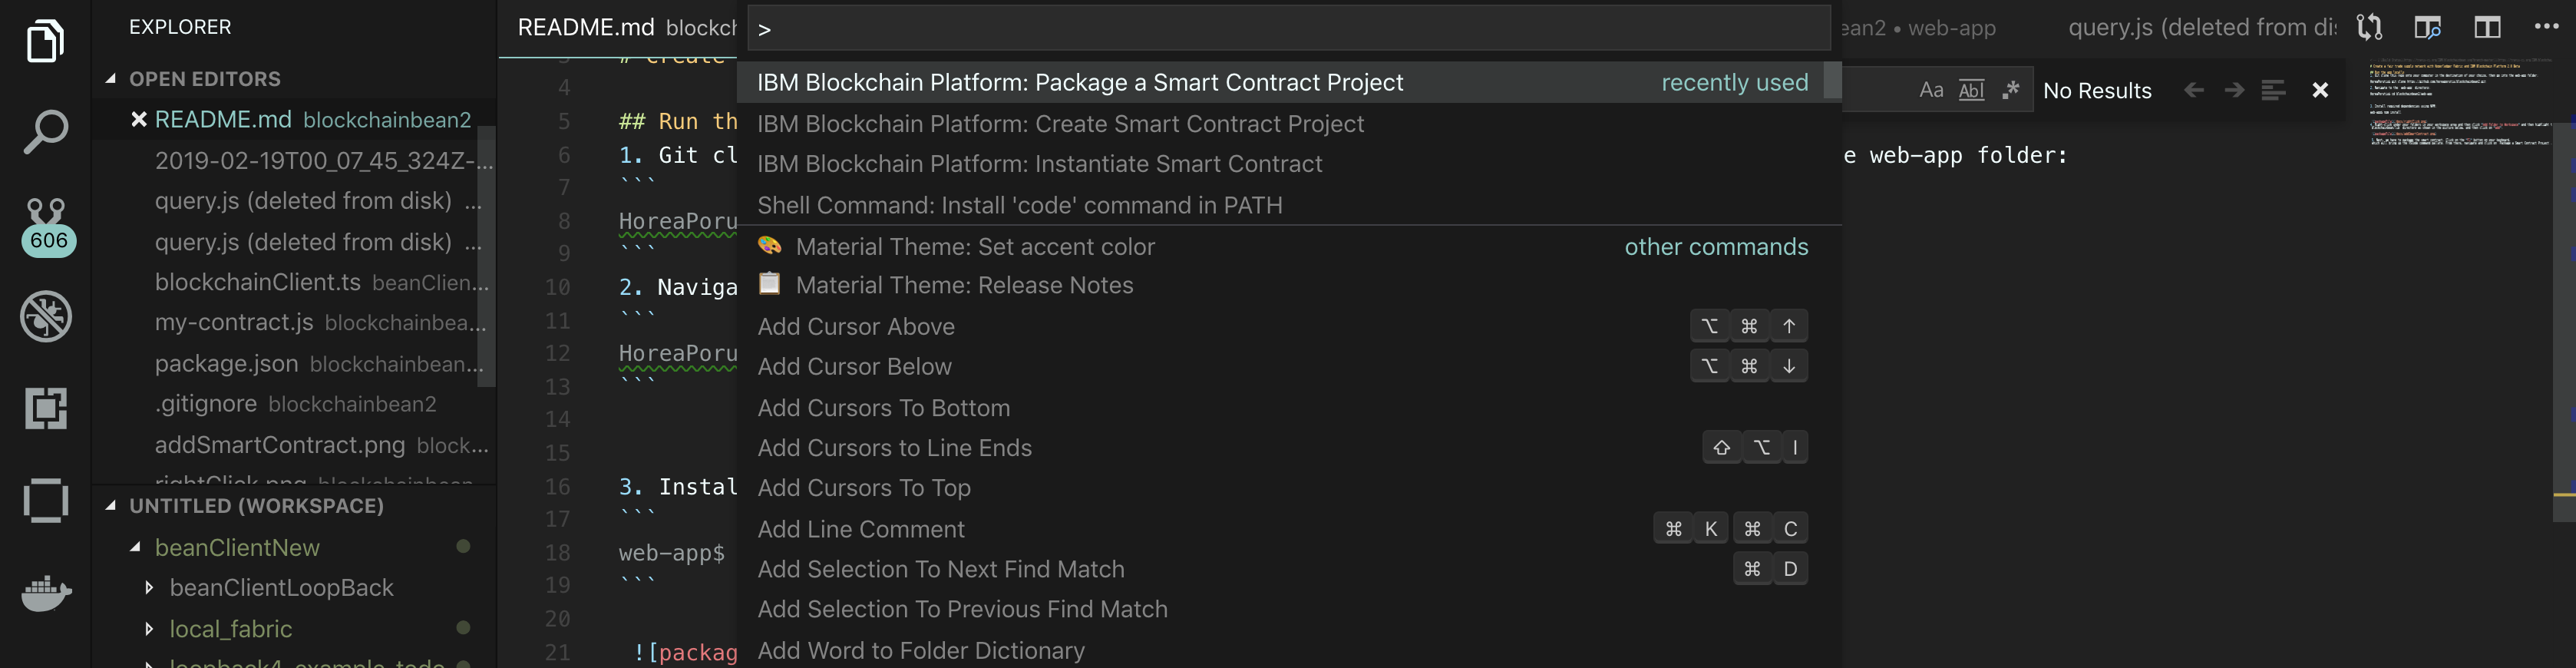
Next, the extension will ask the following question:
Choose a workspace folder to package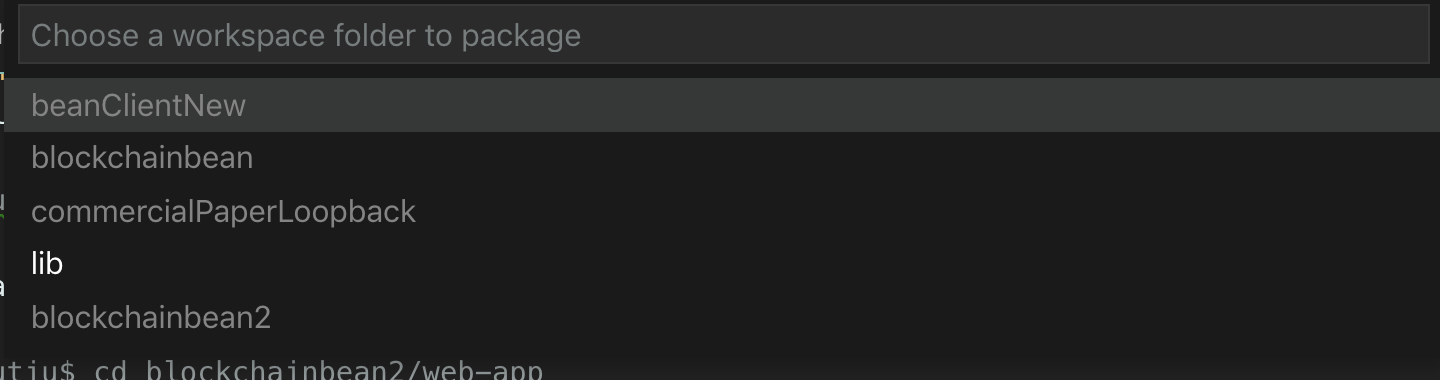
If all went well, you should see the following.
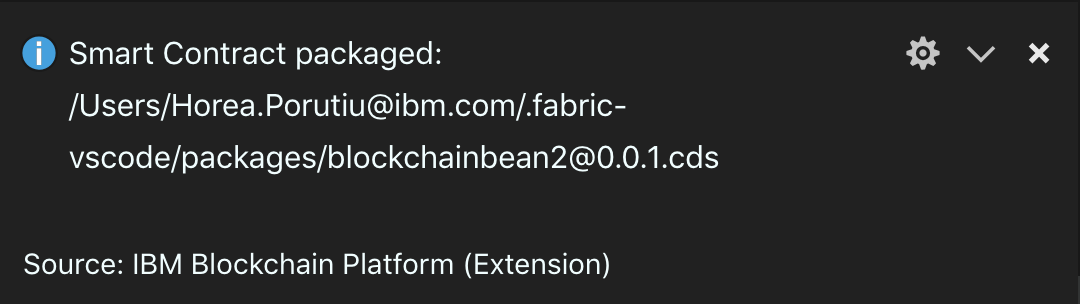 Note that this
 .cds file is extremely important if we want to run our smart contract on the cloud.
Step 4. Create IBM Cloud services
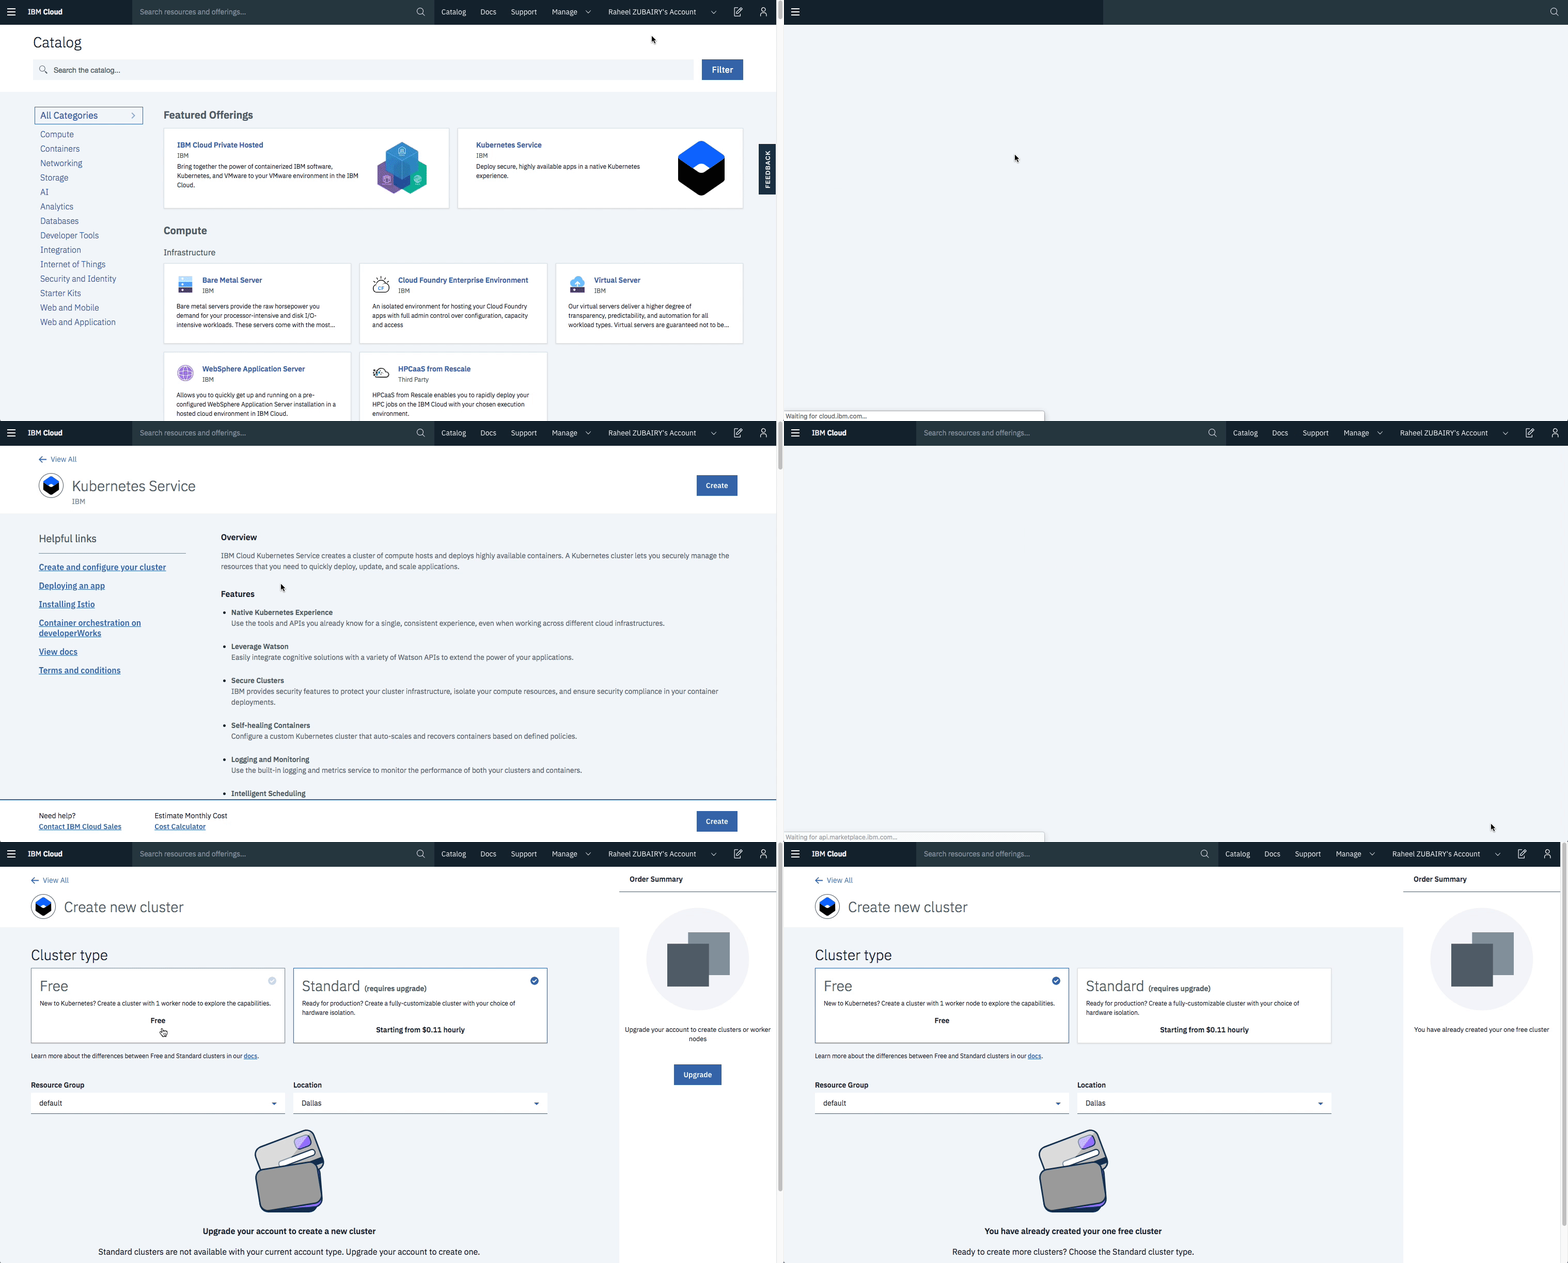
- Create the IBM Cloud Kubernetes Service. You can find the service in the
Catalog. For this code pattern, we can use theFreecluster, and give it a name. Note, that the IBM Cloud allows one instance of a free cluster and expires after 30 days. The cluster takes around 10-15
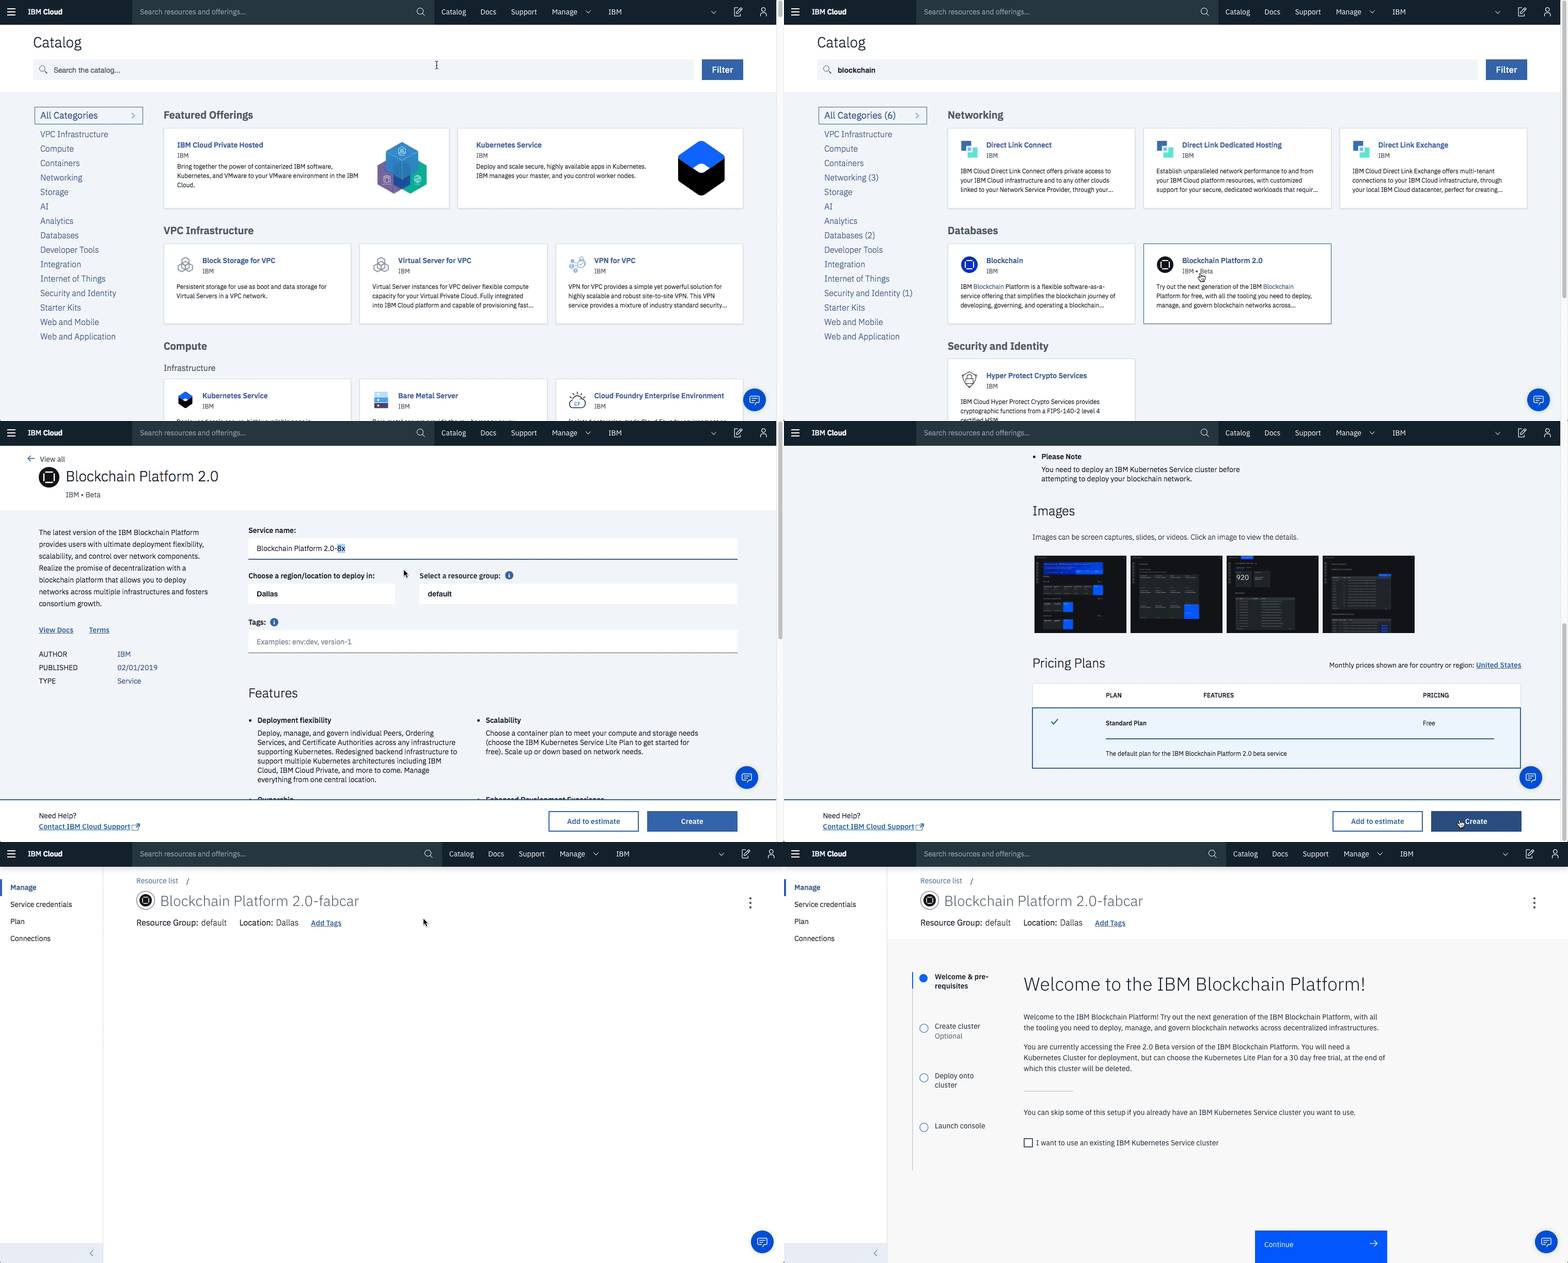
- Create the IBM Blockchain Platform V2 Beta service on the IBM Cloud. You can find the service in the
Catalog, and give a name.
- After your kubernetes cluster is up and running, you can deploy your IBM Blockchain Platform V2 Beta on the cluster. The service walks through few steps and finds your cluster on the IBM Cloud to deploy the service on.
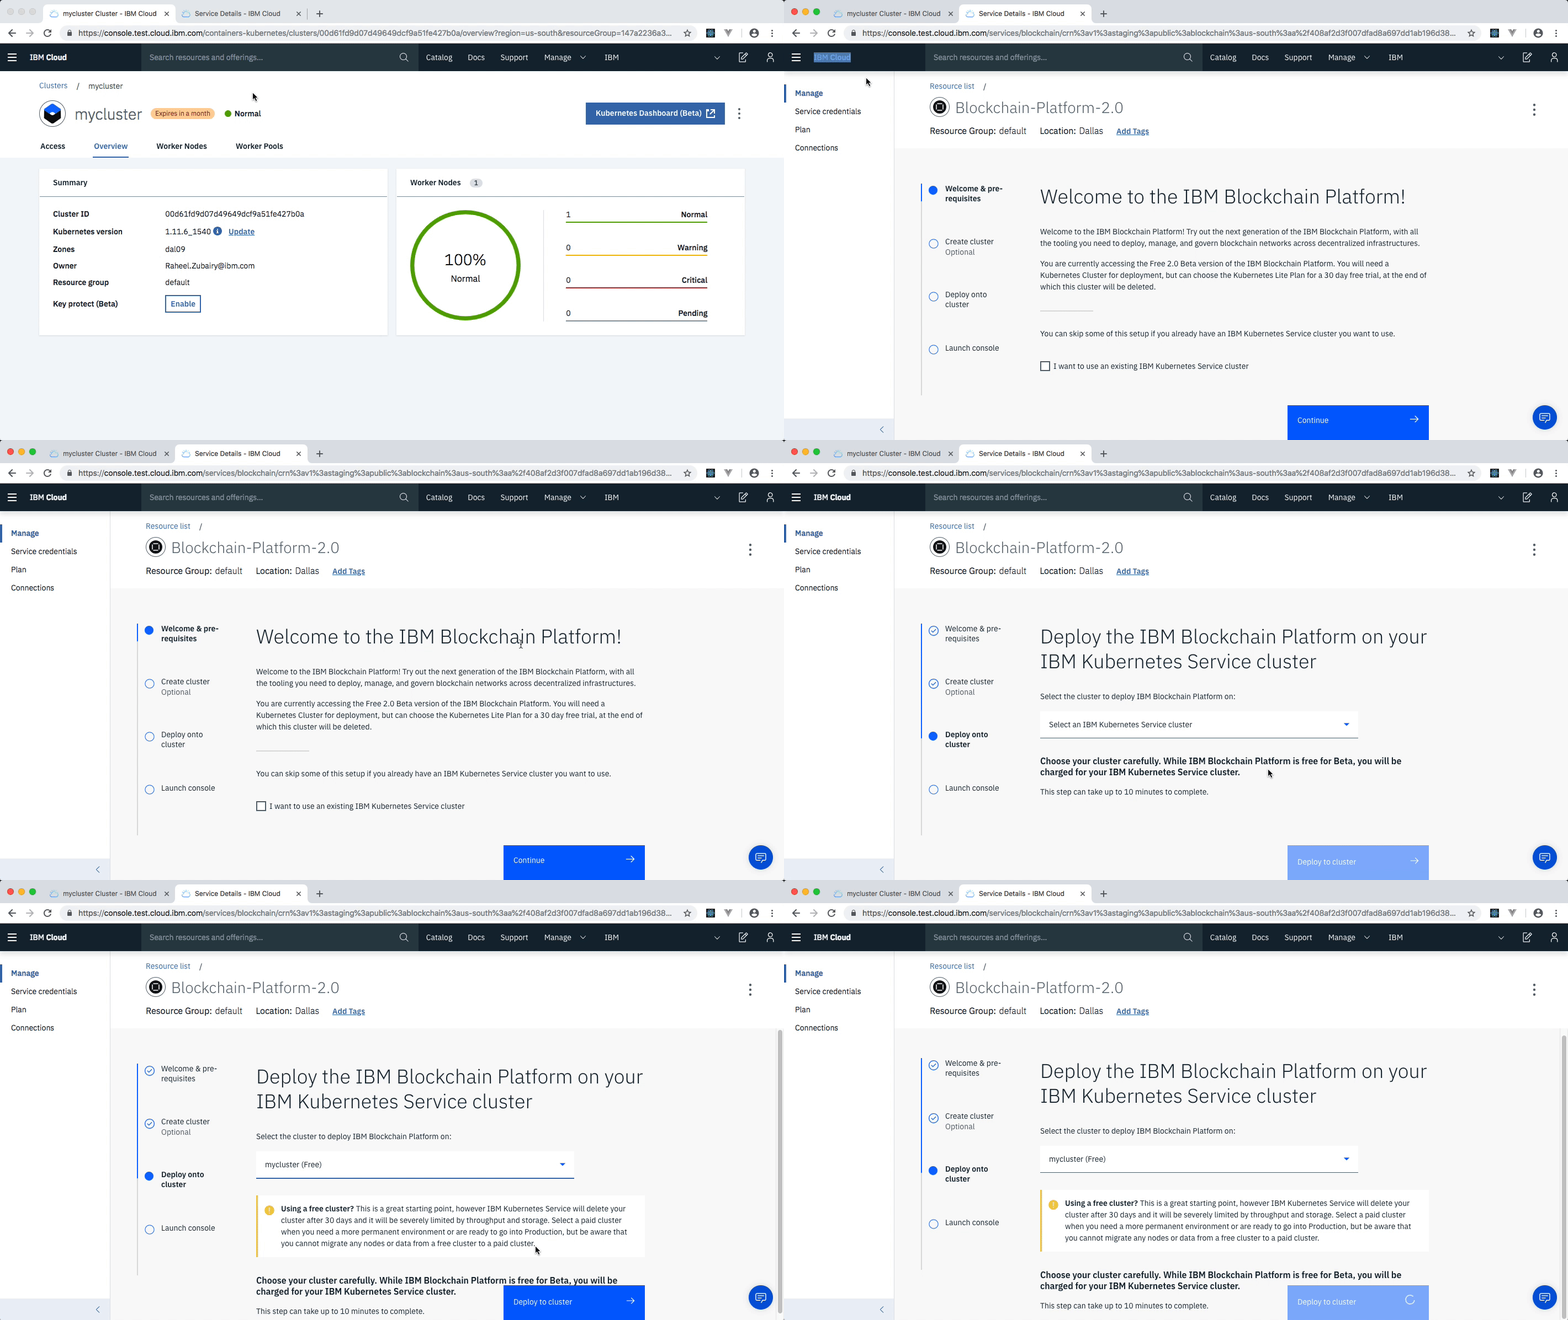
- Once the Blockchain Platform is deployed on the Kubernetes cluster, you can launch the console to start operating on your blockchain network.
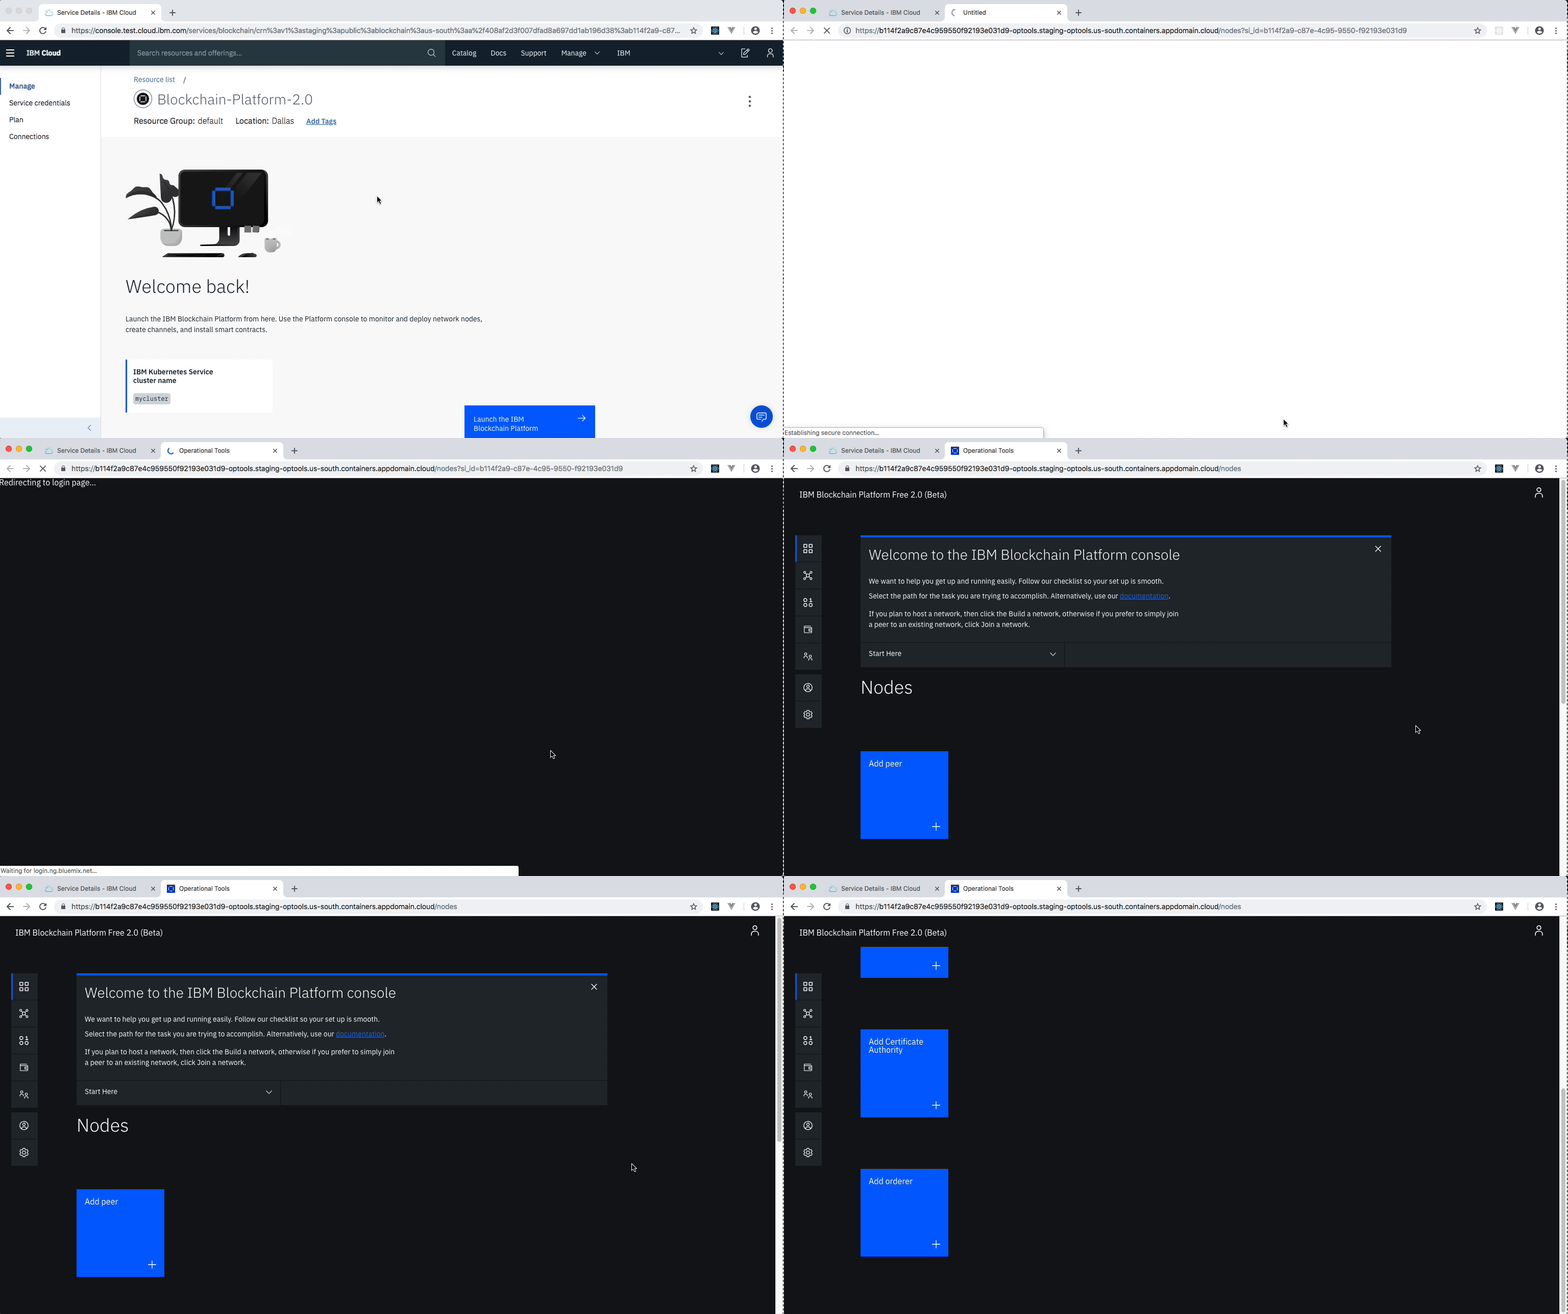
Step 5. Build a network
We will build a network as provided by the IBM Blockchain Platform documentation. This will include creating a channel with a single peer organization with its own MSP and CA (Certificate Authority), and an orderer organization with its own MSP and CA. We will create the respective identities to deploy peers and operate nodes.
Create your organization and your entry point to your blockchain
- #### Create your peer organization CA
Org1 CA.
- Specify an Admin ID of admin and Admin Secret of adminpw.
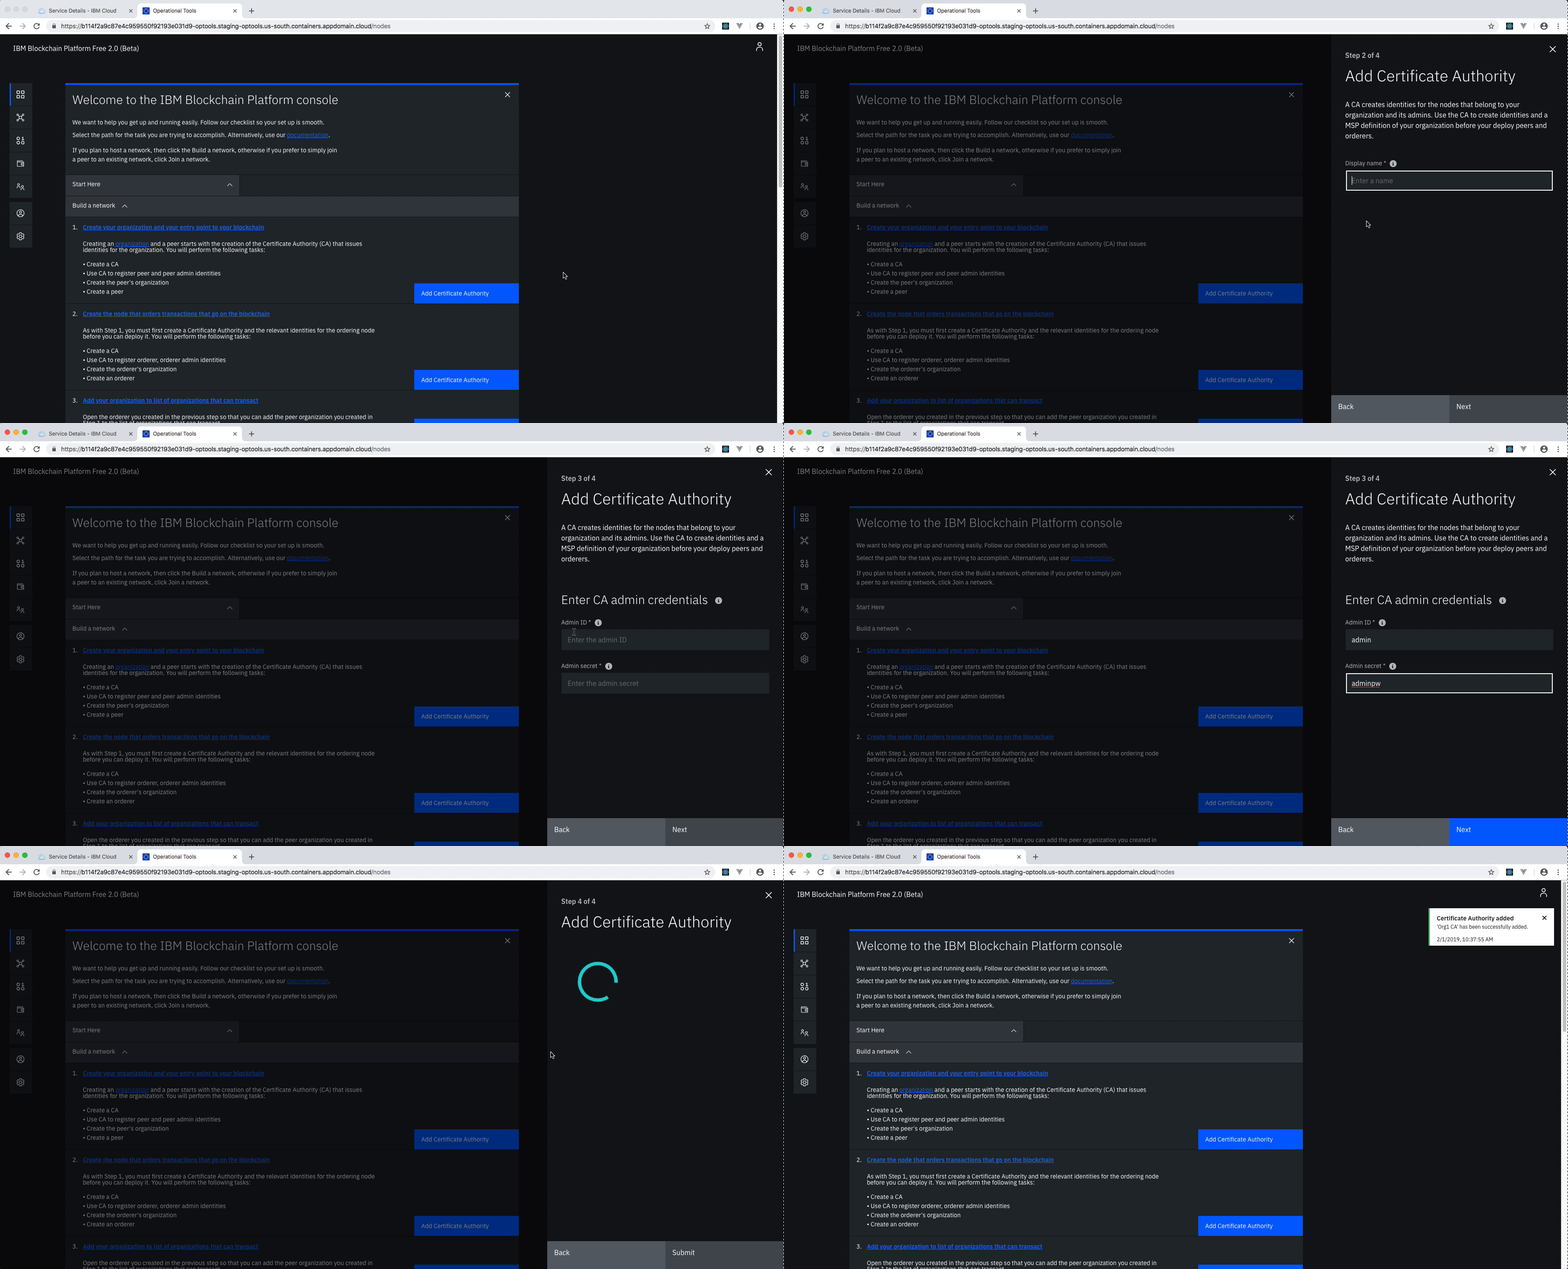
- #### Associate the identity
admin and an Enroll secret of adminpw. Use the default value of Org1 CA Admin for the Identity display name.
- Click Associate identity.

- #### Use your CA to register identities
org1admin, and Enroll Secret of org1adminpw. Click Next. Set the Type for this identity as client and select org1 from the affiliated organizations drop-down list. We will leave the Maximum enrollments and Add Attributes fields blank.
- We will repeat the process to create an identity of the peer. Click on the Register User button. Give an Enroll ID of peer1, and Enroll Secret of peer1pw. Click Next. Set the Type for this identity as peer and select org1 from the affiliated organizations drop-down list. We will leave the Maximum enrollments and Add Attributes fields blank.
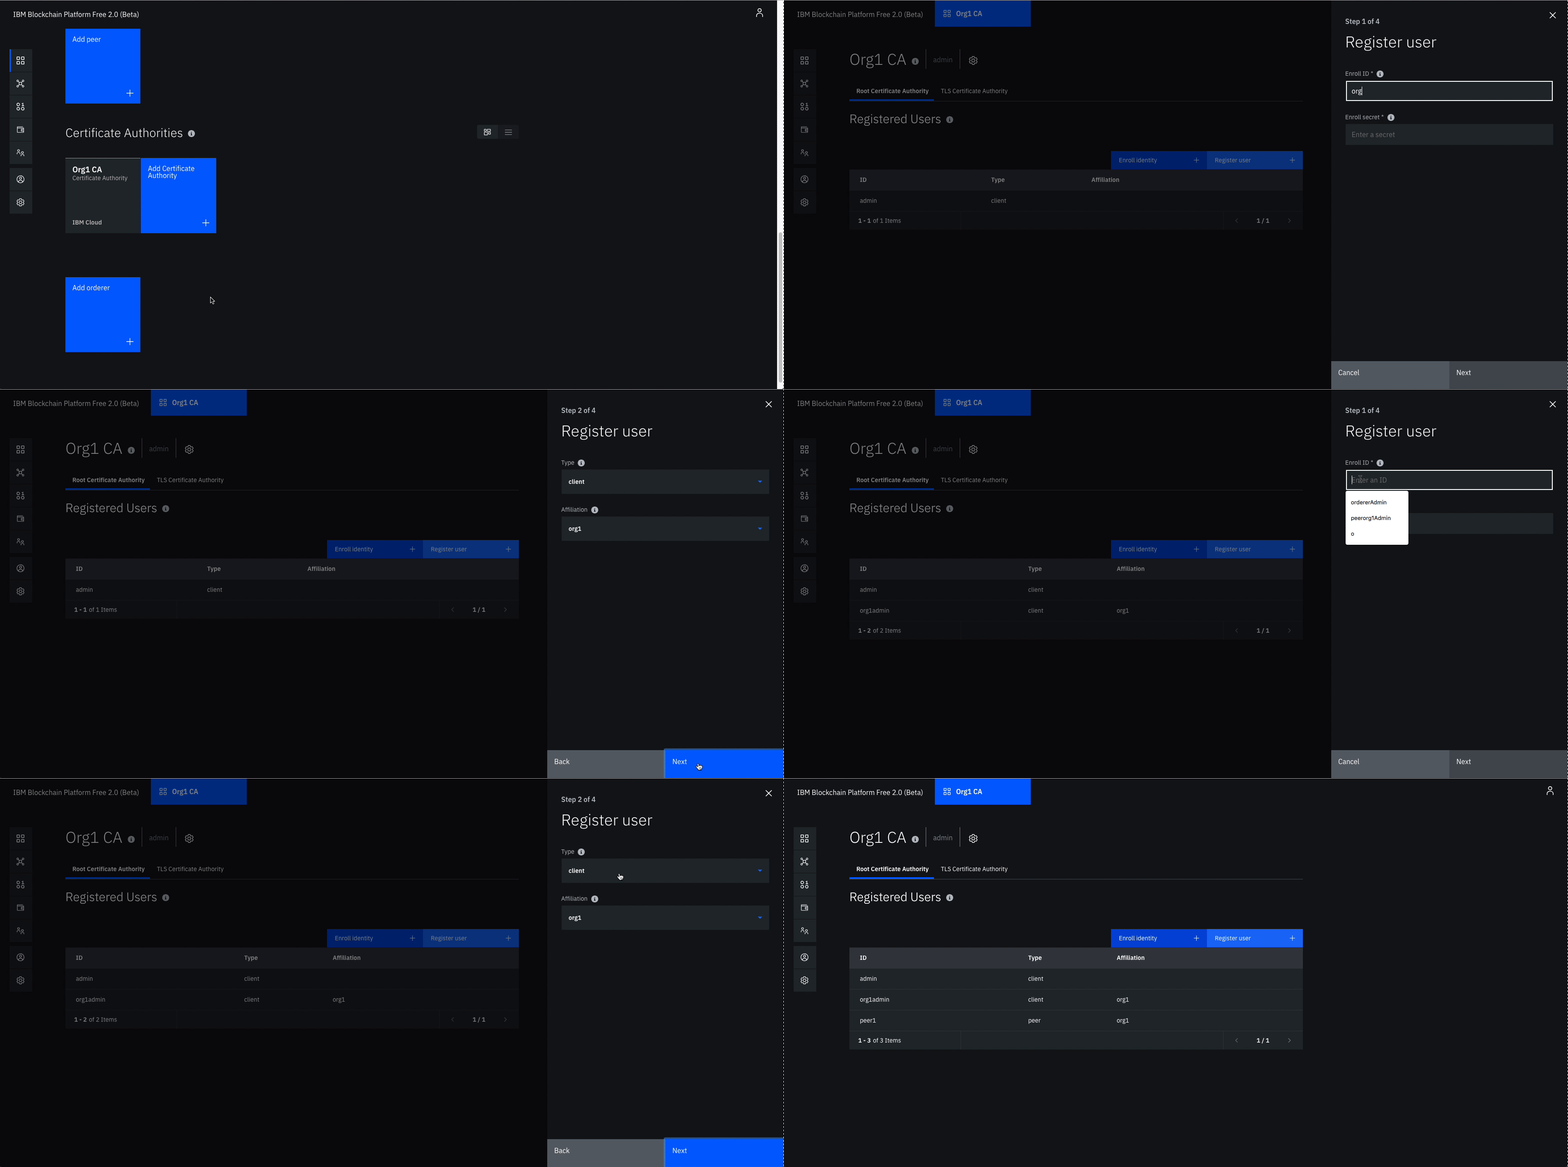
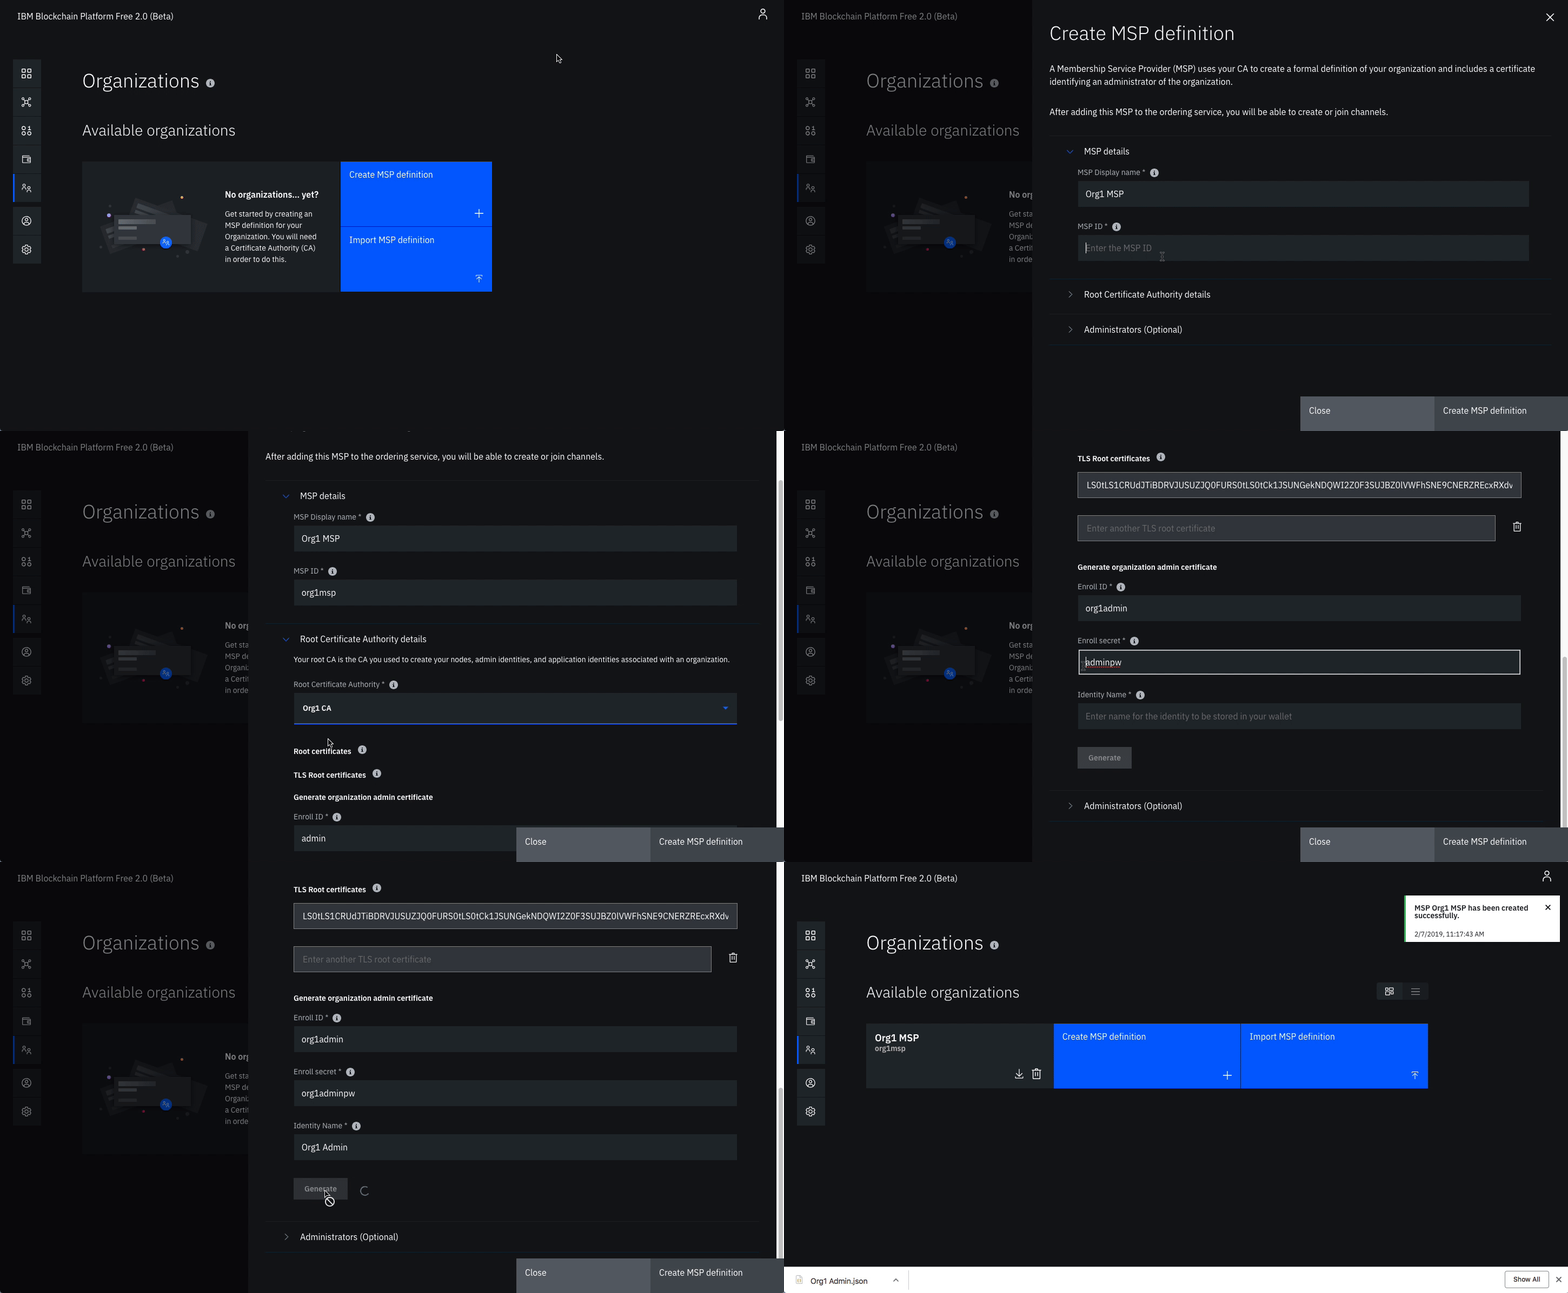
- #### Create the peer organization MSP definition
Org1 MSP and an MSP ID of org1msp.
- Under Root Certificate Authority details, specify the peer CA that we created Org1 CA as the root CA for the organization.
- Give the Enroll ID and Enroll secret for your organization admin, org1admin and org1adminpw. Then, give the Identity name, Org1 Admin.
- Click the Generate button to enroll this identity as the admin of your organization and export the identity to the wallet. Click Export to export the admin certificates to your file system. Finally click Create MSP definition.
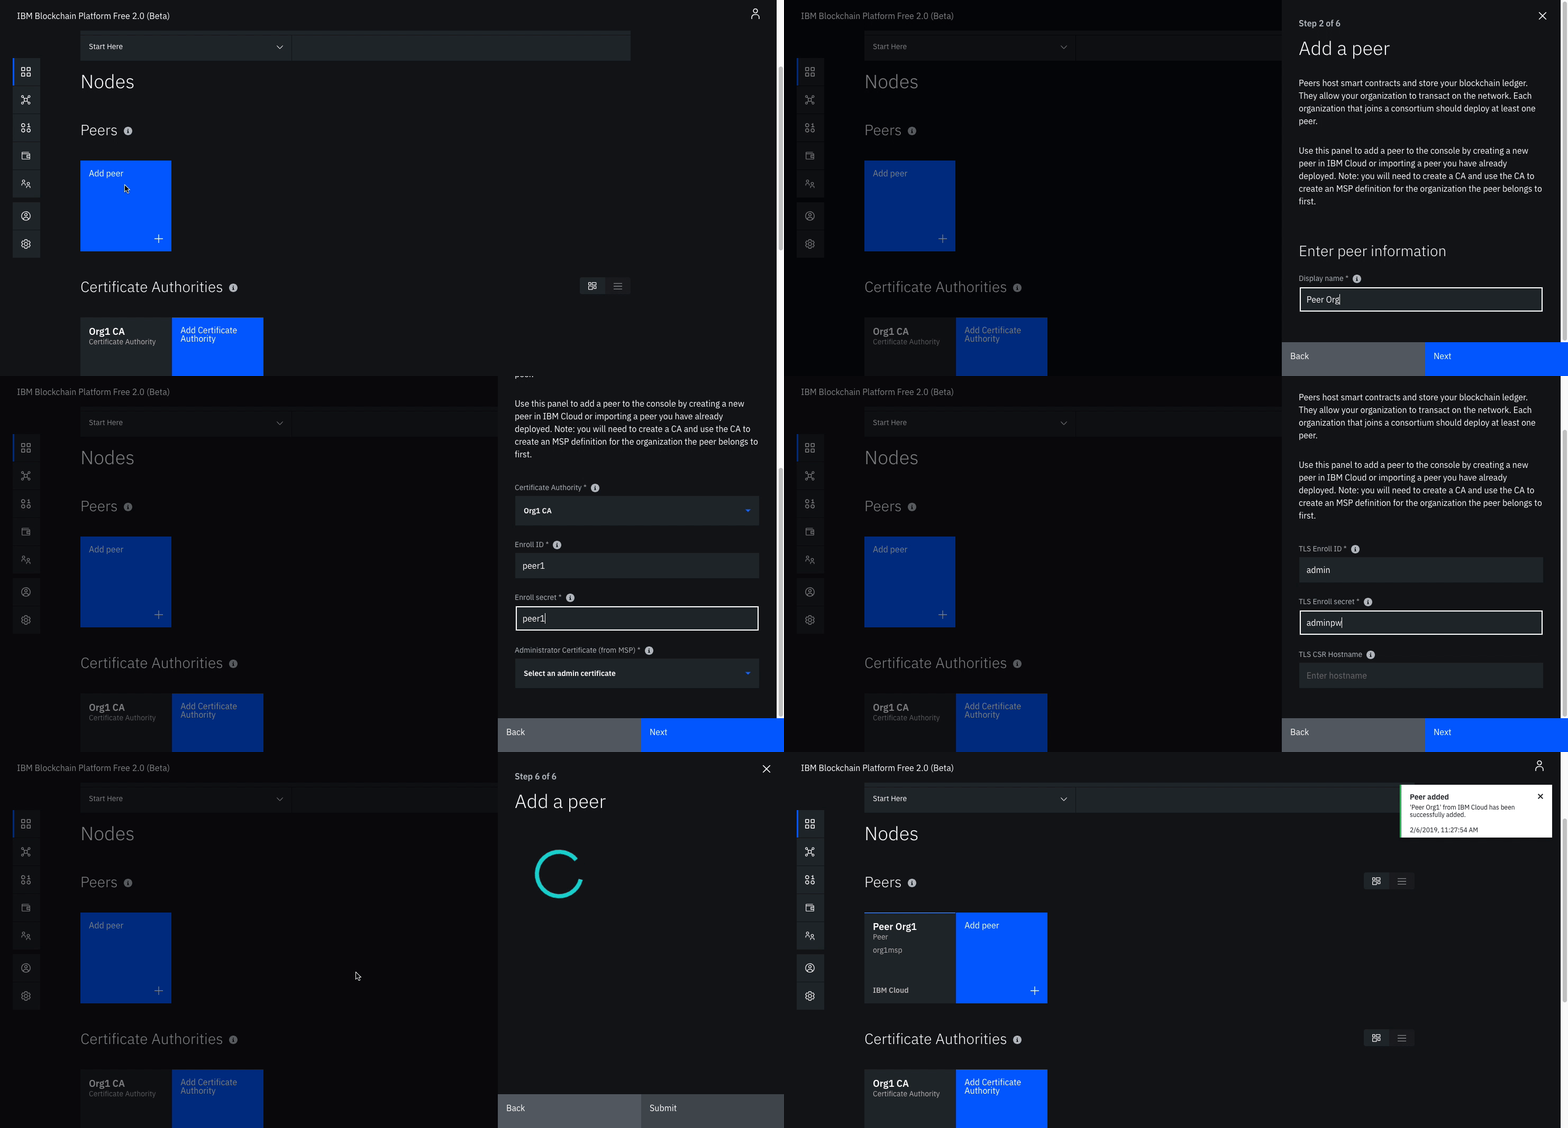
- Create a peer
Peer Org1.
- On the next screen, select Org1 CA as your Certificate Authority. Then, give the Enroll ID and Enroll secret for the peer identity that you created for your peer, peer1, and peer1pw. Then, select the Administrator Certificate (from MSP), Org1 MSP, from the drop-down list and click Next.
- Give the TLS Enroll ID, admin, and TLS Enroll secret, adminpw, the same values are the Enroll ID and Enroll secret that you gave when creating the CA. Leave the TLS CSR hostname blank.
- The last side panel will ask you to Associate an identity and make it the admin of your peer. Select your peer admin identity Org1 Admin.
- Review the summary and click Submit.
Create the node that orders transactions
- #### Create your orderer organization CA
Orderer CA.
- Specify an Admin ID of admin and Admin Secret of adminpw.

- #### Associate the identity
admin and an Enroll secret of adminpw. Use the default value of Orderer CA Admin for the Identity display name.
- Click Associate identity.
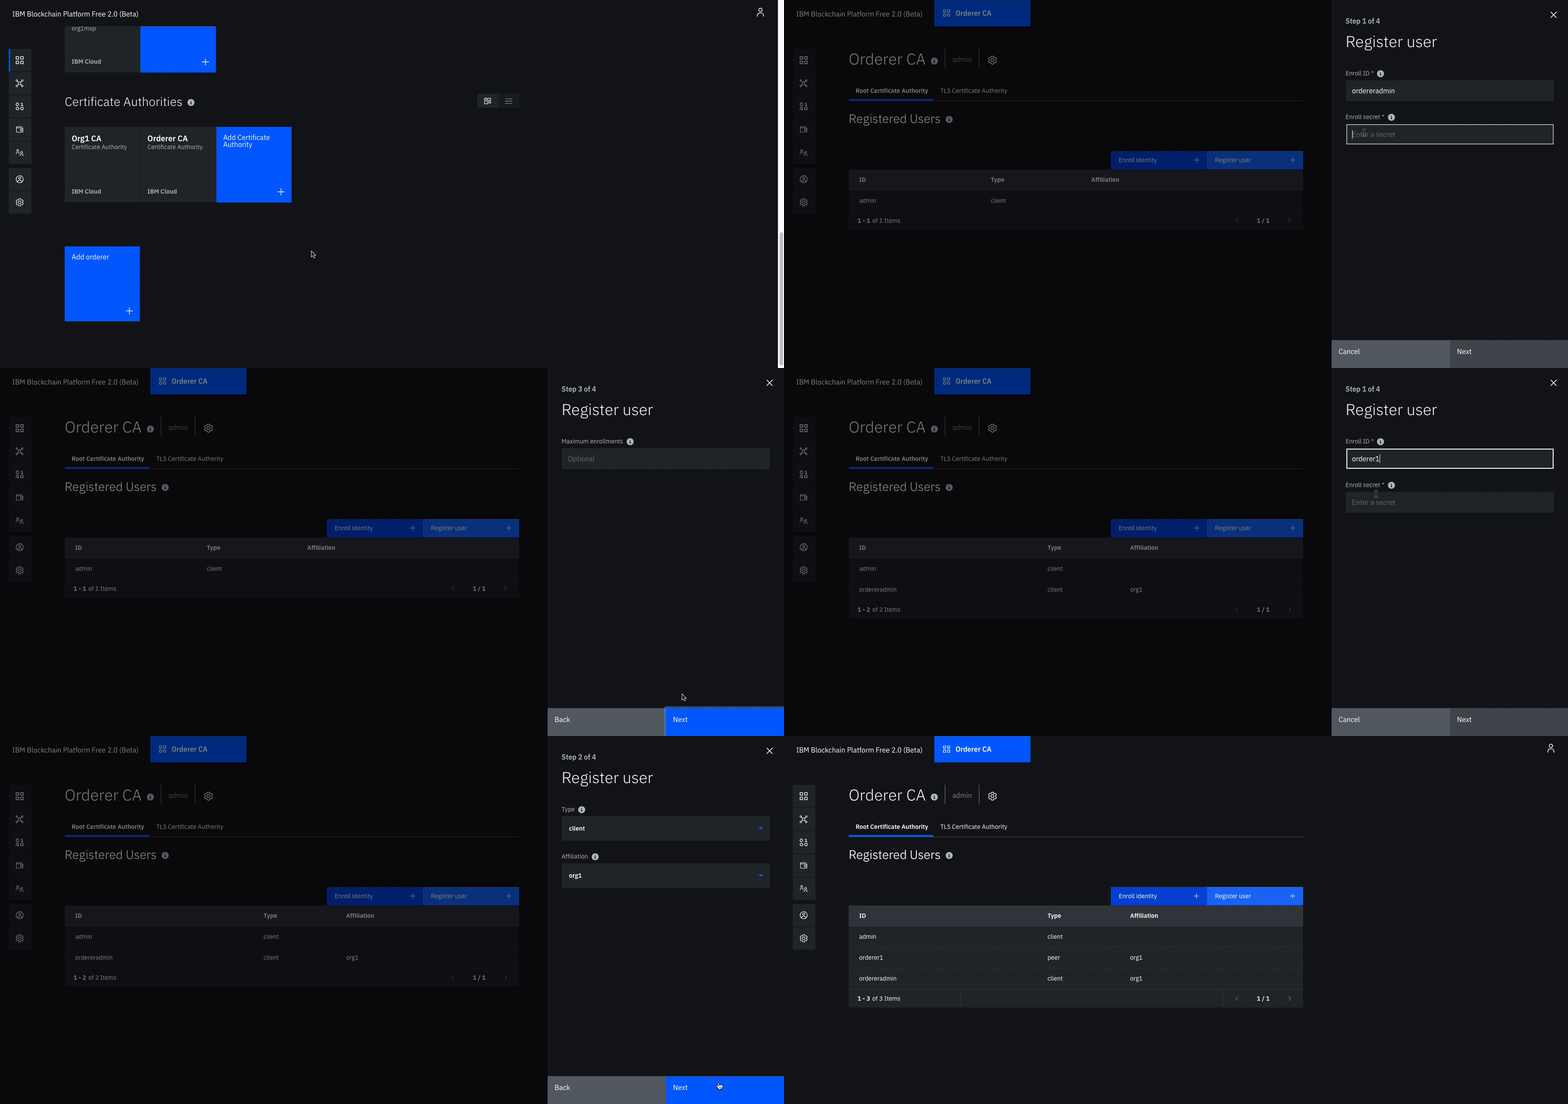
- #### Use your CA to register orderer and orderer admin identities
ordereradmin, and Enroll Secret of ordereradminpw. Click Next. Set the Type for this identity as client and select org1 from the affiliated organizations drop-down list. We will leave the Maximum enrollments and Add Attributes fields blank.
- We will repeat the process to create an identity of the orderer. Click on the Register User button. Give an Enroll ID of orderer1, and Enroll Secret of orderer1pw. Click Next. Set the Type for this identity as peer and select org1 from the affiliated organizations drop-down list. We will leave the Maximum enrollments and Add Attributes fields blank.
- #### Create the orderer organization MSP definition
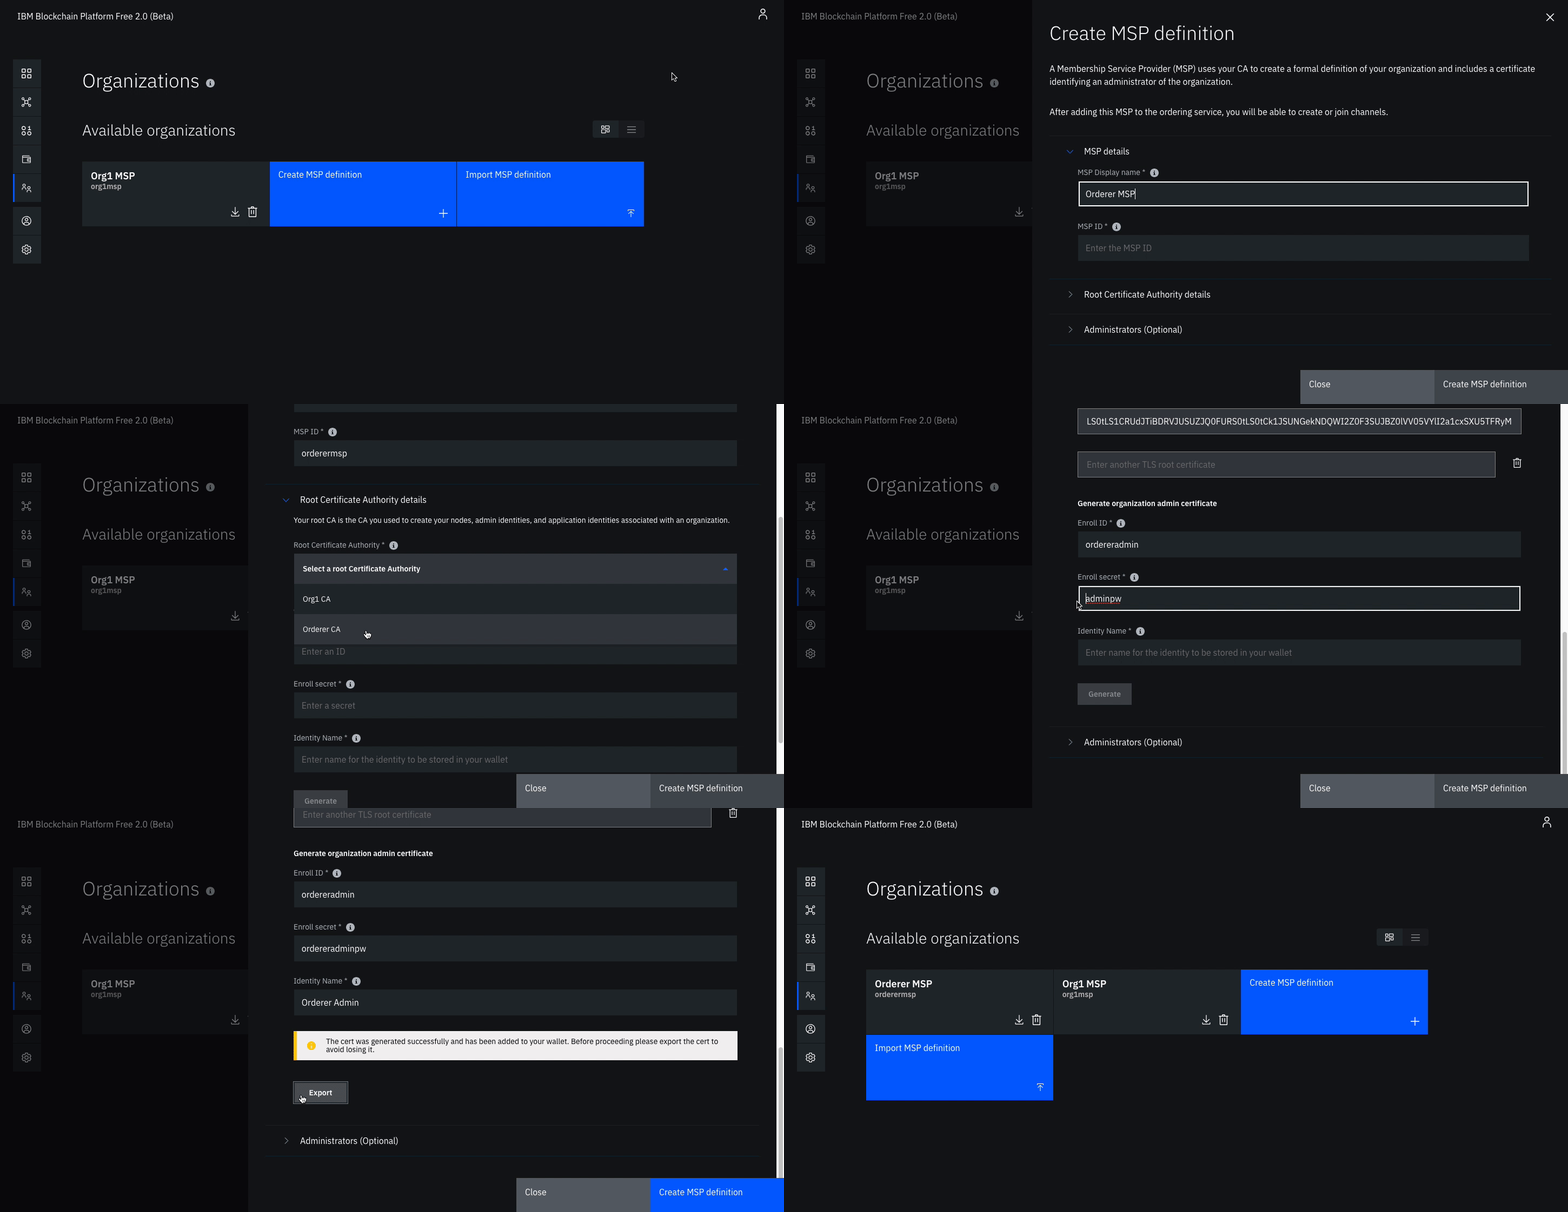
Orderer MSP and an MSP ID of orderermsp.
- Under Root Certificate Authority details, specify the peer CA that we created Orderer CA as the root CA for the organization.
- Give the Enroll ID and Enroll secret for your organization admin, ordereradmin and ordereradminpw. Then, give the Identity name, Orderer Admin.
- Click the Generate button to enroll this identity as the admin of your organization and export the identity to the wallet. Click Export to export the admin certificates to your file system. Finally click Create MSP definition.
- #### Create an orderer
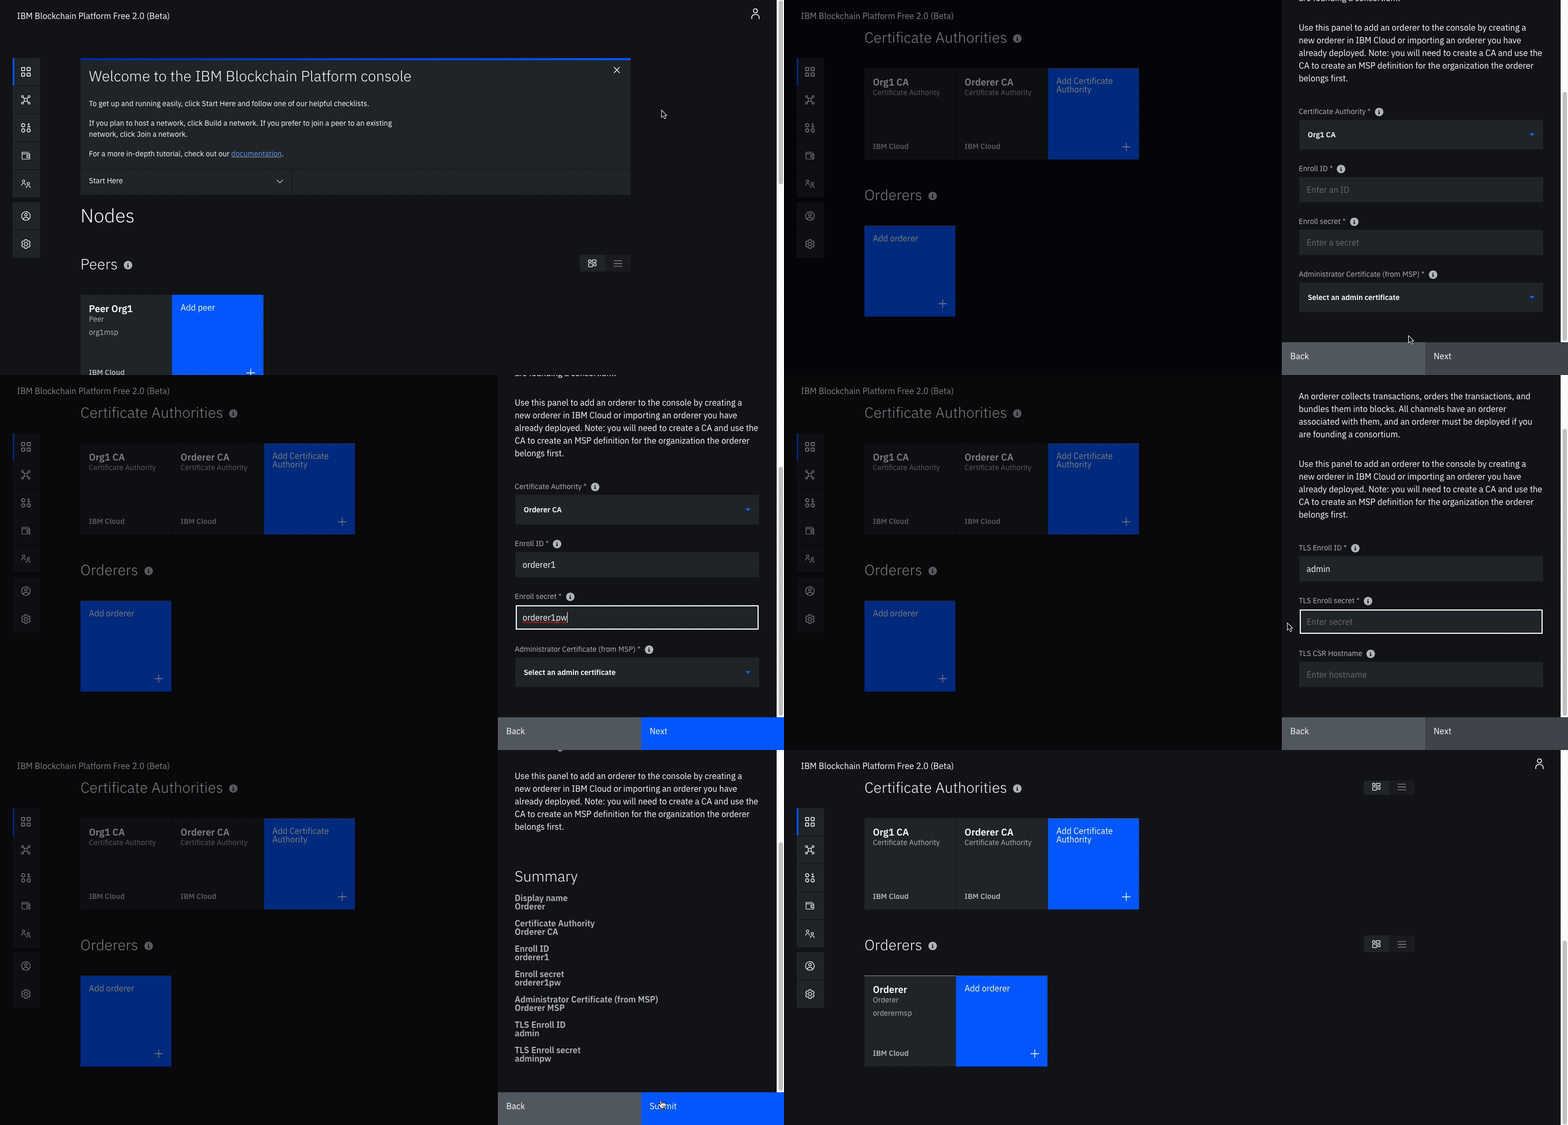
Orderer.
- On the next screen, select Orderer CA as your Certificate Authority. Then, give the Enroll ID and Enroll secret for the peer identity that you created for your orderer, orderer1, and orderer1pw. Then, select the Administrator Certificate (from MSP), Orderer MSP, from the drop-down list and click Next.
- Give the TLS Enroll ID, admin, and TLS Enroll secret, adminpw, the same values are the Enroll ID and Enroll secret that you gave when creating the CA. Leave the TLS CSR hostname blank.
- The last side panel will ask to Associate an identity and make it the admin of your peer. Select your peer admin identity Orderer Admin.
- Review the summary and click Submit.
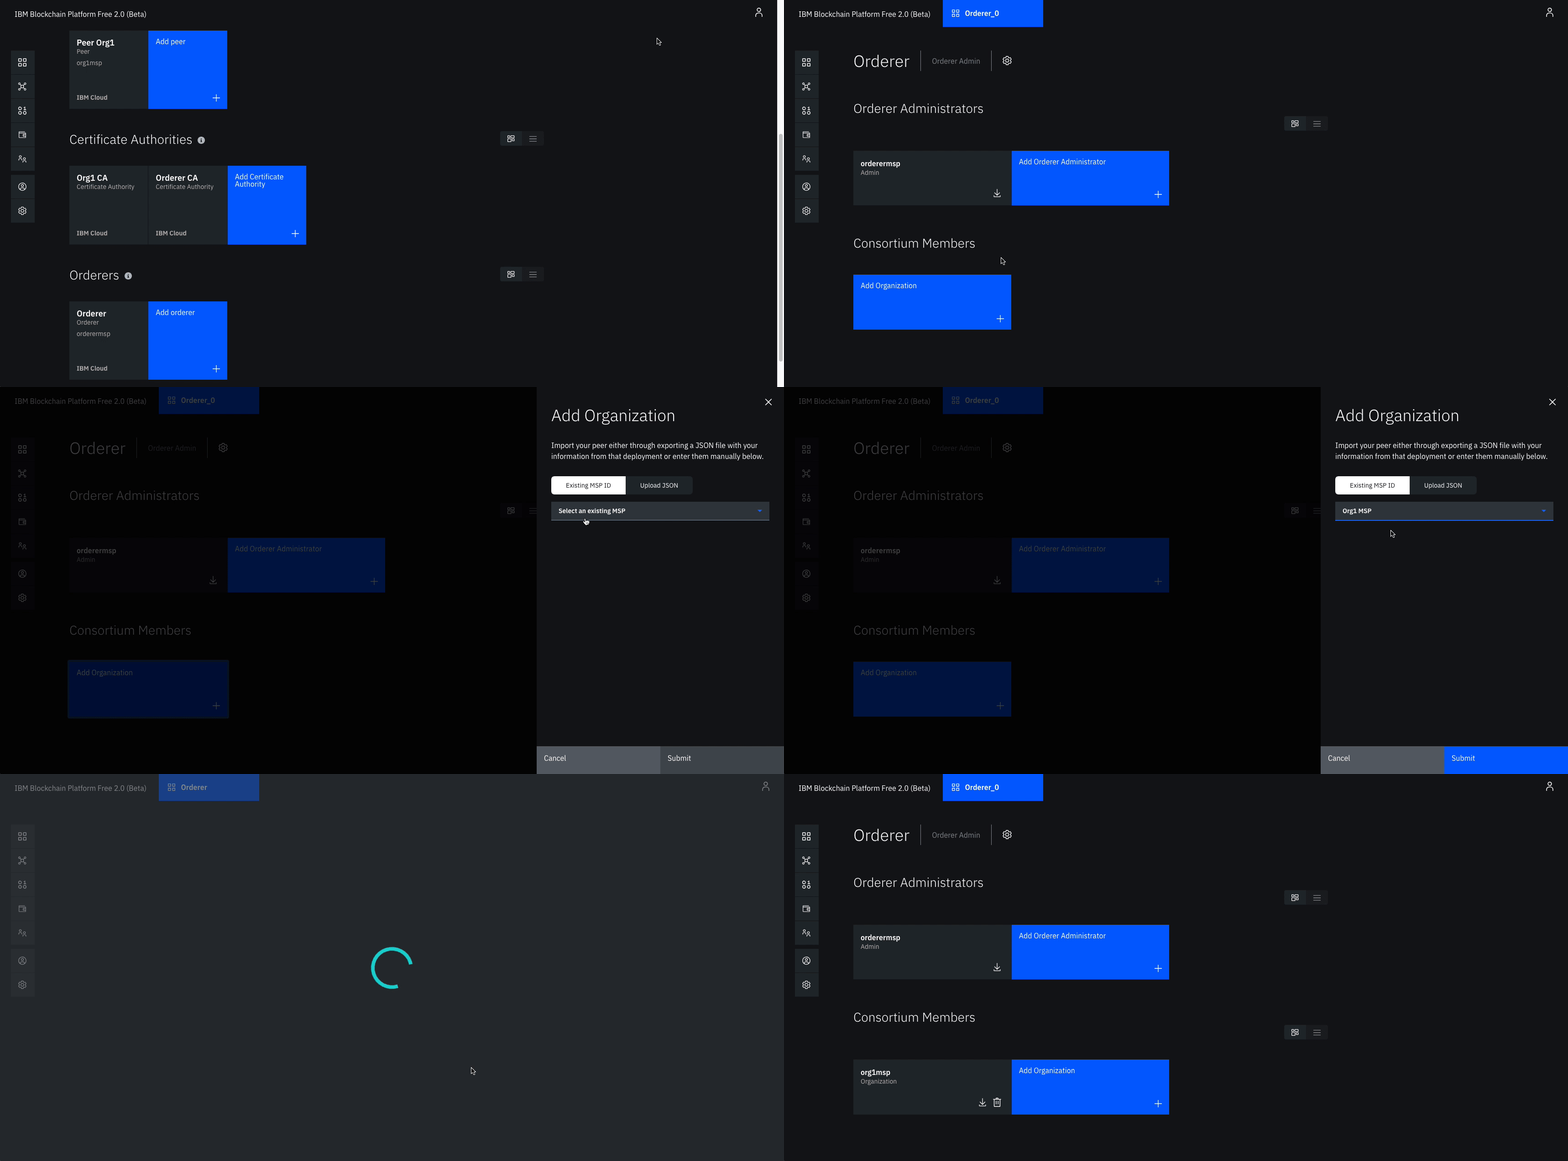
- #### Add organization as Consortium Member on the orderer to transact
Org1 MSP, as this is the MSP that represents the peer's organization org1.
- Click Submit.
Create and join channel
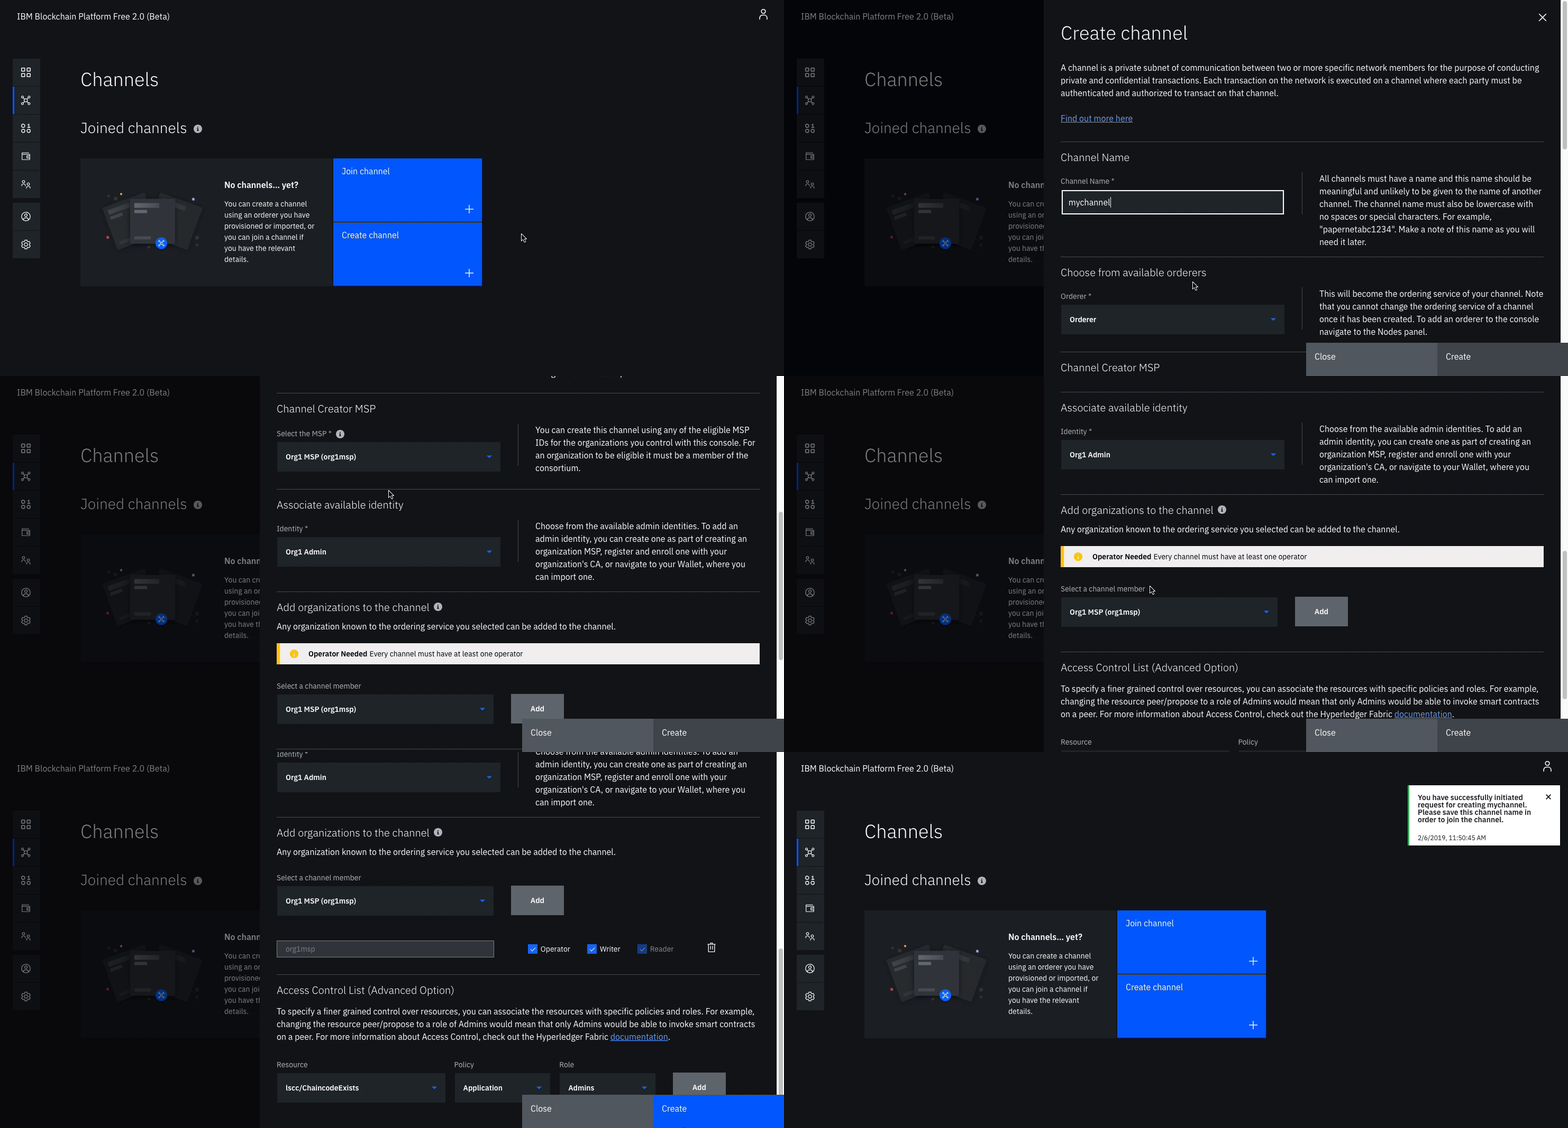
- #### Create the channel
mychannel.
- Select the orderer you created, Orderer from the orderers drop-down list.
- Select the MSP identifying the organization of the channel creator from the drop-down list. This should be Org1 MSP (org1msp).
- Associate available identity as Org1 Admin.
- Click Add next to your organization. Make your organization an Operator.
- Click Create.
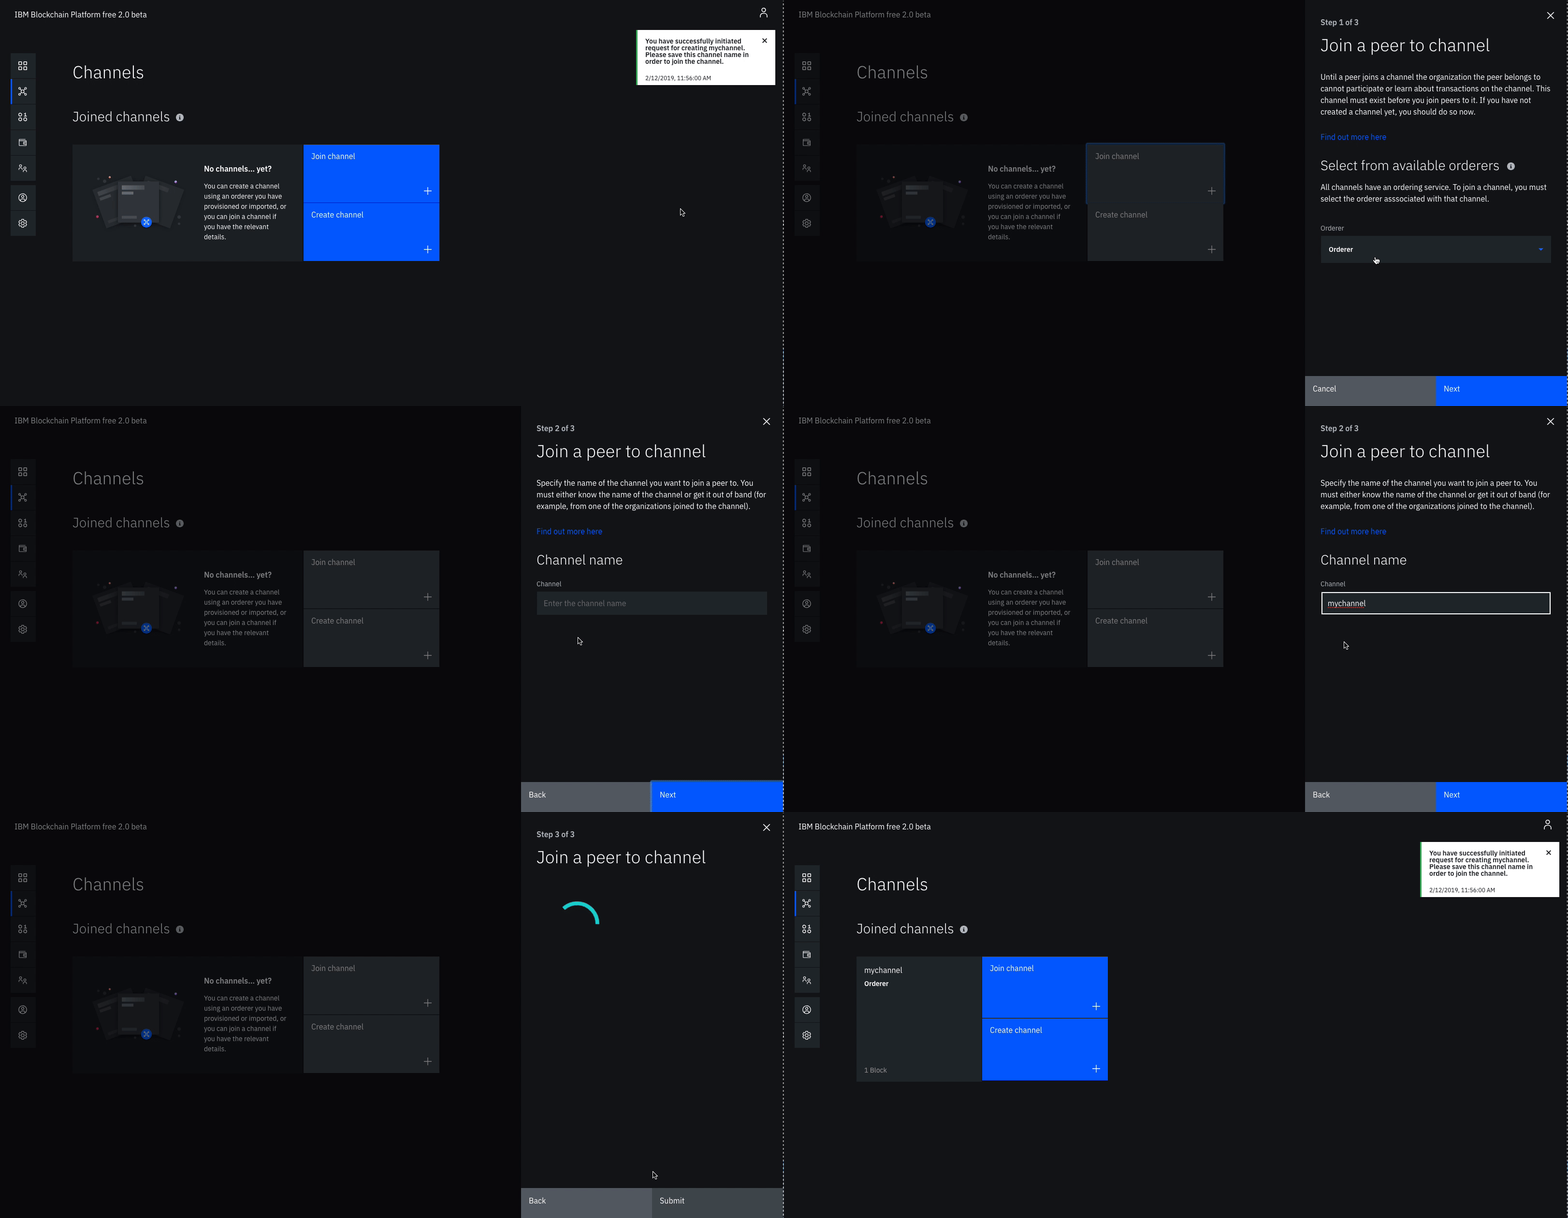
- #### Join your peer to the channel
Orderer and click Next.
- Enter the name of the channel you just created. mychannel and click Next.
- Select which peers you want to join the channel, click Peer Org1 .
- Click Submit.
Step 6. Deploy Blockchainbean2 Smart Contract on the network
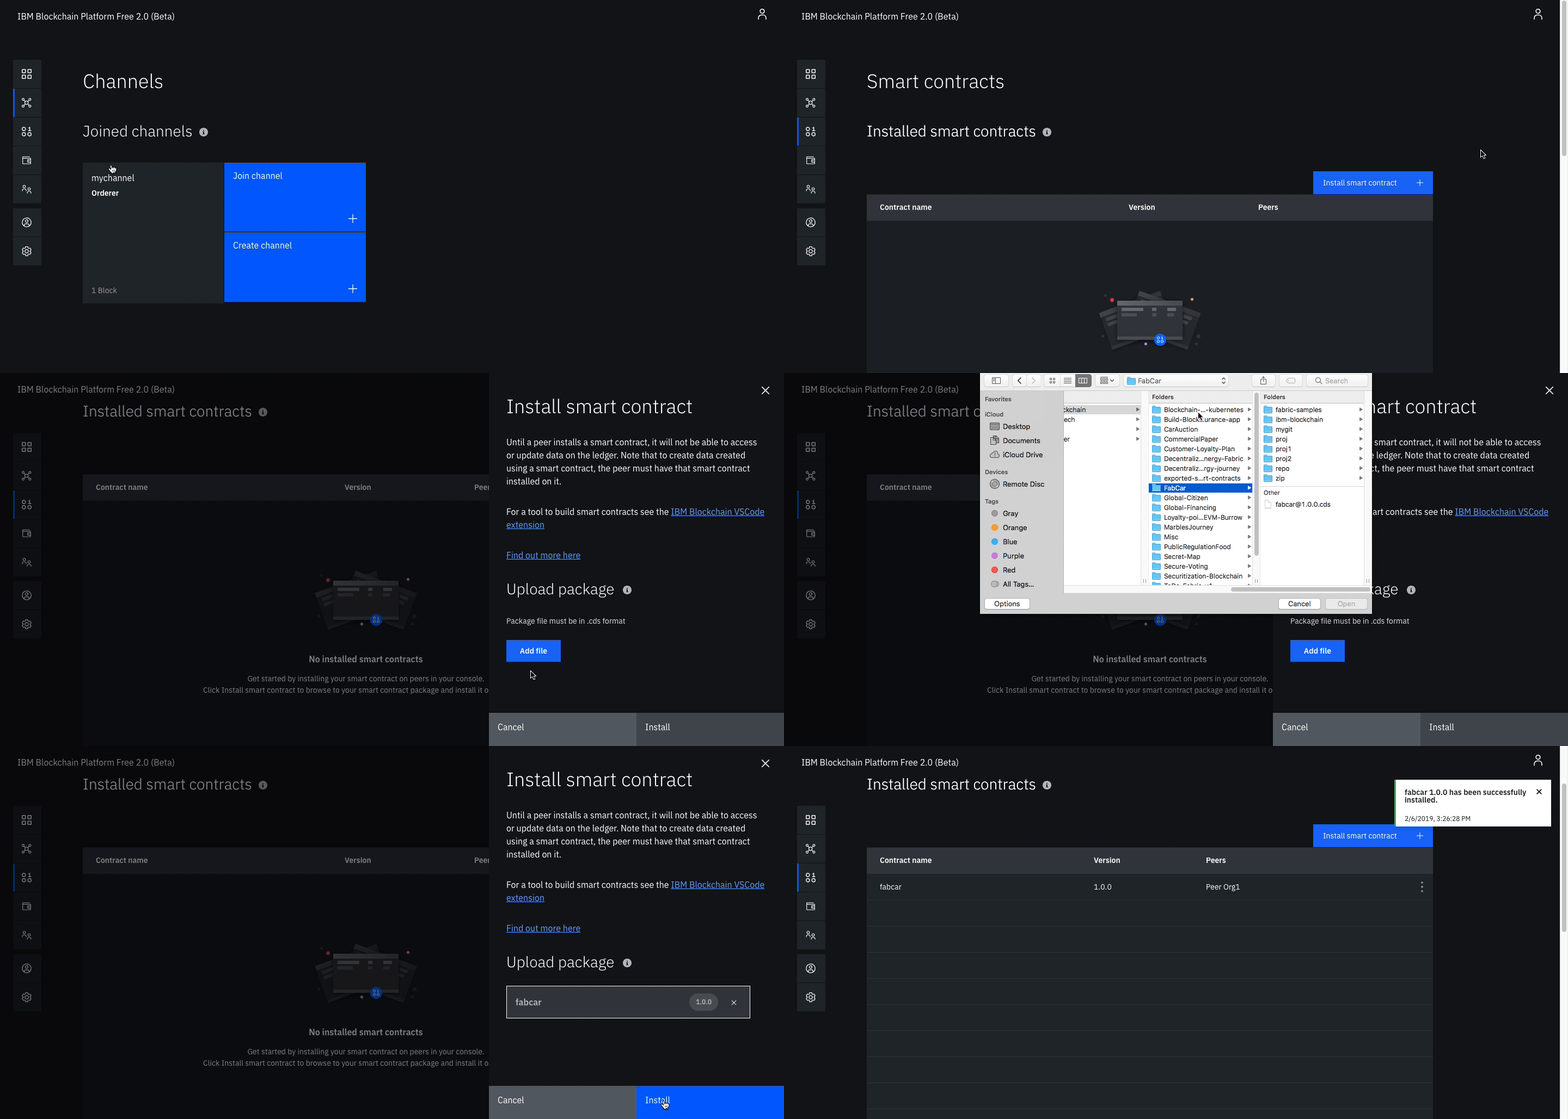
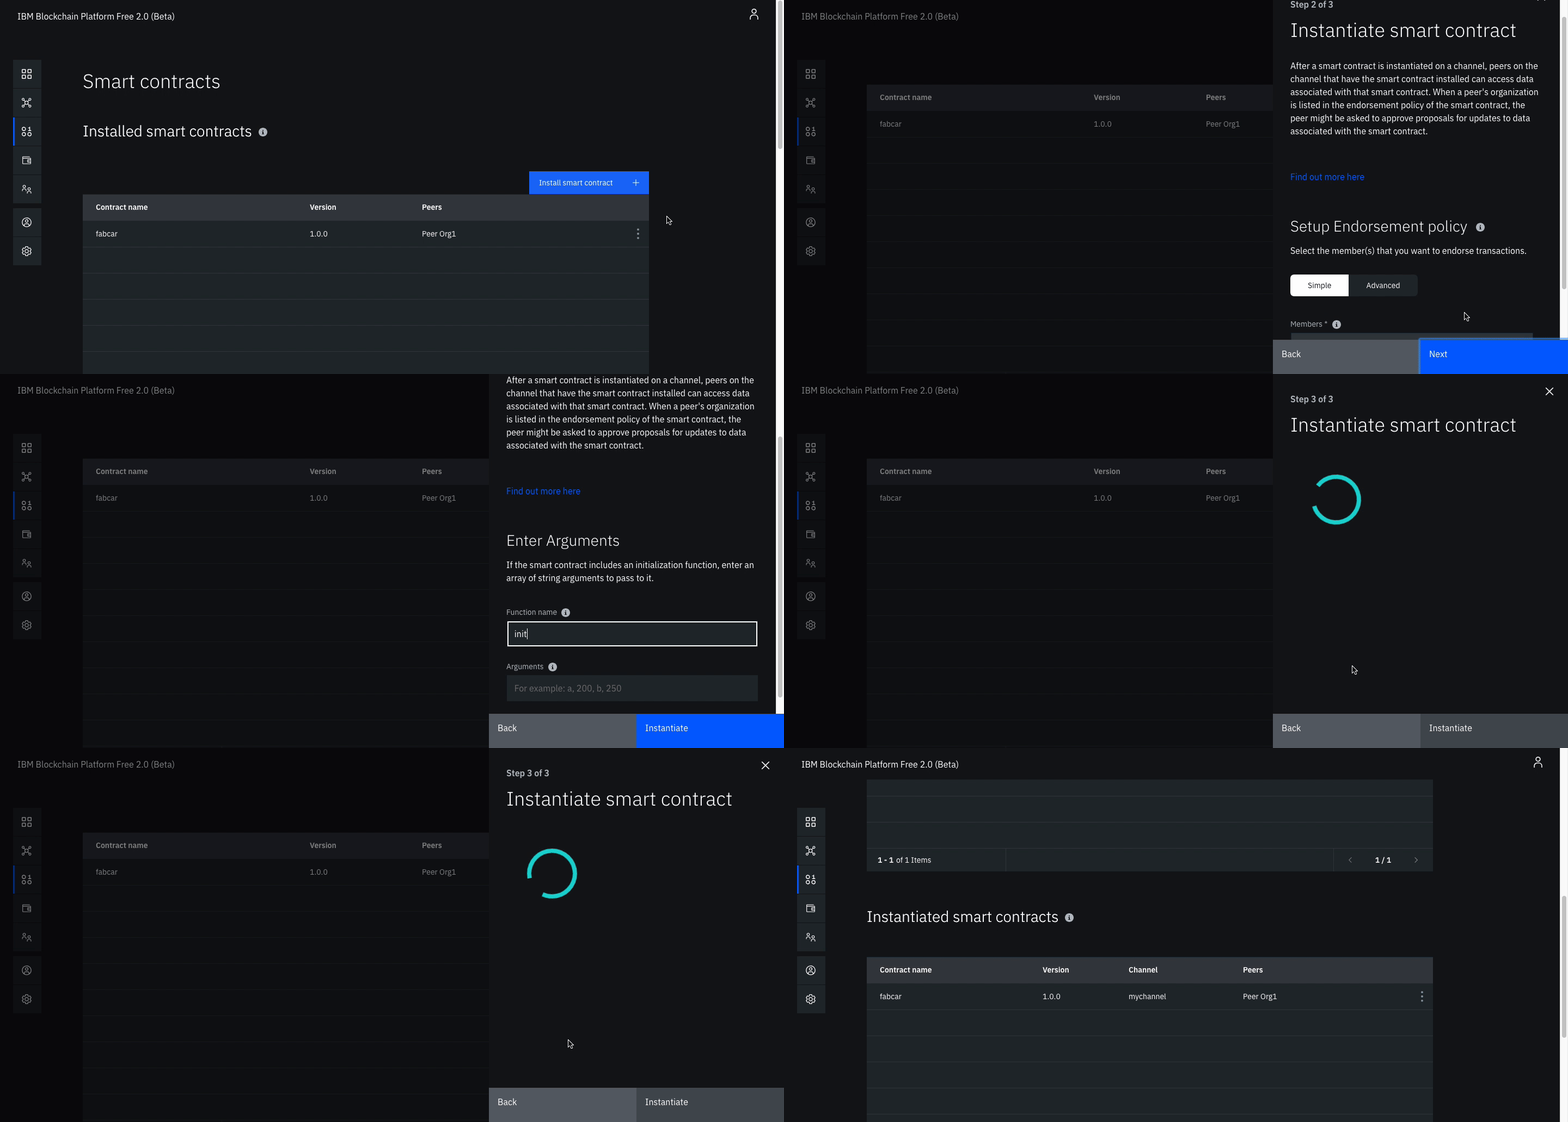
- #### Install a smart contract
- #### Instantiate smart contract
mychannel to instantiate the smart contract on. Click Next.
- Select the organization members to be included in the policy, org1msp. Click Next.
- Give Function name of init and leave Arguments blank.
- Click Instantiate.
Step 7. Connect application to the network
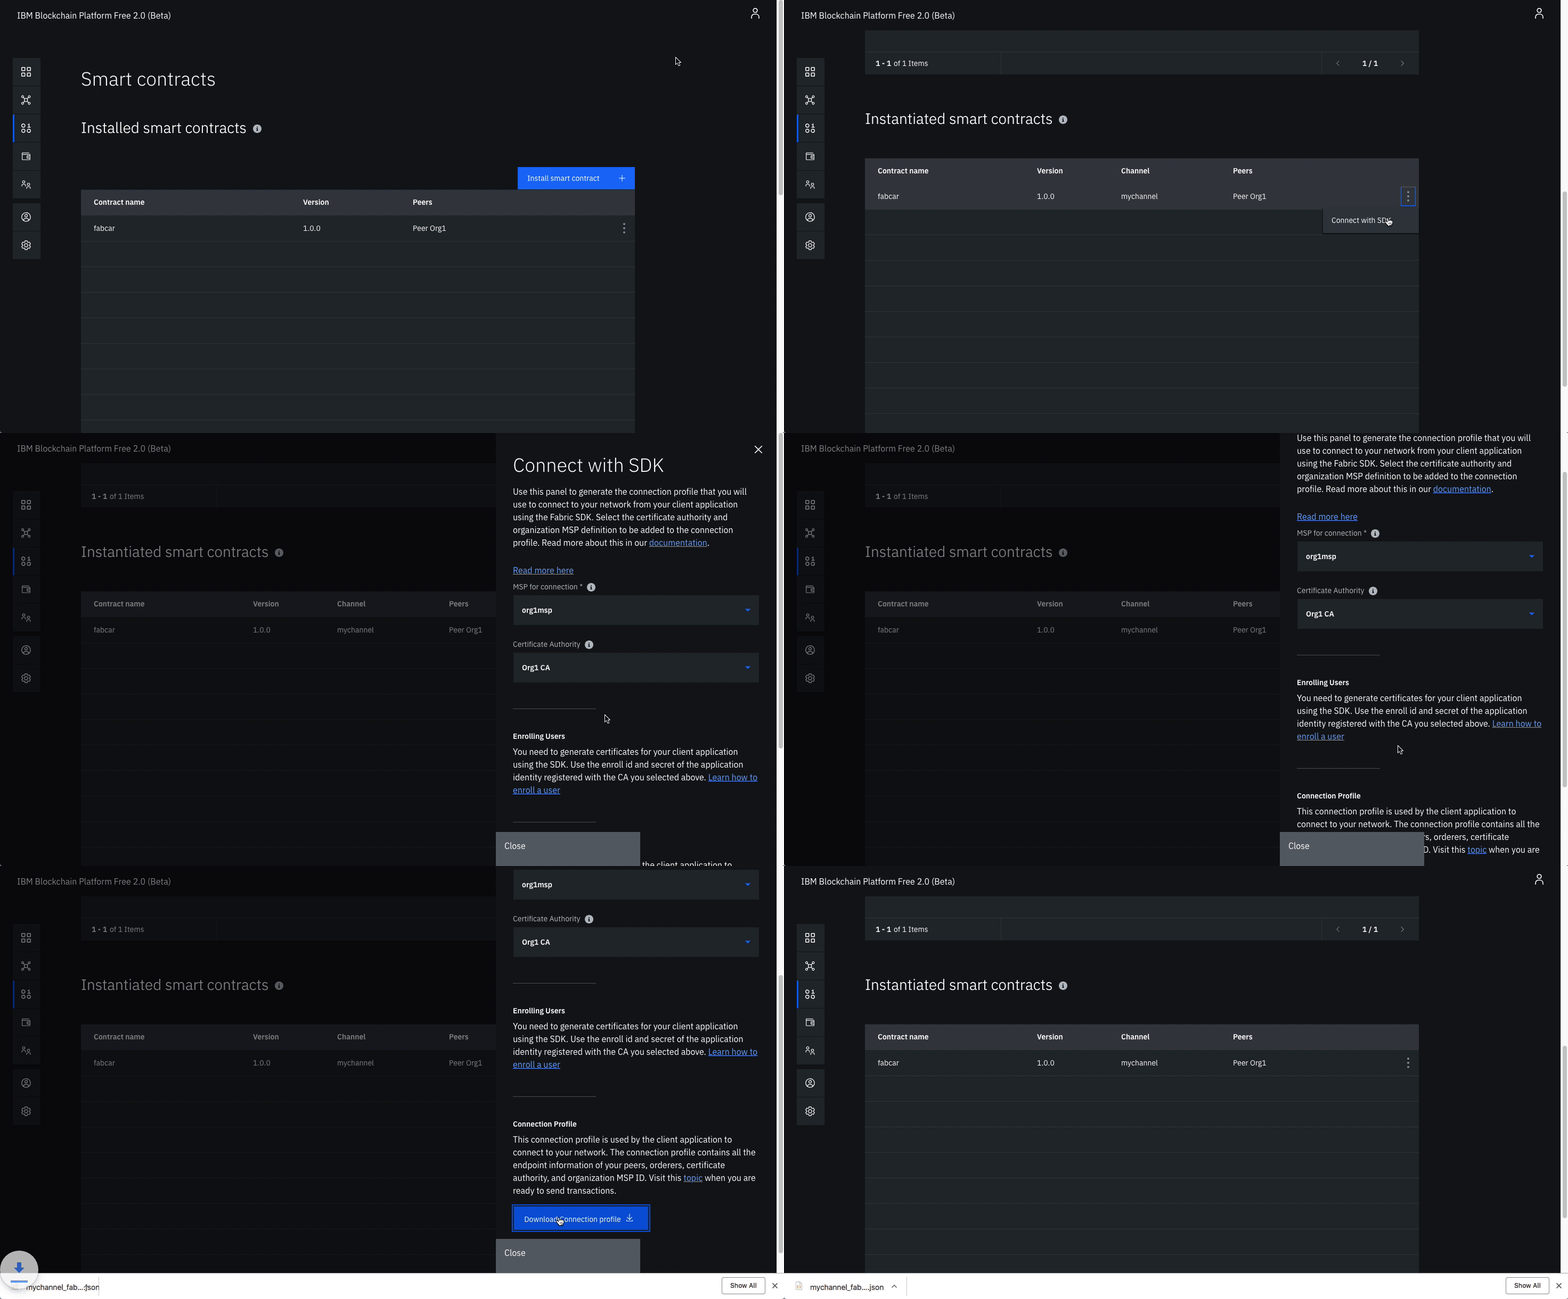
- #### Connect with sdk through connection profile
Connect with SDK from the overflow menu on the right side of the row.
- Choose from the dropdown for MSP for connection, org1msp.
- Choose from Certificate Authority dropdown, Org1 CA.
- Download the connection profile by scrolling down and clicking Download Connection Profile. This will download the connection json which we will use soon to establish connection.
- You can click Close once the download completes.
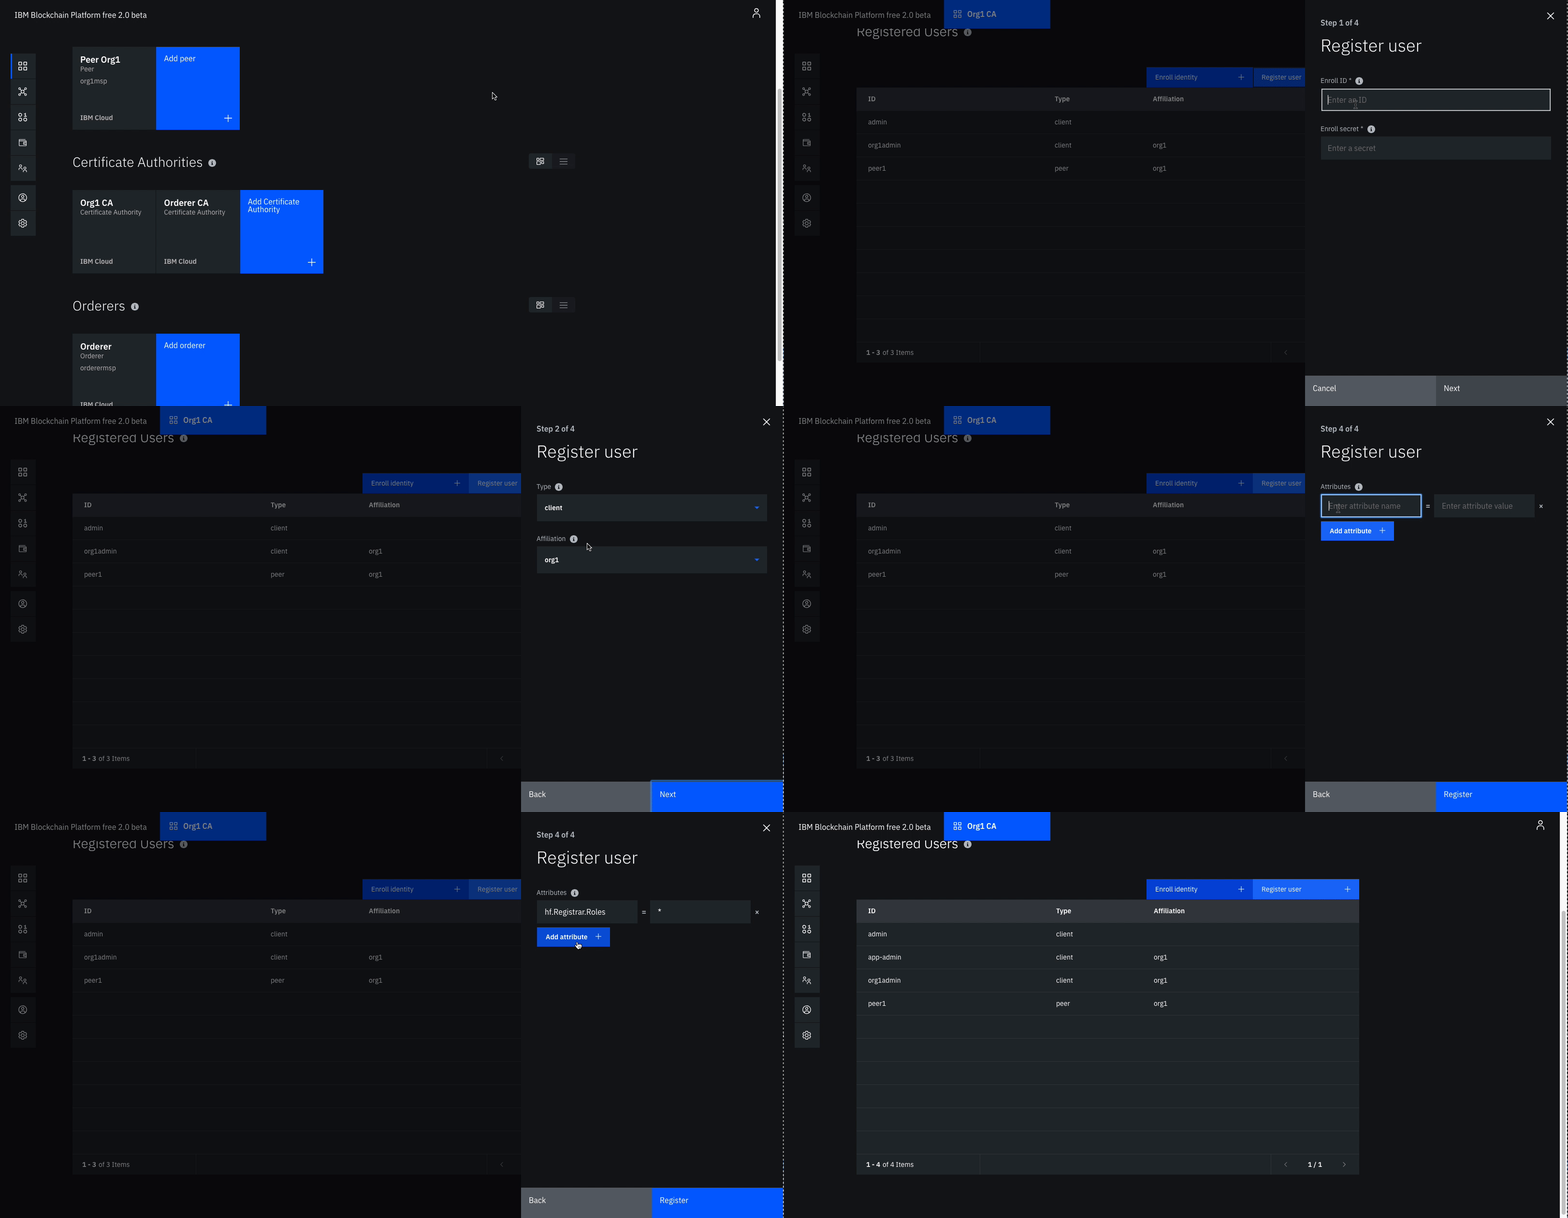
- #### Create an application admin
app-admin and app-adminpw.
- Choose client as Type and any organization for affiliation. We can pick org1 to be consistent.
- You can leave the Maximum enrollments blank.
- Under Attributes, click on Add attribute. Give attribute as hf.Registrar.Roles = *. This will allow this identity to act as registrar and issues identities for our app. Click Add-attribute.
- Click Register.
- #### Update application connection
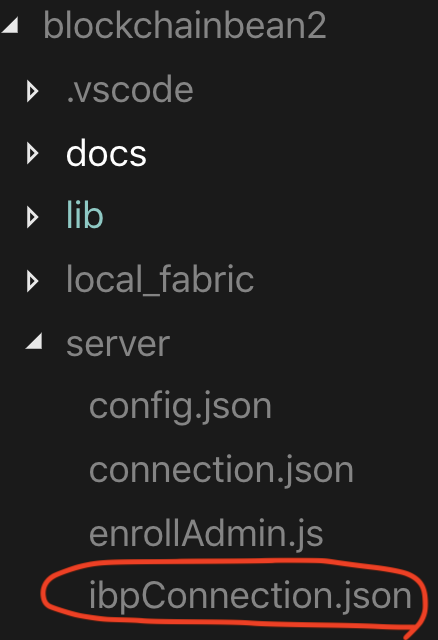
- The ibpConnection.json file should look something like this:
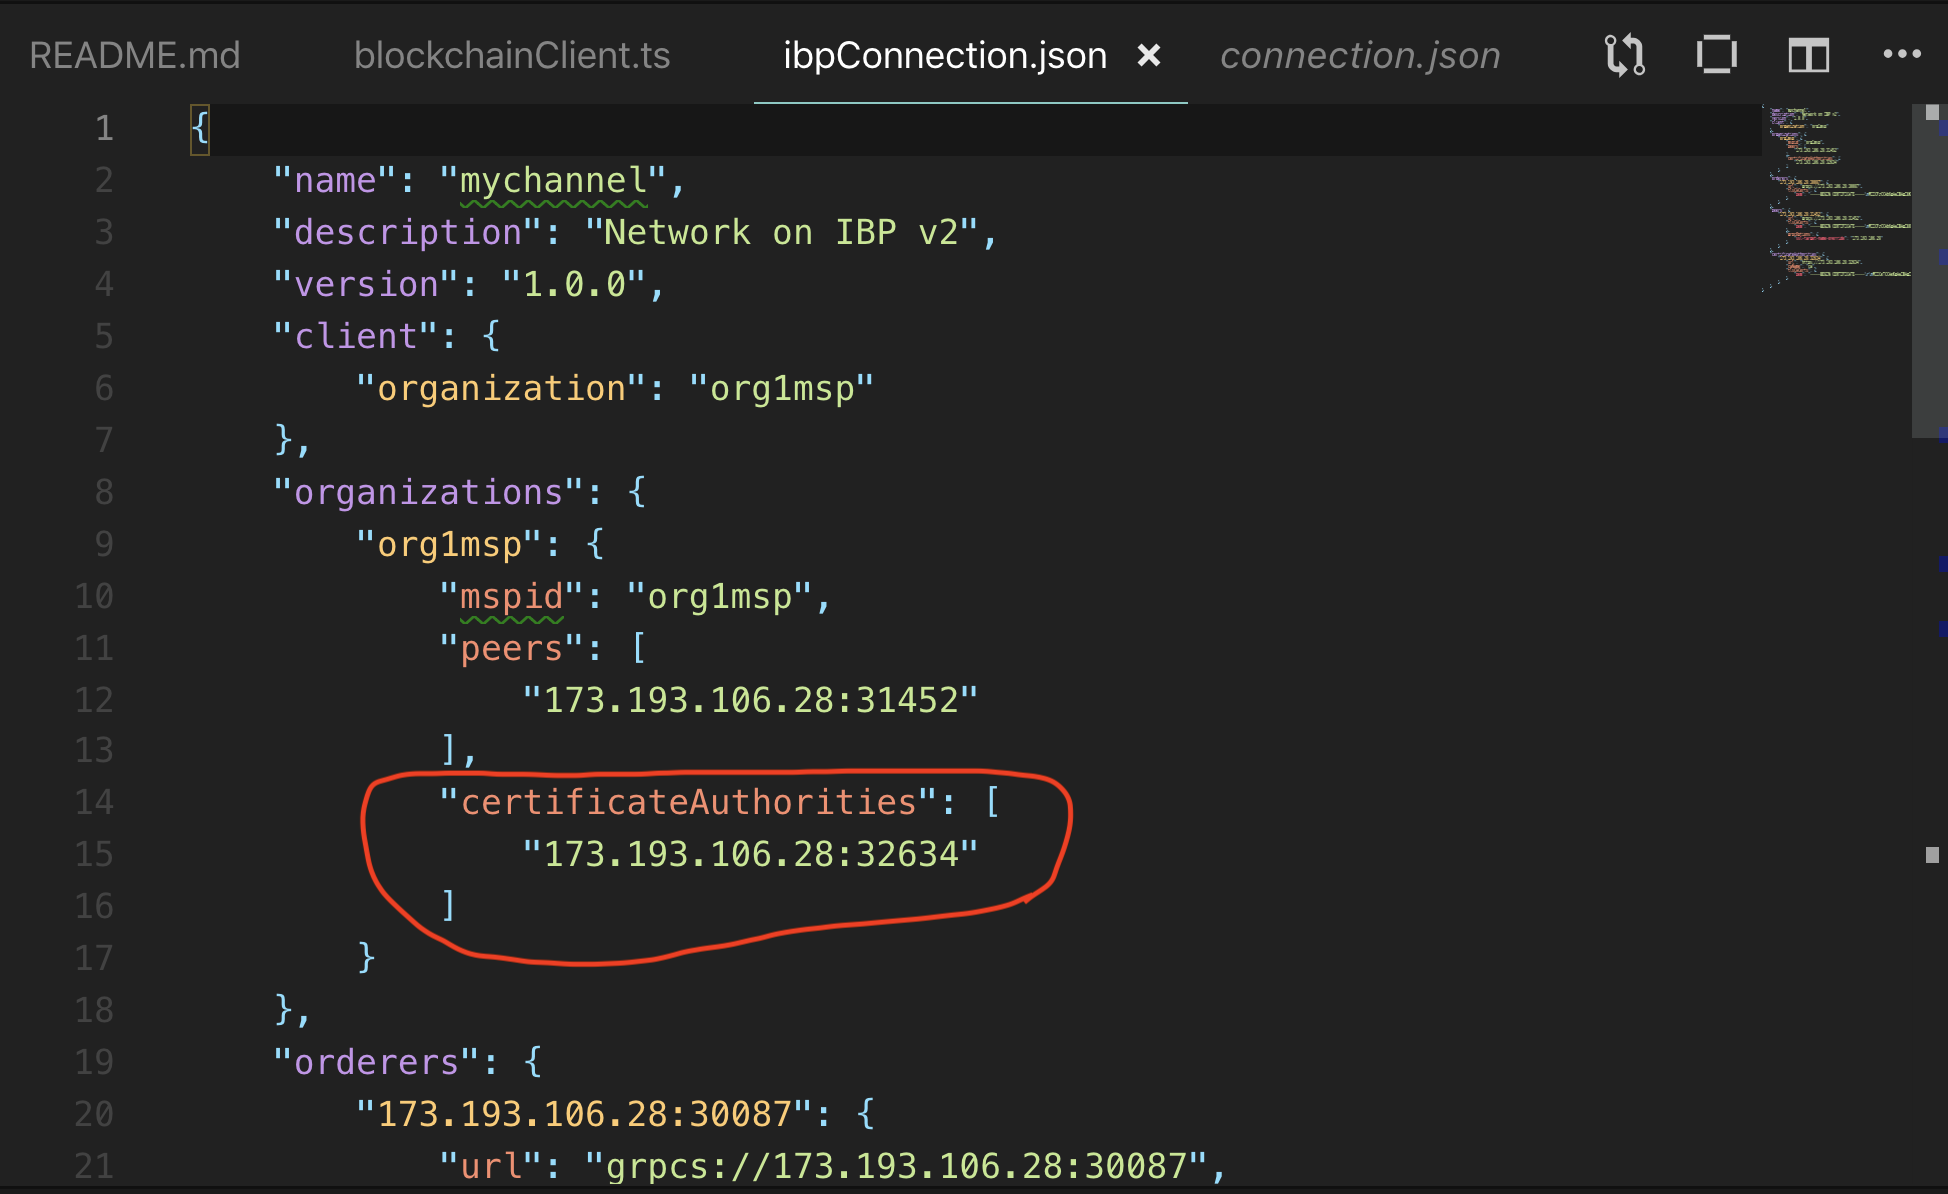
- Update the config.json file with: - The connection json file name you downloaded. - The enroll id and enroll secret for your app admin, which we earlier provided as app-admin and app-adminpw. - The orgMSP ID, which we provided as org1msp. - The caName, which can be found in your connection json file under "organization" -> "org1msp" -> certificateAuthorities". This would be like an IP address and a port. This is circled in red above. - The username you would like to register. - Update gateway discovery to { enabled: true, asLocalhost: false } to connect to IBP.
the current default setup is to connect to a local fabric instance from VS Code
- Once you are done, the final version of the config.json should look something like this (note that I took the caName from the above pic):
{
    "connection_file": "ibpConnection.json",
    "appAdmin": "app-admin",
    "appAdminSecret": "app-adminpw",
    "orgMSPID": "org1msp",
    "caName": "173.193.106.28:32634",
    "userName": "user1",
    "gatewayDiscovery": { "enabled": true, "asLocalhost": false }
}
Step 8. Run the application
- #### Enroll admin
server directory, and install the node dependencies.
cd server
npm installnpm rebuildenrollAdmin.js script
node enrollAdmin.js- You should see the following in the terminal:
msg: Successfully enrolled admin user app-admin and imported it into the wallet- #### Register User
registerUser.js script.
node registerUser.js- You should see the following in the terminal:
Successfully registered and enrolled admin user user1 and imported it into the wallet: fabric-ca request register failed with errors [[{"code":0,"message":"Registration of 'user1' failed: Identity 'user1' is already registered"}]]go ahead and change the user in config.json file, you can use any username you want. Once you save the config.json with a new user, for example:
"userName": "user4",- #### Start the web client
cd web-app- Start the client:
npm startYou can find the app running at http://localhost:8080/explorer If all goes well, you should see something like the picture below:
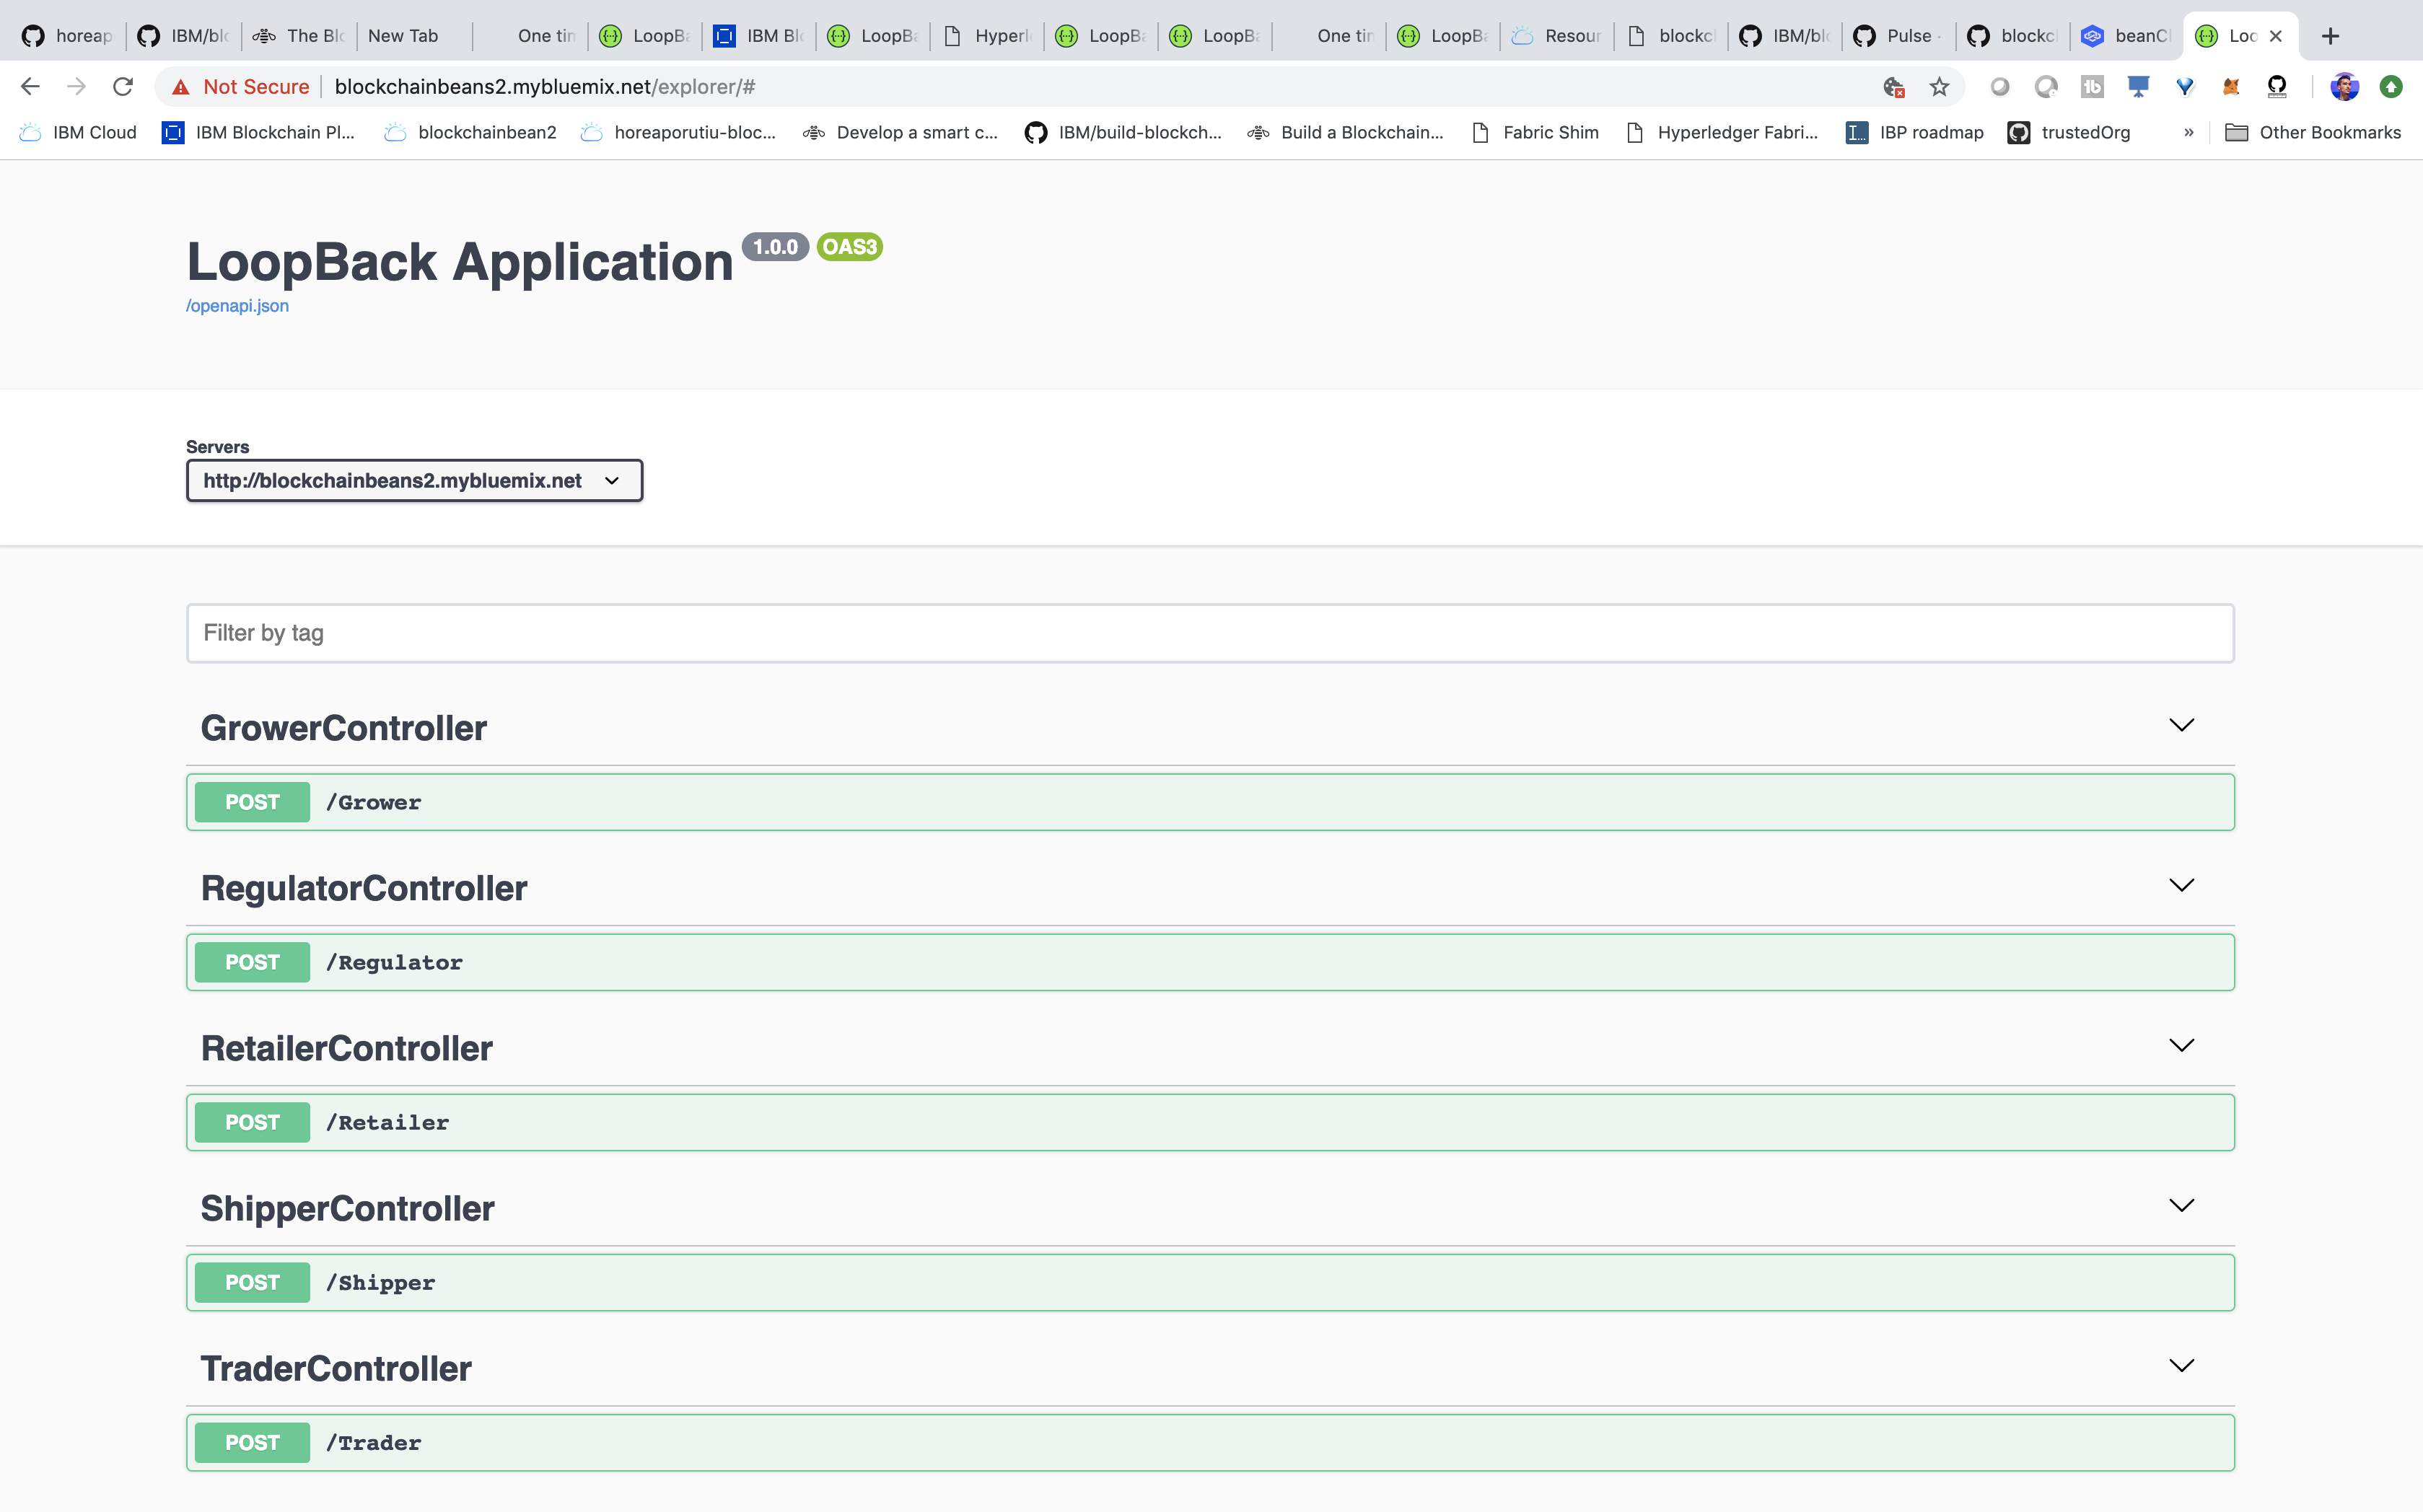 To get started submitting our first transaction on the network, we can update the ledger with some of our suppliers info, such as their address, their uniqueId, and their organization. To do this, first click on
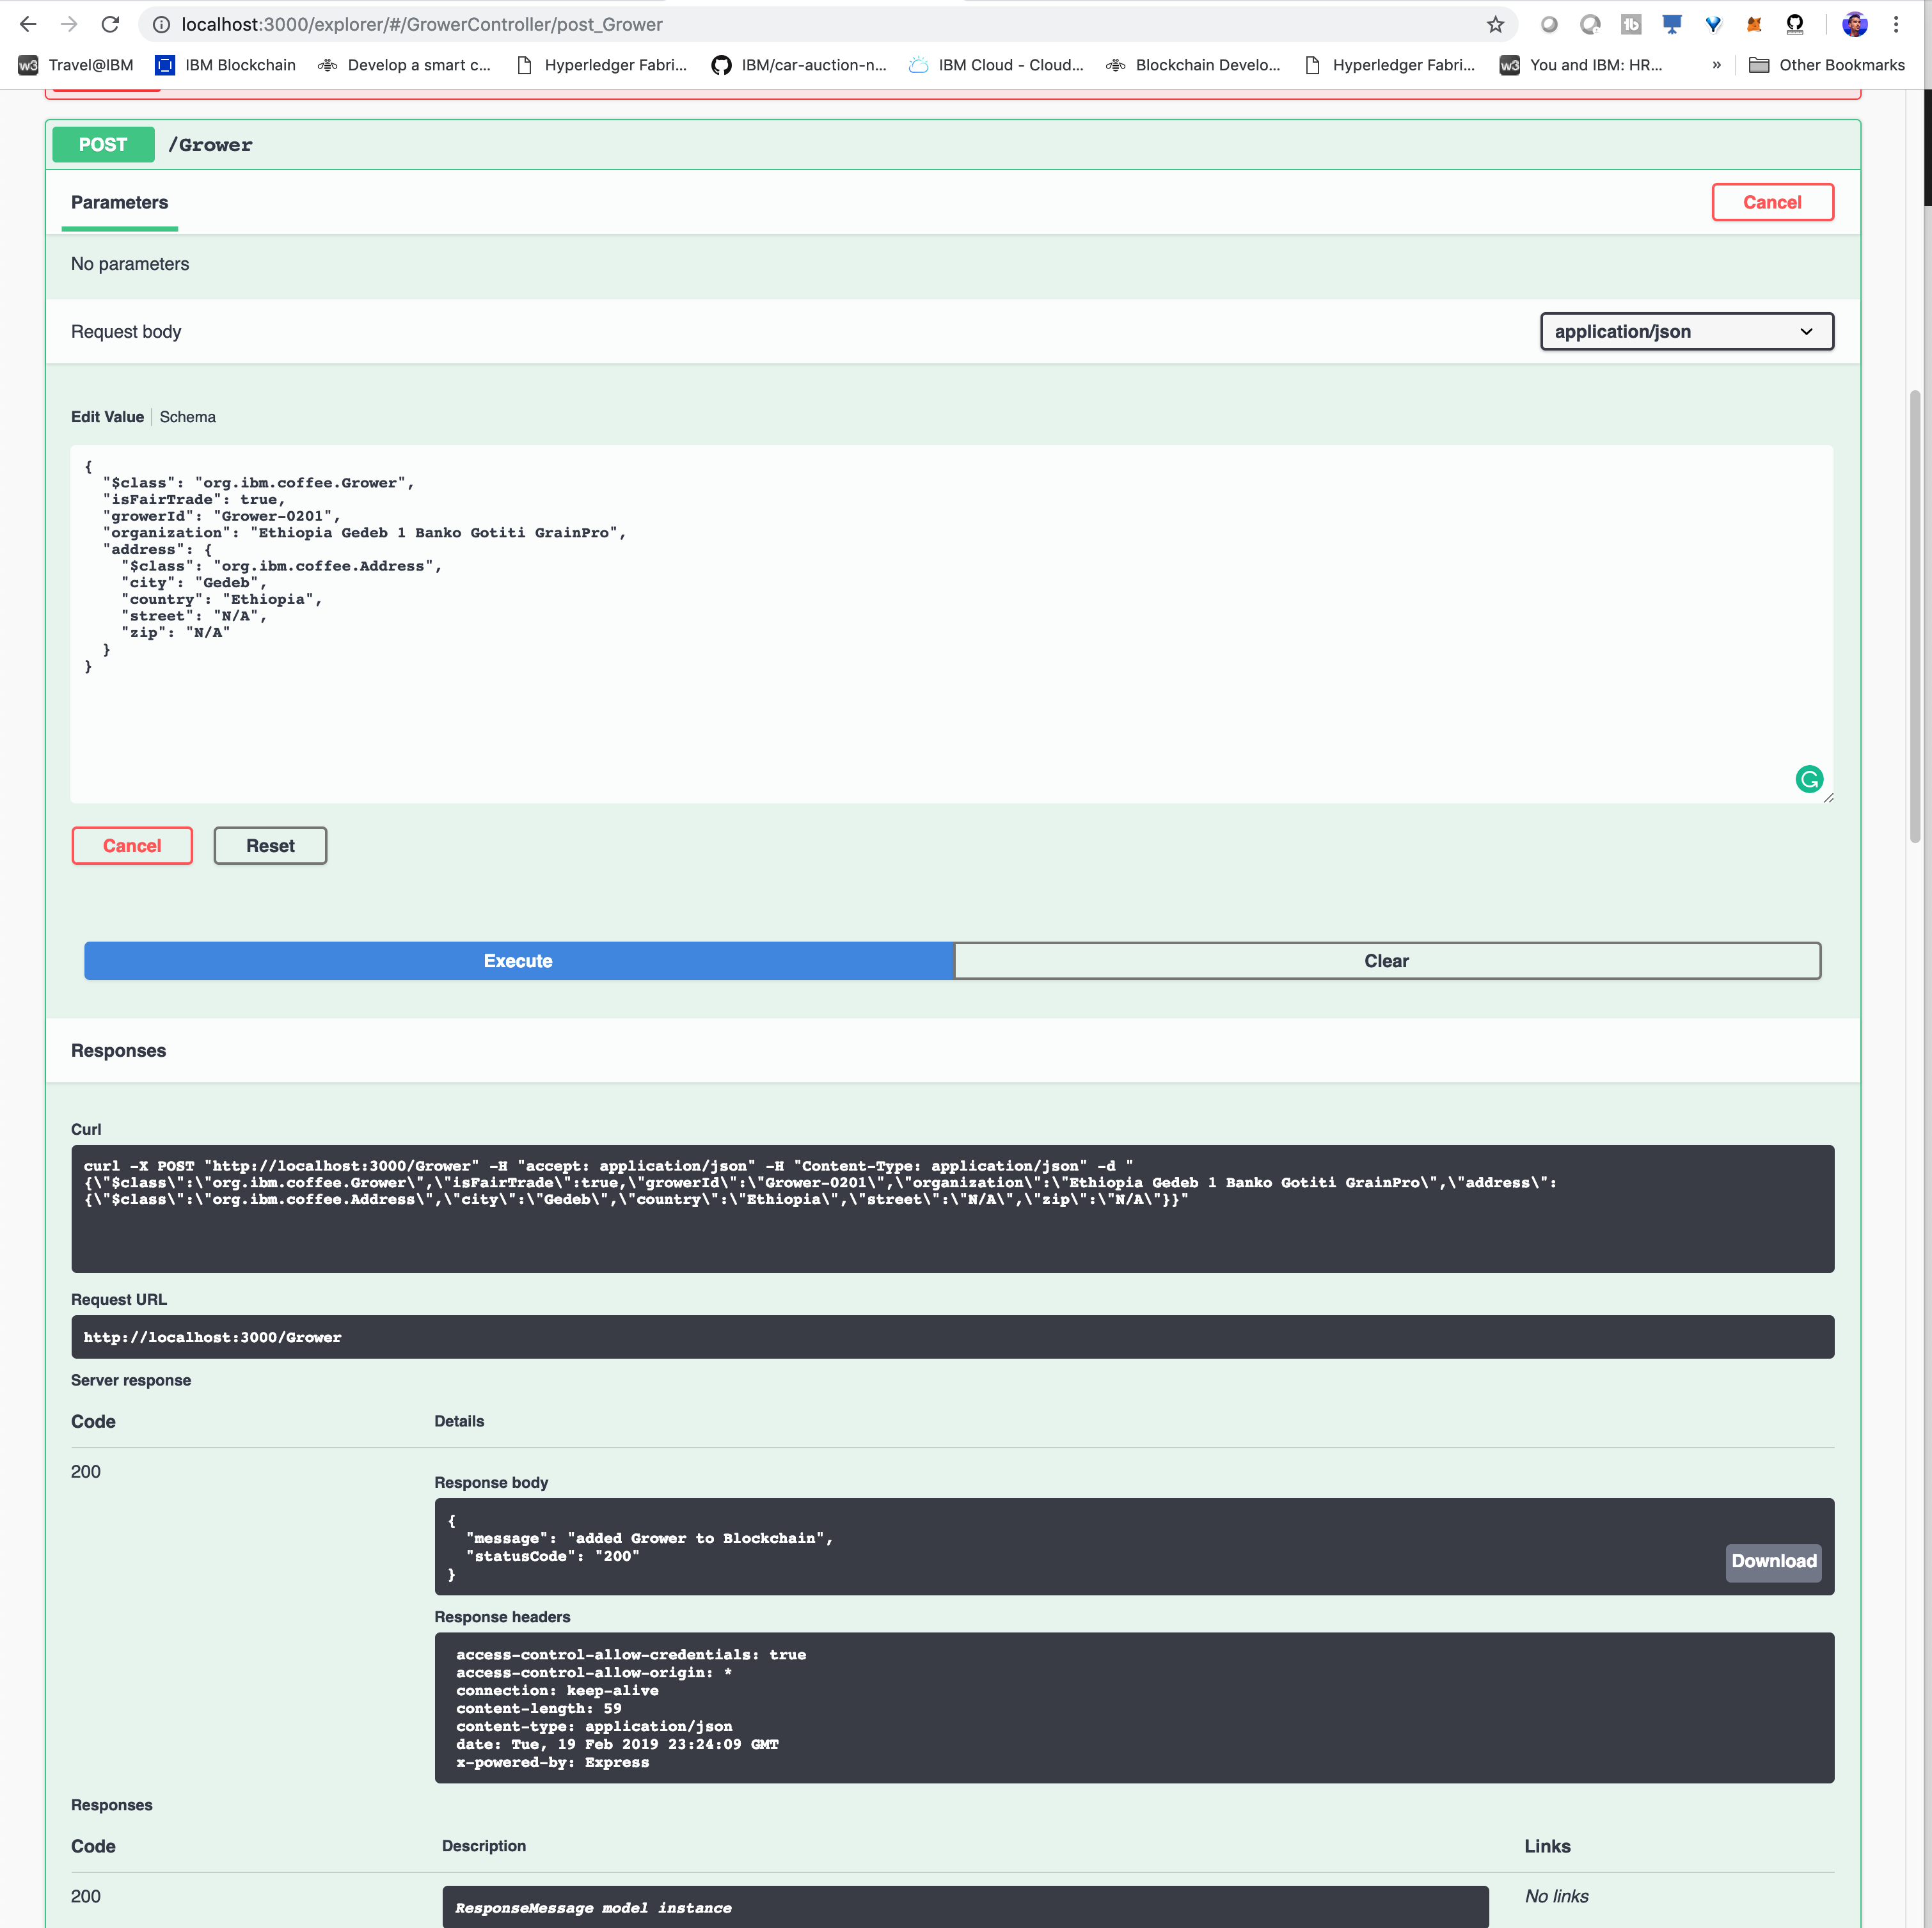
 GrowerController. You should see the Controller expand with the GET/POST methods. Click on the green POST/Grower button and then Try it out to the right of the POST/Grower button. This will enable you to write in a request body. Go ahead and copy and paste the following JSON in to the request body. P.S. (I have made all the commands available in the commands.txt file).
{
  "$class": "org.ibm.coffee.Grower",
  "isFairTrade": true,
  "growerId": "Grower-0201",
  "organization": "Ethiopia Gedeb 1 Banko Gotiti GrainPro",
  "address": {
    "$class": "org.ibm.coffee.Address",
    "city": "Gedeb",
    "country": "Ethiopia",
    "street": "N/A",
    "zip": "N/A"
  }
}
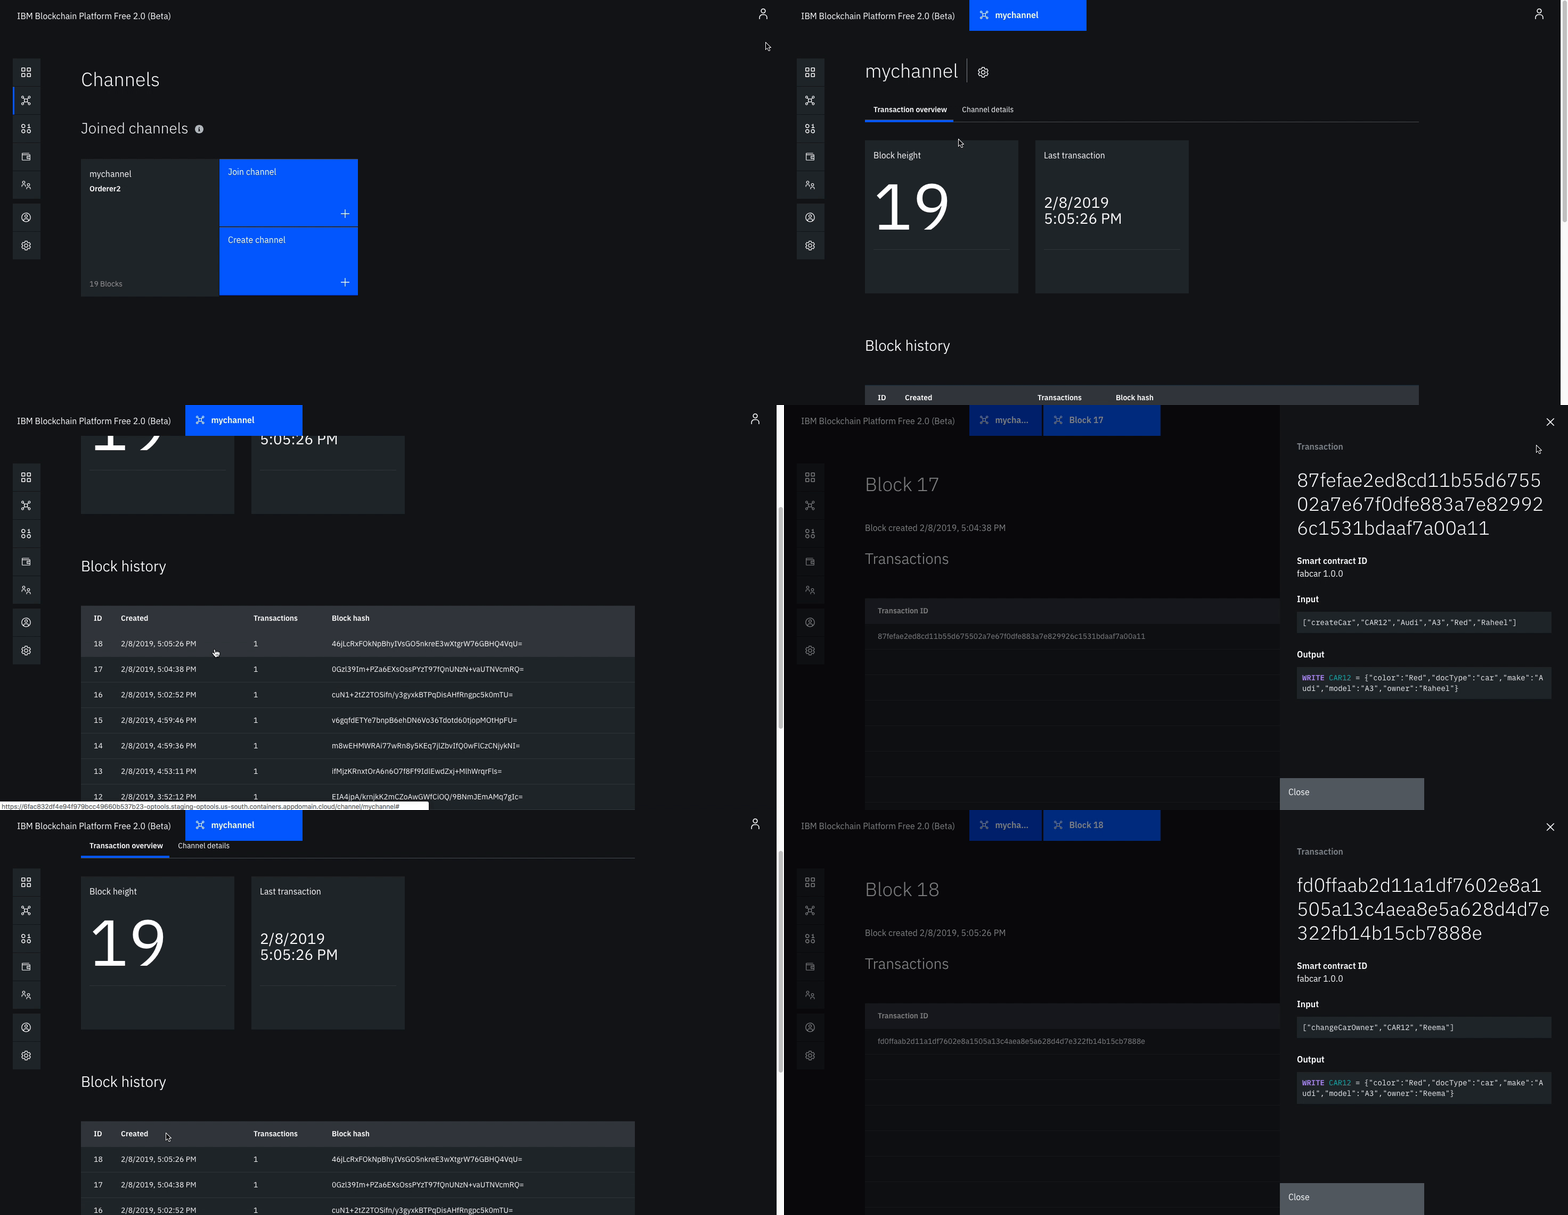
If all went well, you can now go into your blockchain network, click on the channel, and then you should see the block height increased, and if you click on the last block, you should see the latest JSON that we inputted being written to the blockchain. Note: The gif shows how to get to your channel and transaction overview. Your transaction data should be different - it should show updating the ledger with the information of Grower-0201.
The rest of the commands for uploading supply chain documents can be found here.
Bonus Step - Deploy your local app to the Cloud
If you want to keep your application running all the time, you'll want to deploy it to the cloud.To do this, please follow the guide here:
Conclusion
So yes! Go ahead and run the /POST transactions as shown in these steps, and everything will be stored on the IBM Blockchain Platform. So now, you are officially done with this tutorial. So what did you learn?
- How to create a smart contract project with the IBM Blockchain VSCode extension.
- How to deploy your smart contract on a local Hyperledger Fabric network.
- How to update the ledger by submitting transactions to the network.
- Hyperledger stores data as key-value pairs, so to look up data on the network, you need to pass in a key that has a value associated with it. We did that by running the query method.
- How to create a Kubernetes Cluster and IBM Blockchain Platform V2 Beta service and to connect our client Loopback application to our cloud service via the connection profile we downloaded.
- How to view the ledger of a specific channel, by clicking on the channel, the ledger, and then the individual transactions.
GREAT JOB! YOU DID IT! :)
And when you create the cool new startup unicorn after learning a bunch from this tutorial, don't forget to give me, or IBM Developer some credit :)


