
Post-install script for Fedora and RHEL 9 clones to create your ultimate development environment
Developer Workstation Setup Script

UPDATE: Work has now moved to the Debian version. Debian 12 is now the best platform.
Are you tired of spending hours setting up your development environment every time you switch to a new machine? Look no further than the Developer Workstation Setup Script!
This setup script uses Ansible and Bash to quickly and easily install a variety of development and general use software on both cutting edge Fedora and stable Red Hat Enterprise Linux 9 compatible distributions.
Features
The Developer Workstation Setup Script has the following features:
- Works with both cutting edge Fedora (tested up to 38) and stable Red Hat Enterprise Linux 9 (tested up to 9.2) compatible distributions.
- Easy to customize, just add and remove packages/config from the scripts before running.
- Uses stow to install and manage dotfiles.
- Includes a variety of development and general use software:
Installation
These scripts are designed to be run immediately after installing the operating system.
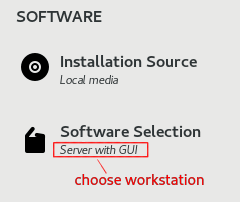
- Install a fresh copy of Fedora or a Red Hat Enterprise Linux 9 compatible distribution. If you are using an el9 clone, select
workstationfrom the software selection option during installation. You must also give your user account administrative privileges, this is a tick-box when you are creating the user. - Clone the repository and
cdinto it:git clone https://github.com/David-Else/developer-workstation-setup-script - Install Ansible:
sudo dnf config-manager --set-enabled crb and sudo dnf install epel-release.
Install Ansible and the community collection:
sudo dnf install ansible-core ansible-collection-community-general
- Customize the software selection by modifying the
install.ymlandinstall-setup.bashscripts with your own software preferences. - Run the scripts:
ansible-playbook ./install.yml -Kand./install-setup.bash
BECOME password in Ansible is your user password, your account must have administrative privileges.
After installation, you must run nnn once with -a to create the fifo file for the preview feature to work.
Optional Tweaks
Based on your software selection, hardware, and personal preferences, you may want to make the following changes:
Audio
- Set the available sample rates for your audio interface:
- Find your audio interface(s) and available sample rates:
cat /proc/asound/cards
Example output:
0 [HDMI           ]: HDA-Intel - HDA ATI HDMI
                      HDA ATI HDMI at 0xf7e60000 irq 31
 1 [USB            ]: USB-Audio - Scarlett 6i6 USB
                      Focusrite Scarlett 6i6 USB at usb-0000:00:14.0-10, high speed
Play some audio and examine the stream for your audio interface (in this case card1):
cat /proc/asound/card1/stream0
Example output:
Focusrite Scarlett 6i6 USB at usb-0000:00:14.0-10, high speed : USB Audio
Playback:   Status: Running     Interface = 1     Altset = 1     Packet Size = 216     Momentary freq = 48000 Hz (0x6.0000)     Feedback Format = 16.16   Interface 1     Altset 1     Format: S32_LE     Channels: 6     Endpoint: 0x01 (1 OUT) (ASYNC)     Rates: 44100, 48000, 88200, 96000, 176400, 192000     Data packet interval: 125 us     Bits: 24     Channel map: FL FR FC LFE RL RR     Sync Endpoint: 0x81 (1 IN)     Sync EP Interface: 1     Sync EP Altset: 1     Implicit Feedback Mode: No
- Create a PipeWire user config file:
cp /usr/share/pipewire/pipewire.conf ~/.config/pipewire/ - Add/modify your sound cards available sample rates by editing
~/.config/pipewire/pipewire.conf:
#default.clock.allowed-rates = [ 48000 ]For the Scarlett 6i6 example above replace it with:
default.clock.allowed-rates = [ 44100 48000 88200 96000 176400 192000 ]Don't forget to remove the # comment.
- Setup PipeWire for low latency audio by following the guide at https://jackaudio.org/faq/linuxrtconfig.html and creating the following file:
cat <<'EOF' | sudo tee /etc/security/limits.d/audio.conf
@audio   -  rtprio     95
@audio   -  memlock    unlimited
EOF
Add yourself to the audio group that you have given the privileges to with sudo usermod -aG audio [username].
Create a user config file for your (PipeWire) JACK settings:
mkdir -p ~/.config/pipewire/jack.conf.d/
cat >~/.config/pipewire/jack.conf.d/jack.conf <<EOF
jack.properties = {
     node.latency       = 256/96000
     node.rate          = 1/96000
     node.quantum       = 256/96000
     node.force-quantum = 256
}
EOF
Intel CPU GPU HW acceleration
- Install the
libva-intel(older systems) orintel-media-driverdriver for Intel CPUs with built-in GPUs to use HW acceleration with MPV.
General
- (Fedora) Hardware codecs with AMD (Mesa)
sudo dnf swap mesa-va-drivers mesa-va-drivers-freeworld
sudo dnf swap mesa-vdpau-drivers mesa-vdpau-drivers-freeworld- (el9) Fix Gnome forgetting your monitor scaling choice, if you only use the GUI
Settings/Displaysit often forgets.
/usr/share/glib-2.0/schemas/93_hidpi.gschema.override with the following content for 200% scaling:
[org.gnome.desktop.interface]
scaling-factor=2
Reinitialize schemas with sudo glib-compile-schemas /usr/share/glib-2.0/schemas
- Setup Deno by creating/updating shell completions:
deno completions bash > deno.shandsudo mv deno.sh /etc/profile.d. - Setup Vale:
.vale.ini file in your $HOME directory to point to an empty directory you want to store your styles, for example:
StylesPath = ~/Documents/stylesRun vale sync. You can create a new config file at Config Generator
- Setup HEIF, AVIF and WebP image formats (inc Apple
.HEICphotos) by adding:
sudo dnf install libheif-freeworld libheif-tools heif-pixbuf-loader webp-pixbuf-loader- Setup Git:
git config --global user.email "you@example.com"
git config --global user.name "Your Name"
git config --global user.signingkey key
git config --global commit.gpgsign trueFAQ
If you would like to use Code for things that Helix still struggles with (like debugging), and still use all the modal keyboard shortcuts, I suggest installing silverquark.dancehelix or asvetliakov.vscode-neovim and using these settings:
settings.json
{
  // font size
  "editor.fontSize": 15,
  "markdown.preview.fontSize": 15,
  "terminal.integrated.fontSize": 15,
  // asvetliakov.vscode-neovim
  "editor.scrollBeyondLastLine": false,
  "vscode-neovim.neovimExecutablePaths.linux": "/usr/local/bin/nvim", // for el9 clones, or "/usr/bin/nvim" for Fedora
  "workbench.list.automaticKeyboardNavigation": false,
  // various
  "window.titleBarStyle": "custom", // adjust the appearance of the window title bar for linux
  "editor.minimap.enabled": false, // controls whether the minimap is shown
  "workbench.activityBar.visible": false, // controls the visibility of the activity bar in the workbench
  "window.menuBarVisibility": "hidden", // control the visibility of the menu bar
  "files.restoreUndoStack": false, // don't restore the undo stack when a file is reopened
  "editor.dragAndDrop": false, // controls whether the editor should allow moving selections via drag and drop
  "telemetry.enableTelemetry": false // disable diagnostic data collection
}
You might also like to install ms-vscode.live-server for live debugging in Code or the browser.
Q: Does this script disable the caps lock key? I've noticed that it works during login but after that it stops working altogether.
A: It makes the caps lock into delete for touch typing purposes, to change it modify this line in install.yml:
- { key: "/org/gnome/desktop/input-sources/xkb-options", value: "['caps:backspace', 'terminate:ctrlaltbksp', 'lv3:rwinswitch', 'altwin:metaalt']" }


